Content marketing is one of the crucial aspects of digital marketing. It is all about how you communicate with your audience and present your content to build up the brand’s reputation.
If the audience finds your content relatable, informative, and valuable, then they will surely share your content.
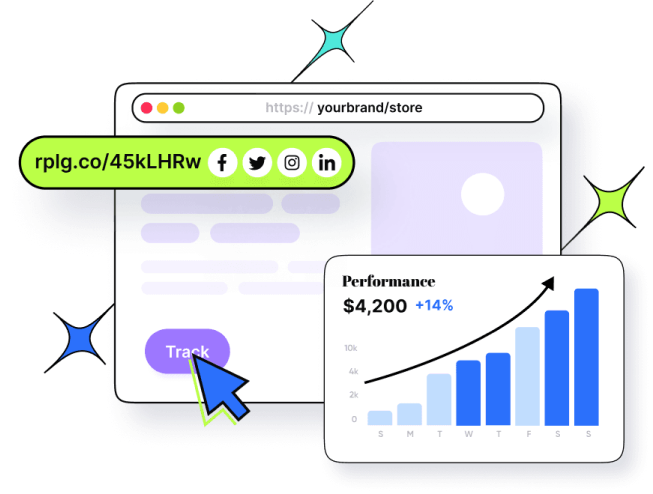
That’s why many marketers turn to Replug — a top-notch solution to craft clean, branded links that make your content more trustworthy and share-worthy before you hit “Publish”.
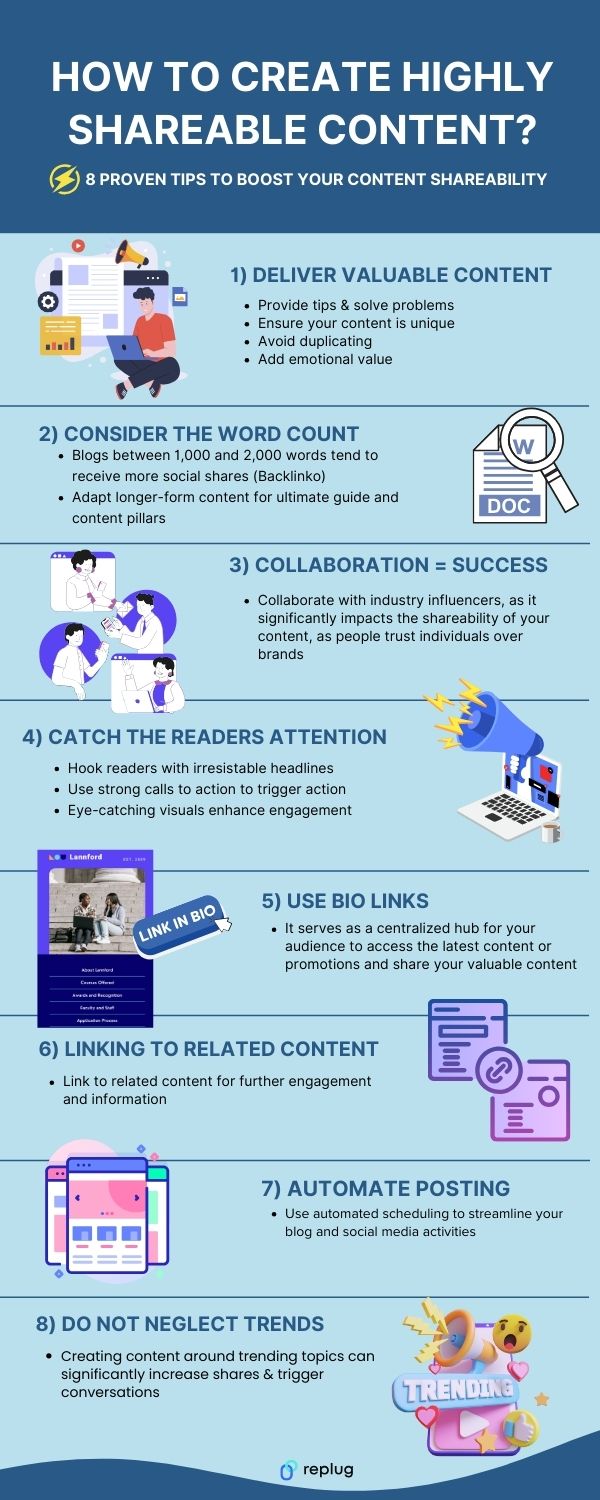
Here, we have devised 8 tips that will make your content soar and roar in the digital world. Take a look at the below infographics.
What is shareable content?
Shareable content refers to digital material, such as articles, videos, images, or infographics, that is designed and crafted in a way that encourages and facilitates easy sharing across various online platforms and social media networks. Shareable content is created with the intention of being shared by users, increasing its visibility and reach on the internet.
The purpose of sharing content is to share valuable information and entertain others. Posting shareable content increases engagement with your audience.
What makes a content shareable?
Sr.
Creating Shareable Content
1.
Make your content special by bringing something unique to the table, i.e. statistical figures or tips.
2.
Evoke emotions through story telling and discussing the pain points of your target audience.
3.
Make your content digestible. Consider the word count strategically, depending upon the topic you select, you don’t want to deliver less nor do you want to overwhelm your audience.
4.
With the attention spans getting lower and lower. So, the headlines,CTAs and visuals are key drivers to hook attention.
5.
Linking your content to other content pieces can bring more eyes to your content. Create evergreen content and repurposing it for different platforms is one of the smart ways to increase content shareability.
6.
Bio links can give you a 360-degree marketing approach to showcase your top performing content. With this amazing URL shortener you can turn long, messy links into neat, branded URLs, making it easier for readers to click, trust, and share your content across social platforms. Personalizing your bio web page and promoting your content on all platforms using a single bio link is much easier now!
7.
Collaborating with influencers that carry a respectable following can get more eyes on your brand.
8.
When it comes to content, keeping up with the trends is important for any industry to deliver value. Stay updated with the latest trends and developments in the industry, such as trending news, meme marketing or any other information can lead to more likes and share
9.
Last but not the least. Using tools like social media schedulers helps maximize the reach of your content, encouraging more shares across various online platforms, ultimately boosting visibility and engagement.
PixelMe, a well-known name, has been a go-to choice for many marketers. But as we step into 2026, it’s essential to understand the changing demands and needs within this industry. This includes factors like competitive pricing, advanced features, strong customer support, and more.
Unluckily, PixelMe lacks some advanced features and has higher pricing than most of its alternatives. But worry not, we have analyzed the best Pixelme alternatives for you.
Switching to Replug could be a smart move. Explore further to find out why Replug is a great choice for managing your links in the digital world.
In this article, we’ll check out what makes Replug better than PixelMe and other similar tools.
But if your link needs are less extensive, feel free to explore the other options as well.
User-friendly URL shortening with custom short links
$149 /mo
Limited advanced analytics Features for extensive management
What is Pixelme?
PixelMe is a versatile URL shortening and link management platform that provides users with tools to streamline link sharing, customization, and tracking.
What they offer
What they don’t
Retarget Pixels
Agency features
Custom Domain
Password-protected links
Browser extension
Branding on micro landing pages
Link analytics
White labeling
Import links
Comprehensive link branding
Top alternatives to Pixelme:
Below are some of the best Pixelme alternatives to look for in 2026.
1. Replug
Why Consider Replug?
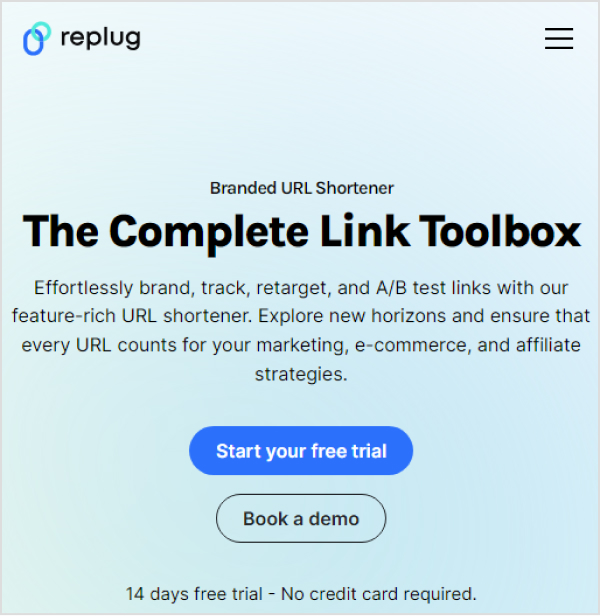
Replug is a custom URL shortener that offers advanced analytics and link retargeting options. It’s a powerful choice for marketers seeking in-depth insights into link performance.
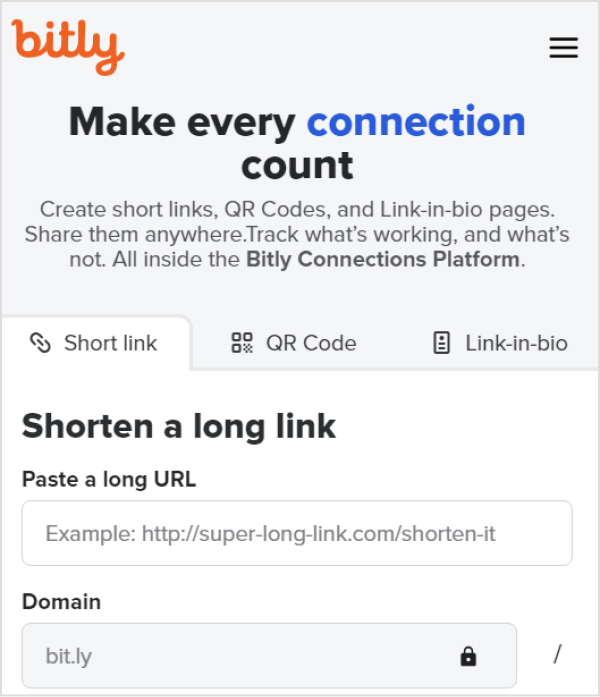
Bitly is a widely recognized URL-shortening service that simplifies link management and provides robust analytics.
Pros:
Widely recognized and trusted.
Robust link analytics.
User-friendly.
Cons:
Does not offer as many advanced features as some competitors.
Limited customization options.
A complete link management solution
for marketing professionals & agencies.
Try Replug for free
3. Cutt.ly
Cutt.ly offers a straightforward approach to link shortening and management. With customizable short links and detailed analytics, it’s a suitable choice for those looking for an easy-to-use URL management solution.
Rebrandly focuses on link branding and customization, allowing users to create branded short links. This can enhance brand visibility and recognition, making it a valuable business choice.
Pros:
Focus on link branding and customization.
Branded short links.
Enhances brand visibility.
Suitable for businesses.
Cons:
It may not have as robust analytics as others.
Pricing may be higher for branding features.
5. TinyURL
TinyURL offers a quick and straightforward approach to link shortening. While it may not provide advanced analytics, its simplicity and speed make it a reliable choice for quick link management.
Pros:
Quick and straightforward link shortening.
Simplifies link management.
Speedy solution for quick link tasks.
Cons:
Lacks advanced analytics.
Limited customization and features.
6. BL. INK
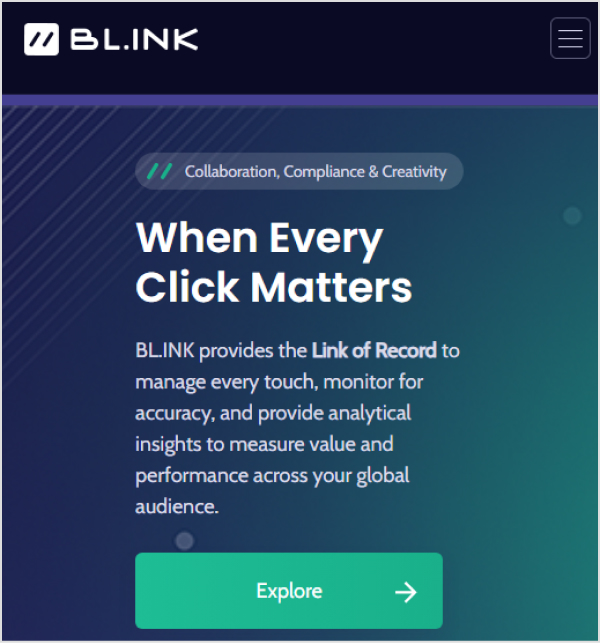
BL.INK is a feature-rich URL-shortening tool with advanced link tracking and analytics. If you’re looking for a comprehensive link management solution, BL.INK is a strong choice.
Pros:
Feature-rich URL-shortening tool.
Advanced link tracking and analytics.
Comprehensive link management solution.
Suitable for data-driven marketing.
Cons:
Pricing may be higher for the feature set.
It may not be as user-friendly for beginners.
7. Sniply
Sniply allows users to add custom calls-to-action to shared content. This unique feature can enhance user engagement and conversions, making it a compelling alternative to PixelMe.
Pros:
A unique feature of adding custom calls-to-action.
Enhances user engagement and conversions.
Compelling for content marketing.
Cons:
Lack of some link management features.
Pricing may vary based on usage.
8. Short.io
Short.io is a user-friendly URL-shortening service that simplifies creating custom short links. With its ease of use and detailed analytics, it’s a reliable choice for straightforward link management.
Pros:
User-friendly URL-shortening service.
Simplifies creating custom short links.
Easy to use and quick.
Cons:
Does not offer as advanced analytics as competitors.
Limited features for extensive link management.
Why should you consider alternatives to pixel me?
One should be considering alternatives to pixel me because the tool lacks lots of essential features. Luckily, Replug offers those features and a lot more useful features for agencies and marketers. Here are some reasons to choose Replug over PixelMe.
All in all, if you value advanced features with high-end customer support with less pricing – Replug is a better option. But as you weigh your options, remember that each alternative presented here has its strengths, catering to different needs and preferences. The right choice depends on your marketing goals, budget, and desired features.
Make a smart choice that matches your plan for success within your industry.
Frequently asked questions
What is the primary purpose of URL shorteners?
URL shorteners like Replug or PixelMe are designed to make long, complex URLs more manageable and aesthetically pleasing, making them easier to share and track.
How do I decide which alternative to PixelMe is right for me?
Consider your marketing goals, budget, and required features. Each alternative has its strengths, so choose the one that aligns with your needs.
Why choose Replug over Pixelme?
Replug gives marketers many helpful tools that are perfect for today’s needs. It lets you customize and analyze links in a way that goes beyond what PixelMe can do.
Are these alternatives user-friendly for beginners?
Yes, most of these alternatives, especially Replug, offer user-friendly interfaces and provide tutorials and support to help beginners get started.
Links serve as vital assets that connect your brand with the digital world, so having full control over them is essential. Branded Link management empowers you to safeguard your brand, optimize your marketing, and efficiently handle the many links your company generates.
Therefore, a central link management tool is essential to enhanced collaboration, accurate tracking, and brand protection. It can also help to increase brand awareness and streamline link sharing between colleagues.
Here’s what branded link management is and why it’s crucial for your company’s online success.
What is branded link management?
Branded link management, often referred to as branded link shortening is a specialized facet of link management that focuses on shortening, customizing, and optimizing links, particularly for branding and marketing purposes.
Branded links are shorter and more user-friendly versions of URLs, and they often feature a custom domain that aligns with a brand or campaign.
Key aspects of branded link management:
Customization: Branded links allow you to tailor URLs to match your brand, campaign, or content. For example, a complex and long URL can be transformed into a concise and branded link.
Branding: By using branded links, you reinforce your brand identity in every link you share. This consistency can boost brand recognition and trust among your audience.
Tracking and analytics: Branded link management tools often offer robust tracking and analytics features. This data helps you measure the performance of your branded links, enabling data-driven marketing decisions.
Link security: Branded link management platforms often include security features that protect your links from malicious activities, ensuring the integrity of your brand’s online presence.
User experience: Branded links are user-friendly and can enhance the overall user experience, as they are easier to remember and share.
A complete link management solution
for marketing professionals & agencies.
Try Replug for free
Branded link management: why do you need it?
Companies, particularly those engaged in e-commerce, affiliate marketing, and social media marketing, benefit from using a link management tool for several compelling reasons:
URL shortening:
A branded link management tool shortens long and cumbersome URLs, making them more user-friendly and aesthetically pleasing. This is particularly useful for sharing links on social media, in email marketing campaigns, and within content.
Tracking and analytics:
Branded link management tools offer robust tracking and analytics features, allowing companies to monitor the performance of their links. This includes tracking click-through rates, conversion rates, and other essential metrics to assess the effectiveness of marketing campaigns.
Conversion analysis:
Companies can analyze the conversion rates associated with specific links. This insight helps in optimizing marketing efforts and understanding which links are driving the most conversions and sales.
Branding:
Branded links provide consistency and reinforce a company’s brand identity with every link shared. This consistency can boost brand recognition and trust among the audience.
Efficiency:
Link management tools streamline the process of creating and managing links, saving time and reducing the risk of errors. This is especially valuable for companies that deal with a large number of links.
Social media traffic:
Many link management tools offer features like bio links, which are crucial for social media marketers. These tools help drive social media traffic to the company’s website by providing a simple and appealing way to share links on platforms with character limits or visual constraints.
Lead generation and retargeting:
Some link management tools go beyond shortening links and offer lead generation and retargeting capabilities, enabling companies to capture leads and re-engage with potential customers who clicked on their links.
A complete link management solution
for marketing professionals & agencies.
Try Replug for free
Brand and manage your links with Replug
A powerful link management tool can be the difference between success and obscurity. Replug.io is not just another option; it’s the best choice, and here’s why:
Branded short links:
Replug’s link shortener transforms lengthy URLs into concise, branded short links. Now, you can create short links in no time at all. Your audience will remember and trust these links, and you can even use your custom domain for that extra touch of professionalism.
Link analytics:
Replug provides in-depth link analytics, so you’re never in the dark about your link performance. UTM tracking allows you to monitor metrics at your fingertips, enabling data-driven decisions.
Bio links:
Say goodbye to juggling multiple links. With Replug, you can consolidate all your branding needs into a single, sleek bio link. It’s a one-stop landing page to engage your audience effectively.
Lost sales don’t have to stay lost. Replug’s retargeting pixel enables you to re-engage potential customers across multiple networks, increasing your chances of conversion.
QR code:
Create dynamic marketing interactions with QR codes. They’re versatile tools that can bridge the gap between the digital and physical worlds.
A/B testing:
Experiment with up to 10 variations of your URLs to find the winning formula. Replug’s A/B testing feature helps you optimize your links for the best results.
Deep links:
Guide your audience through smooth in-app experiences with deep links. These links enable users to navigate seamlessly within mobile apps, enhancing the customer journey.
Link rotator:
Optimize user experiences by intelligently routing traffic based on user preferences. It’s a powerful tool for keeping your audience engaged and interested.
SMS links:
Improve your SMS marketing efforts with bulk short links and insights provided by Replug. Enhance your messaging strategy and drive more conversions.
Call to action generator:
Simplify your calls to action (CTAs) to increase engagement and conversions. Replug makes it easy to create effective CTAs that drive results.
Maximize marketing ROI
by transforming ordinary URLs into branded short links that convert.
Try Replug for free
Replug’s white label solution: Your brand, your link management
For businesses, agencies, and professionals looking to maintain brand consistency and provide top-tier link management services, Replug’s White Label Solution is the game-changer you’ve been waiting for. Here’s why it’s the ultimate choice:
In-house link management: Replug’s White Label Solution allows you to have your very own, in-house link management tool. It’s an extension of your brand, ensuring a seamless user experience for your clients.
Branded experience: Every interaction with your link management tool is a branded experience. Your clients see your branding, reinforcing your identity and building trust.
Client control: With your white-label solution, you maintain full control over your client’s experience, ensuring that it aligns perfectly with your brand’s values and message.
Streamlined workflow: Replug’s white-label tool streamlines the link management process, saving you time and reducing the risk of errors. It’s all about optimizing your workflow to be more efficient and productive.
Data insights: Comprehensive data insights are at your fingertips. Understand how your clients are using the tool and gain insights to guide your services.
Agency growth: As an agency, offering a white-label solution positions you as a full-service provider and strengthens your brand as a leader in your industry.
Final verdict:
Replug is not just a link management tool; it’s a comprehensive solution that empowers your brand, streamlines your digital efforts, and positions you for success in a competitive online landscape.
Whether it’s enhancing brand visibility with branded short links, providing a white-label solution for your agency, or offering a range of powerful features, Replug is the ultimate choice for those who aspire to stand out, make every click count, and unlock their brand’s full potential in the digital world.
FAQs
What is branded link management?
Branded link management combines link shortening with customization using your branded domain, creating links that reinforce your brand’s identity.
Can I track the performance of branded links with analytics?
Yes, our link management tool offers robust analytics, enabling you to monitor click-through rates, conversion rates, and other essential metrics for branded links.
Can branded link management be used by agencies for their clients?
Yes, agencies can benefit from white-label branded link management solutions like Replug to provide branded link management services to their clients.
What tools are available for effective link management?
Numerous tools and platforms are available, including Replug, which offers branded link management, analytics, custom domains, bio links and more.
We’ve just uncovered the best content marketing platforms and tools that can transform your content creation journey.
Without crafting a solid plan for distribution and promotion, putting out content could be a waste of energies. Therefore, what you should do is begin with choosing the right content marketing platforms instead.
This lineup has everything from content management systems to powerful AI-driven tools.
Sr.
Content Marketing Platforms
Category
1.
ContentStudio
Social Media Management
2.
Hubspot
Customer Service Management
3.
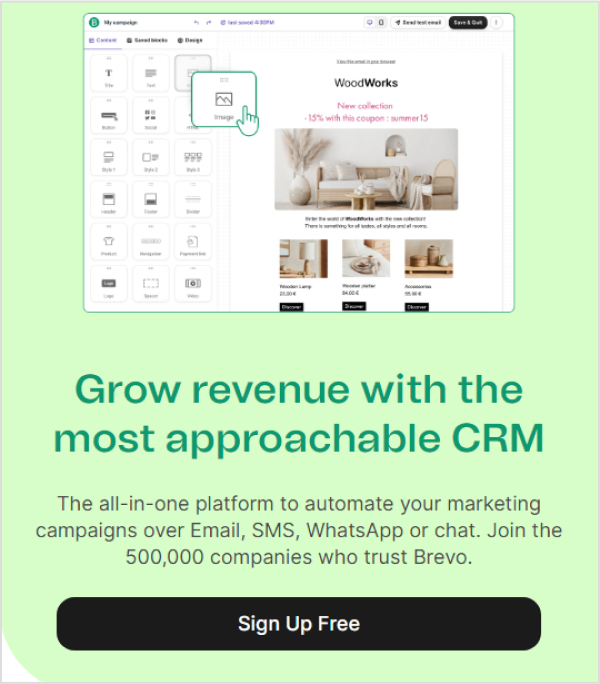
Brevo
Email Marketing
4.
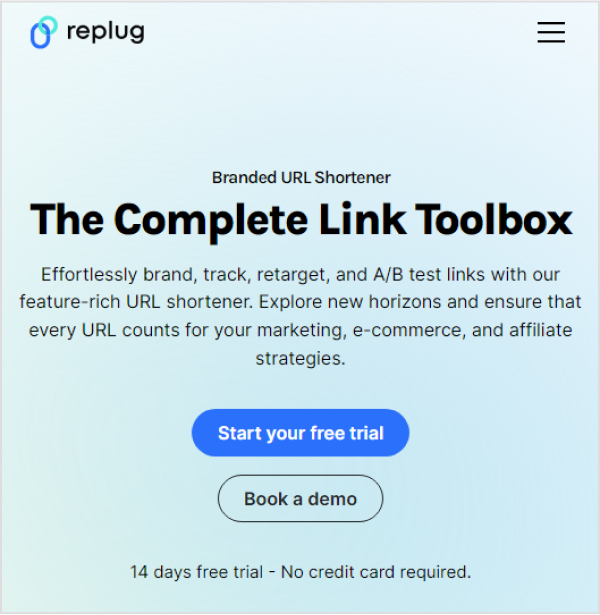
Replug
Branded Link Management
5.
Canva
Graphic & Image Editor
6.
WordPress
Content Management System
7.
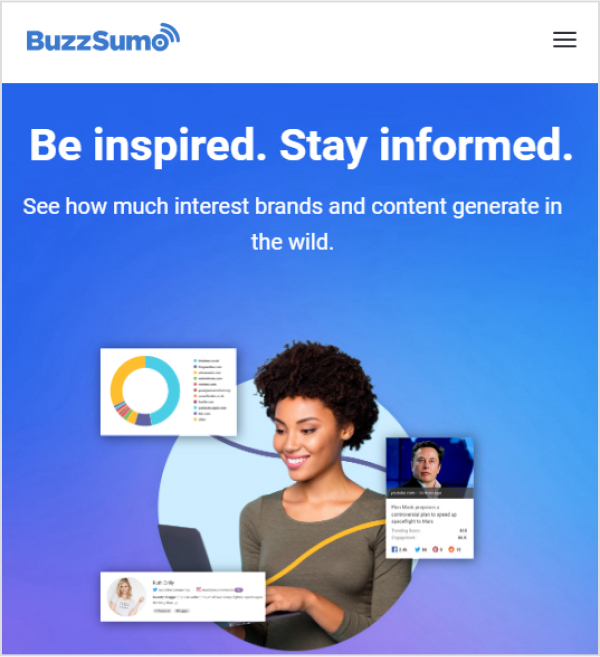
BuzzSumo
Social Listening Tool
8.
Medium
Content Publishing Network
9.
ContentIdeas
Explore Content Trends Tools
What is a content marketing platform?
A content marketing platform is a digital tool that assists businesses in creating, publishing, and managing marketing content effectively. To maximize its utility and ensure it stays ahead of technological advances and market trends, continuous platform development is essential, enabling the platform to support evolving content strategies and integrate seamlessly with other digital marketing tools
Top 9 Content Marketing Platforms
Many kick off their content marketing journey by developing a content plan, which isn’t a bad approach if you have a clear direction.
But for most, the initial step should be choosing content marketing platforms carefully. This way, they can more easily map out a solid plan to create and spread their content.
Below is a list of some of the best content marketing platforms:
1. ContentStudio: Social media management
ContentStudio is a content marketing and social media management platform that streamlines content discovery, curation, and publishing.
Key Features:
Content curation
Social media analytics
Social media automation
Analytics and reporting
Social media management
Pros:
It helps you find trending content in your niche, making it easy to curate and share.
Allows you to automate social media posting for consistent engagement.
ContentStudio is suitable for teams with workflow and approval features.
Cons:
Like any new tool, it may take time to understand its full capabilities.
More advanced features are locked behind higher pricing tiers.
It offers basic engagement analytics, but more detailed insights may require integration with other tools.
Other honorable alternatives:
Hootsuite
Sprout Social
2. HubSpot: Customer service platform
HubSpot is an all-in-one inbound marketing, sales, and customer service platform that provides tools to help businesses grow.
Key features:
CRM (Customer Relationship Management)
Email marketing and automation
Landing pages and forms
Pros:
HubSpot offers a suite of tools, including CRM, marketing, sales, and service hubs, all under one roof.
It allows you to automate marketing campaigns, lead nurturing, and sales processes.
Provides detailed analytics and reporting to measure the success of your marketing efforts.
Cons:
HubSpot can be complex for beginners, requiring time to master.
While it offers a free version, more advanced features come at a price.
Small businesses may find its array of features overwhelming.
Other honorable alternative
Sprinkler
Share Spring
3. Brevo: Email marketing tool
Brevo (formerly Sendinblue) is an all-in-one marketing platform that offers email marketing, marketing automation, and transactional emails.
Key Features:
Email marketing
Marketing automation
Transactional emails
Pros:
SendinBlue combines email marketing, SMS marketing, and marketing automation.
It’s beginner-friendly with a simple and intuitive interface.
Competitive pricing, especially for small businesses.
Cons:
Some advanced marketing automation features may be limited.
Despite being user-friendly, it may take time to master all its capabilities.
Email deliverability rates may vary based on the quality of your email list.
Other honorable alternatives:
Mailchimp
Moosend
Active Campaign
4. Replug: BrandedLink Management
Replug is an efficient URL shortener and a complete link optimization platform that helps you optimize, manage, and track your links hassle-free.
Key Features:
Link branding and shortening
White-label solution
Link tracking and analytics
Call-to-action overlays
SMS marketing
Link rotator
Bio-link generator
Pros:
You can customize and brand your links to match your style.
Replug offers link analytics to track link clicks and performance.
Add call-to-action overlays to your shared links to boost conversions.
Cons:
It’s not a content creation tool but focuses on link optimization.
Some advanced features may be behind a paywall.
Other honorable alternatives:
Bitly
Rebrandly
5. Canva: Graphic designing tool
Canva is a user-friendly graphic design tool that empowers everyone to create visually appealing content.
Key Features:
Template library
Drag-and-drop design tools
Collaboration and sharing
Pros:
Canva’s intuitive interface makes design accessible to beginners and professionals.
It offers a vast library of templates for social media, marketing, and more.
Teams can collaborate in real time on design projects.
Cons:
While great for basic design, it may not replace advanced graphic design software.
Brand consistency can be tricky, especially for larger organizations.
Some features may still require design skills to be used effectively.
Other honorable alternatives:
Vengage
Adobe Express
6. WordPress: Content management system
WordPress is a popular open-source content management system that powers millions of websites and blogs.
Key Features:
Themes and plugins for customization
SEO plugins for optimization
Blogging capabilities
Pros:
It’s highly customizable and suitable for various website types.
WordPress is known for its SEO capabilities and offers numerous plugins for optimization.
A vast community ensures plenty of support and resources.
Cons:
Regular updates and maintenance are necessary to secure your website.
Customizing and managing WordPress may require a learning curve.
You may need to invest in plugins and hosting for optimal website speed.
BuzzSumo is a content research and social listening tool that helps you find popular content and track your brand’s online presence.
Key Features:
Content discovery and research
Social listening and monitoring
Influencer identification
Pros:
Discover the most shared and trending content in your niche.
Monitor mentions of your brand or topics relevant to your business.
Find key influencers in your industry for collaboration.
Cons:
Some advanced features may be available only in higher-priced plans.
Learning to use all features effectively may take time.
BuzzSumo primarily focuses on content research and may not cover all marketing needs.
Other honorable alternative
Share Spring
8. Medium: Content publishing network
Medium is a publishing network that allows you to publish written content. There are several content categories to pick from while posting the content. It’s a complete interactive platform with features like the following system: a paid plan, commenting, and liking.
Key Features:
Writing and publishing articles
Partner program for writers to earn income
Curation for recommended content
Pros:
Medium is a go-to platform for written content.
It’s user-friendly and simplifies the process of publishing.
It comes with a built-in audience interested in long-form written content.
Cons:
It focuses on written content, which may not suit all content needs.
There are limited options for writers to make money.
Curate trending content for a better social presence, get ideas for your next blog posts, find new link-building opportunities, or stay updated with the industry via ContentIdeas.
Key Features:
Content topic generator
Keyword research
Competitor insights
Customizable filters
Content calendar integration
Pros:
Save time and effort by generating content ideas in seconds.
Customize content ideas to match your specific niche and audience.
Plan, create, and schedule content all in one place.
Work seamlessly with your team on content projects.
Understand how well your content ideas are performing and make data-driven decisions.
Cons:
The tool may require some time to learn and fully utilize.
Check if the tool integrates with your existing content management systems.
Requires a stable internet connection for real-time updates and collaboration.
Other honorable alternatives:
Google Trends
Exploding Topics
How to use content marketing platforms to drive business?
A roadmap is necessary to achieve any goal. Here’s a road map on how to use content marketing platforms to drive business growth.
Choose the best platform for content publishing.
Streamline your workflow with cutting-edge software.
Distributing the content and boost engagement.
Analyzing analytics and conversions.
Optimize and necessary changes.
How to plan a perfect content marketing strategy?
Here’s what a proper content plan looks like
A content plan is a roadmap of the content that guides your marketing strategy in translating what your brand wants to achieve through content. The emphasis of a content plan is more on the subject matter and the implication of content on the audience.
This is why selecting content marketing platforms was discussed before building the content plan. Understandably, once the content platforms have been selected, your content plan will be built accordingly.
Here are the key elements one should consider in building a content plan:
Setting clear goals
What do you aim to achieve with your content? Whether it’s generating leads, increasing brand awareness, or boosting sales, your goals should be specific, measurable, and attainable.
Keyword research and SEO integration
Keywords are the foundation of SEO. Identify relevant keywords and integrate them strategically into your content. Optimize meta tags, headers, and descriptions to enhance search engine visibility.
Building a content calendar
Plan your content in advance with a ContentStudio’scontent planner. This helps you organize your topics, schedule posts, and stay ahead of important dates and events.
Content creation
This is where the magic happens. Craft compelling and valuable content that addresses your audience’s needs and interests. If you struggle with introductions, reviewing some hook sentence examples can help you grab attention from the first line. Ensure a consistent tone and style across all your materials.
Analytics and conversion
Regularly analyze the performance of your content. Utilize tools like Usermaven to track traffic, engagement, and conversions. Adjust your strategy based on the data.
Creating evergreen content
Evergreen content remains relevant over time. Balance your content strategy with timely and evergreen pieces to ensure consistent traffic.
Content promotion
Producing great content is just half the battle. Promote your content through social media, email marketing, and guest posting to reach a wider audience.
What are the best platforms for sharing your content?
You can share content on the following content platforms:
1. Facebook
Facebook connects billions worldwide, where you can share text, images, and videos. It’s your personal and business hub.
Key Features:
News Feed for posts and updates
Messenger for private chats
Business Pages for brands
Advertising tools for targeting specific audiences
Pros:
Facebook has a massive user base of over 2.8 billion people, providing a vast reach.
You can share text, images, and videos, allowing creative expression.
It’s a great place to engage with friends and family through likes, comments, and shares.
Businesses find it valuable for advertising, brand-building, and gaining insights into content performance.
Cons:
Frequent algorithm updates can affect how many people see your posts without paid advertising.
Facebook has faced privacy concerns, which may worry some users.
Standing out in the crowd can be a challenge.
2. Instagram
Instagram, the visual wonderland, lets you share stunning images and videos. It’s a creative haven for influencers and brand promotion.
Key Features:
Stories for temporary posts
IGTV for longer videos
Reels for short, engaging clips
Business profiles with insights
Pros:
Instagram focuses on visual content, making it perfect for showcasing products and services.
It’s a hotspot for influencer marketing, with popular users promoting brands.
Advertising options are available to reach the right audience.
Features like IGTV and Reels keep users entertained.
Cons:
Like Facebook, Instagram’s algorithm can affect organic reach because of continuous algorithm challenges.
If your content isn’t visually appealing, it may not perform as well.
3. TikTok
TikTok, the addictive platform, offers short, diverse videos. It’s the go-to platform for entertainment and creativity.
Key Features:
Quick, music-filled videos with effects
Duets for collaboration
Challenges for engagement
Pros:
TikTok’s clever algorithm suggests content users love, keeping them hooked.
Users can discover a wide range of content, from funny sketches to educational tutorials.
It’s incredibly popular with younger folks, making it a hit for reaching Gen Z.
Cons:
TikTok has had its share of privacy concerns.
Content is limited to short videos, which may not suit all creators.
YouTube
YouTube, the video giant, hosts a wealth of content. It’s your source of learning, entertainment, and creativity.
Key Features:
Personal channels for creators
Video editing tools
Live streaming
Options for making money
Youtube shorts
Pros:
YouTube is the top platform for sharing videos, ideal for content creators.
Creators can make money through ads, memberships, and merchandise.
It’s a fantastic source for educational and how-to content.
Cons:
The platform is saturated, making it challenging for new creators to gain attention.
High-quality video production may be required to stand out.
Pinterest
Pinterest is a visual treasure trove, inspiring users with captivating images and ideas. It’s a go-to for creative inspiration and visual discovery.
Key Features:
Pins for sharing visual content
Boards to organize pins
Shopping features for e-commerce
Add others’ pins to your boards
Pros:
Pinterest is the place to discover and get inspired visually.
It’s gold for fashion, home decor, and lifestyle businesses.
Pins last longer compared to typical social media posts.
Create boards related to your famous blog categories.
Post pins consistently to increase your chances of ranking.
Focus on quality over quantity in your content.
Cons:
Pinterest attracts users with particular interests in visual discovery.
It’s best for businesses with highly visual products or services.
The whole point of this article is to educate you on paying close attention to your content types, distribution methods, and the right platforms for getting business.
The ultimate goal of your content marketing plan is to bring the customers, sell the products, and build an audience around your brand. It might not happen on a whim, but it takes time.
If your content is working and you’re on the right platforms, things will show indications that you’re moving in the right direction.
FAQs
How do I choose the best content platform for my business?
When choosing a content marketing platform, look for features like ease of use, content creation tools, SEO capabilities, and integration with your existing marketing stack.
What’s the advantage of using Replug for link management?
Replug allows you to create short links, track their performance, and add call-to-action features to enhance user engagement. It acts as a complete hub for easily managing all your branded links from one place.
How do I analyze the conversions or traffic of my website?
You can use tools like Usermaven to analyze website traffic or conversions.
Which platform is best for e-commerce businesses?
Shopify is a great choice for e-commerce businesses, as it provides features tailored to this industry.
Which is the best social media management tool?
Contentstudio is the best social media management tool brands can use.
Are these platforms suitable for small businesses?
Yes, most of these platforms offer scalable solutions, making them suitable for businesses of all sizes.
Marketing can be complex, but measuring its effectiveness doesn’t have to be. UTM codes are your answer to understanding what’s working and what’s not in your campaigns and, more importantly, to pinpoint which campaigns are doing the heavy lifting. This is where UTM codes come into play, offering a simple solution to the challenge of marketing success. So, let’s break it down:
What are UTM codes?
UTM codes are essentially strings of text that are added to URLs. These strings contain specific parameters that provide invaluable information about the source, medium, and campaign that led a user to a particular webpage. In other words, UTM codes act as data markers, offering a clearer view of the user’s journey, from the initial interaction to conversion.
Here’s a breakdown of the key UTM parameters:
Source:
This parameter specifies the origin of your traffic. Is it coming from an email, a social media platform, a search engine, or another source? Accurately tagging the source helps you identify which channels are driving the most traffic.
Medium:
The medium parameter describes the type of marketing medium used. It could be an email, social, organic search, paid search, or any other medium relevant to your campaign. Categorizing your traffic in this way allows you to determine which marketing avenues are the most effective.
Campaign:
The campaign parameter enables you to track a specific marketing campaign or initiative. Whether it’s a product launch, a seasonal promotion, or an event, this parameter helps you differentiate between different efforts within the same source and medium.
Term (optional):
This parameter is often used for paid search campaigns to identify the keywords that triggered the ad click. It’s an optional parameter and is mainly relevant to search engine advertising.
Content (optional):
Another optional parameter, content can be used to differentiate between different elements of your marketing efforts, such as different ad variations or links within the same campaign.
Understand with an example:
Let’s create an example URL with UTM parameters added.
Original URL:
https://www.example.com/product-page
Now, let’s add UTM parameters to track the source, medium, and campaign:
Source: Let’s say the traffic is coming from an email newsletter.
Medium: The marketing medium is email.
Campaign: It’s part of a campaign called “SummerPromo.”
With these UTM parameters added, you can track that anyone who clicks on this URL is coming from the source “email,” through the medium “email,” and as part of the “SummerPromo” campaign. This allows you to monitor the performance of this specific link in your marketing efforts.
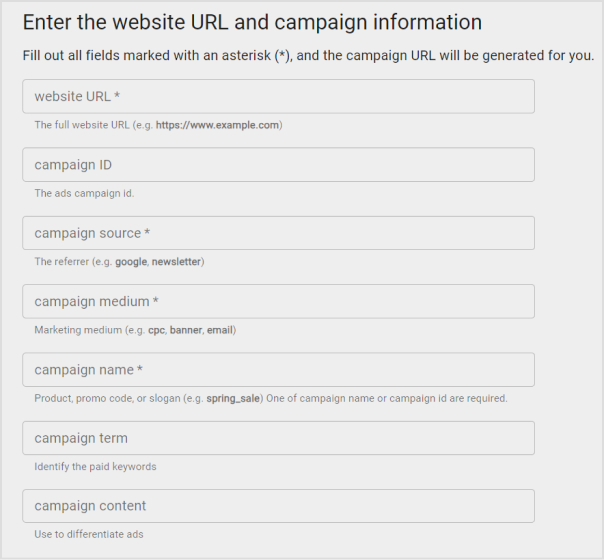
How to create UTM tracking codes?
Creating UTM tracking codes is a pivotal part of monitoring the performance of your online marketing efforts. While it’s technically possible to manually create these codes by adding specific strings to your URLs, it can be complex and time-consuming, especially when you have to manage them at scale. This is where UTM code generators come into play, making the process much more efficient.
Google Analytics URL builder:
Google Analytics offers a straightforward UTM code generator, which has become the go-to choice for many businesses. Here’s how you can use it:
Fill in the required fields for your campaign: the URL of the landing page, source, medium, campaign, term (optional), and content (optional).
Click “Generate URL,” and Google will create the UTM-coded URL for you.
Replug – A convenient alternative:
Replug.io is another powerful tool for UTM code creation, and here’s why it’s worth considering:
Automatic UTM code generation:
Replug automates the UTM code creation process, saving you the trouble of manual entry. This means you can gather valuable analytics data as soon as your campaign goes live.
Shortened and customized URLs:
UTM-coded URLs can become quite lengthy, which can be a problem on platforms like Instagram or when users need to copy and paste links. Replug’s URL shortener free tool shortens and customizes these URLs, making them more elegant and user-friendly.
For example, a long UTM-coded URL might look like this:
While UTM codes are a solid foundation for analyzing marketing performance, they have limitations. Replug offers an enhanced solution called Campaigns, providing in-depth insights and a more hassle-free tracking experience, especially when managing multiple campaigns across various marketing channels.
A complete link management solution
for marketing professionals & agencies.
Try Replug for free
Elevate Your Brand Performance with Replug
UTM codes are a fundamental tool for tracking the success of your brand campaigns, links, and platforms. They provide valuable data, but those unwieldy, lengthy links can be a drawback. As your marketing endeavors become more intricate, it’s essential to adopt a system that offers both enhanced power and efficiency.
This is where Replug steps in as the ideal solution. Replug not only helps you track traffic effectively, even in the most complex marketing landscapes, but it also simplifies the process. With Replug, you obtain concise, stylish links that seamlessly fit into any context. Moreover, it offers an analytics tool that’s user-friendly and excels at managing multichannel marketing campaigns.
In essence, Replug empowers you to elevate your brand’s performance, making tracking and managing your marketing efforts a smoother, more efficient, and ultimately more successful process.
Frequently asked questions
What are UTM codes?
UTM codes are tracking parameters added to URLs to measure marketing performance. They’re vital for data-driven decision-making and proving campaign success.
How do I create UTM codes for my campaigns?
You can create UTM codes manually, but it’s easier and error-free to use online UTM code generators like Google’s Campaign URL Builder or Replug’s UTM code builder.
What is Replug, and how does it work for link tracking?
Bitly is a URL shortening and link management platform that not only shortens links for sharing but also provides link tracking and analytics to measure click-through rates and engagement.
Reinforce brand awareness and encourage social media engagement.
6.
Conversion Retargeting
Focuses on users who have completed specific actions on your website, such as making a purchase or signing up.
User’s past conversions.
Tracks completed actions and leverages user behavior.
Encourage further conversions or upsells to engaged users.
7.
Email Retargeting
Involves sending follow-up emails to users who have abandoned specific actions on your website, such as incomplete purchases or registrations.
User’s past email interactions and abandonment.
Targets users through email campaigns.
Re-engage users and reduce abandonment rates, driving conversions.
8.
List-Based Retargeting
Customizes ads for users based on specific lists or databases, such as email subscriber lists or customer databases.
User’s past interactions and segmentation.
Utilizes existing customer lists and segmentation data.
Personalize content for existing contacts and nurture relationships.
9.
Cross-Channel Retargeting
Re-engages users who have interacted with your brand across multiple marketing channels and platforms.
User’s multi-channel behavior and interactions.
Combines data from various platforms to create a unified strategy.
Deliver a cohesive and personalized user experience across channels.
Most small and mid-sized businesses spend tens of thousands of dollars each year on advertising mediums, such as social media ads, influencer marketing, retargeting ads and search ads.
A large portion of their ad spend goes into retargeting.
We all see some ads pop up more than usual on social media. The reason is that those brands have a retargeting ad strategy in place that keeps showing you their ads.
Ready to explore what retargeting is and how you can develop a retargeting strategy for your business?
Let’s start with the basics.
What’s a retargeting strategy?
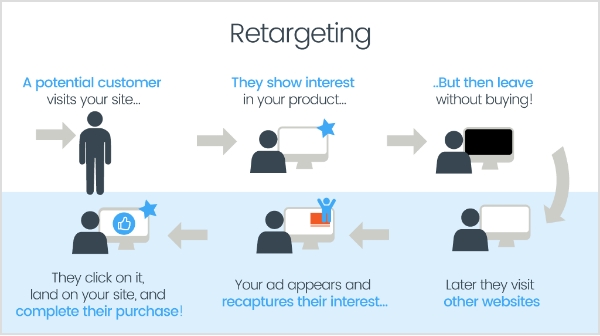
A retargeting strategy refers to the tactic a brand or individual uses to re-engage the website visitor who has shown interest in the product or service and hasn’t converted just yet.
Well, to put it simply: retargeting is remarketing.
A prospect clicks on the product and goes through the details, but leaves the page without making a buying decision.
Now the brand pursues that visitor through different retargeting strategies to bring him back and motivate him to take that plunge.
Remember the ultimate goal of the retargeting campaign is the conversion.
How does retargeting work?
Retargeting allows brands and marketers to remarket the product or service to the audience that has already visited your website.
The way retargeting works is quite interesting. Digital marketers place a short piece of code called a “Pixel” in the website code, which helps social media platforms identify the same visitor to showcase ads.
Digital marketers and advertisers retarget both website visitors who have previously purchased the product and who haven’t completed the transaction.
The core purpose of a retargeting campaign is to push the buyers who are on the fence or abandoned the shopping cart for some reason.
Retargeting isn’t rocket science. Every brand or business that wants to convert visitors into paying customers has to run a retargeting campaign at some point.
What are pixels for retargeting?
A pixel is a piece of code that is embedded in a website, mobile app, or email. The goal of adding a pixel to a website or other online property is to track a user’s activities. The pixel monitors user behavior and reports it to the primary source.
As a result, it opens the door for digital marketers, online enterprises, and e-commerce stores to reach out to the same audience through e-commerce retargeting.
The pixel is the backbone of a retargeting campaign. If it wasn’t for the pixel, the retargeting wouldn’t have been possible.
The pixel function is typically available on all major social media sites that include ad features for advertisers.
I hope that helps.
Now let’s head over to the cream of this article.
9 types of retargeting strategies
It’s important to shed some light on different types of retargeting strategies that are being used by marketers and brands.
1. Contextual retargeting: Increase user engagement through content relevance
Contextual retargeting involves displaying ads on websites or platforms that are contextually related to the content users have previously engaged with. By aligning ad placement with users’ existing interests and behaviors, this strategy aims to prompt users to return and convert based on their contextual inclinations.
In other words, it leverages the power of context to re-engage users, offering them content or products that are closely aligned with their demonstrated preferences. This approach enhances the overall user experience and encourages higher conversion rates by delivering precisely what users are interested in within the context of their online journey.
2. Onsite retargeting: Enhancing user engagement on your website
Onsite retargeting is a powerful strategy for bloggers that involves targeting users while they are actively engaged on your website. This approach goes beyond conventional retargeting by displaying contextually relevant content or ads to users based on their on-site behavior and interactions. By tailoring the on-site experience, you can guide visitors toward desired actions, boost engagement, and ultimately enhance their overall sales.
3. Site retargeting: Nurturing your digital footprint
Site retargeting, often referred to as standard retargeting, is like leaving a friendly breadcrumb trail for users who’ve ventured onto your website but didn’t complete the journey. This strategy re-engages these visitors by presenting tailored ads as they continue their online travels.
The main goal here is to ensure your brand stays fresh in their memory and guide them back to your website to take those actions you desire, whether it’s making a purchase, signing up, or simply exploring more.
4. Search retargeting: Tailoring ads to search behavior for precise engagement
A lot of websites put up cookie notices on their websites. Companies, SAAS businesses, and blogs collect users’ data to send them personalized offers or retarget them via different channels. Search retargeting helps advertisers target users based on their interests and search behavior.
Search retargeting targets users based on their search queries and the keywords they’ve used in search engines. This strategy allows you to reach users with specific interests related to their search behavior, and tailoring ads specifically to their interests and needs.
5. Social retargeting: Boosting brand buzz & engagement on social media
Social retargeting is a social media tactic to push the social media users who liked or engaged with your content on or off the social platform. This method is useful for staying in touch with users who have left your site and keeping your brand in their minds.
It capitalizes on the extensive user base and engagement opportunities on social media platforms like Facebook, Instagram, and Twitter.
Social retargeting involves displaying ads on social media platforms to users who have previously interacted with your brand. The goal is to reinforce brand awareness, encourage social media engagement, and drive conversions by reaching users in the social environment they frequent
6. Email retargeting: Rekindling interest with follow-up emails
Think of email retargeting as a friendly reminder to users who got close to completing an action on your website but didn’t quite finish the job, like leaving items in a cart or abandoning a registration.
The main goal? Revive their interest. We send them a gentle nudge via email, reminding them about their incomplete task and perhaps sweetening the deal with incentives or useful information.
The goal is to encourage them to return and complete the desired action.
7. List-based retargeting: Personalizing content for your most engaged audience
List-based retargeting is a savvy marketing strategy that centers around specific lists or databases, like your email subscriber list or customer database. This tactic empowers you to deliver meticulously personalized and precisely targeted ads to your existing contacts and customers, all while nurturing relationships with your loyal audience.
The beauty of list-based retargeting lies in its ability to ensure that your marketing messages are finely tuned to the preferences and behaviors of those who are already well-acquainted with your brand and offerings. It’s a powerful tool in your marketing arsenal for maintaining and enhancing engagement with your established customer base.
8. Conversion retargeting: Revive your prospects
Conversion retargeting refers to targeting the audience who has taken an interest in your product or service and is probably on the fence to make the purchase. This strategy is effective for companies and entrepreneurs with longer sales cycles because it allows them to target customers who are familiar with your brand and are more likely to make a purchase.
9. Cross-channel retargeting: Win with the omni approach
Cross-channel retargeting is a form of retargeting that involves targeting the audience on another platform using the data. Advertisers use targeting data from several sources, which allows them to reach their target audience no matter what device they’re using. Moreover, it helps them meet the audience that visits their website or shows interest in the products.
Note: There are several retargeting strategies that digital marketers implement over time, but all of them aren’t necessarily used at once.
How does Replug help with retargeting?
One of the key features of this top-notch link optimization platform is “Link Retargeting Pixel”. You just need to copy your pixel code from your favorite social platform to Replug. Shorten a link for free and with each click on the short link, you will add those visitors to your custom ad audience. Thus, helping you reduce ad costs and build custom audiences through social and cross channel retargeting.
How to create a perfect retargeting strategy?
Retargeting ad campaigns require a strategic approach and discipline to run them successfully, which is why many growing SaaS brands prefer working with an experienced SaaS marketing agency to plan, execute, and optimize high-converting retargeting strategies. To reap the benefits of retargeting, it’s necessary to design a strong strategy.
We have researched and combined a number of factors that should be considered when you are in the planning phase.
Let’s go over these key factors.
1. Capitalize on the existing customers
Existing customers are a great asset to any business. Remarketing to existing customers is an excellent approach to get repeat business.
Customers who have previously purchased from you can be shown personalized adverts, such as offering them a discount on their next purchase or displaying them relevant products they might be interested in.
This technique works well because it focuses on those who are already familiar with your brand and are more likely to convert. It can also help boost customer lifetime value and promote customer loyalty.
2. Target specific website URL visitors
Most conversion optimization experts closely track their website visitors’ behavior. Visitors who have visited specific pages on your website are targeted with this retargeting tactic.
For example, if someone visits your website but does not buy anything, you can retarget them with advertising relating to the product they looked at.
The reason it works is that it targets those who have expressed an interest in a certain product or service on your website. It can also assist you in determining which pages on your website are most efficient at converting visitors.
Boost ROI with branded URLs!
Enhance your marketing campaigns by creating shareable, trackable, and fully multi-purpose
customizable branded URLs.
Understanding the audience is a digital marketer’s superpower. The better you understand your website visitors, the higher the conversion – no doubt about it.
Categorizing your retargeting audience into multiple categories based on their website behavior and creating personalized offers could make an impact.
For instance, a digital marketer can separate site visitors who added the products to their cart but did not check out from those who visited your website but did not add anything to their cart.
It gives the digital marketer a chance to send a follow-up email to these potential customers that are more likely to result in conversions.
4. Try an action-based targeting strategy
Since you already know that understanding your audience is the key to improving your conversion rate, the action-based targeting strategy will take your campaign to the next level.
Experiment with an action-based targeting technique, which entails targeting people based on their behaviors on your website. For instance, you can retarget people who have downloaded a checklist or ebook through your opt-in bribe.
It’s an effective retargeting strategy as it focuses on people who have expressed an interest in your product or brand.
This strategy revolves around improving the user experience on your website in order to attract users to interact with your business.
Brands, affiliate marketers, and digital marketers use opt-in forms to encourage people to sign up for their email newsletter, invite them to receive push notifications to the website visitors, and engage on social media to drive traffic to their website.
Website visitors’ engagement has never been this easy. Now businesses can incorporate a chatbot into their website to answer prospects’ queries.
It surely increases on-page visitor engagement and boosts the likelihood of visitors converting into subscribers or paying customers.
6. Reach out to a custom audience
Custom audience isn’t an alien concept for digital marketers, especially Google and Facebook ad experts. This retargeting strategy involves developing a specific audience based on your existing consumer data.
Identifying the audience who has already purchased from you and targeting them with personalized ads could be a game-changer. The custom audience plays a vital role in running ads to a specific audience instead of a wider audience.
Most social media and advertising networks allow you to create or use your custom audience for campaign targeting.
Brands and entrepreneurs try to make the most of their ad spend. Therefore, they try out different ways to advertise as well as find a more niche audience.
One of the best ways to target a custom audience is to advertise to relevant email newsletter readers.
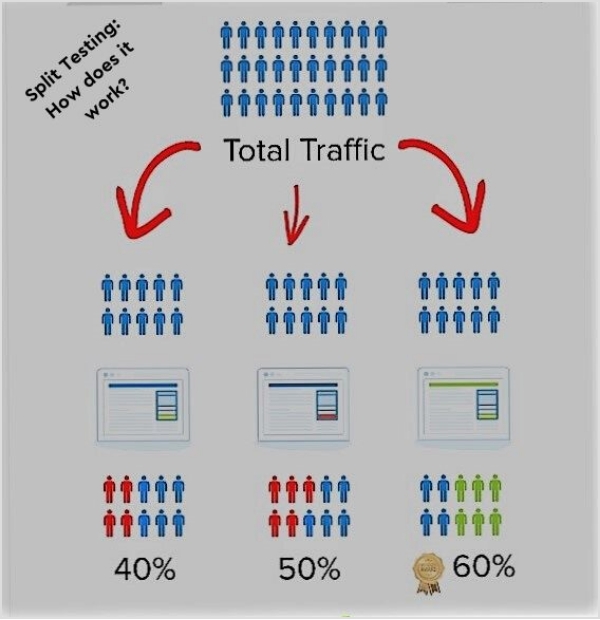
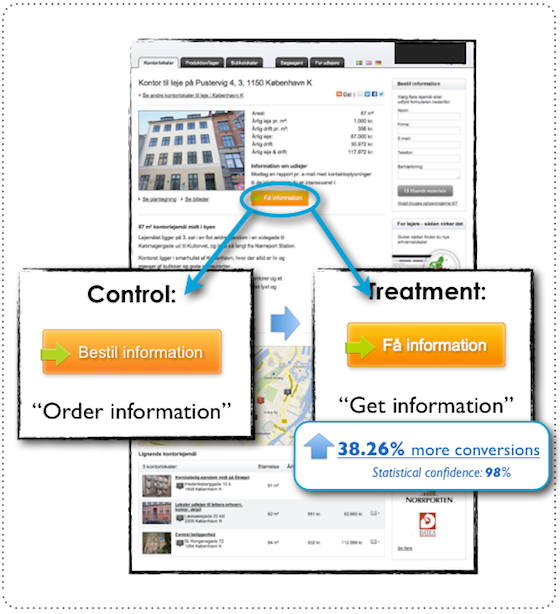
7. A/B test your retargeting ad strategy
A/B testing refers to the comparison of two versions to find out which outperforms the other. The A/B testing technique is used in link management, social media image ads, blog featured images, YouTube thumbnails, and several other places.
It involves testing different versions of your retargeting ads to see which ones perform better. For instance, digital marketers test different ad copy, images, or calls to action to find out which one results in more clicks, engagement, or conversions.
When it comes to benefits of A/B testing your retargeting strategy, you can easily comprehend which elements are most effective at driving conversions or getting more engagement.
8 ways to make your retargeting strategy stand out
Developing a retargeting strategy involves a lot of brainstorming before you move forward. It’s necessary that you’re sure and confident about the route you’re taking to pull this off.
To help you make better decisions regarding establishing and implementing a retargeting strategy, here are some tips in this regard:
1. Retarget the audience with a discount:
Discounts attract both prospects and existing customers. Create a discount offer and retarget the audience that has shown interest in your products.
2. Target people opening your emails:
The email newsletter data is crucial to your digital marketing success. Use your email newsletter statistics to drive interested readers to your offers. It could move the sales graph upward within a few days.
3. Remind checkout abandoning visitors what they’re missing out on:
When you have insights into your shopping cart abandonment, go find the email addresses of the visitors who left the checkout process and went ahead with the purchase. Reach out to them via email or social media ad and tell them what they have been missing out.
4. Exclude converted visitors:
Retargeting doesn’t necessarily mean retargeting everyone. Don’t bother the already converted audience right away. Instead, give it some time before you reach out to the same audience who has just bought your product or service. You won’t want to irritate your paying customers.
5. Use influencers’ testimonials:
Influencer marketing is an underpriced marketing strategy. A lot of brands use social media influencers to attract, engage, and convert like-minded audiences into paying customers. Furthermore, influencers’ testimonials about your brand could be used to remarket your product.
6. Upsell to existing customers:
Retargeting the existing audience could turn out to be a useful hack. Upselling means offering a product to the customer who is buying your product or has already bought one. Since these customers already trust you, they might as well pay attention to your offer.
7. Retarget based on events:
One of the retargeting strategies brands and entrepreneurs could try out is to remarket to the audience that has initiated a talk or participated in the event. For instance, if you host a free webinar on Facebook ads and a group of people sign up and show up webinar. You could later reach out to them via email or connect with them via a meeting scheduling tool and offering them your paid training on Google ads
8. Exclude visitors spending less time on the website:
Site engagement is a huge conversion factor. If your website has a high bounce rate, then it may have low visitor engagement. A retargeting campaign could also revolve around the visitors who spend more time on your website. All you need is to exclude the visitors who land on your website and leave within ten seconds or so.
What are the KPIs for retargeting ads?
Retargeting is an ad strategy in which advertisers target the audience who have previously interacted with a website. The purpose of a retargeting campaign is to reach out to the segment of the audience that is more likely to convert into paying customers.
Advertisers use key performance indicators (KPIs) to assess the efficiency of retargeting campaigns. Here are some of the key performance indicators for retargeting ads:
1. Cost per click (CPC):
It’s an ad metric used to measure the cost of each click on an ad. Advertisers use CPC ads across different ad platforms.
2. Cost per acquisition (CPA):
It’s an advertising metric advertisers use to measure the cost of acquiring a new customer through ads.
3. Click-through rate (CTR):
Click-through rate is an engagement metric that measures the percentage of users who click on the ad after seeing it. CTR is used in email marketing, direct ads, PPC, and affiliate marketing – almost everyone in online marketing where clickability is a factor.
4. Return on investment (ROI):
ROI is a metric that calculates the revenue generated by a marketing or advertising campaign compared to the cost involved in it. ROI plays a vital role in setting the direction of the retargeting ads campaigns.
5. Lead generation:
Lead generation is a process in which a website visitor completes the action and it gets recorded as an event. For instance, a PDF ebook is downloaded by a visitor and offered as an opt-in bribe for an email newsletter. Retargeting ads could be intended to generate leads for a business.
6. Abandon cart rate:
It’s a metric that measures the number of website visitors who abandon their shopping carts after visiting the sales page and starting the buying process.
7. Conversion rate:
It’s one of the discussed sales metrics in the digital marketing world. The conversion rate measures the percentage of website visitors who take the desired action and complete the transaction. It could be a sign-up to a newsletter, buying a product, or downloading a file.
These are some of the most commonly used key performance indicators in digital marketing. Therefore, these KPIs have a significant role in making a retargeting ad campaign a success.
What are the pros and cons of retargeting?
Retargeting advertising strategy has been around for a while. No wonder more and more advertisers are adopting this ad strategy, which makes it worth paying attention to for everyone learning digital marketing.
Let’s discuss the pros and cons of retargeting:
Pros of retargeting
1. Better conversion rate:
Targeting website visitors who have shown some interest in your products takes you one step further. The reason is that the chances of conversion increase as they have already interacted with the brand. Most brands are likely to see a better conversion rate when retargeting to an existing audience.
2. Brand positioning:
Brand positioning means how a brand positions itself in the customers’ minds. Advertising to potential customers who have seen your products before creates brand recognition. A lot of customers take action when they see an offer multiple times, especially when there is an urgency involved in the offering.
3. Sifting the audience:
When a brand retargets to a specific audience, it sifts through a large portion of the population and focuses on the segment of the audience that is more likely to convert. No doubt that retargeting reduces ad wastage on audiences that may take any action on your offer.
4. Increase the ROI:
One of the perks of a retargeting campaign is that it double-downs on a specific audience, which leads to higher returns on investment. Such an outcome may not be possible with broad audience targeting.
5. Personalized offering:
Tailoring the offer for a specific audience leads to more attention through clickability, engagement, and conversion. One of the benefits of retargeting is to tailor ads based on users’ past interactions. It helps advertisers provide a relevant offer that resonates with the audience.
Cons of retargeting
1. Learning curve:
One of the biggest disadvantages of retargeting is that it has a steep learning curve. A beginner advertiser can’t start a retargeting campaign out of the blue. It does take time for a newbie to learn this advertising technique before this person finally hits the bullseye.
2. Limited ad reach:
Since retargeting is all about focusing on a specific group of audience, it could potentially decrease the overall ad reach. In some cases, retargeting could significantly decrease the revenue if the offer isn’t ideal or the retargeting campaign settings aren’t spot on.
3. Dependency factor:
Retargeting can surely turn things around if done right. However, it’s dependent on external forces, for instance, user behavior is a huge factor that sets the direction for a retargeting campaign. So retargeting campaign’s effectiveness relies on how users take action or behave on a specific platform, which might be an issue for some people.
4. Potential ads overexposure:
One of the cons of retargeting ads is that they’re shown to the audience over and over again. The chances are, that some of them get annoyed by the ads and decide not to see that ad again. It could potentially affect the reach of your retargeting ad campaign.
FAQs about retargeting
Let me answer some of the popular questions about retargeting:
Is retargeting cheaper than advertising?
The likelihood of a retargeting campaign being cheaper than normal advertising is high because a normal ad campaign is broader in targeting as compared to focused targeting in a retargeting campaign.
What are the channels for retargeting?
There are various channels for retargeting, such as:
A retargeting campaign is intended for the audience that has already visited our website but never converted just yet.
What is a good CTR for retargeting ads?
A good CTR varies from industry to industry. However, it’s been seen that a good CTR for online ad campaigns is between 1% to 3%.
What is negative retargeting?
A negative remarketing campaign means excluding a segment of the audience from the retargeting campaign or creating an ad in the campaign that won’t be displayed to some of the members of the campaign.
Is retargeting inbound or outbound?
Any form of online advertising is basically an inbound campaign. Since retargeting is running ads to a specific audience, it’s safe to say that retargeting is inbound.
Creating UTM links is a straightforward process that helps you track the effectiveness of your marketing campaigns and understand where your website traffic is coming from. UTM parameters are tags added to your URLs to provide more information about the source of a click.
Here’s a quick and effective approach to creating UTM links:
Understand UTM Parameters:
UTM parameters are tags added to the end of a URL to provide more information about the source of a click. They are essential for tracking and analyzing the performance of your campaigns, allowing you to make data-driven decisions and optimize your marketing strategies.
Here’s a breakdown of the key UTM parameters and their purposes:
utm_source:
Purpose: Identifies the specific source of the traffic, such as a website, platform, or publication.
Replug is a feature-rich link management platform that excels in simplifying UTM tracking while offering robust link management capabilities. Its versatility, customization options, and detailed analytics make it a compelling choice for marketers.
Additionally, Replug provides precise link shortening via a brilliant URL shortener free tool, efficient campaign organization, and seamless integration possibilities, making it an attractive option for businesses of all sizes.
Here’s how to add UTM codes to your URLs using Replug:
Step 1: Sign in or create an account
Begin by signing in to your Replug account. If you don’t have one yet, you can easily create a free account.
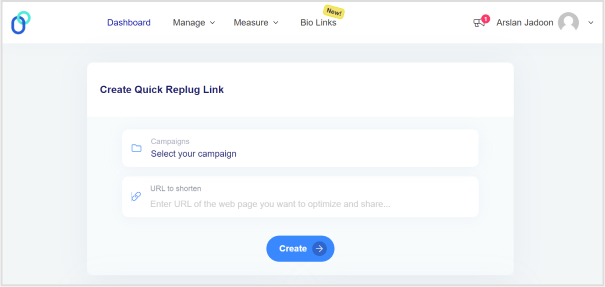
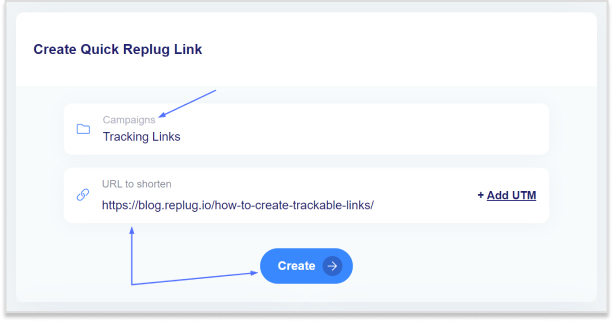
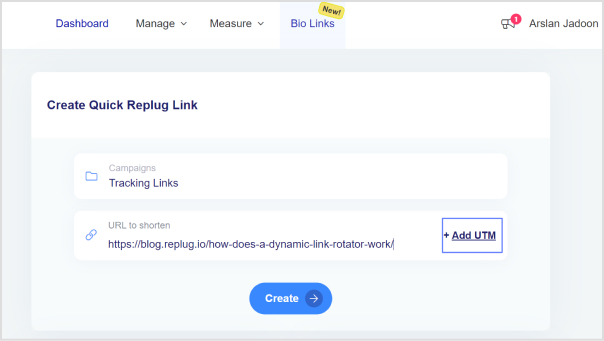
Step 2: Select your campaign
Once you’re logged in, click “Select your campaign” on the main dashboard or create a new campaign.
Step 3: Paste the URL
Locate the “URL to shorten” section below “Select your campaign”, and paste the URL to which you want to add UTM parameters.
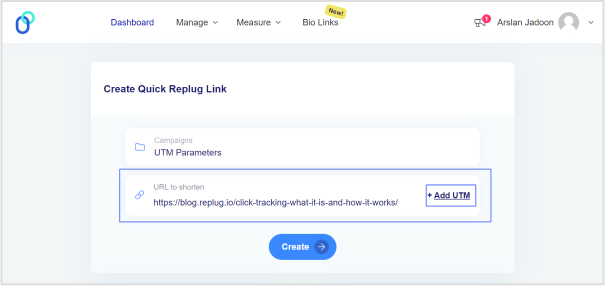
Step 4: Add UTM tag
At the end of the “URL to shorten” section, you’ll see an “add UTM” tag. Click on it to proceed.
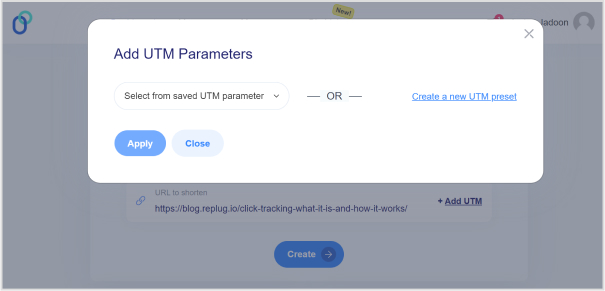
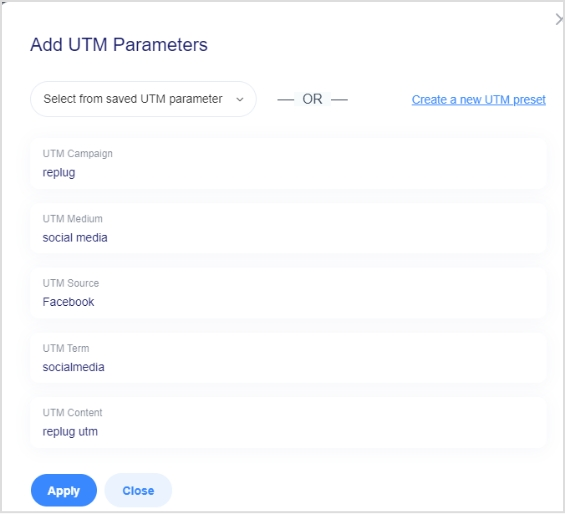
You have the option to either “select from saved UTM parameters” if you’ve used these before or “create a new UTM parameter.”
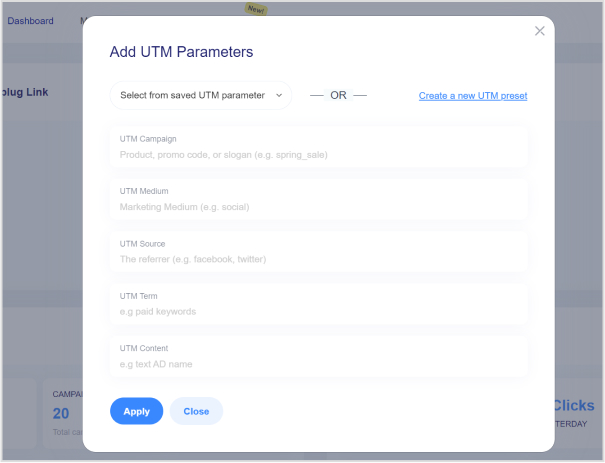
Step 6: Fill in UTM parameters
If you decide to create a new UTM parameter, provide the necessary information such as the source, medium, campaign, term, and content. Once you’ve completed this, click “Apply.”
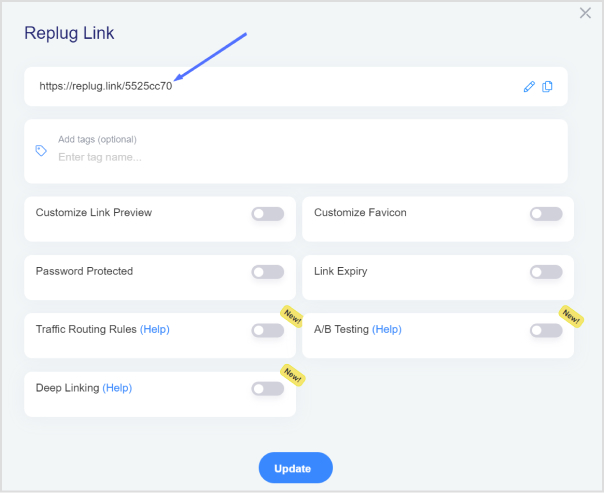
Step 7: Create the URL
Click the “create” button, and Replug will automatically generate a shortened URL with the added UTM parameters.
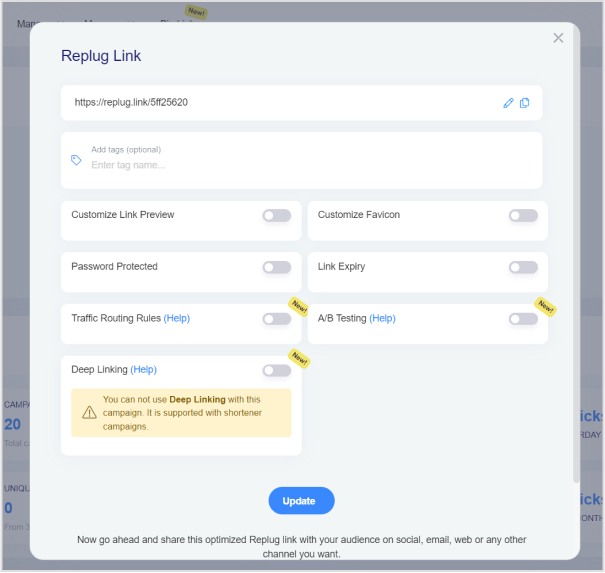
Step 8: Edit UTM code (optional)
If you wish to further customize the URL, you can do so by clicking the edit icon.
After any edits (if necessary), simply copy the URL with the UTM parameters and click the “update” button to save your changes.
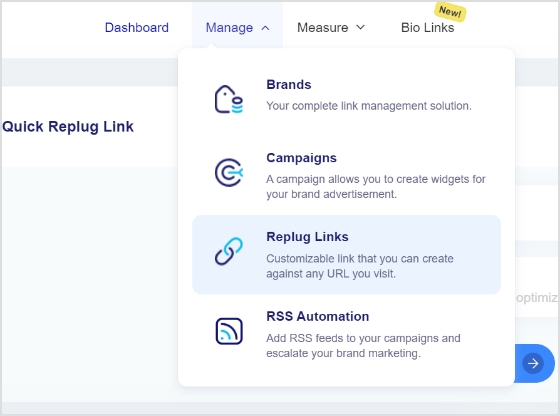
Step 10: Access your URL
To access and manage the URL you’ve just created with UTM parameters, navigate to the “Manage” section in Replug and click on “Replug links.”
By following these steps, you can harness the full potential of Replug to seamlessly integrate UTM parameters into your URLs, improving the accuracy and effectiveness of your marketing campaign tracking and analysis.
A complete link management solution
for marketing professionals & agencies.
Try Replug for free
Frequently asked questions
What are UTM parameters?
UTM parameters are tags added to URLs to track the source and performance of your marketing links. They’re essential for understanding where your traffic comes from and how effective your campaigns are.
How do I create UTM links for my marketing campaigns?
Use an online UTM builder like Replug or manually add UTM parameters to your URLs to create UTM links.
What are the common mistakes to avoid when using UTM parameters?
Avoid using spaces or special characters in your UTM parameters, and make sure they are applied consistently. Be careful with sensitive data like user information in UTM parameters.
QR codes come with more tricks than a magician’s hat. ???? A Dynamic QR code is all about redefining how you connect with information.
Usually, a QR code is printed on the packages or product boxes to access the product details specifications, or other information regarding the product.
However, the dynamic QR code is something most of you haven’t heard of before. You’ll be amazed at how these codes are changing the game for businesses, educators, and more.
So let’s dive deep into it and learn more about this specific type of QR code.
What is a dynamic QR code?
A dynamic QR code is flexible and adaptable codes can be edited, replaced, and updated after their creation. enabling real-time information updates and tracking of user interactions.
The core purpose of a QR code is to direct visitors to a specific website page or information linked to it. These codes are not your standard QR codes; they transform, adapt, and offer unparalleled tracking and customization.
How does dynamic QR code work?
Dynamic QR codes are made using specific software or online tools. Users input the content they want the QR code to show, like a website link or text. The QR code generator then produces a QR code that links to a server or database where the content is kept. You can change the content even after making the QR code.
Dynamic QR codes are responsible for showcasing the QR code analytics for tracking purposes. It also provides an option to edit or alter the destination URL or link information to the QR code. Therefore, the users don’t have to generate new QR codes in case of a change in the information, such as website URL, email address, or phone number.
Moreover, a dynamic QR code also integrates with several third-party tools and softwares to analyze the digital marketing campaign performance. So that’s why it’s important for brands and entrepreneurs to embrace the effectiveness of the dynamic QR codes.
The key steps in how dynamic QR codes work are:
Creation: A dynamic QR code is generated using a QR code generator or software. During this process, a URL (web address) pointing to the server or database is typically included in the QR code.
User Scanning: When a user scans the dynamic QR code using a smartphone or QR code reader, the app decodes the code and sends a request to the included URL.
Server Interaction: The server receives the request and dynamically generates the relevant content. This could be a webpage, text, image, or any other data.
Content Display: The server then sends the content back to the user’s device, which displays the updated information.
Tracking (Optional): Dynamic QR code systems often include tracking capabilities, allowing the QR code owner to collect data on how often the code is scanned.
Static QR code vs. dynamic QR code
Most businesses have been using static QR codes for a while without fashioning the innovation in the process. Therefore, it’s vital to discuss the core differences between a static and dynamic QR code to bring clarity to the readers’ minds.
Let’s do a side-by-side comparison of static and dynamic QR codes to give you perspective on capitalizing on this fantastic marketing and engagement opportunity:
Static QR Codes
Dynamic QR Codes
Permanent
Editable
Non-Trackable
Tackable
No Retargeting Capability
Retargeting Capability
Long Clunky URL
Short URL
Takes Time To Scan
Quick Scanning
Static QR Code
Static QR codes are permanent and cannot be edited, which is the key difference between both types of QR codes
The data linked to a static QR code remains unchanged indefinitely no matter what QR software is used to create the code
One of the factors of static QR codes is that they can’t be tracked regardless of the QR code generator
A huge perk of creating a static QR code is that it’s free to use and the users don’t need a subscription to create a QR code
Static QR codes are compatible with both Android and iOS devices
Dynamic QR Code
The biggest perk of the dynamic QR codes is that they are editable and trackable, making them ideal for businesses to alter the stored information going forward
Dynamic QR codes flawlessly redirect users to various types of information, such as website pages, videos, podcasts, and other information sources
Users can easily store rich media content like videos, images, audio, or custom webpages using dynamic QR codes
Analytics help marketers analyze the performance of their content or product. The performance of the dynamic QR codes can be tracked to analyze the campaign outcome
A dynamic QR code campaign can provide access to detailed reports, showcasing information about the total number of scans, scan locations, scan times, and the scanning device
Dynamic QR code allows users to integrate the QR code with third-party tools, such as Google Analytics, Zapier, and other SAAS products
A complete link management solution
for marketing professionals & agencies.
Try Replug for free
Examples of QR codes
QR codes are a rapidly growing trend without a doubt. Businesses of all sizes are adopting QR codes for marketing and engagement purposes.
Let’s shed some light on the diverse use cases of QR codes to understand the acceptability of this innovation:
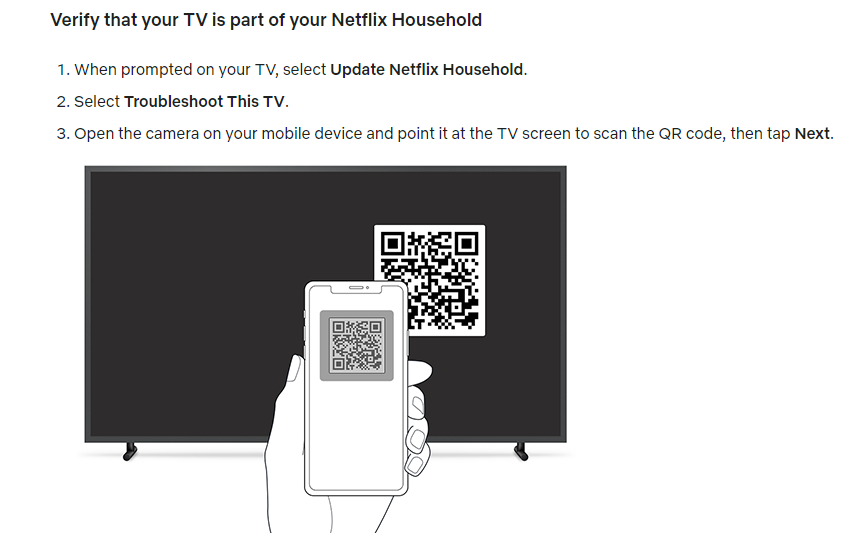
i. Netflix: Household verification
Netflix is a popular OTT streaming service that has millions of users globally. The streaming platform recently implemented a household user verification system through QR codes.
Netflix asks the users to verify their identity to ensure that the subscription is in the same household when the user logs in on a different device or through a different internet connection.
The users are required to scan the QR code using their smartphone’s camera and then they’re redirected to the Netflix app once it’s verified.
Key takeaways:
Streamlined sign-up process, reducing friction for new users.
Enhanced user engagement and personalized recommendations for existing users.
An intuitive and convenient way to access the app’s features using a smartphone’s camera.
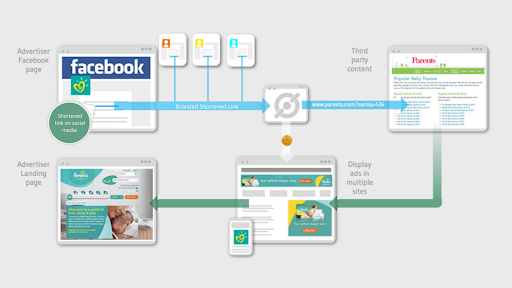
ii. AliExpress triggers app installations through the dynamic QR codes
AliExpress is a well-known Chinese e-commerce platform with customers across the globe.
This e-commerce giant has been using the QR code to direct the audience toward their respective mobile app store.
The iPhone users are redirected to the App Store, whereas the Android users are redirected toward the Google Play Store.
So it’s yet another use case of QR code that’s worth noticing. Brands could elicit this strategy and use the QR code to increase their mobile app downloads for more sales and engagement.
Key takeaways:
Dynamic QR codes offer a streamlined and efficient way for e-commerce platforms.
Brands could elicit this strategy and use the QR code to increase their mobile app downloads for more sales and engagement.
Use cases & uses of QR codes
Now that we have seen some popular examples of dynamic qr codes. But the story does not end there, as there are a number of ways you can use QR codes.
Let’s have a look at the use cases below where dynamic QR codes can be valuable.
i. Marketing Campaigns:
A company runs a marketing campaign with dynamic QR codes on promotional materials. Using it, they can monitor how many times the QR code is scanned, where and when scans occur, and the conversion rate to gauge the campaign’s success.
ii. Contactless Payments:
Dynamic QR codes are employed for contactless payments, where customers can scan the code to make payments at stores, restaurants, or for online purchases.
iii. Retail price updates:
Retailers can update the pricing information on their products by utilizing dynamic QR codes on price tags. This is especially useful during sales or when price changes are frequent.
iv. Inventory tracking in a warehouse:
Warehouse staff can update the QR code to indicate changes in the contents of a shelf or aisle. This allows for accurate and up-to-date inventory tracking without the need for manual record-keeping.
v. Product recalls:
If a product recall is necessary, the company can update the QR code to provide consumers with recall instructions, replacement options, or safety information. This ensures that consumers have access to the most current and critical information.
vi. Restaurant menus:
Restaurants use dynamic QR codes on printed menus to provide customers with access to digital menus. These menus can be updated in real-time to reflect daily specials, pricing changes, or new dishes.
vii. Emergency contact information:
In case of an emergency, first responders can scan the QR code to access the person’s medical history and emergency contacts. The individual can update this information as needed, ensuring accurate data is available during critical situations.
The above cases are just to name a few. These codes can be further utilized in various services departments like travel, real-estate, event management etc. These codes essential in making life easier through real-time updates and convenient processes.
When it comes to QR codes, the benefits are greater than we think. Let’s dive in further to learn about the key benefits.
Benefits of using a dynamic QR code
Dynamic QR codes have relatively broader capabilities as compared to static QR codes. No wonder top brands, marketing agencies, and social media influencers prefer dynamic QR codes for marketing and user engagement.
Let’s take a look at some of the benefits of using a dynamic QR code:
i. Easily editable
The first and foremost benefit of a dynamic QR code is that it can be edited going forward. The information attached to a dynamic QR code can be altered if needed. On the contrary, the static QR codes can’t be edited once created. The QR code is editable, which makes the dynamic QR code a clear choice for most brands and companies. It’s one of the differentiators between dynamic and static QR codes.
ii. Track performance
Static QR codes aren’t trackable, whereas dynamic QR codes can be tracked. Performance tracking makes dynamic QR codes more effective from the data and analytical standpoint. Brands and e-commerce websites use dynamic QR codes so that they can track their products’ reach, engagement, and sales.
iii. Fast processing
Dynamic QR codes are quicker when it comes to processing. The static QR codes are generally free to create. However, dynamic QR codes are available on premium plans. Therefore, it’s crystal clear that dynamic QR codes would be faster than static ones.
iv. Third-party integrations
Third-party tools integration takes any tool or service to the next level. When it comes to dynamic QR code generators, they seamlessly integrate with other tools for marketing and management. Marketers and brands may want to connect their QR codes with analytics tools to keep track of their QR codes’ performance.
v. Retargeting capability
One of the benefits of dynamic QR codes is that they can be used for retargeting the audience through ad networks such as Facebook ads and Google ads. The marketers can launch a retargeting campaign targeting the visitors who scanned the dynamic QR code and increase the likelihood of a conversion.
Add a dynamic QR code to your website using Replug
Adding a dynamic QR code to your website, landing page, or app would be a game-changer in engaging prospective customers or new visitors from a standpoint.
Since the QR code makes it easier for the visitors to access the stored information, the visitors would be able to access the URL or other information swiftly.
Replug is one of the best URL shortening and link management tools out there. You can use its free URL changer to create trackable, shortened links that enhance your campaigns with powerful analytics and seamless management.
One of the most significant features of Replug is QR code generation for the shortened URLs. Here’s how you can add a dynamic QR code to your website link using Replug:
Step 1: Log in to your Replug account
Start by logging in to your Replug account using your credentials.
Create a free account if you haven’t tried it yet. Replug has a 14-day free trial.
Step 2: Generate a short link
After logging in, the next thing you should do is to generate a short link that you want to associate with a QR code. This can be a link to your website, content, or any other online resource. Replug will automatically generate a QR code for it. You don’t need to do anything specific to initiate this process.
Maximize marketing ROI
by transforming ordinary URLs into branded short links that convert.
Try Replug for free
Step 3: Access the “Manage” section
Once a short link is created, navigate to the “Manage” section within your Replug account. Then select “Replug Links” to proceed further to get your QR code.
Step 4: Locate the link
Now locate the specific link you want to download the QR code for to proceed. To get the QR code for the short link you generated, open the settings of the short link by clicking the three-dot icon of that link.
Step 5: Download the QR code
Upon clicking on the three-dot icon, a menu would appear. Click on the option that says “download QR code.” It will prompt Replug to generate and download the QR code image associated with your chosen short link.
Once you’ve clicked on “download QR code,” the image of the QR code will be saved to your device. That will be your dynamic QR code for that specific link.
That’s it!
FAQs about QR codes
Let’s take a look at some of the commonly asked questions about QR codes:
Do dynamic QR codes expire?
The dynamic QR codes can expire depending on the rules set while creating them. The brand that creates the QR code gets to decide the expiration date of the QR code.
Can I change the URL on a dynamic QR code?
Absolutely. You can change the URL on a dynamic QR code. All you need is to go to the QR code tool, locate the respective link, and edit the QR code setting to make the required changes.
Can I reuse an old QR code?
A dynamic QR code could be reused if it’s changed, meaning the information has been altered or updated for reuse. However, the static QR code can’t be changed or reused once created.
Which QR codes never expire?
Static QR codes never expire. Similarly, these QR codes can’t be edited or changed once created. You may have to create a new one if you need to make some changes to the stored information.
What is a unique QR code?
Every QR code is unique. The QR pattern makes them different from one another. The reason why it’s necessary for a QR code to be unique is to ensure that it stores and accesses the appropriate information.
Companies in the digital age must monitor and optimize their online efforts to maximize engagement, conversions, and profitability. Click tracking is an invaluable approach that allows businesses to gain insights into the performance of their online links and marketing campaigns. This guide explores what click tracking is, where it is used, and how it can elevate your brand’s online presence. So, let’s get started.
What is click tracking?
Click tracking is a digital marketing technique that involves monitoring and recording the interactions or clicks made on links, typically hyperlinks, with the aim of gathering data and insights into user behavior and engagement.
It is commonly used in web analytics and online marketing to track the performance of various online elements, such as links in emails, websites, advertisements, or social media posts.
Click tracking is achieved by attaching a unique tracking code, which allows the tracking system to record when and where users click on the link.
How click tracking strengthens your brand: 6 key benefits
Here’s a concise breakdown of how click tracking elevates your brand with six key benefits:
Analyzing user behavior:
Click tracking helps you analyze your audience’s behavior. It answers questions about what messaging prompts them to act, which content resonates the most, and how they access your site, leading to a better user experience.
Optimizing and improving content:
By embedding trackable links, you can assess content performance, determine the type of content that engages your audience, and identify where your content performs best, enabling better content marketing strategies.
Aiding in A/B testing:
Click tracking provides essential data for A/B testing, enabling in-depth analysis of marketing efforts. It helps compare elements like CTA buttons, landing page designs, and email subject lines to find the most effective strategies.
Enhancing social media and content marketing:
Click tracking allows you to evaluate the impact of your social media strategies by tracking page views and click-throughs. It provides insights into audience demographics, helping you improve your social media marketing.
Simplifying data-driven decision-making:
Click tracking eliminates guesswork and facilitates data-driven decision-making. By reviewing precise measurements tied to your efforts, you can identify which initiatives worked well and which didn’t, leading to more informed decisions for future campaigns.
Finding and fixing website errors:
Click tracking can help proactively identify website errors, broken links, non-functional CTAs, etc. This ensures a seamless user experience, preventing potential disruptions to your customers’ journeys.
Utilizing click tracking in different areas
Click tracking is employed in various aspects of digital marketing and user experience analysis, including tracking marketing campaign performance, monitoring email engagement, and optimizing web design to enhance the user experience. It provides valuable insights for data-driven decision-making in these domains.
Link tracking for marketing campaigns:
Click tracking is instrumental in assessing the success of marketing campaigns on platforms like Facebook, LinkedIn, Instagram, and PPC. By incorporating UTM tracking codes, marketers can attribute traffic sources and campaign details.
UTM parameters, which are query strings added to URLs, help identify essential details such as traffic sources, mediums, and campaign names.
This method enables the accurate attribution of traffic, leads, and sales to various marketing campaigns, enhancing segmentation and offering insights into custom campaigns using tools like Google Analytics and Usermaven.
Email link tracking:
Many email marketing tools employ tracking pixels within email messages, allowing marketers to monitor user actions, including opens, clicks, on-site activity, and subscriber engagement.
This feature empowers marketers to discern subscriber preferences, such as content format (text or design-heavy), optimal email send times, and effective subject line formats.
It provides actionable insights for refining email marketing strategies and engagement tactics.
UX click tracking:
In addition to link tracking, UX (User Experience) click tracking offers a visual representation of user interactions on a website.
Heatmap tools like Hotjar record and visualize all user activities, such as clicks on links, images, and site elements, both above and below the fold.
Heatmaps reveal hot areas of user focus and cold areas that are often ignored, helping businesses understand user behavior and interaction patterns.
These insights guide web design improvements to enhance the overall user experience.
Click tracking can identify issues such as high bounce rates without clicks or scrolls above the fold, prompting A/B testing of design elements to enhance customer retention.
Maximize marketing ROI
by transforming ordinary URLs into branded short links that convert.
Try Replug for free
Using Google Analytics and Google Tag Manager for click tracking:
Google Analytics is a web analytics tool that allows you to track and analyze user behavior on your website. And Google Tag Manager serves as an intermediary between your website and Google Analytics. It helps you set up and manage tracking tags for specific user interactions, such as clicks on buttons or links. These tags are then sent to Google Analytics to collect data.
Using Google Analytics:
Account setup: Start by creating a Google Analytics account if you don’t already have one. Within your account, you’ll set up a property for the specific website you want to track.
Tracking code: Google Analytics provides a tracking code snippet. You’ll need to add this JavaScript code to every page of your website. This code collects data on user interactions and sends it to your Google Analytics property.
Verification: After installation, you can verify that Google Analytics is correctly tracking your website’s data. It helps ensure that information is being accurately collected.
Using Google Tag Manager:
Account and container: Create a Google Tag Manager account and set up a container for your website. The container is where you manage all your tracking tags and triggers.
Container snippet: Google Tag Manager also provides a container snippet, which consists of JavaScript code. Similar to Google Analytics, you’ll add this snippet to your website, both in the <head> and <body> sections.
Tag creation: In Google Tag Manager, you create tags for specific user interactions you want to track, such as clicks on particular buttons or links.
Triggers and variables: You’ll configure triggers and variables that specify when and what data to collect. Triggers determine when a tag fires and variables collect specific data, such as the elements clicked.
Tag deployment: After setting up your tags, triggers, and variables, you’ll publish the changes in Google Tag Manager. This makes the tags live on your website.
By combining these two tools, you streamline the process of click tracking, manage the tracking codes effectively, and ensure that data is accurately collected and sent to Google Analytics for in-depth analysis of user interactions.
How to use Replug for link tracking?
Replug is a comprehensive link tracking and management platform that empowers marketers, businesses, and website owners to create, customize, and track their links for various marketing and promotional purposes. It offers a wide range of features designed to enhance link engagement, analyze user behavior, and optimize marketing strategies.
Here’s how to create a tracking link using Replug.io:
Step 1: Sign in or create an account
If you’re not already a Replug user, you can sign up for a free account, or log in to your existing Replug account.
Step 2: Choose or create a campaign
From the main dashboard, you can either select an existing campaign or create a new one. Campaigns are used to organize and group your tracking URLs.
Step 3: Enter the destination URL
Enter the destination URL that you want to track in the “URL to shorten” section, located below the “Select your campaign” option.
Step 4: Add UTM parameters
On the right side of the “URL to shorten” section, locate the “add UTM” tag and click on it.
Step 5: Select or create UTM parameters
You have the option to either select from saved UTM parameters or create a new set.
If you’re creating a new one, fill in the UTM parameters, including source, medium, campaign name, and other necessary details.
Step 6: Generate the tracking URL
After adding or selecting the UTM parameters, click the “Create” button. Replug will automatically generate a shortened version of your URL with the appended UTM parameters.
Step 7: Customize the tracking URL (optional)
If desired, you can further customize the URL by clicking the edit icon.
Step 8: Copy and update
Copy the generated tracking URL to use in your marketing materials.
Click the “Update” button to save your changes.
Step 9: Access your tracking URL
To access the newly created tracking URL and monitor its performance, follow these steps:
Go to the main dashboard.
Click on “Manage.”
Select “Replug links.”
By following these steps, you can efficiently create, customize, and manage tracking URLs using Replug, and monitor their performance through the main dashboard.
A complete link management solution
for marketing professionals & agencies.
Try Replug for free
Replug offers additional features beyond basic link tracking, such as link retargeting, A/B testing, deep linking, bio-links, link management, and more. Depending on your subscription level, you may have access to more advanced features.
Click tracking is the process of monitoring user interactions with links on a website or within marketing materials. Businesses use it to gain insights into user behavior, track the performance of marketing campaigns, and make data-driven decisions to improve their online strategies.
How does click tracking help improve marketing campaigns?
Click tracking provides valuable data on which links are being clicked, where users are coming from, and what actions they take. This data helps businesses optimize marketing efforts, understand user preferences, and refine their strategies for better results.
What tools are typically used for click tracking?
Common tools for click tracking include Google Analytics, Google Analytics, Usermaven and Replug. These platforms offer features to create, customize, and analyze tracked links.
Have you ever heard of the dark posts in your social media management journey?
Most of you haven’t heard about it until recently. Even though dark posts have been around for over a decade, it’s a concept still new to most of us.
If you’d like to get started with link management and ad-campaign tracking, head to Replug and explore our full platform.
And, if you have been paying attention to social media marketing recently, then it’s worth going deeper and figuring out how to use dark posts on social media going forward.
So let’s cut to the chase!
Origin of dark posts
The concept of dark posts was introduced by Facebook in 2012. It was later adopted by all major social media platforms, such as Twitter, LinkedIn, Pinterest, and YouTube.
The dark posts are targeted ads that are tailored toward a specific segment of the audience and these posts don’t appear on the timeline for everyone.
Moreover, the posts don’t have the sponsored post or promoted post attribution, which makes this type of post quite unique.
Advertisers and digital marketers publish dark posts across all major social media platforms mostly to A/B test the performance between dark posts and regular ads.
Example of a dark post
You already know that a dark post doesn’t appear on the page’s feed. Instead, it appears on the timeline to a select group of users.
The purpose of a dark post across all social media platforms is to target the specific audience who hasn’t followed the brand just yet.
So after understanding the concept behind this type of social media post, it wasn’t difficult to spot a dark post.
Here’s an example of a dark post on Facebook:
It seems like Intuit QuickBooks is using dark posts on Facebook to reach out to the targeted audience that has probably heard about them before but hasn’t engaged with them properly.
It was a Facebook ad that appeared on the home feed. In fact, you won’t find that very post anywhere on their Facebook page.
Why use Facebook dark posts?
Some of you might be wondering why we need to use Facebook dark posts. Well, there is a reason why a social media platform provides users with a feature – Facebook’s dark posts feature is no different.
There are a handful of reasons why you should be at least testing out this Facebook ad strategy.
Let’s take a look at some of them:
1. Precise targeting
Precise targeting is the mark of a perfect social media ad campaign. Facebook dark posts offer unparalleled precision in audience targeting, which makes them special.
Unlike regular Facebook page posts that are visible to most followers, dark posts hit the bullseye as they aren’t intended to reach everyone. Instead, they’re tailored to reach a specific group of audiences based on the given demographics, interests, and behaviors.
2. Avoid timeline clutter
Big brands and organizations run multiple Facebook ad campaigns. Since showcasing multiple ads to the same audience could be overwhelming for the audience, dark posts come to the rescue as they don’t clutter your brand’s timeline.
Moreover, dark posts remain invisible to your followers as they’re targeting the prospective audience. This way brands avoid timeline clutter by opting for Facebook dark posts.
3. Split test Facebook ads
Dark posts make split testing easier than ever. Advertisers can create multiple variations of the same ad and test them on different target audiences without overwhelming their followers.
The advertisers would learn which combination of the ad copy, ad design, and target audience works best. As a result, it would immensely refine the brand’s social media advertising strategy.
4. Optimized Ad spend
Ad spending could go out of control if you don’t know what you’re doing, especially when you’re running ads with a tight budget. One of the reasons why dark posts work is that they appear only to the intended audience.
Moreover, advertisers can optimize the ad spend by improving the targeting, behaviors, and interests of the prospective audience.
5. Tailored engagement
Every marketer dreams of getting a ton of engagement on both social media ads and organic posts. Dark posts are a great way to get traction by crafting relevant and thought-provoking ads for a specific audience.
It massively increases the relevance of your ads, making them more impactful to get the desired results.
6. Unobtrusive advertising
Dark posts make it easier for brands and experts to target a select group of audiences without bombarding the same offer to the broad audience base. This subtlety can make a lot of difference in the outcome of the Facebook ad campaign.
How does dark posting work?
Dark posting on social media platforms is not rocket science. Users can dark post on almost all major social media platforms like Facebook, Twitter, LinkedIn, and TikTok.
The way it works is quite simple. Dark posting is an advertising strategy that allows advertisers to publish ads targeting a certain segment without shoving the offer down the throats of existing followers.
Dark posts are also known as “unpublished posts” on Facebook. The reason is that such posts are used as ads only. However, Facebook provides users with an option to publish the dark post later on the page like a regular Facebook page post.
To ensure the proper publishing of a dark post, make sure you opt for the “only use this post for an ad” option while creating your Facebook ad.
We’ll dig deep into the benefits of dark posting on social media platforms later in the article. Just make sure that you have understood the fundamental idea of how dark posting works.
How to identify a dark post social media ad?
Digital marketers and online advertisers may spot a dark post from miles away. It’s essentially an ad just like any sponsored post or boosted post, but it isn’t necessarily intended for the existing customers.
Moreover, experts identify a dark post by looking at the offering as well as visiting the brand’s page to see whether or not the post exists on the timeline.
Here’s an example:
IDP Education is an education and visa consultancy service that helps students with studying abroad, admissions, and visa services.
They published a dark post on their Facebook page which wasn’t available on the Facebook page’s feed. So that’s how it was easily stood out.
Here are four ways to quickly identify a dark post on social media :
1. They don’t show up on your page’s timeline
One of the ways to identify a dark post is that it doesn’t show up on the page’s timeline. One can spot a dark post by looking through the brand’s page that whether or not the same ad is posted as a normal post. Usually, a sponsored or boosted post can be seen on the page’s timeline, but it’s not the case with dark posts.
2. They don’t appear on your followers’ feed
Just like they don’t show up on the page’s timeline, these posts don’t appear on the followers’ feeds. This is the difference between a regular ad and a dark post. A normal ad might be appearing to the current followers depending on the audience targeting, interests, and behaviors. However, the dark posts won’t do that.
3. These posts are only displayed to the targeted audience
Since dark posts don’t appear to the existing followers, these posts are used to target a specific segment of the crowd that hasn’t been following you on social media. Each brand has a buyer persona when trying to reach out to new audiences, and that’s where dark posts come in handy.
4. They are mostly discount or coupon offers
Brands, agencies, and companies use dark posts to get traction using discount offers, coupon codes, and other enticing offers. The purpose is to engage the new faces and bring them into the marketing loop. So dark posts could be used to reach new audiences by offering discounts and coupon codes.
Facebook dark post ads benefits
We’ve discussed how these types of social media ads work and how to spot these ads across different social media platforms. Let’s shed some light on the benefits that they provide to the advertisers:
1. Easier to target a specific audience
Dark posts are paid posts that don’t target your existing audience on social. In fact, these posts target the new users who haven’t followed you or your business page just yet. These posts help brands and entrepreneurs put their products and services in front of new audiences.
2. No bombardment of sponsored posts on the feed
Since dark posts don’t show up on the feeds of the existing followers, these types of posts don’t clutter followers’ home feeds with sponsored posts. Nobody wants to see the sponsored posts from the brands or experts they’re already following.
3. Test out new ad strategies without disturbing the existing followers
Dark posts provide a segue into testing out different ad strategies without making a mess. One of the fears of online advertisers is that they don’t want to disturb the existing customers or followers in any way.
For instance, offering the same product to customers who have already bought the same product would be a bad move.
4. Experiment with new content trends
Experimenting is the key to winning on social media. Don’t shy away from testing out different types of content formats, styles, patterns, and tactics.
Social media trends change over time, so it’s necessary to keep up with the new trends and capitalize on them when they’re in the trend. Dark posts could be a fantastic way to test out new content trends to see how people react to them.
5. No appearance on the timeline
One of the benefits of dark posts is that they don’t appear on the timeline of the advertiser’s page, which means the followers don’t have to see every offer the business is creating for new or unpaid customers.
The dark posts only appear to the audience it is intended to reach out to on the social media platform.
How to create dark posts on Facebook?
Dark posts are paid ads, but they don’t show up to the existing customers. If you’re curious about how to start experimenting with dark posts on Facebook, then allow me to share my two cents on the process.
Let’s head over to the few simple steps to understand how to create this type of Facebook post:
Step 1: Navigate to Ads manager
To create a dark post on Facebook, go to the Facebook Ads Manager, which serves as the central hub for managing your Facebook ads campaigns.
Now click on the drop-down menu located at the top left corner and choose the “Page Posts” option under the “Create & Manage” section.
Once you find this option, move on to the next step and carry on the rest of the process.
Step 2: Create the dark post
Find the “Create Unpublished Page Post” option at the top and click on it to initiate the creation of a new dark post.
Provide your ad details, ensuring that it reaches the right audience. Moreover, when specifying how to utilize the post, opt for “Only use this post for an ad.” Doing so ensures that the post remains hidden from public eyes and would only reach a select group of the audience.
Step 3: Select target audiences
Target audience is one of the fundamentals of any type of digital ad. Advertisers can utilize preexisting segmented ad sets if they’ve created ads previously. However, if you’re new to this, you’ll need to establish audience segments while creating a new ad.
Advertisers have the option to specify their audience’s demographics such as age, gender, location, language, behaviors, and interests to make the ad campaign more authentic and helpful.
Step 4: Check & balance on the dark post performance
It’s vital to keep a check-and-balance on the dark posts’ performance. Don’t hesitate to A/B test different ad types, formats, and styles to see which works better for your brand.
You can conduct a split test on your dark post and based on the results optimize your post accordingly. Moreover, you can modify your audience parameters as needed.
How to analyze the Facebook dark posts?
To analyze the Facebook dark posts, you would have to look at different numbers, graphs, and data. However, it’s not as tricky as it may sound like. Anyone with a little bit of Facebook ads experience can analyze the dark posts’ performance.
Here’s how to do it:
1. Compare the performance with regular ads
Start with comparing the Facebook dark posts’ performance with regular ads or sponsored posts. These regular Facebook ads would appear on the page’s timeline. Plus, they might be showing up to some of the current followers as well.
The idea is to run both types of Facebook ad campaigns and see if there is a difference in the outcome of the regular ads and dark posts. This will give you an idea of how well or badly your dark posts were performing.
2. Split-test different dark posts
Once you’re done comparing dark posts with regular Facebook ads, try split-testing the dark posts with one another. It means you’ll be running multiple dark posts on the same subject and see how they perform.
You can further analyze the winner’s dark post to see what was the differentiator that put the winner’s dark post ahead of others. Harness the power of A/B split testing by comparing different dark posts and trying to find the reasons behind this.
3. Check the ROI of the dark posts
ROI is a popular metric used in digital marketing to analyze the effectiveness of any marketing tactics or strategy. One of the ways to analyze Facebook’s dark posts is to see the return on the investment.
These are essentially paid posts on social media platforms, so there is no harm in analyzing the ROI of one type of paid post to another type of paid post.
4. Keep an eye on the niche preference
Some dark posts may outperform other dark posts from a performance standpoint. Sure, there might be technical differences, which might make the comparison irrelevant. However, there will be some cases where this won’t be an issue.
Keeping an eye on the niche preference means in some niches dark posts or advertising on social media in general would perform better than the others.
It’s necessary to figure out whether or not the dark posts make sense in this niche. Otherwise, you might end up wasting your time and money.
FAQs about dark posts
Are dark posts paid?
Yes, the dark posts are paid posts. However, they are slightly different from the regular paid posts from the targeting standpoint.
Why is it called dark post?
Dark posts are dark posts or unpublished posts because they don’t appear to the current followers. Instead, they only show up to the new audiences.
What is the difference between a dark post and an organic post?
The main difference between a dark post and an organic post is that the dark post reaches the audience through paid advertising. Whereas the organic post reaches the audience naturally through content popularity or recommendation.