Creating UTM links is a straightforward process that helps you track the effectiveness of your marketing campaigns and understand where your website traffic is coming from. UTM parameters are tags added to your URLs to provide more information about the source of a click.
Here’s a quick and effective approach to creating UTM links:
Understand UTM Parameters:
UTM parameters are tags added to the end of a URL to provide more information about the source of a click. They are essential for tracking and analyzing the performance of your campaigns, allowing you to make data-driven decisions and optimize your marketing strategies.
Here’s a breakdown of the key UTM parameters and their purposes:
utm_source:
Purpose: Identifies the specific source of the traffic, such as a website, platform, or publication.
Replug is a feature-rich link management platform that excels in simplifying UTM tracking while offering robust link management capabilities. Its versatility, customization options, and detailed analytics make it a compelling choice for marketers.
Additionally, Replug provides precise link shortening via a brilliant URL shortener free tool, efficient campaign organization, and seamless integration possibilities, making it an attractive option for businesses of all sizes.
Here’s how to add UTM codes to your URLs using Replug:
Step 1: Sign in or create an account
Begin by signing in to your Replug account. If you don’t have one yet, you can easily create a free account.
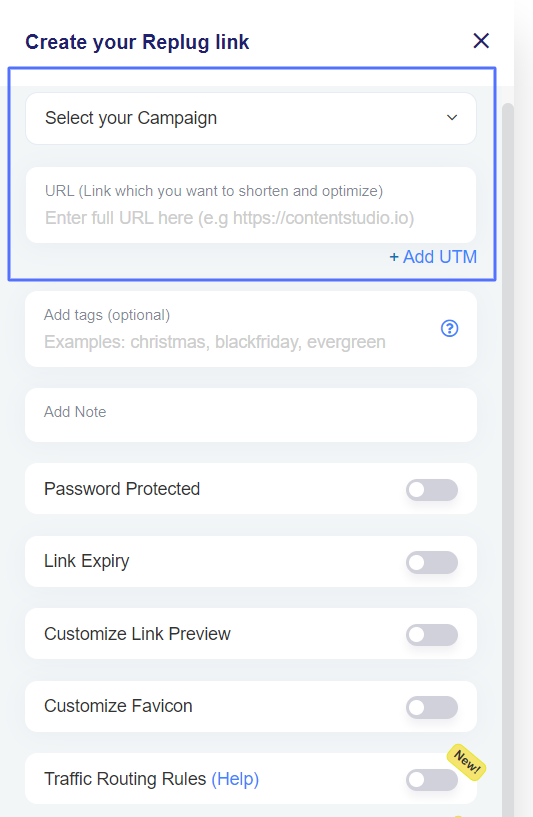
Step 2: Select your campaign
Once you’re logged in, click “Select your campaign” on the main dashboard or create a new campaign.
Step 3: Paste the URL
Locate the “URL to shorten” section below “Select your campaign”, and paste the URL to which you want to add UTM parameters.
Step 4: Add UTM tag
At the end of the “URL to shorten” section, you’ll see an “add UTM” tag. Click on it to proceed.
Step 5: Choose UTM parameters
You have the option to either “select from saved UTM parameters” if you’ve used these before or “create a new UTM parameter.”
Step 6: Fill in UTM parameters
If you decide to create a new UTM parameter, provide the necessary information such as the source, medium, campaign, term, and content. Once you’ve completed this, click “Apply.”
Step 7: Create the URL
Click the “create” button, and Replug will automatically generate a shortened URL with the added UTM parameters.
Step 8: Edit UTM code (optional)
If you wish to further customize the URL, you can do so by clicking the edit icon.
Step 9: Copy and update
After any edits (if necessary), simply copy the URL with the UTM parameters and click the “update” button to save your changes.
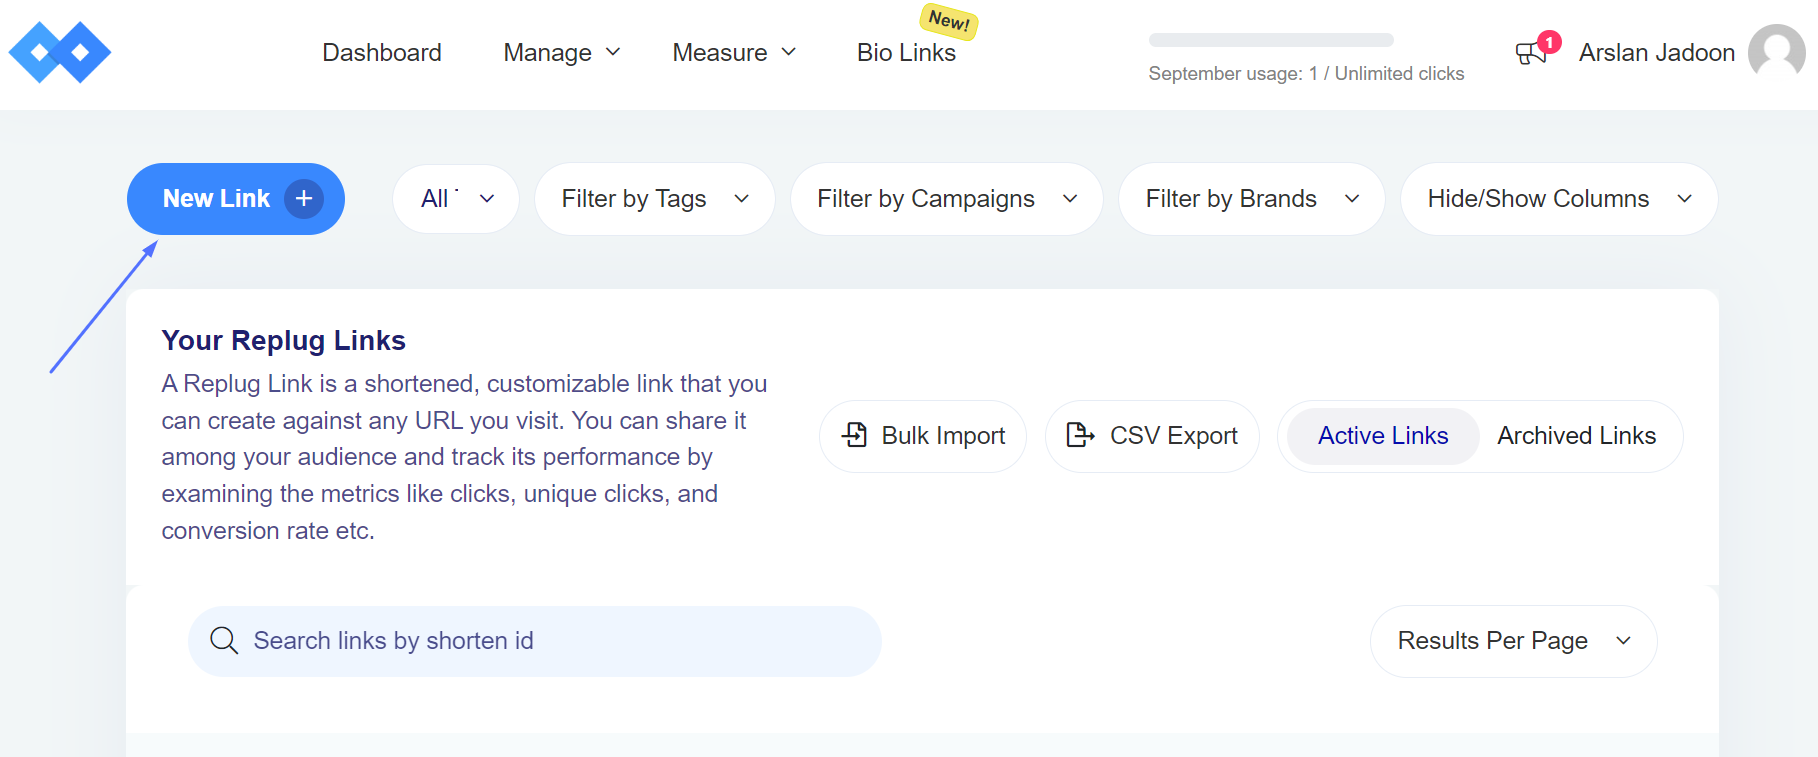
Step 10: Access your URL
To access and manage the URL you’ve just created with UTM parameters, navigate to the “Manage” section in Replug and click on “Replug links.”
By following these steps, you can harness the full potential of Replug to seamlessly integrate UTM codes into your URLs, improving the accuracy and effectiveness of your marketing campaign tracking and analysis.
A complete link management solution
for marketing professionals & agencies.
Try Replug for free
Frequently asked questions
What are UTM parameters?
UTM parameters are tags added to URLs to track the source and performance of your marketing links. They’re essential for understanding where your traffic comes from and how effective your campaigns are.
How do I create UTM links for my marketing campaigns?
Use Replug’s free online UTM builder or manually add UTM parameters to your URLs to create UTM links. For efficiency, it’s better to use a tool.
What are the common mistakes to avoid when using UTM parameters?
Avoid using spaces or special characters in your UTM parameters, and make sure they are applied consistently. Be careful with sensitive data like user information in UTM parameters.
QR codes come with more tricks than a magician’s hat. ???? A Dynamic QR code is all about redefining how you connect with information.
Usually, a QR code is printed on the packages or product boxes to access the product details specifications, or other information regarding the product.
However, the dynamic QR code is something most of you haven’t heard of before. You’ll be amazed at how these codes are changing the game for businesses, educators, and more.
So let’s dive deep into it and learn more about this specific type of QR code.
What is a dynamic QR code?
A dynamic QR code is flexible and adaptable codes can be edited, replaced, and updated after their creation. enabling real-time information updates and tracking of user interactions.
The core purpose of a QR code is to direct visitors to a specific website page or information linked to it. These codes are not your standard QR codes; they transform, adapt, and offer unparalleled tracking and customization.
How does dynamic QR code work?
Dynamic QR codes are made using specific software or online tools. Users input the content they want the QR code to show, like a website link or text. The QR code generator then produces a QR code that links to a server or database where the content is kept. You can change the content even after making the QR code.
Dynamic QR codes are responsible for showcasing the QR code analytics for tracking purposes. It also provides an option to edit or alter the destination URL or link information to the QR code. Therefore, the users don’t have to generate new QR codes in case of a change in the information, such as website URL, email address, or phone number.
Moreover, a dynamic QR code also integrates with several third-party tools and softwares to analyze the digital marketing campaign performance. So that’s why it’s important for brands and entrepreneurs to embrace the effectiveness of the dynamic QR codes.
The key steps in how dynamic QR codes work are:
Creation: A dynamic QR code is generated using a QR code generator or software. During this process, a URL (web address) pointing to the server or database is typically included in the QR code.
User Scanning: When a user scans the dynamic QR code using a smartphone or QR code reader, the app decodes the code and sends a request to the included URL.
Server Interaction: The server receives the request and dynamically generates the relevant content. This could be a webpage, text, image, or any other data.
Content Display: The server then sends the content back to the user’s device, which displays the updated information.
Tracking (Optional): Dynamic QR code systems often include tracking capabilities, allowing the QR code owner to collect data on how often the code is scanned.
Static QR code vs. dynamic QR code
Most businesses have been using static QR codes for a while without fashioning the innovation in the process. Therefore, it’s vital to discuss the core differences between a static and dynamic QR code to bring clarity to the readers’ minds.
Let’s do a side-by-side comparison of static and dynamic QR codes to give you perspective on capitalizing on this fantastic marketing and engagement opportunity:
Static QR Codes
Dynamic QR Codes
Permanent
Editable
Non-Trackable
Tackable
No Retargeting Capability
Retargeting Capability
Long Clunky URL
Short URL
Takes Time To Scan
Quick Scanning
Static QR Code
Static QR codes are permanent and cannot be edited, which is the key difference between both types of QR codes
The data linked to a static QR code remains unchanged indefinitely no matter what QR software is used to create the code
One of the factors of static QR codes is that they can’t be tracked regardless of the QR code generator
A huge perk of creating a static QR code is that it’s free to use and the users don’t need a subscription to create a QR code
Static QR codes are compatible with both Android and iOS devices
Dynamic QR Code
The biggest perk of the dynamic QR codes is that they are editable and trackable, making them ideal for businesses to alter the stored information going forward
Dynamic QR codes flawlessly redirect users to various types of information, such as website pages, videos, podcasts, and other information sources
Users can easily store rich media content like videos, images, audio, or custom webpages using dynamic QR codes
Analytics help marketers analyze the performance of their content or product. The performance of the dynamic QR codes can be tracked to analyze the campaign outcome
A dynamic QR code campaign can provide access to detailed reports, showcasing information about the total number of scans, scan locations, scan times, and the scanning device
Dynamic QR code allows users to integrate the QR code with third-party tools, such as Google Analytics, Zapier, and other SAAS products
A complete link management solution
for marketing professionals & agencies.
Try Replug for free
Examples of QR codes
QR codes are a rapidly growing trend without a doubt. Businesses of all sizes are adopting QR codes for marketing and engagement purposes.
Let’s shed some light on the diverse use cases of QR codes to understand the acceptability of this innovation:
i. Netflix: Household verification
Netflix is a popular OTT streaming service that has millions of users globally. The streaming platform recently implemented a household user verification system through QR codes.
Netflix asks the users to verify their identity to ensure that the subscription is in the same household when the user logs in on a different device or through a different internet connection.
The users are required to scan the QR code using their smartphone’s camera and then they’re redirected to the Netflix app once it’s verified.
Key takeaways:
Streamlined sign-up process, reducing friction for new users.
Enhanced user engagement and personalized recommendations for existing users.
An intuitive and convenient way to access the app’s features using a smartphone’s camera.
ii. AliExpress triggers app installations through the dynamic QR codes
AliExpress is a well-known Chinese e-commerce platform with customers across the globe.
This e-commerce giant has been using the QR code to direct the audience toward their respective mobile app store.
The iPhone users are redirected to the App Store, whereas the Android users are redirected toward the Google Play Store.
So it’s yet another use case of QR code that’s worth noticing. Brands could elicit this strategy and use the QR code to increase their mobile app downloads for more sales and engagement.
Key takeaways:
Dynamic QR codes offer a streamlined and efficient way for e-commerce platforms.
Brands could elicit this strategy and use the QR code to increase their mobile app downloads for more sales and engagement.
Use cases & uses of QR codes
Now that we have seen some popular examples of dynamic qr codes. But the story does not end there, as there are a number of ways you can use QR codes.
Let’s have a look at the use cases below where dynamic QR codes can be valuable.
i. Marketing Campaigns:
A company runs a marketing campaign with dynamic QR codes on promotional materials. Using it, they can monitor how many times the QR code is scanned, where and when scans occur, and the conversion rate to gauge the campaign’s success.
ii. Contactless Payments:
Dynamic QR codes are employed for contactless payments, where customers can scan the code to make payments at stores, restaurants, or for online purchases.
iii. Retail price updates:
Retailers can update the pricing information on their products by utilizing dynamic QR codes on price tags. This is especially useful during sales or when price changes are frequent.
iv. Inventory tracking in a warehouse:
Warehouse staff can update the QR code to indicate changes in the contents of a shelf or aisle. This allows for accurate and up-to-date inventory tracking without the need for manual record-keeping.
v. Product recalls:
If a product recall is necessary, the company can update the QR code to provide consumers with recall instructions, replacement options, or safety information. This ensures that consumers have access to the most current and critical information.
vi. Restaurant menus:
Restaurants use dynamic QR codes on printed menus to provide customers with access to digital menus. These menus can be updated in real-time to reflect daily specials, pricing changes, or new dishes.
vii. Emergency contact information:
In case of an emergency, first responders can scan the QR code to access the person’s medical history and emergency contacts. The individual can update this information as needed, ensuring accurate data is available during critical situations.
The above cases are just to name a few. These codes can be further utilized in various services departments like travel, real-estate, event management etc. These codes essential in making life easier through real-time updates and convenient processes.
When it comes to QR codes, the benefits are greater than we think. Let’s dive in further to learn about the key benefits.
Benefits of using a dynamic QR code
Dynamic QR codes have relatively broader capabilities as compared to static QR codes. No wonder top brands, marketing agencies, and social media influencers prefer dynamic QR codes for marketing and user engagement.
Let’s take a look at some of the benefits of using a dynamic QR code:
i. Easily editable
The first and foremost benefit of a dynamic QR code is that it can be edited going forward. The information attached to a dynamic QR code can be altered if needed. On the contrary, the static QR codes can’t be edited once created. The QR code is editable, which makes the dynamic QR code a clear choice for most brands and companies. It’s one of the differentiators between dynamic and static QR codes.
ii. Track performance
Static QR codes aren’t trackable, whereas dynamic QR codes can be tracked. Performance tracking makes dynamic QR codes more effective from the data and analytical standpoint. Brands and e-commerce websites use dynamic QR codes so that they can track their products’ reach, engagement, and sales.
iii. Fast processing
Dynamic QR codes are quicker when it comes to processing. The static QR codes are generally free to create. However, dynamic QR codes are available on premium plans. Therefore, it’s crystal clear that dynamic QR codes would be faster than static ones.
iv. Third-party integrations
Third-party tools integration takes any tool or service to the next level. When it comes to dynamic QR code generators, they seamlessly integrate with other tools for marketing and management. Marketers and brands may want to connect their QR codes with analytics tools to keep track of their QR codes’ performance.
v. Retargeting capability
One of the benefits of dynamic QR codes is that they can be used for retargeting the audience through ad networks such as Facebook ads and Google ads. The marketers can launch a retargeting campaign targeting the visitors who scanned the dynamic QR code and increase the likelihood of a conversion.
Add a dynamic QR code to your website using Replug
Adding a dynamic QR code to your website, landing page, or app would be a game-changer in engaging prospective customers or new visitors from a standpoint.
Since the QR code makes it easier for the visitors to access the stored information, the visitors would be able to access the URL or other information swiftly.
Replug is one of the best URL shortening and link management tools out there. You can use its free URL changer to create trackable, shortened links that enhance your campaigns with powerful analytics and seamless management.
One of the most significant features of Replug is QR code generation for the shortened URLs. Here’s how you can add a dynamic QR code to your website link using Replug:
Step 1: Log in to your Replug account
Start by logging in to your Replug account using your credentials.
Create a free account if you haven’t tried it yet. Replug has a 14-day free trial.
Step 2: Generate a short link
After logging in, the next thing you should do is to generate a short link that you want to associate with a QR code. This can be a link to your website, content, or any other online resource. Replug will automatically generate a QR code for it. You don’t need to do anything specific to initiate this process.
Maximize marketing ROI
by transforming ordinary URLs into branded short links that convert.
Try Replug for free
Step 3: Access the “Manage” section
Once a short link is created, navigate to the “Manage” section within your Replug account. Then select “Replug Links” to proceed further to get your QR code.
Step 4: Locate the link
Now locate the specific link you want to download the QR code for to proceed. To get the QR code for the short link you generated, open the settings of the short link by clicking the three-dot icon of that link.
Step 5: Download the QR code
Upon clicking on the three-dot icon, a menu would appear. Click on the option that says “download QR code.” It will prompt Replug to generate and download the QR code image associated with your chosen short link.
Once you’ve clicked on “download QR code,” the image of the QR code will be saved to your device. That will be your dynamic QR code for that specific link.
That’s it!
FAQs about QR codes
Let’s take a look at some of the commonly asked questions about QR codes:
Do dynamic QR codes expire?
The dynamic QR codes can expire depending on the rules set while creating them. The brand that creates the QR code gets to decide the expiration date of the QR code.
Can I change the URL on a dynamic QR code?
Absolutely. You can change the URL on a dynamic QR code. All you need is to go to the QR code tool, locate the respective link, and edit the QR code setting to make the required changes.
Can I reuse an old QR code?
A dynamic QR code could be reused if it’s changed, meaning the information has been altered or updated for reuse. However, the static QR code can’t be changed or reused once created.
Which QR codes never expire?
Static QR codes never expire. Similarly, these QR codes can’t be edited or changed once created. You may have to create a new one if you need to make some changes to the stored information.
What is a unique QR code?
Every QR code is unique. The QR pattern makes them different from one another. The reason why it’s necessary for a QR code to be unique is to ensure that it stores and accesses the appropriate information.
Companies in the digital age must monitor and optimize their online efforts to maximize engagement, conversions, and profitability. Click tracking is an invaluable approach that allows businesses to gain insights into the performance of their online links and marketing campaigns. This guide explores what click tracking is, where it is used, and how it can elevate your brand’s online presence. So, let’s get started.
What is click tracking?
Click tracking is a digital marketing technique that involves monitoring and recording the interactions or clicks made on links, typically hyperlinks, with the aim of gathering data and insights into user behavior and engagement.
It is commonly used in web analytics and online marketing to track the performance of various online elements, such as links in emails, websites, advertisements, or social media posts.
Click tracking is achieved by attaching a unique tracking code, which allows the tracking system to record when and where users click on the link.
How click tracking strengthens your brand: 6 key benefits
Here’s a concise breakdown of how click tracking elevates your brand with six key benefits:
Analyzing user behavior:
Click tracking helps you analyze your audience’s behavior. It answers questions about what messaging prompts them to act, which content resonates the most, and how they access your site, leading to a better user experience.
Optimizing and improving content:
By embedding trackable links, you can assess content performance, determine the type of content that engages your audience, and identify where your content performs best, enabling better content marketing strategies.
Aiding in A/B testing:
Click tracking provides essential data for A/B testing, enabling in-depth analysis of marketing efforts. It helps compare elements like CTA buttons, landing page designs, and email subject lines to find the most effective strategies.
Enhancing social media and content marketing:
Click tracking allows you to evaluate the impact of your social media strategies by tracking page views and click-throughs. It provides insights into audience demographics, helping you improve your social media marketing.
Simplifying data-driven decision-making:
Click tracking eliminates guesswork and facilitates data-driven decision-making. By reviewing precise measurements tied to your efforts, you can identify which initiatives worked well and which didn’t, leading to more informed decisions for future campaigns.
Finding and fixing website errors:
Click tracking can help proactively identify website errors, broken links, non-functional CTAs, etc. This ensures a seamless user experience, preventing potential disruptions to your customers’ journeys.
Utilizing click tracking in different areas
Click tracking is employed in various aspects of digital marketing and user experience analysis, including tracking marketing campaign performance, monitoring email engagement, and optimizing web design to enhance the user experience. It provides valuable insights for data-driven decision-making in these domains.
Link tracking for marketing campaigns:
Click tracking is instrumental in assessing the success of marketing campaigns on platforms like Facebook, LinkedIn, Instagram, and PPC. By incorporating UTM tracking codes, marketers can attribute traffic sources and campaign details.
UTM parameters, which are query strings added to URLs, help identify essential details such as traffic sources, mediums, and campaign names.
This method enables the accurate attribution of traffic, leads, and sales to various marketing campaigns, enhancing segmentation and offering insights into custom campaigns using tools like Google Analytics and Usermaven.
Email link tracking:
Many email marketing tools employ tracking pixels within email messages, allowing marketers to monitor user actions, including opens, clicks, on-site activity, and subscriber engagement.
This feature empowers marketers to discern subscriber preferences, such as content format (text or design-heavy), optimal email send times, and effective subject line formats.
It provides actionable insights for refining email marketing strategies and engagement tactics.
UX click tracking:
In addition to link tracking, UX (User Experience) click tracking offers a visual representation of user interactions on a website.
Heatmap tools like Hotjar record and visualize all user activities, such as clicks on links, images, and site elements, both above and below the fold.
Heatmaps reveal hot areas of user focus and cold areas that are often ignored, helping businesses understand user behavior and interaction patterns.
These insights guide web design improvements to enhance the overall user experience.
Click tracking can identify issues such as high bounce rates without clicks or scrolls above the fold, prompting A/B testing of design elements to enhance customer retention.
Maximize marketing ROI
by transforming ordinary URLs into branded short links that convert.
Try Replug for free
Using Google Analytics and Google Tag Manager for click tracking:
Google Analytics is a web analytics tool that allows you to track and analyze user behavior on your website. And Google Tag Manager serves as an intermediary between your website and Google Analytics. It helps you set up and manage tracking tags for specific user interactions, such as clicks on buttons or links. These tags are then sent to Google Analytics to collect data.
Using Google Analytics:
Account setup: Start by creating a Google Analytics account if you don’t already have one. Within your account, you’ll set up a property for the specific website you want to track.
Tracking code: Google Analytics provides a tracking code snippet. You’ll need to add this JavaScript code to every page of your website. This code collects data on user interactions and sends it to your Google Analytics property.
Verification: After installation, you can verify that Google Analytics is correctly tracking your website’s data. It helps ensure that information is being accurately collected.
Using Google Tag Manager:
Account and container: Create a Google Tag Manager account and set up a container for your website. The container is where you manage all your tracking tags and triggers.
Container snippet: Google Tag Manager also provides a container snippet, which consists of JavaScript code. Similar to Google Analytics, you’ll add this snippet to your website, both in the <head> and <body> sections.
Tag creation: In Google Tag Manager, you create tags for specific user interactions you want to track, such as clicks on particular buttons or links.
Triggers and variables: You’ll configure triggers and variables that specify when and what data to collect. Triggers determine when a tag fires and variables collect specific data, such as the elements clicked.
Tag deployment: After setting up your tags, triggers, and variables, you’ll publish the changes in Google Tag Manager. This makes the tags live on your website.
By combining these two tools, you streamline the process of click tracking, manage the tracking codes effectively, and ensure that data is accurately collected and sent to Google Analytics for in-depth analysis of user interactions.
How to use Replug for link tracking?
Replug is a comprehensive link tracking and management platform that empowers marketers, businesses, and website owners to create, customize, and track their links for various marketing and promotional purposes. It offers a wide range of features designed to enhance link engagement, analyze user behavior, and optimize marketing strategies.
Here’s how to create a tracking link using Replug.io:
Step 1: Sign in or create an account
If you’re not already a Replug user, you can sign up for a free account, or log in to your existing Replug account.
Step 2: Choose or create a campaign
From the main dashboard, you can either select an existing campaign or create a new one. Campaigns are used to organize and group your tracking URLs.
Step 3: Enter the destination URL
Enter the destination URL that you want to track in the “URL to shorten” section, located below the “Select your campaign” option.
Step 4: Add UTM parameters
On the right side of the “URL to shorten” section, locate the “add UTM” tag and click on it.
Step 5: Select or create UTM parameters
You have the option to either select from saved UTM parameters or create a new set.
If you’re creating a new one, fill in the UTM parameters, including source, medium, campaign name, and other necessary details.
Step 6: Generate the tracking URL
After adding or selecting the UTM parameters, click the “Create” button. Replug will automatically generate a shortened version of your URL with the appended UTM parameters.
Step 7: Customize the tracking URL (optional)
If desired, you can further customize the URL by clicking the edit icon.
Step 8: Copy and update
Copy the generated tracking URL to use in your marketing materials.
Click the “Update” button to save your changes.
Step 9: Access your tracking URL
To access the newly created tracking URL and monitor its performance, follow these steps:
Go to the main dashboard.
Click on “Manage.”
Select “Replug links.”
By following these steps, you can efficiently create, customize, and manage a tracking URL using Replug, and monitor their performance through the main dashboard.
A complete link management solution
for marketing professionals & agencies.
Try Replug for free
Replug offers additional features beyond basic link tracking, such as link retargeting, A/B testing, deep linking, bio-links, link management, and more. Depending on your subscription level, you may have access to more advanced features.
Click tracking is the process of monitoring user interactions with links on a website or within marketing materials. Businesses use it to gain insights into user behavior, track the performance of marketing campaigns, and make data-driven decisions to improve their online strategies.
How does click tracking help improve marketing campaigns?
Click tracking provides valuable data on which links are being clicked, where users are coming from, and what actions they take. This data helps businesses optimize marketing efforts, understand user preferences, and refine their strategies for better results.
What tools are typically used for click tracking?
Common tools for click tracking include Google Analytics, Google Analytics, Usermaven and Replug. These platforms offer features to create, customize, and analyze tracked links.
Have you ever heard of the dark posts in your social media management journey?
Most of you haven’t heard about it until recently. Even though dark posts have been around for over a decade, it’s a concept still new to most of us.
If you’d like to get started with link management and ad-campaign tracking, head to Replug and explore our full platform.
And, if you have been paying attention to social media marketing recently, then it’s worth going deeper and figuring out how to use dark posts on social media going forward.
So let’s cut to the chase!
Origin of dark posts
The concept of dark posts was introduced by Facebook in 2012. It was later adopted by all major social media platforms, such as Twitter, LinkedIn, Pinterest, and YouTube.
The dark posts are targeted ads that are tailored toward a specific segment of the audience and these posts don’t appear on the timeline for everyone.
Moreover, the posts don’t have the sponsored post or promoted post attribution, which makes this type of post quite unique.
Advertisers and digital marketers publish dark posts across all major social media platforms mostly to A/B test the performance between dark posts and regular ads.
Example of a dark post
You already know that a dark post doesn’t appear on the page’s feed. Instead, it appears on the timeline to a select group of users.
The purpose of a dark post across all social media platforms is to target the specific audience who hasn’t followed the brand just yet.
So after understanding the concept behind this type of social media post, it wasn’t difficult to spot a dark post.
Here’s an example of a dark post on Facebook:
It seems like Intuit QuickBooks is using dark posts on Facebook to reach out to the targeted audience that has probably heard about them before but hasn’t engaged with them properly.
It was a Facebook ad that appeared on the home feed. In fact, you won’t find that very post anywhere on their Facebook page.
Why use Facebook dark posts?
Some of you might be wondering why we need to use Facebook dark posts. Well, there is a reason why a social media platform provides users with a feature – Facebook’s dark posts feature is no different.
There are a handful of reasons why you should be at least testing out this Facebook ad strategy.
Let’s take a look at some of them:
1. Precise targeting
Precise targeting is the mark of a perfect social media ad campaign. Facebook dark posts offer unparalleled precision in audience targeting, which makes them special.
Unlike regular Facebook page posts that are visible to most followers, dark posts hit the bullseye as they aren’t intended to reach everyone. Instead, they’re tailored to reach a specific group of audiences based on the given demographics, interests, and behaviors.
2. Avoid timeline clutter
Big brands and organizations run multiple Facebook ad campaigns. Since showcasing multiple ads to the same audience could be overwhelming for the audience, dark posts come to the rescue as they don’t clutter your brand’s timeline.
Moreover, dark posts remain invisible to your followers as they’re targeting the prospective audience. This way brands avoid timeline clutter by opting for Facebook dark posts.
3. Split test Facebook ads
Dark posts make split testing easier than ever. Advertisers can create multiple variations of the same ad and test them on different target audiences without overwhelming their followers.
The advertisers would learn which combination of the ad copy, ad design, and target audience works best. As a result, it would immensely refine the brand’s social media advertising strategy.
4. Optimized Ad spend
Ad spending could go out of control if you don’t know what you’re doing, especially when you’re running ads with a tight budget. One of the reasons why dark posts work is that they appear only to the intended audience.
Moreover, advertisers can optimize the ad spend by improving the targeting, behaviors, and interests of the prospective audience.
5. Tailored engagement
Every marketer dreams of getting a ton of engagement on both social media ads and organic posts. Dark posts are a great way to get traction by crafting relevant and thought-provoking ads for a specific audience.
It massively increases the relevance of your ads, making them more impactful to get the desired results.
6. Unobtrusive advertising
Dark posts make it easier for brands and experts to target a select group of audiences without bombarding the same offer to the broad audience base. This subtlety can make a lot of difference in the outcome of the Facebook ad campaign.
How does dark posting work?
Dark posting on social media platforms is not rocket science. Users can dark post on almost all major social media platforms like Facebook, Twitter, LinkedIn, and TikTok.
The way it works is quite simple. Dark posting is an advertising strategy that allows advertisers to publish ads targeting a certain segment without shoving the offer down the throats of existing followers.
Dark posts are also known as “unpublished posts” on Facebook. The reason is that such posts are used as ads only. However, Facebook provides users with an option to publish the dark post later on the page like a regular Facebook page post.
To ensure the proper publishing of a dark post, make sure you opt for the “only use this post for an ad” option while creating your Facebook ad.
We’ll dig deep into the benefits of dark posting on social media platforms later in the article. Just make sure that you have understood the fundamental idea of how dark posting works.
How to identify a dark post social media ad?
Digital marketers and online advertisers may spot a dark post from miles away. It’s essentially an ad just like any sponsored post or boosted post, but it isn’t necessarily intended for the existing customers.
Moreover, experts identify a dark post by looking at the offering as well as visiting the brand’s page to see whether or not the post exists on the timeline.
Here’s an example:
IDP Education is an education and visa consultancy service that helps students with studying abroad, admissions, and visa services.
They published a dark post on their Facebook page which wasn’t available on the Facebook page’s feed. So that’s how it was easily stood out.
Here are four ways to quickly identify a dark post on social media :
1. They don’t show up on your page’s timeline
One of the ways to identify a dark post is that it doesn’t show up on the page’s timeline. One can spot a dark post by looking through the brand’s page that whether or not the same ad is posted as a normal post. Usually, a sponsored or boosted post can be seen on the page’s timeline, but it’s not the case with dark posts.
2. They don’t appear on your followers’ feed
Just like they don’t show up on the page’s timeline, these posts don’t appear on the followers’ feeds. This is the difference between a regular ad and a dark post. A normal ad might be appearing to the current followers depending on the audience targeting, interests, and behaviors. However, the dark posts won’t do that.
3. These posts are only displayed to the targeted audience
Since dark posts don’t appear to the existing followers, these posts are used to target a specific segment of the crowd that hasn’t been following you on social media. Each brand has a buyer persona when trying to reach out to new audiences, and that’s where dark posts come in handy.
4. They are mostly discount or coupon offers
Brands, agencies, and companies use dark posts to get traction using discount offers, coupon codes, and other enticing offers. The purpose is to engage the new faces and bring them into the marketing loop. So dark posts could be used to reach new audiences by offering discounts and coupon codes.
Facebook dark post ads benefits
We’ve discussed how these types of social media ads work and how to spot these ads across different social media platforms. Let’s shed some light on the benefits that they provide to the advertisers:
1. Easier to target a specific audience
Dark posts are paid posts that don’t target your existing audience on social. In fact, these posts target the new users who haven’t followed you or your business page just yet. These posts help brands and entrepreneurs put their products and services in front of new audiences.
2. No bombardment of sponsored posts on the feed
Since dark posts don’t show up on the feeds of the existing followers, these types of posts don’t clutter followers’ home feeds with sponsored posts. Nobody wants to see the sponsored posts from the brands or experts they’re already following.
3. Test out new ad strategies without disturbing the existing followers
Dark posts provide a segue into testing out different ad strategies without making a mess. One of the fears of online advertisers is that they don’t want to disturb the existing customers or followers in any way.
For instance, offering the same product to customers who have already bought the same product would be a bad move.
4. Experiment with new content trends
Experimenting is the key to winning on social media. Don’t shy away from testing out different types of content formats, styles, patterns, and tactics.
Social media trends change over time, so it’s necessary to keep up with the new trends and capitalize on them when they’re in the trend. Dark posts could be a fantastic way to test out new content trends to see how people react to them.
5. No appearance on the timeline
One of the benefits of dark posts is that they don’t appear on the timeline of the advertiser’s page, which means the followers don’t have to see every offer the business is creating for new or unpaid customers.
The dark posts only appear to the audience it is intended to reach out to on the social media platform.
How to create dark posts on Facebook?
Dark posts are paid ads, but they don’t show up to the existing customers. If you’re curious about how to start experimenting with dark posts on Facebook, then allow me to share my two cents on the process.
Let’s head over to the few simple steps to understand how to create this type of Facebook post:
Step 1: Navigate to Ads manager
To create a dark post on Facebook, go to the Facebook Ads Manager, which serves as the central hub for managing your Facebook ads campaigns.
Now click on the drop-down menu located at the top left corner and choose the “Page Posts” option under the “Create & Manage” section.
Once you find this option, move on to the next step and carry on the rest of the process.
Step 2: Create the dark post
Find the “Create Unpublished Page Post” option at the top and click on it to initiate the creation of a new dark post.
Provide your ad details, ensuring that it reaches the right audience. Moreover, when specifying how to utilize the post, opt for “Only use this post for an ad.” Doing so ensures that the post remains hidden from public eyes and would only reach a select group of the audience.
Step 3: Select target audiences
Target audience is one of the fundamentals of any type of digital ad. Advertisers can utilize preexisting segmented ad sets if they’ve created ads previously. However, if you’re new to this, you’ll need to establish audience segments while creating a new ad.
Advertisers have the option to specify their audience’s demographics such as age, gender, location, language, behaviors, and interests to make the ad campaign more authentic and helpful.
Step 4: Check & balance on the dark post performance
It’s vital to keep a check-and-balance on the dark posts’ performance. Don’t hesitate to A/B test different ad types, formats, and styles to see which works better for your brand.
You can conduct a split test on your dark post and based on the results optimize your post accordingly. Moreover, you can modify your audience parameters as needed.
How to analyze the Facebook dark posts?
To analyze the Facebook dark posts, you would have to look at different numbers, graphs, and data. However, it’s not as tricky as it may sound like. Anyone with a little bit of Facebook ads experience can analyze the dark posts’ performance.
Here’s how to do it:
1. Compare the performance with regular ads
Start with comparing the Facebook dark posts’ performance with regular ads or sponsored posts. These regular Facebook ads would appear on the page’s timeline. Plus, they might be showing up to some of the current followers as well.
The idea is to run both types of Facebook ad campaigns and see if there is a difference in the outcome of the regular ads and dark posts. This will give you an idea of how well or badly your dark posts were performing.
2. Split-test different dark posts
Once you’re done comparing dark posts with regular Facebook ads, try split-testing the dark posts with one another. It means you’ll be running multiple dark posts on the same subject and see how they perform.
You can further analyze the winner’s dark post to see what was the differentiator that put the winner’s dark post ahead of others. Harness the power of A/B split testing by comparing different dark posts and trying to find the reasons behind this.
3. Check the ROI of the dark posts
ROI is a popular metric used in digital marketing to analyze the effectiveness of any marketing tactics or strategy. One of the ways to analyze Facebook’s dark posts is to see the return on the investment.
These are essentially paid posts on social media platforms, so there is no harm in analyzing the ROI of one type of paid post to another type of paid post.
4. Keep an eye on the niche preference
Some dark posts may outperform other dark posts from a performance standpoint. Sure, there might be technical differences, which might make the comparison irrelevant. However, there will be some cases where this won’t be an issue.
Keeping an eye on the niche preference means in some niches dark posts or advertising on social media in general would perform better than the others.
It’s necessary to figure out whether or not the dark posts make sense in this niche. Otherwise, you might end up wasting your time and money.
FAQs about dark posts
Are dark posts paid?
Yes, the dark posts are paid posts. However, they are slightly different from the regular paid posts from the targeting standpoint.
Why is it called dark post?
Dark posts are dark posts or unpublished posts because they don’t appear to the current followers. Instead, they only show up to the new audiences.
What is the difference between a dark post and an organic post?
The main difference between a dark post and an organic post is that the dark post reaches the audience through paid advertising. Whereas the organic post reaches the audience naturally through content popularity or recommendation.
Ever felt frustrated by Instagram’s link limit? You’re not alone! While Instagram now allows up to five links in your bio, that might not be enough if you have multiple websites, social media accounts, or affiliate links to share.
That’s where Replug comes in. It lets you create a single, sleek bio link page where you can add unlimited links, making it easier for your audience to find everything in one place.
Let’s dive into how you can set up multiple links in your Instagram bio using this top-notch URL shortener!
Why add a Replug link to your Instagram bio?
Before we discuss the how, let’s know the why.
Why should you even consider integrating a Replug link into your Instagram bio?
Beyond the obvious advantage of offering an in-depth view of your presence, here are some compelling reasons:
Boost your follower base: Direct your Instagram followers to explore your other platforms, encouraging them to follow you on those as well. You can also add links to your Instagram in the bios of your other accounts to drive cross-platform engagement and get leads from social media.
Monetize your audience: Replug helps you turn Instagram followers into customers by linking to your e-commerce store, Etsy shop, or other products. Direct users to your purchasable content, turning your followers into potential buyers and boosting sales for Instagram business accounts.
Monitor analytics: Replug provides insights into user engagement, tracking clicks, views, and click-through rates (CTR). For influencers, this data is essential for refining your content strategy, helping you optimize performance and improve audience engagement across platforms.
Offline connection: Share your Instagram QR code with followers to connect them to your other platforms. Whether it’s for a restaurant menu or event info, the offline-to-online connection creates an easy way for users to engage with your content anytime, anywhere.
Customizable landing pages: Build a personalized landing page with Replug that reflects your brand’s style and identity. Customize everything from layout to colors to create an on-brand experience for your audience.
Unlimited links: Replug allows you to share an unlimited number of links through its bio link feature. From your website and blog posts to products and affiliate content, it gives you a simple place to drive traffic and keep your audience engaged.
Retargeting pixel support: Improve your ad campaigns with retargeting by tracking visitors who clicked your links. This feature helps you stay connected with your audience and drive conversions by reaching users who have shown interest.
Mobile-friendly and fast: Replug ensures that your landing pages and links work seamlessly on all devices, offering a fast and smooth experience for users accessing your content from smartphones, tablets, or desktops.
Step 2: Access the “bio links” feature on the Replug dashboard.
Step 3: Click the “New Bio Link” button to create a new bio link specifically for your Instagram bio.
Step 4: Personalize your bio profile to your heart’s content. With Replug, you can add a profile picture, profile title, bio description, and even a verification badge!
Now comes the creative and fun part. You choose from stunning pre-designed templates or create your own. You can also customize colours, select from button styles, and customize colours.
Step 5: Now customize the content you want on your bio link landing page. You can choose from multiple blocks, including social, links, RSS, video, card, and text. This is a great way to add all your links inside a single and clean landing page. It prevents your bio from looking cluttered and messy because of multiple links.
Step6: The final step is to customize SEO and social media preview. Here, you’ll have the option to add your custom meta title, description, custom favicon image, and retargeting pixel to improve the link presence in search engines and social media channels.
Step 7: Customize your bio link slug for a personalized touch.
Step 8: Update your bio link and preview it for final touches.
Step 9: Go back to your bio link dashboard. You will now see that your bio link has been generated and is live.
You can now copy your bio link URL, view your bio link analytics, download the QR for easy sharing, edit your bio link if required, or delete it permanently.
Add bio link URL to Instagram bio:
Step 1: Copy your bio link URL from Replug.
Step 2: Open Instagram on your mobile and tap your profile icon in the bottom right corner.
Step 3: Tap on the edit profile button on your profile page.
Step 4: Now, you will see the add link section on your mobile screen. Tap on it.
Step 5: Tap the add external link section to add your website address.
Step 6: Paste the bio link URL in the URL section and add a title in the title section.
Step 7: Your link in the bio will now appear in your profile.
Step 8: Your Instagram profile now has multiple links in the bio. The bio link URL is now clickable. Here’s what the landing page looks like in our example:
Adding multiple links to your Instagram bio can enhance your profile’s functionality and engagement. By using services like Replug and following the steps mentioned earlier, you can efficiently manage and share multiple links within your Instagram bio.
Keep your audience informed and connected with your content. Explore the possibilities and make the most of your Instagram presence!
Every day, billions of web requests zoom through our networks, yet just one misguided click can bypass thousands of dollars of cybersecurity investment.
Without adequate controls, employees or users might land on malicious or irrelevant sites. It’s more than just annoying; it can cost both time and expose your systems.
In fact, 96% of large organizations today block at least one type of website to mitigate risk and maintain productivity.
The solution? Intelligent and automated URL filtering: The perfect way to stay in control of what’s accessed, when, and by whom.
Ready to see exactly how this works? Let’s jump in and explore what’s happening behind the scenes.
What is URL filtering?
URL filtering is a security and access-control technique where an organization decides which websites users can visit and which ones get blocked. Every time someone requests a URL, the system checks it against a database of categories and reputations, then applies your rules to either allow or deny access.
It’s the mechanism behind why employees can reach approved tools but can’t open a streaming site or a known phishing page from the same network.
What is a URL?
A URL (Uniform Resource Locator) is basically the web address, like https://www.example.com/page. Think of it as the exact address for a webpage or online resource.
How is URL filtering different from Web filtering and DNS filtering?
These three terms get used a lot interchangeably, but they’re not the same thing. Here’s how they actually differ:
URL filtering works at the page level. It checks the full web address, including the path (e.g., /blog/post).
DNS filtering works earlier in the process, at the domain lookup stage, before a connection is even made. It blocks or allows entire domains (like example.com), with no ability to allow some pages while blocking others.
Web filtering is the umbrella term that covers both, plus more. It can include content scanning, file inspection, IP blocking, and other techniques. URL filtering and DNS filtering are both types of web filtering.
In short, DNS filtering is fast and wide; URL filtering is precise and granular; web filtering is the full picture.
How does URL filtering work?
It might seem like blocking a website is as simple as clicking “block,” but behind the scenes, there’s a clear workflow that keeps the process both accurate and efficient.
Let’s walk through the three main steps: URL comparison, policy enforcement, and database & caching.
Step #1: URL comparison
When a user tries to access a webpage, the system takes the exact URL (think www.example.com/page) and checks it against a list of known categories and reputations.
It determines whether that URL is flagged as malicious, non-productive, allowed, or needs review. The check can happen in real-time, even before the full page loads.
Step #2: Policy enforcement
After comparison, the system applies defined rules:
maybe URLs in “social media” are blocked after 3 pm,
“streaming” is allowed only for certain teams, and
all “phishing-risk” sites are blocked entirely.
If the URL is allowed, the user proceeds as usual. However, if not, they might get a block page or a “proceed with caution” warning.
Note: Policies can be user-specific, group-based, time-based, or device/location-based for extra granularity.
Step #3: Database & caching
To keep things fast and up to date, the filtering system uses a database (cloud-based or local) containing URL categories and reputations.
To reduce delay, popular or recently used URLs are stored in a cache, so future checks happen faster. And when the system encounters a URL not in its local list, it may query the cloud service to retrieve the category and reputation, then store the result locally for next time.
In short, it’s a loop of “see URL → check it → apply policy → allow or block,” backed by smart lookups and caching to keep things smooth.
Why is URL filtering important?
Here’s why URL filtering isn’t just a nice-to-have, but a real business essential:
Better security: Blocking access to known malicious or risky web addresses helps stop everything from phishing attempts to ransomware or drive-by downloads. Studies show this is a key reason companies adopt filtering.
Higher productivity: Filtering helps cut down on those sneaky distractions (social media, streaming, endless browsing), which means people spend more time doing work and less time sneaking off.
Bandwidth optimization: When the network isn’t choked with large downloads, videos, or non-essential traffic, you free up bandwidth for mission-critical tasks like video calls, cloud apps, and collaboration tools.
More vigorous policy enforcement: Having clearly defined rules about what can and cannot be accessed helps you enforce your acceptable-use policy, reduce risks, and stay consistent across users and devices.
Coverage for endpoints everywhere: Whether someone is in the office, working from home, on a laptop or mobile device, URL filtering can protect those endpoints too. This ensures remote or mobile users follow the same web-access rules.
Why standalone URL filtering is not enough
URL filtering is a powerful tool, but relying on it alone leaves real gaps in your security posture.
Here are the key reasons why it falls short on its own:
No visibility into encrypted traffic: Most web traffic today runs over HTTPS. Without SSL inspection built into a broader security stack, threats hiding inside encrypted connections simply pass through undetected.
Zero-day threats slip through: URL filtering works off known databases. A brand new malicious domain that has not yet been flagged or categorized will not get blocked, leaving users exposed until the database catches up.
No sandboxing or behavioral analysis: Advanced threats often do not announce themselves. Without sandboxing capabilities to detonate and analyze suspicious content, standalone URL filtering has no way to catch what it cannot already recognize.
Evasion is easier than it looks: Attackers regularly rotate domains, use URL shorteners, or embed malicious content within otherwise clean pages. These tactics are specifically designed to bypass simple category-based filtering.
No coordination with other security layers: A phishing attempt might be caught by an intrusion prevention system or a sandbox, but if your URL filter is not integrated with those tools, it cannot act on that intelligence or close the loop.
Types of security threats addressed by URL filtering
URL filtering addresses far more than just productivity concerns. It actively protects organizations from a range of serious web-based security threats.
Malware: Cybercriminals frequently use websites to distribute malicious software through drive-by downloads, infected files, or exploit kits. URL filtering blocks access to known malware-hosting sites before anything reaches the user’s device.
Phishing attacks:Phishing relies on tricking users into visiting fake pages that mimic legitimate ones to harvest credentials or install malware. URL filtering identifies and blocks these deceptive URLs before the user even lands on the page.
Ransomware delivery: Many ransomware attacks begin with a malicious URL in an email, a chat message, or a compromised ad. URL filtering cuts off this delivery route by blocking access to known ransomware distribution sites.
Inappropriate and harmful content: URL filtering also blocks content that creates legal, compliance, or reputational risks, including adult content, hate speech, and gambling sites that have no place in a professional or educational environment.
Data leakage: Unauthorized file sharing platforms and unsanctioned cloud storage services are a quiet but serious risk. URL filtering blocks access to these destinations, reducing the chances of sensitive data leaving the organization through the web.
Additional URL filtering vital features & capabilities
When you dig a bit deeper into modern URL filtering, you’ll find it offers much more than simple allow/block lists. These extra capabilities give you stronger control, better insight, and more thoughtful decision-making.
Here are the key features:
Granular control
Instead of “everyone sees the same web,” you get the power to set rules for particular groups: by user role, device type, location, or time of day. This means HR might have different access than Sales, for example.
Customizable policies
You’re not stuck with a one-size-fits-all policy. You can carve out custom rules, maybe allow a site for a project team, restrict a sub-page of a domain, or create exceptions.
Real-time threat intelligence
Because threats evolve quickly, modern filtering tools integrate with live feeds and reputation services to spot newly malicious URLs and apply policy without waiting for manual updates.
Reporting & monitoring
You get dashboards and logs showing which sites are being accessed, which were blocked, by whom, and when. That way, you’re not just enforcing rules, you’re tracking what happens and adjusting accordingly.
SSL inspection
Since so much of the web is encrypted (HTTPS), good URL filtering solutions also inspect encrypted traffic (after decryption) so hidden threats inside secure connections don’t slip through.
Bandwidth quota & duration
It’s not just simple blocking or allowing, you can also set limits like “this category gets 500 MB per day” or “only 2 hours of access after work hours” so you manage resources and usage more smartly.
Multiple action options
Rather than a strict yes/no, you get variations: show a warning (“caution”), let a user ask for override permission, or apply a softer block for certain categories. This gives flexibility without losing control.
Best URL filtering examples
Here are five strong examples of how companies and institutions have applied it, and what they gained.
Example 1: Large manufacturer improves accuracy and productivity
A global manufacturing firm deployed a hybrid web-filtering solution (including URL filtering) via Blue Coat and its intelligence network. They reported over 90% accuracy in URL classification, reduced help-desk complaints about latency, and cut their URL blacklist-maintenance costs by 90%.
Example 2: Educational district boosts compliance and performance
In Texas, Pearland ISD rolled out next-gen firewalls with URL filtering and other protections. They saw stronger compliance with the Children’s Internet Protection Act (CIPA) and improved network performance for both staff and students.
Example 3: Survey shows broad industry use and productivity gains
A survey of 645 organizations across North America & Europe found 89% have web filters (including URL filtering) in place. 96% of large enterprises block at least one web service. Among companies that don’t filter, 26% estimated staff spent 7+ hours/week on non-work sites, after filtering, that dropped to 18%.
Integrating URL filtering with other security tools
URL filtering works best when it is not operating in isolation. Pairing it with the right security solutions creates a layered defense that is significantly harder to bypass than any single tool on its own.
Next Generation Firewalls (NGFW): NGFWs control traffic at the network level. Combined with URL filtering, suspicious traffic gets flagged at both the network boundary and the webpage level, closing gaps that either tool would leave on its own.
Intrusion Prevention Systems (IPS): An IPS handles threats already inside the network while URL filtering stops users from reaching dangerous destinations in the first place. Together, they cover both ends of the threat spectrum.
Browser Security: Browser-level security protects users at the point where most web threats land. Layered with URL filtering, it adds extra protection against malware and credential theft, especially for remote workers outside the core network perimeter.
Cloud-Based Security Platforms: For distributed and hybrid teams, cloud-based platforms bring URL filtering and other protections together under one roof, ensuring consistent policy enforcement regardless of where users are working or what device they are on.
Wrapping Up
URL filtering is one of those tools that works quietly in the background until the day it stops a phishing attack and suddenly everyone’s glad it was there.
It gives organizations real control over web access, improves security, keeps productivity on track, and helps meet compliance requirements without constant manual oversight. Pair it with the right security stack, and it becomes one of the most reliable layers in your defense strategy.
If you’re looking for a reliable way to manage and monitor links, give Replug a try. It’s not just a top-notch custom URL shortener for generating short URLs, but it also helps businesses with URL filtering and smarter link management!
Frequently Asked Questions
What are URL filtering test pages?
URL filtering test pages are safe, purpose-built web pages used to verify that a URL filtering solution is working correctly. They are designed to trigger a block response without posing any real threat, so IT teams can confirm that their filtering policies are active and behaving as expected.
What is checkpoint URL filtering?
Check Point URL filtering is a security capability built into Check Point’s network security gateways and Harmony SASE solution. It provides real-time protection against malicious websites, blocks phishing and malware delivery URLs, and allows administrators to set granular access policies by user, group, or device.
What are the default elements for URL filtering?
The typical default elements include:
– a database of known URL categories and reputations, – pre-defined allow/deny lists by category, and – a mechanism to apply these rules automatically to user requests.
Also, default block pages or notifications often come configured, so users see a message when access is denied.
What is URL filtering customization?
URL filtering customization means tailoring the filtering rules to your business’s specific needs:
– Selecting which URL categories apply, – Setting different rules for user groups or devices, – Creating exceptions, and – Adjusting actions (block, warn, allow).
This helps ensure filtering is both effective and practical for your users.
Have you ever shared an interesting post, recommended a funny video, or perhaps even critiqued an article that missed the mark? We’ve all been there.
However, what you may not realize is that the way you share these online treasures can have a significant impact on your brand identity.
If you’ve been using plain, generic short links to share content, it’s time to take a closer look. By doing so, you may unknowingly promote other brands instead of your own.
We’ll get straight to the point and discuss the difference between branded links vs. short links inside this blog. We’ll help you understand the implications of your choice and how it can affect your brand’s online presence.
So, let’s get straight to it!
What is a short link?
A short link, also known as a “short URL” or a “generic short link”, uses a public domain from a third-party service to compress a long version of a web address or URL.
Short links are created to simplify lengthy URLs, making them easier to share, remember, and use. They play a key role, especially in contexts where character limits are a concern, such as social media or printed materials.
Generic short links typically redirect users to the original, longer URL when clicked.
Check out this example of a short link:
👉 Example: bit.ly/3XyZ9aL
This type of link uses a generic shortening domain and a random string of characters. It’s quick to create and works across any platform, but doesn’t reflect your brand identity.
What makes short links so practical & powerful
Higher click-through rates (CTRs): Short links are clean, simple, and visually appealing, encouraging users to click more often compared to long, cluttered URLs.
Enhanced recognition: Even generic short links can reflect consistency and professionalism, helping users associate your content with reliability and trust.
Data-driven insights: These links provide measurable analytics, such as click counts, location, and device type, enabling you to optimize your campaigns with actionable data.
Seamless user experience: Shortened links load quickly, look better across platforms, and make sharing effortless, improving the overall experience for your audience.
Major use cases for short links
SMS marketing: Short links save character space in text messages while tracking engagement, making them perfect for concise, measurable mobile campaigns.
Social media: Generic short links appear clean, fit better within character limits, and enable consistent tracking across platforms like X, Instagram, and LinkedIn.
Email campaigns: Using short links keeps your emails neat and improves click tracking, helping marketers measure the effectiveness of each link more accurately.
QR codes: Short links integrate seamlessly with QR codes, ensuring faster scans, shorter URLs, and flexible tracking of offline-to-online traffic.
Organic sharing: These links make content easier to share across blogs, forums, and emails, increasing reach without cluttering the message.
Offline marketing materials: Placing short links on posters, flyers, or packaging makes it easy for users to type or scan, bridging the gap between offline and online engagement.
Customer support & feedback: Support teams use such links to quickly direct users to FAQs, surveys, or troubleshooting pages without confusing them with long URLs.
A branded link, also known as a “custom short link” or a “vanity URL”, is a type of shortened URL that includes a brand’s or organization’s name or a custom keyword as part of the link.
Unlike generic short links that use a random combination of characters and numbers, branded links are customized to reflect the brand’s identity, making them more recognizable and trustworthy to users.
3 key elements of a branded link are:
Domain – The custom name that represents your brand (e.g., go.yourbrand.com), helping build recognition and trust.
TLD (top-level domain) – The extension that follows the domain (e.g., .com, .io, .link), which can be chosen to align with your brand’s identity or industry.
URL slug – The customizable part after the slash (e.g., /summer-sale), used to describe the content or campaign clearly and memorably.
Example of a branded link:
👉 Example: go.yourbrand.com/offer
A branded link uses a custom domain (e.g., go.yourbrand.com, link.apple.com, etc.). It reinforces brand recognition, looks more trustworthy, and still provides all the tracking and analytics benefits of a short link.
What makes branded links so practical & powerful
Stronger brand identity: Branded links carry your custom domain, reinforcing your brand’s identity every time someone shares or clicks your link.
Increased trust & credibility: Users are more likely to click links that clearly display a recognizable brand name, making them appear legitimate and secure.
Easy to remember & share: Simple, descriptive branded links are easier to recall and share, helping your campaigns gain more organic traction.
Enhanced brand awareness: Every branded link acts as a micro touchpoint, spreading your brand name across social media, email, and digital channels.
Actionable insights & control: You can track clicks, sources, and audience behavior in detail, allowing you to optimize your campaigns with data-driven precision.
Clean & consistent link appearance: Branded links look professional and tidy across all platforms, maintaining consistency in tone and presentation.
Improved SEO & discoverability: Descriptive, keyword-rich branded links can enhance search visibility, helping both users and search engines better understand your content.
Major use cases for branded links
Marketing campaigns: Use branded links to track and analyze engagement across multiple campaigns, improving ROI measurement.
Social media marketing: Create short, on-brand links for platforms like X, Instagram, and LinkedIn to increase clicks and maintain brand consistency.
Affiliate marketing: Provide affiliates with custom-branded URLs to ensure trust, improve conversions, and monitor performance.
Email marketing: Include branded links in newsletters or promotional emails to increase click-through rates and minimize the risk of being filtered as spam.
Influencer collaborations: Give influencers branded links to share, securing brand visibility and accurate tracking of their impact.
Paid advertising: Use branded short links in PPC ads or sponsored content to make URLs look cleaner and more credible.
Event promotion: Share memorable branded links for event registrations, webinars, or launches to simplify access and tracking.
Offline & print media: Utilize branded URLs in flyers, posters, or business cards for easy recall and consistent branding.
Product launches or updates: Direct audiences to specific landing pages for new products or announcements with clear, branded links.
Branded links offer several advantages, particularly in strengthening your brand identity and enhancing user trust. They are valuable for businesses and individuals seeking to establish a cohesive online presence and improve user engagement.
Short links, on the other hand, are helpful in cases where you need a precise link to share with friends or family members, without worrying about online presence.
Feature
Branded Links
Short Links
Domain
Uses a custom, brand-specific domain (e.g., brand.co/link).
Uses a third-party domain (e.g., bit.ly, tinyurl.com).
Branding
Reinforces brand visibility and consistency in every link.
Offers no brand identity or recognition.
Credibility & Trust
Instantly recognizable and trusted due to brand association.
It may appear suspicious or spammy to users.
Click-Through Rate
Higher CTR because branded links look professional and secure.
Typically lower, as users hesitate to click on unfamiliar links.
Use Case
Ideal for marketing, promotions, and professional brand communication.
Suitable for quick personal sharing or temporary links.
Best For
Businesses, marketers, and organizations focused on brand growth and analytics.
Individuals or small-scale, non-branded usage.
The choice depends on your priorities
The choice between branded links and short links eventually depends on your specific goals and the context in which you plan to use them.
Branded links: If strengthening your brand identity, increasing trust, and improving user recognition are important to you, branded links are an excellent choice. They excel in marketing campaigns and content sharing where branding matters.
Short links: If brevity and saving space are crucial, short links are suitable. They are especially dominant in platforms with character constraints. They also make shared URLs look easier to remember, improving overall user experience.
How to create a branded short link using Replug
Are you ready to start using branded links for your own brand? Replug, a powerful free link shortener and branding tool, simplifies the process of creating custom, branded short links.
Let’s walk through the steps to create these links and amplify your brand’s reach.
Step 1: Add your custom domain
The first step in creating branded links with Replug.io is to incorporate your custom domain.
While Replug provides a default shortener domain (rplg.co), using your custom domain strengthens your brand identity and reputation.
Open your Replug dashboard and navigate to “Settings.” Then select “Custom Domains” from the dropdown menu.
Click on “Add Domain” to begin setting up your custom short URL.
On the next screen, provide the essential details, including your custom domain and settings such as the 404 redirect URL and branded domain.
Click “Connect” to add your custom domain to your Replug account.
After successfully connecting your custom domain, you can manage it within your Replug account. Check connectivity status, edit domain settings, or delete domains as needed.
With your custom domain integrated into Replug, you’re now ready to create your custom-branded link. Here’s how:
Paste your long URL in the bar under “Quickly shorten your link”.
Next, click on the blue arrow. Replug will automatically generate a short link for your long URL.
You can rename the link easily. All you need to do is change the slug of your short link.
Finally, save your shortened link. Now your link is ready to share anywhere on Instagram, Discord, or in an email campaign.
Note: You can add some amazing Replug features to your generated link, like customizing your link preview, adding custom favicons, A/B test your links, and more! You can also add retargeting pixels or custom CTAs to your link-shortening campaigns.
Leading brands & businesses prefer branded short links
Let’s take a look at how some of the most popular brands use branded links to their advantage:
The New York Times – nyti.ms
The renowned newspaper, “The New York Times”, simplifies sharing long article URLs on social media and beyond by using the branded link nyti.ms. This branded link not only shortens the URL but also reinforces the brand’s identity with every click.
Nike – swoo.sh
When it comes to sports and lifestyle, Nike is a standout name. They utilize the branded link swoo.sh to create a memorable link for their products and promotions. This reinforces the Nike brand with every shared link.
Amazon – amzn.to
E-commerce giant “Amazon” opts for the branded link amzn.to, to shorten product URLs. This not only saves space in printed materials but also keeps the focus on their products rather than the URL itself.
Coca-Cola – cokeurl.com
Coca-Cola, a global beverage icon, maintains brand consistency by using branded links, such as cokeurl.com. This approach guarantees that every link shared aligns with their brand image.
Starbucks – sbux.co
Starbucks is a renowned global coffee chain that utilizes branded links with the domain sbux.co to simplify the sharing of promotional content. This reinforces their brand identity and keeps their links looking clean and professional.
Conclusion
At the end of the day, the choice between branded links and generic short links comes down to your goals.
Short links are ideal when you need something quick, simple, and space-saving. But if you want to strengthen brand identity, build trust, and boost engagement, branded links clearly stand out. That’s why brands like Nike, Amazon, and Starbucks rely on them.
It’s not just about shortening a URL, it’s about making every click count.
With tools like Replug, you don’t have to choose between convenience and branding; you can get both. Whether you’re sharing on social media, in emails, or even offline, branded links let you stay consistent, professional, and memorable.
So instead of sending traffic through someone else’s domain, take control of your links and make them work harder for your brand.
Frequently asked questions
Why should I consider using branded links for my brand or business?
Branded links, which use your custom domain (e.g., yourbrand.ly/link), enhance brand visibility and recognition with every share, fostering customer loyalty. They improve click-through rates by up to 34% compared to generic links, as they appear more professional and trustworthy. Additionally, they protect against link hijacking and provide valuable analytics to refine marketing strategies.
Are branded links more trustworthy than short links?
Yes, branded links are generally more trustworthy because they incorporate your recognizable domain, signaling legitimacy and reducing user hesitation from unknown shorteners. Studies show they can boost trust by 25-30%, minimizing phishing concerns. In contrast, generic short links often hide the destination, potentially alarming users in an era of heightened cybersecurity awareness.
Can I track the performance of branded links?
Absolutely, most branded link services, such as Replug or Rebrandly, offer rich analytics, including click counts, geographic data, referral sources, and device types. This enables real-time monitoring and A/B testing to optimize campaigns for maximum effectiveness. Integration with tools like Google Analytics further enhances tracking, providing insights into user behavior and ROI.
Why should short links be a part of every marketer’s strategy?
Short links condense lengthy URLs, making them ideal for character-limited platforms like X (Twitter) and improving shareability across social media. They enable precise tracking of engagement metrics, helping marketers measure campaign effectiveness and audience preferences. Moreover, they enhance aesthetics in emails and ads, potentially increasing click rates by 20-40% while supporting retargeting efforts.
When to use short links and branded links?
Use generic short links for quick, internal, or low-stakes sharing where branding isn’t crucial, such as casual social posts or temporary redirects. Opt for branded links in marketing campaigns, email newsletters, or affiliate programs to reinforce brand identity and build trust. Branded links excel in professional contexts, such as ads or content syndication, while short links are sufficient for everyday use.
Provide some valuable tips when using short links?
When using short links:
– Make sure they’re concise yet recognizable to build trust, avoiding overly cryptic formats. – Maintain consistency across your organization by using a unified link structure or platform to reinforce branding and simplify tracking. – Incorporate UTM parameters in destination URLs to effectively monitor traffic sources and campaign performance in analytics tools.
No, it’s not measuring how many people fall asleep on their keyboards while reading your blog.
Although, if that were a metric, some of us would be setting records!
We get it; creating engaging content in 2026 can be a real challenge.
But worry not!
We’ve put together a practical guide with tips and tricks to help you out. Let’s get started.
What is content engagement?
The term “content engagement” describes a level at which a person is interested in and involved with a specific content. This interaction can take various forms, such as:
Engaging content builds trust and credibility, enhances visibility, and drives conversions. Moreover, it provides valuable feedback for content improvement and fosters long-term relationships with your audience.
To make that process easier, from branding to tracking link performance, many content creators rely on Replug.io as their go-to solution for professional link management and optimization.
Steps to create engaging content
Step 1: Understand your audience – The secret key
Before you put pen to paper, you need to get inside the minds of your readers. What are their pain points?
What keeps them up at night?
Tailoring your content to their needs and desires is the first step to engagement.
Step 2: Craft a catchy headline – Reel ’em in
Your headline is the first thing people see.
Make it count!
All the best headlines have the following qualities:
Emotionally compelling
Problems, questions, and curiosities
Relevant keywords
Perfect length
Clear and specific
Without a catchy headline, your content won’t get a chance to engage readers. So craft headlines that stop readers and compel them to click through. Creating engaging challenges as part of your strategy can motivate readers to interact and participate, enhancing their overall experience with your content.
Step 3: The storytelling magic
Stories connect with people. They remind us that we are more alike than we tend to think. That’s why storytelling is one of the most popular writing methods among marketers.
Some of the stories you can tell:
Success stories
Case studies
Showcase your brand’s values
Your challenging beginnings
Choosing to take chances
Remember, great storytelling combines high-quality content, using real-life stories and testimonials from customers and employees.
Nobody has time for long, dense paragraphs. Format your content for easy scanning, making it accessible and engaging. Lists, for example, are shared more frequently than other types of content.
Try Adding:
Contests
Quizzes
Assessments
Infographics
Learning doesn’t have to be boring or monotonous. It can be a thrilling adventure that keeps you hooked and wanting more.
Step 5: Add some personality – Don’t be a robot
Readers can easily spot when something feels forced or insincere. Try adding some personality.
Whether you’re writing a blog post, an article, or even a social media caption.
Let your true self shine through.
Write as you talk
Be Relatable and Trendy
Use a “behind the curtains” approach
Build suspense
Use User-Generated Content
Be witty or humorous
We know adopting a more formal or generic tone when writing is easy. But when you add relatable content, it builds trust with your readers and also keeps them coming back for more.
Step 6: Power of visuals
Gone are the days when plain text alone could captivate an audience. In this age of “pics or it didn’t happen,” visual content is a must.
A well-designed image or video can instantly capture the viewer’s interest. Stats showed that
Video content generates 1200% more shares than text content.
Infographics are shared 300% more often than text-only articles.
Images are shared 94% more often than text-only articles.
This content format is highly suitable for sharing on social media platforms as it allows for compelling storytelling and visual representation of events.
Step 7: Guide your readers with CTA’s
Every piece of content should have a purpose. So craft compelling CTA’s (calls to action) that guide your readers toward the desired action, whether subscribing, sharing, or purchasing.
Boost your conversion rates with irresistable CTAs with
Some of the evergreen brand-friendly CTA’s include:
Learn more
Sign me up
Get for free
Shop now
Let’s do this
Check now
Try now
Create benefit-oriented CTAs for your websites and multiply your conversion rate and lead generation.
Step 8: Optimize your content
Increase your credibility with potential readers by making it easy for them to find the information they want in your content.
Some tips to optimize your content
Target long-tail keywords
Use key phrases with less competition to rank better
Matching the search intent of a search query
Adding an optimized meta title, meta description, and URL
Fixing technical SEO issues affecting your website
Adding relevant internal links and working on your backlink strategy.
Answer frequently asked questions.
While content optimization focuses on improving the user experience and providing value to visitors, SEO primarily drives traffic and improves a website’s visibility in SERPs.
Step 9: Use of AI tools
You can produce high-quality content that resonates with your audience, thanks to Ai. Here’s how AI helps you in the following fields:
Keyword Suggestions: AI tools can suggest topic keywords, helping you hit the bullseye with your content.
Content Structuring: They help structure your ideas, ensuring your content flows seamlessly and keeps readers engaged.
Data Analysis: AI tools analyze data and trends, giving you precious insights to make your content stand out in the crowd.
Grammar and Spelling: Bid farewell to embarrassing typos and grammar slip-ups. AI tools ensure your content is polished and error-free, and exploring a detailed Grammarly review can help creators understand how AI-powered writing assistants improve editing accuracy and content quality.
Enhanced Readability: AI paraphrasing tools offer style and tone suggestions, making your writing more engaging and enjoyable.
SEO Optimization: Boost your content’s visibility with AI’s SEO process. They analyze keywords and offer tips to improve your content’s search engine ranking.
AI Checker Support: Many creators now rely on an AI checker to ensure their content remains authentic, high-quality, and free from unintentional overuse of automation. Many writers now use an AI humanizer to make their content sound more natural and emotionally engaging, ensuring every piece feels authentic and truly written by a human. In addition, platforms like Coursiv can help creators integrate these AI insights seamlessly into their workflow, making the process more organized and actionable.
In short, AI tools have transformed content creation into an efficient, streamlined process, saving time and effort.
How do we measure content engagement?
There is a famous saying; ‘what doesn’t kill you makes you stronger.’ When you have a detailed report, you can measure your achievements and identify past mistakes However, tools like Usermavenprovide privacy-friendly websites and product analytics with pre-built reports.
Here are some key metrics to consider:
1. Session metrics
Understanding the average session length helps decipher user behavior. Long sessions signal that your content structure effectively guides users to explore more. Short sessions, on the other hand, can be positive if users quickly find what they seek.
2. Page views and (CTR)
These basic metrics show how many people view your content and click through to read more. While they don’t provide deep insights into engagement, they are still essential indicators.
3. Time spent on page
This metric tells you how much time users are spending on your content. A longer time spent typically indicates higher engagement as it suggests that users are reading or consuming the content rather than quickly bouncing away.
4. Social shares and likes
Monitoring how often your content is shared on social media platforms, and how many likes or reactions it receives, can provide insights into its popularity and appeal.
Utilizing specialized analytics tools like ContentStudio and staying up-to-date with trends in the field is crucial for successful social media engagement tracking.
5. Scroll depth
This metric measures how far users scroll down a webpage. If users are scrolling deeply into your content, they find it engaging and valuable.
6. Email sign-ups
Email sign-ups are the link that connects visitors to leads and future customers. They represent an urge to remain connected. You may efficiently nurture leads by including a simple sign-up option within your content.
7. CTAs & conversion rates
Conversion rates for various CTAs might shed light on how effective they are. However, if your content is part of a larger marketing funnel, track how many users take a desired action (e.g., signing up for a newsletter and purchasing) after going through your content. You may also like
8. Bounce rate
This is the percentage of visitors who leave your website after viewing only one page. A high bounce rate can indicate that your content is not engaging enough or irrelevant to the audience.
Final Word
To measure content engagement effectively, it’s essential to use a combination of these metrics and tools. Additionally, the specific metrics you focus on may vary depending on your goals and the type of content you’re producing.
Regularly analyzing these metrics and adjusting your content strategy based on the insights gained is vital to improving content engagement over time.
You can even use this brilliant link shortener to turn long, messy URLs into polished, branded links, making sharing easier and more trustworthy across social, email, and content platforms.
Ever wondered how to make your online engagement more personalized and effective? That’s where link rotators come into play, and they’re pretty awesome.
Picture this: You have a single link, but you want to send people to different web pages based on where they’re located, what language they speak, or even the device they’re using. That’s exactly what link rotators do, and they can seriously up your online game.
In this guide, we’re going to walk you through link rotators. We’ll break down how they work, why they’re so important, and how you can use them to boost your online strategy.
So, if you’re ready to take your online engagement to the next level, let’s dive in!
What is a link rotator?
A link rotator is a web service or software tool that dynamically redirects users clicking on a single link to various destination URLs based on predefined conditions or rules. These conditions can include factors like user location, language, device, or specific time frames.
This tool is commonly used in online marketing and website optimization to deliver personalized and contextually relevant content to different segments of an audience, enhancing user engagement and campaign effectiveness.
How does a link rotator work?
Here’s a simplified explanation of how it operates:
Incoming Click: When a user clicks on a link that is managed by a link rotator, their action triggers the link rotator’s evaluation process.
Condition Check: The link rotator checks the user’s click against a set of predefined conditions. These conditions can include factors like the user’s location, language preferences, device type, or even the time and date of the click.
Rule-Based Redirect: If the user’s click aligns with one or more of the predefined conditions, the link rotator automatically redirects the user to a specific destination URL associated with that condition.
Personalized Experience: This dynamic redirection process ensures that users are directed to content or web pages that are most relevant to their specific characteristics or context.
Example Scenario:
Imagine a user clicks on your link from a mobile device located in Germany. In this case, the link rotator will recognize both the mobile device and the user’s location. It will then execute the predefined rule, directing the user to the European mobile page, ensuring a tailored and user-centric experience.
In essence, a link rotator is your dynamic tool for creating personalized, efficient, and responsive journeys for your online audience. It’s about delivering the right content to the right audience, at the right time, and in the right way.
Replug’s link rotator empowers personalized online journeys by directing users to different URLs based on factors like date, language, and location.
It’s perfect for time-sensitive campaigns, multilingual support, and regional targeting. Plus, it distinguishes between devices for a tailored experience.
Here’s how to use Replug’s link rotator feature:
Utilizing the traffic routing feature in Replug.io is a straightforward process. Follow the steps below:
Navigate to the Replug Links page, where you manage your links.
Click on the “New Link” button to start the link creation process.
Click on “Choose your campaign” or create a new one, and then enter the URL you want to shorten or optimize, which will serve as the destination.
Step 2: Enable traffic routing
Before saving the link, enable the traffic routing feature by toggling its slider button.
Enabling this feature will reveal the “Add new rule” button, allowing you to create routing rules.
Note: Traffic Routing Rules and A/B testing cannot be used at the same time.
Step 3: Create routing rules
Click on the “Add new rule” button to open a modal window.
In this modal, you can define filters based on criteria like country, device, browser, and operating system.
Configure the rules based on your criteria. For example:
If the visitor’s country is Pakistan,
the browser is Chrome,
the device is Desktop/Laptop, and
the operating system is Windows,
then route them to: https://replug.io/special-offer/.
Otherwise, if the IP Address is 192.168.13.12, the day of the week is Friday/Sunday, and the date is 2021-11-15, then route them to: https://contentstudio.io/.
If none of the specified conditions match, direct them to the default destination URL.
Step 4: Save and Share
You can create up to 10 rules, and each rule can consist of multiple blocks with multiple filters.
For a rule to take effect, at least one block within that rule must match the user’s conditions; otherwise, the default destination URL will be used.
Once you’ve configured your rules, click the “Save” button at the bottom left of the popup.
Your branded link with the Traffic Routing feature enabled is now ready for use. Share it with your audience to provide them with a personalized experience.
Important Note: It’s crucial to select the appropriate campaign type, especially when using the Traffic Routing feature. When opting for a CTA-type campaign, the destination URLs must be iframed (displayed within another website).
A complete link management solution
for marketing professionals & agencies.
Try Replug for free
Why Use Replug’s Dynamic Link Rotator?
When it comes to optimizing your online engagement strategy, Replug’s dynamic link rotator stands out as a game-changing tool. Here’s why it should be a vital part of your campaigns:
Dynamic URL redirection:
At its core, Replug’s traffic routing feature dynamically redirects users to various destination URLs based on predefined conditions or rules. This dynamic flexibility means that your audience can be sent to precisely the right place based on factors like location, language, and device type.
Personalization:
Replug’s traffic routing feature empowers you to deliver a highly personalized user experience. By analyzing user data and behavior, you can tailor their journey, providing content that matches their unique preferences and needs.
Marketing campaigns:
Link rotators are essential for marketing campaigns, especially time-sensitive promotions. They allow for effortless transitions between different offers, making them ideal for rotating product promotions and limited-time deals.
Multilingual support:
For businesses with a diverse, multilingual audience, Replug’s link rotator automatically redirects users to content in their preferred language, significantly boosting user engagement and satisfaction.
Geographic targeting:
Replug’s link rotator can detect a user’s location and seamlessly redirect them to content or offers specific to their region. This is particularly beneficial for global businesses seeking to tailor campaigns for different countries or regions.
Device-specific routing:
Replug’s link rotator distinguishes between various devices, such as mobile phones and desktop computers. It ensures that users are directed to pages optimized for their specific device, providing an exceptional user experience.
A/B testing:
Marketers love Replug’s link rotator for A/B testing. By directing users to different versions of a web page, you can analyze which version performs better in terms of conversion rates, user engagement, and other crucial metrics.
Analytics and tracking:
Replug’s traffic routing comes equipped with comprehensive analytics and tracking features. This allows you to closely monitor link performance, track click-through rates, and gather valuable data to refine your campaigns for maximum impact.
By integrating Replug’s dynamic traffic routing feature into your online strategy, you unlock a world of possibilities. You can create highly targeted, personalized, and data-driven campaigns that not only deliver results but also enhance the overall user experience.
You can seamlessly uplift this strategy even further by using Replug’s link shortener tool to optimize and track your URLs, ensuring every campaign is both measurable and performance-driven.
Boost your conversion rates with irresistable CTAs with
Do I need technical expertise to set up traffic routing?
No, most Link Rotator tools are designed with user-friendly interfaces, making it accessible even for non-technical users to set up and configure.
Are there any limitations to using a Link Rotator?
Some limitations may include a maximum number of rules or conditions, and it’s essential to ensure the destination websites allow iframing for certain campaigns.
Can I track the performance of links in a Link Rotator?
Yes, most Link Rotators come with built-in analytics and tracking features that allow you to monitor link performance, track click-through rates, and gather valuable data for optimization.
Are Link Rotators compatible with different devices and browsers?
Yes, Link Rotators can be configured to work with various devices and browsers, ensuring a seamless user experience regardless of the platform.
Can I change the destination URLs in a Link Rotator after they’re set up?
Yes, you can typically modify the rules and destination URLs in a Link Rotator as needed, offering flexibility in your campaigns.
Is there a limit to the number of rules or conditions I can set in a Link Rotator?
Many Link Rotators allow you to create up to a certain number of rules or conditions, but this limit can vary depending on the specific tool or service you’re using. It’s important to check the capabilities of the Link Rotator you choose.
Have you ever heard the phrase “leaving money on the table”?
Well, cart abandonment is somewhat similar – the customers leave the website without completing the transaction.
Bummer. Right?
Most e-commerce brands struggle with minimizing cart abandonment so that they can squeeze more money from their website traffic.
However, it doesn’t happen unless they have a bullet-proof strategy in place.
To fix the problem, one needs to come up with an excellent shopping cart abandonment email template that tempts the reader to get back to the website and complete the purchase process.
You’re about to learn:
What is a cart abandonment email?
Why do marketers send out cart abandonment emails?
Why buyers abandon shopping carts in the first place?
The best cart abandonment email templates to get inspiration from
How to approach a prospect who has abandoned the cart
But first things first, you must know what the heck is cart abandonment email.
What is an abandoned cart email?
The abandoned cart email is the one that you receive in your inbox when you add a product to your shopping cart on an e-commerce website, but leave the site without completing the transaction.
The purpose of sending an abandoned cart email is to re-engage the customers who left the website without placing the order.
In some cases, e-commerce brands successfully convert those customers who left the website without buying by sending them the best-abandoned cart emails.
I’ve seen some SAAS companies send out a discount offer to website visitors who abandon the shopping cart on their website.
There could be several reasons why customers might abandon a shopping cart, for instance:
Got distracted and left the website
Found the product on a competitor’s website
Changed their mind about buying it
The reason why it’s important to understand abandoned carts and reach out to those customers is that a customer with a buying intent would add a product to the shopping cart.
Such customers are way more valuable than those lurkers who click through your offers from social media ads but never end up buying anything.
So the next time you leave Target or Amazon’s website after adding a product to your shopping cart and receive an email reminder about that product, don’t be surprised.
Do abandoned cart emails work?
Most of the time, they do work unless you mess it up in the email newsletter formatting or send it out too late. No wonder it’s a widely adopted sales strategy. It looks like a lot of brands recover lost sales through abandoned cart emails.
Statistics by Moosend are clear proof that abandoned cart emails actually convert.
Cart abandonment emails exhibit impressive engagement statistics. They achieve open rates of over 40%, occasionally even reaching a remarkable 45%.
Furthermore, half of these abandonment emails are not just opened but also clicked on, with 21% of the opened emails resulting in click-throughs.
The most compelling fact is that 50% of the users who click through these emails go on to complete their purchase. In essence, half of the recipients who engage with the email content ultimately make a purchase, underlining the effectiveness of these campaigns in converting potential customers into buyers.
What do you write in an abandoned cart email?
There is a not rocket science. You have to quickly explain to the customers where they left off when shopping on your website. Showcase the product they added to the cart, and place a CTA button that takes them straight to the shopping.
10 abandoned cart email examples to learn from
Let’s take a look at some of the best-abandoned cart email templates that work for businesses:
1. Fiverr
Fiverr is quick to send out an email to buyers who search for a specific gig but never end up placing an order on the platform.
The freelancing platform finds a bunch of relevant gigs and emails to the buyer. Here’s what I got when I searched for dog-related gigs while doing some research on the platform:
2. Daraz
Daraz is a popular e-commerce website in Pakistan. It was acquired by Alibaba in 2018. Here’s how Daraz sends out emails if you abandoned carts on their platforms.
Here’s what I found:
3. Kayak Media
Kayak Media is a software company that makes small software.
I once wanted to test out one of their softwares, but somehow, I didn’t go through the purchase process.
Then I received this cart abandonment email which sounds about right:
4. NetPeak Software
Netpeak is yet another software company that immediately sends out cart abandonment emails if you don’t complete the purchase process. Here’s an example:
5. Away
Away is an e-commerce website that sells travel and fashion accessories. I stumbled upon their abandoned cart email template while researching this topic. Here’s what their abandoned cart email looks like:
Ugmonk is a desk accessories e-commerce store that sells aesthetically pleasing and classy office and desk accessories. They send out abandoned cart emails in style as well:
Peel is a well-known brand in the phone case space. They sell all sorts of iPhone and Android phone cases. They also send out cart abandonment emails if you don’t complete the purchase and leave their website. Here’s how they send out a reminder via email:
8. Bearsville Soap Company
Bearsville Soap Company has an interesting approach to sending out abandoned cart emails. They have a brief email copy with a CTA that says, “Return to your cart.”
9. ThredUp
ThredUp comes with a straightforward message in their abandoned cart. They have several things added to their abandoned cart email, for instance, discounted prices, coupon codes, and the CTA.
10. Vans
Vans is a footwear brand that sells sneakers for kids, women, and men. They adopted a unique yet interesting approach in their abandoned cart email. They quickly remind the customers who abandoned the cart that they’re still holding the shopping cart for them.
Plus, they go on to mention the products that the customer might also like, which is quite an ambitious approach.
These were some of the examples of abandoned cart newsletters which were using unique and diverse email newsletter templates to attract, re-engage, and convert abandoned visitors. Sure, marketers could take away a lot from these newsletter examples.
Note: If you handle multiple campaigns and want full control over how your links are shared, tracked, and retargeted, Replug is a comprehensive solution that simplifies link management for modern e-commerce marketers.
A complete link management solution
for marketing professionals & agencies.
Try Replug for free
Moreover, by using a branded custom URL shortener, you can generate neat, memorable links for your cart-recovery emails, improving link click rates, brand recall, and overall campaign performance.
Abandoned Cart Email Best Practices
Wondering how do I email someone who’s abandoned a cart?
If you’re curious about emailing customers who have abandoned the shopping cart and are not sure what to do or say, then this section might come in handy.
Compliance with the best practices will give you better results in turning cart abandoners to customers.
Without any further ado, let’s get right into it:
1. Set up the email automation
Email automation is the process of setting up an email sequence that sends out a series of emails to customers depending on the situation.
When a customer signs up on an e-commerce website, usually the first email that comes through is an account verification email. Similarly, when a purchase is made by the user, a confirmation email goes out to the customer.
So most e-commerce platforms seamlessly integrate with email marketing softwares and allow merchants to send out abandoned cart emails.
To get started with sending abandoned cart emails, simply set up an email sequence in your e-commerce platform or email marketing software to get going.
An email newsletter template is an email theme that a sender uses to compose and design the email message.
Keep in mind that most e-commerce businesses go for a fancy email newsletter template when setting up an abandonment cart email.
While an attractive email newsletter template could attract the customers to take action, it could also create a hurdle in engaging the customers.
The reason is that sometimes the email services block out the email template and notify the email receiver to unblock the template if they want to.
This could impact the clickability of the email and divert the attention of the customer to somewhere else. Similarly, a text-only email doesn’t appeal to the customers to take any section.
Therefore, it’s necessary to find a middle ground where you use an email newsletter template that increases the click-through rate of your email.
3. Write a compelling email subject and body
The email subject line and the in-body message are essential parts of the email. No matter how good your offer is, it won’t work out unless you don’t get the email subject line and body right.
The subject line of your cart abandonment email is the gateway to engagement. This can be achieved through various techniques, such as humor, creating a sense of urgency, or utilizing personalized language.
Writing a compelling email subject and body would significantly help you succeed in generating sales from abandoned carts. Whereas, the body of the email message would convince readers to take action or ignore it altogether.
There has always been a debate about the length of the email newsletters. Some believe that it has to be short, sweet, and brief as a well-crafted subject line entices recipients to open the email and explore its contents further. Whereas, a lot of marketers prefer to send out in-depth email newsletters.
Moreover, a catchy and attractive email subject line would massively impact your abandoned cart email open rate.
4. The first email reminder:
The first email should ideally be dispatched within an hour or two of cart abandonment. At this point, the shopper’s interest is at its peak, making them more likely to return and complete the purchase.
Subsequent reminder emails can be strategically spaced out over a few days or a week to gently encourage the customer to take action without bombarding them with messages.
5. Test out the email sequence
It’s vital to do testing before you move on to the next thing. Don’t shy away from sending out a few test email sequences to yourself to be 100% sure about this.
If you don’t test your abandoned cart email sequence, you’ll never know what customers receive when they abandon the cart.
6. Follow-up sequences:
Achieving the right balance in terms of email frequency and timing is crucial. While follow-up emails are effective, sending too many in quick succession can irritate recipients. Experiment with different timing strategies to identify what resonates best with your audience without inundating them with reminders.
A series of follow-up emails can be a powerful strategy if the initial reminder email doesn’t lead to a conversion. These subsequent emails can build upon the previous messages, progressively strengthening the offer or message. By providing additional incentives or addressing specific objections, you increase the likelihood of convincing hesitant shoppers to complete their purchase.
7. Clear & compelling content:
The content of your cart abandonment email should be clear, concise, and compelling. It should remind the shopper about the items they left behind, emphasizing the unique benefits of those products. Explain why completing the purchase is an excellent decision, using persuasive language and complementing your message with high-quality images of the products. The aim is to reignite the shopper’s interest and urgency to buy.
8. Personalization:
Personalization adds a human touch to your emails. It involves addressing the recipient by their first name and referencing the specific items left in their cart. This level of personalization can significantly increase engagement because it demonstrates that you’re paying attention to their preferences and needs.
Urgency and scarcity tactics can create a sense of FOMO (fear of missing out). You can implement these tactics by mentioning limited stock quantities or including countdown timers for discounts or promotions. These elements encourage recipients to take prompt action, fearing they may miss out on a great deal.
10. Call-to-Action (CTA):
The call-to-action (CTA) is the key element that prompts recipients to take action. It should be clear, visually striking, and placed prominently within the email. The CTA button should guide the recipient directly back to their abandoned cart or the checkout page. Use action-oriented language in the CTA, such as “Complete Your Purchase” or “Get Started Now,” to motivate immediate action.
Boost your conversion rates with irresistable CTAs with
Incentives are powerful tools to entice shoppers to return and complete their purchase. Common incentives include limited-time discounts, free shipping, or complimentary gifts. To maximize the effectiveness of incentives, ensure they are directly relevant to the items left in the abandoned cart. Additionally, clearly communicate the urgency of these incentives to drive immediate action.
12. Mobile responsiveness:
Given the prevalence of mobile shopping, it’s imperative that your cart abandonment emails are mobile-responsive. Mobile-responsive design ensures that your emails display correctly and are easy to navigate on smartphones and tablets. To ensure compatibility, thoroughly test your emails on various devices and email clients to guarantee a seamless experience for all recipients.
13. Segmentation:
Segmentation is a strategic approach to dividing your email list into distinct groups based on customer behavior, purchase history, and the value of the abandoned cart. Once segmented, you can tailor your email messaging to suit the unique preferences and needs of each group. This level of personalization can significantly enhance engagement and conversion rates.
14. Social proof:
Social proof is a psychological phenomenon that influences behavior. In your cart abandonment emails, you can leverage social proof by showcasing positive reviews, testimonials, or product ratings from satisfied customers. By highlighting the experiences of others, you build trust and demonstrate the popularity and quality of your products, making recipients more inclined to complete their purchase.
15. Privacy and trust:
In an age of heightened concern for data security and privacy, assuring customers of their information’s safety is paramount. In your cart abandonment emails, display trust symbols, security badges, and contact information prominently to instill confidence. By addressing these concerns, you build trust and reduce potential barriers to completing the purchase.
16. A/B Testing:
A/B testing, also known as split testing, is a method of experimentation where you compare two versions of an element within your emails to determine which performs better. This can involve testing different subject lines, email content, CTA buttons, or incentives. A/B testing is an ongoing process that allows you to fine-tune your emails and optimize their performance based on data-driven insights.
Providing accessible customer support options in your cart abandonment emails demonstrates your commitment to customer satisfaction. Include easy-to-find contact information or a chat option for recipients who may have questions or need assistance. A responsive and helpful customer support system can contribute to higher satisfaction levels and increased conversions.
18. Opt-out option:
Including an opt-out or unsubscribe option is both a best practice and a legal requirement to comply with email regulations. This feature allows recipients to stop receiving emails if they no longer wish to be contacted. Respecting recipients’ preferences is not only ethical but also important for maintaining a positive brand reputation.
19. Analytics and monitoring:
Leveraging analytics tools is essential for tracking the performance of your cart abandonment email campaign. Key metrics to monitor include open rates, click-through rates, conversion rates, and the revenue generated from the campaign. By closely analyzing these metrics, you gain valuable insights into the effectiveness of your strategy and can make informed adjustments.
FAQs About Abandoned Cart Emails
Let’s shed some light on the frequently asked questions about abandoned carts:
How many abandoned cart emails should I send?
There is no right or wrong way of doing this, especially when it comes to the number of emails one should send out when a customer abandons the shopping cart. Most brands send out one email to remind customers to complete the transaction. However, some brands send up to three abandoned cart emails.
How to keep unwanted emails away?
There are several settings available in the user account settings area on almost every e-commerce platform. Users must go through the settings and alter the settings for notifications, promotional offers, and emails. That’s the perfect way to keep unwanted emails away from your inbox.
Is it legal to send abandoned cart emails?
An abandoned cart email is just another email newsletter that you send to your customers. Make sure you have mentioned in the email or communication section of the terms and conditions of your e-commerce website that the customers may receive promotional or abandoned cart emails from the brand.
What is the best time delay for an abandoned cart email?
It depends on multiple factors, such as time zone, genre, demographics, etc. For instance, if a customer is shopping at 3 a.m. and abandons the cart, you might not want to send out that abandoned cart email at 4 a.m. because he might have gone to bed.
Therefore, you can always test out different time delays so that you can decide what works best for you. Give it at least 10 to 12 hours before you send out the first email.

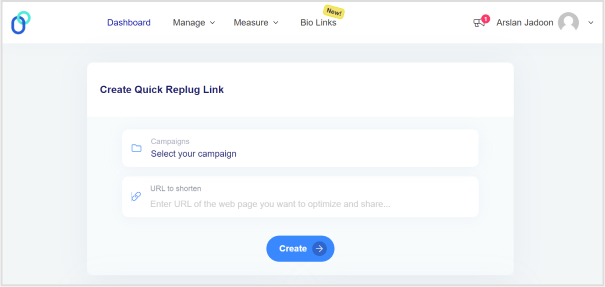
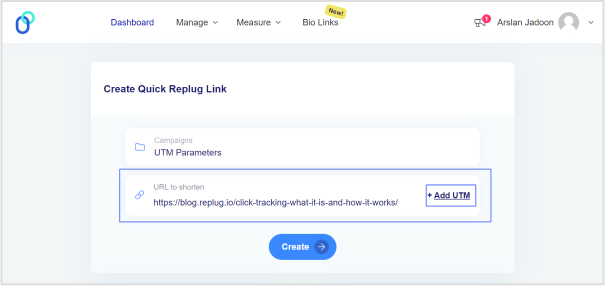
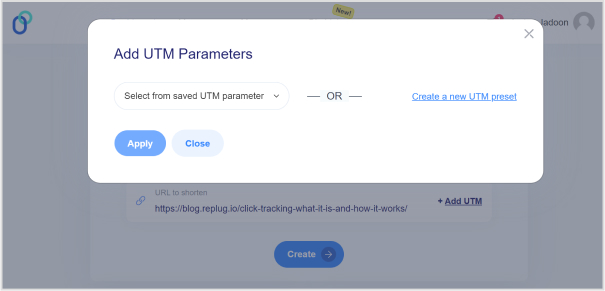
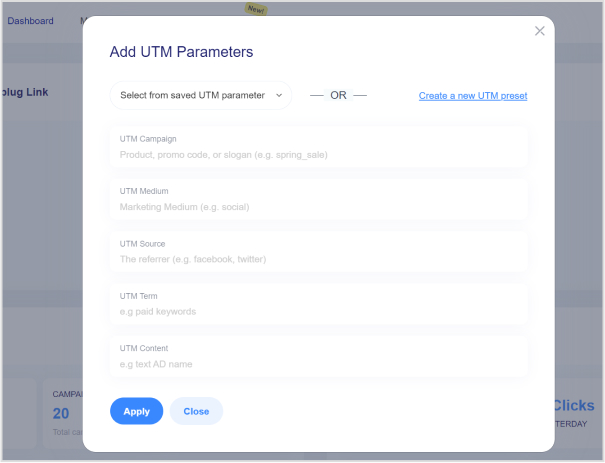
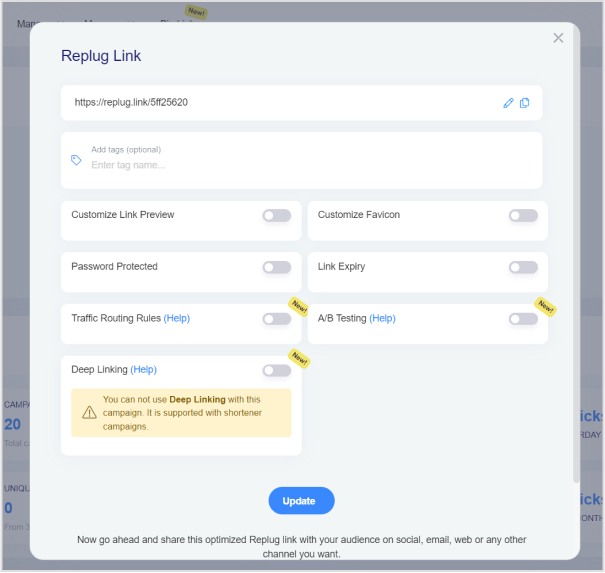


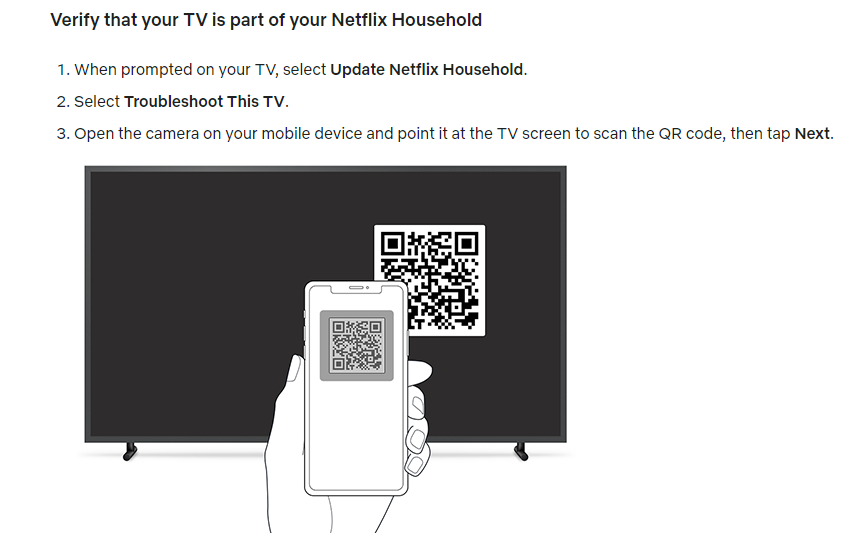


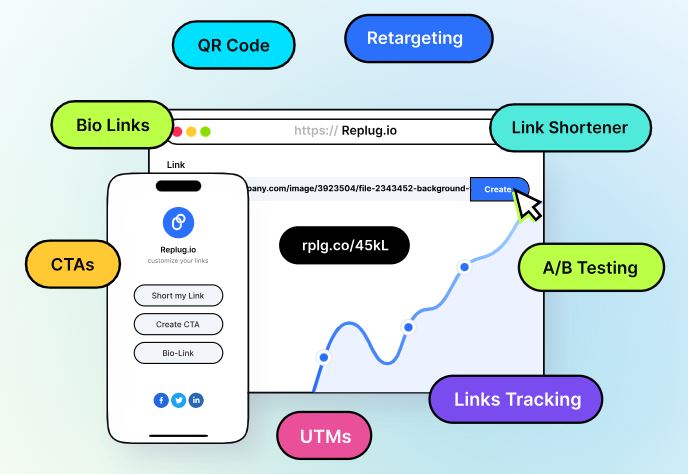
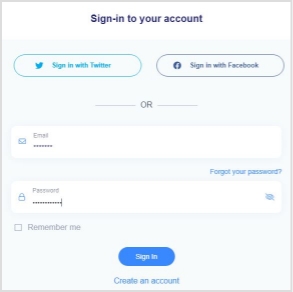
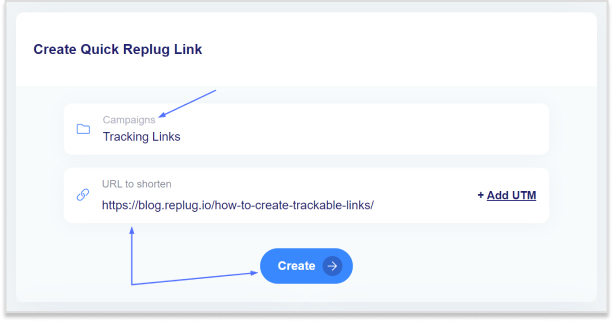

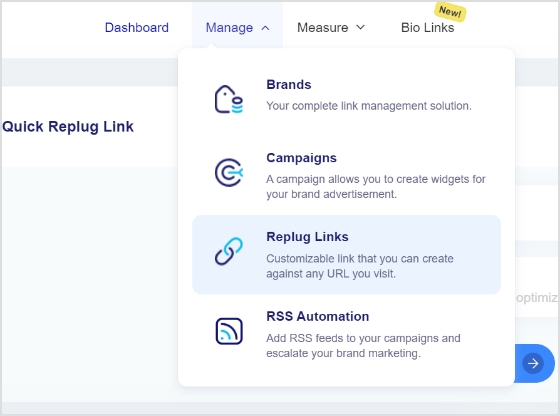
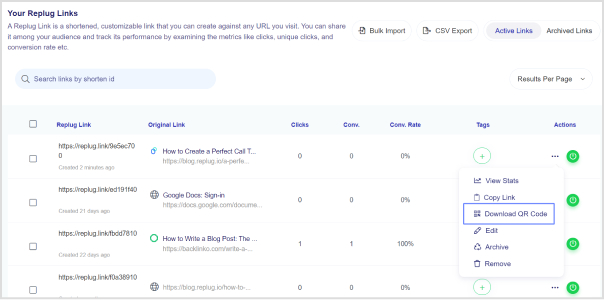
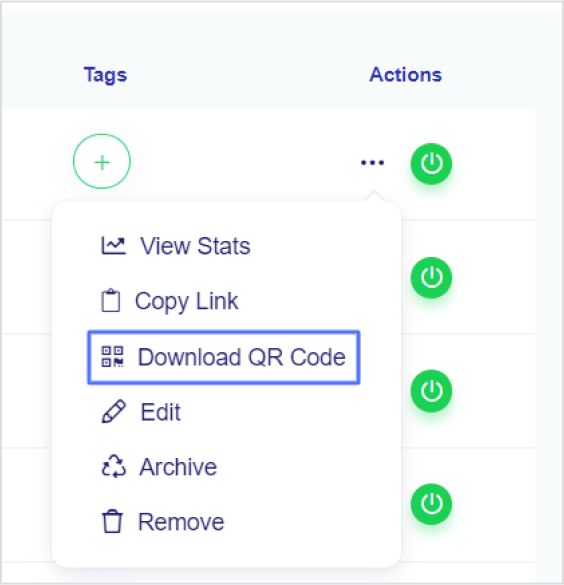
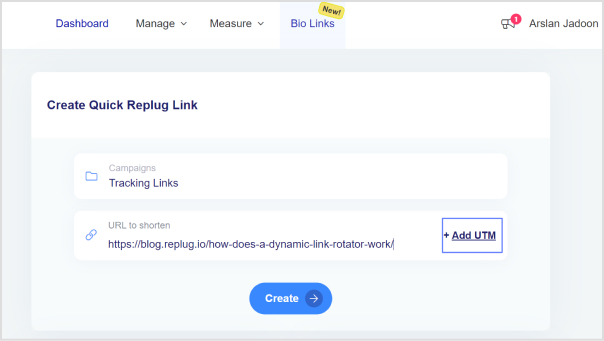
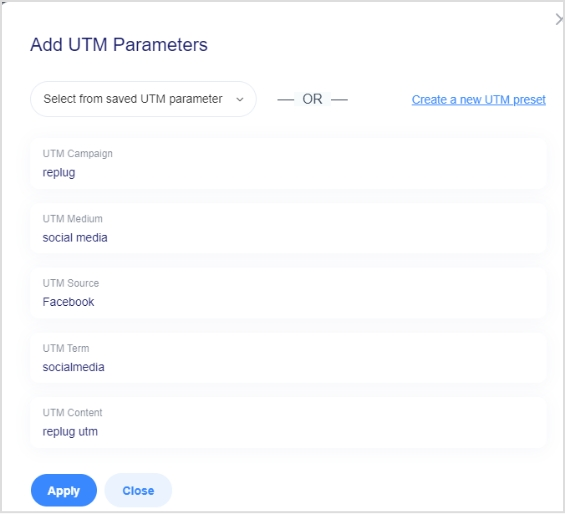
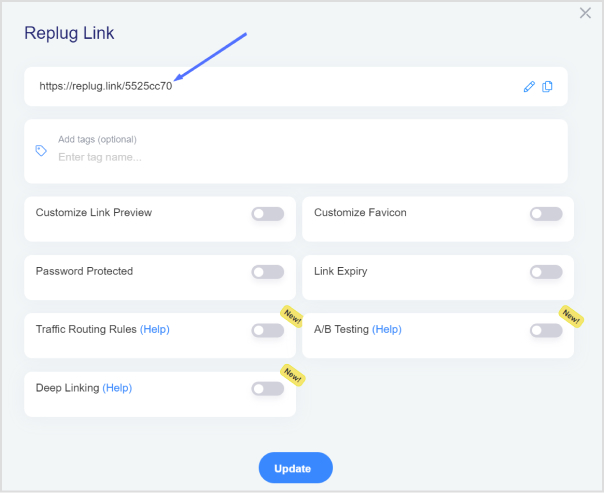

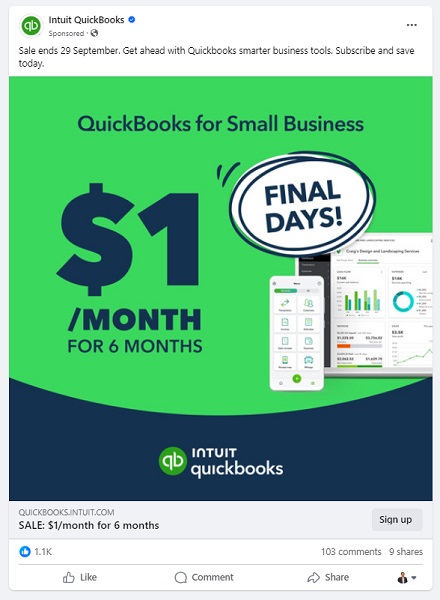


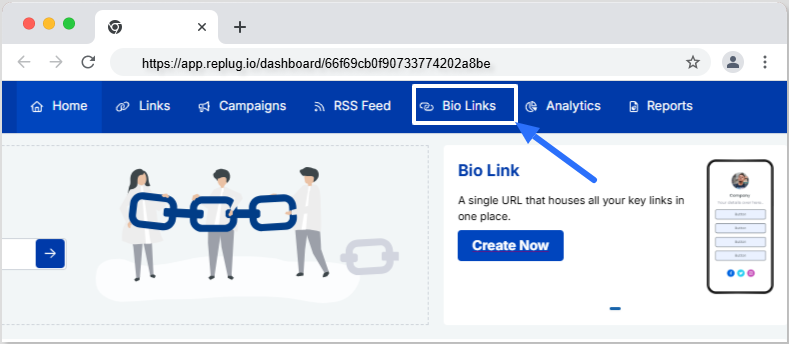
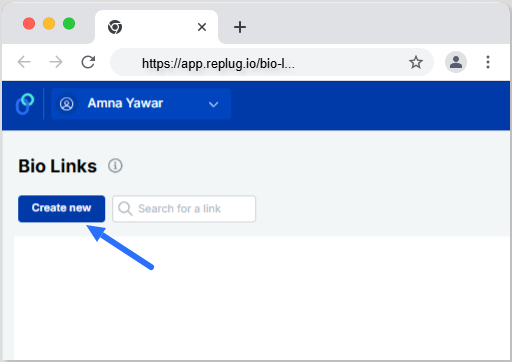
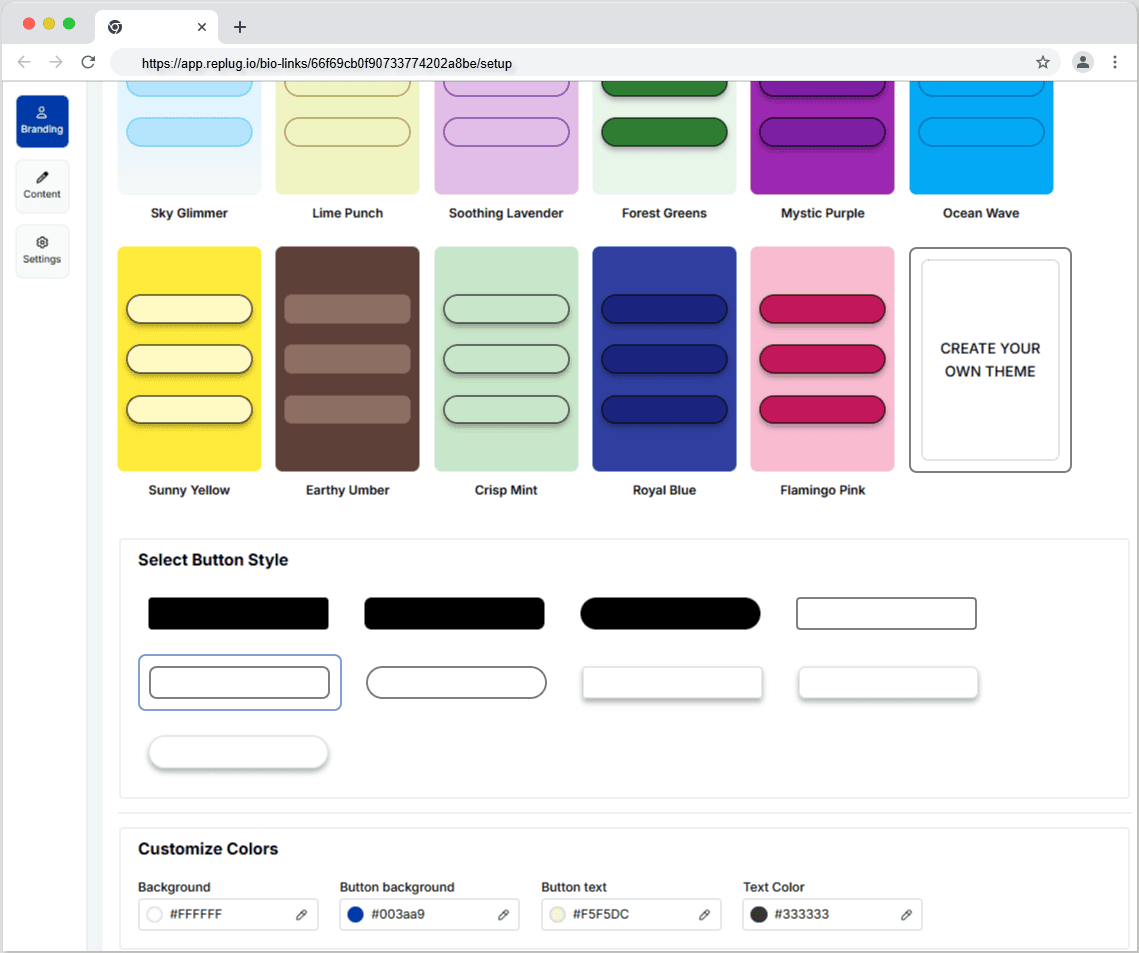
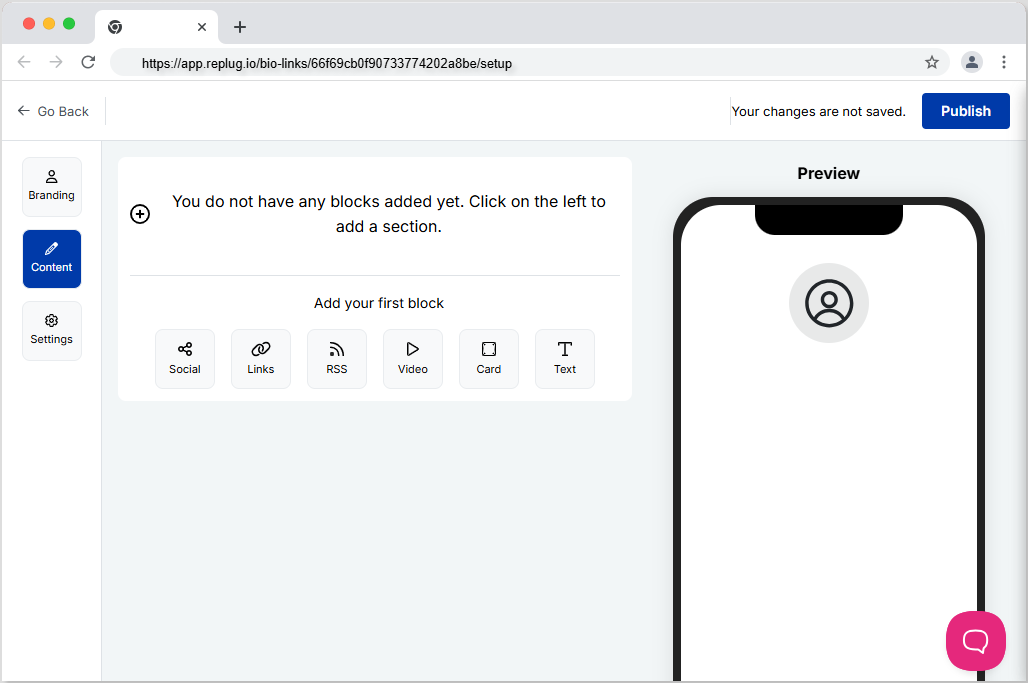
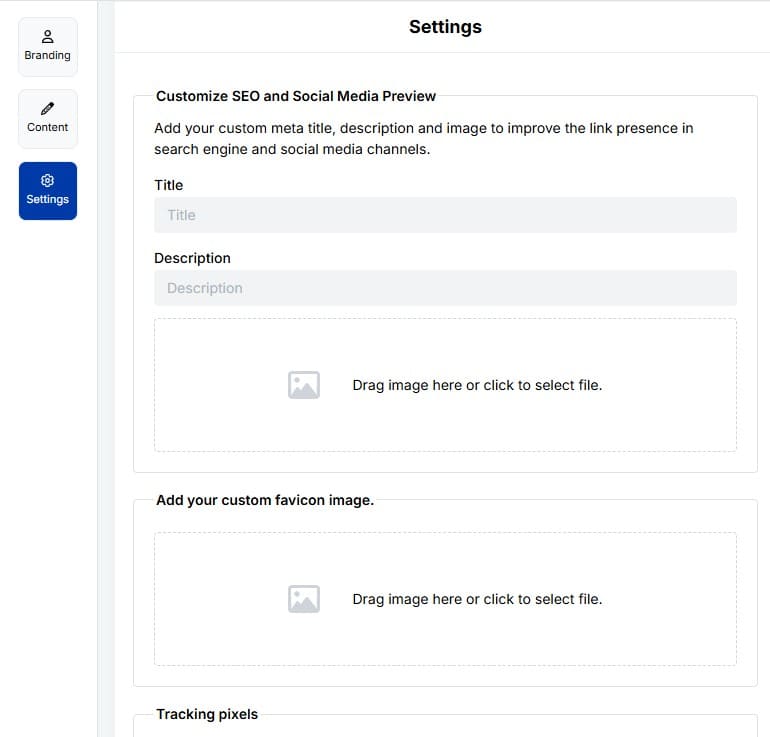
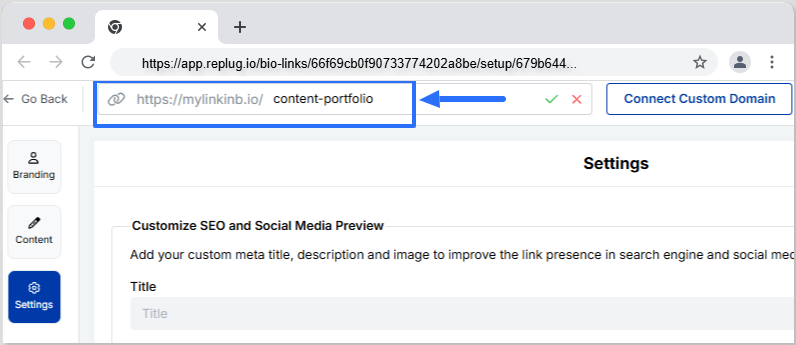
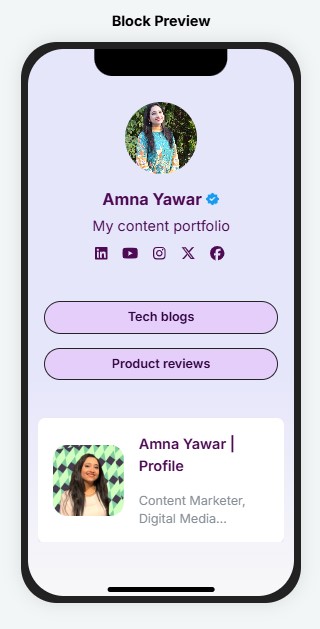
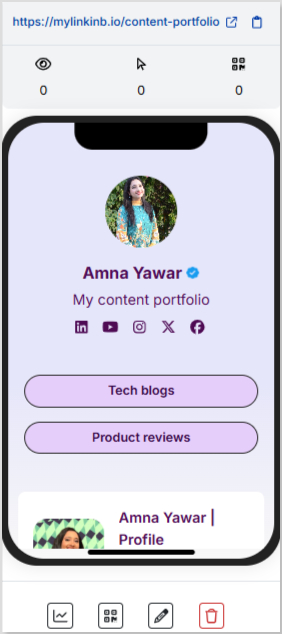
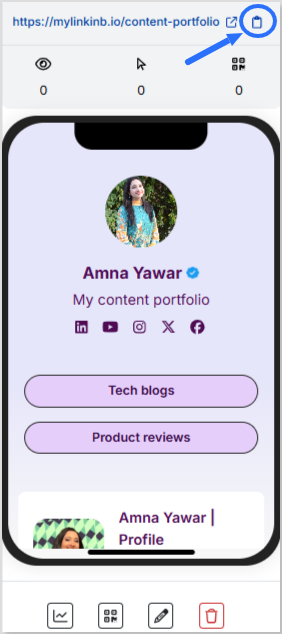

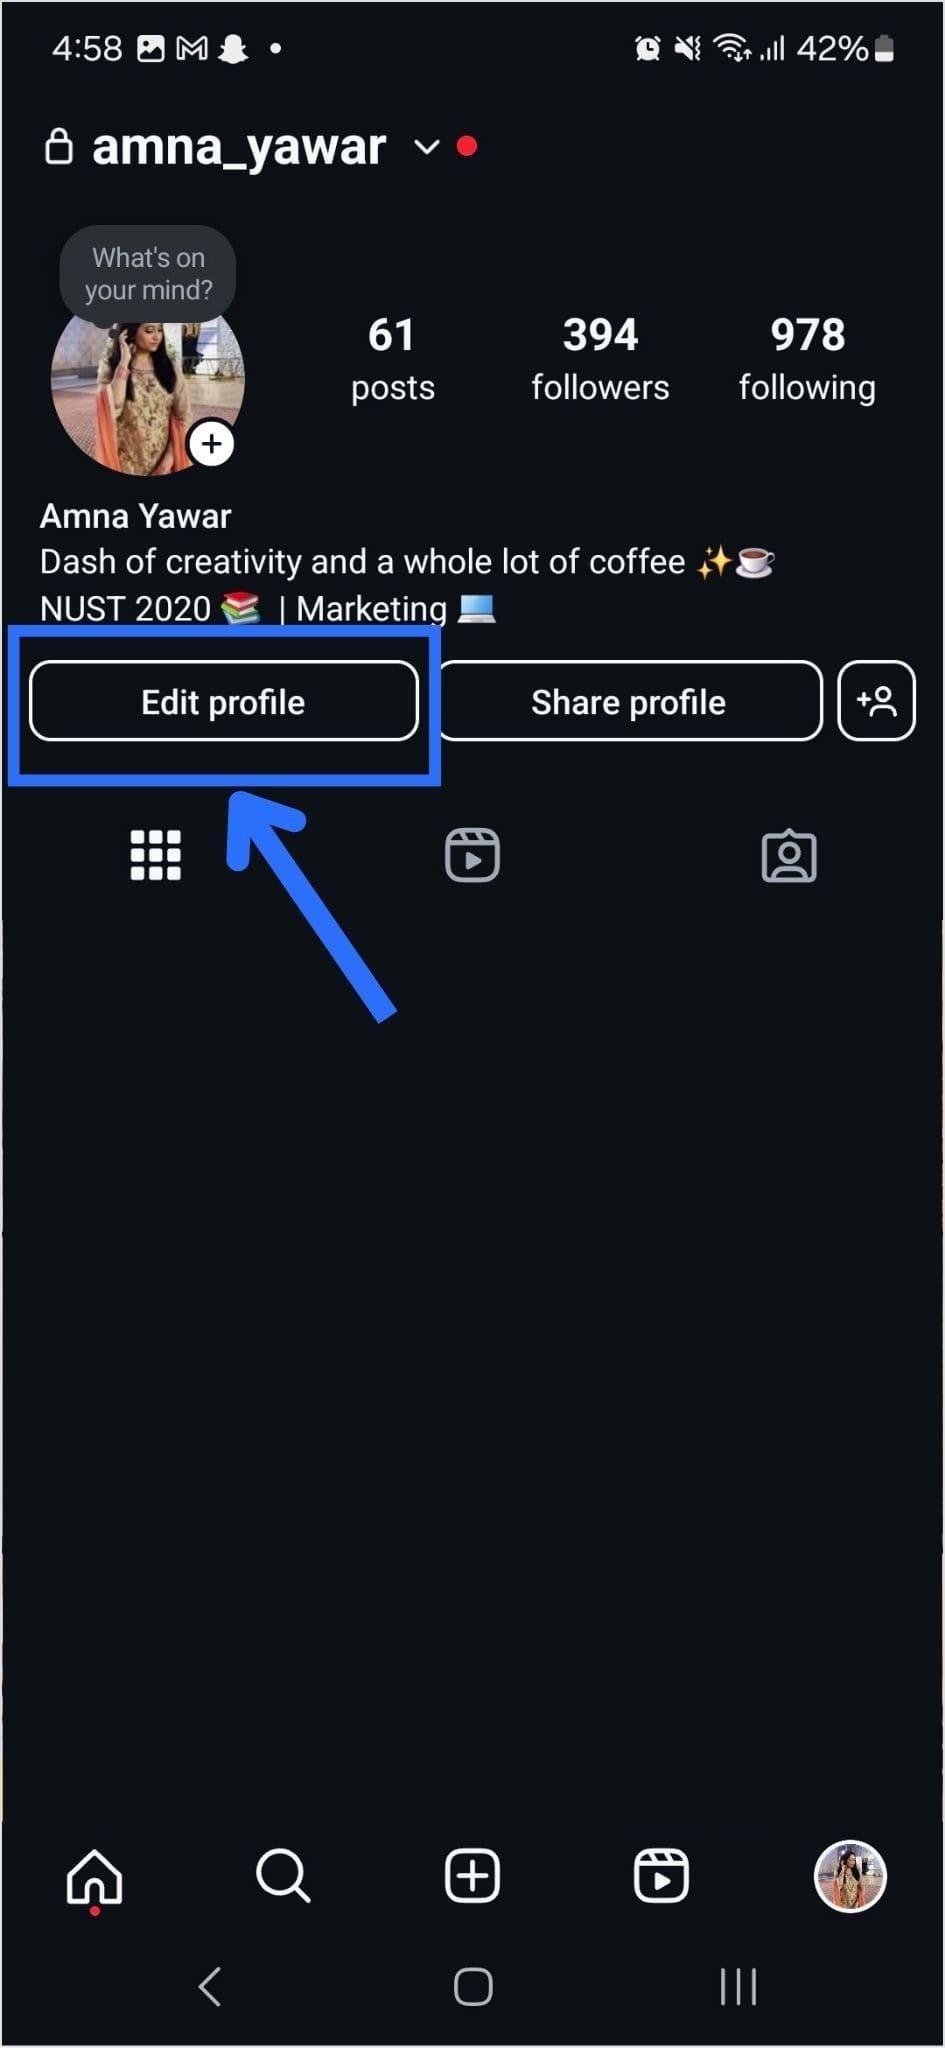
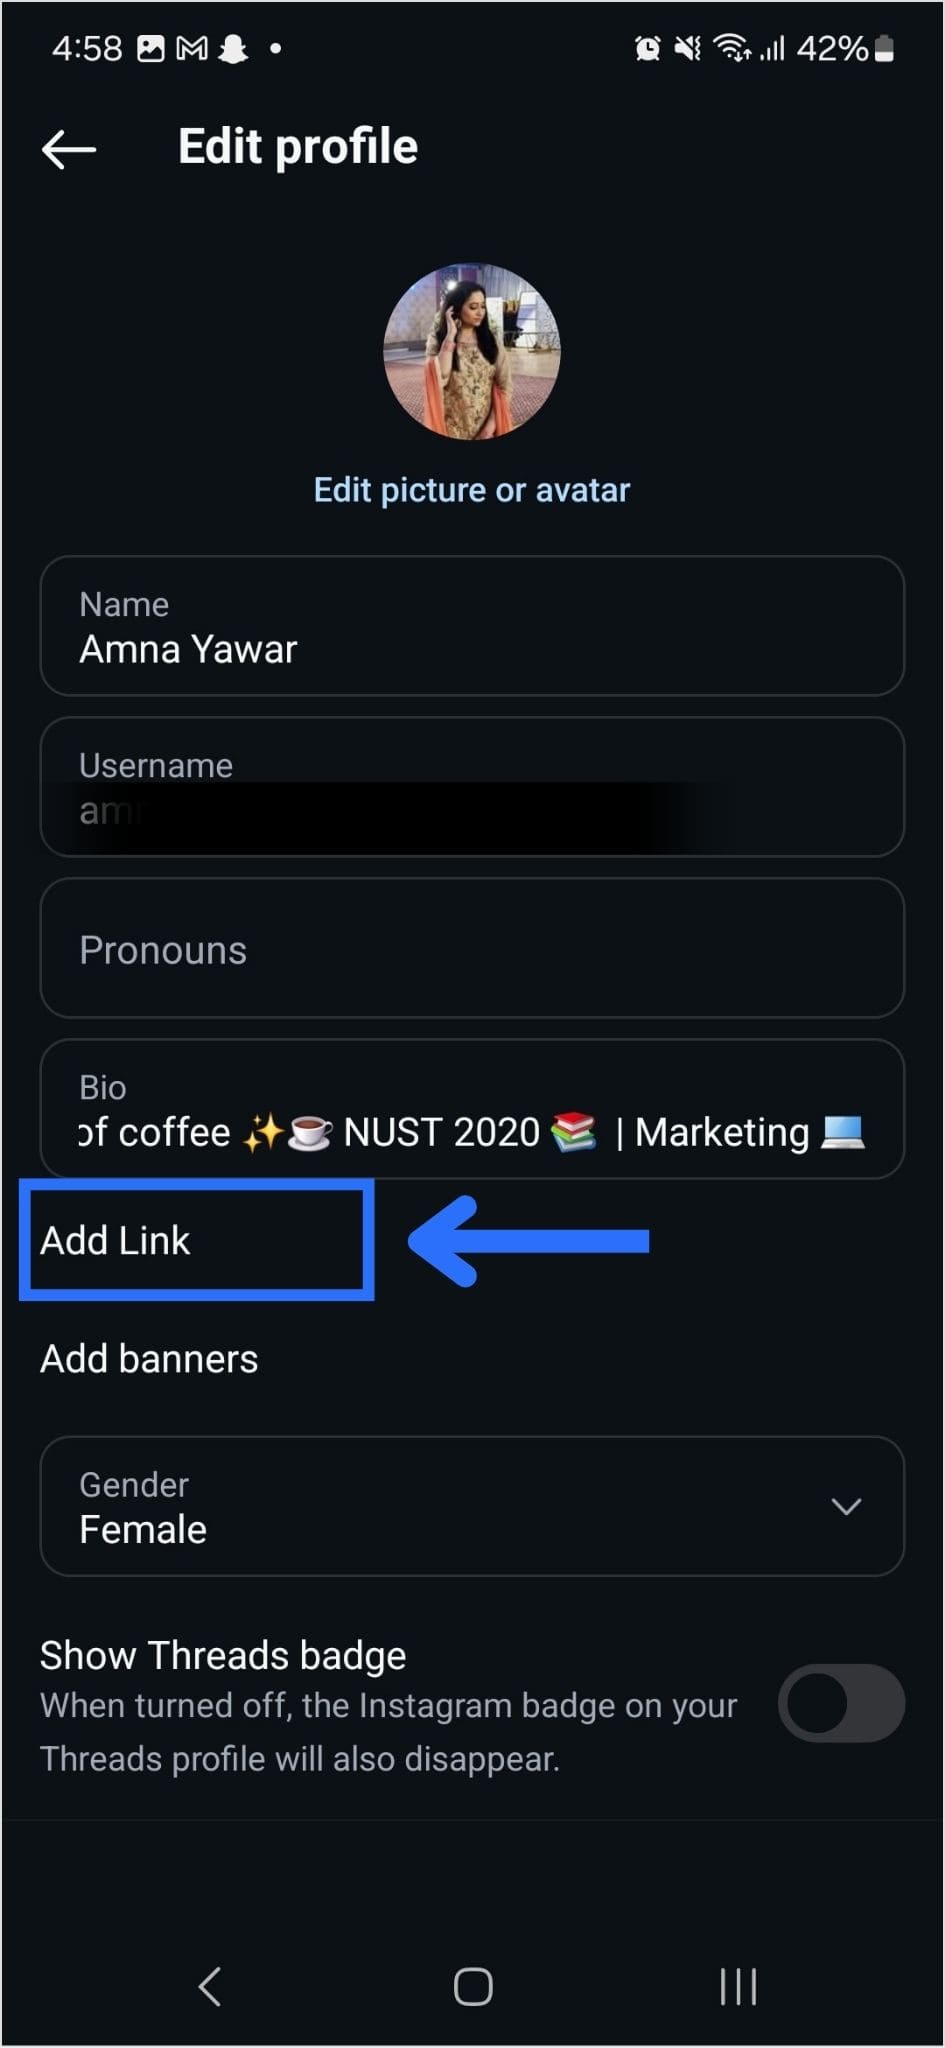


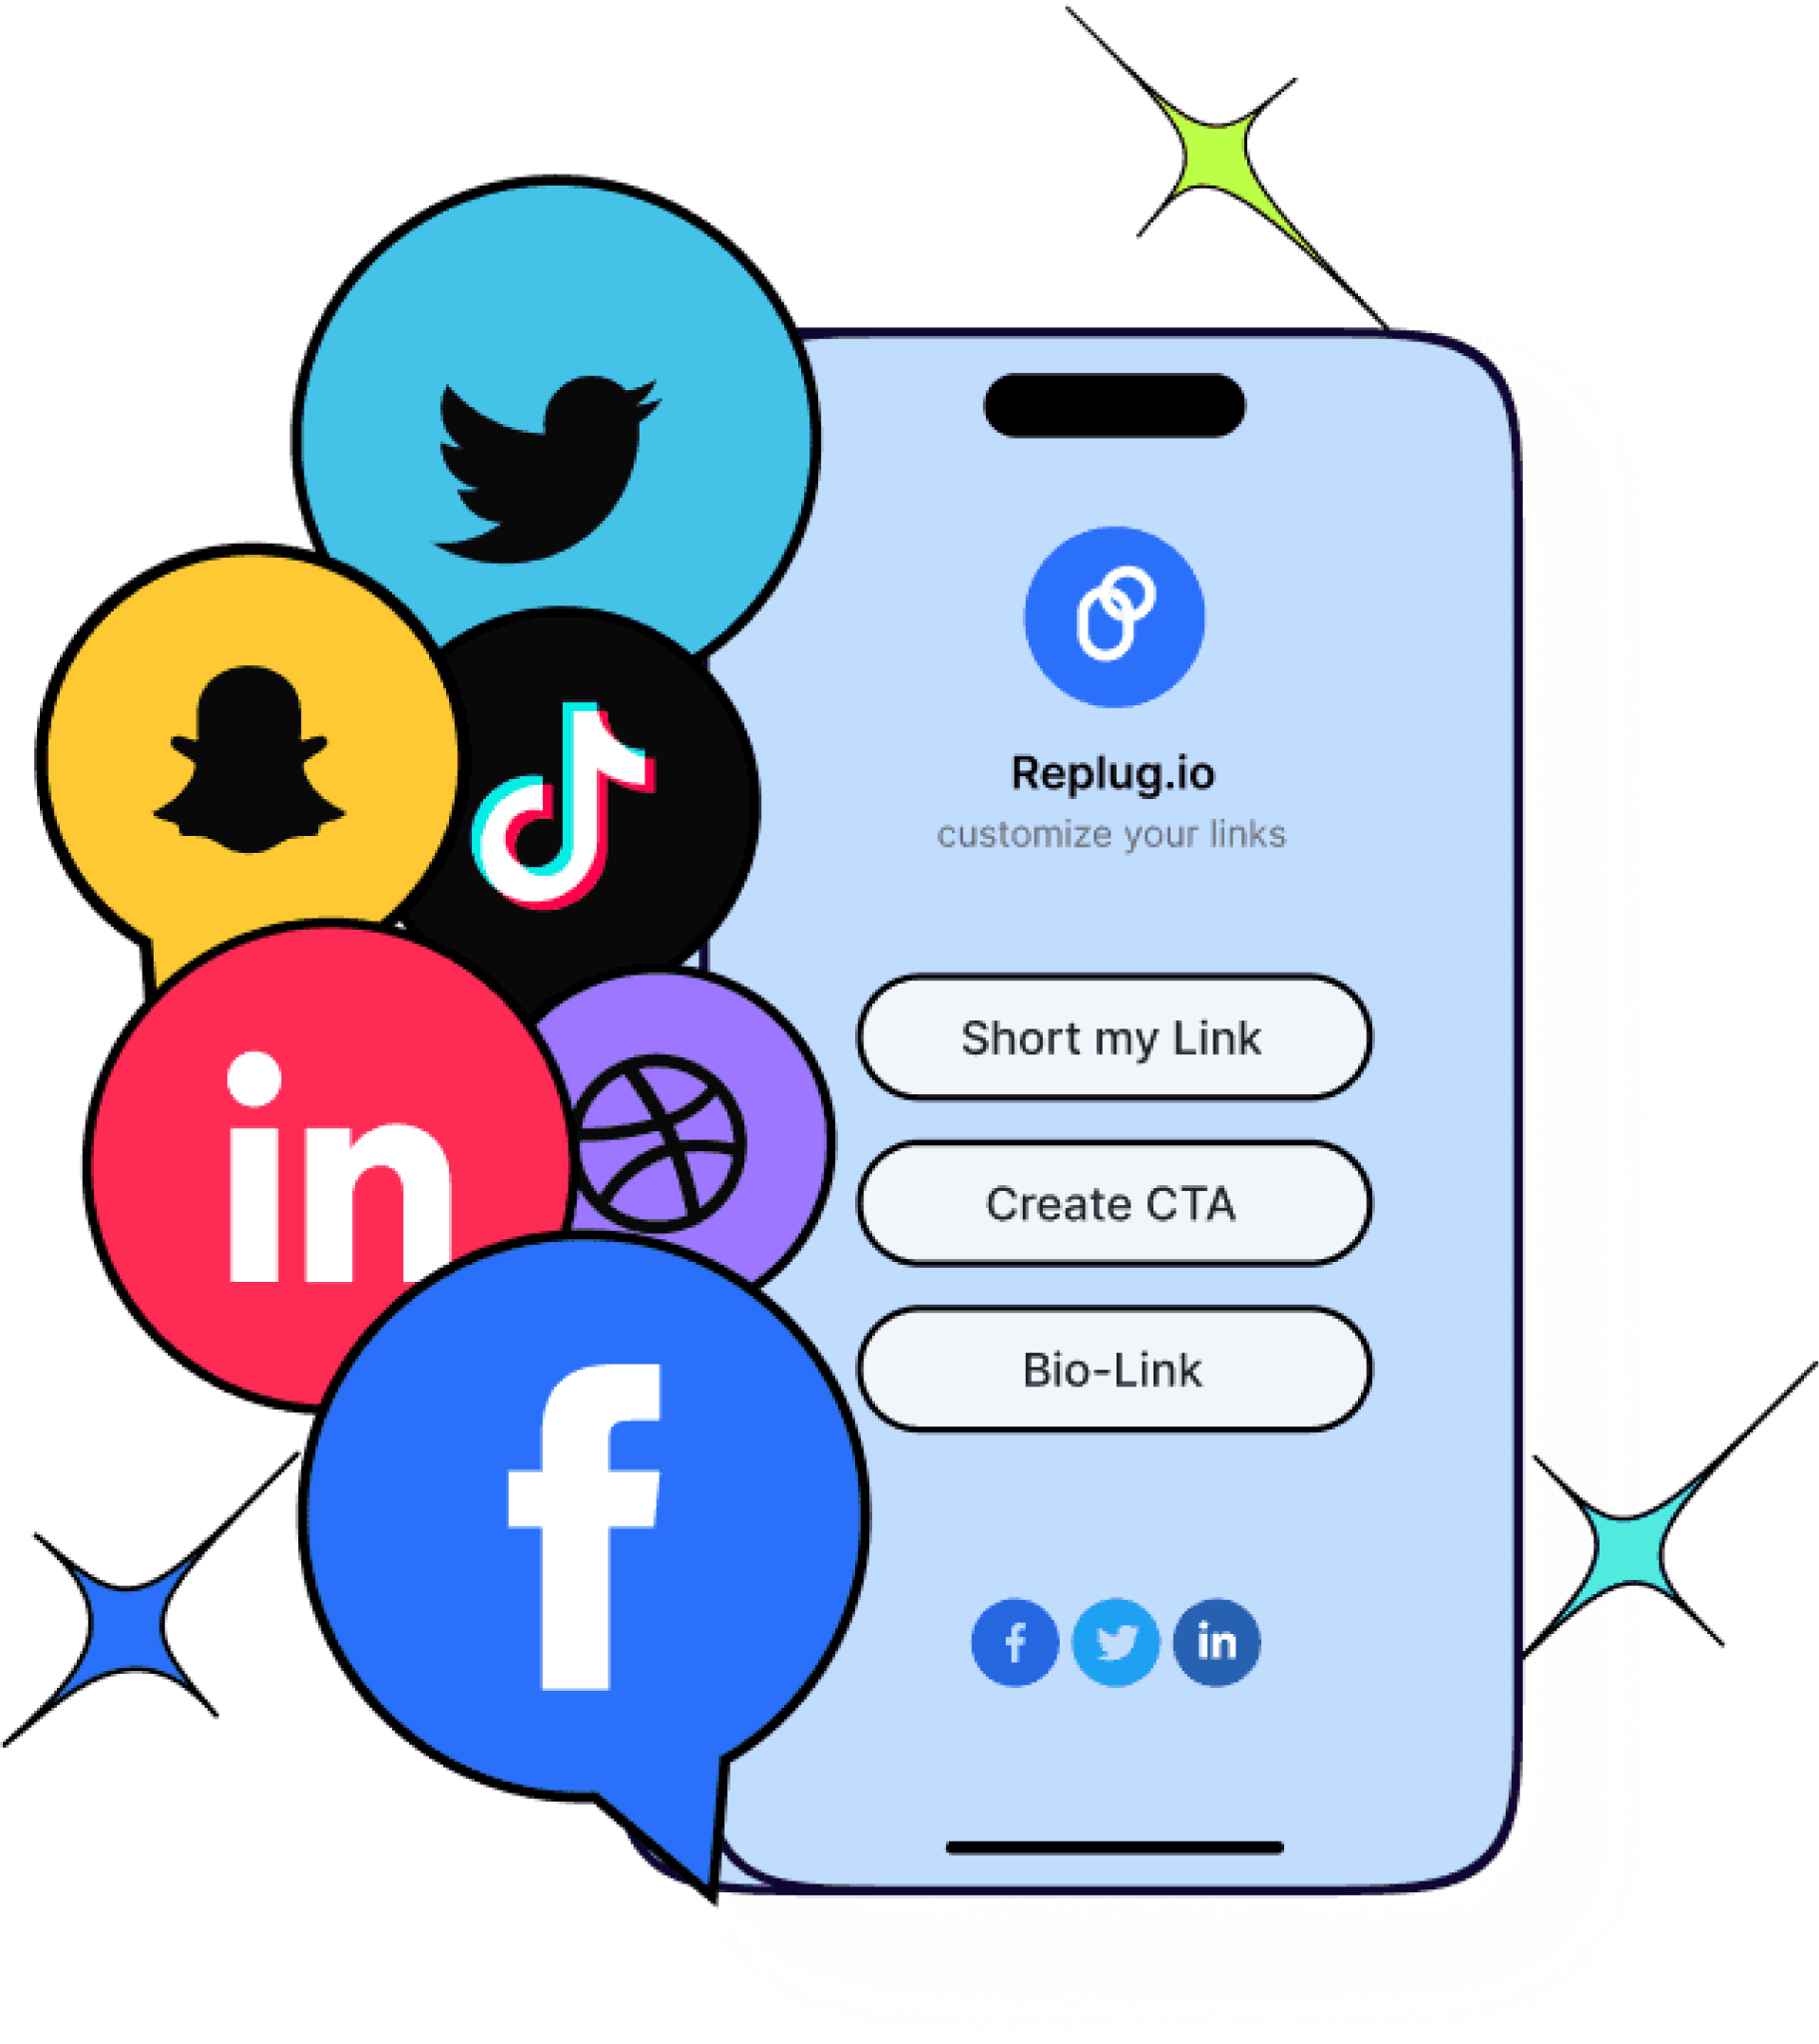
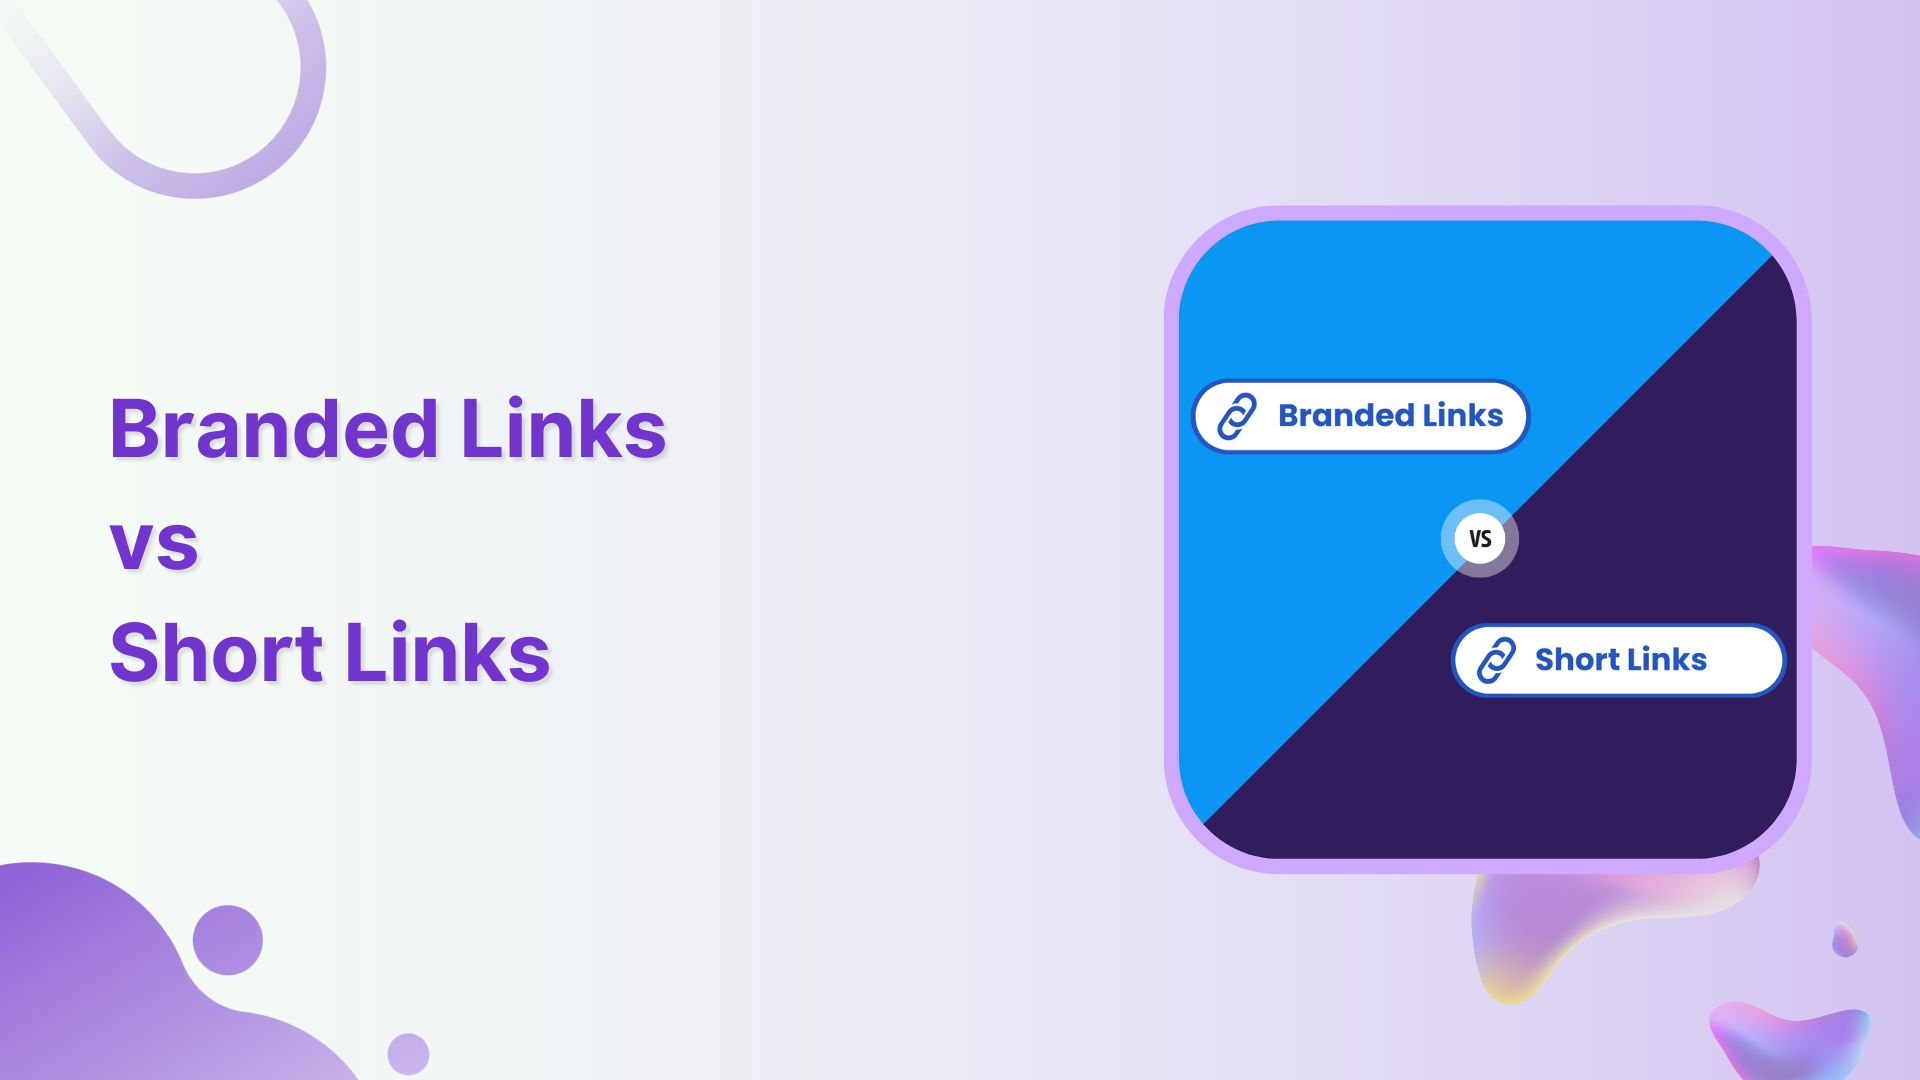
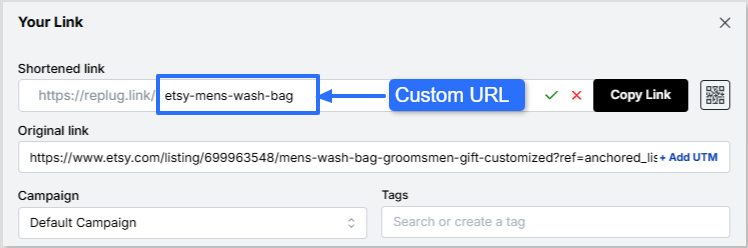
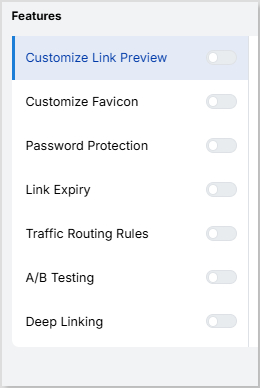
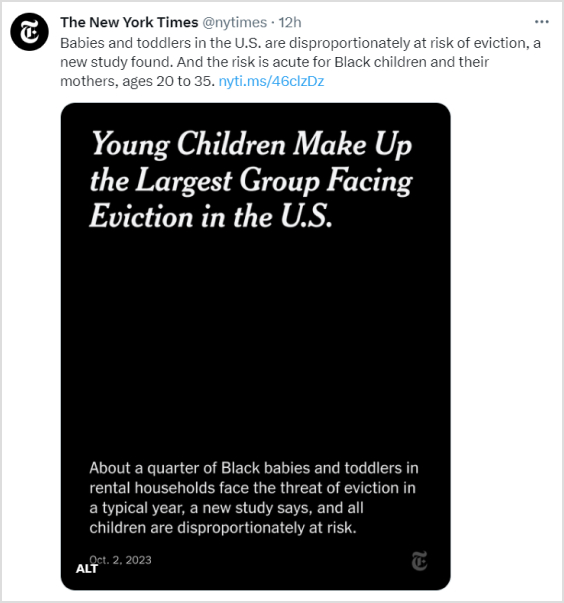
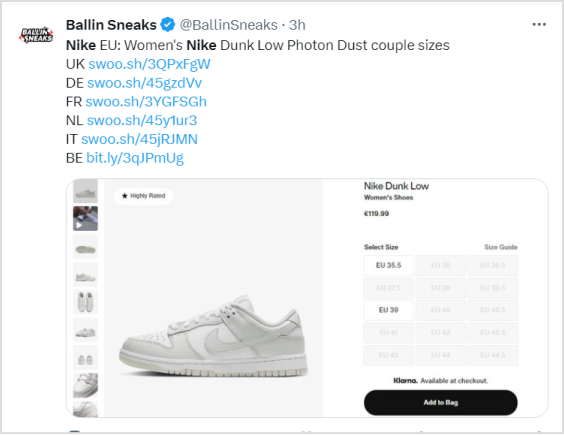

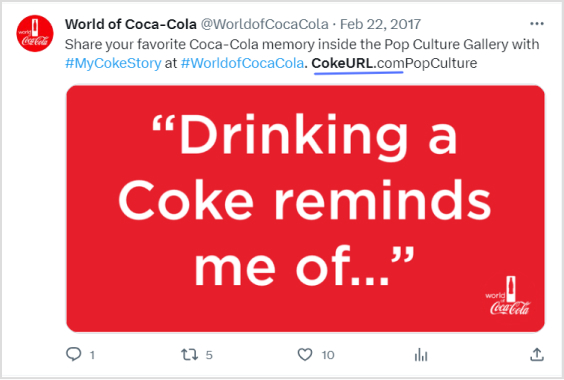
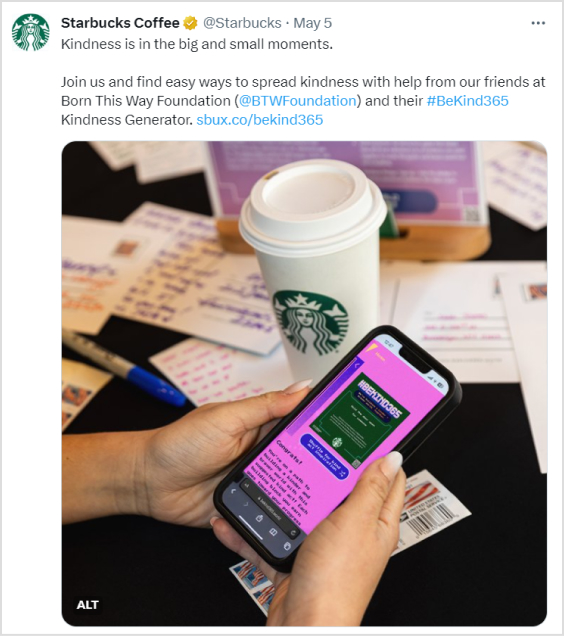


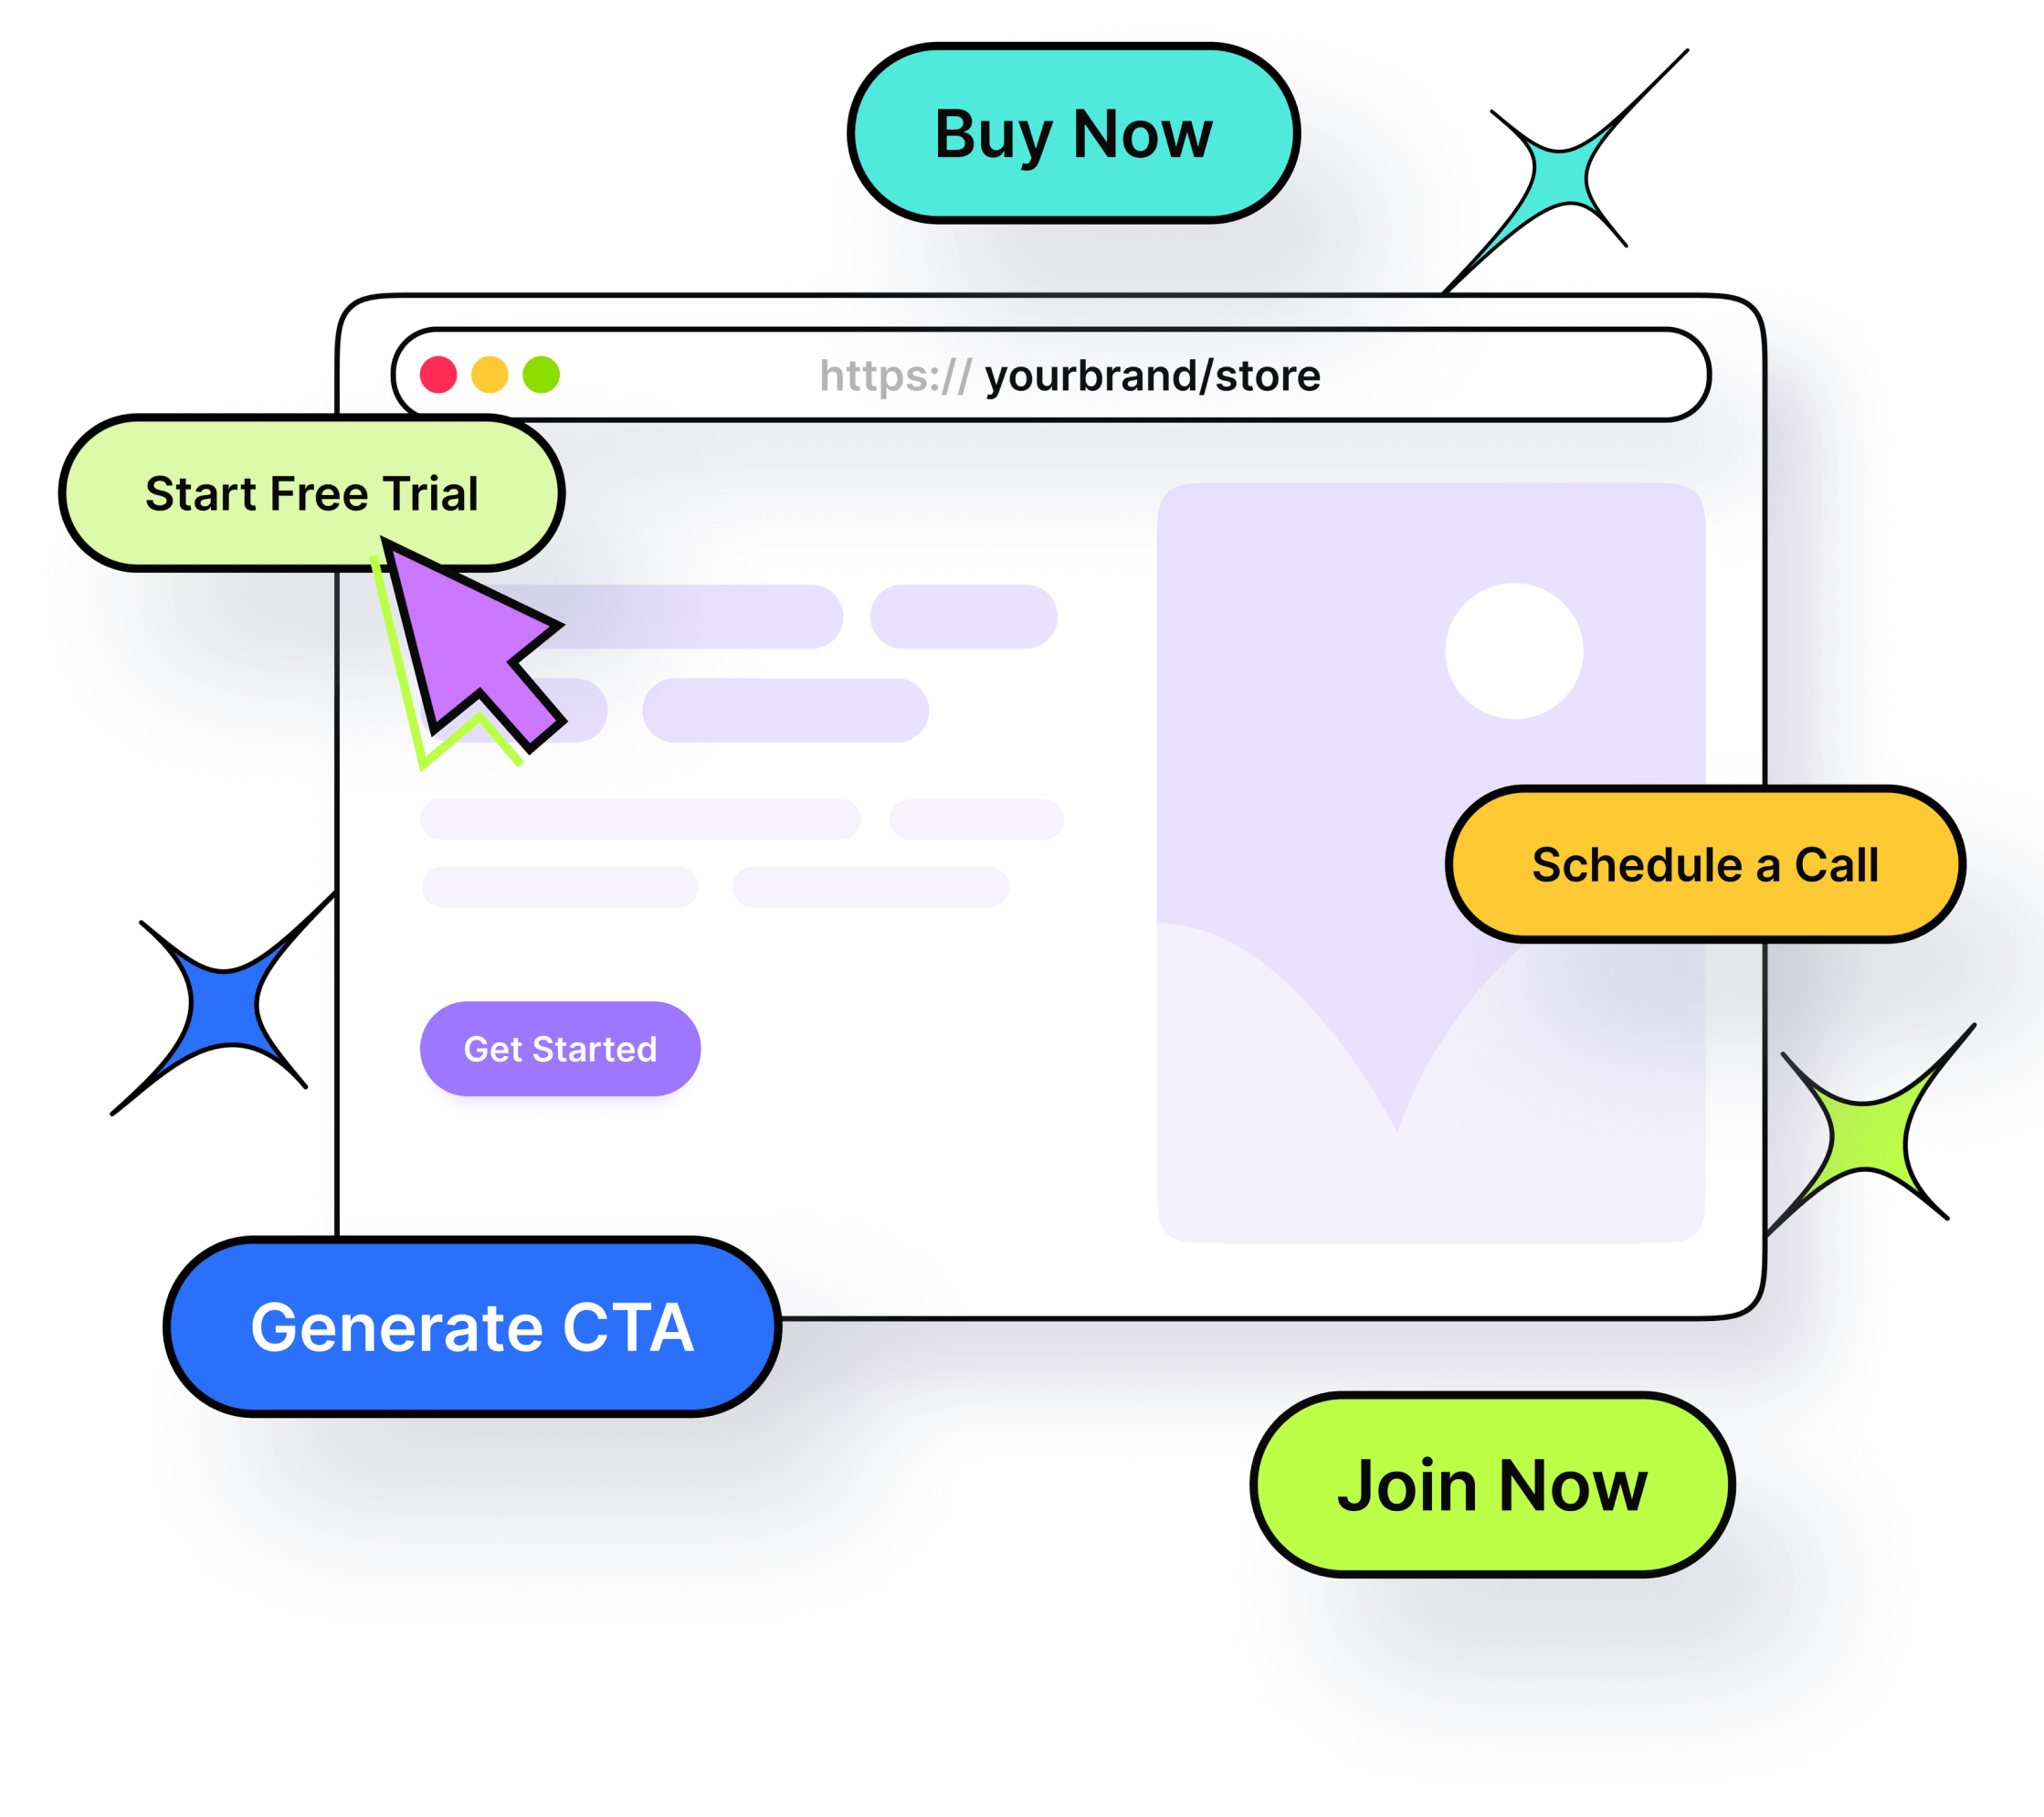

 However, tools like