Have you ever noticed a “thank you” page pops up as soon as you complete an online purchase?Sometimes, e-commerce stores recommend products based on your previous purchases or showcase relevant products buyers purchase along with those products.
You might wonder how this happens. Well, the secret behind all this is something called conversion pixels.
I’ll explain the conversion pixels in a jiffy, but let’s discuss the pixels first.
What’s a pixel?
Pixel is a code inserted into a website, mobile app, or email. The purpose behind adding a pixel to a website or any other online real estate is to track a user’s activity.
The pixel observes the user behavior and reports back to the main source. Thus, it opens up a floodgate of opportunities for digital marketers, online businesses, and e-commerce stores to reach out to the same audience through retargeting.
What is retargeting?
Retargeting is an advertising strategy that allows brands and entrepreneurs to remarket the products or services to the audience that has visited their websites or used their apps. All this becomes possible due to the pixel.
Almost all major social media platforms provide pixels for advertisers. It helps marketers track website visitors and better understand how they interact with the products and content.
What’s a conversion pixel?
A conversion pixel is a piece of code placed on e-commerce websites and apps to track the conversions that occur on the websites, sales pages, and emails.
A conversion pixel is crucial to tracking conversions on websites and apps as it reports to the advertiser when a conversion event occurs. Usually, advertisers use conversion pixels to track the sales performances of their marketing campaigns.
Its code is embedded in the “payment successful” or “thank you for the purchase” pages on an e-commerce website.
When the conversion happens, the conversion pixel triggers a signal and the event gets recorded for the advertiser’s record.
If you ever run a Facebook ad campaign for generating sales on your website, the Meta Pixel is used to track the sales.
Note that a sale isn’t the only conversion metric used by advertisers. In some cases, a successfully generated lead or a downloaded file through an ad is also considered a conversion.
Why use a conversion pixel?
While the primary goal of using a conversion pixel is to keep track of the ad campaign’s performance, there’s more to the story.
Advertisers must know that conversion pixel is imperative to understand the performance of ad units, call-to-actions, and landing pages. Moreover, it doesn’t end here.
Here are four key reasons why to use a conversion pixel:
i. Measure conversion rate
The key benefit of injecting a conversion pixel on your website or landing page is to keep track of your conversion rate, especially after the conversion optimization tactics have been applied. Low or zero conversion is indicative of wrong tactics.
ii. A/B testing Ad strategies
When a conversion pixel is embedded into the website code, it’s pretty clear that the conversions are being closely analyzed. Therefore, it allows advertisers to test out different ad designs, ad copies, and color schemes to see what works the best.
iii. Analyze conversion cost
One of the most underrated metrics is the conversion cost. Some digital marketers pay attention to analyzing the conversion cost, especially if they’re running different marketing campaigns, such as social media advertising and influencer marketing campaigns. It helps them understand which one is outperforming the other one.
iv. Optimize campaigns
When the data of an ad campaign comes up — usually at the end of the campaign — it’s the time to reflect on the situation. Moreover, marketers could optimize campaigns based on the previous ad campaign’s data. This data analysis wouldn’t have been possible without placing the conversion pixel on the site or landing page to track performance.
Use cases for using a conversion pixel
Since conversion pixel provides valuable insights into visitor engagement, it assists brands make data-driven marketing decisions, optimize their digital marketing campaign, and skyrocket the conversion rate.
Here are different areas where marketers can use conversion pixels:
i. Email marketing
Most email marketing softwares have a built-in feature to track the open rate of emails so that users could keep track of their email campaigns’ performances. However, a conversion pixel is also linked with an email campaign to inform the merchant or brand about the action being taken. For instance, users often get confirmation emails when they sign up for a service, it triggers the confirmation signal that a conversion event has occurred.
iii. Online advertising
Running online ad campaigns without any check-and-balance might be a huge mistake. It’s essential to track the performance of an ad campaign. One of the easiest campaign measurement techniques is to place a conversion pixel in the website or landing code.
When advertisers utilize conversion pixels, it assists them track, record, and analyze the output of the ad campaign. As a result, it helps them make informed decisions based on the ROI.
iii. Affiliate marketing
An affiliate marketing campaign would fall flat if there is no conversion tracking available or the conversion pixel isn’t working properly.
The way affiliate marketing works is that an affiliate promotes a product of a merchant and when a web visitor makes a purchase through the affiliate partner’s link, the affiliate earns a commission.
However, the merchant uses the affiliate tracking software to keep track of the affiliate conversions so that the affiliate partners could be paid for their referrals.
iv. E-commerce sales
The most common use case of the conversion pixel is in the e-commerce industry. It assists e-commerce businesses track e-commerce sales.
All they need to do is to place a conversion pixel on their “thank you” or “order confirmation” page to trigger the successful sale signal.
It significantly helps users measure the sales numbers from online ads or any other marketing campaign. More importantly, it’ll give insight into which of the online campaigns or ad platforms are driving the most sales.
v. Track mobile app installations
Startups and mobile app developers can use conversion pixels to track app installs and downloads. Remember to add the conversion pixel to the app download completion page to track the data.
Once it starts working properly, the user can analyze which ad campaigns or marketing channel is driving the most traction.
vi. Lead generation
Lead generation is a process of gathering user details, such as name, phone, and email through a lead magnet or sign-up form.
Businesses and organizations can track the performance of their event registrations landing pages, whether they’re hosting a webinar or a physical event.
Most brands and entrepreneurs use opt-in bribes to generate leads whether it’s access to an email course or a downloadable content.
The conversion pixel comes in handy in lead generation. Without placing a conversion pixel, it won’t be possible to track the conversion of a specific campaign or platform.
For example, if you run a Quora ads campaign, you place Quore Pixel on your website to measure the campaign’s effectiveness.
All they need to do is to paste a conversion pixel, and it will track the performance and effectiveness of the copy, landing page layout design, and ad campaign.
Best conversion tracking tools
Here are some of the best conversion tracking tools to check out:
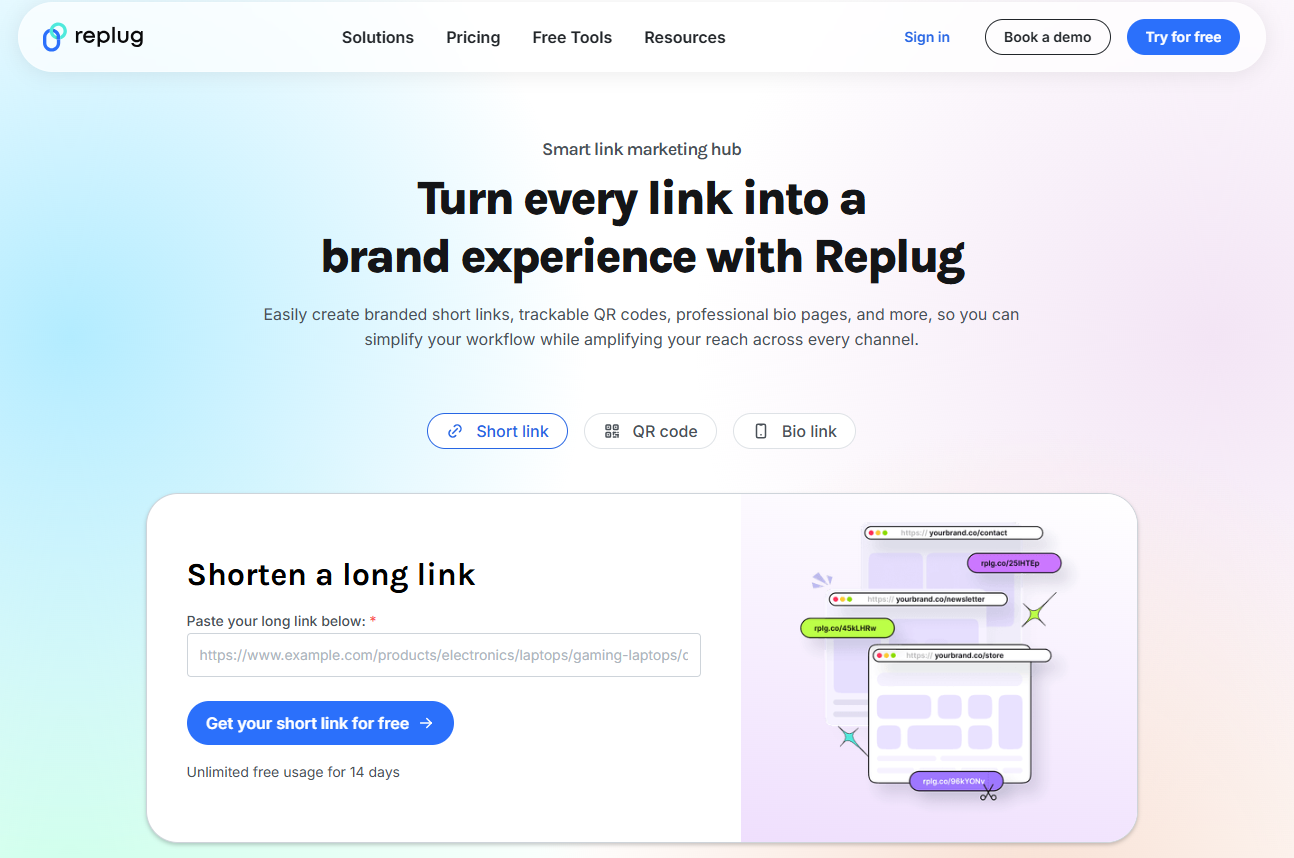
⦁ Replug
Replug is an all-in-one link management platform that provides a complete toolkit for URL management. The key features include a top-notch URL shortener, branded URLs, UTM codes, URL tracking, deep links, retargeting, and more. The link retargeting tool plays a vital role in setting up a retargeting campaign for brands and advertisers using pixel tracking.
⦁ Optimizely
Optimizely is yet another powerful URL-tracking tool for digital marketers and brands. It assists web developers and digital marketers in analyzing and optimizing landing pages and website content pages. This tool empowers brands and digital marketing agencies to implement visual editing, page optimization, and advanced targeting.
⦁ Google Analytics
Google Analytics is the widely popular website and app analytics tool from the house of the internet tech giant Google. It’s used to collect website visitors’ data, conversion reporting, site traffic sources, bounce rate, page views, and much more.
⦁ Woopra
Woopra is a well-known player in the website conversion optimization genre. It’s a powerful tool that helps users track, analyze, and improve the customer journey. It offers powerful features to empower brands with effective, real-time customer analytics.
How to set up conversion tracking pixel for your website?
Conversion pixels are a must-have tool for measuring the effectiveness of your online advertising efforts and digital marketing campaign.
Let’s shed some light on how to set up a conversion pixel for your website:
1. Create a Conversion Pixel
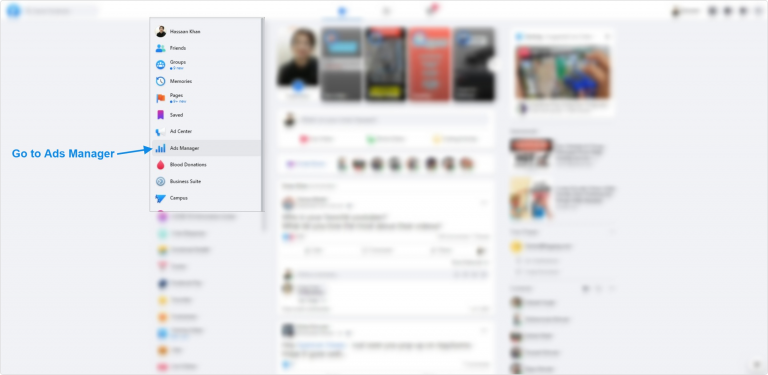
Most first-timers haven’t had a chance to generate their conversion pixel. So the first step while setting up the conversion pixels is to generate the pixel itself. To do this, marketers need to go to their advertising platforms, such as we have taken Facebook Ads Manager in this case.
If it’s not created before, then select the option to create a new conversion pixel in the conversion tracking area. The process is pretty much the same across all social media ad platforms.
2. Choose a name for the pixel
All you need to do is to choose a name for the pixel and select the type of conversion you want to measure, such as a purchase or lead generation.
3. Generate the pixel code for your website
Once the conversion pixel is generated, grab it for installation on your web or app property. You don’t need to be a website developer to insert this piece of code into your website or application.
4. Add the pixel code to your website
Install your conversion pixel on your website or app by adding it to the source code. If you’re using WordPress, it’s better to use a link insertion service or plugin.
In some cases, you might have to manually inject the code into the website source. Make sure the code is in the right place on your page, such as the header or footer. Once it’s done, go ahead and connect it with your site.
So this entails adding a short piece of code to the page or website section where conversions are to be tracked. Once the code is added, save the changes and move on to the next step.
Now you can test traffic using Pixel Helper extension.
Setup Facebook conversion API
Click on the “Events Manager” tab in the Business Manager menu.
Click on “Data Sources” in the left-hand menu.
Select or create the event you want to configure for the Conversion API.
Now you have two options
If using Partner Integration, choose the partner and follow the provided instructions.
If using Manual, you’ll need to manually implement the API calls.
Just follow the prescribed steps and you will be done setting up your conversion API. If you still have any confusion, check the detail here.
Conversion tracking using GA4
Two steps for tracking conversions on Google Analytics4.
Create an event for the confirmation page
Mark the event as a conversion
Step 1: Create an event for the confirmation page
Access admin section and choose property:
Begin by accessing the admin section of your analytics tool or platform. Within this section, locate and select your preferred property. For this guide, let’s focus on the “events” property. Navigate to the property options where you can manage and set up events.
Create a new event:
Inside the “events” property settings, you’ll find the option to create a new event. Click on this option to initiate the event creation process. This is where you’ll define the specific event you want to track and analyze.
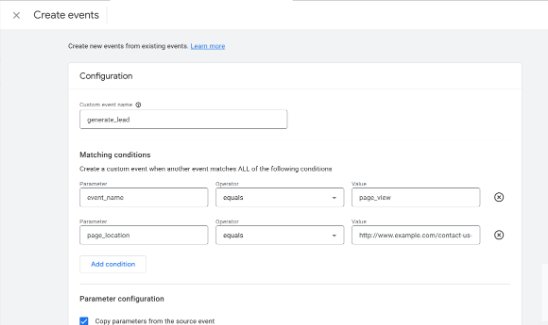
Enter custom event name:
As part of event creation, you’ll need to provide a unique name for the event. For instance, let’s use the example of tracking a lead generation event. In the “Custom event name” field, input a descriptive name such as “generate_lead.” This name should clearly represent the nature of the event you’re setting up.
Set matching conditions:
Matching conditions help define when the event should be triggered and recorded. In the “Matching conditions” section, you’ll configure these conditions for accurate tracking. Start by entering the first matching condition. For instance, if you want to track an event when a page is viewed, input “event_name equals page_view.”
Add first condition:
After entering the initial matching condition, click on the “Add condition” button. This step confirms the first condition you’ve specified. It’s essential for ensuring the event is only triggered when the specified conditions are met.
Enter second matching condition:
Now, proceed to input the second matching condition. This further refines when the event should be recorded. For the lead generation example, if you want to track a form submission on a specific page, enter “page_location equals https://www.example.com/contact-us-submitted.”
Finalize Event Setup:
After providing both matching conditions, review the details you’ve entered. Make sure the event name and conditions accurately represent the event you’re tracking. This step is crucial for proper data interpretation and analysis.
In the Parameter configuration section, click Add modification twice. Because you are using a recommended event, you need to define each of the required parameters. Otherwise, Google Analytics will treat the event as a custom event.
Step 2: Mark the event as a conversion
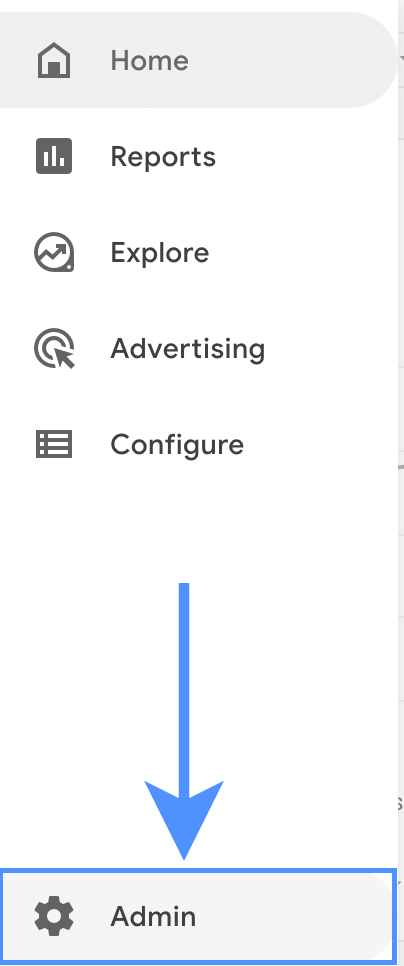
To set up a new conversion event in Google Analytics, start by clicking on the “Admin” option from the main menu. This will take you to the administrative section where you can manage various settings for your account.
Ensure that you’re working within the correct Google Analytics account and property. You’ll want to make sure you’re making changes to the right data. In the “Property” column, find and click on the “Conversions” option. This is where you can manage your conversion tracking settings.
Once you’re in the “Conversions” section, you’ll see an option to create a new conversion event. Click on “New conversion event” to initiate the event creation process. This is where you’ll define the specifics of the event you want to track.
Give your new event a descriptive name. For instance, let’s say you’re setting up an event to track lead generation. Enter the name “generate_lead” in the provided field. This name should clearly represent the action or interaction you’re interested in tracking.
Here’s a detailed video of tracking conversion goals in GA4.
That’s it from our side now get started with your conversion tracking process.
FAQs about Conversion Tracking Pixels
Let’s answer some of the frequently asked questions about conversion tracking:
What triggers a conversion pixel?
Any pre-defined action or event that matches the conversion criteria triggers the conversion pixel and ensures that the action or event gets recorded. The conversion pixel is a short piece of code that plays a crucial role in recording a specific event or action.
How do you set conversion pixels?
To set a conversion pixel, create and grab the conversion pixel from the desired social media advertising platform like Facebook ads or Quora ads, and then put it on the website property, such as a landing page or website to start tracking an action or event.
What is pixel-perfect conversion?
Pixel-perfect conversion refers to the process of understanding design principles and front-end development techniques for translating a design into a digital format with absolute precision. The goal is to ensure that the digital version replicates the original design with accuracy and avoids discrepancies in the output.
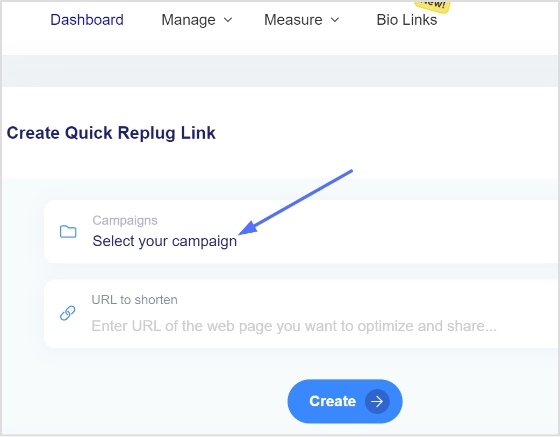
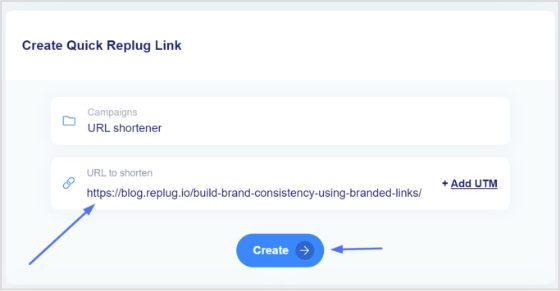
QR codes are a great way to share information quickly and easily. They can be used to encode various data, including URLs, text, contact information, and more.
To create a QR code, you must choose a reliable QR code generator, enter the information you want to encode, choose a design, download the QR code, and share it.
In this guide, you’ll find out how to create a dynamic QR code quickly and easily.
What is a dynamic QR code?
A dynamic QR code is a QR code that can be updated after it has been created. This is in contrast to a static QR code, which cannot be changed once it has been created. Dynamic QR codes are often used for marketing and advertising purposes, as they allow businesses to track the number of people who have scanned their code and to change the content of the code as needed.
Dynamic QR codes are created using a special type of software that allows the user to enter the desired information that they want to be included in the code. This information can then be changed at any time by simply updating the code in the software.
Dynamic QR codes can be scanned by any QR code reader, and they will typically open a web page or redirect the user to a specific location.
How to create a dynamic QR code?
Here’s how to create a dynamic QR code. Follow the step-by-step process below:
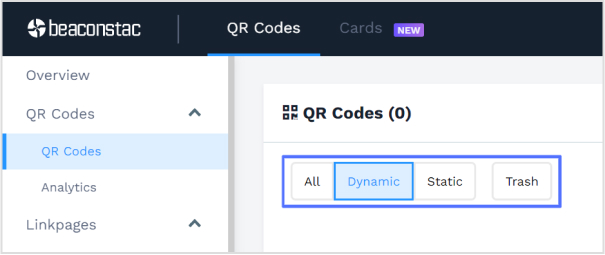
Step 1: Choose a QR code generator. There are many free and paid QR code generators available online. In this case, we are using the Beaconstac QR codes.
Step 2: Log in or create an account for free.
Step 3: Choose the type of QR code you want to create. There are two main types of QR codes: static and dynamic. Static QR codes cannot be changed after they are created, while dynamic QR codes can be updated with new information.
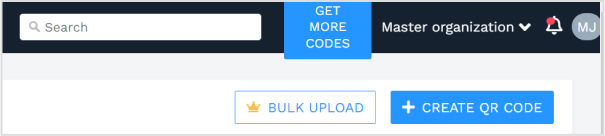
Step 4: Click the “+Create” or “Create QR code” button in the top right corner.
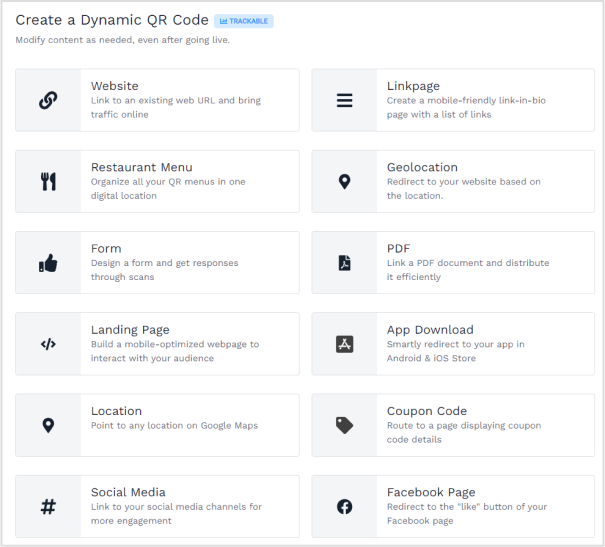
Step 5: Choose the information you want to include in your QR code. This can be a URL, text, contact information, or anything else you want people to be able to access when they scan the code.
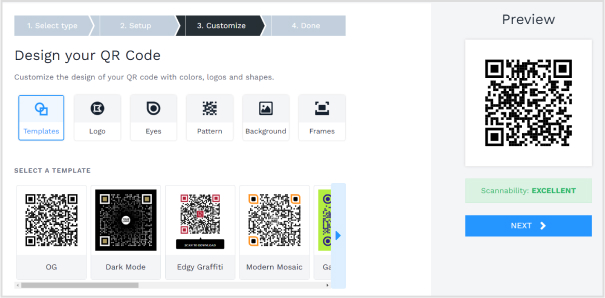
Step 6: Customize the design of your QR code with colors, logos, and shapes.
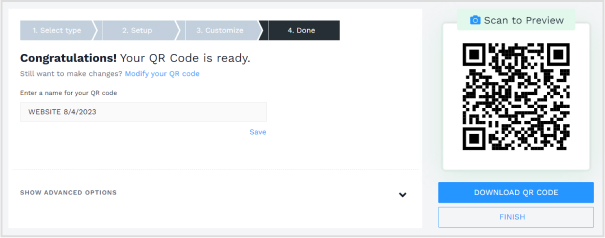
Step 7: Download your QR code. Once you have created your QR code, you can download it as an image file.
Step 8: Share your QR code. You can share your QR code online, print it out, or include it in your marketing materials.
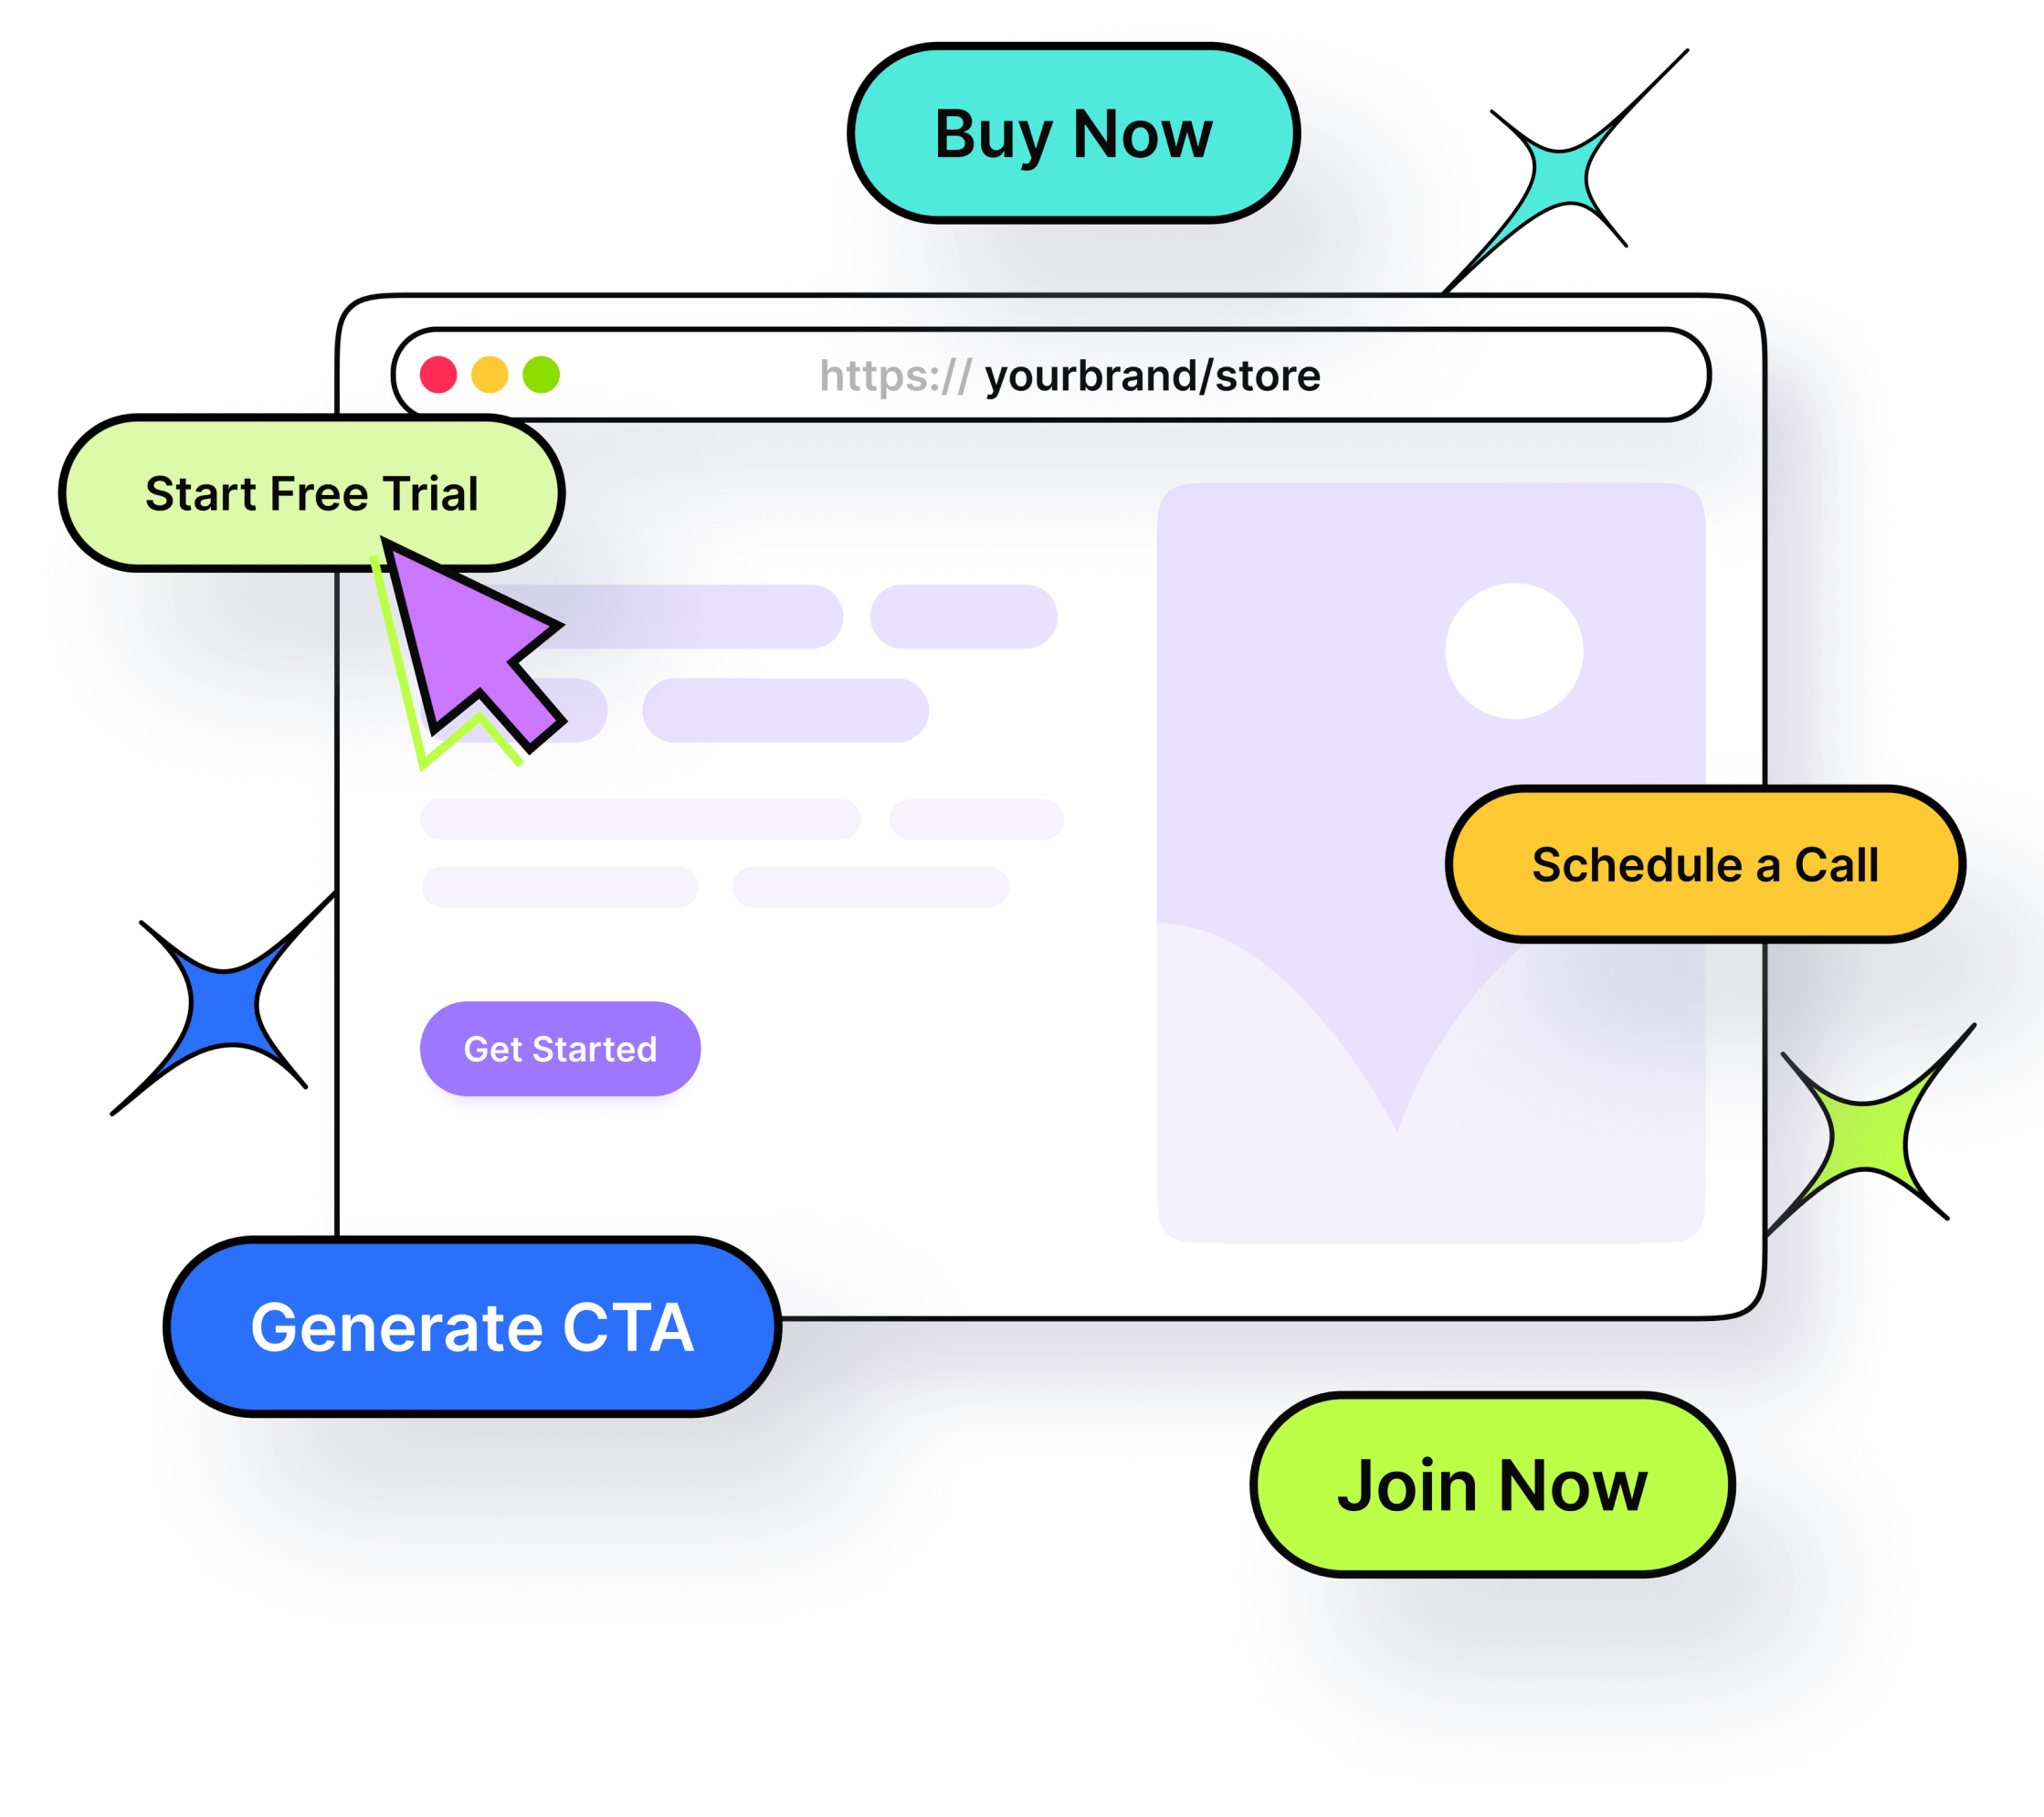
Boost your conversion rates with irresistable CTAs with
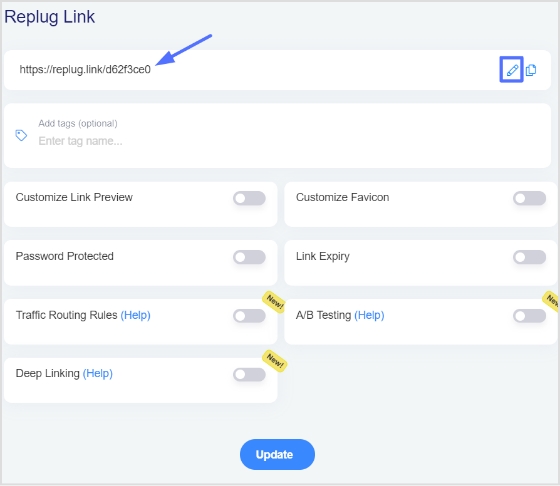
Important note: A longer URL makes your QR code more complex and difficult to scan. Use our link shortener tool to shorten long links and download them as QR codes. By doing so, your content will be easier to scan and access.
How to create a QR code for a URL?
To create a QR code for a URL follow the step-by-step guide below:
Note: Replug.io also provides powerful analytics and tracking features to monitor the performance of your short URLs, and QR codes including click-through rates, geographical data, and other valuable insights.
Static vs Dynamic QR code: What’s the difference?
Static and dynamic QR codes are two types of QR codes that differ in their functionality. Static QR codes are permanent and cannot be changed after they are created.
Dynamic QR codes, on the other hand, can be updated after they are created. This makes dynamic QR codes more versatile than static QR codes, as they can be used for a variety of purposes, such as tracking marketing campaigns or providing access to time-sensitive information.
Here are some of the key differences between static and dynamic QR codes:
Static QR codes are permanent and cannot be changed after they are created. Dynamic QR codes can be updated after they are created.
Static QR codes are typically used for simple tasks, such as directing users to a website or providing contact information. Dynamic QR codes can be used for more complex tasks, such as tracking marketing campaigns or providing access to time-sensitive information.
Static QR codes are typically less expensive to create than dynamic QR codes.
Static QR codes are a good option for simple tasks, such as directing users to a website or providing contact information.
Dynamic QR codes are a good option for more complex tasks, such as tracking marketing campaigns or providing access to time-sensitive information.
Here are some examples of when you might use a static QR code:
To direct users to your website
To provide contact information
To add a product to a shopping cart
Tips for creating a successful QR code:
Ensure the information you encode in your QR code is relevant to your target audience.
Choose a clear and concise design for your QR code.
Share your QR code in places where people are likely to see it and scan it.
Track the results of your QR code campaign to see how well it is performing.
A complete link management solution
for marketing professionals & agencies.
Try Replug for free
Frequently asked questions
Can I convert a static QR code to a dynamic QR code?
It is not possible to convert dynamic QR codes to static QR codes, or vice versa, as the two types of codes are fundamentally different.
How do I create a QR code for a dynamic link?
Use a QR code generator to create a QR code for a dynamic link. Enter the URL of the dynamic link and the generator will create the QR code.
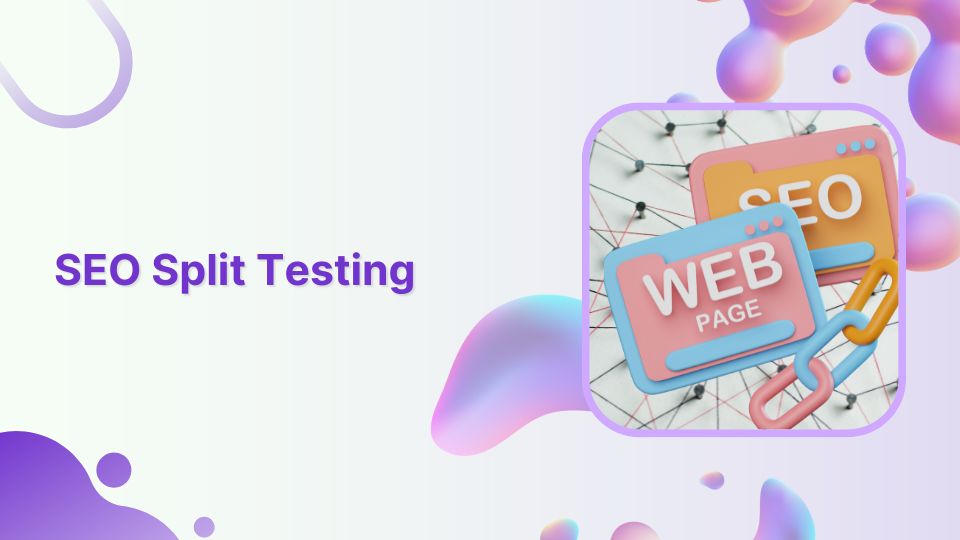
Tired of guesswork in SEO? Embrace the science of SEO split testing!
Discover how small changes to your website’s structure, keywords, and content can have a big impact on search rankings, organic traffic, and user engagement.
Let’s supercharge your website’s organic search results with our SEO split testing guide.
What is SEO Split Testing?
SEO split testing is the process of comparing different versions of web pages to measure their impact on search engine rankings. It’s like a controlled experiment, where you have a variant page with changes and a control page. By tracking the performance of each variant, you can identify the best performing webpage and enhance your website’s visibility in search engines.
The benefits of SEO split testing
Data-driven decision-making: You can make informed decisions based on empirical evidence on the effectiveness of different variations.
Improved user experience: Testing different elements can lead to a better user experience, resulting in higher engagement and improved rankings.
Increased organic traffic: You can attract more organic traffic from search engines by optimizing your website based on test results.
Better conversion rates: Split testing helps identify the most effective strategies to drive conversions.
Adaptation to algorithm changes: It allows you to adjust your SEO strategies in response to algorithm updates.
Stakeholder buy-in: A/B Split test results provide tangible evidence of the impact of SEO efforts.
Below are the benefits of split testing the SEO strategy that might convince you to invest your time in them:
1. Improve Conversion Rates:
Conversion rate optimization (CRO) and SEO are closely related concepts. By split testing your SEO campaign, you can increase traffic and conversion rates. You can fine-tune your SEO strategy to enhance user experience and boost conversions by testing various iterations of landing pages and calls-to-action buttons.
2. Optimize SEO Efforts:
By using split-testing, you can compare various iterations of your SEO strategy, including :
Keyword usage
Meta tags/descriptions
On-page optimization
Content organization
This practice allows you to identify which tactic produces the best outcomes. It assists you in determining the best strategies to raise your search engine rankings and increase organic traffic.
3. Keeping up with algorithm changes:
Search engine algorithms are always changing, so what works today might not work tomorrow. Split-testing enables you to modify and polish your SEO approach to conform to algorithm updates. You can make sure your website maintains its search engine optimization and visibility in the constantly shifting environment by being proactive and conducting ongoing testing.
4. Convince stakeholders and quatify Impact:
The impact of SEO can be quantified by measuring key metrics both before and after changes by performing an SEO Split test. This data-driven strategy offers verifiable proof of the efficacy of your SEO strategy, enabling you to convince stakeholders of the value of your optimizations and make wise resource allocation choices.
5. Refine user experience:
Split-testing SEO components can help you improve your website’s overall user experience. By testing various layouts, navigation structures, page load times, and mobile responsiveness, you can find changes that make your website more user-friendly
Factors to consider before performing the SEO Split test?
These several factors must be considered before performing an SEO split test.
Clear objectives: Define clear objectives for your test. What specific aspect of your SEO strategy are you testing?
Testing scope: Determine the scope of your test. Decide whether you’ll be testing a single webpage or multiple pages.
Sample size: Strive for a sample size that provides meaningful insights without being too resource-intensive.
Test duration: Determine the appropriate duration for your test within the time frame of changing dynamics.
Statistical significance: Establish the level of statistical significance you require for your results to be reliable. This helps determine the confidence level you need to make decisions based on the test data.
Choosing the right testing tool: Use a reliable, user-friendly A/B split testing tool with a solid track record.
Consistency in testing conditions: Make sure the testing conditions, such as the user demographics, devices, browsers, and traffic sources, are constant throughout the test.
Segmentation and personalization: Depending on user characteristics, decide whether you want to segment your audience or personalize the variations.
Data collection and analysis: Establish a clear plan for data collection and analysis to derive actionable conclusions.
Documentation and reporting: Document your test process, including the variations tested, metrics measured, and results obtained. This documentation will be valuable for future reference
How do you know if an SEO test is successful?
Keyword rankings:
When it comes to evaluating your SEO results, one important aspect to consider is monitoring your keyword rankings on search engine results pages (SERPs). While rankings should not be the sole focus of your SEO campaign, they provide valuable insights into the performance and effectiveness of your targeted keywords. By regularly checking your rankings, you can track whether they are improving, declining, or remaining stagnant over time. If you find out that you are not ranking for the keywords you targeted, reevaluate whether it is worth continuing to focus on those keywords or considering alternative options.
Organic traffic:
Another way to see whether your SEO test was successful is by analyzing your website’s organic traffic. There are comprehensive tools like Content Studio that help you look for trends and changes in traffic volume, sources, and user behavior. Compare the data before and after implementing SEO strategies to identify any positive impact on organic traffic.
An increase in organic traffic serves as a strong indicator of the effectiveness of your SEO efforts. However, do keep in mind that organic traffic data is more important than overall traffic. It is because factors outside of SEO can influence overall traffic numbers. Conversely, a decrease in organic traffic suggests that your SEO tests are not working.
Backlinks:
Evaluate the quantity and quality of backlinks to your website. Backlinks from reputable and relevant sources can improve your website’s authority and search rankings. When implementing effective SEO practices, it is natural to witness an increase in backlinks. You need to assess whether the number of links and unique domains they originate from is growing, declining, or stagnant. However, quantity alone is not sufficient; the quality of backlinks also holds great importance. Low-quality backlinks can be detrimental to your website’s reputation, similar to having no links at all. Boost your business visibility in local search with professional services from Copify.
Check impressions:
Impressions refer to the number of times your website appears in search results without receiving any clicks. It serves as an initial metric to consider. This is because, when you begin optimizing for keywords, it’s unlikely that you’ll immediately land on the first page of search results.
Starting from lower pages means that even if your website appears in searches, there is a lower chance that it will be clicked. Knowing that you have begun ranking for those keywords will help you keep working toward the top of the page. You can use ‘Social Media Analytics’ by Content Studio to check your organic impressions. If it shows an increase in the number of organic impressions, your SEO tests are working if not better perform the tests again.
Bounce rate:
Another important aspect to consider when evaluating your SEO performance is analyzing the bounce rate of your website. The bounce rate refers to the percentage of visitors who leave your site after viewing only one page. By examining this metric, you can gain insights into how well your SEO tests are working. You should aim to have a lower bounce rate. This means that visitors find value in your content and are more likely to explore multiple pages on your website.
To improve your bounce rate, focus on creating high-quality content that is relevant, informative, and engaging. Ensure that your website is user-friendly, with clear navigation and intuitive design. Additionally, optimize your landing pages to align with the search intent of your target audience, delivering the information or solution they are seeking.
Conversion rates:
Tracking the number of conversions is one technique you can use to gauge the effectiveness of your SEO strategy. Start with form submissions, purchases, sign-ups, and any other desired actions on your website. A rise in conversion rates indicates that your SEO tactics are effectively attracting visitors who are genuinely interested in your offerings. It signifies that your website’s content, user experience, and overall SEO optimization are aligned with the needs and expectations of your target audience.
Note: To calculate the conversion rate, divide the number of conversions by the total number of visitors and multiply it by 100 to get the percentage.
This metric provides a clear indication of how well your website is performing in terms of converting visitors into customers or achieving your desired goals.
A/B Split Testing using Replug
Replug is a comprehensive platform for URL shortening and tracking. It provides many features to help you manage links and improve your marketing.
Users can shorten and customize URLs with Replug’s trustworhty URL shortener, track link performance, and enhance the overall link shortening experience.
It allows split A/B testing of various URL variations. By doing this you can determine their effect on click-through rates and overall performance.
Follow the steps given below using Replug’s A/B testing tool and perform A/B split tests efficiently in no time at all!
Step 1
To access the Replug application, begin by logging in to your account.
Once logged in, navigate to the Replug Links page.
Locate and click on the New Link button to initiate the process of creating a new link. Follow the subsequent steps provided to complete the link creation procedure.
Step 2
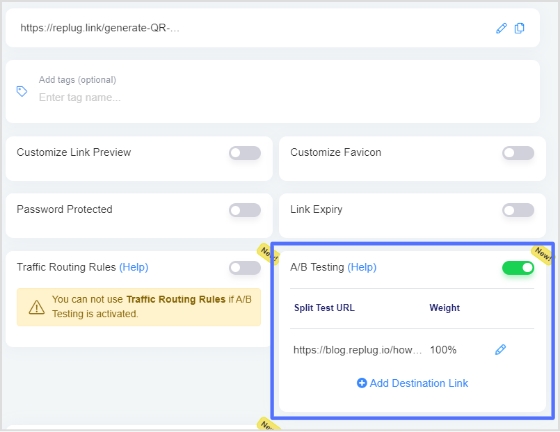
Before saving the link, activate the A/B Split testing feature by switching on the toggle button. This action will automatically set your destination URL as the initial A/B Testing Link with a weightage of 100%.
To include additional URLs for testing, simply click on the “Add Destination Link” button.
Step 3
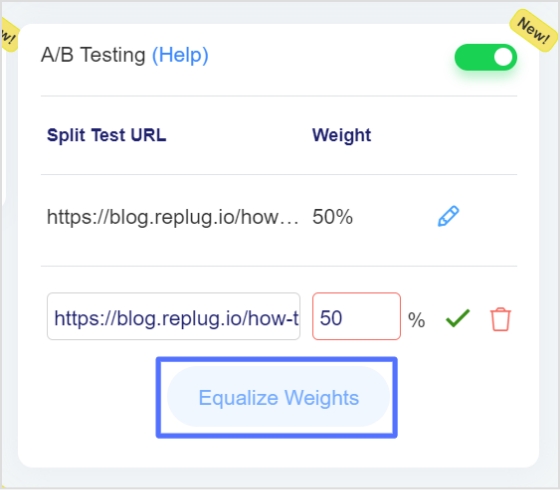
You have the flexibility to assign different weights to each URL, as long as the total weightage adds up to 100%.
To simplify the process, you can utilize the “Equalize Weights” button, which automatically distributes the weightage equally among the URLs.
This allows for easy adjustment and optimization of the weight distribution for your A/B testing purposes.
Step 4
After enabling the A/B Testing feature, you are ready to save your branded link. Start engaging your audience by sharing your Replug Link
Now analyze link performance and keep using the best performing one.
Note: It’s important to note that the weightage assigned to each URL is not influenced by previous visits and does not have strict constraints.Whenever the short link is accessed, the final destination URL is selected based on the defined weightage, ensuring a dynamic and varied user experience. However, it’s worth mentioning that if your campaign type is CTA (Call-to-Action) and the specified link does not support iframe functionality, the link cannot be saved for A/B Testing. This limitation is due to the requirement of displaying web page content within another website using an iframe. If the source website does not permit iframe inclusion, Replug displays a warning when creating CTA Campaigns.
FAQs
What is A/B testing?
A/B testing is a method used to compare two versions of a webpage, advertisement, email, or marketing campaign to determine which one performs better.
When discussing “what is A/B testing” in detail, it refers to showing different variations to separate audience groups and analyzing user behavior to identify the most effective option for improving conversions and engagement.
Does A/B Testing hurt SEO?
A/B testing itself does not hurt SEO. It can be a valuable strategy to optimize your website for better search engine rankings. When running A/B tests, it’s important to ensure that the changes you make align with SEO best practices and guidelines provided by search engines. By running tests you can improve your search engine ranking in Google search results.
Most common mistakes to avoid while running SEO split tests
– No clear goals/ objectives – Simultaneous testing of multiple variations – Not collecting and analyzing enough data to draw statistically significant conclusions. – Not giving the test enough time to run and produce valid data. – Not documenting and tracking the modifications that were made and their impact on SEO performance. – Ignoring additional outside elements that could affect the test results.
What SEO elements can I test using split testing?
You can test various SEO elements to improve your website’s performance. Some elements you can consider testing include:
– Page titles – Meta descriptions – Keyword usage and optimization – Headings and subheadings (H1, H2, etc.) – Content length and formatting – Navigation and site architecture – Calls-to-action – Linking strategies – Image optimization – Mobile responsiveness – URL structure – Site speed
What’s the difference between conducting a split test and an A/B test
A split test and an A/B test are two different terms used to refer to the same type of experiment. However, the term “split test” is a broader term that encompasses any test where different versions are compared including A/B tests. In other words, it refers to dividing the traffic between multiple variations to measure their impact on key metrics. Whereas an A/B test specifically refers to comparing two versions: a control version (A) and a variant version (B).
Have you ever clicked on a link that looked something like /page?id=84721 and got zero idea what you were about to open?
Now compare that to /what-is-a-url-slug. Entirely opposite or totally unlike each other, right?
That little snippet sitting at the end of a web address is called a URL slug, and it’s doing more work than most people give it credit for.
A well-crafted slug improves click-through rates by giving users an immediate idea of what to expect, increasing the likelihood they’ll visit your page.
And with AI-powered search platforms like ChatGPT and Perplexity increasingly recommending content, having keyword-rich slugs helps these systems understand and categorize your pages accurately. This makes SEO-friendly slugs more relevant than ever.
No matter if you’re a blogger, a marketer, or just someone trying to get their website to rank, getting your slugs right matters.
So, let’s start from the very beginning: what exactly does “URL slug” mean?
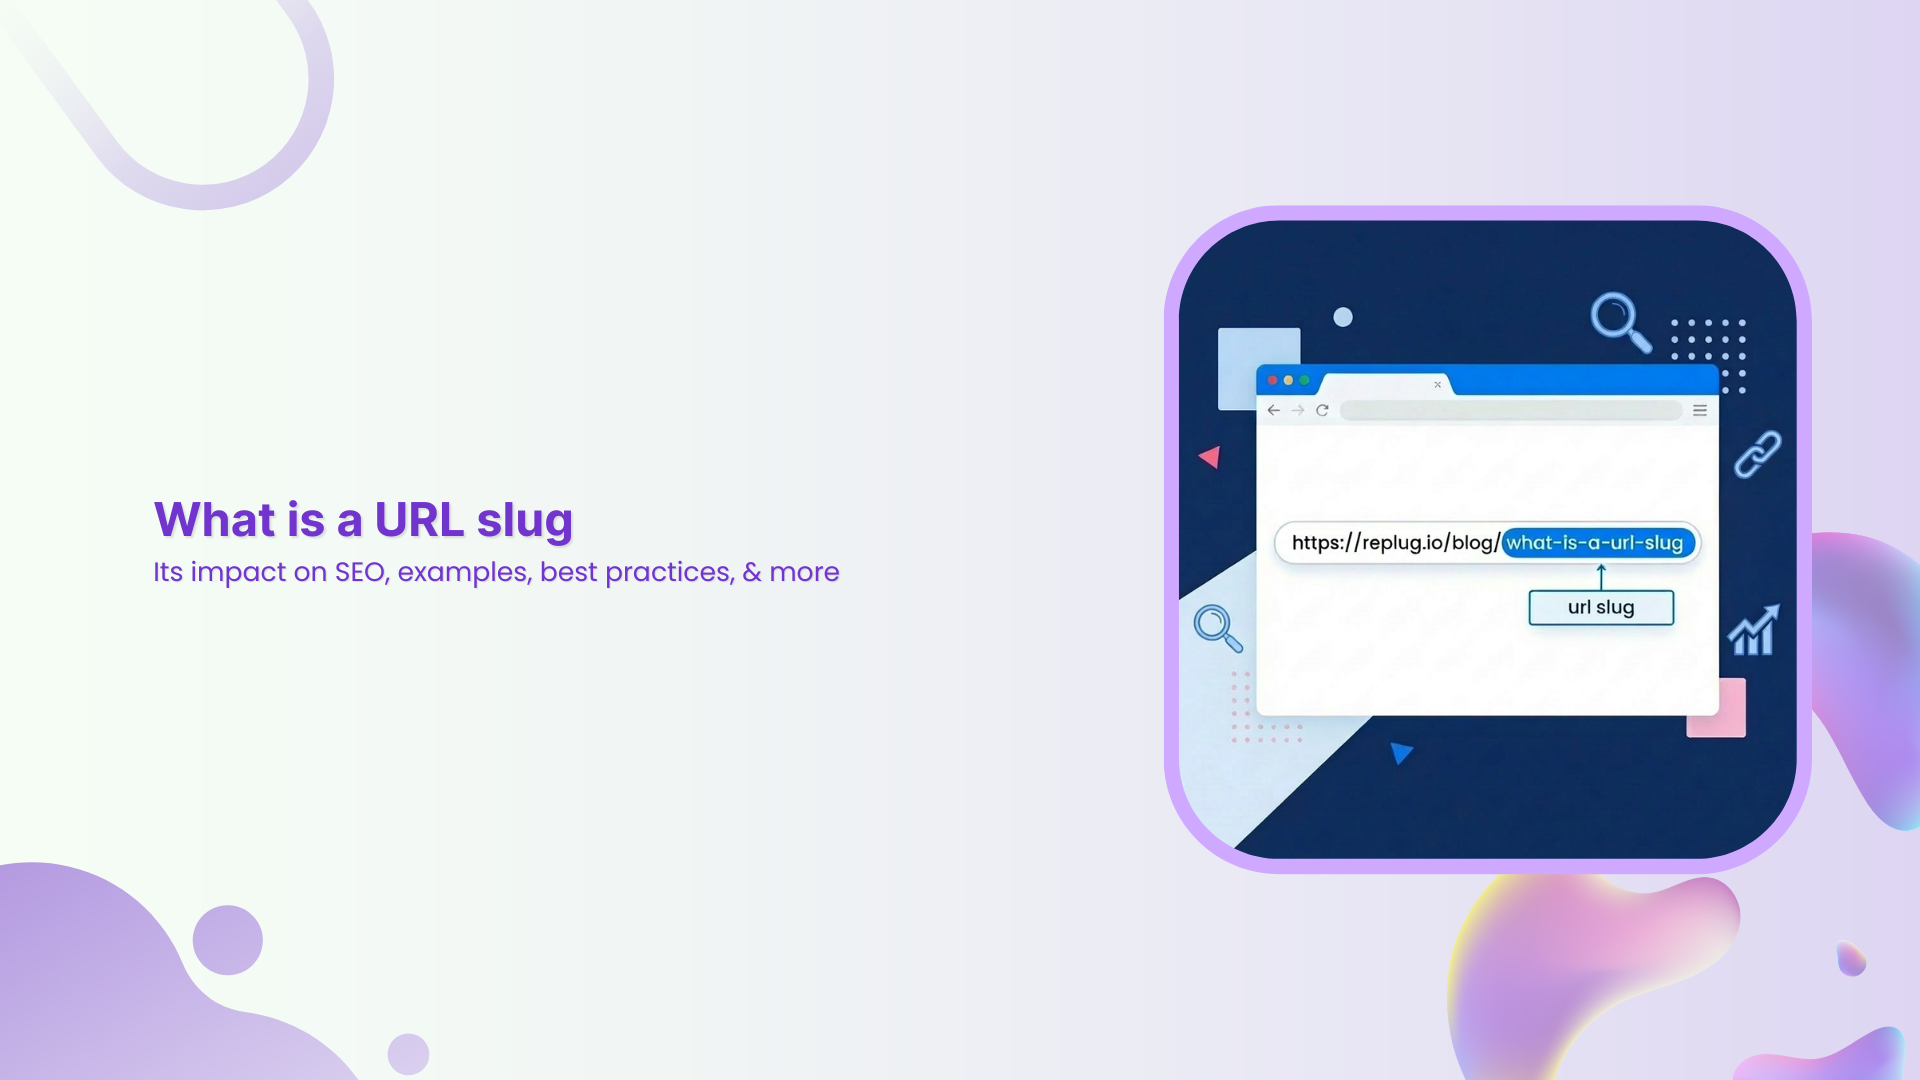
What is a URL slug?
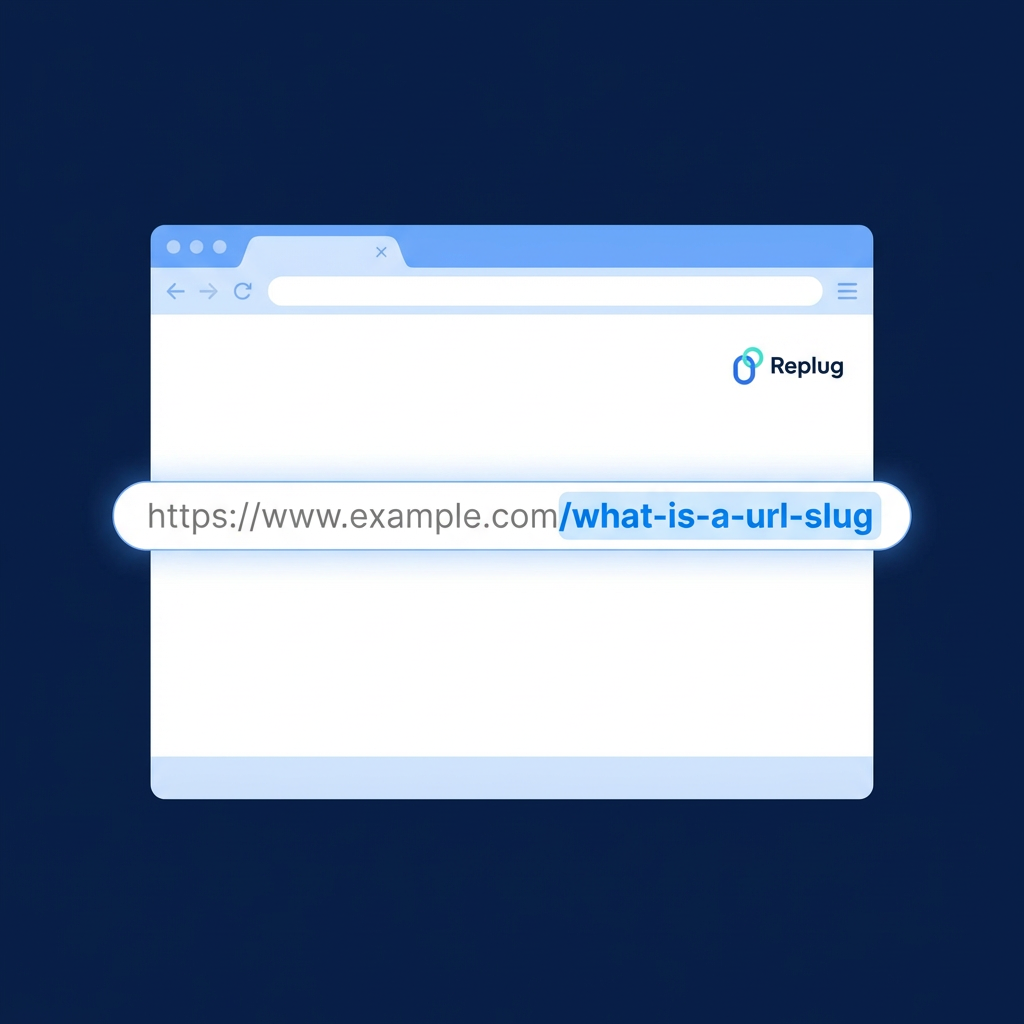
A URL slug is the part of a web address (or a URL) that comes after the domain name and identifies a specific page on a website.
For example, in https://www.example.com/what-is-a-url-slug, the slug is /what-is-a-url-slug.
Think of it as the “name tag” of a webpage. Its primary job is to tell both users and search engines what a page is about, in plain, readable language.
Instead of a confusing string of numbers or random characters, a good slug gives instant context. It’s a small detail, but it plays a key role in how your pages are found, understood, and clicked on.
Why is it called a URL slug?
The word“slug” might sound a little odd in a web context, but it actually comes from the world of journalism. Reporters would assign a short, informal label to a story while it was still being worked on. That label was called a slug.
When the web came along, the term carried over. Just like a journalist’s slug summarizes a story in a few words, a URL slug does the same for a webpage, giving it a short, descriptive identifier within the full web address.
URL slug etymology
The URL slug’s meaning traces back even further than journalism, all the way to the printing industry. In old-school typesetting, a “slug” referred to a solid line of metal type. Printers and editors later borrowed the term to label stories in production.
Over time, as digital publishing took over, the word found its way into the world of URLs, where it stuck. So the next time you’re crafting URLs for your website, you’re actually using a term with roots going back centuries in the publishing world.
What is an example of a slug?
A slug is quite easy to understand when you actually see one in action. Let’s look at some real-world examples, both the kind you want to avoid and the kind you should be aiming for.
URL slug examples (Bad)
Bad slugs are usually auto-generated, messy, or just plain confusing. They give users and search engines no real clue about what the page contains.
/page?id=48291
A random ID number tells nobody anything. It’s not readable, not memorable, and offers zero context about the page’s content.
Way too long. Slugs like this get truncated in search results and are a nightmare to share or remember.
/NEW-Article_SEO%20Tips!!
Uppercase letters, underscores, special characters, and encoded spaces! This slug breaks just about every best practice in the book.
URL slug examples (Good)
Good slugs are short, clean, and descriptive. They tell the reader exactly what to expect before they even click.
/seo-tips
Short, clear, and straight to the point. Anyone seeing this in a URL instantly knows what the page is about.
/best-project-management-tools
Descriptive without being wordy. It targets a clear topic and is easy to read, share, and remember.
/how-to-make-cold-brew-coffee
A great example of a longer slug done right. Every word earns its place, and the meaning is immediately obvious to anyone who reads it.
Why is a URL slug important for SEO in 2026
URL slugs might seem like a minor detail, but they quietly influence how your pages perform in search. From how Google reads your content to how users decide whether to click, a well-optimized slug touches more parts of SEO than most people realize.
Improves search visibility
A clear, keyword-relevant slug helps search engines quickly understand what your page is about, giving it a better shot at showing up for the right queries.
Boosts click-through rates (CTR)
When users see a clean, descriptive slug in search results, they’re more likely to trust the link and click on it. A messy, long URL, on the other hand, can easily put people off.
Google’s John Mueller has confirmed that words in a URL are a ranking factor to some extent. He said that they are a “very, very lightweight” one, helping search engines assess relevance, especially the first time they encounter a page. So, including your primary keyword in the slug still makes sense.
Enhances user experience (UX)
A readable slug sets clear expectations before anyone even lands on your page. Users appreciate knowing what they’re clicking into, and that trust translates into better engagement.
Builds contextual understanding
With AI-powered search platforms increasingly recommending content, keyword-rich slugs help these systems accurately understand and categorize your pages (something that’s only becoming more important).
Reinforces site structure
Consistent, logical slugs across your website make it easier for search engine crawlers to map out your content hierarchy and understand how your pages relate to one another. This ultimately results in excellent topical authority.
Key aspect of on-page optimization
Slugs are one of the first on-page elements search engines look at. Getting them right is a simple, low-effort win that complements everything else you’re doing (content, meta tags, internal linking, and more).
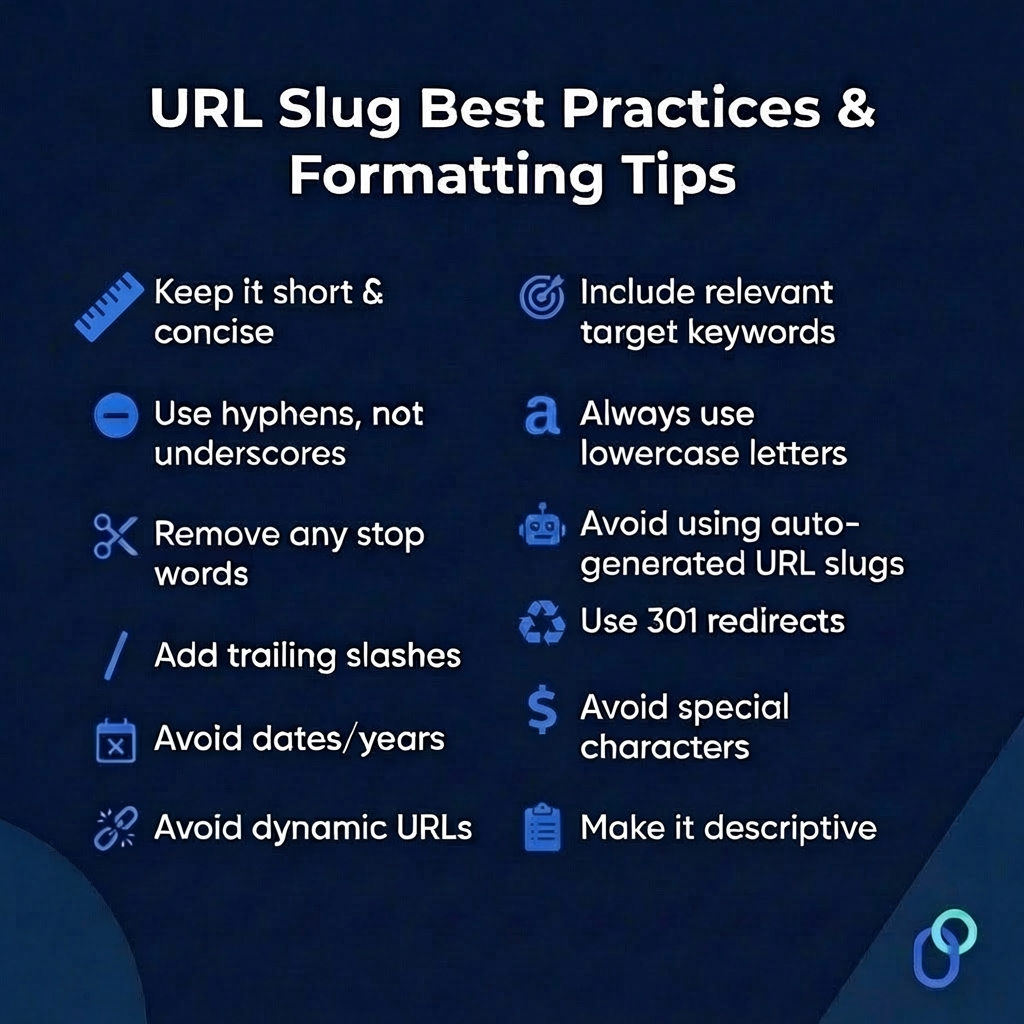
URL slug best practices & formatting tips
Getting your slugs right doesn’t require a lot of effort, but it does require knowing some critical rules. Here are the best practices you should follow every time you create or update a slug on your website.
Top strategies to optimize your URL slugs:
Keep it short & concise
Aim for 3–5 words wherever possible. Short slugs are easier to read, remember, and share, and they’re less likely to get cut off in search results.
Include relevant target keywords
Work your primary keyword naturally into the slug so both users and search engines immediately understand what the page is about. Just don’t force in extra keywords to the point it looks spammy.
Use hyphens, not underscores
Google treats hyphens as word separators, making your slug readable and effortlessly crawlable. Underscores, on the other hand, can cause words to be read as one, so /seo_tips could be interpreted as seotips.
Always use lowercase letters
URLs are case-sensitive, and mixing cases can create duplicate content issues. Sticking to lowercase across the board keeps things clean and consistent. Also, this is the recommended standard practice.
Remove any stop words
Words like “a,” “the,” “and,” and “of” add length without adding value. Trimming them keeps your slug tight. So, /the-best-ways-to-improve-the-seo simply becomes /best-ways-to-improve-seo.
Make it descriptive
Your slug should give anyone reading it a clear idea of what the page covers, even without seeing the page title. If it doesn’t describe the content, it needs reworking.
Add trailing slashes
While not a major ranking factor, using trailing slashes consistently (e.g., /seo-tips/) helps avoid duplicate content issues and keeps your URL structure uniform across the site.
Use 301 redirects
If you ever update an existing slug, always set up a 301 redirect from the old URL to the new one. Skipping this step can wipe out any rankings and backlinks the page had built up.
Avoid dates/years
Including something like “2026” in your slug makes the content look outdated the moment the year changes. Always stick to evergreen slugs that stay relevant long-term.
Avoid special characters
Characters like “%,” “&,” “#,” and “@” can break URLs or get encoded into unreadable strings. Keep your slugs limited to letters and hyphens only.
Avoid dynamic URLs
Auto-generated dynamic URLs like /page?id=5621&cat=3 are hard to read and offer no context. Static, descriptive slugs always perform better for both users and search engines.
Avoid using auto-generated URL slugs
Most CMS platforms generate slugs automatically from page titles, and they’re rarely optimized. Always take a moment to manually edit and clean up the slug before hitting the publish button.
What is a slug in WordPress?
WordPress makes it pretty straightforward to work with URL slugs. Every time you create a new page or post, WordPress automatically generates a slug based on your page title.
But as we’ve already covered, auto-generated slugs aren’t always the best option. The good news is that WordPress lets you edit them easily, giving you full control over how your URLs look.
How to change URL slug in WordPress?
Whether you’re setting a slug for a brand new post or cleaning up an old one, here’s exactly how to do it step-by-step:
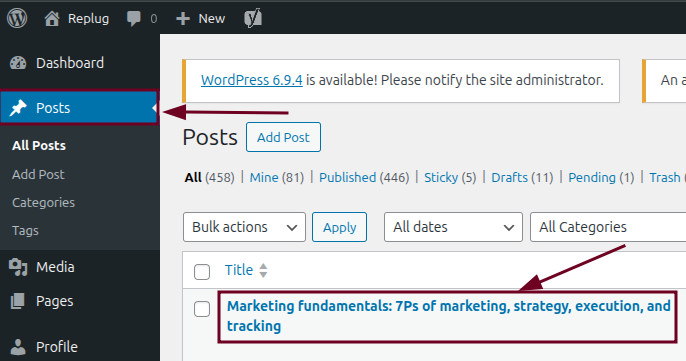
Step #01: Open your post
Log in to your WordPress dashboard and navigate to “Posts” from the left-hand menu. Click on the post whose slug you want to edit.
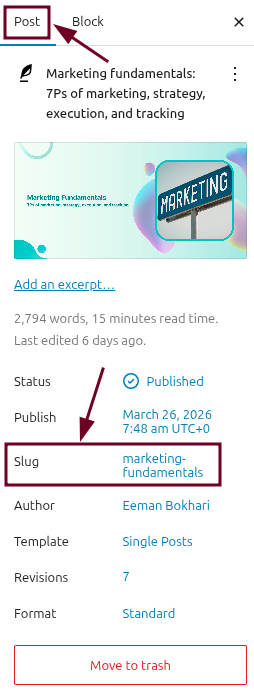
Step #02: Locate the slug field
Once you’re inside the editor, look at the right-hand settings panel. Click on the “Post” tab and look for the “Slug” option.
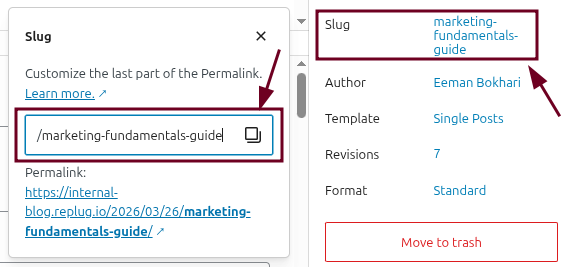
Step #03: Click and edit the slug
Click on the slug field and simply type in your new, optimized slug. Remember to keep it short, lowercase, keyword-relevant, and hyphen-separated. No special characters or spaces.
Step #04: Save the post
Once you’re happy with the new slug, click the “Save” button. It will be in the top right-hand corner of the screen.
Step #05: Set up a 301 redirect (for published posts only)
If the post was already live and ranking, this step is critical. Use a plugin like Rank Math or Yoast SEO to set up a 301 redirect from the old URL to the new one. Both plugins will actually prompt you to do this automatically when they detect a slug change (so don’t skip it).
Step #06: Verify the new URL
Visit your updated post in the browser and check that the new slug is showing correctly in the address bar. While you’re at it, make sure the old URL redirects properly to the new one.
💡 Quick tip: Always update your slug before publishing a new post if possible. Changing slugs on already-ranking pages comes with risks, so only do it when it’s genuinely necessary, and always use a redirect.
Common mistakes to avoid when generating URL slugs
Even small slug mistakes can quietly hurt your SEO and user experience over time. Here are the most common ones people make, and what you should do instead.
Using underscores instead of hyphens
Google reads underscores as connectors, not separators. So, /url_slug gets read as one word (urlslug) rather than two. Always use hyphens to keep your words properly separated.
Including stop words
Words like “the,” “a,” “and,” and “for” just add unnecessary length to your slug without contributing anything meaningful. Cut them out and keep only the words that actually matter.
Keyword stuffing
Fixing multiple keywords into a single slug, like /best-seo-tips-seo-guide-seo-strategies, looks spammy and unnatural. Stick to one primary keyword and keep it clean.
Not using lowercase letters
Uppercase letters in URLs can create case-sensitivity conflicts, leading to duplicate content issues. /SEO-TIPS and /seo-tips can be treated as two entirely different pages by some servers.
Including dates or temporary information
A slug like /best-seo-tools-2026 starts looking outdated the moment the year rolls over. Unless your content is strictly time-sensitive, keep your slugs evergreen so they stay relevant long-term.
Using special characters and spaces
Characters like “#,” “%,” “&,” and spaces don’t belong in slugs. Spaces get converted into %20, making your URL look messy and unprofessional, and some special characters can break the URL entirely. It’s best to avoid them entirely.
Relying on auto-generated slugs
CMS platforms like WordPress auto-generate slugs from your page title, which often results in long, cluttered URLs full of stop words. Always review and manually optimize the slug before publishing.
Changing slugs without redirects
Updating a slug on a live, ranking page without setting up a 301 redirect is one of the costlier SEO mistakes you can make. You’ll lose your backlink equity, your rankings, and send returning visitors to a dead “404” page.
Updating URLs frequently
Constantly tweaking your slugs (even with redirects in place) sends mixed signals to search engines and can destabilize your rankings. Get your slug right the first time and leave it alone.
Make your URL slugs SEO-friendly with Replug!
Managing your URL slugs manually across every page and campaign can get tedious fast. That’s where Replug comes in.
A complete link management solution
for marketing professionals & agencies.
Try Replug for free
But one feature that really stands out is its custom URL shortener. Instead of sharing long, cluttered links, Replug lets you create clean, branded, and SEO-friendly custom slugs within seconds.
You get full control over what appears in your URL, making your links more trustworthy, more clickable, and a lot easier to remember. If clean, professional URLs matter to your brand, Replug is absolutely worth checking out.
Wrapping up
URL slugs are one of those things that are easy to overlook, but once you understand how they work, you’ll never look at a web address the same way again.
From improving your search visibility and CTR to enhancing user experience and reinforcing your site structure, a well-crafted slug does a lot of heavy lifting for something so small.
The rules aren’t complicated either. Keep it short, make it descriptive, use hyphens, skip the stop words, and always redirect before changing a live URL.
Get these basics right from the start, and your slugs will quietly work in your favor for a long time to come.
Frequently asked questions
What is a slug on a website?
The URL slug definition is pretty straightforward. It’s the part of a web address that comes after the domain name and identifies a specific page.
For instance, in https://www.example.com/what-is-a-url-slug, the slug is /what-is-a-url-slug.
Every page on your website should have a unique URL slug. This is what helps both search engines and users distinguish one page from another.
Without a distinctive slug, search engines can get confused about which page to index, and users have no clear idea of what they’re about to open.
How to find a webpage’s URL slug?
This one’s simple. Here’s how to get the URL slug:
Just look at the address bar in your browser when you’re on any webpage. The slug is the part that comes after the domain name. So if you’re on https://www.example.com/seo-tips, the slug is /seo-tips. That’s it!
You can do this for any page on any website, anytime, without needing any special tools or technical knowledge.
What is an SEO slug?
An SEO slug is a URL slug that’s been intentionally optimized for search engines. It typically includes:
– the primary target keyword for that page, – uses hyphens between words, – stays short and descriptive, and – avoids any unnecessary clutter
Basically, it’s the clean, keyword-friendly version of a slug that helps both Google and your readers immediately understand what a page is about, before they even click on it.
Does the URL slug affect SEO?
Yes, but not in a dramatic way. A well-optimized slug contributes to your overall SEO by improving readability, signaling relevance to search engines, and boosting click-through rates.
It won’t single-handedly make or break your rankings, but combined with strong content, good internal linking, and solid technical SEO, it’s a worthwhile piece of the puzzle to get right.
Is the URL slug a ranking factor?
Technically, yes, but a very minor one. Google’s John Mueller has described words in a URL as a “very, very lightweight” ranking factor.
It helps Google get an initial read on your page before fully crawling it. But once the page is indexed, the content itself carries far more weight. So don’t obsess over it, but do make sure your slug is clean and relevant.
Does changing the slug change the URL?
Yes, it does. Your slug is part of your URL, so editing it automatically changes the full web address of that page.
This is why changing slugs on live, already-ranking pages needs to be handled pretty carefully. Always set up a 301 redirect from the old URL to the new one to make sure you don’t lose your traffic, rankings, or backlink value in the process.
What happens when you change or edit a URL slug?
When you change a slug, the old URL essentially stops working unless you set up a redirect. Anyone visiting the old link, no matter through a bookmark, a backlink, or a search result, will land on a 404 error page. That’s bad for both user experience and SEO.
A 301 redirect fixes this by automatically sending visitors and search engines from the old URL to the new one, preserving as much of your SEO value as possible.
What is the maximum length of a URL slug?
There’s no strict rule set by Google, but the general best practice is to keep your slug under 60 characters. Longer slugs tend to get truncated in search results, making them harder to read.
Most SEO professionals recommend sticking to 3–5 words, enough to be descriptive without being excessive. The shorter and clearer, the better!
What is the difference between a URL slug and a URL?
A URL is the full web address of a page, e.g., https://www.example.com/what-is-a-url-slug.
The slug is just one specific part of that URL. In this case, /what-is-a-url-slug.
Think of the URL as the complete home address and the slug as the apartment number. It’s the part that identifies the specific page within the broader domain.
What is the difference between URL path and slug?
When talking about URL slug vs path, the two terms are closely related but not exactly the same thing.
– The URL path is the full section of the web address that comes after the domain name, and it can include multiple levels, like /blog/seo/what-is-a-url-slug. – The slug, on the other hand, is specifically the last segment of that path. In this case, what-is-a-url-slug.
So, every slug is part of a URL path, whereas a URL path can contain multiple segments, with the slug being the final, page-specific identifier at the end.
What are the best tools online for detecting URL slug errors?
There are several solid options worth using:
– Google Search Console is a great free starting point. It flags crawl errors and URL issues directly from Google. – Semrush’s Site Audit and Ahrefs’ Site Audit both do a thorough job of detecting problematic slugs, duplicate URLs, and redirect issues. – Screaming Frog SEO Spider is another favourite among SEO professionals for deep URL analysis.
And if you’re on WordPress, plugins like Yoast SEO and Rank Math will flag slug issues right inside your editor as you work.
Smart URLs, also known as dynamic URLs, are generated automatically based on a set of rules. This contrasts static URLs, which are manually created and do not change. Smart URLs can be used to improve the user experience, track website traffic, and improve search engine optimization.
Smart URLs can be valuable for businesses of all sizes.
They can help businesses to:
Improve the user experience by making it easier for users to find the information they are looking for.
Track website traffic and see how users are interacting with the website.
Improve search engine optimization and make it easier for websites to rank higher in search engine results pages (SERPs).
Before using smart URLs, consider:
Make sure that the rules for generating smart URLs are clear and easy to understand.
Use a consistent naming convention for smart URLs.
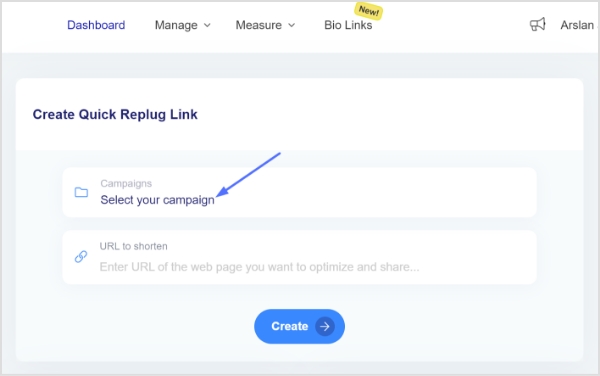
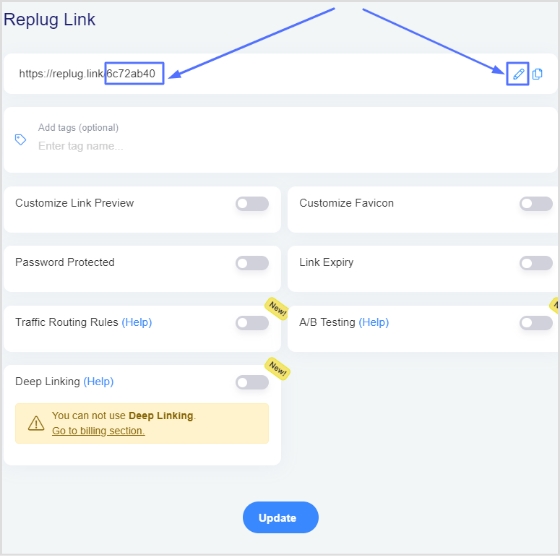
To create a smart URL link, you can use a custom link shortener online. Replug allows you to create short, easy-to-remember links for long URLs. When you create a smart URL link, you can also add keywords and other information to it. This can help people find your link more easily when they are searching for information online.
Here’s how to create a smart URL link using Replug
Make sure that the link is easy to remember and type.
Use keywords in the URL slug so that people can find it easily when they are searching for information online.
Keep the link short so that it is easy to share.
Track the number of clicks on your link to know how it’s performing.
Maximize marketing ROI
by transforming ordinary URLs into branded short links that convert.
Try Replug for free
Replug link analytics: Track your link’s performance
Replug empowers you to unleash the true potential of your links by providing a comprehensive suite of analytics.
No more flying blind – with Replug’s data-driven insights, you can make informed decisions that amplify your marketing efforts.
Picture this: a dashboard that paints a vivid picture of your link’s journey across the web.
From the number of clicks and unique visitors to geographical data, referral sources, and even the devices your audience prefers – it’s all there at your fingertips.
A smart URL is a short, descriptive URL that is easy to remember and share. It is also more likely to be clicked on than a long, complex URL. Smart URLs are often used for marketing and advertising purposes, as they can help to increase website traffic and brand awareness.
What is the difference between hyperlinks and smart links?
Hyperlinks are simply links that point to another web page. They are typically used to provide additional information or to direct users to a related resource. Smart links, on the other hand, are more sophisticated. They can be used to track user behavior, personalize content, and even trigger actions.
Are smart links safe?
The safety of smart links depends on the platform or service that generates them. Some smart links are designed to track users and collect data, while others are simply a way to shorten long URLs. It is important to be aware of the risks associated with any smart link before clicking on it.
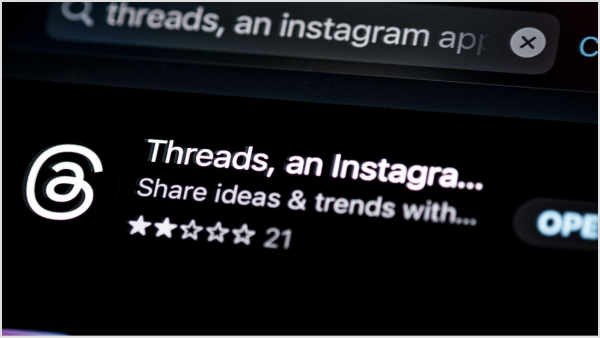
If you think the clash between Musk and Zuckerberg has cooled down, you’re wrong, as the show has just begun with the launch of Instagram Threads.
Now, we’re guessing you’re here because exploring Threads has left you exhausted. Or you may be curious to discover its hidden features!
If you manage multiple social-media profiles, share content across platforms, or distribute many links, Replug can help you organize and optimize all your URLs in one dashboard, keeping link management simple as you explore new apps like Threads.
And no need to worry anymore! We wrote this handy guide to help you get started. Discover new features, and develop your Threads account in no time.
First, let’s begin by defining Threads, discovering its hidden characteristics, its future, and comparing it with Twitter.
So, let’s get started!
What is Threads?
Threads is a text-based social app launched by Mark Zuckerberg in integration with Instagram on the 5th of July, 2023.
Over 100 million people have signed up on the app so far. However, the total number of active users is undefined yet. With Threads, users can create, share or repost multiple types of content, such as short-term texts, images, videos, URLs, etc.
Moreover, the new app is tied to Instagram, so users can automatically be able to connect with all the people they follow on Instagram.
Note: When sharing external links on Threads (or elsewhere), using a trusted short URL generator helps turn long or messy links into clean, easy-to-share URLs that look tidy in posts and are more user-friendly.
How to use Instagram Threads?
Threads offer a variety of popular features that are currently trending in the realm of social media. And have a very user-friendly interface.
However, some of you may be experiencing challenges when trying to sign up for your Threads accounts or when attempting to post a Thread.
Allow me to assist you here.
How do I sign up?
You can sign up directly from your Instagram account. The software will automatically fetch all your data from Instagram, such as your name, username, login credentials, block lists, followers, etc. Additionally, the app can be downloaded for free on iOS and Android devices in over a hundred nations.
Is Threads linked with Instagram?
Yes, Threads is fully integrated with Instagram. It’s like having a mini social network within Instagram.
I don’t have an Instagram account; can I still use Threads?
Currently, the only way to join Threads is through your Instagram account. So, if you want to sign up on the app, you must have an Instagram account first.
Is it safe to use Instagram threads?
One of the most important aspects of any social media platform is privacy, and Threads doesn’t disappoint in this regard. Just like Instagram, this app offers a range of privacy features that allow you to have control over your interactions. For instance, you have the power to block or report any user who may be causing you discomfort or violating your privacy.
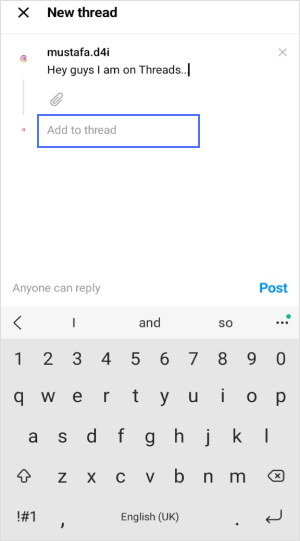
How can I create a Thread?
It’s so simple.
Just tap on the new thread icon at the bottom of your screen.
Add your content, such as text (up to 500 characters), video, or image (up to 10 visual items), and press Done.
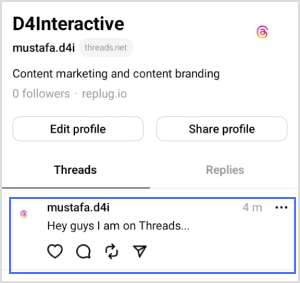
And your thread will be shared on your profile and feed right away.
You may have seen standard thread features like sharing text-based messages, images, video visuals, or reposting your threads post. But below are some hidden features on threads you may not know;
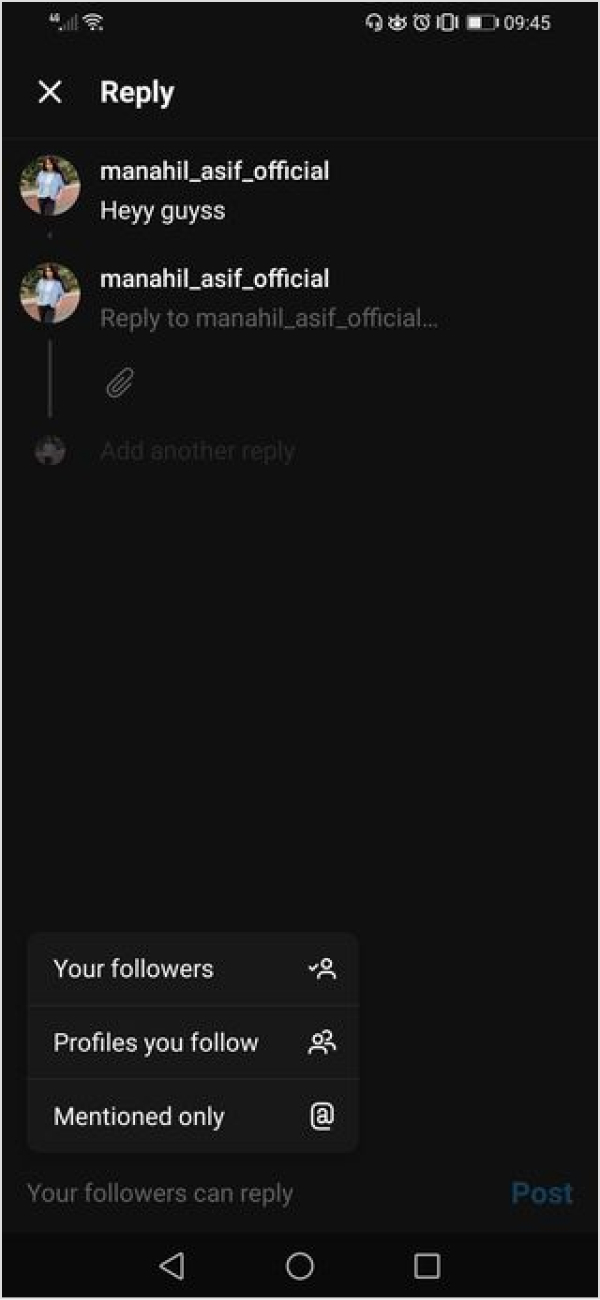
1. Managing replies
When you post a thread, a dialogue box will appear on your keyboard in the reply section. When you press that button, a menu with three choices will appear. Choose the one which suits you.
2. Modified shortcut
If you press return three times, a new thread shortcut will be created immediately, just below the last thread you posted.
3. Fast open the search bar
If you long-press the search icon. It brings up the search bar and pulls up the keyboard alongside. Or you can double-tap on the search tab to search.
4. Quick account following
To quickly follow an account, simply tap the Profile Icon on the user’s profile.
5. Mute a profile without unfollowing
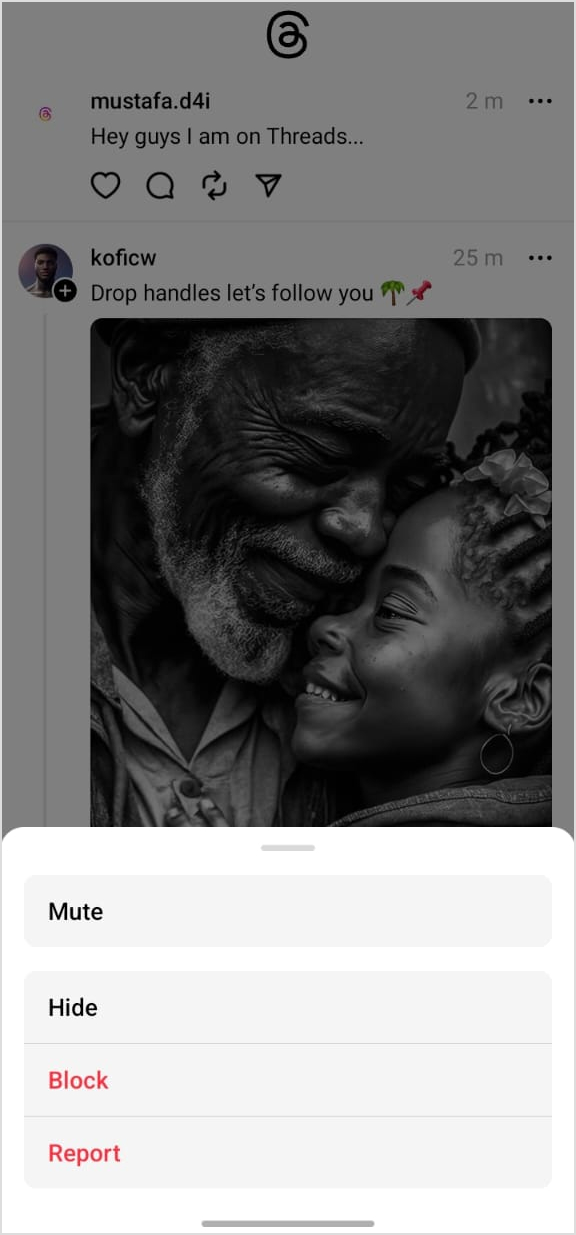
If you don’t want to see threads from a specific user again. You can mute the user profile by tapping the three dots on the extreme right section of the profile that you want to mute.
Now just tap Mute and the selected user will be muted
Note: You’d still be following the user, but none of their Threads will show up in your feed until you unmute him.
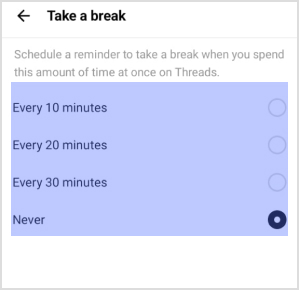
6. Time limits option
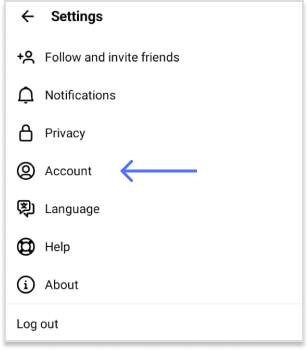
Go to your profile by tapping the Profile icon at the bottom corner of the Threads feed
On the top right corner, tap on the right horizontal bars similar to the Hamburger Icon to navigate to the settings menu
Tap on Account
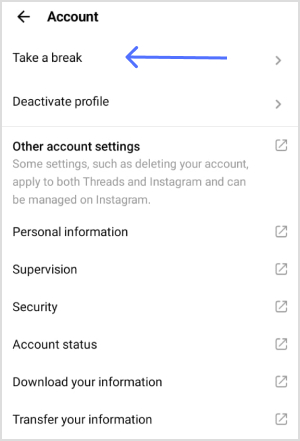
Tap on Take a break
Set the reminder as per your necessity, i.e. from every 10 minutes to 30 minutes
Now the app will remind you to take a break every 10 to 30 minutes after use.
Note: The earlier issues with the app have been resolved. The app now runs smoothly on iOS 17. Also, users can facepile, pill polish, expand pictures on profiles, make extra tall photos that are now fully viewable, trim the binary size, etc. However, Meta is still working on new features, such as following feeds, hashtags, editing posts, post search, web presence, like lists, translations, and many more.
Limitations in the Threads app
But even with all these perks, users are experiencing some limitations listed below.
If someone replies to your thread and you delete the Thread later on, that person’s reply will not be removed.
You can only post a thread text of up to 500 characters.
You won’t be able to view a response to your thread if it comes from a private profile you don’t follow.
Thread feeds show you a mix of posts from people you follow and posts suggested by AI.
You cannot send direct messages to other users.
Currently, no web version of the Threads service is available.
You can only post up to 10 media items (visuals such as images, videos, gifs, etc).
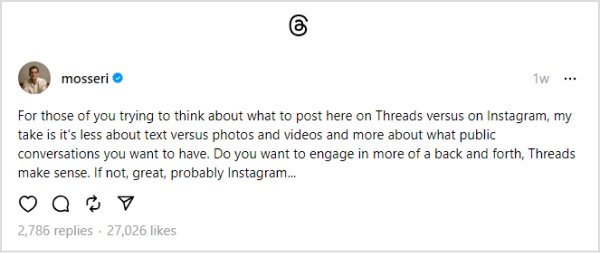
What does Adam Mosseri have to say about Instagram Threads?
There are a lot of rumors and chatter of forthcoming modifications going about the app right now. Such as how Meta will modify Threads. What will happen to Twitter? Is Threads for politics and business? etc.
Adam Mosseri says Threads is for public conversation, not business or politics.
He says in a statement that
“Politics and hard news are important, I don’t want to imply otherwise,”
Further, he says,
“But my take is, from a platform’s perspective, any incremental engagement or revenue they might drive is not at all worth the scrutiny, negativity (let’s be honest), or integrity risks that come along with them.”
After that, users were confused about what to put on Threads and how to develop a network on that platform.
In response to this, Mosseri said…
What are the key differences between Twitter and Threads?
Below are the key differences between Twitter and Threads;
You won’t hear anyone calling Instagram Threads the “Twitter Killer” other than Twitter itself.
In contrast to Twitter’s public, real-time, and open character, Threads provides a platform for private chatting and exchanging information with close pals.
Twitter is widely used because of its general nature, rapid news publication, and accessibility. So, both systems can coexist, with users taking advantage of each for interaction and content creation.
Elon’s rage against Instagram Threads
Musk has threatened to file a lawsuit against the platform(Threads), accusing it of recruiting former employees to work on a ‘copycat’ software to compete with Musk’s original company.
Musk tweeted,
“Competition is fine, cheating is not.”
Twitter lawyer Alex Spiro wrote in a letter:
‘Twitter has serious concerns that Meta Platforms (Threads’) has engaged in systematic, willful, and unlawful misappropriation of Twitter’s trade secrets and other intellectual property.
However, Meta has denied the claims, stating that no current or former Twitter workers are working within the Threads team.
“very optimistic about how the Threads community is coming together.
Competition between the two has become fierce. With Elon Musk rebranding Twitter’s bird logo with “X”. Musk has also repurchased its”X.com” domain (i.e. now redirected to Twitter’s original domain). This shows the intensity will only rise between the two platforms going forward.
The Threads app has already seen 70% decline in its daily active users. While many of the Twitter (now X) users are hating the rebranding of the Twitter app. However, Threads is in its new stages, while Twitter is going through some drastic branding changes, so only time will tell who is going to win this battle.
Frequently asked questions
How do you delete your Threads account?
You can delete your account on Threads; however, to do so, you will also need to erase your account on Instagram. After getting complaints from end-users over this issue, Mosseri announced that the organization is “looking into a way to delete your Threads account separately.“
What is the difference between Threads and Instagram?
Threads is a social media app primarily using texts, while Instagram focuses on multimedia content, particularly visuals.
What can you do on Instagram Threads?
You can actively share images, videos, and text updates on Instagram Threads and effortlessly share real-time updates with your close contacts.
Are there any well-known people posting on the Threads?
On Threads, there are a lot of well-known names, like Selena Gomez, who has more than 5.1 million followers. Kim Kardashian has more than 5 million followers; Mr. Beast has more than 4.6 million followers; and many other famous people.
Imagine you share a link and expect it to simply guide someone to your latest blog or product page, yet behind it might be a tangled mess of tech, misrouting, or even malice.
In fact, over 3.4 billion phishing-related emails are sent every day, many revolving around cleverly disguised URLs.
The problem?
Ordinary web addresses can betray you badly. They expose internal systems, confuse users, or open doors you never intended. That’s when frustration sets in; when clicks go astray, trust fades, and suddenly your neat link strategy becomes a liability.
The solution lies in learning the technique of URL masking. It is a simple yet powerful method that helps you shape how URLs appear, function, and are perceived.
In the next section, we’ll take a quick look at what URL masking actually is, before moving on to methods, best practices, and additional details.
So, let’s get started!
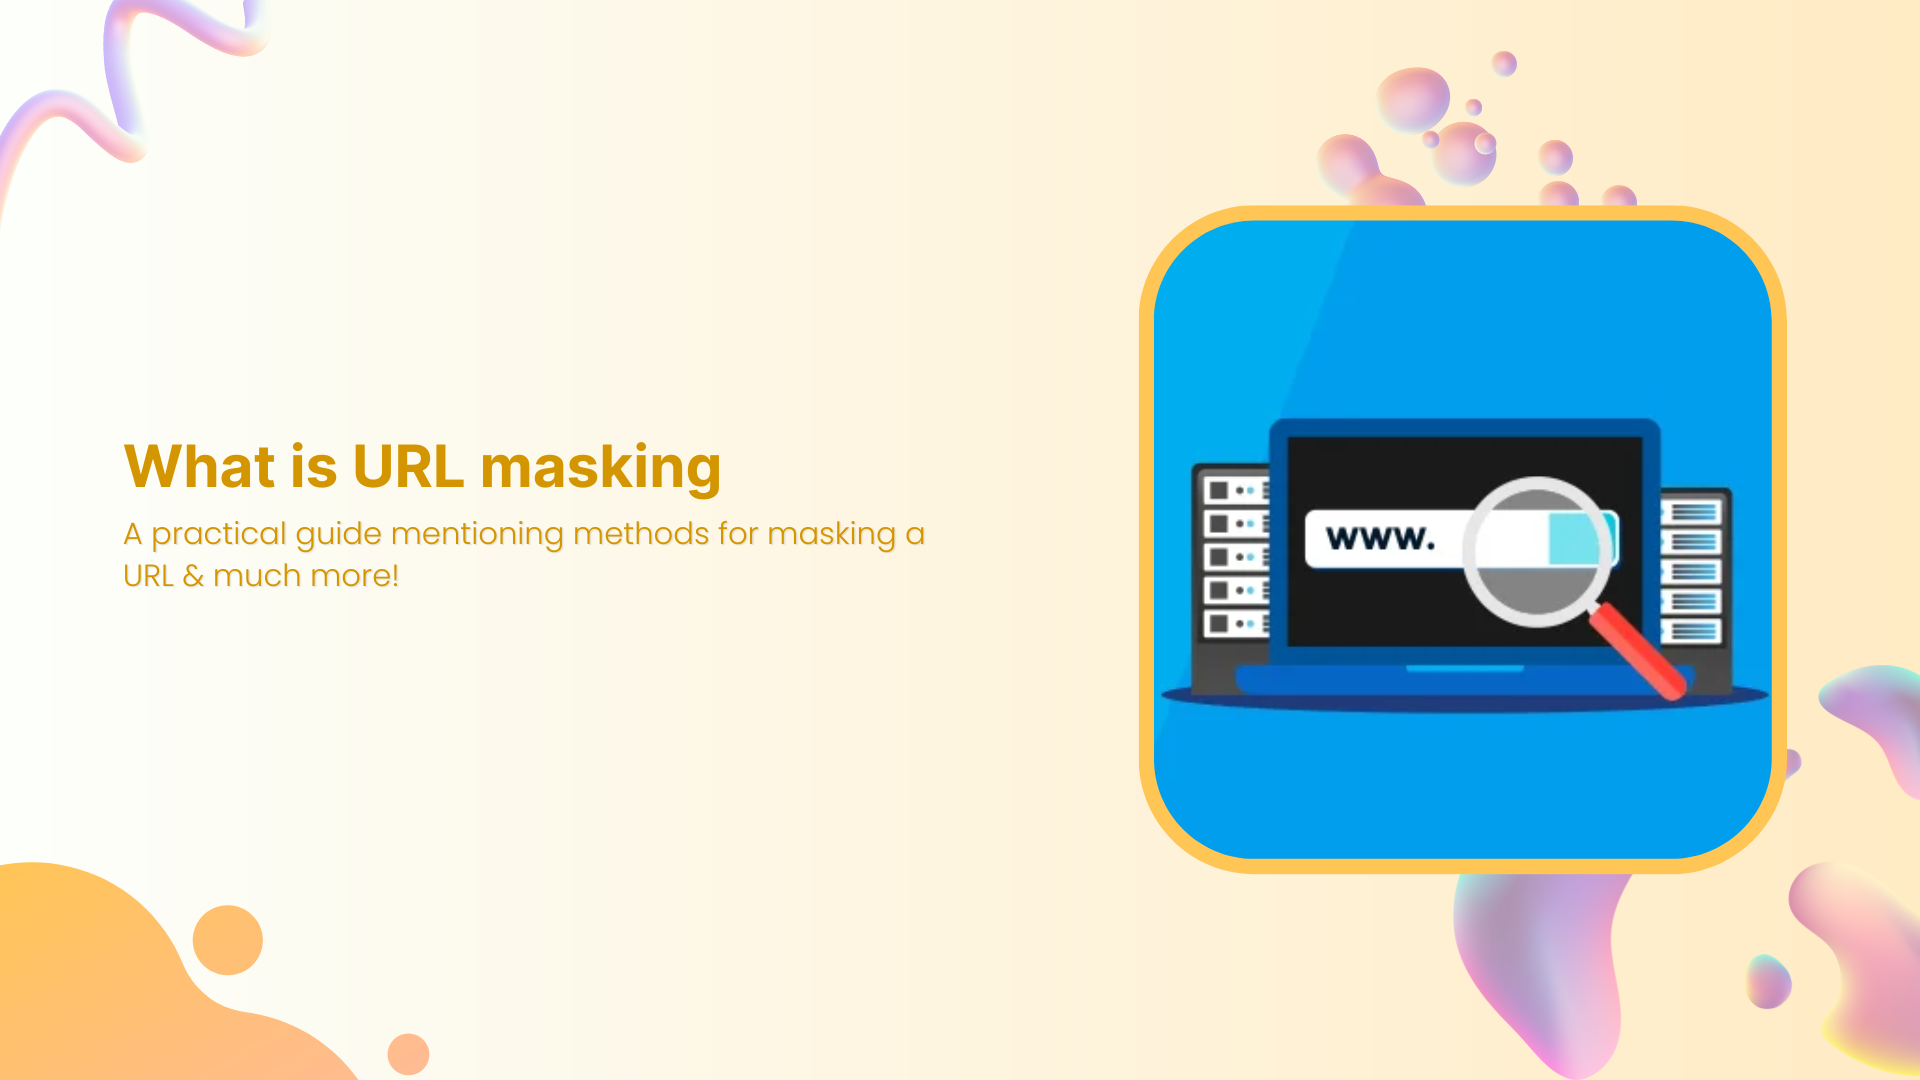
What is URL masking: A brief overview
Think of URL masking as giving your links a stylish mask or camouflage. Simply put, URL masking (also called link masking or link cloaking) is a technique that displays one web address in the browser’s address bar while the content actually comes from a different address behind the scenes.
The primary objective of URL masking is to maintain a clean, branded, or memorable URL for users while hiding the complexity, tracking parameters, or alternate domain that actually serves the content. This can help protect your brand’s appearance, simplify link sharing, and make the experience smoother for visitors.
Now that we’ve got a solid handle on what URL masking means and why it’s used, let’s roll into a concrete example to clarify how it looks in practice.
And you’d prefer it to look short, simpler, and more branded like:
https://yourbrand.com/great-deal
With URL masking, you could set things up so that users see “yourbrand.com/great-deal” in their browser, but behind the scenes, they are served the original long URL’s content.
Another scenario: Your company hosts content on a subsidiary domain like “subdomain.partner-host.com/page”, but you want users to browse while seeing “www.yourbrand.com”in the address bar. URL masking allows this kind of setup.
In either case, the visitor experience is smoother, the URL looks nicer, and you retain control over how your link appears.
Different techniques & types of URL masking
Here are several of the most common ways to mask or “cloak” links, each with its quirks, benefits, and trade-offs.
Domain masking
This technique means that you point a domain (or subdomain) to another target URL, but the user’s browser still shows your original domain in the address bar. Users think they’re on, say, “yourbrand.com”, while the content is being pulled from somewhere else.
Note: It’s great for branding and cleaner links, but keep in mind it can cause SEO issues if search engines see duplicate content at two different domains.
Frame masking
Here, you essentially load another site (or page) inside an <iframe> or similar frame while keeping your domain visible in the browser bar. The user stays on your domain visually, even if the content “behind the scenes” lives elsewhere.
Note: While this provides a seamless user experience, it may limit navigation and bookmarking, and it may also pose search engine optimization or security complications.
Proxy masking
With proxy masking, a proxy server fetches content from a destination site and presents it under your domain. The user hits “yourbrand.com/welcome”, the proxy pulls “otherdomain.com/page”, and you serve that content, but the address bar remains “yourbrand.com/welcome”.
Note: This method gives you more control and flexibility, but it’s more complex to set up and maintain (and you need to think about performance, caching, SSL, etc.).
Server-side scripting
Here, your server script (PHP, ASP.NET, Python, etc.) handles requests for a friendly URL and fetches content from another URL or service, while keeping the visible URL unchanged.
Note: This is a flexible approach if you’re comfortable with backend logic. You can use conditional logic, content transforms, etc., but you’ll still need to watch for SEO fallouts and ensure it’s transparent to users.
URL rewriting
This is more subtle; your server internally maps a user-friendly URL (or masked URL) to the “real” destination URL without changing what appears in the browser bar.
Think of rewriting “yourbrand.com/special-offer” to internally show content from “yourbrand.com/page.php?id=12345”.
Note: It’s commonly used for cleaner, SEO-friendly URLs and better user experience, and often plays nicely with search engine results if done well, because the visible URL corresponds with actual content.
JavaScript redirection
With JavaScript, you can on page load run something like window.location.replace(…) to redirect the user to the destination. However, cleverly, you might keep showing the original URL or manipulate history so it appears masked.
Note: This is relatively easy to implement but less reliable (some users block JS, and search bots may not execute it entirely), and it can feel less perfect.
Meta refresh
This is the simplest HTML trick: a <meta http-equiv=”refresh” content=”0; url=https://destination.com”> tag refreshes the page to the target URL after a short delay. The initial URL stays visible briefly.
Note: It works, but many experts consider it a bit of a legacy approach. It is not very SEO-friendly and is not always regarded as good practice for user experience.
Up next, we’ll explore the different techniques and practices for masking URLs, step by step.
How to do URL masking: Various methods for masking a URL
There are several practical ways to mask a URL, depending on how much control you have over your hosting setup and how fancy you want to get.
Let’s walk through three common approaches.
Server-level (e.g., .htaccess)
This method uses your web server’s configuration, specifically the .htaccess file on Apache servers, to internally map or proxy a visible URL to another destination while keeping the visible link unchanged.
It’s a “behind-the-scenes” technique in which you edit or add rules to the .htaccess file in your web root, and the visitor sees your chosen URL, but the content comes from somewhere else.
How it works:
1. Access your site’s root directory (often public_html or www) and locate or create the .htaccess file.
2. Make sure the server has mod_rewrite enabled (on Apache) so you can use RewriteEngine On, and other rules.
This means when someone visits yourdomain.com/custom-url, the browser address bar shows that, but the server fetches content from /actual/folder/or/page.
4. Test your setup by opening the masked URL and verifying the content shows, but the visible URL remains your custom one.
Important note: This method can create duplicate content or SEO issues if used across different domains without caution.
Using a third-party service or tool
This method uses an external online service (think “URL masking tool online”) that lets you enter a destination URL and handles the redirect/masking for you.
You don’t need to dig into server configuration yourself. Instead, you use a dashboard or a simple interface to get the job done. For instance, many link management or cloaking services let you easily mask affiliate links or vanity URLs without hassle.
How it works:
Sign up (if needed) with the service and go to the “create new link” or “mask URL” section.
Enter the original long, cluttered URL as the destination.
Choose a custom display URL or alias if the service allows it. Some services will say “cloak” or “hide” the destination.
Generate the link. The service returns a new link that shows your chosen alias but forwards to the real URL (behind the scenes).
Share the link. Users click the alias, see your branded, simplified, and unique URL, and are taken to the destination while your custom URL remains in the address bar (or at least appears so).
Finally, monitor performance (clicks, traffic) if the service offers analytics. Some services warn that frames or iframes may not work if the destination blocks them (due to security headers such as X-Frame-Options).
Important note: The “free URL masking online” services and tool versions often have click limits or analytics restrictions.
Using a URL shortener
A URL shortener creates a slim “short link” from a longer URL, which is ideal for sharing and looks much cleaner. Many modern URL shorteners available online let you brand the link, track clicks, and even perform “custom URL masking”.
Maximize marketing ROI
by transforming ordinary URLs into branded short links that convert.
Try Replug for free
How it works:
Pick a URL shortener and create an account if required. We recommend using Replug for this task.
Paste your long destination URL into the platform’s “shorten link” field.
Customize the slug(the part after the slash) to get something memorable or brandable.
Use options (if available) for “custom URL masking,” which may let you replace the domain with a custom one you own, making the short link look like go.yourbrand.com/offer instead of a generic domain.
Generate the short link. Now, when someone clicks it, they see your shortened link in the address bar, click through, and land on the long destination. The user experience is cleaner, and tracking is built in.
Share this link seamlessly. Because you’re using a short, clean URL, it’s easier to include in social media, emails, print, etc.
Important note: A short link doesn’t always “mask” in the most rigid technical sense (it redirects to the destination, and users might spot that). But when paired with a custom domain and branding, it functions effectively for many masking/clean-link use cases.
Using URL masking can bring a bunch of advantages when done thoughtfully. So let’s cover what it can do for you.
Enhances user experience
Masking a URL helps make links simpler, cleaner, and easier to remember. Rather than a long string full of tracking codes or weird characters, visitors see something tidy and on-brand, which makes it more likely they’ll click and feel comfortable.
Protects your brand’s reputation
When links look messy or appear to be affiliate-based, some users hesitate to click them. Masking URLs lets you hide cumbersome links or affiliate identifiers behind a more trusted domain or format. This helps your audience feel the link is legitimate and that your brand is looking after them.
Boosts brand visibility
Every time someone sees your domain (rather than some random partner domain or long URL), the brand imprint grows. A nicely masked link reinforces your brand name, keeps things consistent, and helps users associate the link with you.
Preserves privacy & security
Sometimes the actual URL contains sensitive parameters (trackers, IDs, internal paths) you’d rather keep hidden from view. Masking helps protect those bits and gives you more control over what the user sees, thereby improving perceived security.
Assists in domain parking
If you own multiple domains (or plan to), URL masking lets you forward a domain, so the visible address stays your branded one (even if the content lives elsewhere). This is handy when you’re dealing with domain portfolios or when you want to ensure visitors always see “yourbrand.com” even during transition.
Risks of URL masking
While masking a URL may seem like a handy shortcut, there are real risks involved. It’s good to be aware of them upfront so you can make smarter decisions.
SEO risks
When you mask a URL, you might unintentionally create problems for search engine bots. They could struggle to crawl or index the content correctly.
When the visible URL doesn’t clearly point to the actual content, you could end up with duplicate content issues or diluted authority. Over time, that can hurt your SEO ranking, which is the absolute opposite of what you want.
Loss of credibility
If visitors click a link that appears to lead to one place but actually behaves differently, or if your domain is masking something behind the scenes, you risk making users feel misled. That loss of trust can stick, hurting repeat visits, shares, or referrals.
Violates Google’s guidelines
Techniques that hide or misrepresent where a user or search engine bot is being sent can run afoul of major search engine rules.
For example, practices that resemble “cloaking” are flagged by Google as violations. If you’re seen to be deliberately disguising URLs in a way that misleads bots or users, you risk being penalized or removed from search results.
Requires technical setup
URL masking isn’t always plug-and-play. It might involve server settings, frames, proxies, or rewriting rules.
If you’re not comfortable with the tech side, you might set something up that breaks links, causes slow load times, or behaves inconsistently. This will ultimately result in spending time troubleshooting instead of benefiting.
Doesn’t always display correctly
Not all browsers, user setups, or crawlers will interpret masked URLs the way you expect. Sometimes, the original URL behind the scenes might pop into view, or sharing the link will show the weird internal address instead of your masked one. That kind of inconsistency can confuse users or lead to broken navigation or functionality.
URL masking vs. URL forwarding: Key differences mentioned!
Here’s a friendly look at the primary distinctions between URL masking and URL forwarding, so you can decide which works best for your goals.
Aspect
URL forwarding (Redirect)
URL masking (Cloaking)
What the user sees in the address bar
The browser’s address bar changes to the destination URL after the redirect.
The original domain remains visible, even though the content comes from a different URL.
Technical implementation
Typically done via HTTP status codes (301 or 302) or simple DNS/domain-forwarding settings.
Often uses frames (iFrames), proxy servers, or rewriting so the underlying destination remains hidden.
Impact on SEO & indexing
Generally considered SEO-friendly if done with proper redirects (especially 301).
Can cause SEO issues (duplicate content, indexing confusion) because the actual URL is hidden.
Branding & user trust
Transparent — users see the destination URL, which might be less branded.
Strong branding — original domain stays visible, boosting the appearance of consistency.
Use cases
When you’re permanently moving a site, uniting domains, or want clean redirects.
When you want to retain the appearance of your domain while pulling content from elsewhere.
Potential downsides
Less control over the visible domain; might lose branding opportunity.
May confuse users, interfere with bookmarking/sharing, and pose technical or UX issues.
In short: If you’re going for maximum clarity, SEO safety, and ease of setup, URL forwarding is usually your best companion. On the other hand, if you’re focused on keeping your brand in the spotlight and are okay with managing a little extra complexity, URL masking might be a good fit, but you’ll want to weigh its drawbacks.
Here are some of the most common ways people use this technique. It helps to see them side by side so you can spot which might make sense for your own site.
Affiliate marketing & link sharing: Masking is often used when you’re promoting someone else’s product or a referral link. Instead of sending users to a long, clunky URL with trackers, you show a clean, branded link and hide the real destination behind the scenes.
Branding & aesthetic cleanup: Sometimes you’ve got a link that looks quite messy: lots of parameters, partner domains, or subdomains you don’t want your users to see. Masking lets you present a friendly URL instead.
Embedding third-party content under your domain: If you use a platform or external service but want users to feel like they’re still on your site (your domain in the address bar), masking helps achieve that consistent user experience.
Domain parking or forwarding with your brand domain: You own several domains, or you want old domains to point to your new site without showing the old link. Masking lets visitors see your primary domain even if they typed in one of the other addresses.
Campaign or microsite links: For short-term promotions or specific landing pages, you might mask a long URL. Hence, it’s easier to remember, share on social media, or print on marketing material. The cleaner link also reinforces its origin brilliantly.
Best practices for effective URL masking
When you decide to mask a URL, it’s not just about hiding the real address. It’s about doing it in a way that keeps your users happy, protects your brand, and avoids getting penalized by search engines.
Here are the top things to keep in mind:
Be transparent and build trust: Make sure users aren’t tricked into clicking something unexpected. Masking should clean up or brand a link, not deceive. Transparency helps maintain your credibility and avoids confusing or annoying your visitors.
Think about SEO implications: Masking can introduce SEO risks like duplicate content, indexing issues, or loss of link equity. Always weigh whether a clean redirect or a branded short link might serve you better.
Keep an eye on functionality and test regularly: Test your masked links across browsers, devices, and platforms. Ensure they work properly and don’t break features like login, forms, or share links. Monitoring catches surprises before your users do.
Maintain consistent branding and clarity: Use a URL that aligns with your brand and is easy to remember. Avoid overly long or weird masked URLs, because if users are puzzled, you’ve lost half the benefit.
Use masking only when it adds real value: Masking isn’t necessary in every situation. If a simple redirect or branded short link covers your needs without the extra complexity, go that route instead.
By following these conventions, you’ll ensure you’re using URL masking for the right reasons and doing it in a way that looks professional and doesn’t backfire.
Alternatives to URL masking
If you’re not sure about masking URLs, there are other smart and innovative ways to achieve many of the same goals without the same risks.
Here are some alternatives worth considering:
URL forwarding (redirects): Instead of hiding the real address behind another one, URL forwarding sends users from one link to the destination and updates the browser’s address bar accordingly. It’s more straightforward, more transparent, and usually more friendly to SEO.
URL rewriting / pretty URLs: With this approach, you keep the real destination visible but clean it up: your site rewrites something like “site.com/index.php?page=123” into “site.com/news/latest” using server rules. It maintains transparency while giving users nicer links.
URL shortening & branded short links: Instead of full masking, you shorten a long URL into something like “yourbrand.co/offer”, often via a link management tool or custom domain. It doesn’t completely hide the destination like masking might, but it gives you clean, shareable links and retains trust.
Custom domain or subdomain setup for branding: If the main goal is branding, you can use a custom domain or subdomain (e.g., “go.yourbrand.com”) pointing directly to your content or site. This avoids hiding content entirely but keeps things consistent and branded.
Canonical URLs and self-explanatory paths: Specifically for SEO, focus on drafting URLs that clearly reflect the content (e.g., “yourbrand.com/blog/what-is-url-masking”). Using canonical tags helps avoid duplicate content issues while being honest about the destination.
Wrapping up
To sum up, URL masking can be handy when you want cleaner, more professional-looking links, but it’s not always the best long-term solution.
While it helps with branding and user experience, it also comes with a few risks, like SEO drawbacks and technical complexities.
The key is knowing when and how to use it responsibly, or exploring better alternatives like branded short links or redirects.
And if you’re serious about taking control of your links the smart way, give Replug.io a try today! It’s one of the best custom URL shorteners out there, built to help you create, manage, and track every short link with ease.
Frequently asked questions
What does it mean to mask a URL?
Masking a URL means displaying one web address in the browser’s address bar while secretly loading another page behind it. It’s often used to make long or complex URLs look cleaner and more branded.
Is there a way to hide a URL?
Yes! You can hide a URL using methods like iframe embedding, meta refresh, or server-side redirects. These techniques let you show a custom link while hiding the actual destination.
How to see masked URL?
To reveal a masked URL, right-click the page and select “View Page Source,” or inspect the link in the browser’s developer tools. The real destination URL will usually appear in the iframe or meta tag code.
How to mask a URL in Chrome?
You can’t directly mask a URL in Chrome itself, but you can use a third-party URL masking tool online or a custom redirect through your hosting or domain provider to display a different address.
What is the difference between URL masking and encryption?
URL masking hides the actual address, while encryption protects the data transmitted between your browser and the website using HTTPS. Masking doesn’t secure information; encryption does.
Does URL masking affect SEO?
Yes, it can. Masking hides the real source URL, which can confuse search engines, impact indexing, and even lower your rankings if not done correctly.
How to enable and remove URL masking on a website?
You can enable masking by setting it up in your domain’s control panel (using an iframe or redirect settings). To remove it, disable the masking or switch to a standard 301 redirect instead.
How to request URL masking?
Most domain registrars or hosting providers let you request URL masking through their dashboard or support team. You just need to provide the original URL and the one you want displayed.
How to detect and prevent URL masking attacks?
Use reliable security tools and keep your browser up to date. Avoid clicking suspicious links, and implement SSL certificates and anti-phishing filters to stay protected.
How is URL masking different from URL redirection?
In URL masking, the original link stays visible in the browser’s address bar. In contrast, URL redirection automatically redirects the user to the new destination (by changing or updating the visible link).
Let’s be real, if you’re not on social media in 2026, you’re practically invisible.
With over 5.66 billion active social media users worldwide, that’s nearly 69% of the entire planet, the opportunity to grow your brand, reach new customers, and build real connections has never been bigger.
But here’s the catch: more users also means more noise, more competition, and shrinking attention spans. Simply “posting consistently” doesn’t cut it anymore.
The brands and entrepreneurs winning today are those who work smarter, using clever shortcuts and proven strategies to boost social media engagement without burning out. That’s exactly what this post is for.
So before we jump into the hacks, let’s quickly get on the same page about what social media marketing hacks actually are, and why they matter more than ever.
What are social media marketing hacks?
Think of social media marketing hacks as smart shortcuts, practical tips, and strategies that help you get better results without spending more time or money.
They’re not about “gaming the system”; they’re more about working smarter by understanding how platforms work and using that knowledge to your advantage.
The primary goal?
Cut through the noise, grow your audience faster, and drive real results, whether that’s more followers, clicks, leads, or sales.
And here’s why they matter: Most business owners and marketers are already stretched thin. You don’t always have hours to spend crafting the “perfect” strategy. These hacks give you a faster, leaner path to what actually works, so you can focus on running your business while your social media does the hard work.
Best social media hacks for small businesses: Top strategies & tips to follow!
Running a business means you’re always short on time, budget, or both. However, the good news is you don’t need a massive marketing team to win on social media.
These social media hacks for business will help you punch above your weight, grow faster, and actually enjoy the process. Let’s get into it!
Hack #01: Repurpose top content
Why reinvent the wheel every single day? Take your best-performing content and give it a new life.
Turn a popular blog post into a carousel.
Clip a long video into short Reels.
Convert a great tweet into a quote graphic.
Repurposing saves you hours of content creation time while keeping your feed fresh. The key is to tweak the format, not just copy-paste.
Different audiences consume content differently, so the same idea presented in a new way can reach a whole new crowd without starting from scratch.
Hack #02: Jump on new features
Every time a platform rolls out a new feature (a new content format, a new tool, a new tab), it pushes that to more people. That’s just how it works.
Instagram did it with Reels.
LinkedIn did it with short videos.
TikTok does it constantly.
Be an early adopter. You don’t have to be perfect with it, just show up early.
Platforms want people to use their new features, so they reward you with extra organic reach. It’s basically free visibility if you move fast enough.
Hack #03: Make impactful videos for all platforms
Video is still the king of content in 2026, but keep in mind that not every video fits every platform. A YouTube video won’t work the same way on TikTok, and a LinkedIn video has a different vibe than an Instagram Reel.
The hack here is to shoot one core video and then edit it for each platform (right dimensions, right length, and right tone).
Keep it punchy, lead with a strong hook in the first two seconds, and always deliver value fast. People scroll quickly, so you have to earn their attention right away.
Hack #04: Add subtitles to all videos
This one’s pretty simple, but so many people skip it.
A huge chunk of people scroll social media with their sound off, especially in public places. If your video doesn’t have subtitles, you’re losing a massive portion of your potential viewers before they even hear what you have to say.
Adding captions also makes your content more accessible to people with hearing impairments. A reliable, free AI social caption generator or tools like CapCut, Descript, or even the built-in caption features on Instagram and TikTok make this super easy.
No excuses, just add them right away!
Hack #05: Know the right time to post
Posting great content at the wrong time is like throwing a party when everyone’s asleep. Timing matters the most!
Most platforms give you free access to audience insights. Check when your specific followers are most active and schedule your posts around those windows.
Generally, early mornings, lunch breaks, and evenings tend to perform well, but your audience might be different. Test a few time slots, track what gets the most traction, and then stick with what works.
Consistency at the right time beats random posting every single day.
Hack #06: Use user-generated content (UGC)
User-generated content is one of the most underrated tools out there. When your customers post about your product or service, that’s literally gold. Share it, reshare it, celebrate it.
It builds trust way faster than any branded post because people trust other people’s words more than they trust brands. Ask your customers to tag you, create a branded hashtag, or run a simple challenge.
UGC also cuts down your content creation load significantly. It’s authentic, it’s free, and most importantly, it works. A happy customer showing off your product is worth more than any ad you’ll ever run.
Hack #07: Reshare story highlights
Your Instagram stories disappear after 24 hours, but your “Highlights” stick around forever.
Think of highlights as your social media storefront. Pin your best stories there: customer reviews, product demos, FAQs, behind-the-scenes moments.New visitors who land on your profile will check these out before they even scroll your feed.
Regularly refresh your highlights so they stay relevant and current. This is a passive but powerful way to keep working for you long after the original story has expired. It’s like evergreen content, but for stories.
Hack #08: Reply with a video
Instead of typing a plain text reply to a comment or question, record a short video response.
TikTok made this popular, but it works across platforms. It feels personal, it shows you actually care, and it creates new content at the same time.
If one person is asking a question, chances are ten others have the same one but didn’t bother typing it out. Video replies humanize your brand and boost engagement signals on your post, which tells the algorithm your content is worth pushing to more people. Win-win!
Hack #09: Perform real-time commenting
This one’s about showing up when it matters most.
Jump into comment sections of trending posts, popular creators in your niche, or viral content that’s relevant to your brand, and leave thoughtful, genuine comments. Not spammy “check us out!” stuff, but real responses that add value to the conversation.
When your comment is early and insightful, people notice it, click your profile, and follow you. It’s free exposure, and it positions you as an active voice in your community.
Set aside even 10–15 minutes a day for this, and you’ll start seeing results.
Hack #10: Use polls & questions
Polls and question stickers are some of the easiest ways to spark engagement without needing to create heavy content.
Ask your audience something simple like their opinion, their preference, or even a fun this-or-that. People love sharing their thoughts, and interactive content gets far more responses than passive posts.
Instagram Stories, LinkedIn, and X (Twitter) all have built-in poll features that are incredibly easy to use. Plus, the answers give you direct insight into what your audience actually wants, which helps you create better content down the line. It’s research and engagement rolled into one.
Hack #11: Critically analyze your competition
Don’t just glance at what your competitors are posting; actually study it!
What content gets the most likes, comments, and shares on their page?
What topics do they cover?
Where are the possible gaps?
Tools like Social Blade, Sprout Social, or even just manually scrolling their profiles can tell you a lot. The goal isn’t to copy them, it’s to understand what’s working in your niche and find angles they’re missing.
Your competitors have already done some of the testing for you. Use that information to make smarter content decisions and stay one step ahead.
Hack #12: Batch content creation & similar social media tasks
Jumping in and out of “content mode” throughout the week kills your productivity. Instead, block out one or two dedicated sessions where you create all your content for the week (or even the month) in one go.
Write all your captions together, design all your graphics together, and record all your videos in one sitting.
Batching keeps you in the zone and saves an enormous amount of time. It also means you’re never scrambling at the last minute for something to post.
Plan ahead, batch it out, and then schedule it all to go live automatically.
Hack #13: Use social media scheduling tools
Manually posting every single day across multiple platforms is exhausting and, honestly, unnecessary.
A scheduling tool like ContentStudio lets you plan, schedule, and publish content across all your social channels from one place. You can map out your entire content calendar in advance, set posting times, and let it run on autopilot.
ContentStudio also comes with analytics, content discovery, and collaboration features, making it a solid all-in-one solution for small businesses and busy marketers.
Work smarter, not harder! Schedule your content in bulk and free up your time for things that actually need your personal attention.
Great visuals stop the scroll, but not everyone has a designer on the team. That’s where tools like PostNitro come in.
It is an AI-powered carousel and content creation tool that helps you design eye-catching, platform-ready posts without needing any design skills. It’s fast, beginner-friendly, and built specifically for social media content.
Pair it with a content curation tool to stay on top of trending topics in your niche, and you’ve got a steady stream of relevant, well-designed content ready to go.
Remember, good tools don’t replace creativity; they just make it a whole lot faster.
Hack #15: Use automated social inboxes
If you’re managing multiple social media accounts, keeping up with every comment, DM, and mention can quickly become quite a challenging task.
An automated social inbox pulls all your messages from every platform into one single dashboard. Tools like ContentStudio, Hootsuite, or Zoho Social offer this amazing feature.
You can respond faster, never miss an important message, and keep your engagement levels high without jumping between five different apps.
Fast replies also signal to your audience that there’s a real, attentive person behind the brand, and that builds trust and credibility. Don’t let messages pile up; stay on top of them with automation.
Hack #16: Strategize your posting schedule
Posting randomly whenever you feel like it won’t get you far. You need a clear posting schedule that’s consistent and intentional.
Decide how many times per week you’ll post on each platform, what type of content goes out on which days, and what times work best for your audience.
Consistency tells the algorithm (and your followers) that you’re reliable. It also helps you stay organized and avoid content burnout.
Start with a manageable frequency, like 3-4 posts per week, and build from there. A simple content calendar is all you need to stay on track.
Hack #17: Keep headlines short & exclusive
Your headline, whether it’s a post caption opener, a video title, or a carousel cover, needs to grab attention immediately. Long, wordy headlines get skipped fast; whereas short, punchy ones get clicked.
Aim for clarity over cleverness, and make the reader feel like they’re about to learn something they can’t find just anywhere. Words like “only,” “exclusive,” “proven,” or “you didn’t know” create curiosity and urgency.
Think about what would make you stop scrolling and read something. Then apply that same thinking to your own headlines. Less is almost always more when it comes to hooks.
Hack #18: Focus on high-quality content creation
This might sound obvious, but it’s worth saying out loud: quality always beats quantity.
One genuinely helpful, well-crafted post will outperform ten mediocre ones every time. High-quality content doesn’t necessarily mean expensive production. It means being useful, relevant, and clear.
Does your post solve a problem?
Does it entertain or inform?
Is it easy to read or watch?
Those are the questions to ask before hitting “Publish”.
Audiences can easily tell when something is thrown together just to fill a slot. Take the extra time to make your content actually worth someone’s attention. It pays off in the long run.
Hack #19: Cross-promote your content
Why post something once when you can get multiple uses out of it?
Cross-promotion means sharing your content across different platforms and channels (post on Instagram, share it to Facebook, pin it on Pinterest, mention it in your email newsletter).
Each platform has a slightly different audience, so the same piece of content can reach entirely new people just by showing up in different places.
You can also cross-promote with other creators or brands in complementary niches. It’s a simple way to multiply your reach without creating anything new. More eyeballs, same effort!
Hack #20: Include share/follow buttons
This one sounds almost too simple, but a lot of professionals forget it. If you want people to actually follow you or share your content, make it easy for them to do it.
Add social media follow buttons to your website, your email signature, and your blog posts. Also, include a clear call to action phrase in your posts, asking people to share or tag a friend.
People are more likely to take action when they’re directly prompted. Don’t assume your audience knows what to do next; guide them properly. A small nudge can lead to a significant rise in your reach and follower count.
Hashtags still work, but only when you use them right.
Stuffing 30 random hashtags into every post is outdated and looks spammy. Instead, focus on a small set of relevant, targeted hashtags that actually match your content and audience. Mix up broad hashtags with niche-specific ones to reach both wide and targeted audiences.
On Instagram and TikTok, 3-5 well-chosen hashtags outperform a wall of generic ones.
On LinkedIn and X, 1-3 relevant hashtags work best.
Research what hashtags your ideal audience actually follows, and use those consistently. Quality over quantity, always!
Hack #22: Post consistently but strategically
Consistency is everything on social media, but that doesn’t mean posting just for the sake of it.
Showing up regularly keeps you visible and builds trust with both your audience and the algorithm. But every post should have a purpose (to educate, entertain, inspire, or convert). Random, low-effort posts just to “stay active” can actually hurt your engagement rate over time.
Pick a realistic posting frequency you can maintain without burning out, stick to it, and make sure every post adds genuine value. Consistent and intentional always beats frequent and forgettable.
Hack #23: Run contests & giveaways
Want a quick and reliable way to spike your engagement and grow your following?
The ultimate solution: Run a giveaway!
Contests get people excited, and the entry mechanics like “follow, like, and tag a friend” naturally expand your reach to new audiences without paid ads.
Keep the prize relevant to your brand so you’re attracting the right people, not just freebie hunters. Be clear about the rules, announce the winner publicly, and follow through promptly.
Even a small, well-run giveaway can bring in a solid wave of new followers and create a buzz around your brand that lasts beyond the contest itself.
Hack #24: Schedule your posts in advance
Scheduling your posts in advance gives you control over your content calendar and frees up your daily mental bandwidth for other things. Sit down once a week (or once a month if you’re really organized) and schedule everything out.
Tools like ContentStudio make this incredibly easy, letting you set exact publish times across multiple platforms from one single dashboard.
You’ll never miss a posting slot, you’ll stay consistent even on your busiest days, and your content strategy will feel a lot more intentional.
Prepare ahead, post on autopilot, and stay stress-free!
Hack #25: Take advantage of AI tools
AI tools have completely changed the content creation game for small businesses. Tools like ContentPen help you generate well-written social media and blog content in minutes.
An efficient AI video generator lets you create engaging video content without a camera or editing skills, whereas AI image generation tools give you unique, scroll-stopping visuals without hiring a designer.
The result? You produce more top-notch content, faster, and at a fraction of the cost.
AI doesn’t replace your creativity; it amplifies it. Use these tools to handle the complex tasks so you can focus on strategy and connecting with your audience.
Hack #26: Collaborate with well-known influencers
Influencer collaborations aren’t just for big brands with big budgets. Micro-influencers (those with anywhere between 10,000 and 100,000 followers) often deliver higher engagement rates and more genuine audience trust than mega-influencers.
Find creators in your niche whose audience overlaps with your target customers, and reach out for a collaboration. It could be a product review, a co-created post, a takeover, or a simple shoutout. Their endorsement puts your brand in front of a warm, already-engaged audience.
Start small, build real relationships, and let the results speak for themselves. Word-of-mouth at scale, that’s what influencer marketing really is.
Hack #27: Keep social media cheat sheets
A social media cheat sheet is basically a quick-reference guide that keeps all your important information in one place. This could be optimal image sizes for each platform, best posting times, hashtag sets, brand voice guidelines, caption formulas, and content ideas.
It sounds simple, but having this ready saves you an incredible amount of time and keeps your content consistent.
Whether it’s just you or a small team handling your social media, a cheat sheet means nobody has to Google “Instagram Reel dimensions” for the 100th time.
Build one, update it regularly, and watch your workflow become noticeably smoother and faster.
Hack #28: Use AI analytics tools
Posting content without tracking performance is like driving with your eyes closed.
AI-powered analytics tools like Usermaven take the guesswork out of your social media strategy by showing you exactly what’s working and what isn’t.
You get clear insights into audience behavior, content performance, traffic sources, and conversion patterns, all presented in a way that’s actually easy to understand. No data science degree required!
Use these insights to double down on what performs well and ditch what doesn’t. Smart decisions come from real data, and tools like Usermaven make that data accessible to everyone, not just big marketing teams.
Hack #29: Deploy a social media AI agent
AI agents are one of the most exciting developments for social media managers in 2026. A social media AI agent can handle repetitive tasks like:
responding to common DMs,
engaging with comments,
suggesting content ideas, and
even flagging important messages that need your personal attention
Think of it as a tireless assistant that’s always on, even when you’re not. This frees up significant time while keeping your engagement levels consistent.
It’s not about replacing the human touch; it’s about making sure the routine stuff gets handled so you can focus on the more meaningful, relationship-building side of social media.
Hack #30: Repost the same idea in a different format
One great idea deserves more than one single post. If a topic resonated with your audience, don’t just move on; revisit it in a different format.
Turn a popular carousel into a short video.
Expand a viral one-liner into a full caption with a story behind it.
Convert a well-performing post into a poll or a question.
Different people absorb content in different ways, so presenting the same core idea through multiple formats means you’re reaching a wider audience with content you know already works.
It’s not being repetitive, it’s being strategic about the value you’ve already created.
Hack #31: Posting slightly off-peak hours (might work at times)
Everyone posts during peak hours, which means that’s also when competition for attention is highest.
Sometimes, posting just slightly before or after the rush can actually work in your favor. Your content has less to compete with and can gain some early traction before the feed gets flooded.
This doesn’t work every single time, and is not a rule; it’s more of an experiment worth trying. A/B test a few posts during off-peak windows, track the results, and see how your specific audience responds.
Sometimes the unconventional move is exactly what gives you an unexpected edge!
Hack #32: Make use of voice-to-text software
If you ever find yourself staring at a blank screen trying to write captions or content ideas, try talking instead of typing.
Voice-to-text tools let you speak your thoughts naturally and instantly convert them into written text. It’s faster, more conversational, and often produces content that sounds genuinely human (because it literally is).
Tools like Otter.ai, Google Docs voice typing, or even your phone’s built-in dictation feature work great for this. Use it to brain-dump content ideas, draft captions on the go, or script videos while you’re commuting. It’s a small shift that can seriously speed up your workflow.
Hack #33: Consider live streaming for better engagement
Live streaming is one of the most powerful ways to connect with your audience in real time. There’s something about a live broadcast that feels raw, honest, and personal, and people respond to that.
No matter if it’s a product demo, a behind-the-scenes look, a Q&A session, or just a casual chat, going live puts a real face behind your brand.
Platforms like Instagram, TikTok, YouTube, and Facebook all prioritize live content and notify your followers when you go live.
Engagement during live sessions (comments, reactions, questions) tends to be significantly higher than on regular posts. Show up live and watch your community grow.
Hack #34: Use emojis to connect with your audience’s emotions
Emojis aren’t unprofessional; they’re human. When used correctly, they make your captions more expressive, easier to scan, and genuinely more fun to read.
A well-placed emoji can break up a long block of text, highlight a key point, or add a tone that plain words sometimes can’t convey.
They also make your content feel warmer and more approachable, which helps people connect with your brand on a personal level.
Just don’t overdo it! One or two emojis per line is plenty. Match the emoji to the mood of the message, keep it relevant, and let your personality shine through.
Hack #35: Automate your customer service
Your audience doesn’t only reach out between 9-5. Questions and messages come in at all hours, and slow responses can cost you trust or even a sale.
Automating your customer service with chatbots and auto-reply tools ensures nobody gets left waiting. Set up quick replies for the most common questions (pricing, shipping, hours, and how to place an order).
Tools like ManyChat, Tidio, or Meta’s built-in auto-reply features make this easy to set up for businesses of all sizes. Automation handles the routine stuff so you can focus your personal attention on the conversations that actually need it.
Hack #36: Use Pinterest for trending content ideas
Pinterest is massively underrated as a content research tool. People use it to search for ideas, inspiration, and solutions, which means the trending content on Pinterest tells you exactly what topics your audience is actively looking for.
Search your niche on Pinterest and pay attention to what’s being saved and shared the most. Those are your content ideas, handed to you for free.
You can then take those trending topics and create content around them on Instagram, TikTok, LinkedIn, Twitter (X), or wherever your audience hangs out.
Using a reliable Twitter VPN can also help you see trending content from other regions, keeping your brand ahead of the curve.
Think of Pinterest less as a platform to post on and more as a free trend-spotting tool.
Hack #37: Use Facebook/LinkedIn carousel ads
Carousel ads are one of the best-performing ad formats on both Facebook and LinkedIn (and for good reason). They let you tell a story across multiple slides, showcase several products at once, or walk someone through a step-by-step idea, all within a single ad.
Each card can have its own image, headline, and link, giving you more creative flexibility than a standard single-image ad. They’re also interactive; people swipe through them, which increases time spent with your ad.
For small businesses with a limited ad budget, carousels tend to deliver strong results because they pack more value into one placement.
Hack #38: Generate memes for Instagram/TikTok reels
Memes are one of the most shareable content formats on the internet nowadays, and they cost almost nothing to make.
A well-timed, relatable meme can accumulate shares, saves, and comments way faster than a polished branded post. The trick is to keep them relevant to your niche and your audience’s everyday experience.
If your followers laugh and think “this is so me,” they’ll share it definitely, and that share puts your brand in front of a whole new audience.
Tools like Canva or CapCut make meme and Reel creation quick and easy. Don’t be afraid to be a little funny.
Hack #39: Join Facebook groups for better engagement opportunities
Facebook Groups are still one of the most active and underutilized spaces on social media for small businesses.
Find groups where your target audience already hangs out (industry-specific groups, local business communities, interest-based groups) and genuinely participate. Answer questions, share helpful advice, and contribute to conversations without immediately pitching your product.
When you show up consistently and add real value, people naturally get curious about who you are and what you do. It’s organic, trust-based visibility that money can’t buy.
Just remember, lead with value first, and let the business follow naturally from there.
Hack #40: Create templates for commonly used graphics
If you’re designing every single graphic from scratch each time, you’re wasting a lot of time you don’t have.
Create a set of reusable templates for the content types you post most often (quote cards, product announcements, tips posts, promotional banners, story graphics).
Tools like Canva let you save branded templates with your colors, fonts, and logo already in place. Next time you need a post, just swap out the text or image, and you’re done in minutes.
Templates keep your branding consistent across every post while cutting your design time down dramatically. Set them up once and reuse them forever.
But honestly, the feature that stands out the most for social media managers and small business owners is its URL shortener.
Replug’s efficient link shortener lets you create clean, custom-branded short links in a matter of seconds. Instead of sharing long, messy URLs that look untrustworthy, you get sleek, professional links that carry your brand name, building credibility every single time someone clicks.
Maximize marketing ROI
by transforming ordinary URLs into branded short links that convert.
Try Replug for free
And it doesn’t stop there. Every link you shorten through Replug comes with built-in analytics, so you can track clicks, monitor performance, and actually understand what’s driving traffic.
It’s simple, fast, and genuinely useful. Give Replug a try today and see the difference a smarter link strategy makes for your social media presence.
Wrapping up
There you have it! 40 practical, tried-and-tested social media hacks that can genuinely transform the way you show up online.
Whether you’re a solo entrepreneur juggling a hundred things at once or a social media manager handling multiple brands, these strategies are designed to save you time, boost your results, and make the whole process a lot less challenging.
You don’t have to implement all 40 overnight. Start with a handful that feel most relevant to where you are right now, and build from there.
Consistency, creativity, and the right tools are all you really need. Now stop reading and start implementing; your audience is waiting!
Frequently asked questions
How social media hacks your brain?
Social media is deliberately designed to keep you hooked. It does this by:
– presenting minor things as urgent, – promoting endless scrolling without real satisfaction, – pushing multitasking, and – using emotional distress to keep you reactive
It also encourages constant comparison with peers and reinforces your existing beliefs rather than challenging them.
What is the 5 5 5 rule for social media?
The 5 5 5 rule is a simple daily engagement habit.
– Make 5 posts, – Leave 5 meaningful comments on other people’s content, and – Create 5 new connections
It keeps you consistently active and helps grow your presence organically without overburdening your schedule.
What is the 30/30/30 rule for social media?
The 30/30/30 rule helps you maintain a balanced content mix.
– Allocate 30% of your posts to your own brand, – 30% to curated content from other sources, and – 30% to fun or generally engaging content
The remaining 10% is kept aside for real-time updates and trending moments.
What is the 5 3 1 rule on Instagram?
The 5 3 1 rule is an engagement strategy focused on daily interaction. Every day:
– Engage with five small accounts, – Three medium accounts, and – One large account (all within your niche)
It steadily increases your brand visibility and helps you build genuine relationships across different audience sizes.
What is the 5 3 2 content rule?
The 5 3 2 rule gives your content a healthy, balanced structure. For every 10 posts:
– 5 should be curated content from other sources, – 3 should be your own original content, and – 2 should be personal or behind-the-scenes content.
It keeps your feed varied, relatable, and never overly promotional.
What are the 7 C’s of social media?
The 7 C’s are the core pillars of a solid social media strategy.
Together, they cover everything from building an engaged audience and producing great content to having real interactions and turning followers into actual customers.
What are some hidden social media growth hacks?
Some lesser-known but highly effective growth tactics include engaging with others in your niche before you post.
Content that receives quick interaction within the first hour is more likely to be pushed further by the algorithm, so timing your engagement matters.
Also, the three ranking signals that now outweigh everything else across major platforms are watch time, saves, and shares, so create content people want to revisit and pass on.
How to increase website traffic through social media?
The most effective approach is straightforward:
– publish for discovery, – optimize for search, – make the next click obvious, and – track every campaign properly
Add website links to your bios, include clear CTAs in your posts, share blog content regularly, and use link-in-bio tools to direct followers to specific pages.
A social media calendar helps you balance awareness posts, engagement posts, and click-focused posts. All three working together consistently is what drives steady, reliable website traffic over time.
Are you looking to make your website discoverable by millions of users across the web? Do you want to ensure that your content appears in Google’s search results?
If so, you’ve come to the right place! Submitting your URL to Google is an essential step in getting your website indexed and increasing its visibility online.
For marketers who care even more about both visibility and link performance, Replug.io provides an integrated way to shorten, brand, and manage all your shared URLs, so that every link counts.
In this guide, we will simplify the process and provide you with simple, easy-to-understand instructions on how to submit your URL to Google.
Let’s dive in and make your mark in the digital world!
Why submit URLs to Google?
Submitting URLs to Google is essential for several reasons:
Enhanced Visibility: Submitting URLs ensures that your web pages are indexed and appear in Google’s search results, increasing visibility among your target audience.
Faster Indexing: By submitting URLs, you expedite the process of indexing, allowing your content to be searchable sooner.
Increased Organic Traffic: Indexed URLs have the potential to appear in search engine results, attracting organic traffic to your website.
Control Over Search Results: URL submission allows you to prioritize your most valuable web pages in search results, giving you more control over your online presence.
Recognition of Updates: Submitting URLs alerts Google to crawl and index your updated content, ensuring users have access to the latest version.
Improved Rankings: Indexed URLs contribute to higher search engine rankings, boosting visibility and organic traffic.
A complete link management solution
for marketing professionals & agencies.
Try Replug for free
Method 2: Submit an XML Sitemap
Follow these steps to submit an XML Sitemap:
Step 1: Submit your XML Sitemap
On the Sitemaps page, click on the “Add/Test Sitemap” button.
In the text field that appears, enter the filename or path of your XML sitemap. It should typically be named “sitemap.xml” and located in the root directory of your website.
Click on the “Submit” button to add your XML sitemap to Google Search Console.
Step 2: Verify Successful Submission
After submitting your XML sitemap, Google Search Console will display the status and details of the submitted sitemap. It may take some time for Google to process the sitemap and index the included URLs.
Check the “Coverage” report in Google Search Console to ensure that the submitted URLs are being indexed properly. Monitor any errors or warnings that may require attention.
It’s important to note that Google’s crawling and indexing process may take some time. Submitting a URL doesn’t guarantee immediate inclusion in search results, but it improves the chances of your web page being discovered and indexed by Google.
Repeat this process whenever you have new content or make significant updates to ensure timely indexing and visibility in search results.
And when you’re sharing your newly indexed links, you can shorten them through an efficient link shortener to brand them and track clicks easily. This will ultimately result in making your SEO efforts more measurable and powerful.
FAQs
What is the purpose of submitting URLs to Google?
The purpose of submitting URLs to Google is to enhance visibility and ensure that your web pages are indexed and included in search results.
How long does it take for Google to index submitted URLs?
The time taken for Google to index submitted URLs can vary, but it typically ranges from a few hours to a few days.
Can I submit multiple URLs at once to Google?
Yes, you can submit multiple URLs at once to Google using an XML sitemap or by requesting a crawl through Google Search Console.
Should I resubmit my URLs to Google if I make updates to my website?
Yes, it is advisable to resubmit your URLs to Google whenever you make updates to ensure timely indexing of the modified content.
What should I do if my submitted URLs are not getting indexed by Google?
If your submitted URLs are not getting indexed by Google, you should review potential issues such as crawl errors or content quality to troubleshoot and address the problem.
How often should I review and update my XML sitemap?
Regularly reviewing and updating your XML sitemap is recommended, especially when new content is added or existing content is modified.
Have you ever tried emailing a PDF only to hear, “I can’t open this”?
That’s a real pain, especially when 98% of businesses still rely on PDFs for sharing docs in 2026. And yet, bulky attachments, hidden files, and endless download steps slow everyone down.
If you’ve ever felt frustrated by unclickable docs, you’re not alone! Slow downloads and attachment chaos waste precious time, and they kill engagement.
The good news?
There’s a super simple fix, i.e., turn your PDF into a clean, shareable link online. No downloads, no headaches!
In just seconds, you can create a URL anyone can open with just a single click, and keep everyone happy.
Ready to break down what a PDF actually is before we get into how conversion works?
Let’s get right to it!
What is a PDF?
A “PDF (Portable Document Format)” is a universal file format that preserves a document’s layout, fonts, images, and content, so it looks the same no matter what device or software you use to open it. It was created to make sharing and viewing documents easy and consistent for everyone.
PDFs work on computers, phones, and browsers without changing their actual appearance.
For example, if you save your résumé as a PDF and send it to someone, it will look exactly the same on their screen as it does on yours (no weird formatting or missing fonts).
What is a URL?
A “URL (short for Uniform Resource Locator)” is basically the web address you type or click to find something online, whether it’s a webpage, a video, an image, or even a document like a PDF. It tells your browser where something lives on the internet and how to load it.
Think of it like a street address for online stuff. For instance, https://www.example.com/page1 takes you right to that specific page (i.e., page1).
Can you convert a PDF to a link/URL?
Yes! You can absolutely convert a PDF into a shareable URL online, and most tools do it in just a few clicks.
You simply upload your PDF to a free service, and it hosts the file and instantly gives you a link anyone can open in their browser, hassle-free.
That link lets people view (and sometimes download) your PDF without having to send the file itself.
It’s quick, works on phones and computers, and you can share the URL via email, chat, or social media seamlessly.
How to convert PDF to URL link for free: 4 simple methods discussed!
Sharing your PDF as a link makes it much easier for others to view or download without bulky attachments.
Below are four easy ways to turn a PDF into a shareable URL, starting with the most popular free option using cloud storage like Google Drive, OneDrive, and Dropbox.
Here’s how to convert a PDF to a URL for free, with simple steps anyone can easily follow!
Method #01: Using Cloud Storage (easiest way)
Uploading your PDF to cloud storage lets you generate a quick, unique URL you can share with anyone, anytime. Most cloud drives let you control who can view or edit the file, perfect for free PDF-to-link sharing.
Google Drive PDF to URL conversion
1. Go to Google Drive and sign in to your Google account.
2. Click “+ New” → “File upload” and choose your PDF.
3. Once uploaded, right-click the file and click “Share” → “Get link.”
4. Change the permission from “Restricted” to “Anyone with the link”(Viewer) so others can open it without signing in.
5. Click “Copy link,” then “Done,” and paste it wherever you want to share.
OneDrive PDF to URL conversion
1. Open OneDrive and sign in with your Microsoft account.
2. Upload your PDF by dragging it into your OneDrive folder or using Upload → Files.
3. After the upload finishes, select or right-click the file and click “Share.”
4. Choose “Anyone with the link can view” or “Anyone with the link can edit” to make the URL public.
5. Click “Copy link” and share it.
Dropbox PDF to URL conversion
1. Sign in to Dropbox and upload your PDF to your space.
2. Hover over the PDF and click “Share.”
3. If a link hasn’t been created yet, click “Create link.”
4. Once ready, hit “Copy link” to grab the URL.
5. Share the link, so people can open it in a browser.
These cloud storage methods are reliable ways to learn how to convert a PDF to a URL for free, without extra tools or software. Next, we’ll look at other simple approaches that don’t even require a cloud account!
Method #02: Converting to HTML (for web pages)
If you want your PDF to act like a real online web page, converting it to HTML is a great way to do so.
Turning a PDF into an HTML file lets browsers display it just like a site, and once it’s online, you can share its URL easily.
Here’s how to convert a PDF into a web-friendly HTML using popular tools:
Using Adobe Acrobat
1. Open your PDF file inside Adobe Acrobat on your computer/laptop.
2. From the toolbar on the right, click on the “Create & Edit” option.
3. At the top of the window, choose the “Export PDF” or “Convert” option.
4. In the list of available formats, pick “HTML Web Page” for the output type.
5. Set your desired options (like whether to create a single HTML file or several), and then click “Export” to proceed.
6. Click “Save” and Adobe Acrobat will export your PDF as an HTML document.
7. Upload the HTML file(s) and any related folders to your web host, then open them through their URL.
Using PDFelement
1. Launch PDFelement and open your PDF file in the app (either by dragging it or selecting “Open File”).
2. In the top menu, go to the “Convert” tab.
3. Click the option that says “To HTML” or select “HTML” from the output formats.
4. Choose where you want the converted file saved, and click “Save.”
5. PDFelement will turn your PDF into an HTML web page ready for sharing or hosting online.
Method #03: Using other notable online tools
If you’re looking for quick web-based ways to turn your PDF into a URL without installing anything, several online tools make this super easy.
These platforms let you upload your PDF file and get a shareable link in just a few clicks. Perfect option for converting a PDF to a URL in minutes!
pdfFiller
pdfFiller lets you upload a PDF and instantly generate a shareable URL/link you can send to anyone. No complicated steps!
1. Go to the pdfFiller website.
2. Upload your PDF file using the upload box.
3. Choose the “Share or Create Link” option.
4. Adjust permission settings, and click the button labeled “Create Link.”
5. Wait for the conversion to finish.
6. Copy the link provided and share it via email, chat, or social media.
EdgeOne Pages
EdgeOne Pages offers simple PDF-to-URL hosting. Upload your file and get a direct link, with options for custom domains and secure HTTPS.
1. Visit EdgeOne Pages and sign in or create an account.
2. Upload your PDF file to the platform.
3. Pick a free default domain or connect your own.
4. Click “Deploy” or “Publish” to host the file.
5. Copy the generated URL and share it with anyone.
FlippingBook
FlippingBook converts your PDF into a stylish, interactive online document with a shareable link. Great choice if you want more than a basic viewer.
1. Go to FlippingBook.
2. Upload your PDF via the “Upload PDF” button.
3. Wait while the tool converts it into an online flip book.
4. Customize settings or look if you’d like.
5. When ready, copy the URL for your generated flip book.
6. Share the link by email, social media, or embed it on your site.
Method #04: Via a quick file host
If you want to generate a quick PDF URL without long processes or accounts, using a temporary file host is one of the easiest ways to do it.
These services let you upload a PDF and instantly get a link to share with others. The ideal option when you just need a fast way to convert PDF to URL without storage or setup.
Tiiny.host
Tiiny.host lets you upload your PDF and host it online in seconds, giving you a unique URL others can open right away (with no complicated setup).
1. Visit Tiiny.host in your browser.
2. Drag and drop your PDF file into the upload area.
3. Enter a custom link name if you want a friendly URL.
4. Click “Publish” or “Launch” and wait a moment.
5. Copy the generated link you get and share it. Anyone with the URL can view the PDF online.
WeTransfer
WeTransfer is primarily a file-sharing service that instantly turns uploads into shareable links. A great tool for big PDFs up to ~2 GB.
1. Go to wetransfer.com in any web browser.
2. Click “Add your files” or the “+” icon, then pick your PDF.
3. Choose “Get transfer link (or Link Transfer)” instead of emailing it, from “…” or “More Options.”
4. Hit “Transfer” and wait for the upload to finish.
5. Once done, copy your download link. This becomes your shareable PDF URL.
Note: With the free plan, the link typically stays active for about 3–7 days.
SendSpace
SendSpace is another simple file host that creates a shareable link for any upload, including PDFs, with up to ~300 MB on the free plan.
1. Open sendspace.com in your browser.
2. Click the “Browse” button and select your PDF.
3. Start the upload; wait until it’s fully complete.
4. When finished, copy your unique link from the results page.
5. Share that link anywhere you like! People can visit it to download or view your PDF.
These quick hosts are excellent when you want a fast and free way to convert a PDF to a URL without complex tools. Ideal for one-off shares, portfolios, resumes, or client files.
How to convert a PDF to a URL link on Mac (iCloud Drive)
If you keep your PDF in iCloud Drive on your Mac, you can create a shareable link right from Finder, so anyone with the URL can view or download it.
It’s a great way to share large documents without attachments, and it works across devices as long as you’re signed into your Apple ID.
Here’s how to convert a PDF to a URL on a MacBook, step-by-step:
1. Move your PDF to iCloud Drive: Open Finder, go to iCloud Drive, and drag your PDF in there. Wait a moment for it to finish uploading.
2. Select the file: In iCloud Drive, click the PDF you want to share to highlight it.
3. Open the “Share” menu: Right-click (or Control-click) the file and choose “Share”, then “Share File” from the menu. You can also click the “Share” icon inside the toolbar for this step. It is a square with an upward arrow.
4. Set link access: In the window that appears, click “Share Options” and switch “Only invited people can edit” to “Anyone with the link” if you want anyone to open it without signing in. Also, set the permission to “can view only.”
5. Copy the link: Click the “Copy Link” option. Your unique iCloud PDF link will be copied to your clipboard. Just paste it into an email, message, or post to send it.
That’s all! Now you’ve successfully turned a PDF stored in your iCloud Drive into a URL link others can open easily.
How to convert a PDF to a clickable URL link on a laptop/PC
Turning a PDF into a clickable link on your laptop or PC is simple and takes only a couple of minutes.
You just upload the file to a free online PDF-to-URL converter, and it instantly gives you a shareable link you can copy and send to anyone.
These tools work right in your browser and don’t require downloading special software, making the process quick and easy for everyday sharing.
Step-by-step guide:
1. Pick a PDF-to-URL tool: Open your browser and go to a free converter like PDF Deck, UPDF, or LinkyHost. These let you upload and convert PDFs to URLs right away!
2. Upload your PDF: Click the “Upload” or “Choose File” button and select the PDF you want to share from your PC.
3. Generate the URL: Once the file finishes uploading, the tool will process it and show you a shareable link. (Some tools give you a QR code too!)
4. Copy the link: Click “Copy Link (or similar)” to save the URL to your clipboard.
5. Share the URL: Paste the link into an email, chat, or webpage, so anyone who clicks it can open your PDF in a browser effortlessly.
That’s it! No installs, no tech setup, just a few clicks to turn your PDF into a clickable URL link!
How to convert a PDF to a link in mobile
Turning a PDF into a clickable URL on your mobile phone is easier than you might think. You don’t need to install heavy software for this task.
You can use free online tools right from your phone’s browser to upload your PDF and instantly get a shareable link that anyone can open hassle-free.
Step-by-step guide:
1. Open your mobile browser: Launch Chrome, Safari, or your usual browser on your iPhone or Android phone.
2. Go to a PDF-to-URL tool: Visit a free converter like PDF to Link(pdftolink.io) or iScanner. These work on phones just like on a desktop.
3. Upload your PDF: Tap “Upload” or “Choose File,” then pick the PDF from your phone’s files or cloud storage.
4. Generate the shareable link: Once the upload finishes, the site will create a URL for your PDF. Just tap “Copy Link” to save it.
5. Share your link: Paste the link into a message, email, or WhatsApp. Now, anyone can open your PDF with just a single tap!
👉 Some modern mobile apps also let you create and share a PDF link directly (e.g., certain PDF hosting apps on iPhone), but using a browser tool is usually the fastest way on any device.
By now, you’ve seen that turning a PDF into a clickable URL link is something anyone can do in minutes, no matter if you’re on a laptop, mobile phone, Mac with iCloud Drive, or using cloud storage and online tools.
These methods make sharing documents effortless, eliminate bulky attachments, and keep your links neat and easy to access.
And if you want to go a step further and create short link versions that are trackable and professional, tools like Replug make it pretty simple to shorten, brand, and monitor your links while boosting engagement.
Maximize marketing ROI
by transforming ordinary URLs into branded short links that convert.
Try Replug for free
Yes! You can turn a PDF into a URL by uploading it to an online hosting tool or cloud service. Once uploaded, the platform gives you a shareable link that anyone can open in a browser. Services like PDF to Link and Tiiny.host make this real quick.
Here’s how to turn a PDF into a URL:Just upload your file and copy the link the tool generates. As simple as that!
How to change a PDF to a URL?
To change a PDF into a URL, use a free online PDF-to-URL converter. Just visit the site, upload your PDF, and it will instantly create a unique web link for your file. You can then copy that link and share it anywhere.
How to host a PDF on a URL?
You host a PDF at a URL by placing it on a web server or in cloud storage (such as Google Drive, Dropbox, or a reliable hosting service). After uploading, set the file’s sharing to public and copy the URL it provides you. That link becomes the address (hosted address) others can use to open it.
Can I convert a PDF to a webpage?
Definitely! You can convert a PDF to a web page by converting it to HTML or by hosting it as a web-accessible document. Some tools let you export your PDF as an HTML file or embed it in a webpage viewer, so people can view it like a website rather than just a download file.
How to convert PDF to URL via Adobe?
With Adobe PDF to link, Adobe Acrobat doesn’t directly generate a public URL by itself. Instead, you would first upload your PDF to a cloud or hosting service (like Adobe Document Cloud or Drive), then share the public link it provides.
Note: Adobe Acrobat lets you edit and prepare PDFs before hosting, but the actual URL is generated by the upload service.
How to convert a PDF file to a URL on iPhone and Android?
You can turn a PDF into a URL link right from your phone using free online converters (like PDF to Link or similar). Just open your mobile browser → go to the tool’s site → upload the PDF from your device or cloud, and the tool will generate a shareable link you can copy and send.
Alternatively, upload the PDF to cloud storage (e.g., Google Drive, Dropbox, OneDrive) and use the share feature to get a link.
How do I turn a PDF into a Google link?
To get a Google link for a PDF:
1. Upload the file to Google Drive, 2. Then right-click it and choose “Share.” 3. Change the access to “Anyone with the link (Viewer)” (if needed), 4. Then copy the link and share it.
That link will let others view or download your PDF in a browser.
How to share a PDF as an online link?
The simplest way is to upload your PDF to a cloud service like Google Drive, Dropbox, OneDrive, or a PDF-to-link site. After uploading, use the “Share” or “Get link” option and set the access you want (e.g., “Anyone with the link”). Finally, copy the URL and send it to anyone you want!
How to convert a PDF URL to base64 in JavaScript?
To turn a PDF URL into base64 in JavaScript, you typically fetch the PDF data as a binary blob and then encode it.
Note: Base64 lets you embed the PDF data as text (e.g., in HTML or JSON) instead of linking to a file.
Why might you need to convert a PDF to a URL online?
You might convert a PDF to a URL online because it makes sharing documents much easier. There are no large attachments, no format issues, and recipients can open it directly in a browser.
URLs are great for posting online, sending in chats or emails, and avoiding file size limits that come with attachments.
How to embed a PDF in a web page easily?
To embed a PDF on a web page so visitors can view it without downloading, upload your file to a host (like Google Drive or a PDF hosting service), then use an HTML embed method.
A common approach is to add an <iframe> or <embed> tag with the PDF’s URL as the source to your page’s HTML. This displays the PDF right on the page.
What is the best PDF-to-link converter online in 2026?
In 2026, several good online PDF-to-URL converters exist, but tools like PDF to Link (pdftolink.io) and LinkyHost stand out for simplicity and free use. They let you upload a PDF and get a shareable link instantly.
Some other platforms offer analytics and tracking, too. Also, comprehensive tools like Papermark are gaining popularity for advanced link analytics and custom options.
How to share your PDF link in an email, chat, and on social platforms?
Once you have a shareable URL for your PDF, just copy the link and paste it wherever you want: in an email message, chat app (like WhatsApp or Messenger), or on social sites like Facebook, LinkedIn, or Twitter.
Most platforms automatically turn the link into a clickable item, so recipients can open the PDF in their browser without downloading it.
How to upload a PDF to a URL?
To upload a PDF so it has its own URL, use a hosting solution or service such as cloud storage or an online PDF-to-link tool. Upload the file, then use the platform’s share or generate link feature. The system will host your file and provide a URL you can share. That’s your live link to the PDF.
What are the most common PDF link types?
Here are common types of PDF links you might use or encounter:
–Direct link: A simple URL that opens or downloads the PDF file. –Link to a page: A link that opens the PDF to a specific page (often done with #page=number). –Link to selected text: A URL that highlights or jumps to particular text within the PDF. –Custom link: A branded, user-friendly, vanity URL(often created through a link shortener or custom host).
These cover most ways people share or reference PDFs online.