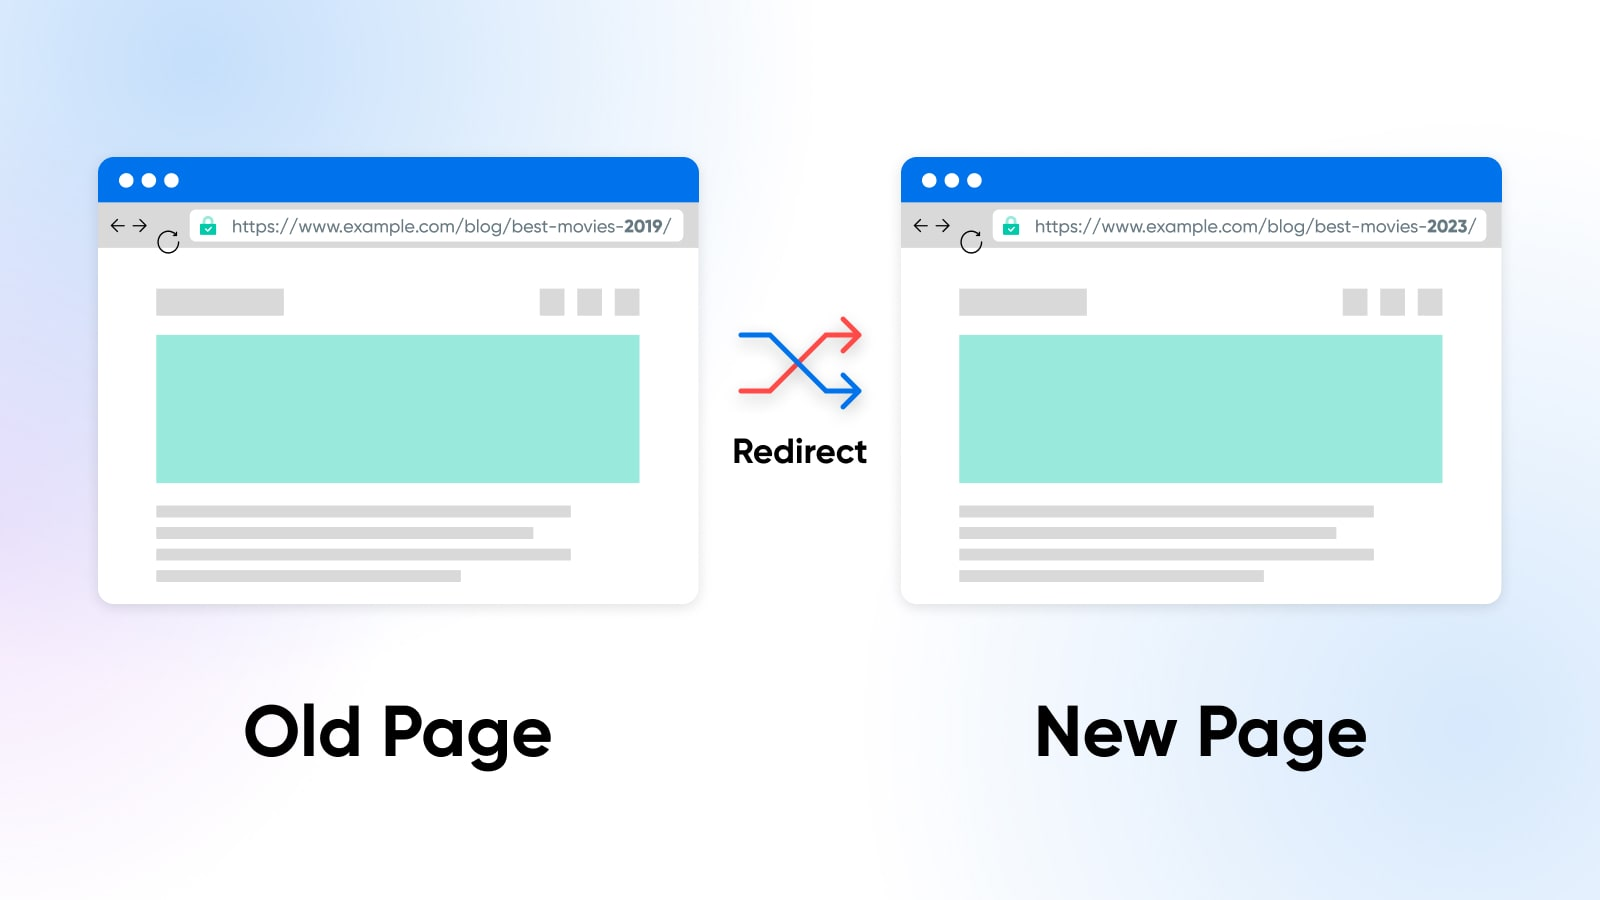
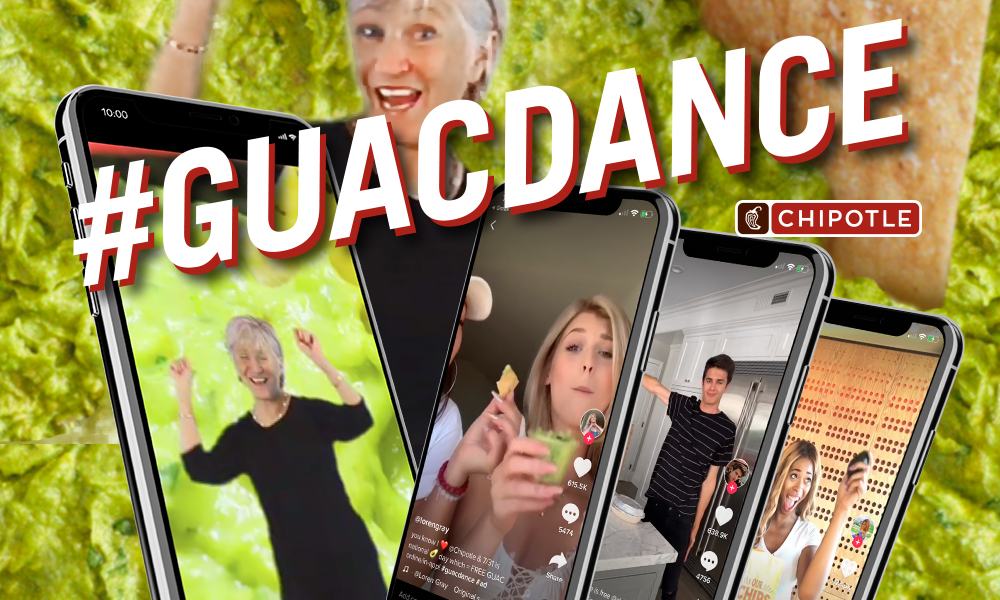
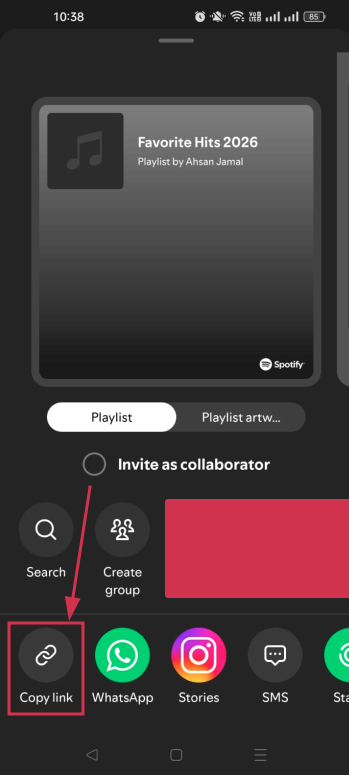
QR codes come with more tricks than a magician’s hat. ???? A Dynamic QR code is all about redefining how you connect with information.
Usually, a QR code is printed on the packages or product boxes to access the product details specifications, or other information regarding the product.
However, the dynamic QR code is something most of you haven’t heard of before. You’ll be amazed at how these codes are changing the game for businesses, educators, and more.
So let’s dive deep into it and learn more about this specific type of QR code.
What is a dynamic QR code?
A dynamic QR code is flexible and adaptable codes can be edited, replaced, and updated after their creation. enabling real-time information updates and tracking of user interactions.
The core purpose of a QR code is to direct visitors to a specific website page or information linked to it. These codes are not your standard QR codes; they transform, adapt, and offer unparalleled tracking and customization.
How does dynamic QR code work?
Dynamic QR codes are made using specific software or online tools. Users input the content they want the QR code to show, like a website link or text. The QR code generator then produces a QR code that links to a server or database where the content is kept. You can change the content even after making the QR code.
Dynamic QR codes are responsible for showcasing the QR code analytics for tracking purposes. It also provides an option to edit or alter the destination URL or link information to the QR code. Therefore, the users don’t have to generate new QR codes in case of a change in the information, such as website URL, email address, or phone number.
Moreover, a dynamic QR code also integrates with several third-party tools and softwares to analyze the digital marketing campaign performance. So that’s why it’s important for brands and entrepreneurs to embrace the effectiveness of the dynamic QR codes.
The key steps in how dynamic QR codes work are:
Creation: A dynamic QR code is generated using a QR code generator or software. During this process, a URL (web address) pointing to the server or database is typically included in the QR code.
User Scanning: When a user scans the dynamic QR code using a smartphone or QR code reader, the app decodes the code and sends a request to the included URL.
Server Interaction: The server receives the request and dynamically generates the relevant content. This could be a webpage, text, image, or any other data.
Content Display: The server then sends the content back to the user’s device, which displays the updated information.
Tracking (Optional): Dynamic QR code systems often include tracking capabilities, allowing the QR code owner to collect data on how often the code is scanned.
Static QR code vs. dynamic QR code
Most businesses have been using static QR codes for a while without fashioning the innovation in the process. Therefore, it’s vital to discuss the core differences between a static and dynamic QR code to bring clarity to the readers’ minds.
Let’s do a side-by-side comparison of static and dynamic QR codes to give you perspective on capitalizing on this fantastic marketing and engagement opportunity:
Static QR Codes
Dynamic QR Codes
Permanent
Editable
Non-Trackable
Tackable
No Retargeting Capability
Retargeting Capability
Long Clunky URL
Short URL
Takes Time To Scan
Quick Scanning
Static QR Code
Static QR codes are permanent and cannot be edited, which is the key difference between both types of QR codes
The data linked to a static QR code remains unchanged indefinitely no matter what QR software is used to create the code
One of the factors of static QR codes is that they can’t be tracked regardless of the QR code generator
A huge perk of creating a static QR code is that it’s free to use and the users don’t need a subscription to create a QR code
Static QR codes are compatible with both Android and iOS devices
Dynamic QR Code
The biggest perk of the dynamic QR codes is that they are editable and trackable, making them ideal for businesses to alter the stored information going forward
Dynamic QR codes flawlessly redirect users to various types of information, such as website pages, videos, podcasts, and other information sources
Users can easily store rich media content like videos, images, audio, or custom webpages using dynamic QR codes
Analytics help marketers analyze the performance of their content or product. The performance of the dynamic QR codes can be tracked to analyze the campaign outcome
A dynamic QR code campaign can provide access to detailed reports, showcasing information about the total number of scans, scan locations, scan times, and the scanning device
Dynamic QR code allows users to integrate the QR code with third-party tools, such as Google Analytics, Zapier, and other SAAS products
A complete link management solution
for marketing professionals & agencies.
Try Replug for free
Examples of QR codes
QR codes are a rapidly growing trend without a doubt. Businesses of all sizes are adopting QR codes for marketing and engagement purposes.
Let’s shed some light on the diverse use cases of QR codes to understand the acceptability of this innovation:
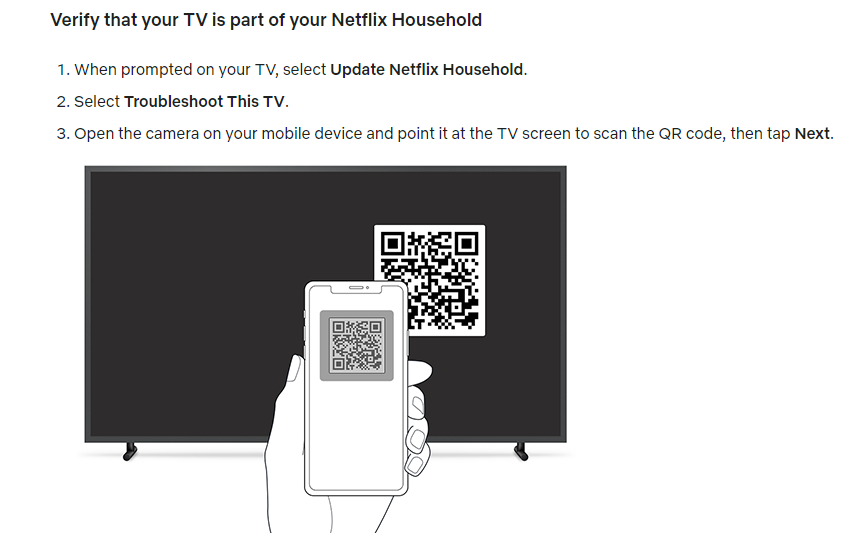
i. Netflix: Household verification
Netflix is a popular OTT streaming service that has millions of users globally. The streaming platform recently implemented a household user verification system through QR codes.
Netflix asks the users to verify their identity to ensure that the subscription is in the same household when the user logs in on a different device or through a different internet connection.
The users are required to scan the QR code using their smartphone’s camera and then they’re redirected to the Netflix app once it’s verified.
Key takeaways:
Streamlined sign-up process, reducing friction for new users.
Enhanced user engagement and personalized recommendations for existing users.
An intuitive and convenient way to access the app’s features using a smartphone’s camera.
ii. AliExpress triggers app installations through the dynamic QR codes
AliExpress is a well-known Chinese e-commerce platform with customers across the globe.
This e-commerce giant has been using the QR code to direct the audience toward their respective mobile app store.
The iPhone users are redirected to the App Store, whereas the Android users are redirected toward the Google Play Store.
So it’s yet another use case of QR code that’s worth noticing. Brands could elicit this strategy and use the QR code to increase their mobile app downloads for more sales and engagement.
Key takeaways:
Dynamic QR codes offer a streamlined and efficient way for e-commerce platforms.
Brands could elicit this strategy and use the QR code to increase their mobile app downloads for more sales and engagement.
Use cases & uses of QR codes
Now that we have seen some popular examples of dynamic qr codes. But the story does not end there, as there are a number of ways you can use QR codes.
Let’s have a look at the use cases below where dynamic QR codes can be valuable.
i. Marketing Campaigns:
A company runs a marketing campaign with dynamic QR codes on promotional materials. Using it, they can monitor how many times the QR code is scanned, where and when scans occur, and the conversion rate to gauge the campaign’s success.
ii. Contactless Payments:
Dynamic QR codes are employed for contactless payments, where customers can scan the code to make payments at stores, restaurants, or for online purchases.
iii. Retail price updates:
Retailers can update the pricing information on their products by utilizing dynamic QR codes on price tags. This is especially useful during sales or when price changes are frequent.
iv. Inventory tracking in a warehouse:
Warehouse staff can update the QR code to indicate changes in the contents of a shelf or aisle. This allows for accurate and up-to-date inventory tracking without the need for manual record-keeping.
v. Product recalls:
If a product recall is necessary, the company can update the QR code to provide consumers with recall instructions, replacement options, or safety information. This ensures that consumers have access to the most current and critical information.
vi. Restaurant menus:
Restaurants use dynamic QR codes on printed menus to provide customers with access to digital menus. These menus can be updated in real-time to reflect daily specials, pricing changes, or new dishes.
vii. Emergency contact information:
In case of an emergency, first responders can scan the QR code to access the person’s medical history and emergency contacts. The individual can update this information as needed, ensuring accurate data is available during critical situations.
The above cases are just to name a few. These codes can be further utilized in various services departments like travel, real-estate, event management etc. These codes essential in making life easier through real-time updates and convenient processes.
When it comes to QR codes, the benefits are greater than we think. Let’s dive in further to learn about the key benefits.
Benefits of using a dynamic QR code
Dynamic QR codes have relatively broader capabilities as compared to static QR codes. No wonder top brands, marketing agencies, and social media influencers prefer dynamic QR codes for marketing and user engagement.
Let’s take a look at some of the benefits of using a dynamic QR code:
i. Easily editable
The first and foremost benefit of a dynamic QR code is that it can be edited going forward. The information attached to a dynamic QR code can be altered if needed. On the contrary, the static QR codes can’t be edited once created. The QR code is editable, which makes the dynamic QR code a clear choice for most brands and companies. It’s one of the differentiators between dynamic and static QR codes.
ii. Track performance
Static QR codes aren’t trackable, whereas dynamic QR codes can be tracked. Performance tracking makes dynamic QR codes more effective from the data and analytical standpoint. Brands and e-commerce websites use dynamic QR codes so that they can track their products’ reach, engagement, and sales.
iii. Fast processing
Dynamic QR codes are quicker when it comes to processing. The static QR codes are generally free to create. However, dynamic QR codes are available on premium plans. Therefore, it’s crystal clear that dynamic QR codes would be faster than static ones.
iv. Third-party integrations
Third-party tools integration takes any tool or service to the next level. When it comes to dynamic QR code generators, they seamlessly integrate with other tools for marketing and management. Marketers and brands may want to connect their QR codes with analytics tools to keep track of their QR codes’ performance.
v. Retargeting capability
One of the benefits of dynamic QR codes is that they can be used for retargeting the audience through ad networks such as Facebook ads and Google ads. The marketers can launch a retargeting campaign targeting the visitors who scanned the dynamic QR code and increase the likelihood of a conversion.
Add a dynamic QR code to your website using Replug
Adding a dynamic QR code to your website, landing page, or app would be a game-changer in engaging prospective customers or new visitors from a standpoint.
Since the QR code makes it easier for the visitors to access the stored information, the visitors would be able to access the URL or other information swiftly.
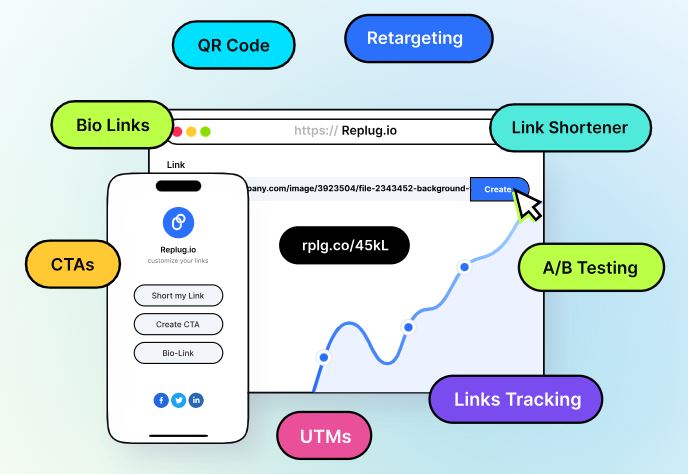
Replug is one of the best URL shortening and link management tools out there. You can use its free URL changer to create trackable, shortened links that enhance your campaigns with powerful analytics and seamless management.
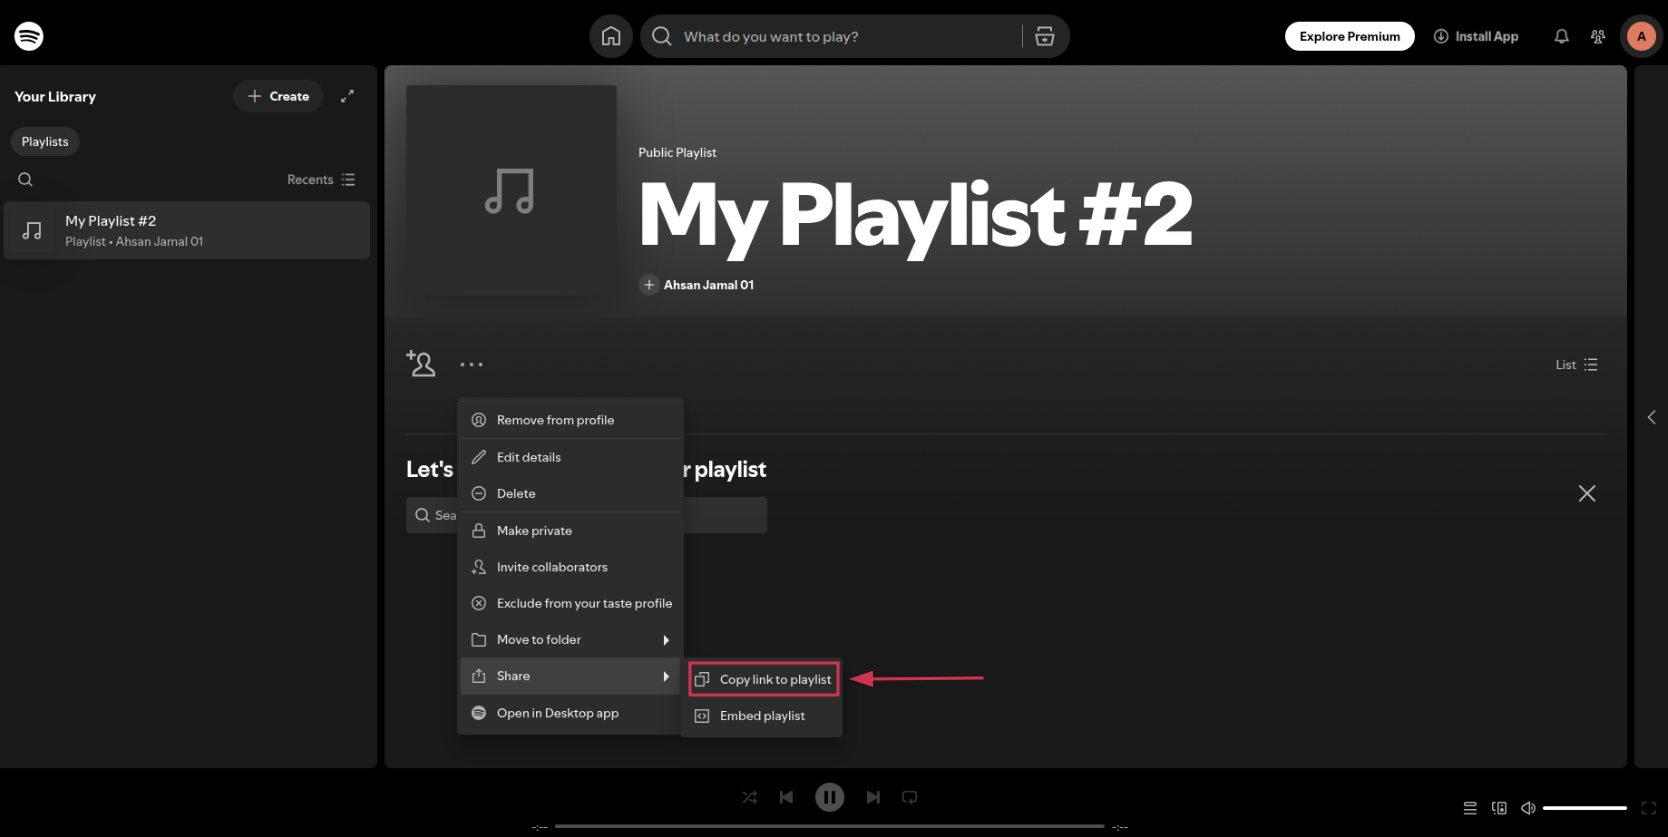
One of the most significant features of Replug is QR code generation for the shortened URLs. Here’s how you can add a dynamic QR code to your website link using Replug:
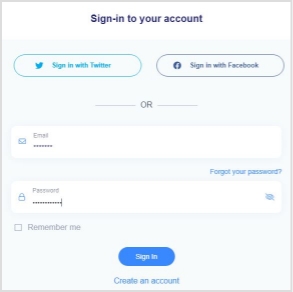
Step 1: Log in to your Replug account
Start by logging in to your Replug account using your credentials.
Create a free account if you haven’t tried it yet. Replug has a 14-day free trial.
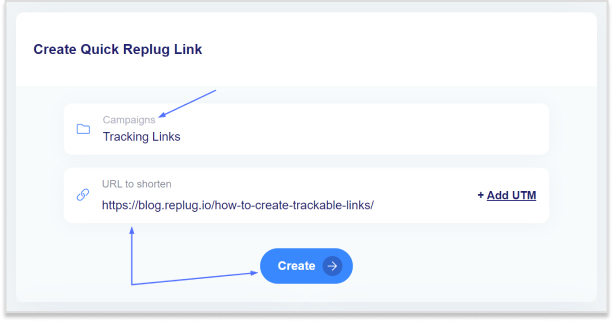
Step 2: Generate a short link
After logging in, the next thing you should do is to generate a short link that you want to associate with a QR code. This can be a link to your website, content, or any other online resource. Replug will automatically generate a QR code for it. You don’t need to do anything specific to initiate this process.
Maximize marketing ROI
by transforming ordinary URLs into branded short links that convert.
Try Replug for free
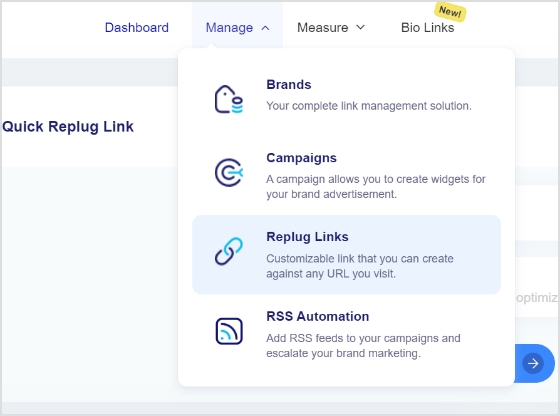
Step 3: Access the “Manage” section
Once a short link is created, navigate to the “Manage” section within your Replug account. Then select “Replug Links” to proceed further to get your QR code.
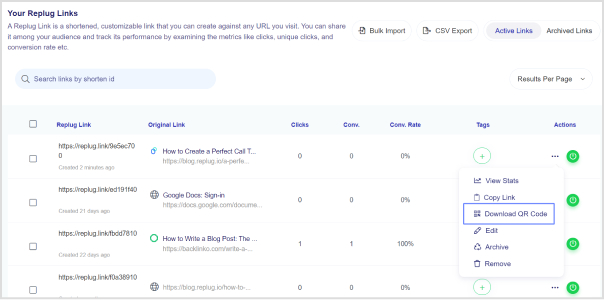
Step 4: Locate the link
Now locate the specific link you want to download the QR code for to proceed. To get the QR code for the short link you generated, open the settings of the short link by clicking the three-dot icon of that link.
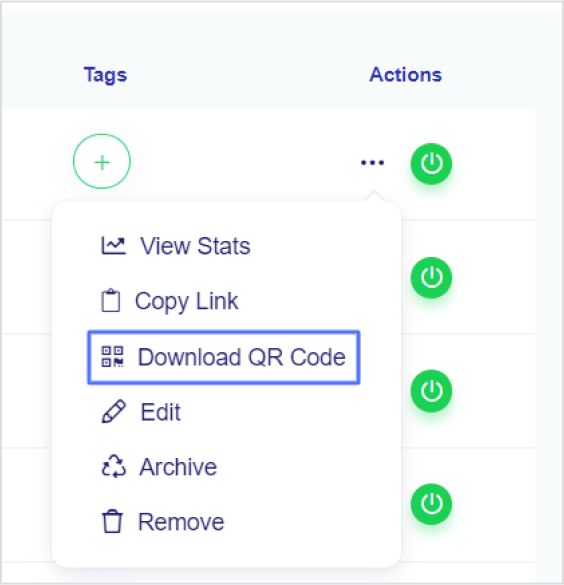
Step 5: Download the QR code
Upon clicking on the three-dot icon, a menu would appear. Click on the option that says “download QR code.” It will prompt Replug to generate and download the QR code image associated with your chosen short link.
Once you’ve clicked on “download QR code,” the image of the QR code will be saved to your device. That will be your dynamic QR code for that specific link.
That’s it!
FAQs about QR codes
Let’s take a look at some of the commonly asked questions about QR codes:
Do dynamic QR codes expire?
The dynamic QR codes can expire depending on the rules set while creating them. The brand that creates the QR code gets to decide the expiration date of the QR code.
Can I change the URL on a dynamic QR code?
Absolutely. You can change the URL on a dynamic QR code. All you need is to go to the QR code tool, locate the respective link, and edit the QR code setting to make the required changes.
Can I reuse an old QR code?
A dynamic QR code could be reused if it’s changed, meaning the information has been altered or updated for reuse. However, the static QR code can’t be changed or reused once created.
Which QR codes never expire?
Static QR codes never expire. Similarly, these QR codes can’t be edited or changed once created. You may have to create a new one if you need to make some changes to the stored information.
What is a unique QR code?
Every QR code is unique. The QR pattern makes them different from one another. The reason why it’s necessary for a QR code to be unique is to ensure that it stores and accesses the appropriate information.
Have you ever heard of the dark posts in your social media management journey?
Most of you haven’t heard about it until recently. Even though dark posts have been around for over a decade, it’s a concept still new to most of us.
If you’d like to get started with link management and ad-campaign tracking, head to Replug and explore our full platform.
And, if you have been paying attention to social media marketing recently, then it’s worth going deeper and figuring out how to use dark posts on social media going forward.
So let’s cut to the chase!
Origin of dark posts
The concept of dark posts was introduced by Facebook in 2012. It was later adopted by all major social media platforms, such as Twitter, LinkedIn, Pinterest, and YouTube.
The dark posts are targeted ads that are tailored toward a specific segment of the audience and these posts don’t appear on the timeline for everyone.
Moreover, the posts don’t have the sponsored post or promoted post attribution, which makes this type of post quite unique.
Advertisers and digital marketers publish dark posts across all major social media platforms mostly to A/B test the performance between dark posts and regular ads.
Example of a dark post
You already know that a dark post doesn’t appear on the page’s feed. Instead, it appears on the timeline to a select group of users.
The purpose of a dark post across all social media platforms is to target the specific audience who hasn’t followed the brand just yet.
So after understanding the concept behind this type of social media post, it wasn’t difficult to spot a dark post.
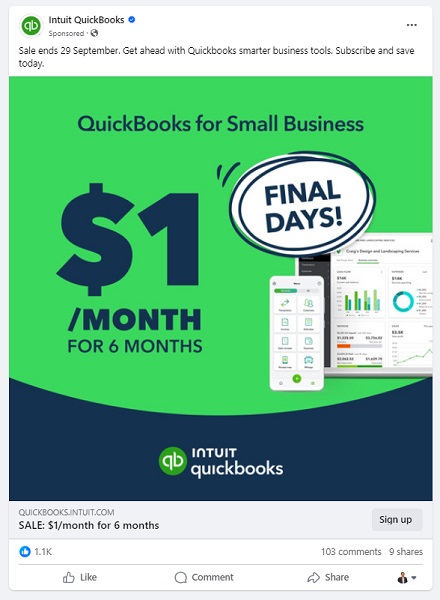
Here’s an example of a dark post on Facebook:
It seems like Intuit QuickBooks is using dark posts on Facebook to reach out to the targeted audience that has probably heard about them before but hasn’t engaged with them properly.
It was a Facebook ad that appeared on the home feed. In fact, you won’t find that very post anywhere on their Facebook page.
Why use Facebook dark posts?
Some of you might be wondering why we need to use Facebook dark posts. Well, there is a reason why a social media platform provides users with a feature – Facebook’s dark posts feature is no different.
There are a handful of reasons why you should be at least testing out this Facebook ad strategy.
Let’s take a look at some of them:
1. Precise targeting
Precise targeting is the mark of a perfect social media ad campaign. Facebook dark posts offer unparalleled precision in audience targeting, which makes them special.
Unlike regular Facebook page posts that are visible to most followers, dark posts hit the bullseye as they aren’t intended to reach everyone. Instead, they’re tailored to reach a specific group of audiences based on the given demographics, interests, and behaviors.
2. Avoid timeline clutter
Big brands and organizations run multiple Facebook ad campaigns. Since showcasing multiple ads to the same audience could be overwhelming for the audience, dark posts come to the rescue as they don’t clutter your brand’s timeline.
Moreover, dark posts remain invisible to your followers as they’re targeting the prospective audience. This way brands avoid timeline clutter by opting for Facebook dark posts.
3. Split test Facebook ads
Dark posts make split testing easier than ever. Advertisers can create multiple variations of the same ad and test them on different target audiences without overwhelming their followers.
The advertisers would learn which combination of the ad copy, ad design, and target audience works best. As a result, it would immensely refine the brand’s social media advertising strategy.
4. Optimized Ad spend
Ad spending could go out of control if you don’t know what you’re doing, especially when you’re running ads with a tight budget. One of the reasons why dark posts work is that they appear only to the intended audience.
Moreover, advertisers can optimize the ad spend by improving the targeting, behaviors, and interests of the prospective audience.
5. Tailored engagement
Every marketer dreams of getting a ton of engagement on both social media ads and organic posts. Dark posts are a great way to get traction by crafting relevant and thought-provoking ads for a specific audience.
It massively increases the relevance of your ads, making them more impactful to get the desired results.
6. Unobtrusive advertising
Dark posts make it easier for brands and experts to target a select group of audiences without bombarding the same offer to the broad audience base. This subtlety can make a lot of difference in the outcome of the Facebook ad campaign.
How does dark posting work?
Dark posting on social media platforms is not rocket science. Users can dark post on almost all major social media platforms like Facebook, Twitter, LinkedIn, and TikTok.
The way it works is quite simple. Dark posting is an advertising strategy that allows advertisers to publish ads targeting a certain segment without shoving the offer down the throats of existing followers.
Dark posts are also known as “unpublished posts” on Facebook. The reason is that such posts are used as ads only. However, Facebook provides users with an option to publish the dark post later on the page like a regular Facebook page post.
To ensure the proper publishing of a dark post, make sure you opt for the “only use this post for an ad” option while creating your Facebook ad.
We’ll dig deep into the benefits of dark posting on social media platforms later in the article. Just make sure that you have understood the fundamental idea of how dark posting works.
How to identify a dark post social media ad?
Digital marketers and online advertisers may spot a dark post from miles away. It’s essentially an ad just like any sponsored post or boosted post, but it isn’t necessarily intended for the existing customers.
Moreover, experts identify a dark post by looking at the offering as well as visiting the brand’s page to see whether or not the post exists on the timeline.
Here’s an example:
IDP Education is an education and visa consultancy service that helps students with studying abroad, admissions, and visa services.
They published a dark post on their Facebook page which wasn’t available on the Facebook page’s feed. So that’s how it was easily stood out.
Here are four ways to quickly identify a dark post on social media :
1. They don’t show up on your page’s timeline
One of the ways to identify a dark post is that it doesn’t show up on the page’s timeline. One can spot a dark post by looking through the brand’s page that whether or not the same ad is posted as a normal post. Usually, a sponsored or boosted post can be seen on the page’s timeline, but it’s not the case with dark posts.
2. They don’t appear on your followers’ feed
Just like they don’t show up on the page’s timeline, these posts don’t appear on the followers’ feeds. This is the difference between a regular ad and a dark post. A normal ad might be appearing to the current followers depending on the audience targeting, interests, and behaviors. However, the dark posts won’t do that.
3. These posts are only displayed to the targeted audience
Since dark posts don’t appear to the existing followers, these posts are used to target a specific segment of the crowd that hasn’t been following you on social media. Each brand has a buyer persona when trying to reach out to new audiences, and that’s where dark posts come in handy.
4. They are mostly discount or coupon offers
Brands, agencies, and companies use dark posts to get traction using discount offers, coupon codes, and other enticing offers. The purpose is to engage the new faces and bring them into the marketing loop. So dark posts could be used to reach new audiences by offering discounts and coupon codes.
Facebook dark post ads benefits
We’ve discussed how these types of social media ads work and how to spot these ads across different social media platforms. Let’s shed some light on the benefits that they provide to the advertisers:
1. Easier to target a specific audience
Dark posts are paid posts that don’t target your existing audience on social. In fact, these posts target the new users who haven’t followed you or your business page just yet. These posts help brands and entrepreneurs put their products and services in front of new audiences.
2. No bombardment of sponsored posts on the feed
Since dark posts don’t show up on the feeds of the existing followers, these types of posts don’t clutter followers’ home feeds with sponsored posts. Nobody wants to see the sponsored posts from the brands or experts they’re already following.
3. Test out new ad strategies without disturbing the existing followers
Dark posts provide a segue into testing out different ad strategies without making a mess. One of the fears of online advertisers is that they don’t want to disturb the existing customers or followers in any way.
For instance, offering the same product to customers who have already bought the same product would be a bad move.
4. Experiment with new content trends
Experimenting is the key to winning on social media. Don’t shy away from testing out different types of content formats, styles, patterns, and tactics.
Social media trends change over time, so it’s necessary to keep up with the new trends and capitalize on them when they’re in the trend. Dark posts could be a fantastic way to test out new content trends to see how people react to them.
5. No appearance on the timeline
One of the benefits of dark posts is that they don’t appear on the timeline of the advertiser’s page, which means the followers don’t have to see every offer the business is creating for new or unpaid customers.
The dark posts only appear to the audience it is intended to reach out to on the social media platform.
How to create dark posts on Facebook?
Dark posts are paid ads, but they don’t show up to the existing customers. If you’re curious about how to start experimenting with dark posts on Facebook, then allow me to share my two cents on the process.
Let’s head over to the few simple steps to understand how to create this type of Facebook post:
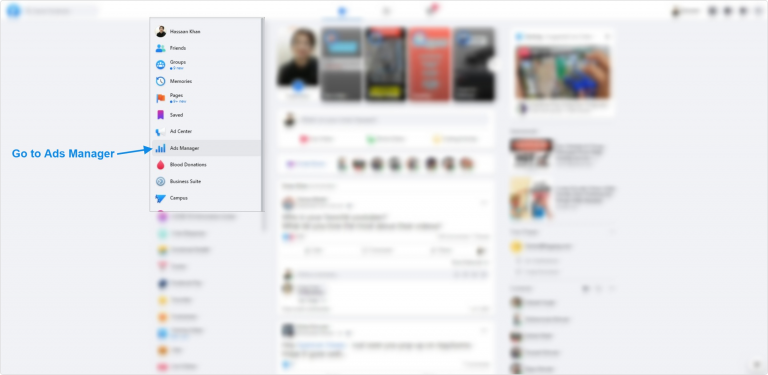
Step 1: Navigate to Ads manager
To create a dark post on Facebook, go to the Facebook Ads Manager, which serves as the central hub for managing your Facebook ads campaigns.
Now click on the drop-down menu located at the top left corner and choose the “Page Posts” option under the “Create & Manage” section.
Once you find this option, move on to the next step and carry on the rest of the process.
Step 2: Create the dark post
Find the “Create Unpublished Page Post” option at the top and click on it to initiate the creation of a new dark post.
Provide your ad details, ensuring that it reaches the right audience. Moreover, when specifying how to utilize the post, opt for “Only use this post for an ad.” Doing so ensures that the post remains hidden from public eyes and would only reach a select group of the audience.
Step 3: Select target audiences
Target audience is one of the fundamentals of any type of digital ad. Advertisers can utilize preexisting segmented ad sets if they’ve created ads previously. However, if you’re new to this, you’ll need to establish audience segments while creating a new ad.
Advertisers have the option to specify their audience’s demographics such as age, gender, location, language, behaviors, and interests to make the ad campaign more authentic and helpful.
Step 4: Check & balance on the dark post performance
It’s vital to keep a check-and-balance on the dark posts’ performance. Don’t hesitate to A/B test different ad types, formats, and styles to see which works better for your brand.
You can conduct a split test on your dark post and based on the results optimize your post accordingly. Moreover, you can modify your audience parameters as needed.
How to analyze the Facebook dark posts?
To analyze the Facebook dark posts, you would have to look at different numbers, graphs, and data. However, it’s not as tricky as it may sound like. Anyone with a little bit of Facebook ads experience can analyze the dark posts’ performance.
Here’s how to do it:
1. Compare the performance with regular ads
Start with comparing the Facebook dark posts’ performance with regular ads or sponsored posts. These regular Facebook ads would appear on the page’s timeline. Plus, they might be showing up to some of the current followers as well.
The idea is to run both types of Facebook ad campaigns and see if there is a difference in the outcome of the regular ads and dark posts. This will give you an idea of how well or badly your dark posts were performing.
2. Split-test different dark posts
Once you’re done comparing dark posts with regular Facebook ads, try split-testing the dark posts with one another. It means you’ll be running multiple dark posts on the same subject and see how they perform.
You can further analyze the winner’s dark post to see what was the differentiator that put the winner’s dark post ahead of others. Harness the power of A/B split testing by comparing different dark posts and trying to find the reasons behind this.
3. Check the ROI of the dark posts
ROI is a popular metric used in digital marketing to analyze the effectiveness of any marketing tactics or strategy. One of the ways to analyze Facebook’s dark posts is to see the return on the investment.
These are essentially paid posts on social media platforms, so there is no harm in analyzing the ROI of one type of paid post to another type of paid post.
4. Keep an eye on the niche preference
Some dark posts may outperform other dark posts from a performance standpoint. Sure, there might be technical differences, which might make the comparison irrelevant. However, there will be some cases where this won’t be an issue.
Keeping an eye on the niche preference means in some niches dark posts or advertising on social media in general would perform better than the others.
It’s necessary to figure out whether or not the dark posts make sense in this niche. Otherwise, you might end up wasting your time and money.
FAQs about dark posts
Are dark posts paid?
Yes, the dark posts are paid posts. However, they are slightly different from the regular paid posts from the targeting standpoint.
Why is it called dark post?
Dark posts are dark posts or unpublished posts because they don’t appear to the current followers. Instead, they only show up to the new audiences.
What is the difference between a dark post and an organic post?
The main difference between a dark post and an organic post is that the dark post reaches the audience through paid advertising. Whereas the organic post reaches the audience naturally through content popularity or recommendation.
Every day, billions of web requests zoom through our networks, yet just one misguided click can bypass thousands of dollars of cybersecurity investment.
Without adequate controls, employees or users might land on malicious or irrelevant sites. It’s more than just annoying; it can cost both time and expose your systems.
In fact, 96% of large organizations today block at least one type of website to mitigate risk and maintain productivity.
The solution? Intelligent and automated URL filtering: The perfect way to stay in control of what’s accessed, when, and by whom.
Ready to see exactly how this works? Let’s jump in and explore what’s happening behind the scenes.
What is URL filtering?
URL filtering is a security and access-control technique where an organization decides which websites users can visit and which ones get blocked. Every time someone requests a URL, the system checks it against a database of categories and reputations, then applies your rules to either allow or deny access.
It’s the mechanism behind why employees can reach approved tools but can’t open a streaming site or a known phishing page from the same network.
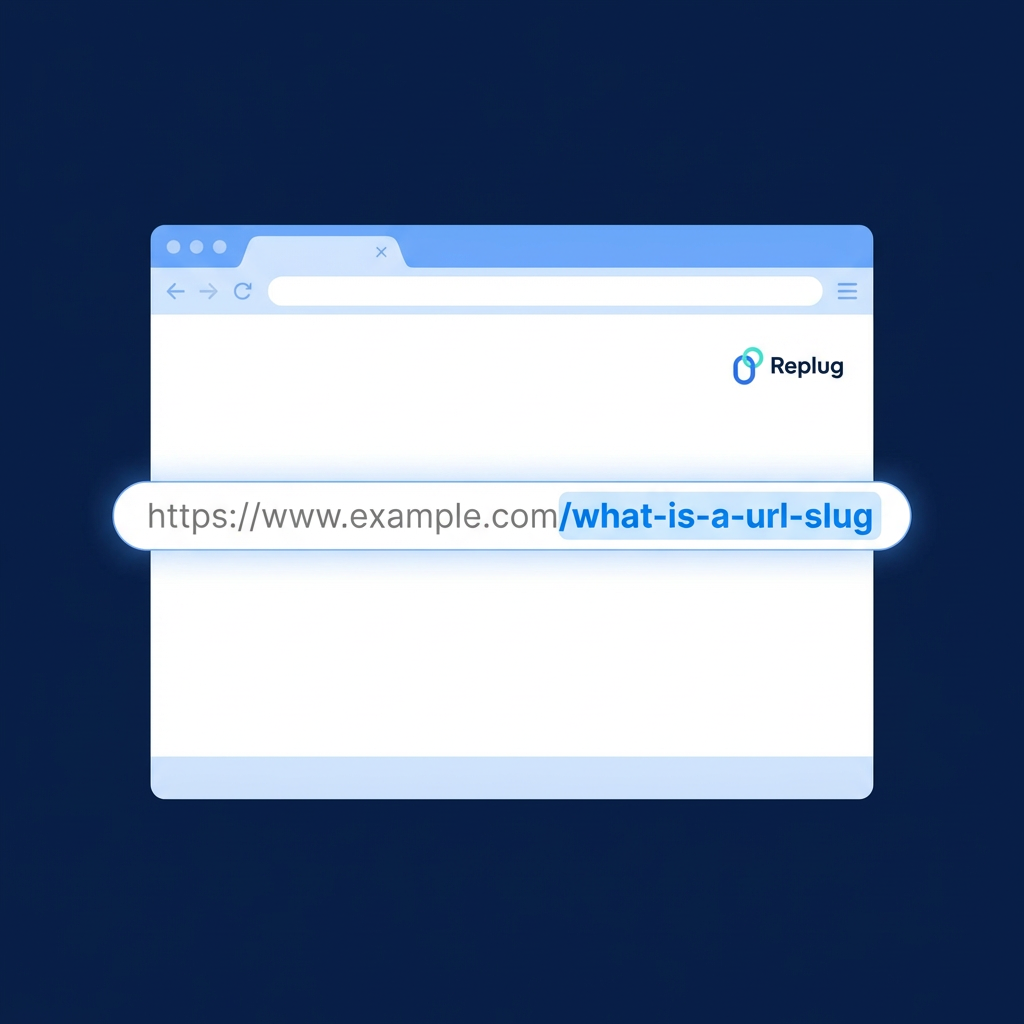
What is a URL?
A URL (Uniform Resource Locator) is basically the web address, like https://www.example.com/page. Think of it as the exact address for a webpage or online resource.
How is URL filtering different from Web filtering and DNS filtering?
These three terms get used a lot interchangeably, but they’re not the same thing. Here’s how they actually differ:
URL filtering works at the page level. It checks the full web address, including the path (e.g., /blog/post).
DNS filtering works earlier in the process, at the domain lookup stage, before a connection is even made. It blocks or allows entire domains (like example.com), with no ability to allow some pages while blocking others.
Web filtering is the umbrella term that covers both, plus more. It can include content scanning, file inspection, IP blocking, and other techniques. URL filtering and DNS filtering are both types of web filtering.
In short, DNS filtering is fast and wide; URL filtering is precise and granular; web filtering is the full picture.
How does URL filtering work?
It might seem like blocking a website is as simple as clicking “block,” but behind the scenes, there’s a clear workflow that keeps the process both accurate and efficient.
Let’s walk through the three main steps: URL comparison, policy enforcement, and database & caching.
Step #1: URL comparison
When a user tries to access a webpage, the system takes the exact URL (think www.example.com/page) and checks it against a list of known categories and reputations.
It determines whether that URL is flagged as malicious, non-productive, allowed, or needs review. The check can happen in real-time, even before the full page loads.
Step #2: Policy enforcement
After comparison, the system applies defined rules:
maybe URLs in “social media” are blocked after 3 pm,
“streaming” is allowed only for certain teams, and
all “phishing-risk” sites are blocked entirely.
If the URL is allowed, the user proceeds as usual. However, if not, they might get a block page or a “proceed with caution” warning.
Note: Policies can be user-specific, group-based, time-based, or device/location-based for extra granularity.
Step #3: Database & caching
To keep things fast and up to date, the filtering system uses a database (cloud-based or local) containing URL categories and reputations.
To reduce delay, popular or recently used URLs are stored in a cache, so future checks happen faster. And when the system encounters a URL not in its local list, it may query the cloud service to retrieve the category and reputation, then store the result locally for next time.
In short, it’s a loop of “see URL → check it → apply policy → allow or block,” backed by smart lookups and caching to keep things smooth.
Why is URL filtering important?
Here’s why URL filtering isn’t just a nice-to-have, but a real business essential:
Better security: Blocking access to known malicious or risky web addresses helps stop everything from phishing attempts to ransomware or drive-by downloads. Studies show this is a key reason companies adopt filtering.
Higher productivity: Filtering helps cut down on those sneaky distractions (social media, streaming, endless browsing), which means people spend more time doing work and less time sneaking off.
Bandwidth optimization: When the network isn’t choked with large downloads, videos, or non-essential traffic, you free up bandwidth for mission-critical tasks like video calls, cloud apps, and collaboration tools.
More vigorous policy enforcement: Having clearly defined rules about what can and cannot be accessed helps you enforce your acceptable-use policy, reduce risks, and stay consistent across users and devices.
Coverage for endpoints everywhere: Whether someone is in the office, working from home, on a laptop or mobile device, URL filtering can protect those endpoints too. This ensures remote or mobile users follow the same web-access rules.
Why standalone URL filtering is not enough
URL filtering is a powerful tool, but relying on it alone leaves real gaps in your security posture.
Here are the key reasons why it falls short on its own:
No visibility into encrypted traffic: Most web traffic today runs over HTTPS. Without SSL inspection built into a broader security stack, threats hiding inside encrypted connections simply pass through undetected.
Zero-day threats slip through: URL filtering works off known databases. A brand new malicious domain that has not yet been flagged or categorized will not get blocked, leaving users exposed until the database catches up.
No sandboxing or behavioral analysis: Advanced threats often do not announce themselves. Without sandboxing capabilities to detonate and analyze suspicious content, standalone URL filtering has no way to catch what it cannot already recognize.
Evasion is easier than it looks: Attackers regularly rotate domains, use URL shorteners, or embed malicious content within otherwise clean pages. These tactics are specifically designed to bypass simple category-based filtering.
No coordination with other security layers: A phishing attempt might be caught by an intrusion prevention system or a sandbox, but if your URL filter is not integrated with those tools, it cannot act on that intelligence or close the loop.
Types of security threats addressed by URL filtering
URL filtering addresses far more than just productivity concerns. It actively protects organizations from a range of serious web-based security threats.
Malware: Cybercriminals frequently use websites to distribute malicious software through drive-by downloads, infected files, or exploit kits. URL filtering blocks access to known malware-hosting sites before anything reaches the user’s device.
Phishing attacks:Phishing relies on tricking users into visiting fake pages that mimic legitimate ones to harvest credentials or install malware. URL filtering identifies and blocks these deceptive URLs before the user even lands on the page.
Ransomware delivery: Many ransomware attacks begin with a malicious URL in an email, a chat message, or a compromised ad. URL filtering cuts off this delivery route by blocking access to known ransomware distribution sites.
Inappropriate and harmful content: URL filtering also blocks content that creates legal, compliance, or reputational risks, including adult content, hate speech, and gambling sites that have no place in a professional or educational environment.
Data leakage: Unauthorized file sharing platforms and unsanctioned cloud storage services are a quiet but serious risk. URL filtering blocks access to these destinations, reducing the chances of sensitive data leaving the organization through the web.
Additional URL filtering vital features & capabilities
When you dig a bit deeper into modern URL filtering, you’ll find it offers much more than simple allow/block lists. These extra capabilities give you stronger control, better insight, and more thoughtful decision-making.
Here are the key features:
Granular control
Instead of “everyone sees the same web,” you get the power to set rules for particular groups: by user role, device type, location, or time of day. This means HR might have different access than Sales, for example.
Customizable policies
You’re not stuck with a one-size-fits-all policy. You can carve out custom rules, maybe allow a site for a project team, restrict a sub-page of a domain, or create exceptions.
Real-time threat intelligence
Because threats evolve quickly, modern filtering tools integrate with live feeds and reputation services to spot newly malicious URLs and apply policy without waiting for manual updates.
Reporting & monitoring
You get dashboards and logs showing which sites are being accessed, which were blocked, by whom, and when. That way, you’re not just enforcing rules, you’re tracking what happens and adjusting accordingly.
SSL inspection
Since so much of the web is encrypted (HTTPS), good URL filtering solutions also inspect encrypted traffic (after decryption) so hidden threats inside secure connections don’t slip through.
Bandwidth quota & duration
It’s not just simple blocking or allowing, you can also set limits like “this category gets 500 MB per day” or “only 2 hours of access after work hours” so you manage resources and usage more smartly.
Multiple action options
Rather than a strict yes/no, you get variations: show a warning (“caution”), let a user ask for override permission, or apply a softer block for certain categories. This gives flexibility without losing control.
Best URL filtering examples
Here are five strong examples of how companies and institutions have applied it, and what they gained.
Example 1: Large manufacturer improves accuracy and productivity
A global manufacturing firm deployed a hybrid web-filtering solution (including URL filtering) via Blue Coat and its intelligence network. They reported over 90% accuracy in URL classification, reduced help-desk complaints about latency, and cut their URL blacklist-maintenance costs by 90%.
Example 2: Educational district boosts compliance and performance
In Texas, Pearland ISD rolled out next-gen firewalls with URL filtering and other protections. They saw stronger compliance with the Children’s Internet Protection Act (CIPA) and improved network performance for both staff and students.
Example 3: Survey shows broad industry use and productivity gains
A survey of 645 organizations across North America & Europe found 89% have web filters (including URL filtering) in place. 96% of large enterprises block at least one web service. Among companies that don’t filter, 26% estimated staff spent 7+ hours/week on non-work sites, after filtering, that dropped to 18%.
Integrating URL filtering with other security tools
URL filtering works best when it is not operating in isolation. Pairing it with the right security solutions creates a layered defense that is significantly harder to bypass than any single tool on its own.
Next Generation Firewalls (NGFW): NGFWs control traffic at the network level. Combined with URL filtering, suspicious traffic gets flagged at both the network boundary and the webpage level, closing gaps that either tool would leave on its own.
Intrusion Prevention Systems (IPS): An IPS handles threats already inside the network while URL filtering stops users from reaching dangerous destinations in the first place. Together, they cover both ends of the threat spectrum.
Browser Security: Browser-level security protects users at the point where most web threats land. Layered with URL filtering, it adds extra protection against malware and credential theft, especially for remote workers outside the core network perimeter.
Cloud-Based Security Platforms: For distributed and hybrid teams, cloud-based platforms bring URL filtering and other protections together under one roof, ensuring consistent policy enforcement regardless of where users are working or what device they are on.
Wrapping Up
URL filtering is one of those tools that works quietly in the background until the day it stops a phishing attack and suddenly everyone’s glad it was there.
It gives organizations real control over web access, improves security, keeps productivity on track, and helps meet compliance requirements without constant manual oversight. Pair it with the right security stack, and it becomes one of the most reliable layers in your defense strategy.
If you’re looking for a reliable way to manage and monitor links, give Replug a try. It’s not just a top-notch custom URL shortener for generating short URLs, but it also helps businesses with URL filtering and smarter link management!
Frequently Asked Questions
What are URL filtering test pages?
URL filtering test pages are safe, purpose-built web pages used to verify that a URL filtering solution is working correctly. They are designed to trigger a block response without posing any real threat, so IT teams can confirm that their filtering policies are active and behaving as expected.
What is checkpoint URL filtering?
Check Point URL filtering is a security capability built into Check Point’s network security gateways and Harmony SASE solution. It provides real-time protection against malicious websites, blocks phishing and malware delivery URLs, and allows administrators to set granular access policies by user, group, or device.
What are the default elements for URL filtering?
The typical default elements include:
– a database of known URL categories and reputations, – pre-defined allow/deny lists by category, and – a mechanism to apply these rules automatically to user requests.
Also, default block pages or notifications often come configured, so users see a message when access is denied.
What is URL filtering customization?
URL filtering customization means tailoring the filtering rules to your business’s specific needs:
– Selecting which URL categories apply, – Setting different rules for user groups or devices, – Creating exceptions, and – Adjusting actions (block, warn, allow).
This helps ensure filtering is both effective and practical for your users.
Have you ever shared an interesting post, recommended a funny video, or perhaps even critiqued an article that missed the mark? We’ve all been there.
However, what you may not realize is that the way you share these online treasures can have a significant impact on your brand identity.
If you’ve been using plain, generic short links to share content, it’s time to take a closer look. By doing so, you may unknowingly promote other brands instead of your own.
We’ll get straight to the point and discuss the difference between branded links vs. short links inside this blog. We’ll help you understand the implications of your choice and how it can affect your brand’s online presence.
So, let’s get straight to it!
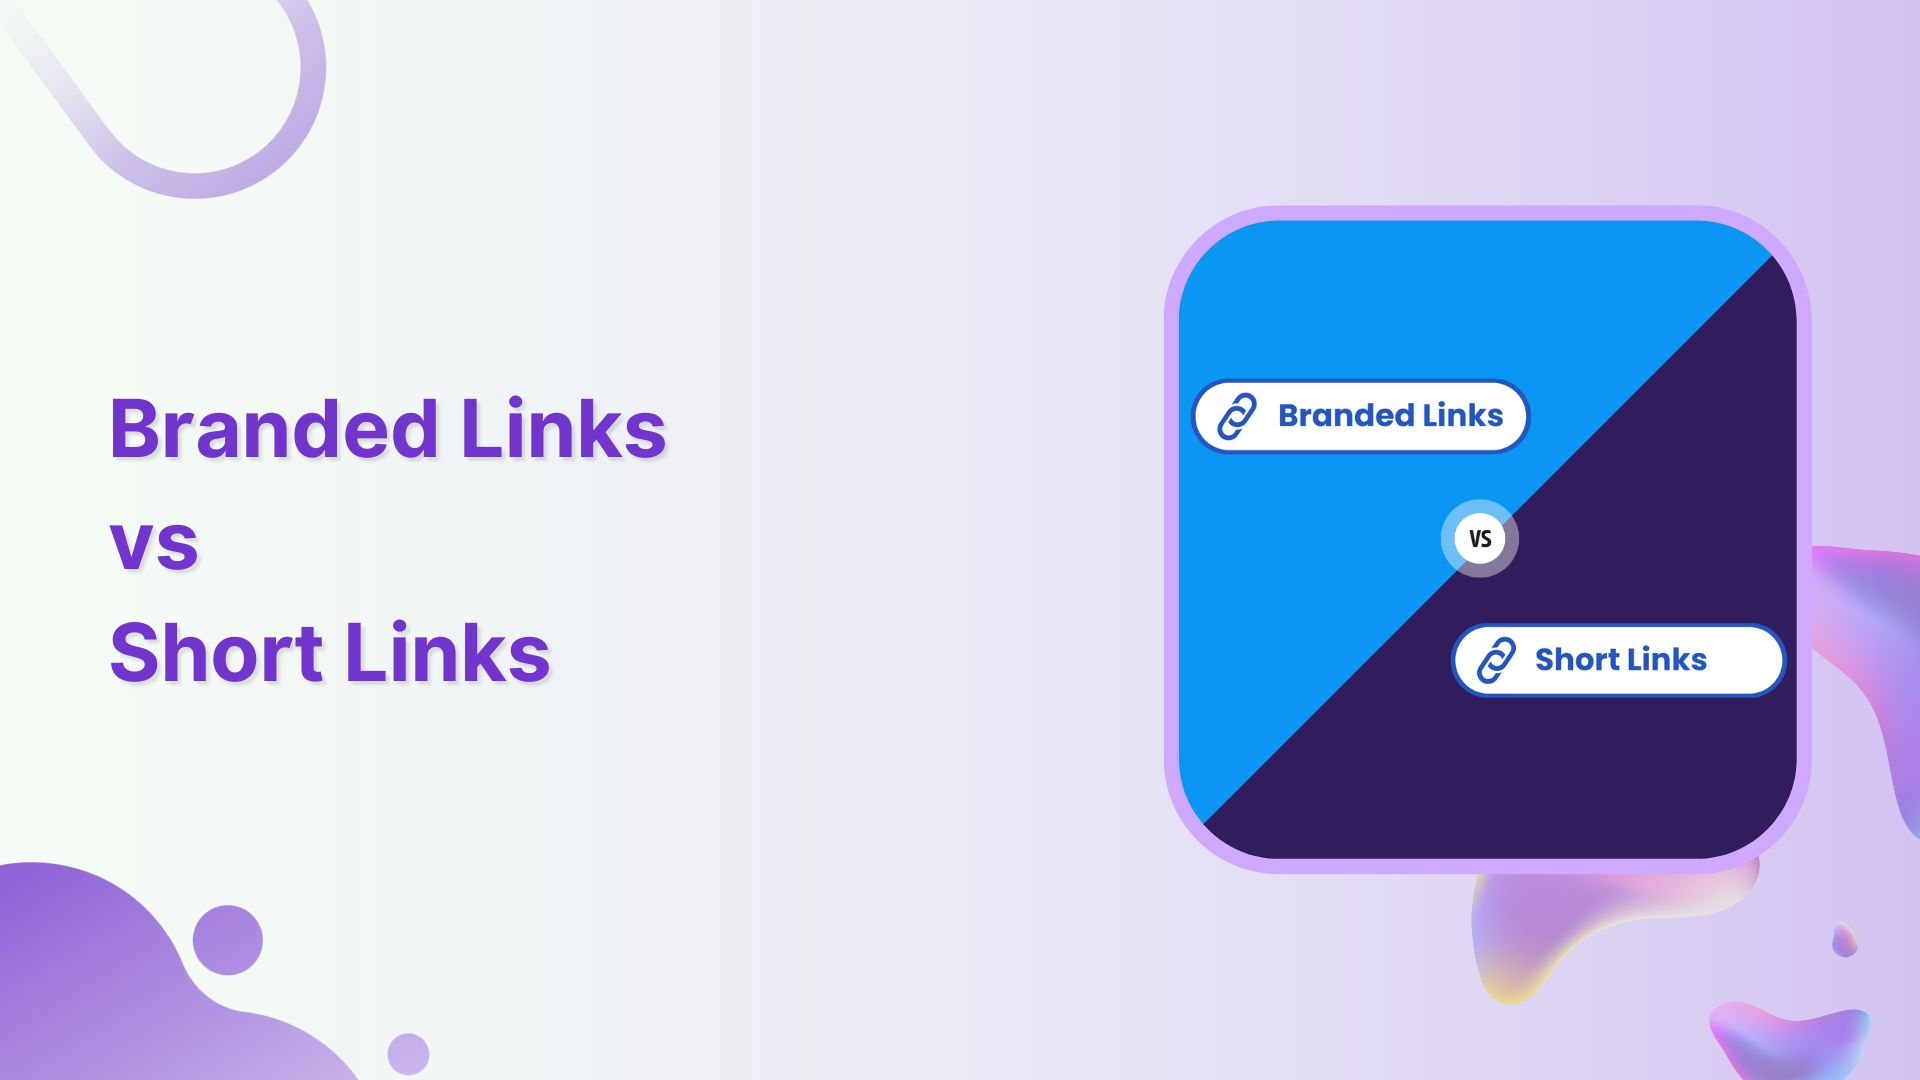
What is a short link?
A short link, also known as a “short URL” or a “generic short link”, uses a public domain from a third-party service to compress a long version of a web address or URL.
Short links are created to simplify lengthy URLs, making them easier to share, remember, and use. They play a key role, especially in contexts where character limits are a concern, such as social media or printed materials.
Generic short links typically redirect users to the original, longer URL when clicked.
Check out this example of a short link:
👉 Example: bit.ly/3XyZ9aL
This type of link uses a generic shortening domain and a random string of characters. It’s quick to create and works across any platform, but doesn’t reflect your brand identity.
What makes short links so practical & powerful
Higher click-through rates (CTRs): Short links are clean, simple, and visually appealing, encouraging users to click more often compared to long, cluttered URLs.
Enhanced recognition: Even generic short links can reflect consistency and professionalism, helping users associate your content with reliability and trust.
Data-driven insights: These links provide measurable analytics, such as click counts, location, and device type, enabling you to optimize your campaigns with actionable data.
Seamless user experience: Shortened links load quickly, look better across platforms, and make sharing effortless, improving the overall experience for your audience.
Major use cases for short links
SMS marketing: Short links save character space in text messages while tracking engagement, making them perfect for concise, measurable mobile campaigns.
Social media: Generic short links appear clean, fit better within character limits, and enable consistent tracking across platforms like X, Instagram, and LinkedIn.
Email campaigns: Using short links keeps your emails neat and improves click tracking, helping marketers measure the effectiveness of each link more accurately.
QR codes: Short links integrate seamlessly with QR codes, ensuring faster scans, shorter URLs, and flexible tracking of offline-to-online traffic.
Organic sharing: These links make content easier to share across blogs, forums, and emails, increasing reach without cluttering the message.
Offline marketing materials: Placing short links on posters, flyers, or packaging makes it easy for users to type or scan, bridging the gap between offline and online engagement.
Customer support & feedback: Support teams use such links to quickly direct users to FAQs, surveys, or troubleshooting pages without confusing them with long URLs.
A branded link, also known as a “custom short link” or a “vanity URL”, is a type of shortened URL that includes a brand’s or organization’s name or a custom keyword as part of the link.
Unlike generic short links that use a random combination of characters and numbers, branded links are customized to reflect the brand’s identity, making them more recognizable and trustworthy to users.
3 key elements of a branded link are:
Domain – The custom name that represents your brand (e.g., go.yourbrand.com), helping build recognition and trust.
TLD (top-level domain) – The extension that follows the domain (e.g., .com, .io, .link), which can be chosen to align with your brand’s identity or industry.
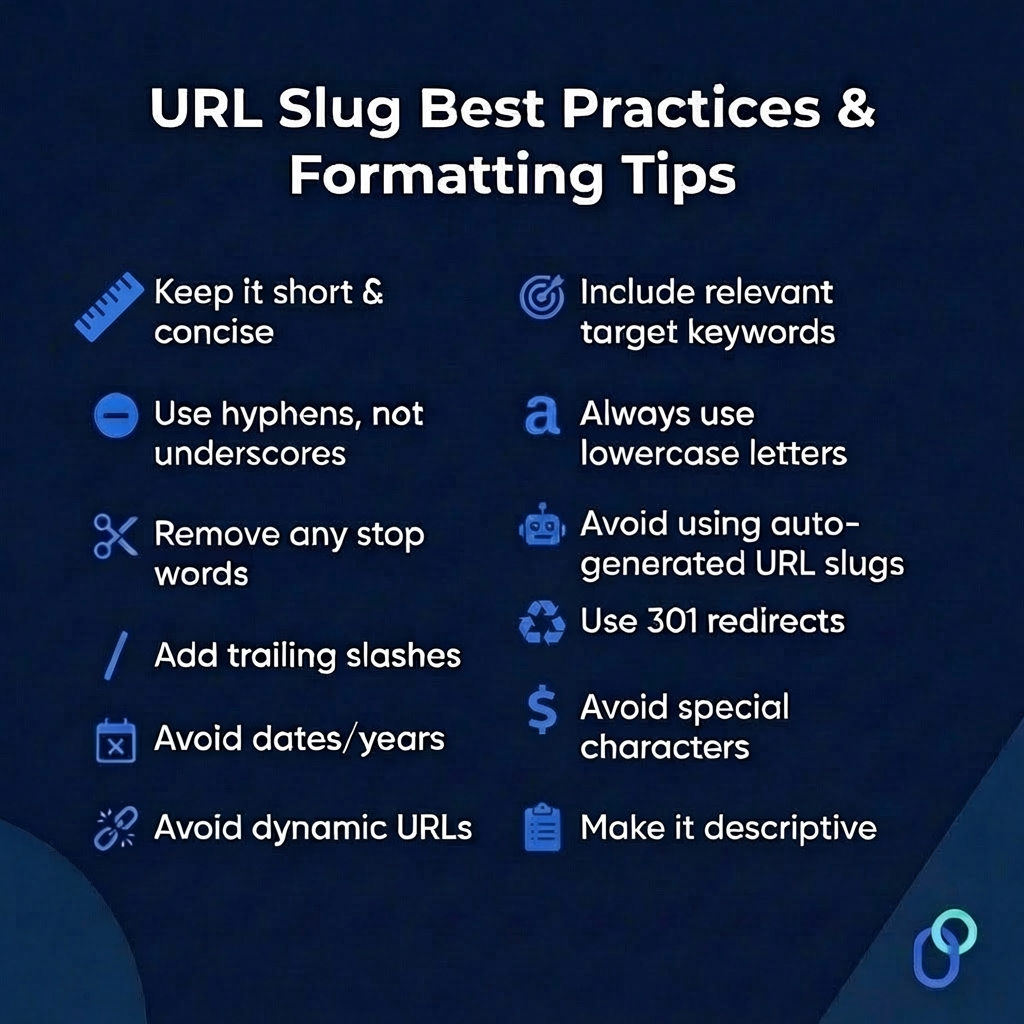
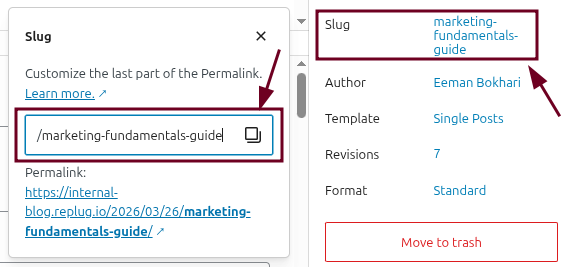
URL slug – The customizable part after the slash (e.g., /summer-sale), used to describe the content or campaign clearly and memorably.
Example of a branded link:
👉 Example: go.yourbrand.com/offer
A branded link uses a custom domain (e.g., go.yourbrand.com, link.apple.com, etc.). It reinforces brand recognition, looks more trustworthy, and still provides all the tracking and analytics benefits of a short link.
What makes branded links so practical & powerful
Stronger brand identity: Branded links carry your custom domain, reinforcing your brand’s identity every time someone shares or clicks your link.
Increased trust & credibility: Users are more likely to click links that clearly display a recognizable brand name, making them appear legitimate and secure.
Easy to remember & share: Simple, descriptive branded links are easier to recall and share, helping your campaigns gain more organic traction.
Enhanced brand awareness: Every branded link acts as a micro touchpoint, spreading your brand name across social media, email, and digital channels.
Actionable insights & control: You can track clicks, sources, and audience behavior in detail, allowing you to optimize your campaigns with data-driven precision.
Clean & consistent link appearance: Branded links look professional and tidy across all platforms, maintaining consistency in tone and presentation.
Improved SEO & discoverability: Descriptive, keyword-rich branded links can enhance search visibility, helping both users and search engines better understand your content.
Major use cases for branded links
Marketing campaigns: Use branded links to track and analyze engagement across multiple campaigns, improving ROI measurement.
Social media marketing: Create short, on-brand links for platforms like X, Instagram, and LinkedIn to increase clicks and maintain brand consistency.
Affiliate marketing: Provide affiliates with custom-branded URLs to ensure trust, improve conversions, and monitor performance.
Email marketing: Include branded links in newsletters or promotional emails to increase click-through rates and minimize the risk of being filtered as spam.
Influencer collaborations: Give influencers branded links to share, securing brand visibility and accurate tracking of their impact.
Paid advertising: Use branded short links in PPC ads or sponsored content to make URLs look cleaner and more credible.
Event promotion: Share memorable branded links for event registrations, webinars, or launches to simplify access and tracking.
Offline & print media: Utilize branded URLs in flyers, posters, or business cards for easy recall and consistent branding.
Product launches or updates: Direct audiences to specific landing pages for new products or announcements with clear, branded links.
Branded links offer several advantages, particularly in strengthening your brand identity and enhancing user trust. They are valuable for businesses and individuals seeking to establish a cohesive online presence and improve user engagement.
Short links, on the other hand, are helpful in cases where you need a precise link to share with friends or family members, without worrying about online presence.
Feature
Branded Links
Short Links
Domain
Uses a custom, brand-specific domain (e.g., brand.co/link).
Uses a third-party domain (e.g., bit.ly, tinyurl.com).
Branding
Reinforces brand visibility and consistency in every link.
Offers no brand identity or recognition.
Credibility & Trust
Instantly recognizable and trusted due to brand association.
It may appear suspicious or spammy to users.
Click-Through Rate
Higher CTR because branded links look professional and secure.
Typically lower, as users hesitate to click on unfamiliar links.
Use Case
Ideal for marketing, promotions, and professional brand communication.
Suitable for quick personal sharing or temporary links.
Best For
Businesses, marketers, and organizations focused on brand growth and analytics.
Individuals or small-scale, non-branded usage.
The choice depends on your priorities
The choice between branded links and short links eventually depends on your specific goals and the context in which you plan to use them.
Branded links: If strengthening your brand identity, increasing trust, and improving user recognition are important to you, branded links are an excellent choice. They excel in marketing campaigns and content sharing where branding matters.
Short links: If brevity and saving space are crucial, short links are suitable. They are especially dominant in platforms with character constraints. They also make shared URLs look easier to remember, improving overall user experience.
How to create a branded short link using Replug
Are you ready to start using branded links for your own brand? Replug, a powerful free link shortener and branding tool, simplifies the process of creating custom, branded short links.
Let’s walk through the steps to create these links and amplify your brand’s reach.
Step 1: Add your custom domain
The first step in creating branded links with Replug.io is to incorporate your custom domain.
While Replug provides a default shortener domain (rplg.co), using your custom domain strengthens your brand identity and reputation.
Open your Replug dashboard and navigate to “Settings.” Then select “Custom Domains” from the dropdown menu.
Click on “Add Domain” to begin setting up your custom short URL.
On the next screen, provide the essential details, including your custom domain and settings such as the 404 redirect URL and branded domain.
Click “Connect” to add your custom domain to your Replug account.
After successfully connecting your custom domain, you can manage it within your Replug account. Check connectivity status, edit domain settings, or delete domains as needed.
With your custom domain integrated into Replug, you’re now ready to create your custom-branded link. Here’s how:
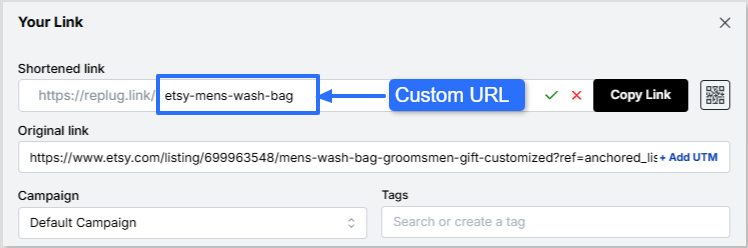
Paste your long URL in the bar under “Quickly shorten your link”.
Next, click on the blue arrow. Replug will automatically generate a short link for your long URL.
You can rename the link easily. All you need to do is change the slug of your short link.
Finally, save your shortened link. Now your link is ready to share anywhere on Instagram, Discord, or in an email campaign.
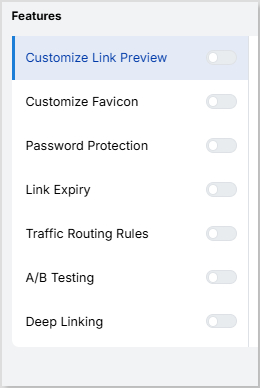
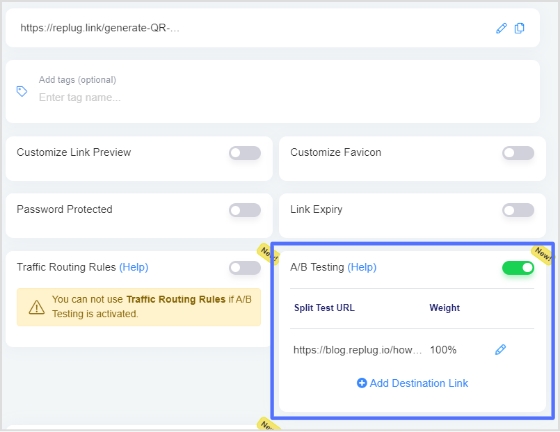
Note: You can add some amazing Replug features to your generated link, like customizing your link preview, adding custom favicons, A/B test your links, and more! You can also add retargeting pixels or custom CTAs to your link-shortening campaigns.
Leading brands & businesses prefer branded short links
Let’s take a look at how some of the most popular brands use branded links to their advantage:
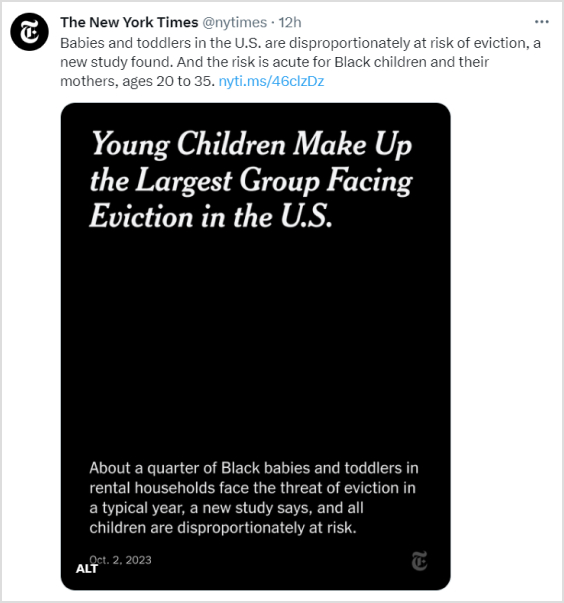
The New York Times – nyti.ms
The renowned newspaper, “The New York Times”, simplifies sharing long article URLs on social media and beyond by using the branded link nyti.ms. This branded link not only shortens the URL but also reinforces the brand’s identity with every click.
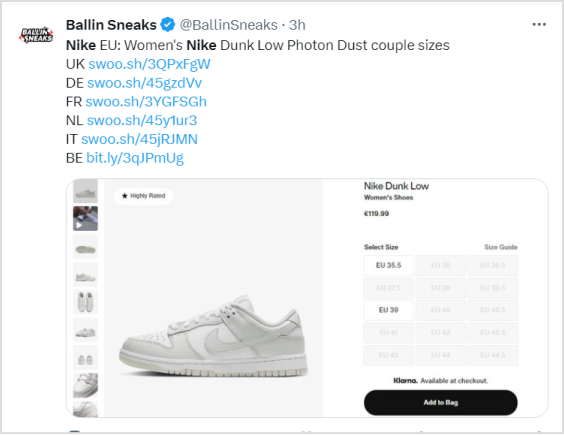
Nike – swoo.sh
When it comes to sports and lifestyle, Nike is a standout name. They utilize the branded link swoo.sh to create a memorable link for their products and promotions. This reinforces the Nike brand with every shared link.
Amazon – amzn.to
E-commerce giant “Amazon” opts for the branded link amzn.to, to shorten product URLs. This not only saves space in printed materials but also keeps the focus on their products rather than the URL itself.
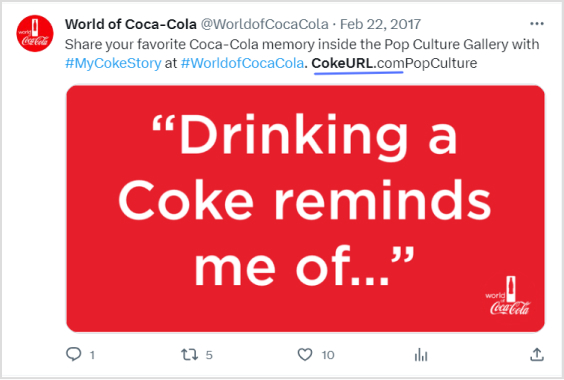
Coca-Cola – cokeurl.com
Coca-Cola, a global beverage icon, maintains brand consistency by using branded links, such as cokeurl.com. This approach guarantees that every link shared aligns with their brand image.
Starbucks – sbux.co
Starbucks is a renowned global coffee chain that utilizes branded links with the domain sbux.co to simplify the sharing of promotional content. This reinforces their brand identity and keeps their links looking clean and professional.
Conclusion
At the end of the day, the choice between branded links and generic short links comes down to your goals.
Short links are ideal when you need something quick, simple, and space-saving. But if you want to strengthen brand identity, build trust, and boost engagement, branded links clearly stand out. That’s why brands like Nike, Amazon, and Starbucks rely on them.
It’s not just about shortening a URL, it’s about making every click count.
With tools like Replug, you don’t have to choose between convenience and branding; you can get both. Whether you’re sharing on social media, in emails, or even offline, branded links let you stay consistent, professional, and memorable.
So instead of sending traffic through someone else’s domain, take control of your links and make them work harder for your brand.
Frequently asked questions
Why should I consider using branded links for my brand or business?
Branded links, which use your custom domain (e.g., yourbrand.ly/link), enhance brand visibility and recognition with every share, fostering customer loyalty. They improve click-through rates by up to 34% compared to generic links, as they appear more professional and trustworthy. Additionally, they protect against link hijacking and provide valuable analytics to refine marketing strategies.
Are branded links more trustworthy than short links?
Yes, branded links are generally more trustworthy because they incorporate your recognizable domain, signaling legitimacy and reducing user hesitation from unknown shorteners. Studies show they can boost trust by 25-30%, minimizing phishing concerns. In contrast, generic short links often hide the destination, potentially alarming users in an era of heightened cybersecurity awareness.
Can I track the performance of branded links?
Absolutely, most branded link services, such as Replug or Rebrandly, offer rich analytics, including click counts, geographic data, referral sources, and device types. This enables real-time monitoring and A/B testing to optimize campaigns for maximum effectiveness. Integration with tools like Google Analytics further enhances tracking, providing insights into user behavior and ROI.
Why should short links be a part of every marketer’s strategy?
Short links condense lengthy URLs, making them ideal for character-limited platforms like X (Twitter) and improving shareability across social media. They enable precise tracking of engagement metrics, helping marketers measure campaign effectiveness and audience preferences. Moreover, they enhance aesthetics in emails and ads, potentially increasing click rates by 20-40% while supporting retargeting efforts.
When to use short links and branded links?
Use generic short links for quick, internal, or low-stakes sharing where branding isn’t crucial, such as casual social posts or temporary redirects. Opt for branded links in marketing campaigns, email newsletters, or affiliate programs to reinforce brand identity and build trust. Branded links excel in professional contexts, such as ads or content syndication, while short links are sufficient for everyday use.
Provide some valuable tips when using short links?
When using short links:
– Make sure they’re concise yet recognizable to build trust, avoiding overly cryptic formats. – Maintain consistency across your organization by using a unified link structure or platform to reinforce branding and simplify tracking. – Incorporate UTM parameters in destination URLs to effectively monitor traffic sources and campaign performance in analytics tools.
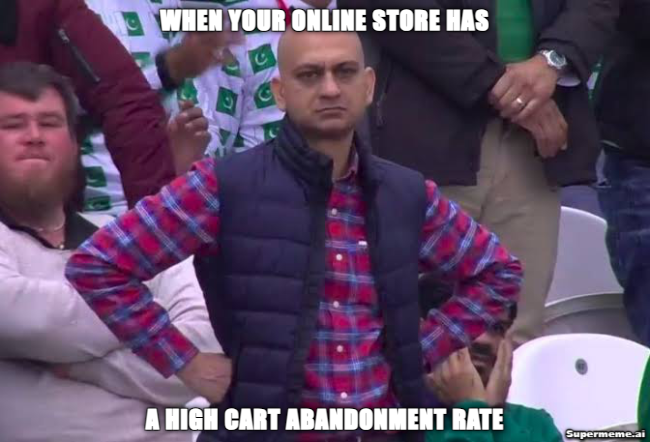
Have you ever heard the phrase “leaving money on the table”?
Well, cart abandonment is somewhat similar – the customers leave the website without completing the transaction.
Bummer. Right?
Most e-commerce brands struggle with minimizing cart abandonment so that they can squeeze more money from their website traffic.
However, it doesn’t happen unless they have a bullet-proof strategy in place.
To fix the problem, one needs to come up with an excellent shopping cart abandonment email template that tempts the reader to get back to the website and complete the purchase process.
You’re about to learn:
What is a cart abandonment email?
Why do marketers send out cart abandonment emails?
Why buyers abandon shopping carts in the first place?
The best cart abandonment email templates to get inspiration from
How to approach a prospect who has abandoned the cart
But first things first, you must know what the heck is cart abandonment email.
What is an abandoned cart email?
The abandoned cart email is the one that you receive in your inbox when you add a product to your shopping cart on an e-commerce website, but leave the site without completing the transaction.
The purpose of sending an abandoned cart email is to re-engage the customers who left the website without placing the order.
In some cases, e-commerce brands successfully convert those customers who left the website without buying by sending them the best-abandoned cart emails.
I’ve seen some SAAS companies send out a discount offer to website visitors who abandon the shopping cart on their website.
There could be several reasons why customers might abandon a shopping cart, for instance:
Got distracted and left the website
Found the product on a competitor’s website
Changed their mind about buying it
The reason why it’s important to understand abandoned carts and reach out to those customers is that a customer with a buying intent would add a product to the shopping cart.
Such customers are way more valuable than those lurkers who click through your offers from social media ads but never end up buying anything.
So the next time you leave Target or Amazon’s website after adding a product to your shopping cart and receive an email reminder about that product, don’t be surprised.
Do abandoned cart emails work?
Most of the time, they do work unless you mess it up in the email newsletter formatting or send it out too late. No wonder it’s a widely adopted sales strategy. It looks like a lot of brands recover lost sales through abandoned cart emails.
Statistics by Moosend are clear proof that abandoned cart emails actually convert.
Cart abandonment emails exhibit impressive engagement statistics. They achieve open rates of over 40%, occasionally even reaching a remarkable 45%.
Furthermore, half of these abandonment emails are not just opened but also clicked on, with 21% of the opened emails resulting in click-throughs.
The most compelling fact is that 50% of the users who click through these emails go on to complete their purchase. In essence, half of the recipients who engage with the email content ultimately make a purchase, underlining the effectiveness of these campaigns in converting potential customers into buyers.
What do you write in an abandoned cart email?
There is a not rocket science. You have to quickly explain to the customers where they left off when shopping on your website. Showcase the product they added to the cart, and place a CTA button that takes them straight to the shopping.
10 abandoned cart email examples to learn from
Let’s take a look at some of the best-abandoned cart email templates that work for businesses:
1. Fiverr
Fiverr is quick to send out an email to buyers who search for a specific gig but never end up placing an order on the platform.
The freelancing platform finds a bunch of relevant gigs and emails to the buyer. Here’s what I got when I searched for dog-related gigs while doing some research on the platform:
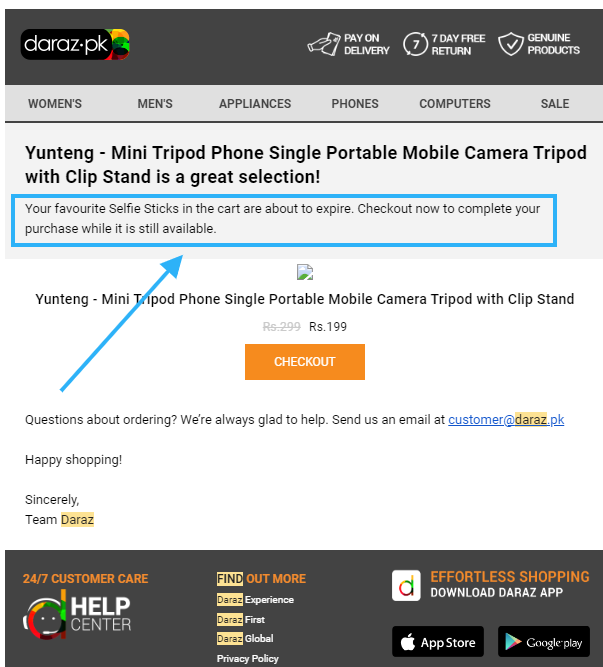
2. Daraz
Daraz is a popular e-commerce website in Pakistan. It was acquired by Alibaba in 2018. Here’s how Daraz sends out emails if you abandoned carts on their platforms.
Here’s what I found:
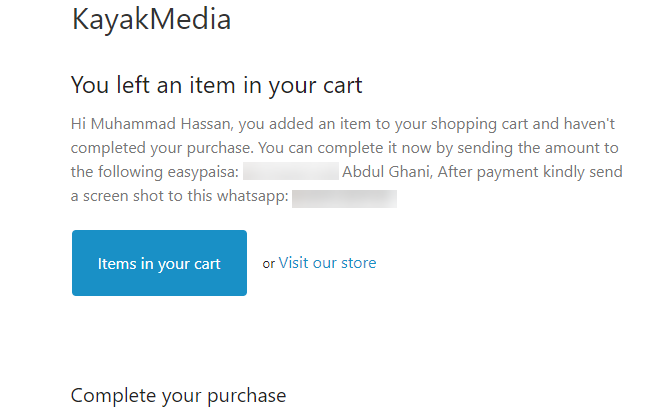
3. Kayak Media
Kayak Media is a software company that makes small software.
I once wanted to test out one of their softwares, but somehow, I didn’t go through the purchase process.
Then I received this cart abandonment email which sounds about right:
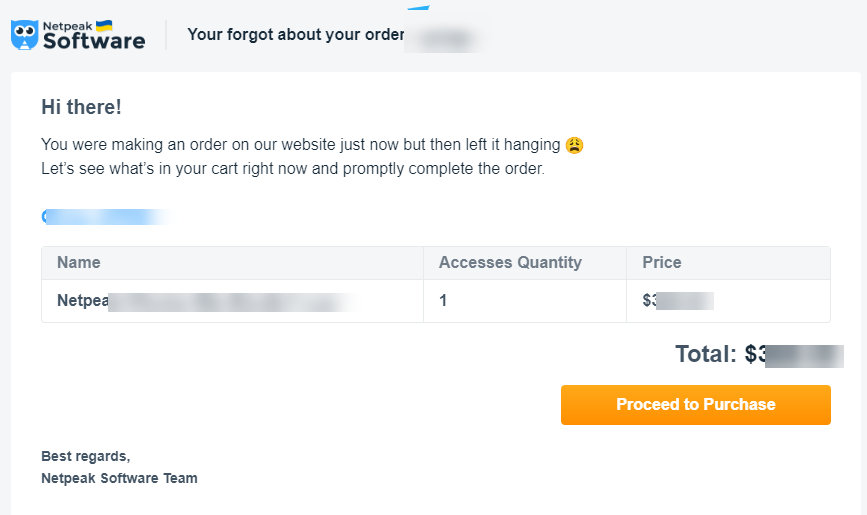
4. NetPeak Software
Netpeak is yet another software company that immediately sends out cart abandonment emails if you don’t complete the purchase process. Here’s an example:
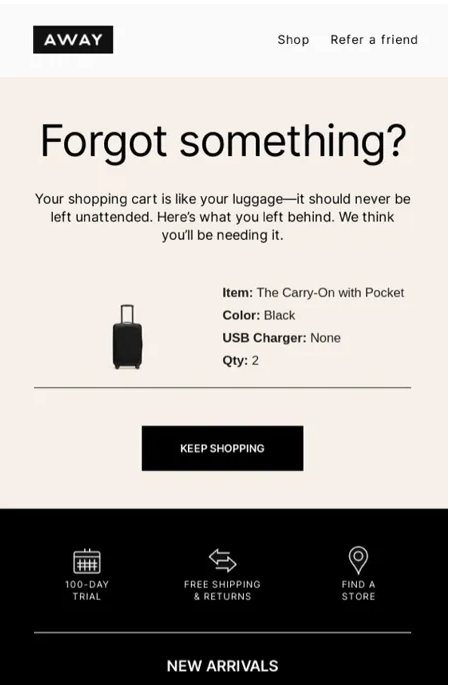
5. Away
Away is an e-commerce website that sells travel and fashion accessories. I stumbled upon their abandoned cart email template while researching this topic. Here’s what their abandoned cart email looks like:
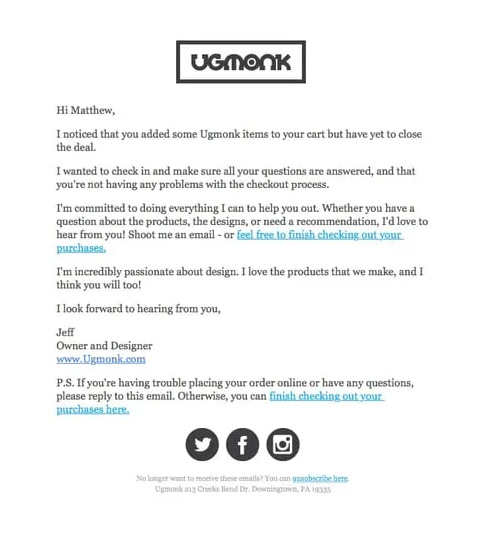
Ugmonk is a desk accessories e-commerce store that sells aesthetically pleasing and classy office and desk accessories. They send out abandoned cart emails in style as well:
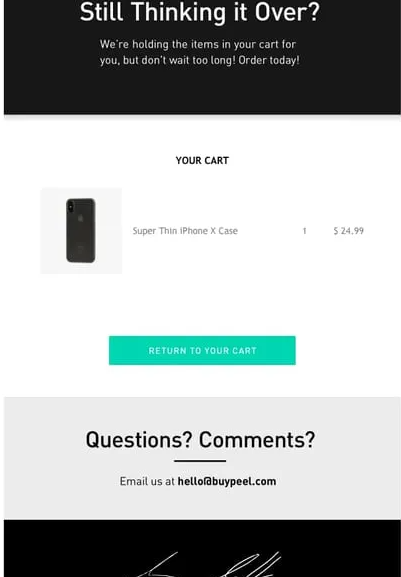
Peel is a well-known brand in the phone case space. They sell all sorts of iPhone and Android phone cases. They also send out cart abandonment emails if you don’t complete the purchase and leave their website. Here’s how they send out a reminder via email:
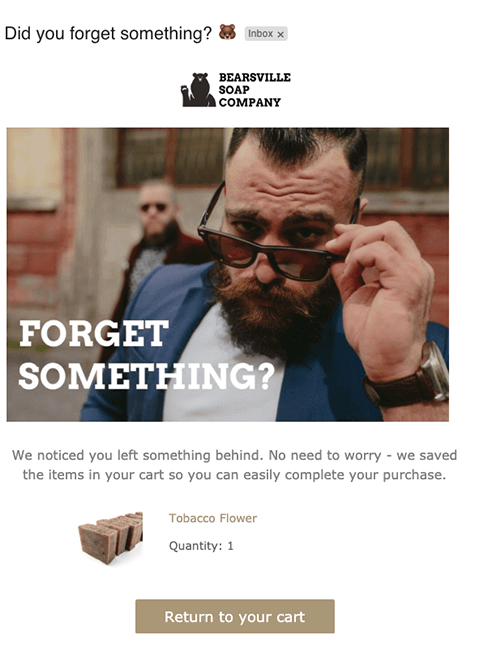
8. Bearsville Soap Company
Bearsville Soap Company has an interesting approach to sending out abandoned cart emails. They have a brief email copy with a CTA that says, “Return to your cart.”
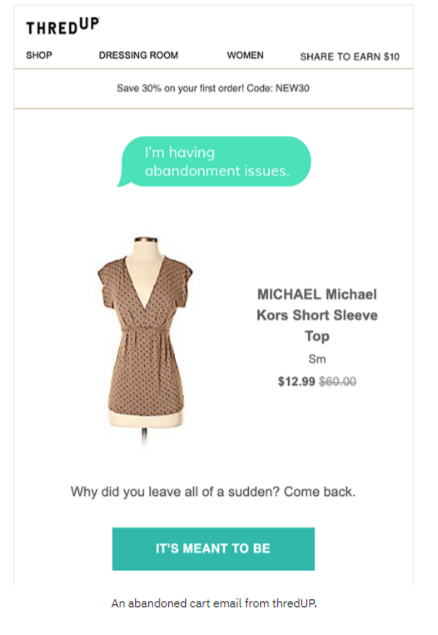
9. ThredUp
ThredUp comes with a straightforward message in their abandoned cart. They have several things added to their abandoned cart email, for instance, discounted prices, coupon codes, and the CTA.
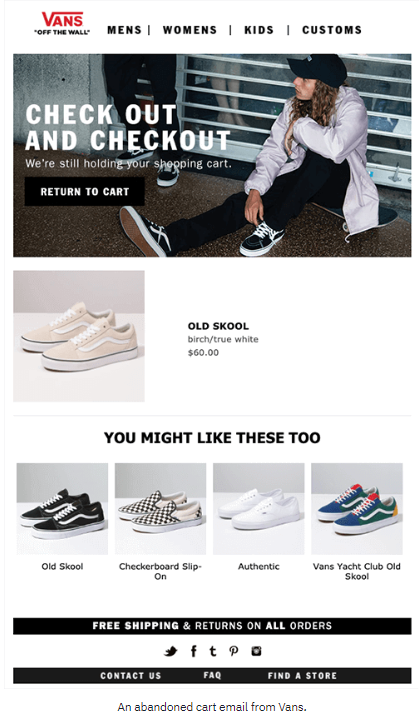
10. Vans
Vans is a footwear brand that sells sneakers for kids, women, and men. They adopted a unique yet interesting approach in their abandoned cart email. They quickly remind the customers who abandoned the cart that they’re still holding the shopping cart for them.
Plus, they go on to mention the products that the customer might also like, which is quite an ambitious approach.
These were some of the examples of abandoned cart newsletters which were using unique and diverse email newsletter templates to attract, re-engage, and convert abandoned visitors. Sure, marketers could take away a lot from these newsletter examples.
Note: If you handle multiple campaigns and want full control over how your links are shared, tracked, and retargeted, Replug is a comprehensive solution that simplifies link management for modern e-commerce marketers.
A complete link management solution
for marketing professionals & agencies.
Try Replug for free
Moreover, by using a branded custom URL shortener, you can generate neat, memorable links for your cart-recovery emails, improving link click rates, brand recall, and overall campaign performance.
Abandoned Cart Email Best Practices
Wondering how do I email someone who’s abandoned a cart?
If you’re curious about emailing customers who have abandoned the shopping cart and are not sure what to do or say, then this section might come in handy.
Compliance with the best practices will give you better results in turning cart abandoners to customers.
Without any further ado, let’s get right into it:
1. Set up the email automation
Email automation is the process of setting up an email sequence that sends out a series of emails to customers depending on the situation.
When a customer signs up on an e-commerce website, usually the first email that comes through is an account verification email. Similarly, when a purchase is made by the user, a confirmation email goes out to the customer.
So most e-commerce platforms seamlessly integrate with email marketing softwares and allow merchants to send out abandoned cart emails.
To get started with sending abandoned cart emails, simply set up an email sequence in your e-commerce platform or email marketing software to get going.
An email newsletter template is an email theme that a sender uses to compose and design the email message.
Keep in mind that most e-commerce businesses go for a fancy email newsletter template when setting up an abandonment cart email.
While an attractive email newsletter template could attract the customers to take action, it could also create a hurdle in engaging the customers.
The reason is that sometimes the email services block out the email template and notify the email receiver to unblock the template if they want to.
This could impact the clickability of the email and divert the attention of the customer to somewhere else. Similarly, a text-only email doesn’t appeal to the customers to take any section.
Therefore, it’s necessary to find a middle ground where you use an email newsletter template that increases the click-through rate of your email.
3. Write a compelling email subject and body
The email subject line and the in-body message are essential parts of the email. No matter how good your offer is, it won’t work out unless you don’t get the email subject line and body right.
The subject line of your cart abandonment email is the gateway to engagement. This can be achieved through various techniques, such as humor, creating a sense of urgency, or utilizing personalized language.
Writing a compelling email subject and body would significantly help you succeed in generating sales from abandoned carts. Whereas, the body of the email message would convince readers to take action or ignore it altogether.
There has always been a debate about the length of the email newsletters. Some believe that it has to be short, sweet, and brief as a well-crafted subject line entices recipients to open the email and explore its contents further. Whereas, a lot of marketers prefer to send out in-depth email newsletters.
Moreover, a catchy and attractive email subject line would massively impact your abandoned cart email open rate.
4. The first email reminder:
The first email should ideally be dispatched within an hour or two of cart abandonment. At this point, the shopper’s interest is at its peak, making them more likely to return and complete the purchase.
Subsequent reminder emails can be strategically spaced out over a few days or a week to gently encourage the customer to take action without bombarding them with messages.
5. Test out the email sequence
It’s vital to do testing before you move on to the next thing. Don’t shy away from sending out a few test email sequences to yourself to be 100% sure about this.
If you don’t test your abandoned cart email sequence, you’ll never know what customers receive when they abandon the cart.
6. Follow-up sequences:
Achieving the right balance in terms of email frequency and timing is crucial. While follow-up emails are effective, sending too many in quick succession can irritate recipients. Experiment with different timing strategies to identify what resonates best with your audience without inundating them with reminders.
A series of follow-up emails can be a powerful strategy if the initial reminder email doesn’t lead to a conversion. These subsequent emails can build upon the previous messages, progressively strengthening the offer or message. By providing additional incentives or addressing specific objections, you increase the likelihood of convincing hesitant shoppers to complete their purchase.
7. Clear & compelling content:
The content of your cart abandonment email should be clear, concise, and compelling. It should remind the shopper about the items they left behind, emphasizing the unique benefits of those products. Explain why completing the purchase is an excellent decision, using persuasive language and complementing your message with high-quality images of the products. The aim is to reignite the shopper’s interest and urgency to buy.
8. Personalization:
Personalization adds a human touch to your emails. It involves addressing the recipient by their first name and referencing the specific items left in their cart. This level of personalization can significantly increase engagement because it demonstrates that you’re paying attention to their preferences and needs.
Urgency and scarcity tactics can create a sense of FOMO (fear of missing out). You can implement these tactics by mentioning limited stock quantities or including countdown timers for discounts or promotions. These elements encourage recipients to take prompt action, fearing they may miss out on a great deal.
10. Call-to-Action (CTA):
The call-to-action (CTA) is the key element that prompts recipients to take action. It should be clear, visually striking, and placed prominently within the email. The CTA button should guide the recipient directly back to their abandoned cart or the checkout page. Use action-oriented language in the CTA, such as “Complete Your Purchase” or “Get Started Now,” to motivate immediate action.
Boost your conversion rates with irresistable CTAs with
Incentives are powerful tools to entice shoppers to return and complete their purchase. Common incentives include limited-time discounts, free shipping, or complimentary gifts. To maximize the effectiveness of incentives, ensure they are directly relevant to the items left in the abandoned cart. Additionally, clearly communicate the urgency of these incentives to drive immediate action.
12. Mobile responsiveness:
Given the prevalence of mobile shopping, it’s imperative that your cart abandonment emails are mobile-responsive. Mobile-responsive design ensures that your emails display correctly and are easy to navigate on smartphones and tablets. To ensure compatibility, thoroughly test your emails on various devices and email clients to guarantee a seamless experience for all recipients.
13. Segmentation:
Segmentation is a strategic approach to dividing your email list into distinct groups based on customer behavior, purchase history, and the value of the abandoned cart. Once segmented, you can tailor your email messaging to suit the unique preferences and needs of each group. This level of personalization can significantly enhance engagement and conversion rates.
14. Social proof:
Social proof is a psychological phenomenon that influences behavior. In your cart abandonment emails, you can leverage social proof by showcasing positive reviews, testimonials, or product ratings from satisfied customers. By highlighting the experiences of others, you build trust and demonstrate the popularity and quality of your products, making recipients more inclined to complete their purchase.
15. Privacy and trust:
In an age of heightened concern for data security and privacy, assuring customers of their information’s safety is paramount. In your cart abandonment emails, display trust symbols, security badges, and contact information prominently to instill confidence. By addressing these concerns, you build trust and reduce potential barriers to completing the purchase.
16. A/B Testing:
A/B testing, also known as split testing, is a method of experimentation where you compare two versions of an element within your emails to determine which performs better. This can involve testing different subject lines, email content, CTA buttons, or incentives. A/B testing is an ongoing process that allows you to fine-tune your emails and optimize their performance based on data-driven insights.
Providing accessible customer support options in your cart abandonment emails demonstrates your commitment to customer satisfaction. Include easy-to-find contact information or a chat option for recipients who may have questions or need assistance. A responsive and helpful customer support system can contribute to higher satisfaction levels and increased conversions.
18. Opt-out option:
Including an opt-out or unsubscribe option is both a best practice and a legal requirement to comply with email regulations. This feature allows recipients to stop receiving emails if they no longer wish to be contacted. Respecting recipients’ preferences is not only ethical but also important for maintaining a positive brand reputation.
19. Analytics and monitoring:
Leveraging analytics tools is essential for tracking the performance of your cart abandonment email campaign. Key metrics to monitor include open rates, click-through rates, conversion rates, and the revenue generated from the campaign. By closely analyzing these metrics, you gain valuable insights into the effectiveness of your strategy and can make informed adjustments.
FAQs About Abandoned Cart Emails
Let’s shed some light on the frequently asked questions about abandoned carts:
How many abandoned cart emails should I send?
There is no right or wrong way of doing this, especially when it comes to the number of emails one should send out when a customer abandons the shopping cart. Most brands send out one email to remind customers to complete the transaction. However, some brands send up to three abandoned cart emails.
How to keep unwanted emails away?
There are several settings available in the user account settings area on almost every e-commerce platform. Users must go through the settings and alter the settings for notifications, promotional offers, and emails. That’s the perfect way to keep unwanted emails away from your inbox.
Is it legal to send abandoned cart emails?
An abandoned cart email is just another email newsletter that you send to your customers. Make sure you have mentioned in the email or communication section of the terms and conditions of your e-commerce website that the customers may receive promotional or abandoned cart emails from the brand.
What is the best time delay for an abandoned cart email?
It depends on multiple factors, such as time zone, genre, demographics, etc. For instance, if a customer is shopping at 3 a.m. and abandons the cart, you might not want to send out that abandoned cart email at 4 a.m. because he might have gone to bed.
Therefore, you can always test out different time delays so that you can decide what works best for you. Give it at least 10 to 12 hours before you send out the first email.
Have you ever clicked a link only to end up somewhere unexpected, or worse, hit a dead end? That tiny URL redirect you didn’t notice might be the culprit.
Around 25–40% of legitimate web URLs involve some form of redirection, and nearly half of the external links you click have been redirected at least once, just to keep the web usable and up to date.
But here’s the catch!
While redirects help fix broken links and support site moves, they can also slow down pages, confuse search engines, and chip away at hard-earned SEO value if misused.
That’s why understanding how redirects really work matters more than ever, especially in 2026, when performance and search rankings go hand-in-hand.
So what exactly is URL redirection, and why should every site owner know it?
Let’s get started!
What is URL redirection?
At its simplest, “URL redirection” is when one web address (a URL) automatically sends you to another without you having to click anything.
Think of it like someone gently guiding you to the right room in a huge conference hall. You ask for one door, and a host points you straight to the correct one.
In technical terms, when a browser requests a specific URL, the server tells it, “Hey, this content has moved. Go here instead!”
The primary goal of this technique is to keep users and search engines happy. It ensures that even when content moves, links don’t break, visitors land where they expect, and your website doesn’t lose hard-earned traffic or SEO value.
That’s why good redirects matter so much in web design and site maintenance. They help prevent those annoying dead ends that frustrate users and damage your site’s credibility.
URL redirect types
When we talk about the different types of URL redirects, we’re really just grouping the ways one URL sends users (and search engines) to another.
Redirects can be short- or long-term, and each has its own purpose and impact on how browsers and search bots behave.
They’re a big deal when you’re managing a website because the wrong one can hurt traffic or search rankings if you’re not careful.
Permanent redirects
A permanent redirect tells the browser and search engines that a page has moved for good. The most common permanent status code is 301 (“Moved Permanently”), which signals that the original URL should no longer be used and that the new one takes its place.
Search engines typically carry over most of the original’s SEO value to the new URL, making it ideal for site moves, structural changes, or page consolidation.
Temporary redirects
A temporary redirect (like 302, 303, or 307) sends visitors to another URL for now, but indicates the original URL is only temporarily unavailable. The idea is that the original one might come back someday.
Search engines usually keep the old URL indexed and don’t pass along SEO value as a permanent redirect does. This type is handy for things like short-term promotions, maintenance pages, or A/B testing.
Server-side redirects
Server-side redirects happen at the web server level before any content loads. The server simply returns a special HTTP status code and a new destination URL, and the browser follows it immediately.
These are usually the best choice because they’re fast and clear to browsers and search engines.
Permanent server-side redirects
This is the classic “set it and forget it” move, using a server-side permanent status (like 301 or 308) to point an old URL to a new one forever.
It tells crawlers and browsers to update their records so that, over time, users and search engines only experience the new address.
Temporary server-side redirects
With temporary server-side redirects (like 302 or 307), you tell the server to send people elsewhere, but only for a limited time. The server itself handles the redirect, but search engines recognize that the original URL remains the “real” one in the long run.
That makes this perfect for things like site maintenance or seasonal campaigns where you expect to revert back.
How does URL redirection work?
URL redirection might sound technical, but it’s really just about guiding a browser from the URL someone requests to another URL that actually has the content you want them to see.
Behind the scenes, there’s a simple conversation between your browser and the server that makes it happen.
Here’s the complete process explained:
1. Request
It all starts when someone types a URL into their browser or clicks a link. That browser sends a request to the server that hosts that address, asking for the resource (page, image, etc.).
Think of it like knocking on the server’s door and saying, “Hey, can I see this page?”
2. Server response
The server examines the request and checks whether the URL needs to be redirected. If it’s been set up to redirect, the server doesn’t send the page content.
Instead, it sends a special redirect response with a status code in the 300 range, along with a “Location” header that tells the browser the new URL to use.
3. Browser action
Once the browser receives that special response with the new URL, it doesn’t sit there; it follows the instruction immediately.
The browser makes a new request to the destination URL that the server told it about. That’s why when a redirect happens, you might see the address in the browser change (updated).
4. Content served
Now that the browser has requested the correct final URL, the server at that location sends back the real content you were after, no matter if that’s a web page, image, file, or anything else. The browser then displays it as if it were a normal page load.
So, in short:your browser asks for a URL → the server says “go to this other URL instead” → your browser follows it → and then you get the content you wanted. Simple, smooth, and essential for keeping the web working properly!
Common reasons for performing URL redirection
URL redirection isn’t just a typical tech trick! It’s used in lots of everyday web situations to make the internet smoother and more user-friendly.
From cleaning up links to protecting user privacy (and yes, even the bad stuff), redirects play a role in how we get around online.
To shorten URLs or links
Sometimes URLs are long, messy, or hard to remember, especially when you’re sharing them in a tweet or text. Redirects let you use short links that forward users to the original, long URL while keeping things neat and easy to share.
To exclude broken links
When pages move or get deleted, clicking old links can lead to a dead end (like a 404 error). Redirects help by sending visitors from the old URL to a working page instead, keeping links alive and users happy.
To permit multiple domain names
Many site owners register several domain names (like “.com”, “.net”, or common misspellings) but want them all to show the same website. Redirects make this possible by directing everyone to a single primary domain.
To facilitate smooth website navigation
Redirects help guide users around your site hassle-free, e.g., when a page has moved, during maintenance, or when content is reorganized. They assist visitors so they don’t run into confusing errors or outdated pages.
For privacy and data protection
Some services redirect links through intermediary systems to hide things like referrer information and other sensitive details before sending users to their destination. This can help protect user privacy and obscure internal URLs.
For malicious intent (not recommended)
Unfortunately, redirects can also be abused. Cybercriminals sometimes use them to hide phishing pages or distribute malware by making a link look safe before sending you somewhere dangerous. That’s why it’s always best to be cautious with unfamiliar or suspicious links.
URL redirection isn’t just a geeky server trick; it’s used every day on the web to make sure people land where they should, protect data, improve usability, and sometimes (unfortunately) for shady stuff.
Let’s walk through the primary objectives for which this happens!
Ensuring secure site access (HTTPS)
Websites often redirect visitors from HTTP (insecure) to HTTPS(secure) URLs, so data such as passwords and personal information is encrypted. This is critical for privacy and defense against snooping or tampering.
Redirecting misspelled or variant domain names
People often make typos or try different domain endings, like “.net” or “.org”. Redirecting these to your leading site helps capture that traffic instead of losing it or showing errors.
Seamless transition to a new domain
If you redesign your site, rebrand, or change domains, redirects make sure old links still point people to the right place so bookmarks and search results don’t break.
Redirects can be used to log when someone leaves your site, for example, to track which external links get clicked most, helping with link analytics and marketing insights.
Simplifying messy, long URLs with short aliases
Short links (like replug.io links) are easier to share and remember. They work by redirecting people from a short alias to the full, complex URL in the background.
Long-lasting redirect aliases for dynamic URLs
Some services create stable URLs that always point to changing or complex content. This is especially handy with long query strings or dynamic parameters. This makes sharing and linking cleaner.
“Post-Redirect-Get” design pattern to prevent duplicate submissions
In web forms, redirecting after a “POST” request prevents a user from accidentally resubmitting the form if or when they refresh the page, which prevents duplicate actions like double purchases.
Device-specific and geo-based routing
Redirects can send users to different URLs based on their device (mobile vs desktop) or where they’re browsing from (country/language), giving a tailored experience.
Some people try to use redirects to game rankings or send search traffic to pages that shouldn’t rank otherwise, but major search engines now detect and penalize these tricks.
Misleading site visitors
Redirects can be exploited to confuse users, like sending someone to a spammy or unexpected page. Modern browsers show the real URL, but this can still be part of phishing or scam tactics.
Stripping off “referrer” information
When you click a link, browsers send the page you came from in the referrer field. Some redirects hide or strip this to protect privacy or sensitive info before loading the destination.
Various URL redirect implementation methods
There are several ways to make one URL send visitors to another, depending on your access, needs, and how strict you want to be about standards, SEO, or user experience.
Now, let’s walk through the main methods you’ll run into.
Manual redirect
This is the simplest kind! You just put a normal link on a page, asking users to click it to go somewhere else. It’s not automatic, but it works as a fallback or basic suggestion if more advanced redirects aren’t available.
HTTP status codes
This is the most reliable, standard way to redirect. The server responds with a “3xx status code” (e.g., 301, 302, or 307) and a Location header pointing to the new URL. Browsers and search engines understand this instantly and act on it before loading content.
Refresh Meta tag & HTTP refresh header
If you can’t set server headers, you can use an HTML <meta http-equiv=”refresh”> tag in the <head> of a page. With a zero-second delay, browsers will automatically load the new address.
Note: It’s a fallback method and usually less preferred for SEO, but it’s useful when you don’t control the server.
JavaScript URL redirects
You can use JavaScript in a page to change the “window.location” to a new URL. This happens in the browser after the page starts loading and works great for conditional or interactive redirects, but search engines may not always follow it during crawling.
Frame URL redirects
Older sites sometimes use “frames” or “iframes”, where one page loads another inside a frame. This redirect loads the target URL inside the frame, giving a similar effect.
Note: It’s not common anymore and can cause usability or SEO problems, but you may still see it on legacy systems.
Redirect chains & loops
These aren’t methods you want; they’re pitfalls. A redirect chain is when A → B → C happens instead of a direct A → C, which slows loading and can lose SEO value.
On the other hand, a redirect loop occurs when URLs keep pointing back to each other, forming an endless cycle that traps browsers. Both should be avoided with careful planning and testing.
Create & manage URL redirects
Once you know why redirects matter, the next step is figuring out how to actually set them up and manage them, whether you’re using a website platform, a server, a DNS service, or even a browser tool.
Different environments offer different tools and levels of control, so let’s go through the most common ones you’ll encounter.
WordPress URL redirect
On WordPress, the easiest way to create and manage redirects without touching server files is to use a redirect plugin like “Redirection”.
This lets you set up 301s, 302s, and more right from your dashboard, track 404 errors, and handle query parameters without editing “.htaccess” or Nginx configs. It’s especially handy for non-technical users or larger sites with lots of redirects.
Cloudflare URL redirect
If your site uses Cloudflare, you can manage redirects at the edge using “Page Rules”, “Single Redirects”, or “Bulk Redirects” in the dashboard.
These tools let you send traffic from one URL to another before it even reaches your server, which is fast and efficient. You choose the source and destination patterns and set the HTTP status code (e.g., HTTP 301 or HTTP 302).
DNS URL redirect
Some DNS providers let you create simple redirects at the DNS level by pointing a hostname (like a root domain) to an IP and combining it with a redirect rule in your DNS or host settings.
This redirects traffic for the whole domain. It is particularly useful if you want domain-wide forwarding without a web server.
Note: Pure DNS records without associated redirect rules won’t forward URLs on their own.
Google URL redirect
When you set up redirects, Google will follow them and understand relationships between old and new URLs.
For example, with a 301 (permanent) redirect, Google treats the destination as the canonical URL for indexing. This means pages you’ve moved or consolidated can stay visible to search engines with minimal SEO impact.
URL redirect Chrome
On your own browser, tools like Chrome extensions (e.g., “Requestly” or “Redirect Path”) let you test, debug, or override redirects locally.
These are especially useful for developers or QA testers who want to simulate or observe a redirect or a redirect chain in the browser in real-time.
nginx URL redirect
If your site runs on an Nginx server, you can define redirects in your server block using “return” or “rewrite” directives.
For instance, a simple 301 redirect from an old path to a new one can be done in the Nginx “config” file. This is very flexible and powerful, but it requires server access.
Django URL redirect
In Django (a Python web framework), redirects are handled in your app’s URL configuration or views using functions like “redirect()” and careful validation to prevent open redirect vulnerabilities.
Django also provides tools to help ensure safety when redirecting based on request parameters.
URL redirect with parameters
Sometimes you need redirects that include parameters (e.g., “?ref=123”) or that pass query strings through to the new URL.
Many redirect tools, whether in WordPress plugins, Cloudflare rules, or server configurations, let you preserve or customize query parameters so your tracking or dynamic values aren’t lost during redirection.
URL redirection benefits
Now, you guys are well aware that URL redirection isn’t just a behind-the-scenes web thing. It has real perks for your website, your visitors, and your brand.
From keeping your SEO strong to making links easier to use and remember, redirects play a significant role in modern web management.
Preserving SEO value by passing link equity
When you move or rename a page, search engines like Google transfer the link equity (the SEO value built up through backlinks and ranking signals) from the old URL to the new one using a redirect. This keeps your rankings steady and prevents you from losing hard-earned SEO visibility.
Preventing traffic loss from broken links
Without redirects, old links can result in 404 errors, which frustrate users and drive them away. Redirects guide visitors from outdated URLs to the right content, helping you keep traffic flowing where it should.
Improving user experience (UX)
Redirects make sure visitors always land on relevant content, even if they click an old or shared link. This smooth browsing experience keeps people engaged and reduces bounce rates, which search engines appreciate too.
Maintaining brand consistency
No matter if you’ve moved to a new domain or reorganized content, redirects help keep your brand message consistent. Instead of ending up on error pages or old URLs, visitors always see your current, branded content.
Simplifying marketing with memorable, short URLs
Using tactics like a vanity URL (custom, branded short links) makes your URLs easier to remember and share. These clean, descriptive redirects not only look professional, but also encourage more clicks in campaigns and social posts.
Summing up
In a continuously transforming digital world, URL redirection is one of those tools that quietly keep everything running smoothly.
From preserving SEO value and preventing broken links to improving user experience and simplifying marketing with clean, memorable links, everything is done efficiently (behind the scenes).
Whether you’re managing redirects on a CMS, server, or with tools like a URL shortener, understanding how redirects work helps you keep your site healthy and your users happy.
We’ve covered types, purposes, methods, and real-world reasons you’d use them, so you’re set to make smart redirection decisions moving forward.
And if you’re looking to streamline and optimize your links even more, give Replug, i.e., an all-in-one link optimization platform, a try today. It is a reliable URL shortener that shortens links in seconds, with built-in tracking and testing features.
A complete link management solution
for marketing professionals & agencies.
Try Replug for free
Frequently asked questions
How do I redirect a URL to another URL online?
URL redirection is the automatic redirection of a user from one URL to another. A web server usually does this to ensure visitors are directed to the correct page, even if the URL has changed or the page is moved.
What does it mean to redirect a URL?
Redirecting a URL means automatically sending anyone who visits one web address to a different one instead.
When a browser requests a URL that has a redirect, the server tells it to go to a new location, so the visitor ends up at a different page or site without manually typing the new address.
This is commonly used when pages move, domains change, or you want to forward traffic to a new address.
In this case, when someone visits the old URL, they are automatically redirected to the new one.
How to check if a URL is redirecting?
To check if a URL is redirecting, you can:
– Use a URL redirect checker tool (like “Redirect Checker”). – Check the HTTP headers for a “301” or “302” response, indicating a permanent or temporary redirect.
Alternatively, you can use browser developer tools to see the redirection in real-time.
How to set up a URL redirect for a domain?
To set up a URL redirect, you typically:
1. Log in to your domain hosting account. 2. Find the URL forwarding or redirect settings (this may vary depending on your hosting provider). 3. Choose the type of redirect (301 for permanent or 302 for temporary). 4. Enter the destination URL where users should be redirected. 5. Save the settings.
Do URL redirects have a bad impact on SEO?
URL redirects generally do not harm SEO if done correctly, especially when using permanent redirects (301). However, excessive or improper redirection can slow down a website and confuse search engines. Keeping redirects clean and minimal is key to good SEO.
When to use URL redirects?
You should use URL redirects in cases such as:
– When a page is permanently moved to a new URL (301 redirect). – If a page or site has been deleted, but you want to redirect traffic to a related page. – When you restructure your website and URLs change. – To manage changes in domains.
Mention the ways to redirect a website URL efficiently?
Efficient ways to redirect a URL include:
– 301 redirect for permanent redirection. – 302 redirect for temporary redirection. – Using .htaccess files(on Apache servers). – Setting up redirects in CMS platforms like WordPress or Shopify. – Managing redirects through DNS settings for domain-level redirects.
How to redirect a URL in Shopify?
In Shopify, to set up a URL redirect:
1. Go to the Shopify admin panel. 2. Navigate to Online Store > Navigation. 3. Scroll down to URL Redirects and click Add URL Redirect. 4. Enter the old URL in the “Redirect from” field and the new URL in the “Redirect to” field. 5. Save the redirect.
What is the best way to manage URL redirects?
To manage URL redirects effectively:
– Use a URL redirect manager or plugin(if on platforms like WordPress, Shopify, etc.). – Utilize URL redirect services that track and update broken links and redirects. – Set up redirects via the server or CMS settings to ensure they’re applied consistently.
What tools are best for managing large-scale URL redirects?
Some of the best tools for managing large-scale URL redirects include:
–Screaming Frog SEO Spider ( the best URL redirect tool for checking and managing large redirects). –Redirection (URL redirect checker plugin for WordPress). –Ahrefs (URL redirect tester tool with redirect management and SEO features). –Replug (for simple redirects). –Usermaven (for monitoring and managing site redirects).
Are free URL redirection services legit?
Yes, free redirection services can be legitimate, but they vary in quality. It’s essential to use a reputable service to ensure security and performance. Services like Replug offer free redirection, but for professional or business use, premium services may provide more control and fewer limitations.
If you’re a brand still sleeping on TikTok in 2026, you’re leaving serious money on the table. The platform now has nearly 2 billion monthly active users and an engagement rate of 3.70%, miles ahead of every other major social platform.
And when creators get involved?
68% of TikTok users say they’ve bought something based on a creator’s recommendation. That’s not just scrolling; that’s buying power.
TikTok influencer marketing statistics also show that creators on the platform drive engagement rates 24x higher than on platforms like X. This tells you everything about where your audience’s attention actually lives.
No matter if you’re a startup or an established brand, partnering with the right TikTok creators can completely change the game. But first, let’s get clear on what TikTok influencer marketing actually means and why it’s different from anything you’ve tried before.
What is TikTok influencer marketing?
TikTok influencer marketing is when brands partner with TikTok creators (people who’ve already built a loyal, engaged following) to promote their products or services through authentic, short-form video content.
Unlike traditional advertising, where you’re pushing a message out to a cold audience, influencer marketing on TikTok puts your brand in front of people who already trust the creator talking about it. That trust is the whole point!
The primary objective is simple: Use a creator’s existing influence to spark genuine interest in your brand, drive traffic, and ultimately generate leads or sales, all in a way that feels natural rather than salesy.
It works particularly well on TikTok because the platform rewards authentic, entertaining content over polished ads. When the right creator talks about your product in their own voice, it doesn’t feel like marketing, and that’s exactly why it converts so well.
How TikTok influencer marketing works
Here’s how the process works, broken down into simple steps:
Step #01: Define goals & find creators
Start by getting clear on what you actually want (more brand awareness, website traffic, leads, or direct sales). Once you know your goal, find creators whose audience matches your target customers. Niche relevance matters way more here than just follower count.
Note: Remember, a micro-influencer with 20K highly engaged followers can often outperform a mega-creator with a million passive ones.
Step #02: Negotiate & compensate
Reach out to your shortlisted creators and work out the details (deliverables, timelines, usage rights, and payment). Compensation can be a flat fee, free products, a commission-based deal, or a mix of all three.
Be upfront about expectations, but also give creators room to do what they do best. Their audience follows them for a reason.
Step #03: Review & post
Before anything goes live, review the content to make sure it aligns with your brand guidelines and goals. That said, avoid over-editing or stripping out the creator’s personality.
Authenticity is what makes TikTok content perform at its best. Once you’re both happy with it, it goes live and starts doing its thing.
Step #04: Boost & measure
Don’t just post and hope for the best. Use TikTok’s Spark Ads feature to boost top-performing influencer content to an even wider audience.
Then track the numbers that actually matter (views, clicks, conversions, and ROI) so you know what worked and can make smarter decisions for your next campaign.
Why use TikTok influencer marketing in 2026?
With nearly 2 billion active users and an algorithm that can make anyone go viral overnight, TikTok isn’t just a social media platform anymore; it’s a full-on marketing machine.
If you’re still on the fence about investing in TikTok influencer marketing, these four reasons should clear things up pretty fast.
High return on investment (ROI) through micro & nano-influencers
Here’s the thing: You don’t need to spend a fortune to see real results on TikTok. Bigger doesn’t always mean better when it comes to influencers.
Nano-influencers on TikTok consistently pull in double-digit engagement rates, hovering just above 10%. Whereas micro-influencers deliver 60% higher engagement than mega-influencers at roughly one-tenth the cost per post.
So instead of blowing your entire budget on one big-name creator, you can partner with a handful of smaller creators, stretch your dollars further, and actually get better results.
Nano-influencers on TikTok regularly clear 8–12% engagement, and most accept product-only deals or flat fees in the $25–$500 range for a single video. That’s a pretty solid deal for any brand, either big or small.
The rise of authentic content
People are tired of polished, scripted ads, and TikTok users especially can smell a fake one from a mile away. That’s exactly why UGC (user-generated content) is killing it on TikTok right now.
UGC on TikTok is 22% more effective than brand-created videos and outperforms Facebook ads by 32% and regular ads by 46%. It just feels real, and that’s the whole point.
85% of people find UGC more trustworthy than brand-created content, so when a creator genuinely talks about your product in their own words, their audience listens (quite attentively).
For brands, this means you get high-performing content without the big production budget – just authentic storytelling that connects.
Direct integration with commerce
TikTok has taken influencer marketing a step further by blending content and shopping into one seamless experience.
With TikTok Shop, viewers can go from watching a creator’s video to buying the product without ever leaving the app. TikTok Shop hit $23.4 billion in US GMV and is nearly doubling year-over-year, with conversion rates sitting at 4.7% on average (well above the 2–4% typical of traditional e-commerce).
On top of that, performance-based deals are becoming the new standard. TikTok Shop affiliate commissions typically range from 5–20% of sales, meaning creators only earn when they actually drive results.
This is a win-win situation for brands since you’re paying for performance, not just exposure.
Search & discoverability
TikTok isn’t just a place to scroll for fun anymore. People are actively using it to find products, get recommendations, and make buying decisions.
Nearly half of all consumers surveyed used TikTok as a search engine in 2026, up from 41% in 2024 (a nearly 20% jump in just two years).
Among small business owners, 38% relied on TikTok influencers for product sales or promotions in 2026, up from just 25% in 2024.
When a creator posts a product review or a “best of” video, that content can show up in TikTok search results and keep driving organic traffic long after it’s posted.
So influencer content on TikTok isn’t just a one-time boost; it’s a long-term discoverability asset for your brand.
Running a successful TikTok influencer campaign isn’t just about finding a popular creator and hoping for the best; you need an actual plan.
Whether you’re chasing brand awareness, community growth, or direct sales, picking the right strategy and campaign type makes all the difference.
Let’s break it all down!
Influencer strategy framework
Before you spend a single dollar, you need a clear framework to guide your campaign. Think of it as your game plan.
Here’s how to build one that actually works:
Know your goal first: Are you trying to get more people to know your brand exists, drive traffic to your website, or push product sales? Your goal decides everything else. The type of creator you work with, the content format, the budget, and how you measure success.
Pick the right creator tier: Not every campaign needs a mega-influencer (in fact, most don’t). Match your goals to the right tier. Nano and micro-influencers for targeted, high-engagement campaigns; macro and mega-influencers when you need broad reach fast. A mix of both often works best!
Brief your creators, but give them room: A good creative brief covers your key message, and it must include details (like product features or a promo code) and the dos and don’ts. But here’s the golden rule: don’t script everything. TikTok audiences can tell when a video feels forced, so let the creator speak in their own voice. That’s the whole reason you hired them.
Set a timeline and content schedule: Consistency matters on TikTok. Work out a realistic posting schedule with your creators and make sure it aligns with any product launches, seasonal events, or campaign windows you’re targeting.
Track the right metrics: Views and likes are nice, but they don’t tell the whole story. Depending on your goal, focus on metrics that actually matter (engagement rate, click-through rate, promo code redemptions, TikTok Shop conversions, and overall ROI).
Key influencer campaign types
Now let’s get into the fun part, i.e., the actual campaign types. Each one serves a different purpose, and the best brands mix and match depending on what they’re trying to achieve.
Brand awareness
Product unboxing is one of the most natural and effective ways to introduce your brand to a new audience. Creators unbox your product on camera, walk through how it works, or share an honest review, and their audience gets to see it in action through someone they already trust. It doesn’t feel like an ad; it feels like a recommendation from a friend.
Tutorial videos especially perform well because they’re genuinely useful. They show people exactly how to use your product and answer questions before they’re even asked. The key here is letting creators keep it real. An honest, slightly imperfect review will almost always outperform a perfectly scripted one on TikTok.
Additionally, if you want people to actually participate in your marketing, a branded hashtag challenge is the way to go. You create a challenge, give it a catchy hashtag, and invite TikTok users to join in. The beauty of this format is that it turns your campaign into a trend, and TikTok’s algorithm loves that kind of participation.
Think of Chipotle’s #GuacDance or e.l.f. Cosmetics’ #eyeslipsface challenge. Both went massively viral because they were simple, fun, and easy to recreate. Pairing your challenge with a popular or original sound takes it even further. The goal is to make the barrier to entry low enough that anyone can join, but the idea catchy enough that people actually want to.
Community engagement
Duets and Stitches are TikTok’s built-in tools for creating conversation between creators and brands, and they’re gold for community engagement.
A Duet places two videos side by side, while a Stitch lets a creator clip and react to your content at the start of their own video. Brands can use these features to respond to customer content, collaborate with creators in real time, or even encourage fans to react to a campaign video.
It builds a sense of community because it shows your brand is actually listening and participating (not just broadcasting). Encouraging creators to Duet or Stitch your content also multiplies your reach organically, since their audience sees it too.
An account takeover, on the other hand, is exactly what it sounds like. You hand the keys to your brand’s TikTok account over to a creator for a set period of time (usually 24–48 hours) and let them post as themselves on your page.
This works really well for community engagement because it brings a fresh voice and energy to your account and exposes their fanbase to your brand at the same time. The creator’s followers follow them to your page, your existing audience gets new content they actually enjoy, and everyone wins.
Just make sure you’re choosing someone whose values and vibe genuinely align with your brand. A takeover only works when it feels like a natural fit, not a forced collab.
Conversion & sales
When the goal is to actually drive purchases, tutorials and GRWM videos are some of the highest-converting content formats on TikTok.
A tutorial shows your product being used in a real, relatable situation, such as someone doing their skincare routine, cooking a meal, or styling an outfit, and naturally weaves your product into the story.
GRWM (Get Ready With Me) content works the same way. Creators walk viewers through their daily routine while casually featuring your product, making it feel like a lifestyle choice rather than an advertisement.
The authenticity of these formats is what drives conversions. Viewers watch the whole video, see real results, and feel confident enough to click and buy.
Besides, these three formats are your most direct tools for turning views into sales:
→ With affiliate deals, creators get a unique link and earn a commission on every sale they generate, which keeps them motivated to push your product genuinely and consistently.
→ Promo codes work similarly but with the added bonus of urgency and exclusivity. When a creator says “use my code for 15% off,” their audience feels like they’re getting a special deal.
→ Giveaways, on the other hand, are great for building rapid momentum. They drive comments, shares, and follows in a short burst, boosting your visibility on the “For You Page”.
Use all three smartly:affiliate links for sustained sales, promo codes for conversion pushes, and giveaways when you need a quick spike in engagement or want to grow your following fast.
Find the ideal TikTok influencers for your brand
Finding the right TikTok creator for your brand isn’t just about picking whoever has the most followers; it’s about finding someone whose audience, content style, and values actually align with what you’re selling.
Here’s a simple, step-by-step approach to help you build your TikTok influencer list the right way:
Define your target & budget
Start by getting crystal clear on who you’re trying to reach and how much you’re willing to spend.
Define your target audience(age, interests, location, buying behavior) and let that guide every decision you make. Your budget will also determine what creator tier makes sense.
Working with nano and micro-influencers keeps costs low while still delivering strong results, whereas macro creators need a bigger spend. Set your scope early so you’re not scrambling later.
Leverage influencer discovery tools
TikTok’s own Creator Marketplace is the best place to start. It’s free, built directly into the platform, and lets you filter creators by niche, audience demographics, engagement rate, and location.
If you want to go deeper, third-party platforms like Modash, Upfluence, Heepsy, and Creator.co give you even more data and filtering options.
These tools save you hours of manual searching and help you quickly shortlist creators who actually match your campaign goals.
Manual research & competitive analysis
Don’t underestimate the power of doing a little digging yourself. Check what creators your competitors are tagging or working with. If a creator is driving results for a brand in your space, they’re worth a closer look.
Hashtag surfing is another underrated tactic; just search your niche hashtags on TikTok and see which creators are consistently showing up with solid engagement. This hands-on approach often surfaces hidden gems that no tool would have flagged.
Vetting for the “Ideal fit”
Once you’ve got a shortlist, it’s time to filter out the wrong fits:
Check their engagement rate. A creator with 20K followers and a 9% engagement rate will likely outperform someone with 200K and 1% any day.
Scroll through their past content and comments to assess brand safety. Make sure there’s nothing that could embarrass your brand.
Also look for any past brand collaborations. If they’ve worked with similar brands before and done it well, that’s a solid green flag that they understand how sponsored content works.
Reach out & pitch
Keep your outreach short, personal, and genuine. Mention something specific about their content to show you’ve actually watched it.
Creators get a ton of generic DMs, and a personalized message instantly stands out. Clearly explain who you are, what you’re offering, and what you’re looking for, but keep the tone conversational rather than corporate.
Whether you’re sliding into their DMs on TikTok, emailing through their bio link, or reaching out via their management, lead with value and make it easy for them to say “YES”.
Best TikTok influencer marketing examples
Sometimes the best way to understand what great TikTok influencer marketing looks like is to see it in action.
These five campaigns are some of the most talked-about examples across different industries, and each one has a clear lesson brands can learn from and apply.
e.l.f. Beauty: The #EyesLipsFace Challenge
e.l.f. Beauty made history on TikTok by doing something no brand had done before: commissioning an original song specifically for a TikTok challenge.
The strategy was simple but brilliant. They created a catchy, danceable track and invited users to show off their makeup looks using the #EyesLipsFace hashtag.
The campaign became the most viral US campaign in TikTok history, attracting over 3.5 million user-generated videos and totaling 5.6 billion views. Even celebrities like Lizzo and Reese Witherspoon joined in organically, without being paid.
The key takeaway: When your content is fun, easy to recreate, and culturally on point, your audience does the marketing for you.
Chipotle: #GuacDance
Chipotle turned “National Avocado Day” into one of the most successful branded TikTok campaigns ever.
Partnering with popular creators Brent Rivera and Loren Gray, they launched the #GuacDance challenge, inviting fans to bust out their best guacamole-inspired dance moves to Dr. Jean’s viral “Guacamole Song”.
The campaign received 250,000 video submissions and 430 million video starts in just six days, becoming TikTok’s highest-performing branded challenge in the US at the time. It also resulted in Chipotle’s biggest guacamole day ever, with over 800,000 sides served.
The lesson here is clear: Tie your campaign to a real cultural moment, keep it fun, and let your audience run with it.
YSL Beauty: Loveshine Lip Oil Stick
YSL Beauty’s launch of the Loveshine Lip Oil Stick is a textbook example of mixing high-profile ambassador power with grassroots creator content.
The campaign was fronted by global superstar Dua Lipa as YSL’s new global makeup ambassador, but the real fuel came from TikTok.
Beauty influencers and everyday users alike posted reviews, tutorials, and first impressionsusing branded hashtags, driving millions of views and widespread engagement. Mega-creator Alix Earle’s video alone pulled in over 293,000 likes.
The collaboration with high-profile influencers like Dua Lipa and Alix Earle significantly boosted brand awareness and engagement, particularly for the Loveshine Lip Oil launch. The product quickly went viral and became one of YSL’s most talked-about launches in recent years.
Insta360: #NoseMode Amplification
Insta360’s approach is one of the smartest examples of a brand listening before jumping in.
When users started organically going viral by attaching their Insta360 cameras to selfie sticks pointed at their noses (creating a funny, fish-eye “nose-mode” perspective), the brand didn’t force a campaign.
Instead, they jumped in to amplify what was already happening, engaging with influencers and fans who were already creating this content naturally.
The results were staggering: 680 million views and a cost per view of just $0.0004. The campaign even earned Insta360 a nomination for “Brand of the Year” at the YouTube Streamys.
The lesson learned: Sometimes the best campaign idea is already sitting right in your comment section.
YETI: The “Unknown” Ambassador Program
YETI’s approach to influencer marketing is refreshingly different from most brands.
Instead of chasing celebrities and mega-influencers with millions of followers, YETI built its ambassador program around real outdoor enthusiasts (hunters, fishermen, surfers, chefs, ranchers, and athletes). These are people who genuinely live the lifestyle their products are built for.
Rather than recruiting through influencer marketing agencies or platforms, YETI showed up at community events to discover talent organically. It ran a two-year vetting process for ambassadors to ensure mutual investment and authentic long-term partnerships.
Today, a network of over 500 ambassadors provides authentic user-generated content and product validation, and the brand has grown to nearly $1.8 billion in revenue.
The takeaway is powerful: Choosing creators based on genuine passion over follower count builds a brand community that lasts.
One of the first questions every brand asks is: “How much does this actually cost?”
The honest answer is:It depends!
TikTok influencer pricing varies a lot based on follower count, niche, content format, and a handful of other factors. Here’s a clear breakdown to help you plan your budget without any guesswork.
Influencer cost tiers
Not all creators are priced the same, and that’s actually a good thing. It means there’s a tier that fits almost every budget.
Whether you’re a small business exploring the feasibility of a situation or gauging opinions before fully committing, or an established brand going all in, here’s what you can expect to pay across different influencer tiers on TikTok in 2026.
Influencer tier
Followers
Rate per video
Best for
Nano-influencers
1K – 10K
$25 – $500
Community building, UGC acquisition, niche targeting
A quick tip: Don’t just chase the biggest names. Nano and micro-influencers often deliver better ROI than their pricier counterparts because their audiences are tighter, more engaged, and more likely to actually trust the recommendation.
Core budgeting criteria
Knowing the base rates is just the starting point. Your final campaign cost will be shaped by several other factors that most brands overlook until they’re already negotiating.
Here’s what actually moves the price needle:
Campaign goal & performance metrics
Before you agree to any deal, know what success looks like in numbers. Setting a target Cost Per Acquisition (CPA) or Cost Per Mille (CPM) upfront keeps your spending in check and helps you evaluate whether a creator’s quote is actually worth it. If a creator’s CPM doesn’t align with your targets, it’s okay to simply walk away.
Metric
What it means
Why it matters for budgeting
CPA (Cost Per Acquisition)
Cost to acquire one customer through the campaign
Helps measure direct ROI from influencer spend
CPM (Cost Per Mille)
Cost per 1,000 video views
Great for awareness campaigns with broad reach goals
Engagement rate
Likes, comments, shares relative to views
A high-engagement creator often justifies a higher rate
Conversion rate
Likes, comments, and shares relative to views
Key for sales-focused campaigns via TikTok Shop or links
Usage rights & paid boosting (Spark Ads)
When you want to repurpose a creator’s video as a paid ad (which you absolutely should if it performs well), expect to pay more. Spark Ads let you boost a creator’s organic post directly from their profile, keeping that authentic feel while putting paid spend behind it. Always clarify usage rights before signing any deal.
Usage type
Typical rate increase
Notes
Organic post only
Base rate (no extra charge)
Content lives on the creator’s page only
Spark Ads rights
+20% – 50% on top of the base rate
Brand boosts the creator’s post as a paid ad
Full usage rights (repurpose across channels)
+30% – 100% on top of the base rate
Use on website, email, other paid platforms
Exclusivity clause
+15% – 40% on top of the base rate
Creator agrees not to work with your competitors
Content format
The type of content you request directly impacts what you’ll pay. A simple product mention in an existing video is very different from a fully produced TikTok Shop live session. Here’s how formats generally stack up in terms of pricing.
Content format
Complexity
Typical cost impact
Standard video integration
Low – Medium
Base rate; most common format
Duets or Stitches
Low
Minimal add-on; quick to produce
Green screen challenges
Medium
Slight premium for creative setup
TikTok Shop takeovers / Live shopping
High
Significantly higher; requires real-time hosting, prep, and longer time commitment
Niche premiums
Not all niches are priced equally, and if you’re in a high-value space like finance, tech, or legal, expect to pay more even for the same follower count. That’s because creators in these niches have highly specific, high-intent audiences that are harder to reach and more valuable to advertisers.
Niche
Premium level
Reason
Finance / Investing
Very High
High-intent, high-income audience
Tech / SaaS
High
Niche expertise, trusted by decision-makers
Beauty / Skincare
Medium – High
Large audience, strong purchase intent
Fitness / Health
Medium
Broad but engaged community
Food / Lifestyle
Low – Medium
High volume creators, competitive market
Production requirements
The more hands-on your brief, the more it’ll cost. A casual, phone-shot talking-head video is quick and cheap. Whereas a full production with specific location requirements, custom outfits, or branded props will take more time and effort from the creator, and that time has a price.
Multiple videos, Stories, and Lives bundled together
Key metrics to consider & track for TikTok influencer marketing
Running a TikTok influencer campaign without tracking the right metrics is like driving with your eyes closed. You won’t know what’s working until it’s too late.
These are the numbers that actually matter and what each one tells you about your campaign’s performance.
Average watch time
Average watch time tells you how long, on average, people are actually watching a creator’s video before scrolling away.
On TikTok, this is a big deal because the algorithm heavily favors content that keeps people watching.
If a creator’s videos are holding attention for longer, that’s a strong signal that the audience is genuinely interested and that your brand message is actually being seen, not just skipped past.
Completion rate/retention rate
Completion rate is the percentage of viewers who watch a video all the way to the end, and it’s one of the most honest indicators of content quality.
A high completion rate means the video is compelling enough to hold attention from the first second to the last, which is exactly what TikTok’s algorithm rewards with wider distribution.
When evaluating a creator for your campaign, a consistent completion rate above 25–30% is generally a good sign.
Video views
Video views are the most basic metric, but they still matter, especially for brand awareness campaigns where reach is the primary goal.
On TikTok, views can come from both a creator’s existing followers and completely new audiences through the “For You Page”. This makes the number potentially much larger than the creator’s actual follower count.
That said, views alone don’t tell the whole story, so always look at them alongside engagement and completion data for a fuller picture.
Engagement rate
Engagement rate is the percentage of viewers who actually interact with a video (through likes, comments, shares, and saves) relative to the total views or follower count. It’s one of the best indicators of how connected a creator is with their audience.
A high engagement rate means people aren’t just passively watching; they’re reacting, which is exactly the kind of response you want when promoting a product.
On TikTok, a healthy engagement rate for influencer content generally sits between 3–9%, though nano and micro-influencers often beat this significantly.
Share rate
Share rate measures how often viewers share a video with others, and on TikTok, this is one of the most powerful signals a video can send.
When someone shares a creator’s post to their own followers or via DM, it means the content resonated enough that they wanted other people to see it too.
For brands, a high share rate means your campaign is spreading organically beyond the creator’s existing audience, essentially giving you free additional reach that you didn’t pay for.
Stitch & Duet counts
Stitch & Duet counts show how many other TikTok creators have responded to or remixed a piece of content.
This metric is unique to TikTok and is a strong indicator of cultural traction. It means the content sparked enough of a reaction that other people felt compelled to create their own videos in response.
For influencer campaigns, a high Stitch or Duet count is a great sign that your content is generating real conversation and community buzz. This naturally extends your campaign’s reach without any extra spend.
Click-through rate (CTR)
Click-through rate (CTR) measures how many people clicked on a link in the creator’s bio, a TikTok Shop product tag, or a paid Spark Ad after watching the video. This is the bridge between content performance and actual business results.
A strong CTR tells you the video did its job. It captured attention and created enough curiosity or desire that viewers wanted to take the next step.
For reference, a CTR of 1–3% on TikTok is generally considered solid for influencer-driven content.
Conversion rate
Conversion rate tells you what percentage of the people who clicked actually completed the action you wanted. No matter if that’s making a purchase, signing up for something, or downloading an app.
This is the metric that directly ties your influencer spend to real business outcomes. Tracking this properly requires unique promo codes, UTM parameters, or TikTok Shop affiliate links so you can attribute sales back to specific creators with confidence.
Cost per acquisition (CPA)
Cost Per Acquisition (CPA)is the total amount you spent divided by the number of customers or leads you actually got from a campaign. It’s the clearest way to measure whether your influencer investment was worth it.
If your CPA is lower than what you’d typically pay through paid ads or other channels, your influencer campaign is doing its job efficiently.
Tracking CPA across different creators also helps you figure out which partnerships deliver the best bang for your buck, so you know exactly who to work with again.
How to effectively measure TikTok influencer marketing ROI
Getting influencer content live is only half the job; the other half is knowing whether it actually worked.
Measuring ROI on TikTok isn’t always straightforward, but with the right systems in place, you can get a very clear picture of what your spend is actually delivering.
Here are the key strategies for tracking TikTok’s ROI properly:
Assign dedicated tracking mechanisms
This is the foundation of any solid measurement setup!
Give every creator a unique promo code(like “SARAH07”) so you can directly attribute purchases to their content. Pair that with custom UTM-tagged URLs so your analytics tools can track exactly where traffic is coming from. And don’t underestimate post-purchase surveys.
A simple “How did you hear about us?” question at checkout is surprisingly powerful for capturing TikTok-driven sales that don’t always show up cleanly in your attribution data. This is especially when someone watches a video, closes the app, and buys later.
Monitor platform-specific KPIs
TikTok has its own set of signals that tell you if a campaign is truly resonating.
Keep a close eye on engagement and saves. A high save count means people are bookmarking the content to come back to it, which is a strong purchase-intent signal. Besides, track click-through rates on any linked content or TikTok Shop tags, and watch for branded search lift.
If people are suddenly Googling your brand name or searching for you on TikTok itself after a campaign drops, that’s a clear sign your influencer content is creating real awareness beyond the immediate view count.
Calculate true profitability
To know if your campaign was actually worth it, you need to look at the full financial picture.
Start with your total investment. That’s creator fees, product costs, usage rights, and any Spark Ads spend combined.
Then calculate your Customer Acquisition Cost (CAC)by dividing that total by the number of new customers generated.
Finally, factor in Earned Media Value (EMV), i.e.,the estimated value of the organic reach, UGC, and word-of-mouth your campaign generated beyond paid placements.
This gives you a much more honest picture of what your influencer spend truly returned.
Run holdout tests (incrementality)
This one’s underused but incredibly valuable!
A holdout test works by splitting your audience into two groups. One that sees your influencer campaign and one that doesn’t, and then comparing the purchase behavior between them.
The difference in conversion rates between the two groups is your true incremental lift, meaning the sales that happened specifically because of the campaign, not just organically.
It removes the guesswork around whether your influencer content actually moved the needle or if those customers would have bought anyway. Even a simple version of this test can completely change how you evaluate creator partnerships going forward.
The impact of TikTok influencer marketing on consumer behavior
TikTok hasn’t just changed how brands market; it’s fundamentally changed how people discover, evaluate, and buy products.
From snapping up a skincare product mid-scroll to building brand loyalty through creator communities, the platform is reshaping consumer behavior in ways no other channel has done before.
Here’s exactly how it’s happening:
High impulse & discovery-based purchasing
TikTok is basically the world’s most effective impulse-buying machine right now. With 55% of TikTok users making impulse purchases on the app, the platform has turned casual scrolling into a shopping event.
A huge part of this is driven by the “TikTok Made Me Buy It (TMMBI)” phenomenon. The hashtag has accumulated a staggering 80 billion views from over 20 million posts, with products like the Stanley Cup and Dyson Airwrap going from niche items to sold-out sensations almost overnight.
TikTok’s algorithm is specifically wired to keep showing you content that matches your interests. This means the right product video lands in front of the right person at exactly the right emotional moment, and that’s a very powerful recipe for unplanned purchases.
Trust & relatability over aspiration
What makes TikTok influencer marketing so uniquely effective is the type of trust it creates. People aren’t buying from polished celebrities living unreachable lifestyles. Instead, they’re buying based on recommendations from everyday creators who feel like friends.
This “everyday expert” effect is real and measurable: 92% of consumers trust user-generated content and peer reviews more than traditional ads for unplanned purchases.
When a regular person shows you a product working in their actual bathroom or kitchen, that social proof hits differently than any TV commercial ever could. It feels honest, relatable, and low-risk, which makes the decision to buy a whole lot easier.
Accelerated trend cycles
TikTok has completely compressed the timeline from “unknown product” to “mainstream must-have”.
What used to take months or even years to trend now happens in days. Viral challenges, hashtag trends, and user-generated content can propel specific products or aesthetics into mainstream popularity within days, creating microtrends and accelerating the consumer cycle.
What’s particularly interesting is the democratization this creates. A small brand with zero ad budget can go viral just as fast as a big-name company if their product resonates on the platform.
A creator with 8,000 followers can start a trend that a brand with 8 million followers couldn’t manufacture. That’s a genuinely new dynamic in consumer culture.
Direct conversion (frictionless shopping)
One of the biggest behavioral shifts TikTok has driven is the collapse of the gap between discovery and purchase. Thanks to TikTok Shop, product tags, and in-app checkout.
Now, consumers no longer need to leave the app, search Google, find the website, and then decide to buy. The entire journey now happens in one seamless flow.
Over 71 million users made purchases through TikTok Shop in 2025, with that number continuing to rise in 2026. This shows that consumers are increasingly comfortable buying directly from the app without visiting external websites.
This frictionless path from content to checkout is genuinely changing how purchase decisions are made. They’re faster, more emotional, and increasingly in-the-moment.
Potential for buyer’s regret
Here’s the side of TikTok commerce that doesn’t get talked about enough. Not every impulse purchase lands well.
When people buy quickly based on a 30-second video, the product doesn’t always live up to the hype, and that gap between expectation and reality is called post-purchase dissonance.
More than one in four TikTok users have regretted their impulse purchases, with Gen X users being most likely to experience this remorse at 31%, compared to 25% of both Gen Z and millennial users.
For brands, this is an important signal; the sale isn’t the finish line. Following up with strong post-purchase communication, honest product representation in creator briefs, and easy returns can turn a potentially regretful buyer into a loyal repeat customer.
No matter if you’re just starting out or looking to scale fast, working with the right TikTok influencer marketing agency or platform can save you a ton of time and get you significantly better results.
From full-service agencies that handle everything end-to-end to self-serve marketplaces that put you in the driver’s seat, here are five of the best options worth knowing about in 2026.
Ubiquitous
Ubiquitous is a full-service TikTok influencer marketing agency with over 14,000 creators in their network, covering a combined 27 billion followers.
What makes them stand out is their data-driven approach. They focus on median views and historical performance rather than just follower counts, so you’re actually matched with creators who consistently deliver.
They’ve worked with brands like Amazon, Disney, Netflix, and Adobe, handling everything from creator sourcing and negotiation to content briefing and Spark Ads amplification.
The Influencer Marketing Factory
The Influencer Marketing Factory is known for its creative-first approach and end-to-end influencer marketing support, from defining brand objectives and KPIs through to influencer selection and campaign execution.
With offices in Miami and New York and a globally distributed team, they’ve run campaigns for major names like Google, Hasbro, Amazon, and Bud Light.
They’re a solid pick for brands that want a structured, metrics-driven campaign without sacrificing creative quality.
Collabstr
Collabstr is a self-serve marketplace where brands can search thousands of vetted TikTok, Instagram, and YouTube influencers for free. You only pay once you’ve approved the creator’s content.
There are no subscriptions or hidden fees, which makes it a great starting point for smaller brands or anyone wanting to test influencer marketing without a big upfront commitment.
Their platform has facilitated over 21,000 collaborations and hosts more than 200,000 creators, with real-time tracking built right into the dashboard.
Viral Nation
Viral Nation is a global TikTok influencer marketing agency with access to over 18,000 vetted creators. It offers everything from strategy and content production to paid media integration and AI-powered brand safety tools.
It’s particularly well-suited for enterprise brands and has delivered campaigns for clients in 30+ countries. Besides, it has worked with Fortune 500 companies, including Amazon, Microsoft, and Tencent.
Above all, its social media campaigns have engaged over a billion customers and reduced customer acquisition costs for clients by 42%.
JoinBrands
JoinBrands connects brands with over 100,000 US-based content creators for TikTok, YouTube, Instagram, and Amazon campaigns. Brands own full licensing and distribution rights to all content created.
It’s especially popular with DTC and eCommerce brands because it integrates directly with TikTok Shop, giving you clear visibility into which creators are actually driving sales.
Pricing starts with a pay-as-you-go plan at $0 per month, making it one of the more accessible options for brands at any stage.
Major benefits of TikTok influencer marketing for brands & businesses
TikTok influencer marketing isn’t just another line item in your marketing budget; it’s one of the highest-ROI channels available to brands right now.
From building genuine trust with new audiences to driving direct purchases in-app, here’s why more brands are doubling down on it in 2026.
Unmatched engagement & reach
TikTok’s algorithm is uniquely built to push content beyond a creator’s existing followers, which means your brand can reach completely new audiences without paying extra for it.
With engagement rates sitting at 3.70%, far ahead of Instagram and other major platforms, influencer content on TikTok doesn’t just get seen; it gets genuinely interacted with.
For brands, that kind of organic reach and active engagement is incredibly hard to replicate anywhere else.
Deepening trust & social proof
People buy from people they trust, and TikTok creators have already built that trust with their audiences long before you enter the picture.
When a creator vouches for your product in their own words and style, it carries far more weight than any traditional ad ever could.
92% of consumers say they trust peer recommendations and UGC over branded content, which is exactly why influencer-led campaigns consistently outperform standard brand-produced ads on the platform.
Tapping into niche communities
One of TikTok’s biggest strengths is just how specific its communities get. From #BookTok and #SkinTok to #FitnessTok and #FinTok, there’s a tight-knit community for virtually every niche out there.
Partnering with creators inside these spaces lets your brand speak directly to a hyper-relevant, already-engaged audience instead of casting a wide net and hoping for the best. That kind of precision targeting is genuinely difficult to achieve through paid ads alone.
Direct sales through TikTok Shop
TikTok Shop has completely changed the game by turning content into a checkout experience. Now, viewers can go from watching a creator’s video to completing a purchase without ever leaving the app.
TikTok Shop hit $23.4 billion in US GMV with conversion rates averaging 4.7%, i.e., well above what most traditional e-commerce channels deliver.
For brands, this means every piece of influencer content has the potential to be a direct revenue driver, not just an awareness play.
Highly cost-effective
Compared to traditional advertising and even influencer marketing on other platforms, TikTok gives you more value for your money, especially when you work with nano and micro-influencers.
Over 80% of TikTok influencer collaborations cost under $300, which means even brands with modest budgets can run effective, multi-creator campaigns without overspending.
Add in the organic reach TikTok’s algorithm provides on top of that, and your actual cost per impression ends up being remarkably low compared to most other paid channels.
Best practices to follow for guaranteed TikTok influencer marketing success
Getting results on TikTok isn’t just about throwing money at creators and hoping something sticks. The brands that consistently win on this platform follow a clear set of practices that maximize every dollar they spend.
Here’s what actually works:
Rely on authentic storytelling over high-production value
TikTok users have a sixth sense for content that feels fake or overly polished, and they scroll right past it. Raw, real, and relatable beats glossy and scripted every single time on this platform.
Let creators tell your brand’s story in their own natural way, even if that means a slightly imperfect video shot on a phone in their bedroom. That authenticity is exactly what drives clicks and conversions.
Grant creators creative freedom
You hired a creator in the first place because their audience trusts them, so let them do what they do best. Give them a solid brief that covers your key message and non-negotiables, but don’t script every word or dictate every shot.
Creators who are given room to put their own spin on branded content consistently produce higher-performing videos. This is because the content feels native to their channel rather than like a paid placement.
Target micro-influencers
If budget efficiency and genuine engagement are priorities (and they should be), micro-influencers are your best bet. They have tighter, more loyal audiences that actually listen to their recommendations, and they cost a fraction of what macro or mega-influencers charge.
Running campaigns with multiple micro-creators simultaneously also spreads your risk and gives you a much wider pool of content to test and optimize from.
Track with clear KPIs
Before any campaign goes live, lock in exactly what success looks like in numbers. Whether it’s a target engagement rate, a cost-per-acquisition cap, a minimum click-through rate, or a TikTok Shop conversion goal, having clear KPIs from day one keeps your spend accountable.
Plus, they make it easy to evaluate which creators and content formats are actually delivering. Without them, you’re just guessing!
Utilize Spark Ads
When a piece of influencer content performs well organically, don’t just let it sit there; amplify it. Spark Ads let you boost a creator’s existing post as a paid ad directly from their profile, which keeps the authentic feel intact while dramatically extending the content’s reach.
This is one of the highest-ROI moves in TikTok marketing right now because you’re putting paid budget behind content that’s already been proven to resonate.
Test & learn
No two creators, niches, or audiences are exactly the same, so treat every campaign as a learning opportunity. Run small tests with multiple creators, different content formats, and varying hooks before scaling what works.
The brands that grow fastest on TikTok are the ones that move quickly, analyze results honestly, and aren’t afraid to cut what’s not working and double down on what is.
Build long-term relationships
One-off collaborations are fine for testing, but the real magic happens when you invest in ongoing creator partnerships. When a creator works with your brand repeatedly, their audience starts to associate your product with someone they trust on a regular basis.
And that repeated exposure builds the kind of brand familiarity that actually shifts buying behavior. Long-term partners also produce better content over time because they genuinely get to know your brand inside and out.
Useful tips for starting your own TikTok influencer marketing campaign
Starting a TikTok influencer campaign for the first time can feel a little challenging, since there are a lot of moving parts. But if you break it down into the right steps, it’s actually pretty straightforward.
Here are four practical tips to help you launch with confidence and get real results from day one:
Tip #01: Identify the right influencers
Don’t get distracted by big follower numbers; engagement is what actually matters. A creator with 15K highly engaged followers will almost always outperform one with 500K passive ones.
Before reaching out, dig into their audience demographics to make sure there’s a genuine overlap with your target customers. There’s no point in paying for reach that won’t convert.
Use TikTok’s own Creator Marketplace as your starting point. It gives you real performance data, audience insights, and filtering tools that make shortlisting the right creators a whole lot faster and more reliable.
Tip #02: Focus on genuine storytelling
The golden rule on TikTok is simple:if it feels like an ad, it won’t perform like one.
Let the influencer take the lead on how they present your product. Their audience follows them for their voice, not yours.
Embrace what makes TikTok unique (trending sounds, native formats, humor, and real-life situations). This is because content that fits the platform’s culture always outperforms content that feels imported from Instagram or YouTube.
Just make sure you give creators a clear brief upfront so they understand your key message, any must-include details, and your brand’s boundaries. Then step back and let them do their thing.
Tip #03: Track & measure success
Before anything goes live, get crystal clear on what you’re actually trying to achieve, i.e., more sales, brand awareness, app downloads, or follower growth. This is because your goal shapes everything else about how you measure success.
Set up trackable incentives like unique promo codes, custom affiliate links, or UTM-tagged URLs for every creator so you can directly attribute results to specific partnerships.
Once the campaign is live, monitor performance consistently. Track views, engagement rate, click-throughs, and conversions, and use that data to figure out what’s working, what’s not, and where to put your money next time.
Tip #04: Leverage paid ads & repurposing
When a creator’s video starts performing well organically, that’s your cue to amplify it with Spark Ads. Boosting it as a paid ad straight from the creator’s profile keeps the authentic feel intact while putting real reach behind it.
Don’t let good UGC go to waste either. Top-performing creator content can be repurposed across your own social channels, email campaigns, and product pages, where it often converts better than traditional brand-produced creative.
And finally, don’t just post and ghost. Interact with comments, respond to stitches and duets, and engage with the community your campaign generates. TikTok rewards brands that show up like real participants, not just advertisers.
Common TikTok influencer marketing mistakes to avoid
Even brands with solid budgets and good intentions can fall flat on TikTok if they’re making the wrong moves. The good news is that most of these mistakes are completely avoidable once you know what to look out for.
Here are the six most common ones, and exactly how to fix them:
Over-scripting & controlling the content
When brands hand creators a word-for-word script and demand they stick to it, the content almost always falls flat.
TikTok audiences can immediately tell when a video feels forced or unnatural, and they scroll straight past it.
The impact? Low engagement, poor watch time, and wasted spend.
The fix is simple: Give creators a solid brief with your key message and non-negotiables, then trust them to deliver it in their own voice. That’s literally what their audience showed up for!
Focusing solely on follower count
Chasing big follower numbers without checking engagement is one of the most expensive mistakes you can make.
A creator with a million followers and a 0.5% engagement rate is far less valuable than one with 30K followers and a 9% engagement rate.
The impact is real. Low engagement means your message isn’t landing, no matter how many people technically “saw” it.
Always vet creators based on engagement rate, audience quality, and content relevance first, and treat follower count as a secondary data point.
Treating TikTok like a hard-sell infomercial
TikTok is not the place for aggressive, buy-now-or-miss-out sales tactics. Users come to the platform to be entertained, informed, and inspired, not pitched.
Brands that push hard-sell content see their videos decline in reach because TikTok’s algorithm actively deprioritizes low-engagement posts.
The fix is to lead with value (entertainment, education, humor, or relatability) and let the product recommendation feel like a natural part of the story rather than the whole point of the video.
Neglecting clear calls to action (CTAs)
Great content without a clear next step is a missed opportunity every single time. If viewers watch a video, love the product, but have no idea where to go or what to do next, they just move on.
The impact is poor conversion despite solid views and engagement. The fix is to always include a simple, specific CTA phrase, whether that’s a link in bio, a promo code, a TikTok Shop tag, or a direct “comment below”.
Always make it easy for interested viewers to take the next step without having to think too hard.
Ignoring FTC disclosure guidelines
This one isn’t just a marketing mistake; it can actually get your brand into legal trouble.
The FTC requires that paid partnerships be clearly disclosed, and TikTok’s own branded content policies align with this.
When creators don’t properly label sponsored content with tags like #ad or #sponsored, it misleads viewers and erodes trust when they find out.
The fix is straightforward: Make proper disclosure a non-negotiable part of every creator brief, and confirm it’s in place before any content goes live.
Failing to track campaign metrics
Running a campaign without tracking its performance is like spending money with your eyes closed. If you’re not measuring what’s actually working, you have no way to improve, optimize, or justify future spend.
The impact is wasted budget on partnerships and content that may not be delivering any real results.
However, the fix is to set clear KPIs before launch, i.e., engagement rate, CTR, promo code redemptions, or TikTok Shop conversions. Moreover, review the data consistently throughout the campaign so you can make smart, informed decisions in real time.
Get started with TikTok influencer marketing today!
There’s never been a better time to tap into TikTok influencer marketing. The audience is there, the tools are better than ever, and the ROI speaks for itself. The only thing left is to actually get started!
No matter if you’re a brand manager, a social media marketer, or a content creator looking to streamline your workflow, Replug is the all-in-one link management platform built to make your TikTok campaigns sharper and more precisely trackable.
A complete link management solution
for marketing professionals & agencies.
Try Replug for free
With Replug’s custom URL shortener, you can create clean, branded short links for every influencer campaign, making it easy to track clicks, attribute traffic, and measure exactly where your conversions are coming from.
And if you’re just warming up, Replug also offers free tools to make your TikTok life easier. This includes a free TikTok caption generator to craft scroll-stopping captions in seconds and a free TikTok video downloader to save and repurpose top-performing content without any hassle.
Start smart, track everything, and let the results do the talking!
Frequently asked questions
How to create a TikTok influencer marketing strategy that drives sales, for sure?
Here’s how to create one:
1. Start by defining your goal. 2. Then find creators whose audience matches your target customers. 3. Brief them clearly, but give them creative freedom. 4. Use trackable promo codes or affiliate links, amplify top-performing posts with Spark Ads, and review your metrics consistently to double down on what’s actually working.
How can I use TikTok influencer marketing to drive ecommerce conversions?
Ecommerce influencer marketing on TikTok works best when you combine authentic creator content with TikTok Shop product tags, affiliate links, and in-app checkout.
Tutorials, GRWM videos, and honest product reviews tend to convert the highest because they show the product in real, relatable use (removing hesitation before the purchase decision).
Can small businesses and brands also benefit from TikTok influencer marketing?
Absolutely! Small businesses are actually in a great position because nano and micro-influencers (who are very budget-friendly) deliver some of the highest engagement rates on the platform.
You don’t need a massive budget to see real results; you just need the right creator and a genuine product worth talking about.
Is TikTok influencer marketing effective for all industries in 2026?
It works best for consumer-facing industries like beauty, fashion, food, fitness, tech, and home goods. That said, even B2B brands and service-based businesses are finding success by tapping into niche creator communities.
Resources like the influencer marketing hub TikTok section can help you benchmark what’s working in your specific industry.
Why does TikTok influencer marketing work for product brands?
TikTok’s format (short, engaging, and algorithm-driven) is perfectly built for product discovery. Creators can show your product in action in a way that feels organic rather than advertised, and TikTok Shop makes the path from “I want that” to “I just bought that” incredibly short and frictionless.
What types of influencer marketing campaigns perform best on TikTok?
Product tutorials, GRWM videos, unboxing videos, and branded hashtag challenges consistently perform the best. Affiliate and promo code campaigns are top performers for direct conversions, while challenges drive the most organic participation and UGC.
Also, the TikTok Creative Center is a great place to research trending content formats and sounds before planning your campaign.
Why is TikTok a game-changer for influencer marketing in 2026?
TikTok’s algorithm gives every piece of content a genuine shot at going viral, regardless of the creator’s follower count.
Combined with TikTok Shop’s seamless in-app purchasing and one of the highest engagement rates of any social platform, it creates a rare combination of reach, trust, and direct buyingpower that no other platform currently matches.
How does TikTok influencer marketing differ from other channels?
Unlike Instagram or YouTube, TikTok’s discovery engine pushes content to new audiences organically; you’re not just talking to existing followers.
The TikTok Influencer Program also gives brands a structured, native way to find and collaborate with vetted creators directly on the platform. This ultimately streamlines the whole process compared to manual outreach on other channels.
What are some of the most inspiring TikTok influencer marketing success stories?
Some standout examples include:
– Brand Pierre, which leveraged TikTok creators to build massive organic buzz around their products. – Candy Funhouse, whose creator collaborations turned them into one of the most recognizable candy brands on the platform. – Klassy Network, which used micro-influencer content to drive serious direct sales.
Netflix’s #CobraKaiChop challenge is another great one. It got fans actively participating and generating millions of views, building hype for the show entirely through community-driven content.
Each of these worked because they met TikTok’s audience where they already were!
Music has always been about sharing: a song that gets you through a rough day or a playlist that perfectly captures a road trip. And with Spotify now crossing 760 million monthly active users globally, chances are your friends and family are already on it too.
No matter if you’re curating the ultimate party mix or sending a feel-good playlist to someone going through a hard time, knowing how to share a Spotify playlist is one of those small things that genuinely brings people closer.
It’s easier than most people think, and way more personal than just texting a song title. So let’s start from the very beginning: creating your playlist and getting it share-ready.
How to create and share a Spotify playlist
Before you can share your music with anyone, you need a playlist worth sharing. In this section, we’ll walk you through creating your first (or next) Spotify playlist, and don’t worry, the sharing part is coming up shortly in the sections below.
How to create a playlist on Spotify on mobile (iOS & Android)
Creating a playlist on Spotify’s mobile app is straightforward. Whether you’re on an iPhone or an Android device, the steps are exactly the same.
Here’s how to create a Spotify playlist and share link (step-by-step):
Step#01: Open the Spotify app
Grab your phone and tap the “Spotify” icon to launch the app. Make sure you’re logged into your account before proceeding.
Step#02: Tap “Your Library”
Hit the “Your Library” tab at the bottom center of your screen. This is where all your saved music, podcasts, and playlists live.
Step#03: Tap the “+” icon
Look for the “+” icon at the top right corner of the your library screen and tap it. This is your starting point for creating something new.
Step#04: Select “Playlist”
A small menu will pop up with a couple of options. Tap “Playlist” to begin setting up your new playlist.
Step#05: Enter a name for your playlist
Type in a name that fits the vibe (whether it’s “Favorite Hits 2026,” “Sunday Morning Chill,” or “Gym Hits 2026”). Make it something you and your friends will instantly get.
Step#06: Tap “Create”
Hit the “Create” button, and that’s it. Your playlist is officially live!
Now you can start adding songs to it and get it ready to share!
How to create a playlist on Spotify on desktop (PC & Mac)
Prefer using a PC over a smartphone?
Creating a playlist on Spotify’s desktop web player is just as simple. Follow these steps, and you’ll have one ready in under a minute:
Step#01: Go to open.spotify.com
Open any browser on your PC or Mac and head over to open.spotify.com. This is Spotify’s official web player, so no app download is needed.
Step#02: Click the “Log in” button & sign in
Hit the “Log in” button at the top right corner of the page and enter your Spotify credentials. You can also sign in quickly using your Google, Facebook, or Apple account.
Step#03: Click the “Create playlist” button
Once you’re in, look for the “Create Playlist” button on the left-hand sidebar. One click and Spotify will instantly generate a blank playlist for you.
Step#04: Customize the playlist name & photo
Click on the default playlist name to rename it to something that fits your theme. You can also upload a custom cover photo by hovering over the playlist image area. A small touch that makes your playlist feel a lot more personal!
How to share Spotify playlist on phone
Now that your playlist is ready, it’s time to share it!
Sharing a Spotify playlist from your phone takes less than a minute, and the steps are identical, no matter if you’re on an iPhone or an Android device.
Here’s exactly what to do:
Step#01: Open the Spotify app
Tap the “Spotify” icon on your phone to open the app and make sure you’re logged into your account.
Step#02: Tap “Your Library”
Head to the “Your Library” tab at the center bottom of your screen. All your created and saved playlists will be right there waiting for you.
Step#03: Select the playlist
Scroll through your library and tap on the specific playlist you want to share. This will open it up fully.
Step#04: Tap the three dots (⋮) icon
Look for the three vertical dots (⋮) icon next to the share icon on the playlist page and tap it. This opens up a menu with several options for that playlist.
Step#05: Tap “Share”
From the menu that appears, tap the “Share” option. Spotify will immediately pull up sharing options for you.
Step#06: Tap “Copy link”
Tap “Copy link” to copy the playlist’s unique URL straight to your clipboard. You won’t see any confirmation pop-up; it copies silently, so don’t tap it twice.
Step#07: Share the copied link anywhere
Now paste that link wherever you like, i.e., inside a WhatsApp chat, Instagram DM, text message, email, or even a Tweet. Anyone who taps it will be taken directly to your playlist on Spotify.
📝 Note: Besides copying the link, Spotify also gives you two other handy sharing options. Invite Collaborators(so friends can add songs to your playlist) and Show Spotify Code(a scannable code that opens your playlist instantly).
How to share Spotify playlist on desktop
Sharing a playlist from your desktop is just as quick and hassle-free as doing it from your phone.
Whether you’re on a PC or a Mac, the process is the same. Just a few clicks and your playlist link is ready to go.
Here’s how:
Step#01: Go to open.spotify.com
Open your preferred browser and navigate to open.spotify.com. No app installation required; the web player works just fine for this.
Step#02: Click the “Log in” button & sign in
Hit the “Log in” button at the top right and sign in with your Spotify credentials. Use whichever login method you set your account up with (email, Google, Facebook, or Apple).
Step#03: Click the playlist in your left sidebar
Find your playlist listed in the left-hand sidebar and click on it. This will open the playlist in the main window.
Step#04: Click the three dots (…)
Now, click the three horizontal dots (…) icon that appears next to the invite collaborators icon. This opens up the playlist options menu.
Step#05: Select “Share”
From the dropdown menu, hover over or click “Share” to reveal the sharing options available for your playlist.
Step#06: Click “Copy link to playlist”
Click on “Copy link to playlist,” and the URL will be instantly copied to your clipboard, ready to be pasted anywhere you need it.
Step#07: Paste the copied link anywhere
Now simply paste the link into an email, a Slack message, a DM, or wherever you want to send it. The recipient just clicks it and lands directly on your playlist.
📝 Pro Tip:Prefer a faster route? Simply right-click the playlist directly from the left-hand sidebar and select “Share” from the context menu. No need to open the playlist page at all!
How to share Spotify playlist to Apple Music
Want to send your playlist to someone who uses Apple Music instead of Spotify?
Apple actually has a built-in music transfer feature that makes moving playlists between the two platforms surprisingly simple.
Here’s how to get it done:
Step#01: Go to Settings → Apps → Music
Open the “Settings” app on your iPhone, scroll down to “Apps”, and tap on “Music”. This is where Apple keeps its music transfer options tucked away.
Step#02: Tap “Transfer music from other music services”
Inside the “Music” settings, tap on “Transfer music from other music services”. This feature is Apple’s native tool for pulling in playlists and songs from third-party streaming platforms.
Step#03: Pick “Spotify” from the list
You’ll see a list of supported music services. Tap on “Spotify”. If prompted, sign in to your Spotify account to authorize the transfer.
Step#04: Select the specific playlist to share
Browse through your Spotify playlists and select the one you want to transfer over. You can typically move one playlist at a time through this method.
Step#05: Tap “Add to Library”
Hit “Add to Library,” and Apple Music will start matching and importing the songs into your Apple Music library. Some tracks may not transfer if they aren’t available on Apple Music.
How to share Spotify playlist to YouTube Music
Not everyone you know is on Spotify; some of your friends might be die-hard YouTube Music users.
The good news is that YouTube Music has a built-in playlist transfer feature that lets you move your Spotify playlists over with minimal effort.
Here’s how to do it step-by-step:
Step#01: Open the YouTube Music app
Launch the “YouTube Music” app on your phone. Make sure you’re on the latest version of the app to ensure the transfer feature is available.
Step#02: Tap your profile picture
Tap your profile picture at the top right corner of the screen. This opens up your account menu and settings options.
Step#03: Go to Settings → Privacy & data
From the account menu, tap “Settings” and then navigate to “Privacy & data”. This is where YouTube Music keeps its data and transfer-related options.
Step#04: Tap “Transfer playlists from other apps”
Look for the “Transfer playlists from other apps” option and tap it. YouTube Music will now show you a list of supported platforms to transfer from.
Step#05: Select “Spotify” from the available options
From the list of supported services, tap on “Spotify”. This tells YouTube Music which platform it needs to connect to for the transfer.
Step#06: Log in to authorize the connection
You’ll be prompted to sign in to your Spotify account. Go ahead and log in. This simply gives YouTube Music permission to access your Spotify playlists.
Step#07: Select the playlist you want to share
Browse through your Spotify playlists and tap on the one you’d like to transfer. Pick carefully, especially if you have a lot of playlists to choose from.
Step#08: Confirm the transfer
Hit “Confirm” and YouTube Music will get to work importing your playlist. Tracks that are available on YouTube Music will be matched and added automatically to your library.
📝 Note: If you don’t see Spotify listed as an available option, don’t worry. Simply use a trusted third-party service like “Soundiiz” or “TuneMyMusic” to transfer your playlists from Spotify to YouTube Music hassle-free.
Creating and sharing a playlist is one thing; keeping it well-organized and enjoyable is another. A little smart management goes a long way in making your playlists feel intentional rather than cluttered.
Here are five practical tips to help you stay on top of your Spotify playlists like a pro:
Tip #01: Curate a “Holding Inbox” for new discoveries
Create a dedicated playlist called something like “Inbox” or “New Finds” where you dump every new song you come across. This keeps your main playlists clean while giving you a space to properly evaluate new tracks before adding them permanently.
Tip #02: Utilize desktop playlist folders to group by vibe or year
On the Spotify desktop app, you can create “folders” to organize your playlists into categories. Think “Workout,” “Late Night,” or “2026 Favorites”. It’s a simple habit that saves you a lot of scrolling time, especially if you have dozens of playlists built up over the years.
Tip #03: Take advantage of batch-editing shortcuts
On desktop, you can select multiple songs at once by holding Ctrl (Windows) or Cmd (Mac) and clicking tracks. This makes it easy to move, remove, or reorder several songs in one go rather than doing it one by one.
Tip #04: Use the search bar to refine and filter your tracks
Did you know you can search within a playlist? Just open your playlist and use the search bar at the top to quickly find a specific song or artist without endlessly scrolling through hundreds of tracks.
Tip #05: Enable smart shuffle & filter out bad recommendations
Spotify’s “Smart Shuffle” feature adds recommended songs to your playlist session on the fly. If a suggestion doesn’t fit the vibe, simply tap the minus (−) button next to it to remove it from the recommendation queue. This also trains Spotify to get better at reading your taste over time.
How Replug makes Spotify playlist sharing smarter in 2026
Once you have your playlist link ready, why share a messy, long URL when you can make it look clean and professional?
Replug is an all-in-one link management platform that lets you shorten, brand, and track your links effortlessly.
Its custom link shortener lets you generate a personalized branded short URL within seconds. So instead of a cluttered Spotify URL, you’re sharing something sleek like yourbrand.co/summer-playlist.
Maximize marketing ROI
by transforming ordinary URLs into branded short links that convert.
Try Replug for free
Replug also offers a dedicated Spotify link shortener and a Spotify QR code generator, making it incredibly easy to share your playlists across social media, bios, or even printed materials.
It’s a small upgrade that makes a big difference. Must give it a try!
Frequently asked questions
How to share Spotify playlist link?
Here’s how to do it:
Open the playlist → tap the three dots menu → hit “Share” → and then tap “Copy link”.
You can now paste that link anywhere (a text message, DM, email, or social media post).
How to share Spotify playlist with kids account?
Here’s how to do it:
1. Open the main “Spotify” app on your device and make sure the playlist you want to share is set to “Public”. You must be the original creator of the playlist. 2. Launch the “Spotify Kids” app on your child’s device or your own. 3. On the “Who’s Listening?” screen, tap the “Grown Ups” icon and enter your 4-digit PIN. 4. Pick the specific kid’s profile you want to share the playlist with. 5. Tap on “Shared Playlists”, scroll to find your desired playlist, and tap “Share”.
Your child will now be able to find the playlist in the “Shared with you” section on their homepage.
How to share Spotify playlist with family members?
Simply copy the playlist link (via the three dots → Share → Copy Link) and send it to your family member directly over WhatsApp, iMessage, or any messaging app. If you’re on a “Spotify Family plan”, you can also invite them as collaborators to add songs together.
How to share Spotify playlist to another account?
Simply copy the playlist link and send it to the other account’s owner. As long as the playlist is set to “Public”, anyone with the link can open and follow it on their own Spotify account. No special permissions needed!
How to share a playlist on Spotify without Premium?
You don’t need Premium for this at all!
Playlist sharing is available on the free Spotify tier as well. Just copy the link and share it. The recipient can listen to it whether they’re on free or Premium, though free users will experience shuffle-only playback on mobile.
How to share Spotify playlist to Amazon Music?
Amazon Music doesn’t have a native Spotify import feature built in yet. Your best bet is to use a third-party tool like “Soundiiz” or “TuneMyMusic” to transfer your Spotify playlist directly into your Amazon Music library in just a few steps.
How to share Spotify playlist with someone who is not your friend?
No Spotify “friendship” is required to share a playlist. Just make sure your playlist is set to “Public”, copy the link, and send it to anyone. They can open and follow it even if you’re not connected on Spotify at all.
How do you give someone access to your Spotify playlist?
Open the playlist, tap the three-dot menu, and select “Invite Collaborators”. Share the invite link with whoever you want. Once they accept, they’ll be able to add and remove songs from the playlist just like you can.
How do I share a Spotify playlist to another phone?
The process is the same regardless of the device. Copy the playlist link from your phone and send it to the other person via any messaging app. Once they tap the link on their phone, it’ll open directly in their Spotify app.
How to make a collaborative playlist on Spotify?
To make a Spotify collaborative playlist, open the app, create or select a playlist, and tap the “Invite Collaborators” button. It is the silhouette of a person with a plus sign. Copy the link and send it to your friends so they can start adding songs.
Have you ever noticed a “thank you” page pops up as soon as you complete an online purchase?Sometimes, e-commerce stores recommend products based on your previous purchases or showcase relevant products buyers purchase along with those products.
You might wonder how this happens. Well, the secret behind all this is something called conversion pixels.
I’ll explain the conversion pixels in a jiffy, but let’s discuss the pixels first.
What’s a pixel?
Pixel is a code inserted into a website, mobile app, or email. The purpose behind adding a pixel to a website or any other online real estate is to track a user’s activity.
The pixel observes the user behavior and reports back to the main source. Thus, it opens up a floodgate of opportunities for digital marketers, online businesses, and e-commerce stores to reach out to the same audience through retargeting.
What is retargeting?
Retargeting is an advertising strategy that allows brands and entrepreneurs to remarket the products or services to the audience that has visited their websites or used their apps. All this becomes possible due to the pixel.
Almost all major social media platforms provide pixels for advertisers. It helps marketers track website visitors and better understand how they interact with the products and content.
What’s a conversion pixel?
A conversion pixel is a piece of code placed on e-commerce websites and apps to track the conversions that occur on the websites, sales pages, and emails.
A conversion pixel is crucial to tracking conversions on websites and apps as it reports to the advertiser when a conversion event occurs. Usually, advertisers use conversion pixels to track the sales performances of their marketing campaigns.
Its code is embedded in the “payment successful” or “thank you for the purchase” pages on an e-commerce website.
When the conversion happens, the conversion pixel triggers a signal and the event gets recorded for the advertiser’s record.
If you ever run a Facebook ad campaign for generating sales on your website, the Meta Pixel is used to track the sales.
Note that a sale isn’t the only conversion metric used by advertisers. In some cases, a successfully generated lead or a downloaded file through an ad is also considered a conversion.
Why use a conversion pixel?
While the primary goal of using a conversion pixel is to keep track of the ad campaign’s performance, there’s more to the story.
Advertisers must know that conversion pixel is imperative to understand the performance of ad units, call-to-actions, and landing pages. Moreover, it doesn’t end here.
Here are four key reasons why to use a conversion pixel:
i. Measure conversion rate
The key benefit of injecting a conversion pixel on your website or landing page is to keep track of your conversion rate, especially after the conversion optimization tactics have been applied. Low or zero conversion is indicative of wrong tactics.
ii. A/B testing Ad strategies
When a conversion pixel is embedded into the website code, it’s pretty clear that the conversions are being closely analyzed. Therefore, it allows advertisers to test out different ad designs, ad copies, and color schemes to see what works the best.
iii. Analyze conversion cost
One of the most underrated metrics is the conversion cost. Some digital marketers pay attention to analyzing the conversion cost, especially if they’re running different marketing campaigns, such as social media advertising and influencer marketing campaigns. It helps them understand which one is outperforming the other one.
iv. Optimize campaigns
When the data of an ad campaign comes up — usually at the end of the campaign — it’s the time to reflect on the situation. Moreover, marketers could optimize campaigns based on the previous ad campaign’s data. This data analysis wouldn’t have been possible without placing the conversion pixel on the site or landing page to track performance.
Use cases for using a conversion pixel
Since conversion pixel provides valuable insights into visitor engagement, it assists brands make data-driven marketing decisions, optimize their digital marketing campaign, and skyrocket the conversion rate.
Here are different areas where marketers can use conversion pixels:
i. Email marketing
Most email marketing softwares have a built-in feature to track the open rate of emails so that users could keep track of their email campaigns’ performances. However, a conversion pixel is also linked with an email campaign to inform the merchant or brand about the action being taken. For instance, users often get confirmation emails when they sign up for a service, it triggers the confirmation signal that a conversion event has occurred.
iii. Online advertising
Running online ad campaigns without any check-and-balance might be a huge mistake. It’s essential to track the performance of an ad campaign. One of the easiest campaign measurement techniques is to place a conversion pixel in the website or landing code.
When advertisers utilize conversion pixels, it assists them track, record, and analyze the output of the ad campaign. As a result, it helps them make informed decisions based on the ROI.
iii. Affiliate marketing
An affiliate marketing campaign would fall flat if there is no conversion tracking available or the conversion pixel isn’t working properly.
The way affiliate marketing works is that an affiliate promotes a product of a merchant and when a web visitor makes a purchase through the affiliate partner’s link, the affiliate earns a commission.
However, the merchant uses the affiliate tracking software to keep track of the affiliate conversions so that the affiliate partners could be paid for their referrals.
iv. E-commerce sales
The most common use case of the conversion pixel is in the e-commerce industry. It assists e-commerce businesses track e-commerce sales.
All they need to do is to place a conversion pixel on their “thank you” or “order confirmation” page to trigger the successful sale signal.
It significantly helps users measure the sales numbers from online ads or any other marketing campaign. More importantly, it’ll give insight into which of the online campaigns or ad platforms are driving the most sales.
v. Track mobile app installations
Startups and mobile app developers can use conversion pixels to track app installs and downloads. Remember to add the conversion pixel to the app download completion page to track the data.
Once it starts working properly, the user can analyze which ad campaigns or marketing channel is driving the most traction.
vi. Lead generation
Lead generation is a process of gathering user details, such as name, phone, and email through a lead magnet or sign-up form.
Businesses and organizations can track the performance of their event registrations landing pages, whether they’re hosting a webinar or a physical event.
Most brands and entrepreneurs use opt-in bribes to generate leads whether it’s access to an email course or a downloadable content.
The conversion pixel comes in handy in lead generation. Without placing a conversion pixel, it won’t be possible to track the conversion of a specific campaign or platform.
For example, if you run a Quora ads campaign, you place Quore Pixel on your website to measure the campaign’s effectiveness.
All they need to do is to paste a conversion pixel, and it will track the performance and effectiveness of the copy, landing page layout design, and ad campaign.
Best conversion tracking tools
Here are some of the best conversion tracking tools to check out:
⦁ Replug
Replug is an all-in-one link management platform that provides a complete toolkit for URL management. The key features include a top-notch URL shortener, branded URLs, UTM codes, URL tracking, deep links, retargeting, and more. The link retargeting tool plays a vital role in setting up a retargeting campaign for brands and advertisers using pixel tracking.
⦁ Optimizely
Optimizely is yet another powerful URL-tracking tool for digital marketers and brands. It assists web developers and digital marketers in analyzing and optimizing landing pages and website content pages. This tool empowers brands and digital marketing agencies to implement visual editing, page optimization, and advanced targeting.
⦁ Google Analytics
Google Analytics is the widely popular website and app analytics tool from the house of the internet tech giant Google. It’s used to collect website visitors’ data, conversion reporting, site traffic sources, bounce rate, page views, and much more.
⦁ Woopra
Woopra is a well-known player in the website conversion optimization genre. It’s a powerful tool that helps users track, analyze, and improve the customer journey. It offers powerful features to empower brands with effective, real-time customer analytics.
How to set up conversion tracking pixel for your website?
Conversion pixels are a must-have tool for measuring the effectiveness of your online advertising efforts and digital marketing campaign.
Let’s shed some light on how to set up a conversion pixel for your website:
1. Create a Conversion Pixel
Most first-timers haven’t had a chance to generate their conversion pixel. So the first step while setting up the conversion pixels is to generate the pixel itself. To do this, marketers need to go to their advertising platforms, such as we have taken Facebook Ads Manager in this case.
If it’s not created before, then select the option to create a new conversion pixel in the conversion tracking area. The process is pretty much the same across all social media ad platforms.
2. Choose a name for the pixel
All you need to do is to choose a name for the pixel and select the type of conversion you want to measure, such as a purchase or lead generation.
3. Generate the pixel code for your website
Once the conversion pixel is generated, grab it for installation on your web or app property. You don’t need to be a website developer to insert this piece of code into your website or application.
4. Add the pixel code to your website
Install your conversion pixel on your website or app by adding it to the source code. If you’re using WordPress, it’s better to use a link insertion service or plugin.
In some cases, you might have to manually inject the code into the website source. Make sure the code is in the right place on your page, such as the header or footer. Once it’s done, go ahead and connect it with your site.
So this entails adding a short piece of code to the page or website section where conversions are to be tracked. Once the code is added, save the changes and move on to the next step.
Now you can test traffic using Pixel Helper extension.
Setup Facebook conversion API
Click on the “Events Manager” tab in the Business Manager menu.
Click on “Data Sources” in the left-hand menu.
Select or create the event you want to configure for the Conversion API.
Now you have two options
If using Partner Integration, choose the partner and follow the provided instructions.
If using Manual, you’ll need to manually implement the API calls.
Just follow the prescribed steps and you will be done setting up your conversion API. If you still have any confusion, check the detail here.
Conversion tracking using GA4
Two steps for tracking conversions on Google Analytics4.
Create an event for the confirmation page
Mark the event as a conversion
Step 1: Create an event for the confirmation page
Access admin section and choose property:
Begin by accessing the admin section of your analytics tool or platform. Within this section, locate and select your preferred property. For this guide, let’s focus on the “events” property. Navigate to the property options where you can manage and set up events.
Create a new event:
Inside the “events” property settings, you’ll find the option to create a new event. Click on this option to initiate the event creation process. This is where you’ll define the specific event you want to track and analyze.
Enter custom event name:
As part of event creation, you’ll need to provide a unique name for the event. For instance, let’s use the example of tracking a lead generation event. In the “Custom event name” field, input a descriptive name such as “generate_lead.” This name should clearly represent the nature of the event you’re setting up.
Set matching conditions:
Matching conditions help define when the event should be triggered and recorded. In the “Matching conditions” section, you’ll configure these conditions for accurate tracking. Start by entering the first matching condition. For instance, if you want to track an event when a page is viewed, input “event_name equals page_view.”
Add first condition:
After entering the initial matching condition, click on the “Add condition” button. This step confirms the first condition you’ve specified. It’s essential for ensuring the event is only triggered when the specified conditions are met.
Enter second matching condition:
Now, proceed to input the second matching condition. This further refines when the event should be recorded. For the lead generation example, if you want to track a form submission on a specific page, enter “page_location equals https://www.example.com/contact-us-submitted.”
Finalize Event Setup:
After providing both matching conditions, review the details you’ve entered. Make sure the event name and conditions accurately represent the event you’re tracking. This step is crucial for proper data interpretation and analysis.
In the Parameter configuration section, click Add modification twice. Because you are using a recommended event, you need to define each of the required parameters. Otherwise, Google Analytics will treat the event as a custom event.
Step 2: Mark the event as a conversion
To set up a new conversion event in Google Analytics, start by clicking on the “Admin” option from the main menu. This will take you to the administrative section where you can manage various settings for your account.
Ensure that you’re working within the correct Google Analytics account and property. You’ll want to make sure you’re making changes to the right data. In the “Property” column, find and click on the “Conversions” option. This is where you can manage your conversion tracking settings.
Once you’re in the “Conversions” section, you’ll see an option to create a new conversion event. Click on “New conversion event” to initiate the event creation process. This is where you’ll define the specifics of the event you want to track.
Give your new event a descriptive name. For instance, let’s say you’re setting up an event to track lead generation. Enter the name “generate_lead” in the provided field. This name should clearly represent the action or interaction you’re interested in tracking.
Here’s a detailed video of tracking conversion goals in GA4.
That’s it from our side now get started with your conversion tracking process.
FAQs about Conversion Tracking Pixels
Let’s answer some of the frequently asked questions about conversion tracking:
What triggers a conversion pixel?
Any pre-defined action or event that matches the conversion criteria triggers the conversion pixel and ensures that the action or event gets recorded. The conversion pixel is a short piece of code that plays a crucial role in recording a specific event or action.
How do you set conversion pixels?
To set a conversion pixel, create and grab the conversion pixel from the desired social media advertising platform like Facebook ads or Quora ads, and then put it on the website property, such as a landing page or website to start tracking an action or event.
What is pixel-perfect conversion?
Pixel-perfect conversion refers to the process of understanding design principles and front-end development techniques for translating a design into a digital format with absolute precision. The goal is to ensure that the digital version replicates the original design with accuracy and avoids discrepancies in the output.
Have you ever clicked on a link that looked something like /page?id=84721 and got zero idea what you were about to open?
Now compare that to /what-is-a-url-slug. Entirely opposite or totally unlike each other, right?
That little snippet sitting at the end of a web address is called a URL slug, and it’s doing more work than most people give it credit for.
A well-crafted slug improves click-through rates by giving users an immediate idea of what to expect, increasing the likelihood they’ll visit your page.
And with AI-powered search platforms like ChatGPT and Perplexity increasingly recommending content, having keyword-rich slugs helps these systems understand and categorize your pages accurately. This makes SEO-friendly slugs more relevant than ever.
No matter if you’re a blogger, a marketer, or just someone trying to get their website to rank, getting your slugs right matters.
So, let’s start from the very beginning: what exactly does “URL slug” mean?
What is a URL slug?
A URL slug is the part of a web address (or a URL) that comes after the domain name and identifies a specific page on a website.
For example, in https://www.example.com/what-is-a-url-slug, the slug is /what-is-a-url-slug.
Think of it as the “name tag” of a webpage. Its primary job is to tell both users and search engines what a page is about, in plain, readable language.
Instead of a confusing string of numbers or random characters, a good slug gives instant context. It’s a small detail, but it plays a key role in how your pages are found, understood, and clicked on.
Why is it called a URL slug?
The word“slug” might sound a little odd in a web context, but it actually comes from the world of journalism. Reporters would assign a short, informal label to a story while it was still being worked on. That label was called a slug.
When the web came along, the term carried over. Just like a journalist’s slug summarizes a story in a few words, a URL slug does the same for a webpage, giving it a short, descriptive identifier within the full web address.
URL slug etymology
The URL slug’s meaning traces back even further than journalism, all the way to the printing industry. In old-school typesetting, a “slug” referred to a solid line of metal type. Printers and editors later borrowed the term to label stories in production.
Over time, as digital publishing took over, the word found its way into the world of URLs, where it stuck. So the next time you’re crafting URLs for your website, you’re actually using a term with roots going back centuries in the publishing world.
What is an example of a slug?
A slug is quite easy to understand when you actually see one in action. Let’s look at some real-world examples, both the kind you want to avoid and the kind you should be aiming for.
URL slug examples (Bad)
Bad slugs are usually auto-generated, messy, or just plain confusing. They give users and search engines no real clue about what the page contains.
/page?id=48291
A random ID number tells nobody anything. It’s not readable, not memorable, and offers zero context about the page’s content.
Way too long. Slugs like this get truncated in search results and are a nightmare to share or remember.
/NEW-Article_SEO%20Tips!!
Uppercase letters, underscores, special characters, and encoded spaces! This slug breaks just about every best practice in the book.
URL slug examples (Good)
Good slugs are short, clean, and descriptive. They tell the reader exactly what to expect before they even click.
/seo-tips
Short, clear, and straight to the point. Anyone seeing this in a URL instantly knows what the page is about.
/best-project-management-tools
Descriptive without being wordy. It targets a clear topic and is easy to read, share, and remember.
/how-to-make-cold-brew-coffee
A great example of a longer slug done right. Every word earns its place, and the meaning is immediately obvious to anyone who reads it.
Why is a URL slug important for SEO in 2026
URL slugs might seem like a minor detail, but they quietly influence how your pages perform in search. From how Google reads your content to how users decide whether to click, a well-optimized slug touches more parts of SEO than most people realize.
Improves search visibility
A clear, keyword-relevant slug helps search engines quickly understand what your page is about, giving it a better shot at showing up for the right queries.
Boosts click-through rates (CTR)
When users see a clean, descriptive slug in search results, they’re more likely to trust the link and click on it. A messy, long URL, on the other hand, can easily put people off.
Google’s John Mueller has confirmed that words in a URL are a ranking factor to some extent. He said that they are a “very, very lightweight” one, helping search engines assess relevance, especially the first time they encounter a page. So, including your primary keyword in the slug still makes sense.
Enhances user experience (UX)
A readable slug sets clear expectations before anyone even lands on your page. Users appreciate knowing what they’re clicking into, and that trust translates into better engagement.
Builds contextual understanding
With AI-powered search platforms increasingly recommending content, keyword-rich slugs help these systems accurately understand and categorize your pages (something that’s only becoming more important).
Reinforces site structure
Consistent, logical slugs across your website make it easier for search engine crawlers to map out your content hierarchy and understand how your pages relate to one another. This ultimately results in excellent topical authority.
Key aspect of on-page optimization
Slugs are one of the first on-page elements search engines look at. Getting them right is a simple, low-effort win that complements everything else you’re doing (content, meta tags, internal linking, and more).
URL slug best practices & formatting tips
Getting your slugs right doesn’t require a lot of effort, but it does require knowing some critical rules. Here are the best practices you should follow every time you create or update a slug on your website.
Top strategies to optimize your URL slugs:
Keep it short & concise
Aim for 3–5 words wherever possible. Short slugs are easier to read, remember, and share, and they’re less likely to get cut off in search results.
Include relevant target keywords
Work your primary keyword naturally into the slug so both users and search engines immediately understand what the page is about. Just don’t force in extra keywords to the point it looks spammy.
Use hyphens, not underscores
Google treats hyphens as word separators, making your slug readable and effortlessly crawlable. Underscores, on the other hand, can cause words to be read as one, so /seo_tips could be interpreted as seotips.
Always use lowercase letters
URLs are case-sensitive, and mixing cases can create duplicate content issues. Sticking to lowercase across the board keeps things clean and consistent. Also, this is the recommended standard practice.
Remove any stop words
Words like “a,” “the,” “and,” and “of” add length without adding value. Trimming them keeps your slug tight. So, /the-best-ways-to-improve-the-seo simply becomes /best-ways-to-improve-seo.
Make it descriptive
Your slug should give anyone reading it a clear idea of what the page covers, even without seeing the page title. If it doesn’t describe the content, it needs reworking.
Add trailing slashes
While not a major ranking factor, using trailing slashes consistently (e.g., /seo-tips/) helps avoid duplicate content issues and keeps your URL structure uniform across the site.
Use 301 redirects
If you ever update an existing slug, always set up a 301 redirect from the old URL to the new one. Skipping this step can wipe out any rankings and backlinks the page had built up.
Avoid dates/years
Including something like “2026” in your slug makes the content look outdated the moment the year changes. Always stick to evergreen slugs that stay relevant long-term.
Avoid special characters
Characters like “%,” “&,” “#,” and “@” can break URLs or get encoded into unreadable strings. Keep your slugs limited to letters and hyphens only.
Avoid dynamic URLs
Auto-generated dynamic URLs like /page?id=5621&cat=3 are hard to read and offer no context. Static, descriptive slugs always perform better for both users and search engines.
Avoid using auto-generated URL slugs
Most CMS platforms generate slugs automatically from page titles, and they’re rarely optimized. Always take a moment to manually edit and clean up the slug before hitting the publish button.
What is a slug in WordPress?
WordPress makes it pretty straightforward to work with URL slugs. Every time you create a new page or post, WordPress automatically generates a slug based on your page title.
But as we’ve already covered, auto-generated slugs aren’t always the best option. The good news is that WordPress lets you edit them easily, giving you full control over how your URLs look.
How to change URL slug in WordPress?
Whether you’re setting a slug for a brand new post or cleaning up an old one, here’s exactly how to do it step-by-step:
Step #01: Open your post
Log in to your WordPress dashboard and navigate to “Posts” from the left-hand menu. Click on the post whose slug you want to edit.
Step #02: Locate the slug field
Once you’re inside the editor, look at the right-hand settings panel. Click on the “Post” tab and look for the “Slug” option.
Step #03: Click and edit the slug
Click on the slug field and simply type in your new, optimized slug. Remember to keep it short, lowercase, keyword-relevant, and hyphen-separated. No special characters or spaces.
Step #04: Save the post
Once you’re happy with the new slug, click the “Save” button. It will be in the top right-hand corner of the screen.
Step #05: Set up a 301 redirect (for published posts only)
If the post was already live and ranking, this step is critical. Use a plugin like Rank Math or Yoast SEO to set up a 301 redirect from the old URL to the new one. Both plugins will actually prompt you to do this automatically when they detect a slug change (so don’t skip it).
Step #06: Verify the new URL
Visit your updated post in the browser and check that the new slug is showing correctly in the address bar. While you’re at it, make sure the old URL redirects properly to the new one.
💡 Quick tip: Always update your slug before publishing a new post if possible. Changing slugs on already-ranking pages comes with risks, so only do it when it’s genuinely necessary, and always use a redirect.
Common mistakes to avoid when generating URL slugs
Even small slug mistakes can quietly hurt your SEO and user experience over time. Here are the most common ones people make, and what you should do instead.
Using underscores instead of hyphens
Google reads underscores as connectors, not separators. So, /url_slug gets read as one word (urlslug) rather than two. Always use hyphens to keep your words properly separated.
Including stop words
Words like “the,” “a,” “and,” and “for” just add unnecessary length to your slug without contributing anything meaningful. Cut them out and keep only the words that actually matter.
Keyword stuffing
Fixing multiple keywords into a single slug, like /best-seo-tips-seo-guide-seo-strategies, looks spammy and unnatural. Stick to one primary keyword and keep it clean.
Not using lowercase letters
Uppercase letters in URLs can create case-sensitivity conflicts, leading to duplicate content issues. /SEO-TIPS and /seo-tips can be treated as two entirely different pages by some servers.
Including dates or temporary information
A slug like /best-seo-tools-2026 starts looking outdated the moment the year rolls over. Unless your content is strictly time-sensitive, keep your slugs evergreen so they stay relevant long-term.
Using special characters and spaces
Characters like “#,” “%,” “&,” and spaces don’t belong in slugs. Spaces get converted into %20, making your URL look messy and unprofessional, and some special characters can break the URL entirely. It’s best to avoid them entirely.
Relying on auto-generated slugs
CMS platforms like WordPress auto-generate slugs from your page title, which often results in long, cluttered URLs full of stop words. Always review and manually optimize the slug before publishing.
Changing slugs without redirects
Updating a slug on a live, ranking page without setting up a 301 redirect is one of the costlier SEO mistakes you can make. You’ll lose your backlink equity, your rankings, and send returning visitors to a dead “404” page.
Updating URLs frequently
Constantly tweaking your slugs (even with redirects in place) sends mixed signals to search engines and can destabilize your rankings. Get your slug right the first time and leave it alone.
Make your URL slugs SEO-friendly with Replug!
Managing your URL slugs manually across every page and campaign can get tedious fast. That’s where Replug comes in.
A complete link management solution
for marketing professionals & agencies.
Try Replug for free
But one feature that really stands out is its custom URL shortener. Instead of sharing long, cluttered links, Replug lets you create clean, branded, and SEO-friendly custom slugs within seconds.
You get full control over what appears in your URL, making your links more trustworthy, more clickable, and a lot easier to remember. If clean, professional URLs matter to your brand, Replug is absolutely worth checking out.
Wrapping up
URL slugs are one of those things that are easy to overlook, but once you understand how they work, you’ll never look at a web address the same way again.
From improving your search visibility and CTR to enhancing user experience and reinforcing your site structure, a well-crafted slug does a lot of heavy lifting for something so small.
The rules aren’t complicated either. Keep it short, make it descriptive, use hyphens, skip the stop words, and always redirect before changing a live URL.
Get these basics right from the start, and your slugs will quietly work in your favor for a long time to come.
Frequently asked questions
What is a slug on a website?
The URL slug definition is pretty straightforward. It’s the part of a web address that comes after the domain name and identifies a specific page.
For instance, in https://www.example.com/what-is-a-url-slug, the slug is /what-is-a-url-slug.
Every page on your website should have a unique URL slug. This is what helps both search engines and users distinguish one page from another.
Without a distinctive slug, search engines can get confused about which page to index, and users have no clear idea of what they’re about to open.
How to find a webpage’s URL slug?
This one’s simple. Here’s how to get the URL slug:
Just look at the address bar in your browser when you’re on any webpage. The slug is the part that comes after the domain name. So if you’re on https://www.example.com/seo-tips, the slug is /seo-tips. That’s it!
You can do this for any page on any website, anytime, without needing any special tools or technical knowledge.
What is an SEO slug?
An SEO slug is a URL slug that’s been intentionally optimized for search engines. It typically includes:
– the primary target keyword for that page, – uses hyphens between words, – stays short and descriptive, and – avoids any unnecessary clutter
Basically, it’s the clean, keyword-friendly version of a slug that helps both Google and your readers immediately understand what a page is about, before they even click on it.
Does the URL slug affect SEO?
Yes, but not in a dramatic way. A well-optimized slug contributes to your overall SEO by improving readability, signaling relevance to search engines, and boosting click-through rates.
It won’t single-handedly make or break your rankings, but combined with strong content, good internal linking, and solid technical SEO, it’s a worthwhile piece of the puzzle to get right.
Is the URL slug a ranking factor?
Technically, yes, but a very minor one. Google’s John Mueller has described words in a URL as a “very, very lightweight” ranking factor.
It helps Google get an initial read on your page before fully crawling it. But once the page is indexed, the content itself carries far more weight. So don’t obsess over it, but do make sure your slug is clean and relevant.
Does changing the slug change the URL?
Yes, it does. Your slug is part of your URL, so editing it automatically changes the full web address of that page.
This is why changing slugs on live, already-ranking pages needs to be handled pretty carefully. Always set up a 301 redirect from the old URL to the new one to make sure you don’t lose your traffic, rankings, or backlink value in the process.
What happens when you change or edit a URL slug?
When you change a slug, the old URL essentially stops working unless you set up a redirect. Anyone visiting the old link, no matter through a bookmark, a backlink, or a search result, will land on a 404 error page. That’s bad for both user experience and SEO.
A 301 redirect fixes this by automatically sending visitors and search engines from the old URL to the new one, preserving as much of your SEO value as possible.
What is the maximum length of a URL slug?
There’s no strict rule set by Google, but the general best practice is to keep your slug under 60 characters. Longer slugs tend to get truncated in search results, making them harder to read.
Most SEO professionals recommend sticking to 3–5 words, enough to be descriptive without being excessive. The shorter and clearer, the better!
What is the difference between a URL slug and a URL?
A URL is the full web address of a page, e.g., https://www.example.com/what-is-a-url-slug.
The slug is just one specific part of that URL. In this case, /what-is-a-url-slug.
Think of the URL as the complete home address and the slug as the apartment number. It’s the part that identifies the specific page within the broader domain.
What is the difference between URL path and slug?
When talking about URL slug vs path, the two terms are closely related but not exactly the same thing.
– The URL path is the full section of the web address that comes after the domain name, and it can include multiple levels, like /blog/seo/what-is-a-url-slug. – The slug, on the other hand, is specifically the last segment of that path. In this case, what-is-a-url-slug.
So, every slug is part of a URL path, whereas a URL path can contain multiple segments, with the slug being the final, page-specific identifier at the end.
What are the best tools online for detecting URL slug errors?
There are several solid options worth using:
– Google Search Console is a great free starting point. It flags crawl errors and URL issues directly from Google. – Semrush’s Site Audit and Ahrefs’ Site Audit both do a thorough job of detecting problematic slugs, duplicate URLs, and redirect issues. – Screaming Frog SEO Spider is another favourite among SEO professionals for deep URL analysis.
And if you’re on WordPress, plugins like Yoast SEO and Rank Math will flag slug issues right inside your editor as you work.