Google Forms are perfect for collecting feedback, running surveys, or managing event registrations. But here’s the catch:the default links they generate are long, messy, and hard to share.
Not only do these cluttered URLs look unprofessional, but they’re also difficult to remember, tricky to fit into social media bios, and almost impossible to use on printed material.
The good news? You can shorten your Google Forms link in just a few clicks. In this guide, we’ll walk you through:
How to shorten a Google Forms link using Google’s built-in option
Why shortening links matters (aesthetics, user experience, branding, security, analytics)
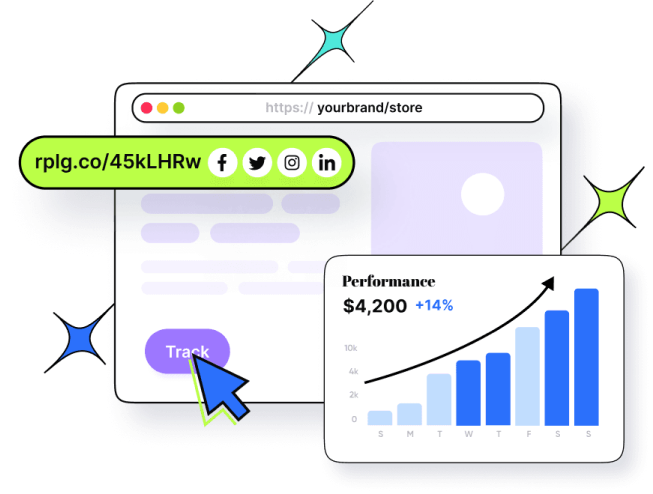
How to take it further with Replug: for branded links, click tracking, QR codes, and more
By the end, you’ll know not only how to create a short, neat link for your form but also how to maximize its impact for sharing, branding, and conversions.
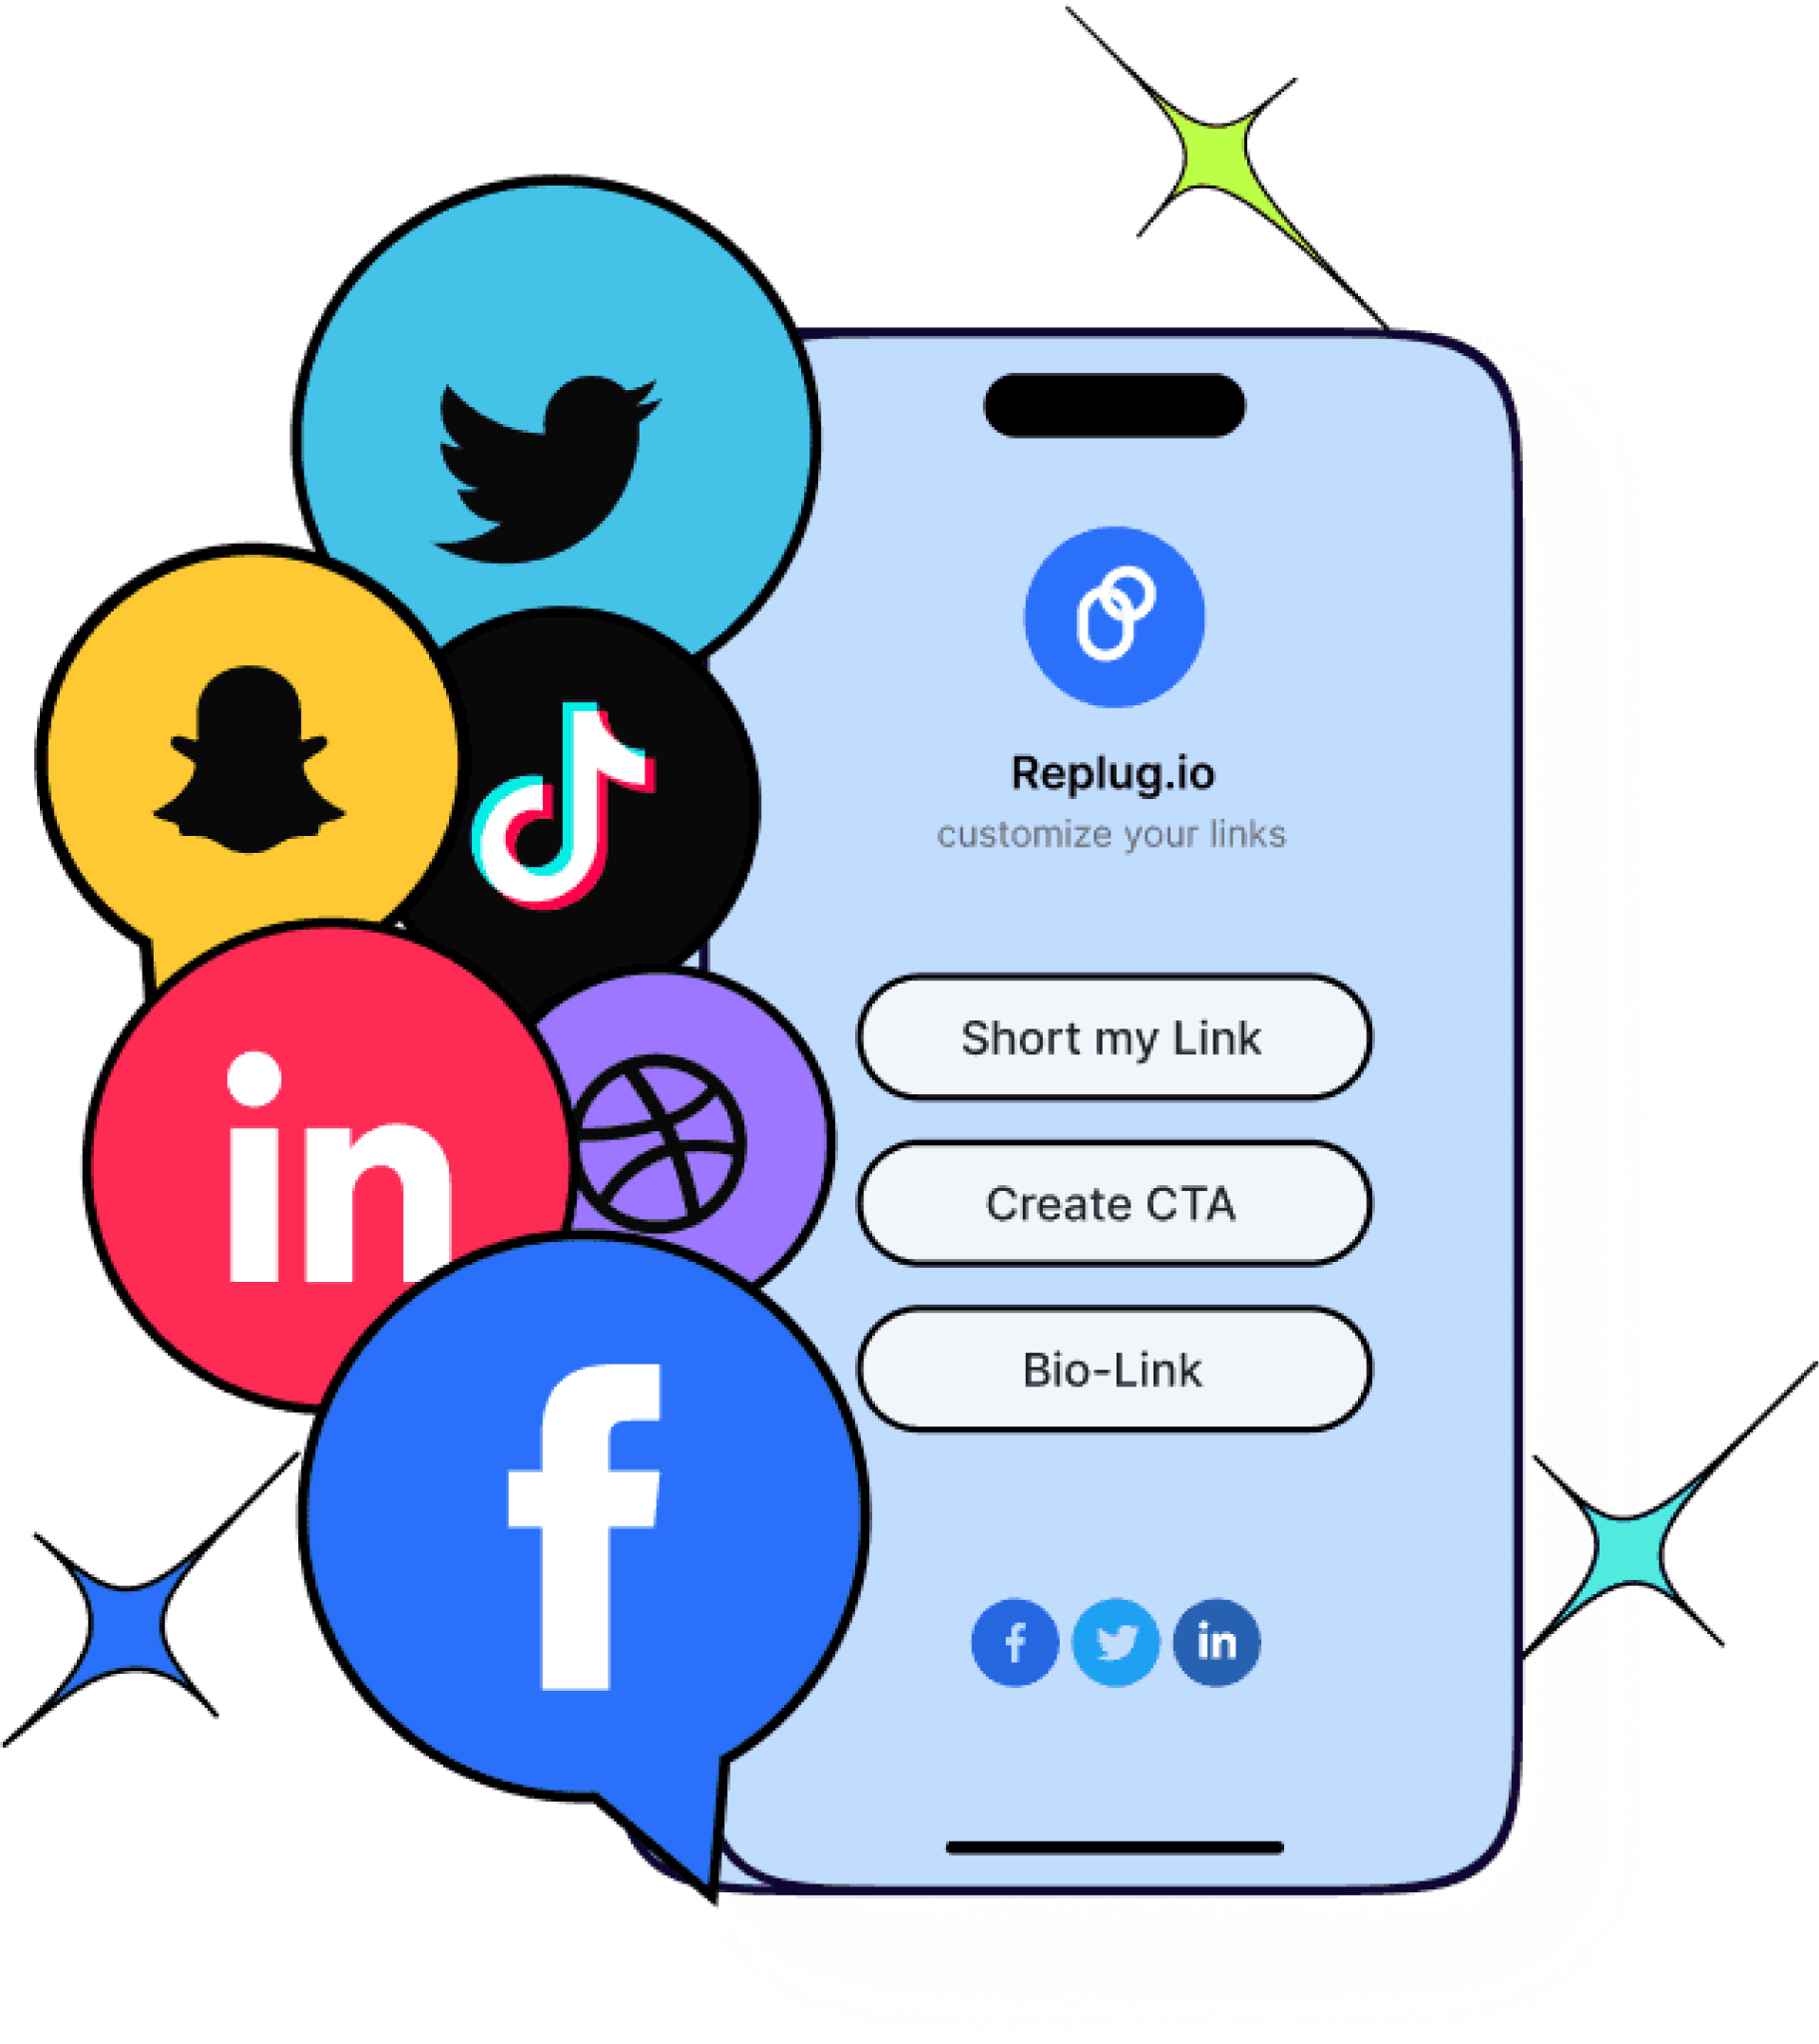
A complete link management solution
for marketing professionals & agencies.
Try Replug for free
Why shorten Google Forms links?
Before we get into the steps, let’s answer the big question: why bother shortening at all?
Here are the top five reasons:
Visual appeal: Shortened links look cleaner and more professional, especially when shared in emails, on social media, or in presentations.
User experience: A short link is easier to type, remember, and share. It improves overall accessibility.
Branding & trust:Branded links increase CTR, look professional, build trust, and are far more memorable than random strings of characters.
Character limitations: Platforms like X (formerly Twitter), SMS, and messaging apps often have word or character limits. A long Google Forms link can get cut off or even break.
Tracking & analytics: While Google’s built-in shortener only makes the URL shorter, a custom link shortener gives you click tracking, engagement insights, and campaign performance plus detailed analytics.
How to shorten Google Forms link (built-in method)
Google Forms actually includes a simple option to shorten your link. Here’s how:
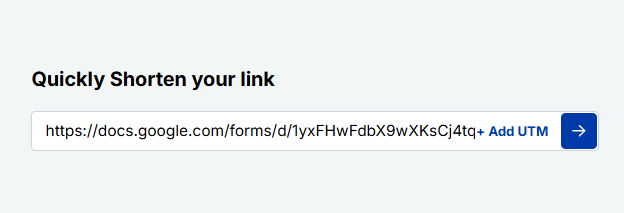
Open your Google Form.
Click the Send button in the top-right corner.
Select the link icon (the chain symbol).
Tick the Shorten URL checkbox.
Click Copy to grab your new, shorter link.
That’s it! In seconds, you’ll have a cleaner link that’s easier to share.
👉 Limitation: This method only shortens the link. You can’t rename it, brand it, or track performance.
How to shorten and customize Google Forms Link with Replug in 5 easy steps
If you want more than just a cleaner link, this is where Replug.io comes in.
Here’s how to shorten your Google Forms link with this leading link shortener, and brand it using advanced customization features:
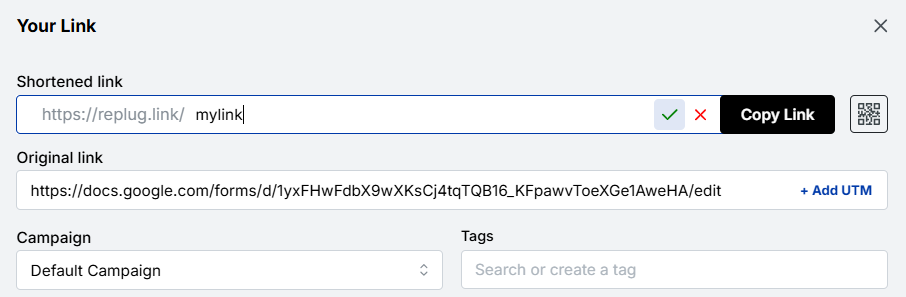
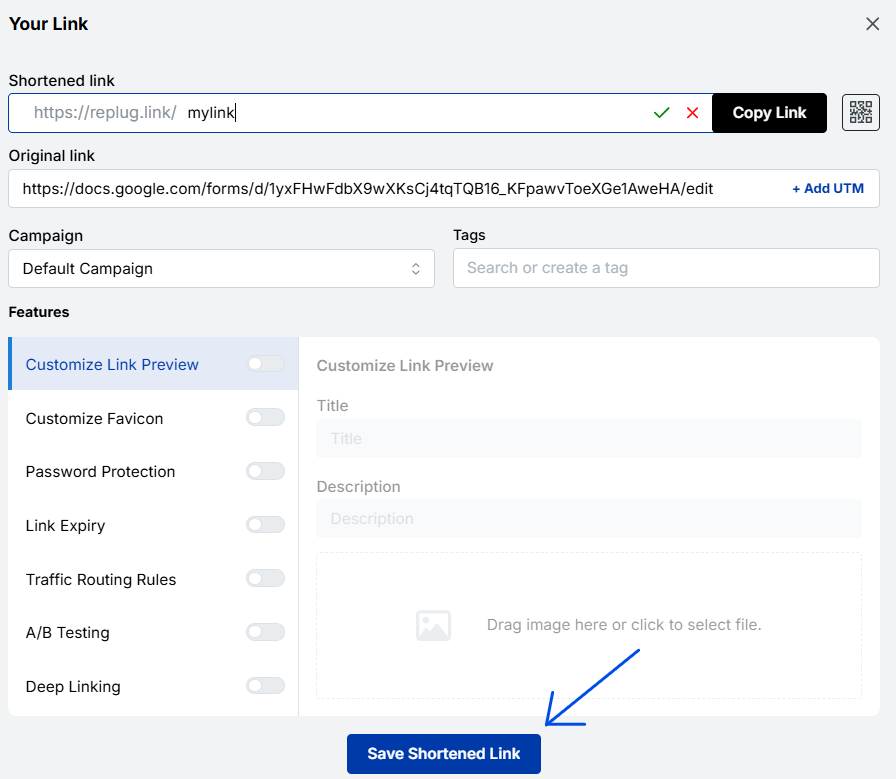
Step 1: Copy your Google Forms link
Open your Google Forms link and copy it (via Send → Link icon → Copy).
For your ease, we’ve put together a quick comparison table between Google Forms Shortener and Replug. This way, you can see at a glance what each tool offers and decide which fits your needs best.
Feature
Google Forms
Replug
Shortens link
✅
✅
Customize link slug
❌
✅
Use branded domain
❌
✅
Track clicks & analytics
❌
✅
Generate QR codes
❌
✅
Retargeting pixels
❌
✅
A/B testing
❌
✅
Expiration dates
❌
✅
Conclusion
In this blog, we talked about why shortening Google Forms links isn’t just about saving space; it’s about creating links that are easy to share, trustworthy, and professional. While Google’s default option does the job, it falls short when it comes to branding, insights, and overall impact.
That’s where Replug steps in. With branded links, detailed analytics, retargeting, and A/B testing, it transforms a simple form link into a tool that drives engagement and optimizes conversions rate.
Ready to turn your Google Form links into growth engines? Try Replug today!
Frequently asked questions
How to get an editing link for Google Forms?
When you create a Google Form, the editing link is automatically tied to your account. You don’t need to generate it separately. Just copy the URL in your browser while editing. If you want to share the form with collaborators, click the “Add collaborators” option and grant them editing access.
Can I customize a Google Form link?
Google itself doesn’t allow much customization beyond shortening it to a generic forms.gle link. But if you want a clean, branded, and memorable link, you can use a tool like Replug. It not only shortens links but also lets you customize and brand them for a professional touch.
Does editing a Google Form change the link?
Nope! If you edit the questions or design of your Google Form, the link stays the same. The only time it changes is if you create a brand-new form. But here’s a tip: if you’re worried about keeping your links future-proof, shorten them with Replug. That way, even if you update or swap out the form later, you can redirect the same short link without resending a new one.
Where is the Google URL shortener?
Google’s official URL shortener (goo.gl) was discontinued in 2019. However, you can use alternatives like Replug to shorten links, brand them, and track performance.
Will Google shortened links stop working next year?
Yes, Google has already phased out support for goo.gl links. While existing ones may still work for a while, they’re not guaranteed forever. The safer option is to move to a reliable URL shortener like Replug. It ensures your links remain live, branded, and under your control, without worrying about sudden shutdowns.
Readers don’t care about the full hyperlink; they care about where it leads them. But long, exposed URLs? They clutter the page, disrupt readability, and make your content harder to trust.
The solution is simple: shorten the hyperlink to make it more trustworthy.
Instead of linking to a long, clunky URL, you can use a short, branded link that looks neat and is easy to manage. In this blog, we’ll explain what a hyperlink is, how to shorten a hyperlink with Replug, and the benefits of doing so.
Let’s start with the basics before we move on to the process.
Maximize marketing ROI
by transforming ordinary URLs into branded short links that convert.
Try Replug for free
What is a hyperlink?
A hyperlink is a clickable element in a document, web page, or email that takes the reader to another location. It could open a new page, lead to a section within the same file, or direct someone to external content like a video, image, or resource.
Hyperlinks usually appear as text, phrases, or buttons. For example:
In a blog: “Click here to learn more”
In a document: a word like “Download” might point to a file link
In an email: a phrase like “Shop now” could take readers to a landing page
Behind the hyperlink is a URL. If that URL is long, you can create a short link so the hyperlink remains clean and reliable.
Why shorten a hyperlink?
Shortening hyperlinks has clear benefits for both presentation and performance:
Cleaner look: no distracting or broken lines in documents or blogs.
Professional branding: links can carry your brand name with Replug.
Improved trust: readers are more likely to click short, branded links.
Analytics and tracking: shortened links allow us to monitor clicks.
Flexibility: edit or update the destination without changing the hyperlink text.
In short, shortening makes hyperlinks smarter and more useful.
How to shorten a hyperlink with Replug
Here’s the step-by-step process on how to shorten a hyperlink using this user-friendly link optimization platform.
Step 1: Sign in or sign up
Go to Replug and sign up for a free 14-day trial (no credit card needed). If you already have an account, log in to the dashboard.
Step 2: Paste your long URL
On the dashboard, paste the original long link into the bar under “Quickly shorten your link”. This creates a shortened version instantly.
Step 3: Create a branded URL (optional)
At first, Replug generates a short URL with an alphanumeric slug. For example:
You can customize the URL slug to make it look more recognizable and professional:
This not only looks professional but also improves recognition.
Step 4: Enable link cloaking (optional)
Replug also offers link cloaking. If you want the shortened URL to appear as a vanity link in the browser (helpful for affiliates or content marketers), you can enable this option while setting up your link.
Step 5: Save and copy the short URL
Once ready, click on “Save Shortened Link” and copy your short link.
Step 6: Add it to your hyperlink
Now, go back to your document, blog editor, or email tool. Highlight the text you want to hyperlink (for example, Learn more). Insert your Replug short link instead of the original long URL.
Now, when readers click the hyperlink, they’ll be directed to the shortened link, which then forwards them to the intended destination.
Benefits of using Replug for shortened hyperlinks
Replug lets you shorten a link while turning it into a complete marketing asset. Here are the benefits that it offers:
Custom branded links: build trust and align links with your brand.
Maximize marketing ROI
by transforming ordinary URLs into branded short links that convert.
Try Replug for free
Who actually benefits from shortening hyperlinks?
Shortened hyperlinks can be applied across multiple scenarios:
Digital marketing: Short hyperlinks help brands maintain consistent messaging across platforms. They’re easy to share in emails, ads, and campaigns while keeping everything clean and trackable. Marketers can also run A/B tests with different links to see which strategies bring better results.
Social media marketing: Short hyperlinks keep posts neat, boost engagement, and encourage sharing. A branded link also feels more trustworthy, making users more likely to click.
Vanity links: Custom, keyword-based links are easier for people to remember and type. With a high-quality link shortener, creating vanity links becomes simple, giving businesses a professional, user-friendly way to share content.
Affiliate marketing: Replug helps cloak affiliate links into branded hyperlinks that look clean, trustworthy, and click-worthy. Plus, with advanced affiliate link tracking, affiliates can see which campaigns are driving real conversions.
Campaign analytics: Every click on a hyperlink tells a story. Marketers gain insights into click-through rates, demographics, and user behavior, which helps optimize campaigns and allocate resources more effectively.
QR codes: Pairing QR codes with short hyperlinks is a powerful way to reach audiences across touchpoints. With dynamic QR codes, you can update the destination anytime without changing the code itself, keeping campaigns flexible and future-proof.
Conclusion
Long hyperlinks not only look messy but also reduce trust and harm readability. By shortening them, you can keep links clean, branded, and easy to share while unlocking analytics and flexibility.
With Replug, hyperlinks go beyond shortening. You can create custom branded links, cloak affiliate URLs, track campaign performance, and even generate QR codes. Whether it’s for digital marketing, social media, or affiliate promotions, Replug turns every hyperlink into a smart marketing asset.
If you want hyperlinks that people are irresistibly clickable, it’s time to shorten and manage them with Replug!
Frequently asked questions
How do I reduce the length of a hyperlink?
Shortening the length of a hyperlink is simple: Copy the long link from your website or social media, paste it into Replug, click to create, and save your new short link.
How do I rename or shorten a hyperlink?
If you just want to rename it, most platforms (Word, Google Docs, emails, websites, etc.) let you edit the display text of the link. Instead of showing the full URL, you can replace it with cleaner text like “Read more” or “Visit here”. If you want to shorten the actual link itself, you can use a URL shortener like Replug. Just paste your long URL, generate a short one, and use that wherever you share it.
How to shorten a URL safely?
Use a reliable URL shortener, opt for branded links, and avoid suspicious third-party tools. Always preview and test shortened links before sharing to ensure they’re safe and trustworthy.
How do I edit a hyperlink to make it shorter in Word?
Right-click the link, select Edit Hyperlink, then choose ScreenTip (top-right of the dialog box) and type in your preferred text.
Think about how many times you’ve wanted someone to contact you on WhatsApp without first saving your number. It’s a little friction that often leads to lost leads, slower responses, and missed opportunities. This is where WhatsApp short links come in.
With over 2.5 billion users worldwide, WhatsApp has become one of the most powerful communication channels for businesses. From small stores to global brands, your customers already use WhatsApp daily, and short links make it effortless to maximize engagement
In this guide, we’ll walk through everything you need to know:
What WhatsApp short links are
How to create them (manually, and with link shortening tools like Replug)
How to customize them for better results
Where to use them
Best practices for using them in business
Common mistakes to avoid
By the end, you’ll know not just how to create a WhatsApp short link, but also how to optimize it for maximum clicks and conversions.
Maximize marketing ROI
by transforming ordinary URLs into branded short links that convert.
Try Replug for free
What is a WhatsApp short link?
A WhatsApp short link is a URL that, when clicked, opens a chat window directly with a specific number in WhatsApp.
For example:
When a customer clicks it, WhatsApp launches with your number pre-filled. You can even add a default message, so the chat opens with text already typed in. For example:
This simple feature saves time for customers and makes initiating a conversation effortless.
You don’t need fancy tools to get started. Here’s the simplest way:
Take this base link:
Add your phone number (no spaces, dashes, or special characters, just country code + number). Example:
(Optional) Add a pre-filled message using ?text= followed by the message in URL-encoded format. Example:
That’s it. You now have a working WhatsApp link.
How to shorten and customize your WhatsApp link
While the manual method works, the link can look long and messy, especially if you’ve added a pre-filled message. With a short link generator like Replug, you can:
This makes your link look professional and gives you full control.
Create a WhatsApp short link with Replug in 5 easy steps
Replug.io is a great tool if you want to stand out with a professional, branded WhatsApp short link of your profile. It lets you customize your link and track how it performs.
2. Paste your WhatsApp long link in the bar under “Quickly Shorten your link”:
3. Create a custom URL (optional):
Once done, you’ll get an auto-generated Replug short link. Here’s what it looks like:
Replug also allows you to customize the slug of your WhatsApp short link. This helps people identify what your link is all about at first glance:
4. Add UTM parameters to track clicks and engagement (optional):
You can easily add UTM parameters through Replug. In our example, we’ve decided to share the link on WhatsApp, so we’ve set the UTM source as “WhatsApp”. You can set it to whichever platform you’re sharing the link on.
5. Save the link and share it across your marketing channels!
With Replug, you have the added benefit of tracking your links and knowing exactly how well your links are performing.
Benefits of using WhatsApp short links
Why go through the effort of creating a WhatsApp short link? Here are the main benefits:
Reduce friction in communication
Instead of asking customers to manually save your number, they just tap and start chatting.
Increase response rates
The easier it is to reach you, the more likely people are to do it. This boosts response and conversion rates.
Personalize user experience
By pre-filling a message, you guide the conversation and improve user experience. For example:
“Hi, I’d like to order the red t-shirt in medium.”
“I want to book an appointment for Friday.”
Perfect for multi-channel marketing
You can add short links to websites, emails, Instagram bios, Facebook ads, or even QR codes.
Trackable with link shorteners
When paired with a link management tool like Replug, you can track clicks, add UTM parameters, and optimize campaigns.
Where to use your WhatsApp short link
A WhatsApp short link can fit into almost every touchpoint of your customer journey. Here are some powerful ways to use it:
Social media profiles: Add your WhatsApp link to your Instagram bio, Facebook page, TikTok profile, or LinkedIn. Customers can reach you instantly.
Email signatures: Include your link in your professional email signature to make yourself more accessible.
Websites and landing pages:Add a “Chat on WhatsApp” button that directly links to your WhatsApp.
Digital ads: Place your short link in Google or Meta ads to drive leads directly into a WhatsApp conversation.
Printed marketing: Combine your WhatsApp short link with a QR code and place it on flyers, brochures, or product packaging.
Examples of WhatsApp short link use cases
To make things more practical, here are real-world scenarios where businesses use WhatsApp short links effectively:
E-commerce stores: Adding a “Message us on WhatsApp” link on the checkout page to answer last-minute buyer questions.
Agencies: Including a WhatsApp link in email pitches so prospects can respond instantly.
Event planners: Sharing WhatsApp links with attendees for instant updates and confirmations.
Restaurants: Using QR codes linked to WhatsApp for table reservations or takeaway orders.
Freelancers: Adding a WhatsApp short link to portfolios or social profiles for quick inquiries.
Best practices for WhatsApp short links
To get the most out of your short links, keep these tips in mind:
Always use international format: If you don’t include the correct format, your link won’t work. Always start with the country code.
Enhance your pre-filled messages: Make it easy for customers to understand and send. Here are some ready-to-use templates you can copy:
– “Hi, I’d like to know your pricing.”
– I want to book an appointment for [date].”
– “Do you have this product in stock?”
– “I’m interested in your services. Can we schedule a quick call?”
– “Hi, I need customer support with my recent order.”
💡 Pro tip: keep messages short and clear. Avoid long paragraphs that might look spammy.
Use branded short links:This adds trust and makes your links memorable. Customers are more likely to click on a branded link than a random one.
Maximize marketing ROI
by transforming ordinary URLs into branded short links that convert.
Try Replug for free
Track your performance:Use a tool like Replug to see how many people are clicking your WhatsApp links, where they’re from, and what campaigns drive the most conversations.
Place links strategically: Think about your customer journey. Add your WhatsApp link at points where people are most likely to have questions or need quick support.
Optimize your WhatsApp short links using Replug
Replug helps you maximize the value of your WhatsApp short links by combining branding, analytics, and personalization. With custom domains, aliases, and preview controls, your links look professional and build trust. Plus, you can track detailed metrics, add UTM tags, and run A/B tests. Features like retargeting pixels, deep linking, and link expiration further enhance engagement, making every campaign smarter and more effective.
A complete link management solution
for marketing professionals & agencies.
Try Replug for free
How to generate QR codes from WhatsApp short links
Sometimes links aren’t enough, especially in offline marketing. This is where QR codes shine.
By converting your WhatsApp short link into a QR code, customers can scan and chat with you instantly.
How to do it:
Shorten your WhatsApp link with a tool like Replug.
While WhatsApp links are simple to create, businesses often make small mistakes that reduce their effectiveness:
Using the local number format instead of the international
Making the pre-filled message too long
Not testing the link before sharing
Overloading every post with the link (can look spammy)
Forgetting to brand or shorten the link
Final thoughts
Creating a WhatsApp short link isn’t just about making communication easier, it’s about giving your business a direct, reliable way to connect with customers. In this guide, we’ve walked you through what short links are, how to create them manually or with Replug, where to use them, and the best practices to follow.
Now it’s your turn: set up your first WhatsApp short link, test it, and start turning casual clicks into meaningful conversations.
Frequently asked questions
How do I create a WhatsApp shortcut?
Open the chat you want, tap the three-dot menu (on Android) or swipe left on iPhone, and select “add chat shortcut” (Android) or “add to home screen” (iPhone). This creates a quick-access icon on your phone’s home screen.
How do I add WhatsApp link on Instagram?
Go to your Instagram profile → Edit Profile → Links → Add External Link. Paste your WhatsApp short link and save. Now visitors can tap your bio to message you directly.
How do I add a WhatsApp link to my profile?
If you mean social profiles (LinkedIn, Facebook, TikTok, etc.): just paste your WhatsApp short link in the website/bio field. Some platforms even auto-convert it into a clickable button.
How to create a short WhatsApp group link?
1. Open your WhatsApp group → Tap group name. 2. Select “invite to group via link.” 3. Copy the link provided 4. If you want a cleaner version, you can shorten it using a URL shortener like Replug.
It only takes a few seconds for someone to decide if they’ll click your link or not.
Social platforms like Instagram and TikTok limit the number of links you have in your bio; but what if you have multiple offers, pages, or products to share? This is where knowing how to use a linktree (bio link or link in bio) on your social media profile, becomes essential.
Done right, your linktree becomes a mini home page that drives clicks, engagement, and even sales, all in one place. In this guide, we’ll cover what a linktree is, why it matters for social media, its benefits, how to set it up effectively, and how tools like Replug can take your link management and marketing to the next level.
What is a linktree and why it matters for social media presence
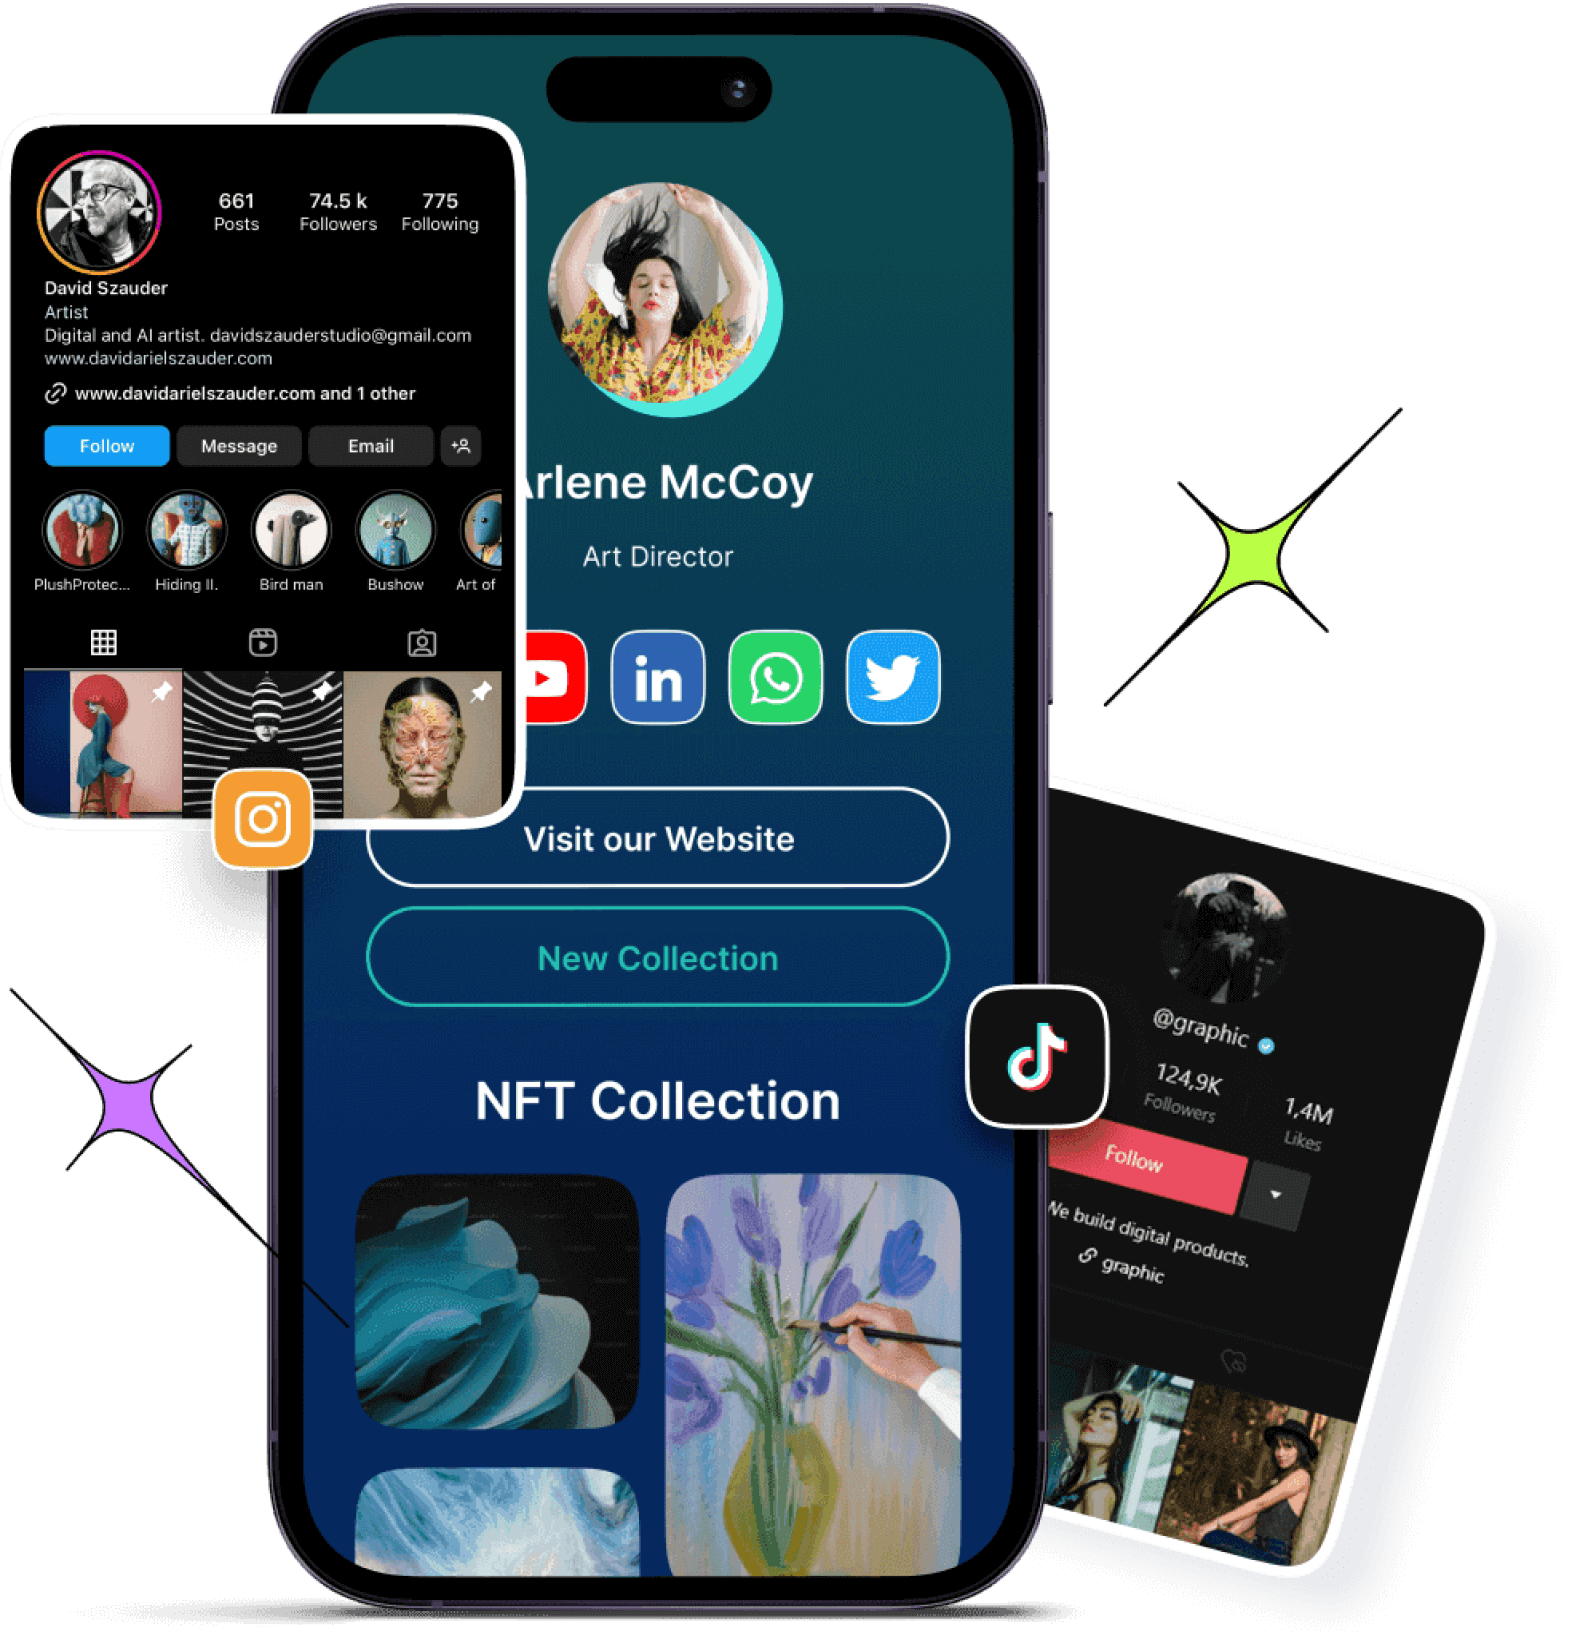
A linktree or “link in bio” tool allows you to create a simple, mobile-friendly landing page that houses multiple links. Instead of swapping out your single bio URL for every new campaign, you use one permanent link that directs followers to a list of all your important destinations.
This solves the “one link” problem by creating a centralized hub for your audience. Whether they want to visit your website, read your latest blog, shop your store, or connect on other platforms, they can find everything in one organized space. This makes it easy for followers to find everything from your website and blog to online stores and affiliate links, all accessible from your Instagram link in bio or TikTok profile.
Benefits of using a linktree for social media
Using a linktree offers numerous benefits that can transform your social media presence from simply having followers to actively engaging and converting them into customers or fans.
Here’s why investing time in setting up and optimizing your bio link is so powerful:
1. Centralizes your content and simplifies user experience
A linktree creates a centralized hub where all your important URLs live together. This means followers don’t have to guess where to find your website, blog, store, or affiliate links. Everything is organized and accessible in one clean place.
Here’s an example of Lilly Singh, a popular YouTube content creator. Her linktree page has a list of all her important links; from her Spotify Playlist to Amazon Storefronts:
2. Improves follower engagement and click-through rates
When followers have multiple relevant options to explore, they’re more likely to engage with at least one of your links. This increases your overall click-through rate (CTR) compared to a single generic link.
Take an online artist who links to their portfolio, commission page, and Behance. Fans who may not be ready to commission can still visit the portfolio or support on Behance, increasing total engagement. Here’s an example of Pascal Blanche:
3. Boosts conversions and drives sales
A linktree enables you to direct followers toward specific calls to action such as buying products, signing up for newsletters, or downloading resources. By placing your highest priority links at the top, you funnel your audience toward conversions more efficiently.
Customizing your link-in-bio page with your brand’s colors, fonts, and logos reinforces your identity and professionalism. This consistency builds trust and encourages followers to engage with your links confidently.
Brands that neglect this risk appearing generic or untrustworthy, which can reduce click rates. Here’s an example of the famous clothing brand Gap and how they use pastel blue throughout their branding:
5. Offers detailed tracking and data-driven insights
Unlike static links, a bio link set up provides valuable analytics showing which links get the most clicks, the time of day followers engage, and where your traffic comes from. This data lets you understand your audience better and refine your social media and marketing strategies.
For example, Walgreens, an online store, might discover that their “Weekly Deals” link gets more clicks in the evenings, prompting them to schedule product announcements or Instagram Stories for that time to maximize engagement.
6. Enables easy updates and real-time campaign management
A linktree lets you update and reorder your links anytime without changing your bio URL. This flexibility means you can respond quickly to new product launches, promotions, or seasonal campaigns without confusing your followers with new URLs.
For instance, a musician promoting a new album release, upcoming tour dates, and merch drops can update their linktree instantly to match the current focus. Here’s an example of Katy Perry’s bio link page. She can easily edit her tour dates without changing her bio link:
7. Enhances cross-platform promotion and reach
Your followers are spread across multiple platforms like Instagram, TikTok, X (Twitter), and even LinkedIn. Using a single linktree URL across all profiles creates a consistent user experience and maximizes your reach.
A fitness coach, Alexia Clark, for instance, uses the same linktree URL on Instagram and TikTok, helping fans from both channels access workouts, nutrition plans, and coaching services seamlessly.
8. Supports affiliate marketing and influencer partnerships
A linktree is ideal for affiliate marketers and influencers who want to share multiple product links without cluttering their captions or bios; especially useful for Amazon products. A clear, well-organized bio link page makes it easier for followers to shop and supports higher affiliate commissions.
For example, Erica Taylor, a beauty influencer, places all their favorite product affiliate links on their linktree page, simplifying shopping for followers.
9. Reduces friction and builds trust with followers
When followers see a neat, branded bio link page, it reduces doubts about clicking links. Using branded short URLs and customizing your page increases perceived legitimacy; especially important on platforms like Instagram, where phishing attempts can be common.
Taylor Swift uses a branded bio link in her Instagram bio:
Go beyond generic link pages!
Create custom bio links that truly fit your brand
With Replug, you can create bio links that are unique, engaging, and built to convert.
Why Replug is the best choice to boost your linktree and social media presence
While linktree setups help you organize your bio links, Replug takes it a step further by integrating advanced marketing features designed to maximize engagement, conversions, and brand growth.
Branded short URLs for credibility and recall
Replug allows you to create custom branded short URLs that match your business name or brand identity. This not only builds trust with your audience but also makes your links memorable and professional-looking, a crucial factor when promoting on platforms like Instagram and TikTok.
Retargeting pixels to reconnect with your audience
One of Replug’s standout features is the ability to add retargeting pixels (from facebook, google, linkedin, etc.) to your shortened links. This means you can continue marketing to users who clicked your bio link but didn’t convert immediately, turning casual visitors into loyal customers over time.
In-depth analytics to optimize your strategy
Understanding which links get the most clicks and from which platform is key to refining your social media marketing. Replug’s click analytics dashboard gives you detailed reports on click-through rates, geographic data, devices used, and referral sources so you can make data-driven decisions to improve your linktree effectiveness.
Seamless integration with your favorite platforms
Whether you’re driving traffic from Instagram stories, TikTok videos, or Amazon affiliate marketing posts, Replug integrates smoothly with your existing tools and campaigns. This ensures your bio link strategy is unified and easy to manage across all channels.
Easy customization for brand consistency
Replug lets you customize your linktree landing pages with your brand colors, logos, and fonts, creating a consistent and polished look that builds follower trust. A cohesive brand experience across your social profiles increases the likelihood that users will click through and take action.
Keep your linktree fresh by adding, removing, or rearranging links in real time without changing the bio link URL. Replug’s intuitive dashboard makes managing multiple campaigns, affiliate links, and promotions effortless.
Support for affiliate marketing and e-commerce
If you’re using linktree for Amazon affiliate marketing or selling products directly, Replug’s advanced tracking and retargeting tools can boost your affiliate commissions and sales. Segment your audience and target them with personalized ads based on their interaction with your bio links.
Boosts SEO with valuable backlinks Including a link in your bio can also provide important SEO benefits. Each bio link acts as a backlink to your website, helping to establish your site as a credible resource. This can improve your search engine rankings and drive more organic traffic over time.
Offers customization and flexibility to keep content fresh Replug’s linktree pages are flexible and editable. You can include multiple types of links, such as social profiles, booking systems, product pages, and more, all in one place. This makes it easy to keep your content fresh and relevant by adding or updating links as needed.
Enhances call-to-action effectiveness Strong, clear calls to action in your social posts and on your bio link page encourage followers to click and engage. Phrases like “head to the link in our bio to learn more” or “Shop now” help direct followers and increase conversions.
How to use Replug to get the most out of your linktree presence
Follow these steps to optimize your bio link strategy:
Set up your replug profile Choose a clear profile name and add your brand’s logo. write a compelling description that invites users to explore your links.
Organize and customize your links
Arrange your top offers first, followed by secondary links, while customizing the page with Replug’s branding tools, images, and videos to keep it engaging and on-brand.
Analyze link performance regularly Check Replug’s analytics to see what’s working. A/B test your bio link page for different calls to action and link arrangements to maximize clicks.
Update links frequently Keep your page dynamic by refreshing links to reflect current promotions, seasonal campaigns, or trending content. This encourages repeat visits.
Create a custom URL
Connect your custom domain and customize the slug of your bio link. This strengthens brand identity and improves visibility.
Maximize marketing ROI
by transforming ordinary URLs into branded short links that convert.
Try Replug for free
Best practices for maximizing linktree’s impact
Here are some simple strategies to ensure your bio link drives results:
Keep it simple: Limit your linktree to 3–7 focused, high-value links. Too many options can overwhelm visitors and reduce clicks.
Use branded short URLs: Swap out long, cluttered links for clean, branded short URLs. This builds trust and boosts professionalism. This is where link management tools like Replug come in handy.
Add clear, action-oriented CTAs:Use compelling CTAs like “Shop now,” “Download free guide,” or “Watch the tutorial.” Clear calls to action guide your audience and increase clicks.
Show social proof: Include testimonials, user reviews, or follower counts to enhance credibility and encourage more conversions on your linktree.
Monitor analytics regularly: Track link performance closely. With Replug, you’ll get a dedicated bio link dashboard where you can track all how many clicks your linktree got according to location, browser, referral sources, and OS.
Promote your Linktree everywhere: Share your linktree across Instagram stories, reels, posts, and other channels to maximize reach and engagement.
Common mistakes to avoid when using linktree
Avoid these pitfalls for a smooth and effective bio link:
Linking to outdated or irrelevant pages
Overloading your page with too many links
Using generic, long URLs instead of branded ones
Neglecting analytics and performance tracking
Forgetting to update your links for new campaigns
Ignoring mobile optimization since majority users come from mobile
Conclusion
Mastering how to use a linktree effectively is key to boosting your social media presence. It centralizes your links, engages followers, and drives conversions from Instagram, TikTok, and beyond. By following best practices and leveraging tools like Replug, you can transform that one bio link into a powerful growth engine for your brand.
Linktree (also known as bio link or link in bio) is a digital service that lets you create a single page containing multiple links, making it easy to share all your important content from one URL. You simply add your links, customize the layout, and share your linktree on platforms like Instagram, TikTok, or in your email signature.
Is it free to create a linktree?
Yes, you can create a free linktree with Replug’s 14-day trial. After that, you can choose and pay for the plan of your choice.
Do I need a website if I have a linktree?
No, you don’t necessarily need a website if you have a linktree. However, having both can work well together. Your linktree can serve as a quick-access hub, while your website can provide more detailed information.
Can I track how many people click my linktree?
Yes, you can track your linktree analytics with Replug. You can see how many people clicked your links, where your audience is from, and which links perform best. This helps you make data-driven decisions.
What’s the best tool for creating a linktree?
Replug is one of the best tools for creating a linktree (bio link or link in bio). It offers advanced features such as branded short URLs, retargeting pixels, and in-depth analytics that can help you drive more traffic and conversions. If you want both style and performance, Replug is a great choice.
Can I change the links in my linktree?
Yes, you can edit your linktree at any time; adding, removing, or rearranging links as needed. Changes update instantly, so your audience always sees the most current version.
QR codes have become a vital tool for connecting the physical and digital worlds. But have you ever wondered why most QR codes are square? In this blog, we’ll dive into the square QR code, explore the role of its shape, explain whether QR codes must always be square, and show you how to get and use these codes effectively.
Whether you’re interested in a square QR code generator or want to create a square website QR code, this guide will give you clear insights.
What is a square QR code?
A square QR code is a type of two-dimensional barcode made up of black and white squares arranged in a larger square grid. It stores data such as website URLs, text, or contact details that can be quickly scanned and decoded by smartphones or QR scanners.
Unlike traditional barcodes, which are linear and one-dimensional, QR codes can hold much more data due to their square grid design. Since becoming an international standard in 2000, QR codes have found use in marketing, supply chain tracking, and everyday interactions like menu scanning.
Are QR codes always square, and why is their shape important?
You might wonder, does a QR code have to be square?
The truth is, while most standard QR codes are square, not all QR or 2D codes strictly follow that shape. The classic QR code’s square design comes from its evenly arranged grid of modules in rows and columns. This geometric structure provides distinct corners and alignment points that scanners use to quickly determine orientation and accurately decode information.
The square shape remains the most popular because its symmetry and clear edges make scanning fast and reliable. However, modern designs sometimes feature rounded corners, custom shapes, or embedded logos that give QR codes a less boxy look. Even so, these creative variations still maintain the essential square or rectangular grid underneath to ensure they remain scannable.
In short, while there’s flexibility in design, the underlying square structure is key to how QR codes function effectively.
How to get a square QR code
If you’re wondering how to get a square QR code, the process is simple. Most square QR code generators produce the standard square format by default. Simply:
Input the data you want the QR code to contain (URL, text, contact info)
Customize colors or add logos if you want, while keeping the square layout intact
Download and use your square QR code on your website, packaging, or marketing materials
Creating a square QR code with Replug is just as easy and helps direct users to specific web pages effortlessly.
Beyond just generating QR codes, Replug allows you to create branded short URLs that enhance trust and click-through rates when embedded in your codes. Plus, with Replug’s analytics dashboard, you can track every scan, add UTM parameters for campaign insights, and even run A/B tests to optimize your QR code performance. This makes managing and measuring your QR code campaigns smarter and more effective.
Maximize marketing ROI
by transforming ordinary URLs into branded short links that convert.
Try Replug for free
Benefits of using square QR codes
Here are some top benefits of why you should use square QR codes in your marketing strategy:
Reliable scanning
The square shape of QR codes, combined with their distinct corner patterns, allows scanning devices to quickly detect the code’s orientation. This ensures fast and accurate reading even from different angles or under less-than-ideal lighting conditions. The symmetry and alignment markers built into the square design make it easier for almost all smartphones and scanners to decode the information reliably.
Higher data capacity
Compared to traditional one-dimensional barcodes, square QR codes can store significantly more information. Thanks to their two-dimensional square grid, they can encode URLs, text, contact details, product information, and more, all in a compact space. This makes them ideal for applications requiring detailed or lengthy data, such as marketing campaigns, inventory tracking, and digital menus.
Robust error correction
Square QR codes are designed with error correction capabilities, which means they can still be read accurately even if part of the code is damaged, dirty, or obscured. Depending on the error correction level, up to 30% of the code can be compromised without affecting scanability. This makes square QR codes highly durable and practical in real-world environments where wear and tear are common.
Square QR codes are incredibly versatile. They’re widely used in marketing to drive user engagement, in retail for product labeling, in logistics and supply chain management for tracking inventory, and in event management for fast check-ins. Their ability to store diverse types of data makes them a universal tool across various sectors.
Increased adoption for contactless solutions
Since the pandemic, the use of square QR codes has surged due to their effectiveness in enabling contactless interactions. Restaurants use them for touch-free menus and ordering, retailers for digital payments, and public venues for health check-ins. This trend shows how the square QR code’s design supports both convenience and safety in today’s world.
How Replug enhances QR code usage
Replug isn’t just a link shortener; it’s also a complete QR code solution that helps you create, optimize, and measure the impact of your square QR codes.
Custom, dynamic square QR codes
With Replug, you can generate fully customizable square QR codes that match your brand’s style. Dynamic QR codes allow you to change the destination URL anytime without needing to reprint the code, saving costs and boosting flexibility. Whether it’s for a new campaign or an updated product page, your QR codes stay relevant and effective.
A/B testing for better performance
Not sure which landing page drives more engagement? Replug enables you to A/B test multiple URLs linked to different QR codes. This data-driven approach helps you identify the best-performing links and optimize your campaigns for higher conversions.
Multiple download formats
Whether you need high-resolution PNGs, SVGs, JPEG for crisp scaling, or WEBP for websites, Replug lets you download your square QR codes in the format that fits your marketing needs. This versatility ensures your codes look perfect everywhere, from billboards to social media posts.
Retargeting pixels
Replug allows you to add retargeting pixels to your QR code links, so anyone who scans your code can be retargeted with follow-up ads on platforms like Facebook and Google, helping turn interest into action.
Share across all digital channels
Replug makes QR code distribution seamless, so your audience can access your content wherever they engage with your brand.
Detailed analytics and tracking
Replug provides a dedicated dashboard that tracks how many people scanned your QR codes, when, and from where. These insights help you understand audience behavior and the effectiveness of your QR code campaigns. You can also add UTM parameters to your QR code URLs to monitor traffic sources and campaign success
Deep linking for smooth user journeys
Replug supports deep linking, meaning QR codes can take users directly into specific pages or features within your mobile app. This eliminates extra navigation steps, making the customer journey smoother and increasing the likelihood of engagement and conversions.
Drive more clicks, conversions, and app installations by deep linking
to your favorite platforms.
Try deep links for free
Customizing your square QR code: tips and tricks
Though the QR code square shape must remain intact for scanability, you can customize it:
Use high-contrast colors for better readability.
Incorporate your logo without covering essential parts.
Maintain adequate size to ensure easy scanning.
Avoid distorting the square grid or alignment markers.
Custom designs can boost brand recognition while keeping codes functional.
Conclusion
Square QR codes are the standard because their shape supports fast, reliable scanning and high data capacity. While QR codes don’t always have to look perfectly square, the underlying square grid is crucial for their function.
Whether you want to create a simple square website QR code or customize your codes with branding, tools like Replug can help you track and optimize your QR code campaigns effectively.
Ready to create your own square QR codes? Try Replug today and start enhancing your marketing efforts with smart, trackable links!
FAQs on square QR codes
Does a QR code have to be square?
Standard QR codes are almost always square because their scanning technology depends on the square grid and corner patterns. However, some designer QR codes have creative shapes but keep an underlying square or rectangular structure for scanability.
How do I get a square QR code?
Use a trusted square QR code generator online that creates standard square QR codes by default.
Can I customize the shape of my QR code?
You can add logos or adjust colors, but the QR code’s essential square grid and alignment markers must remain intact to ensure it scans properly.
What is a square website QR code?
A QR code in square format that directs users to a website or a specific web page.
How does Replug work with QR codes?
Replug creates branded short URLs ideal for QR codes, offers analytics on scan performance, and enables retargeting for better campaign results.
Need a quick, scannable way to share your links offline? Replug makes it easy. This guide walks you through how to create a square QR code in just a few clicks; no design skills needed.
What is a square QR code?
A square QR codeis the most widely recognized type of QR code. It has a square-shaped pattern that scanners can read easily, making it the default and most reliable format for marketers and businesses.
Whether you’re linking to your main website, product page, lead form, or social profile, a square QR code is both reliable and universally recognizable.
How to create a square QR code in Replug
Creating a square QR code in Replug is quick, user-friendly, and customizable.
Step 1: Log in or sign up
Sign in to your Replug account or sign up. Signing up gives you a 14-day free trial with access to all features.
Step 2: Click “QR codes”
From the navigation menu on your Replug dashboard, click “QR Codes”, then click “Create new”
Step 3: Enter your QR code details
Fill in the basic details such as:
Title
Destination link (shortened or original)
Campaign name (optional)
Step 4: Customize your QR code
Select Square as your QR code shape style.
To make it fully square:
Choose Square for the border style
Choose Square for the center style
Set the frame shape as Square
Add your logo in the center for branding
Step 5: Create and download
Click “Create QR code” to generate it.
Then click Download to save your QR code in either PNG, SVG, JPEG, or WEBP
Tip: Always test your QR code using multiple devices before printing or sharing
Tips to maximize your QR code’s performance with Replug
Want your QR code to work harder for you? Here are a few bonus tips:
Use branded short URLs for credibility
Branded links make your QR codes look more trustworthy and memorable. Instead of generic URLs, use your brand name in the link to boost click-through rates and build brand recognition.
Add UTM parameters to track campaign success
UTM parameters help you understand where your traffic is coming from. Add tags like source, medium, and campaign to your URLs before generating the QR code, so you can measure results inside Replug’s dashboard.
Set up retargeting pixels for those who scan
With Replug, you can add retargeting pixels to any link behind your QR code. This allows you to re-engage scanners later through Facebook Ads, Google Ads, or other retargeting platforms.
Try A/B testing with multiple QR codes
Create two or more square QR codes for the same destination but with slight differences, like call-to-action text or design style. Monitor which version performs better and optimize accordingly.
Use deep linking to take users straight into apps
Don’t just send users to a mobile webpage. Use deep links to take them directly into apps like Spotify, YouTube, or WhatsApp. It improves the user experience and can significantly boost conversions.
Why use a square QR code
There are multiple benefits of using QR codes, especially for marketers and businesses. Here’s why square QR codes are the go-to choice:
Universally scannable across all devices
Easy to align in print and digital formats
Compatible with most QR code scanners
Clean, symmetrical, and professional-looking
Ideal for packaging, flyers, posters, and business cards
Whether you’re running a campaign or linking to content, using a reliable QR code generator like Replug ensures consistency and trackability.
Best practices for using square QR codes
To get the best results from your QR codes:
Use high-resolution formats when printing
Keep whitespace (quiet zone) around the code
Avoid placing it on reflective or dark surfaces
Test it under different lighting conditions
Always verify the link before distribution
Replug’s QR code generator allows you to monitor scans and gather analytics, making it one of the most effective free QR code generator tools (14-day trial) available.
Using Replug’s QR code generator, you can create a QR code that’s stylish, functional, and completely trackable. Whether it’s for packaging, business cards, posters, or digital campaigns, square QR codes help bridge the offline-online gap seamlessly.
Try Replug’s QR code feature today and unlock smarter offline engagement.
Maximize marketing ROI
by transforming ordinary URLs into branded short links that convert.
Try Replug for free
Frequently asked questions
What is a square QR code?
It’s the standard type of QR code with a square matrix structure, designed for universal scanning compatibility.
How to get a square QR code using Replug?
Simply go to the QR code section in Replug, fill in the details, and select Square as the shape during customization.
Can I add a logo to my square QR code?
Yes, Replug lets you upload your logo and center it within the QR code.
Can I generate QR Codes for free?
Replug offers a 14-day free trial with access to all QR code generation and tracking features.
What file types can I download my QR code in?
You can download your QR code in PNG, SVG, JPEG, or WEBP format.
Driving traffic to your content is essential for success in the digital age. Whether you’re sharing content on social media, in emails, or through advertisements, your click-through rate (CTR) is a critical metric that directly impacts your online presence.
While there’s plenty of advice on improving CTR through content optimization, one often overlooked factor is the link itself. In fact, one of the most effective yet underused strategies to increase CTR using branded links is by turning generic, forgettable URLs into clear, trustworthy ones that reflect your brand identity.
In this article, we’ll explore how branded links can significantly enhance your CTR and why they deserve a place in your marketing toolkit.
Maximize marketing ROI
by transforming ordinary URLs into branded short links that convert.
Try Replug for free
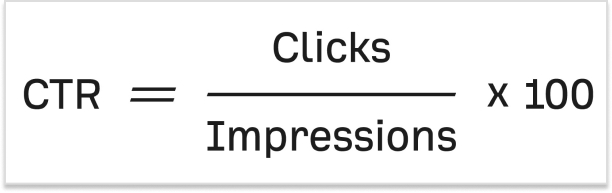
Understanding CTR
Before diving into the world of branded links, let’s establish a clear understanding of CTR. Click-through rate (CTR) is a vital metric in online marketing, expressed as a percentage. It’s the number of times a link is clicked divided by the number of times it’s viewed. Simply put, if your link gets ten views and one click, your CTR is 10%. Now, let’s delve into why CTR is so crucial.
Let’s say you crafted a groundbreaking piece of content that has the potential to change lives, but no one reads it. Bummer, isn’t it?
The quality of your content will only matter if it reaches your target audience. And the first step? Getting them to click.
Your link is the bridge between you and your reader, making CTR a make-or-break factor for your content’s success.
What are branded links?
Branded links, also known as vanity URLs or custom short links, are URLs that have been customized to include a specific brand’s name or a relevant keyword. Unlike generic, lengthy, or complex URLs, branded links are shorter, more descriptive, and often feature the brand’s domain name or a recognizable keyword, making them more user-friendly and visually appealing.
Now that we have a grip on the concept of CTR and branded links, let’s discuss how the way you use them can make or break your results. A well-crafted branded link can boost trust, clicks, and conversions; while a poorly executed one can do the opposite.
In the next section, we’ll dive into the best ways to increase CTR using branded links, so you can use them to their full potential.
7 best ways to increase CTR using branded links
Let’s explore how you can leverage branded links to optimize your CTR.
Include your brand name in the link:
The domain is the first element of your link, and it’s imperative to include your brand name. Many people use link-shortening tools for brevity, but this often obscures the brand name. Branded links, also known as vanity URLs, remedy this by showcasing your brand, increasing trust, and building brand awareness.
Use a unique top-level domain (TLD):
After your domain, the choice of Top-Level Domain (TLD) can impact CTR. New TLDs can help your link stand out and convey relevance. For instance, using “.tech” for tech-related content or “.store” for online retail adds clarity and can attract more clicks.
Include a keyword:
The URL slug, the part that comes after the slash, is an essential component of SEO. Branded links allow you to choose your keywords, ensuring your link’s relevance and SEO-friendliness. This customization can set you apart from generic shorteners that offer limited options.
Consider link length:
Long URLs can hinder readability and may be truncated on social media. Short, concise links are more appealing to users. They are simple to maintain and encourage clicks. Use this best custom link shortener to generate short branded links in a matter of seconds.
Use “https://” for secure links:
‘Https://’ before a URL signifies a secure connection with SSL certification, which builds trust in your brand’s links. Additionally, Google favors ‘https://’ sites in its search rankings, giving you an SEO boost.
Not sure how HTTPS differs from HTTP? Here’s a helpful guide that explains the difference between the two.
Make sure you keep your word:
Your branded link should match the content it leads to. Consistency builds trust, and trust drives clicks. The best way to do this is by adding a custom link preview when sharing links on social media channels with proper metadata (title, description, thumbnail).
Make them memorable:
Branded links are easier to remember, and that makes them more shareable across channels, even offline. When your audience can recall your links, they’re more likely to revisit and click. Keep tracking performance and optimizing your branded URLs regularly to boost results over time.
Maximize your CTR with Replug’s branded link solution
At Replug, we understand the importance of CTR in driving the success of your marketing campaigns. That’s why we’ve developed a comprehensive Branded link solution that takes your CTR optimization to the next level.
Our platform combines the power of branded links with advanced features designed to supercharge your CTR:
Branding and trust: Replug’s branded links prominently display your brand name, building trust and credibility with your audience.
Customization: Tailor your branded links to fit your brand’s style and messaging, ensuring every link you share is aligned with your marketing goals.
Tracking and analytics: Gain real-time insights into link performance and user engagement, allowing you to make data-driven decisions for maximum CTR.
A/B testing: Don’t just set and forget. A/B test different slugs or CTAs in your branded links. Even small tweaks can lead to noticeable CTR improvements.
Custom QR Codes: QR codes make your branded links scannable on physical materials like posters, packaging, or brochures. Replugs help bridge offline and online traffic through custom QR codes to boost engagement.
SMS links: Pair SMS marketing with branded links to increase trust and open rate. Clean, recognizable URLs in messages look more credible and drive higher CTR from your audience’s inbox.
Simplicity and memorability: Our user-friendly platform ensures that your links are not only effective but also easy to remember and share.
Maximize marketing ROI
by transforming ordinary URLs into branded short links that convert.
Try Replug for free
End note
Optimizing your CTR is crucial for the success of your online content. By understanding the importance of CTR and utilizing branded links, you can significantly increase the chances of your audience engaging with your content. These seven strategies are simple to implement and can yield substantial benefits.
Start using branded links today and watch your CTR soar, bringing your content to a wider audience and achieving the impact it deserves.
Maximize marketing ROI
by transforming ordinary URLs into branded short links that convert.
Try Replug for free
FAQs About branded links and CTR
What is a good CTR (Click-Through Rate)?
A “good” CTR can vary depending on the industry and platform, but generally, a CTR between 2% to 5% is considered average across most channels.
Are branded links better for SEO?
Yes. Branded links often include keywords and relevant slugs, making them more descriptive and SEO-friendly. Plus, when paired with https://, they signal trust and security to both users and search engines.
Can I use branded links outside of social media?
Absolutely! Branded links can be used in emails, SMS campaigns, printed materials, presentations, QR codes, and even podcasts. They’re memorable and easy to type, making them versatile for both online and offline channels.
What tools can I use to create and track branded links?
Replug is a great option. It lets you create custom, branded links and provides detailed analytics, including total clicks, unique clicks, geotargeting data, device info, browser, OS, and referral sources, to help you measure and improve performance.
How do branded QR codes help increase CTR?
By turning branded links into QR codes, you give users a quick and seamless way to access your content, especially in offline settings like events, packaging, or signage. A familiar brand in the URL builds trust and boosts the likelihood of a scan and click.
Want to share your favorite tracks or current jams with friends on Discord? This guide walks you through exactly how to link Spotify to Discord so your music becomes part of the conversation.
As a bonus, we’ll spill the tea on how Replug can help amplify your Spotify presence even more.
Let’s begin connecting!
Maximize marketing ROI
by transforming ordinary URLs into branded short links that convert.
Try Replug for free
Why link Spotify to Discord?
Linking Spotify to Discord is a simple way to display what you’re listening to, connect over music with friends, or even sync up using the “Listen Along” feature. Whether you’re an artist, podcaster, or casual listener, integrating the two platforms adds a new dimension to your Discord presence.
Step-by-step: How to link Spotify to Discord
Let’s walk through the exact process of how to link your Spotify to Discord in just a few clicks.
Now you know exactly how to link Spotify to Discord, share what you’re listening to, and even enjoy synchronized playback with friends. It’s a great way to add more personality to your profile, whether you’re jamming solo or connecting with your community.
Plus, if you’re looking to go beyond personal sharing and actually grow your music or content audience, tools like Replug can take your visibility even further.
FAQs on linking Spotify to Discord
How do I link Spotify to Discord?
To link Spotify to Discord, open the Discord desktop app, go to User Settings > Connections, and click on the Spotify icon. Log in to your Spotify account and authorize the connection. You can then choose to display your music on your profile or status.
How to listen to Spotify together on Discord?
You can use Discord’s Listen Along feature to sync your Spotify playback with a friend. Just click on a friend who is listening to Spotify and select Listen Along. Both users must have Spotify Premium, and it only works in text chats, not voice channels.
Why doesn’t my Discord show my Spotify?
Make sure you’ve correctly linked your Spotify account in User Settings > Connections, and enable both: – Display on profile – Display Spotify as your status If it’s still not showing, try disconnecting and reconnecting your account or restarting the app.
How to listen together on Spotify?
Outside of Discord, Spotify offers a feature called Group Sessions (for Premium users) that lets you listen together with friends in real time. Within Discord, the Listen Along feature achieves the same effect when both users are connected and using Spotify Premium.
Is Spotify Premium required to link Spotify to Discord?
No, you don’t need Premium to link Spotify to Discord or display your status. However, you do need Spotify Premium to use the Listen Along feature with friends.
Can you link Spotify to Discord on mobile?
No. Currently, the Spotify connection setup must be done through the Discord desktop app. Once linked, your music status can be viewed across devices, but initial linking isn’t supported on mobile.
The sky? Calm? Maybe “Monday blues”, or something cool and refreshing?
Now think “Red”.
How do you feel?
In danger? Energized? Bold? Maybe even a little anxious?
See what just happened?
Colors don’t just look different; they feel different. They shape how we perceive, react, and decide. In marketing, that’s where color psychology steps in. It’s a quiet force, often overlooked, but it speaks louder than you might think.
And that brings us to a crucial question: Can something as small as your call-to-action button color really influence clicks?
YES! It can.
At first glance, it might seem like a minor design choice. But it’s not. Color quietly guides what users notice, how they feel, and what they do next. The numbers back this up: 60% of people decide whether to accept or reject a product based on color alone. And consistent brand colors can increase recognition by up to 80%.
But what makes a CTA button color work?
Is it as simple as using red for urgency and blue for trust? Or is there more behind the choices?
In this blog, we’ll explore what color psychology tells us, share real-life CTA button examples, and talk about how to choose colors that fit your brand and audience.
Boost your conversion rates with irresistable CTAs with
Why call to action button color matters for website conversion
When you’re working to improve website conversion, it’s easy to focus on things like copy, layout, or adding eye-catching visuals. But, your call to action button color can quietly play a bigger role than you might expect. After all, your CTA button isn’t just a design element; it’s what guides your visitors toward the next step, whether that’s signing up, buying, or learning more.
Colors influence what catches our eye first, how we feel about a brand, and how confident we feel about taking action. Research suggests that colors can even affect our heart rate, sense of urgency, and trust, all of which directly impact conversion optimization efforts. That’s why something as small as a CTA button can help increase CTR and maximize your conversion rate when chosen thoughtfully.
Think of it like this: your CTA button is the tipping point between browsing and converting. And while great copy helps, the right color makes that message stand out.
Just imagine a bold orange “Start free with email” button on a white landing page. It’s almost impossible to miss, isn’t it?
Choosing a color that contrasts with your background, fits your brand, and aligns with your audience’s preferences can make all the difference.
Now, let’s look at call to action button color psychology and explore how certain colors can trigger specific emotions and behaviors.
Call to action button color psychology: How colors influence user behavior
Call-to-action buttons may look simple, but there’s deep psychology behind what makes people click. Colors tap into emotions, perceptions, and even gender or cultural preferences. For instance, research shows women often prefer purple, green, and blue, while men lean toward blue, green, and black.
But choosing the right color isn’t just about emotion. It’s about strategy.
Your button must stand out from the background, reflect your brand tone, and stay consistent across your site. A color that pops in one layout might fade in another. A bold red may scream urgency on a white background but vanish into a dark hero image.
Also, cultural context matters. White means mourning in China, while in Greece, it’s purple. Brand identity plays a role too: playful orange might feel off on a luxury brand, while elegant black could be too intense for a kids’ site.
In short: color doesn’t just decorate, it directs. And when chosen wisely, it quietly nudges users to take action.
Put theory into action with Replug
Now that you know how much a button color can impact user behavior, here’s the real question: how do you bring this to life on your own pages?
Replug has a custom CTA generator that helps you design high-performing CTA overlays and bridge pages that align with your brand. You can personalize every detail; text, colors, logos, button placement, and layout, so your CTAs feel intentional and not generic.
Whether you’re using red for urgency or blue for trust, Replug gives you full creative control to test, tweak, and convert:
Button color, size, and placement
Backgrounds, layout, and design
Targeted messaging that connects with the right audience
If you’re ready to stop guessing and start converting, Replug gives you the tools to make every CTA count.
Boost your conversion rates with irresistable CTAs with
You’ve seen how colors can influence action, but just picking red or green isn’t enough. Here are a few best practices to make sure your CTA buttons actually convert:
Contrast is key
Your button should stand out, not blend in. Make sure it contrasts clearly with the background and surrounding elements.
Stick to one primary CTA color
Don’t overload your page with multiple button colors. Choose one primary action color and stick to it for consistency and clarity.
Test what works for your audience
Color psychology is powerful, but it’s not one-size-fits-all. A/B test your CTA colors to see which one actually gets more clicks.
Use a customizable CTA generator
Use a CTA generator tool like Replug to design CTA buttons with full control over colors, fonts, and layouts. This way, your CTAs will always feel on-brand and eye-catching.
Get inspiration from the best brands
Look into how top brands craft their CTA buttons. Pay attention to color, text, and placement, and take notes on what grabs your attention.
Pair color with strong copy
Even the most vibrant button won’t convert if the copy’s vague. Use action-driven text like “Get Started”, “Try it Free”, or “See How It Works.”
Make it mobile-friendly
Your CTA should be big enough to tap and look just as good on mobile screens as it does on desktop.
Now that we’ve doubled down on why the color of your call-to-action button matters and how to customize it using Replug, we’ve handpicked some of the best CTA button color examples for you. These real-world examples will give you a visual understanding of how different colors guide user perception, and how smart brands use them to drive clicks, signups, and sales.
Ready to pick your favorite?
Scroll down and see which CTA makes you want to click!
10 best call to action button colors (and when to use them)
So, what is the best call to action button color?
Marketers, designers, and honestly, entire Slack channels have debated this endlessly. But the answer isn’t as simple as “red always wins” or “blue builds trust.”
Let’s break it down, color by color, with what psychology and research actually tell us:
1. Red: urgency, excitement
Red is bold, loud, and great when you need to shout. It sparks urgency, perfect for flash sales, limited-time offers, or “Get Started” buttons. Also, red has been shown to increase heart rate.
When to use: Short-term offers, countdowns, or high-energy campaigns where you want quick clicks.
When to skip: If your brand is about calm, trust, or luxury, red might feel too aggressive or stressful.
Examples:
Coca-Cola:Shop Collection — red evokes excitement and brand passion.
Netflix:Get Started — red hints at bold entertainment and immediacy.
Green is reassuring. It whispers “Go ahead, it’s safe,” which is why it’s often used on checkout buttons or anything health-related. It’s tied to nature, wellness, and even prosperity.
When to use: Moments where you want users to feel comfortable and reassured as they take the next step.
When to skip: If your site already has a lot of green, your button might fade into the background.
Examples:
Postnitro:Start creating free carousels — calm encouragement to begin.
Evernote:Get Evernote free — signals progress with a peaceful touch.
Blue is a crowd favorite. 57% of men and 35% of women rank it as their top color. It feels secure, stable, and reliable, which is why banks, SaaS tools, and corporate sites love it.
When to use: Professional services, information-heavy sites, or brands built on credibility.
When to skip: In food-related spaces (blue can suppress appetite) or when you want a more emotional, warm vibe.
Examples:
Replug:Get your short link for free with this efficient URL shortener online — stable, reliable call to action.
ContentStudio:Start your free trial — builds user confidence.
Orange is energetic and playful, combining red’s urgency with yellow’s cheerfulness. However, about 29% of people rank orange as their least favorite color. It can feel cheap or off-brand in serious contexts.
When to use: Playful brands or when you want fast engagement without feeling too aggressive.
When to skip: Luxury products or serious industries where a more premium feel is needed.
Examples:
HubSpot:Get a demo — warm and inviting for curious prospects.
The Budgetnista:Take the 60 sec quiz — quick and casual engagement.
5. Yellow: Bright, optimistic, and grabs attention
Yellow pops off the page and brings a sunny, cheerful energy. It’s hard to miss, which is great for catching eyes. But too much yellow can feel overwhelming or even cautionary, like a warning sign.
When to use: Secondary actions, highlights, or to draw attention to updates and offers.
When to skip: As your main CTA color. It can strain the eyes or create tension if overused.
Examples:
charity: water:Join now — optimistic urgency for a cause.
Mailchimp:Start preview — energetic but not overwhelming.
Black buttons look powerful and stylish, especially for fashion, luxury, or tech brands. About 28% of famous companies use black as their brand colors for a cutting-edge feel.
When to use: Premium product lines, minimalist designs, or when you want to add weight to your button.
When to skip: Friendly, casual brands or spaces where black might come off as too harsh or impersonal.
Examples:
Contentpen:Start with 3 free articles — sharp and direct.
Typeform:Get Started — it’s free — stylish and professional.
Grey doesn’t compete for attention, making it ideal for secondary actions. It’s balanced and professional but easily blends into the background if not used carefully.
When to use: Supporting buttons, disclaimers, or actions that don’t need the spotlight.
When to skip: As your main CTA color, it can feel dull or signal a disabled state.
Examples:
Canva:Read more — clear, but not dominant.
Etsy:Shop these unique finds — blends into a creative backdrop.
White lets other design elements shine. It creates a sense of space and minimalism when used well. But too much white can create visibility issues, especially with low-contrast backgrounds.
When to use: High-end, airy layouts or when your background is dark and you need something that pops.
When to skip: White-on-white designs or when the overall feel risks being too sterile or lifeless.
Examples:
M&M’s:Personalize your M&M’S — lets color pop on the page.
Apple:Watch the clip — sleek, distraction-free experience.
Warm colors like red, orange, and yellow can create urgency and excitement.
Cool colors like blue, green, and black often build trust or feel premium.
There’s no single “best color,” only the best choice for your brand, audience, and context.
What experts say about CTA button colors and conversion optimization
If you search online for the “best call to action button color”, you’ll quickly find lots of strong opinions, and sometimes, conflicting advice. Some marketers swear by red for urgency. Others love green for its calm and positive feel. And plenty argue that blue builds the most trust.
So, who’s right?
Experts often fall into three camps when it comes to conversion optimization:
The generalizers: They share broad best practices, like “warm colors grab attention” or “contrast your button against the background.” These tips help, but they don’t always explain why certain colors resonate more with specific audiences.
The pigeonholers: They believe there’s a secret formula, a single “winning” color that always boosts conversions. But, what works for one brand or campaign might not work for another.
The perpetual testers: They focus on experimenting over and over. For them, there’s no one-size-fits-all answer. The real key is trying different button colors, tracking what drives clicks, and refining based on results.
The truth is, your call to action button color does matter, but context is everything. Replug users often run A/B tests on their landing pages to see which one performs best – and call to action button colour can be a potential variable as to why only one landing page is worth keeping.
For instance, some audiences might click more on a bold orange “Learn More” button, while another responds better to a calm blue “Get Started.” This testing-first mindset is what often helps brands increase CTR and see the real impact of color on your conversion rates.
There isn’t a single color that works perfectly for every product or audience. Instead, it’s about choosing a color that fits your brand, contrasts well with your design, and feels right to your target users.
Wrapping it up
The right CTA button color can catch the eye, stir emotion, and even nudge someone to click.
But there’s no one-size-fits-all formula.
Your brand, audience, and goals should guide your palette. Want trust? Try blue. Need urgency? Red might do the trick. Going for luxury? Maybe black.
So, test, tweak, and trust your data. And don’t be afraid to break the “rules” if it works for your people.
Because at the end of the day, it’s not just about color psychology; it’s about connection.
Boost your conversion rates with irresistable CTAs with
There’s no fixed palette, but popular CTA button colors include red (urgency), green (go), blue (trust), orange (excitement), and black (luxury). The best color depends on your brand vibe and what action you want people to take.
What is a good color for a button?
A good button color stands out from your background and matches your message. Red and orange work well for urgent actions, while green and blue feel more calm and trustworthy.
What color attracts people to click?
Red and orange tend to drive the highest click-through rates in many tests. But ultimately, the most “clickable” color is one that contrasts well and aligns with user expectations on your site or campaign.
What is call-to-action button color psychology?
CTA button color psychology is the study of how different colors influence people’s decisions to click. For example, red can create urgency, blue builds trust, and green signals success. Choosing the right color can improve conversions—when done with context in mind.
When it comes to cleaner, more trustworthy links, marketers and affiliates often face the choice: link shortening vs link cloaking.
They might seem similar, but each serves its own purpose. Knowing the difference can help protect your affiliate income, improve branding, and boost engagement.
In this post, we’ll explain:
What they are
How each works
Why they matter
What’s the difference between them
When to use them
And why tools like Replug.io do more than your average link shortener
Even if you don’t know what “link shortening” and “link cloaking” means, this guide is for you.
Boost ROI with branded URLs!
Enhance your marketing campaigns by creating shareable, trackable, and fully multi-purpose
customizable branded URLs.
Let’s say you run an Instagram account for product reviews. You want to share an affiliate offer.
Your raw link might look like this:
We won’t recommend this because:
It looks spammy (people ask, “Where will this take me?”)
It’s hard to read or remember
It breaks in text messages or emails
It reveals your affiliate ID, and someone could strip it out
Has UTM parameters, which might confuse users
It’s impossible to say out loud in a video or podcast
This is why link shorteners and link cloaking tools exist: to help you create secure branded links.
What is link shortening?
Link shortening is the process of turning a long, complex destination URL into a clean, short url that’s easier to share. The shortened URL redirects to the original destination URL, so users still land exactly where you want them.
For example:
becomes:
The process is quick and handled by a link shortening service or short URL shortener like Replug.
How link shortening works (and why it matters)
Link shortening isn’t complicated behind the scenes, but it helps to know how it works.
When you shorten a URL:
You enter your long link into a link shortening service like Replug
The URL shortener or link shortener generates a short URL
When someone clicks, the short URL redirects them to the original destination URL
This process is quick, and the user rarely notices the redirect. Plus, with tools like Replug, your shortened URLs don’t have to look random; you create branded links as well.
Benefits of link shortening
Link shortening isn’t just about making URLs look nicer. Here are a few benefits:
Better user experience: Shortened URLs are easier to read, share, and remember.
Improved trust: Branded short URLs look more professional than long affiliate URLs.
Updatable anytime: Easily change the destination URL later without changing the short URL.
Tracking & analytics: See how many people clicked, where they came from, and what device they used.
Concise messaging: Fits well in social media posts, SMS, email, and print materials.
Using a reliable link shortening tool like Replug also helps keep your shortened URLs active and secure.
What is link cloaking?
Link cloaking goes beyond shortening, and is especially useful for affiliate marketers. It creates a branded, shortened URL that disguises the actual destination URL. When users click your cloaked URL, they still see your branded link in the browser bar, rather than your raw affiliate URL. That’s why it’s also called link disguising or link masking.
For instance, an affiliate URL like:
could be cloaked to:
How link cloaking works (and why it matters)
Link cloaking sounds complex, but it’s actually simple once you see what’s happening.
When you cloak a URL:
You enter your long affiliate link (or any destination URL) into a link cloaking tool like Replug.
The tool creates cloaked URL; usually short, branded, and clean
When someone clicks your cloaked link, they’re taken to the destination URL, but the original messy affiliate URL stays hidden.
Maximize marketing ROI
by transforming ordinary URLs into branded short links that convert.
Try Replug for free
Benefits of link cloaking
Cloaked URLs do more than just look tidy:
Protects affiliate IDs: Prevents people from copying your link and removing your ID.
Prevents commission theft: Makes it harder for others to hijack or change the link.
Brand consistency: Shows visitors a consistent, branded URL.
Increased trust: Users are more likely to click on branded links than strange-looking affiliate URLs.
Advanced tracking: Many link cloaking tools offer detailed link analytics, conversion tracking, and even split testing.
At first glance, both seem similar because they make URLs shorter and cleaner. But the difference between link shortening and link cloaking is in how they handle the destination URL and what they’re used for.
Keeps the destination URL visible (after the redirect)
Branding
Uses custom/branded links to reflect brand identity
May or may not use branded links
User perception
Appears more trustworthy and professional when branded
Focuses more on convenience and brevity
Tracking & analytics
Often includes detailed tracking and performance measurement features
May include basic click tracking
Branded links
Branded links are a form of cloaked links
Can include branded links, but not all shortened links are cloaked
Use case example
Affiliate marketing, where destination needs to be masked or branded
Social media posts or SMS, where space is limited
In short: All cloaked URLs are shortened, but not all shortened URLs are cloaked.
Controversy around link cloaking
Some platforms see link cloaking as deceptive because it hides the real destination. This can affect trust if the user feels misled.
But when used transparently, for example, to protect your affiliate ID while still sending users to a relevant page, it’s ethical and widely accepted. Replug helps here by letting you cloak affiliate URLs without hiding intent. Your links look professional, stay on brand, and are trackable, so your audience still knows they’re clicking a trusted link.
How to know which one to choose, and when?
Link shortening vs link cloaking isn’t always about picking one. It’s about what fits your campaign.
Rotating links to show different offers in different places.
If you only need shorter, cleaner URLs for your own content, basic link shortening is usually enough. But if you’re sharing affiliate URLs, need to mask the destination and protect your ID; link cloaking is the smarter choice because it already combines branding, shortening, and protection in one link.
Why Replug does more than basic link shortening services
Basic link shorteners stop at making short URLs. Replug does more:
Affiliate link cloaking: Hide affiliate URLs behind branded links.
Advanced analytics: Track total and unique clicks from devices, locations, referrals, and OS.
QR codes: Generate customizable, dynamic QR codes that can be tracked
Retargeting: Add retargeting pixels to your short link to bring back lost customers and reduce cart abandonment.
A/B testing: Test up to 10 URLs at once with weighted split testing and keep the one with better CTR.
Call-to-action overlays: Add CTA buttons, popups, and banners over your content
Link management: Edit destination URLs, add link expiration on seasonal campaigns, and manage your links and bulk download them all within a single dashboard
SMS links: Keep URLs short and clean so they fit character limits and look trustworthy when sent by text
Deep linking: Direct users straight into a specific app page or product screen instead of just the homepage.
Instead of just shortening a URL, you get full link management + advanced features to help links perform better.
Conclusion
Messy URLs don’t just look bad; they can kill trust, hurt clicks, and cost you affiliate commissions.
That’s why knowing the difference between link shortening and link cloaking matters:
Use link shortening to keep URLs neat and track clicks.
Use link cloaking to protect your affiliate IDs, keep branded URLs visible, and track deeper data.
For creators, affiliates, and businesses that care about trust and conversions, cloaking isn’t sneaky; it’s smart marketing. And with a tool like Replug, you get both shortening and cloaking, plus analytics, retargeting and more, all under your own brand.
Frequently asked questions
What is the point of link shortening?
Link shortening turns long, messy URLs into short, shareable ones. This makes them easier to use in social media posts, SMS, print materials, or anywhere you need clean, memorable links, while also letting you track clicks and engagement.
Is using a link shortener bad for SEO?
Not usually. A short URL itself doesn’t hurt your site’s SEO. Just make sure you’re using a reputable link shortening service (like Replug) and branded domains to keep trust high. Clean, branded links can actually improve click-through rates, which indirectly helps traffic.
How link cloaking improves mobile user experience?
Cloaked URLs are shorter, branded, and easier to read on small screens, so users can see and trust what they’re clicking. They also prevent links from breaking in messaging apps or mobile browsers, making it simpler for people to reach the intended page without confusion.
What does it mean to cloak a link?
Cloaking a link means hiding the real destination URL behind a branded, user-friendly URL. Visitors see your custom link instead of the original affiliate or tracking URL, which helps protect affiliate IDs and looks more trustworthy.
Does Replug do both shortening and cloaking?
Yes. Replug lets you create both simple short URLs and fully cloaked, branded links, plus advanced features like retargeting, call-to-action overlays, and A/B testing.
Why do affiliates cloak links?
To protect their affiliate ID from being removed, hide long and messy URLs, build trust with branded links, and sometimes add retargeting or tracking pixels. Cloaked links also look cleaner and more professional in marketing campaigns.
Does Amazon allow link cloaking?
No. Amazon’s Affiliate Program (Amazon Associates) specifically prohibits cloaking its affiliate links. It’s important to always check the Associates Program Policies before cloaking.
How do you hide your affiliate link with a redirect?
Use a link cloaking tool like Replug. You paste your long affiliate URL into the tool, create a branded, cloaked link, and when someone clicks it, they’re redirected to your affiliate offer while only seeing your clean, branded link in the browser.