Affiliate marketing is one of the easiest ways to earn money online – whether you’re a creator, blogger, or run a business. And it all starts with a single link: the affiliate link.
Think of it as your personal tracking link. When someone clicks it and makes a purchase, you get paid. It’s that simple. But how does it actually work? And how can you make the most of it?
Let’s walk you through the basics, plus how tools like Replug can take your affiliate strategy to the next level.
Maximize marketing ROI
by transforming ordinary URLs into branded short links that convert.
Try Replug for free
The basics of affiliate marketing
At its core, affiliate marketing involves three main parties:
Merchants (also called advertisers or retailers) who sell products or services
Affiliates (publishers or partners) who promote those products
Consumers who purchase the products through affiliate recommendations
The affiliate acts as an intermediary, connecting potential customers to merchants. In return for driving sales, the affiliate receives a percentage of each successful transaction.
What are affiliate links?
An affiliate link is a unique URL assigned to an affiliate (that’s you!) by a company or brand. When someone clicks on that link, makes a purchase, or completes a specific action, you earn a commission. Simple as that.
How affiliate links actually work?
When a merchant sets up an affiliate program, they generate unique tracking links for each affiliate. These links contain tracking parameters or cookies that identify:
The affiliate’s ID – A unique identifier assigned to each affiliate partner
The specific product being promoted – Often indicated in the URL structure
The campaign or promotional channel – To track which marketing efforts are most effective
Here’s what happens behind the scenes when someone clicks an affiliate link:
A consumer clicks on the affiliate link in a blog post, video description, or social media post
The link redirects them to the merchant’s website
A tracking cookie is placed in the consumer’s browser (typically lasting 7-90 days)
If the consumer makes a purchase within the cookie’s duration, the sale is attributed to the affiliate.
The merchant’s affiliate system (such as ReferralCandy) records the transaction and assigns the commission to the affiliate
Managing affiliate links
Every click matters in affiliate marketing. Replug helps you take control, track performance, boost conversions, and stay organized effortlessly.
Alongside managing affiliate URLs, many marketers also use tools like Referral Factory to build referral programs that work hand-in-hand with their affiliate strategy, letting them generate unique referral links, track conversions, and automate rewards for every successful referral.
Here’s where Replug comes in
Affiliate links are powerful, but let’s be honest, they’re often long, messy, and not exactly click-worthy. That’s where this efficient custom link maker comes into play.
With Replug, you can:
Shorten and brand your affiliate links (turn that long URL into short branded URL)
Track clicks and conversions in real time with detailed analytics
Retarget users who click your affiliate links with ads, even if they don’t purchase right away
Customize link previews for better engagement across social platforms
Here’s how to shorten an affiliate link using Replug
Step 1:
Go to Replug and log in to your account. If you don’t have an account, sign up for free.
Step 2:
On the Replug dashboard, locate the “Quickly shorten your URL” field. And paste your affiliate link into the box.
Press Enter, and a pop-up window will appear. Here, you can customize the link to create a branded and recognizable URL.
Click the “Checkmark” to generate your shortened Replug link.
Step 3: (Additional step)
Replug offers powerful tools to help you maximize your affiliate earnings:
QR codes have become an essential tool for quickly sharing information in an efficient and user-friendly way. If you frequently use Google Docs for collaboration, creating a QR code can help others access your document with just a quick scan. Whether you’re sharing notes, presentations, or project plans, a QR code eliminates the need for typing long URLs and enhances accessibility.
In this guide, we’ll show you how to make a QR code for a Google Doc using Replug and directly inside Google Chrome.
What is a QR code for Google Docs?
A QR code for Google Docs is a machine-readable barcode that encodes the URL of your document. When scanned, it instantly redirects users to your Google Doc, making document sharing seamless.
Offering quick links to important documents in business presentations
Distributing forms and surveys without requiring users to manually type a link
Now, let’s dive into the step-by-step process of generating a QR code for your Google Docs using Google Chrome and Replug.
How to make a QR code for a Google Doc using Google Chrome?
If you use Google Chrome, you can generate a QR code for your Google Doc without any third-party tools. Here’s how:
Open your Google Doc in Chrome.
Click on the address bar where the URL is displayed.
Look for the QR code icon on the right side of the address bar (if available) or right-click anywhere on the page and select Create QR code for this page.
If you can’t find any of these options:
Click on the More (three dots) menu in Chrome.
Select Cast, save, and share and then Create QR code.
You can now:
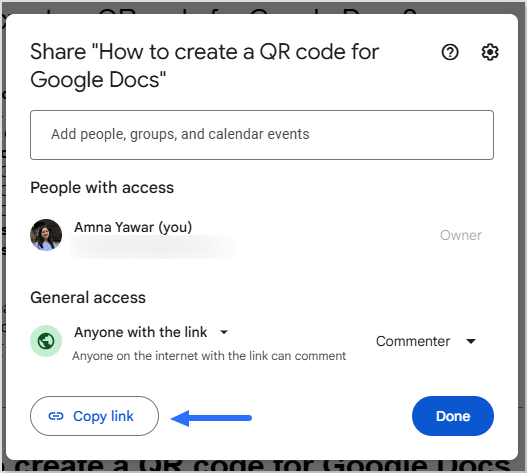
Copy the QR link.
Download the QR code as an image.
Scan the QR code with another device’s camera.
This method is quick and convenient, but the QR code is static, meaning you cannot edit the link, track scans, or customize its design.
Replug makes QR code generation effortless, offering customizable, trackable, and dynamic codes to enhance your QR code marketing and engagement strategies.
Customization options: Easily personalize your QR code’s foreground and background colour to match your brand identity.
Analytics and tracking: Track real-time scan data, including the number of scans, locations, and devices used, to gain insights into user engagement.
High-resolution downloads: Download QR codes in high-quality formats that are suitable for both digital and print use without losing clarity.
Easy management: Store, categorize, and manage multiple QR codes within a centralized dashboard, ensuring easy access and organization.
Editable links: Use dynamic QR codes to change the destination URL of your Google Doc anytime without the need to recreate or redistribute the QR code.
Unlimited scans: Unlike online Google Docs QR code generators, Replug QR codes don’t expire. The tool offers unlimited QR code scans, which is especially useful if you’re sharing your document with a large audience.
A complete link management solution
for marketing professionals & agencies.
Try Replug for free
Benefits of using a QR code for Google Docs
Here are some general benefits of using a Google Docs QR code for sharing your documents:
Quick access: Eliminates the hassle of typing long URLs, allowing users to scan and access the document instantly with just a smartphone camera.
User-friendly: Anyone, regardless of technical expertise, can easily scan a QR code and open the document without any extra steps.
Time-saving: You don’t need to manually share links via email or messaging apps, making document access seamless and efficient.
Better engagement: Ensures smoother collaboration in classrooms, meetings, and events by providing instant access to relevant materials.
Improved document distribution: Ideal for organizations that frequently share important files, reports, and resources with employees or clients.
Enhanced security: Reduces the risk of typos and phishing scams by ensuring users are directed to the correct document without errors.
Versatile usage: Can be printed on posters, included in presentations, embedded in emails, or displayed on websites for easy document access.
Eco-friendly: Promotes paperless sharing, reducing the need for printed handouts while making documents more accessible.
Conclusion
Creating a QR code for Google Docs makes document sharing more accessible and efficient. Whether for professional, educational, or marketing purposes, QR codes simplify the process. By using Replug, you get additional features like customization, tracking, and easy management, making your QR codes even more effective.
So, why wait? Start generating QR codes for your Google Docs today and enhance your sharing experience!
Also, check out our short URL generator to create clean, branded links that complement your QR codes and streamline document sharing even further.
Frequently asked questions
Is it possible to update the link in a QR code after creating it?
If you use Replug’s dynamic QR codes, you can change the destination link without changing the QR code.
Can I customize my QR code’s design with Replug?
Yes, Replug allows you to customize the background and foreground colour of your QR code to match your brand identity.
Do QR codes for Google Docs expire?
If you use a static QR code, it remains active as long as the Google Docs link is valid. However, dynamic QR codes may have expiry settings depending on the tool used.
Can I track how many people scan my QR code?
Yes, with Replug’s analytics, you can monitor Google Docs QR code scan activity and engagement metrics.
Can I create a QR code for Google Docs without a third-party tool?
Yes! Google Chrome has a built-in QR code generator that allows you to create a QR code directly from the browser.
With over 1.2 billion users on LinkedIn and more than 310 million active every single month, your profile isn’t just a digital resume; it’s your first impression. And one thing most people overlook is their LinkedIn profile URL.
By default, LinkedIn hands you a messy string of random numbers and letters that looks something like linkedin.com/in/ahsan-jamal-4b3x892z. Not exactly the way you want, right?
A clean, customized URL makes you look more professional, easier to find, and way more shareable, whether you’re adding it to your resume, email signature, or business card.
The best part? It takes less than two minutes to change.
In this guide, we’ll walk you through exactly how to do it on both mobile and desktop. But first, if you’re wondering what a LinkedIn URL actually is and why it matters, let’s break that down real quick.
What is a LinkedIn URL?
A LinkedIn URL is simply the web address that leads directly to a unique LinkedIn profile. It looks something like this: linkedin.com/in/yourname.
By default, LinkedIn auto-generates this link, and it’s usually a jumbled mess of a person’s name plus a random string of numbers and characters.
The primary purpose of a LinkedIn URL is to give a unique, shareable link that people can use to find and visit a profile instantly.
Think of it as one’s personal address on LinkedIn. The cleaner it looks, the better the impression it makes.
Importance of changing your LinkedIn URL
Here’s why customizing your LinkedIn URL actually matters:
Professionalism & personal branding: A custom URL like linkedin.com/in/ahsanjamal instantly looks more polished and intentional. It signals that you take your professional presence seriously.
Improved searchability & SEO: When your URL includes your actual name, it’s more likely to show up when someone Googles you. This makes it easier for recruiters or clients to find you online.
Memorability & consistency: A clean, name-based URL is much easier to remember, and it keeps your personal brand consistent across your resume, portfolio, and social profiles.
Easy sharing on the go: No matter if you’re at a networking event or sending forth a quick email, a short and clean URL is way easier to share verbally or in writing.
Removes clutter: Getting rid of those random numbers just makes everything look tidier on your resume, your email signature, and anywhere else you drop your LinkedIn link.
How to change LinkedIn URL on mobile
Changing your LinkedIn URL on a smartphone is pretty straightforward. It just takes a few taps, and you’re done. Follow the next steps, and you’ll have a clean, custom URL in no time.
Here’s how to change your LinkedIn URL in the mobile app:
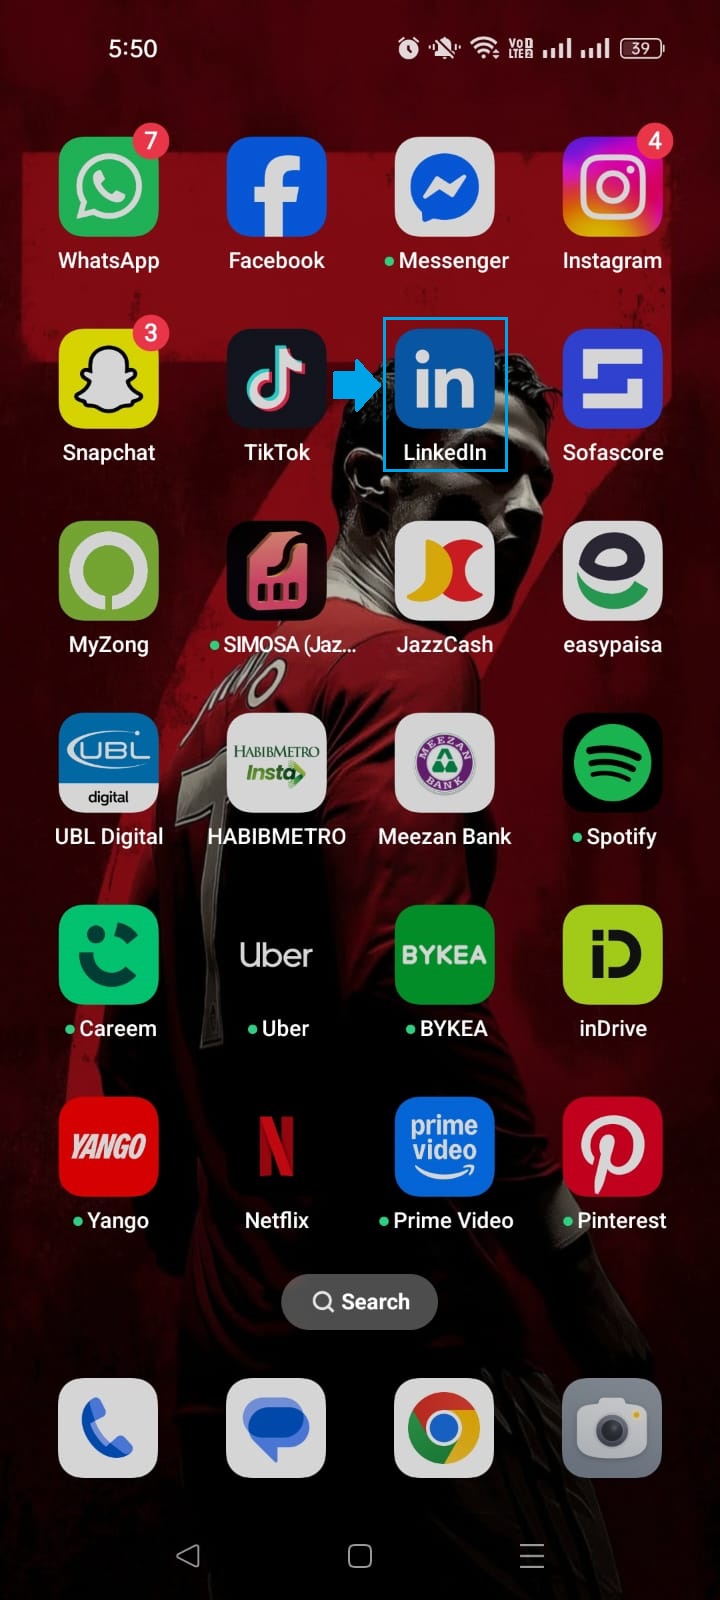
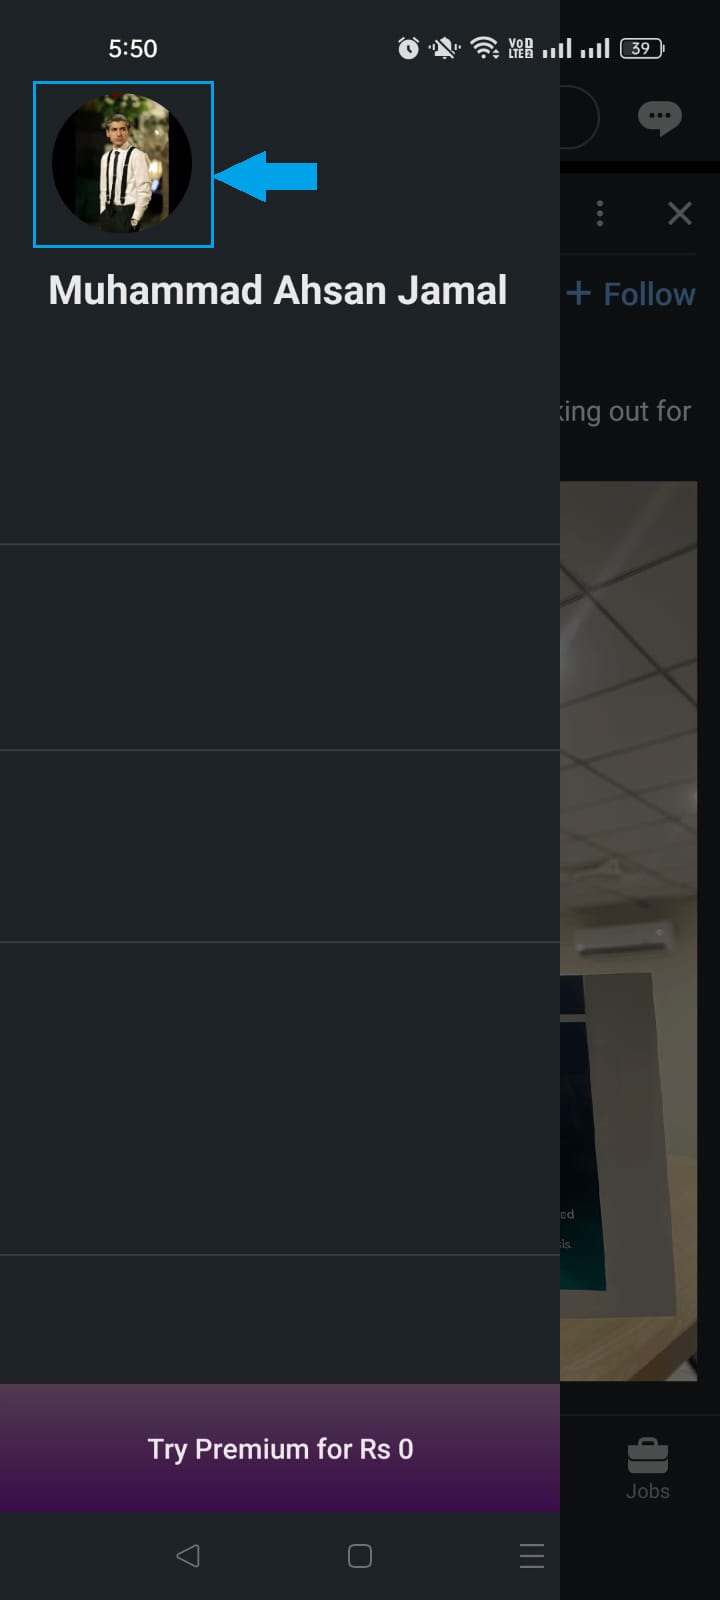
Step #01: Open the LinkedIn app
Grab your phone and launch the LinkedIn app. Make sure you’re logged into the account whose URL you want to change.
Step #02: Go to your profile
Tap on your profile picture or your name at the top of the screen to navigate to your profile page.
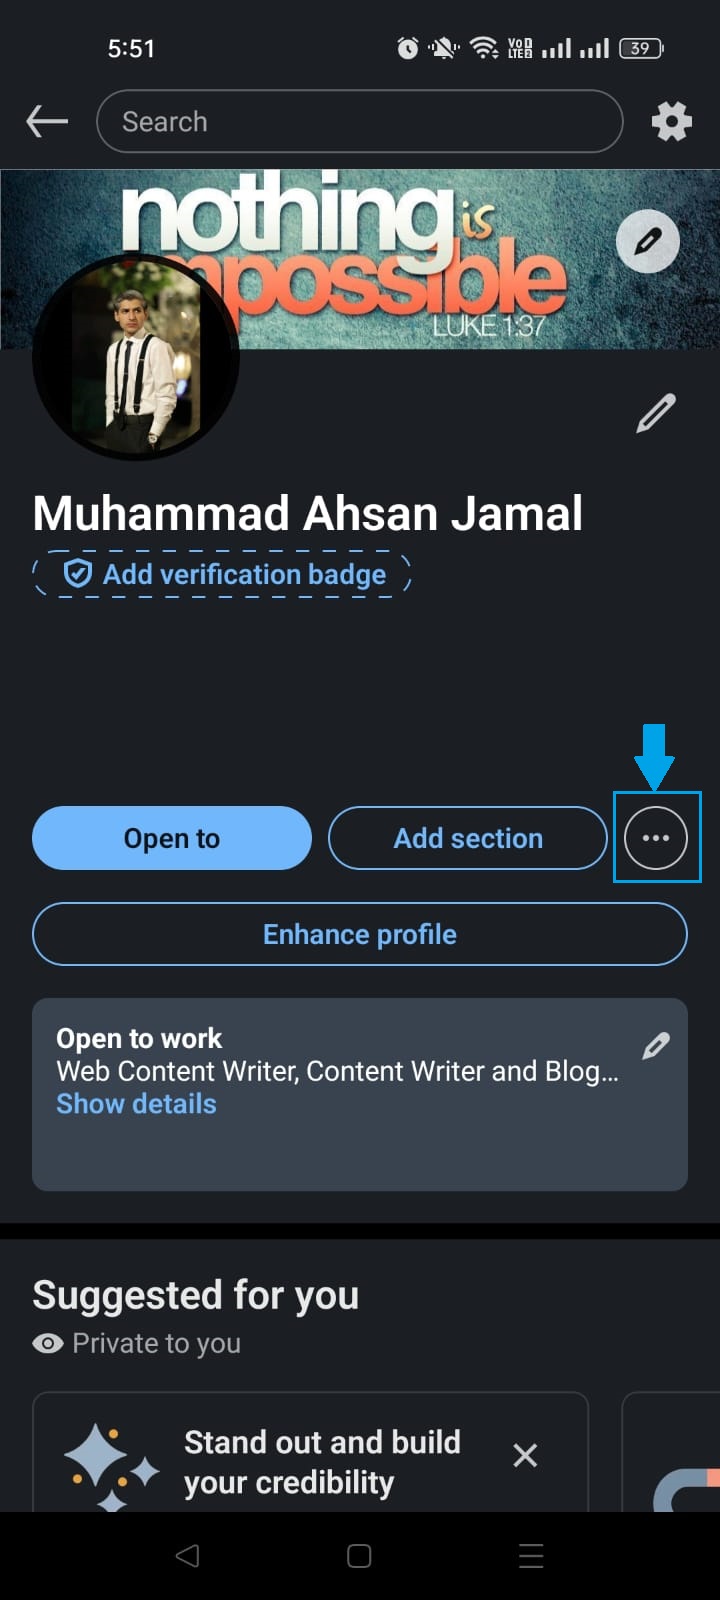
Step #03: Tap the (…) button
Once you’re on your profile, look for the three-dot (…) button and tap on it to open a list of options.
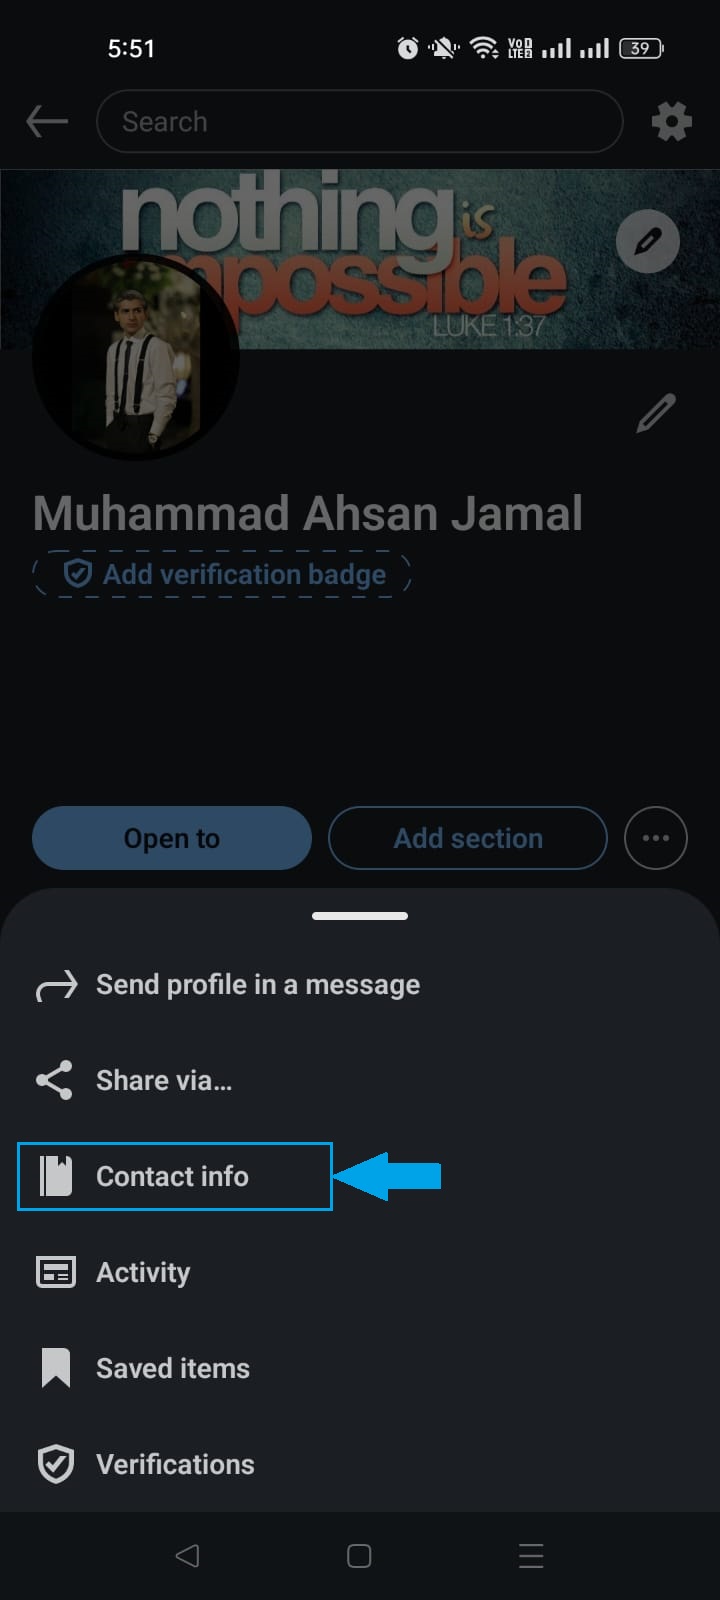
Step #04: Select “Contact info”
From the menu that appears, tap on “Contact info”. This is where LinkedIn stores your profile URL along with your other contact details.
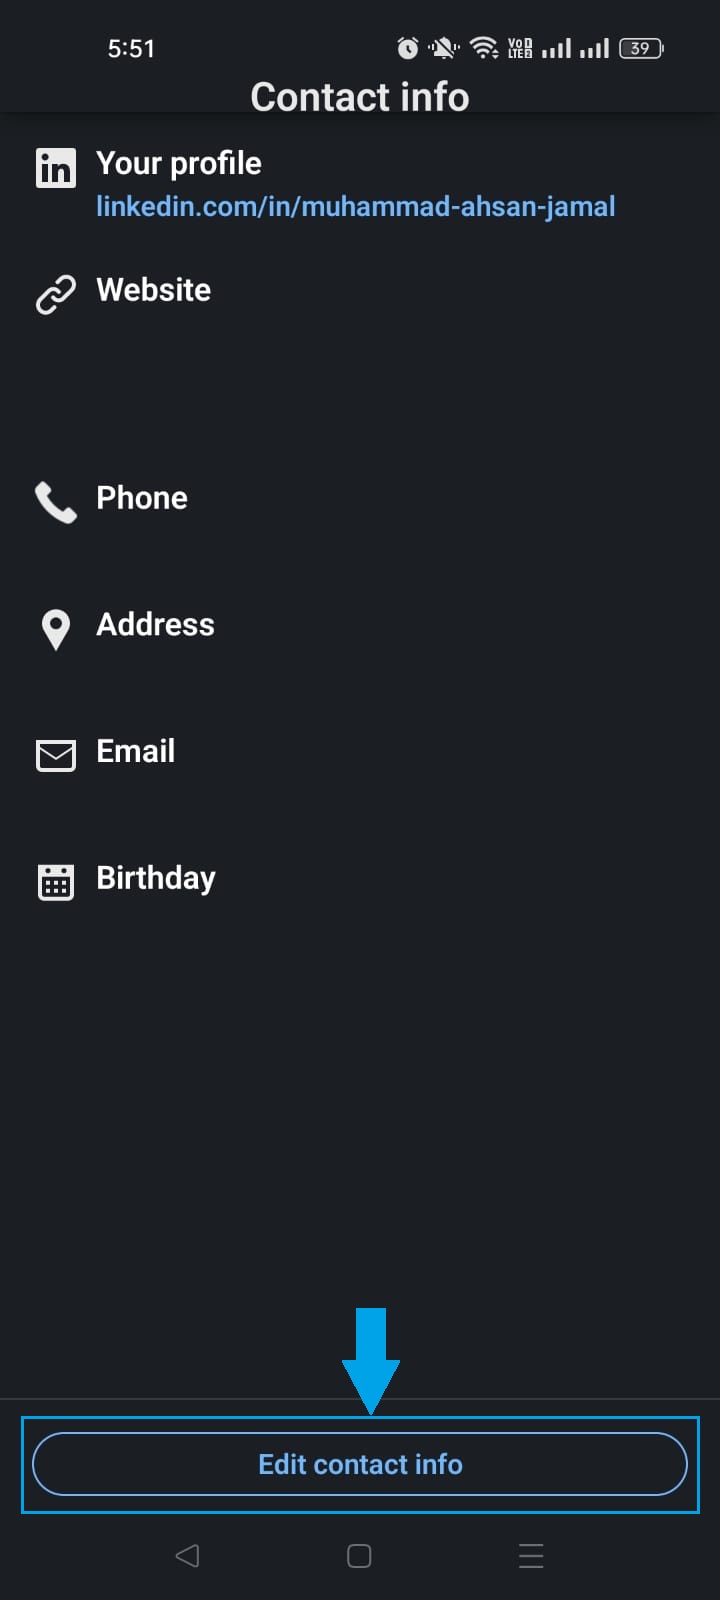
Step #05: Tap “Edit contact info” button
At the bottom of the screen, tap the “Edit contact info” button to make changes to your information.
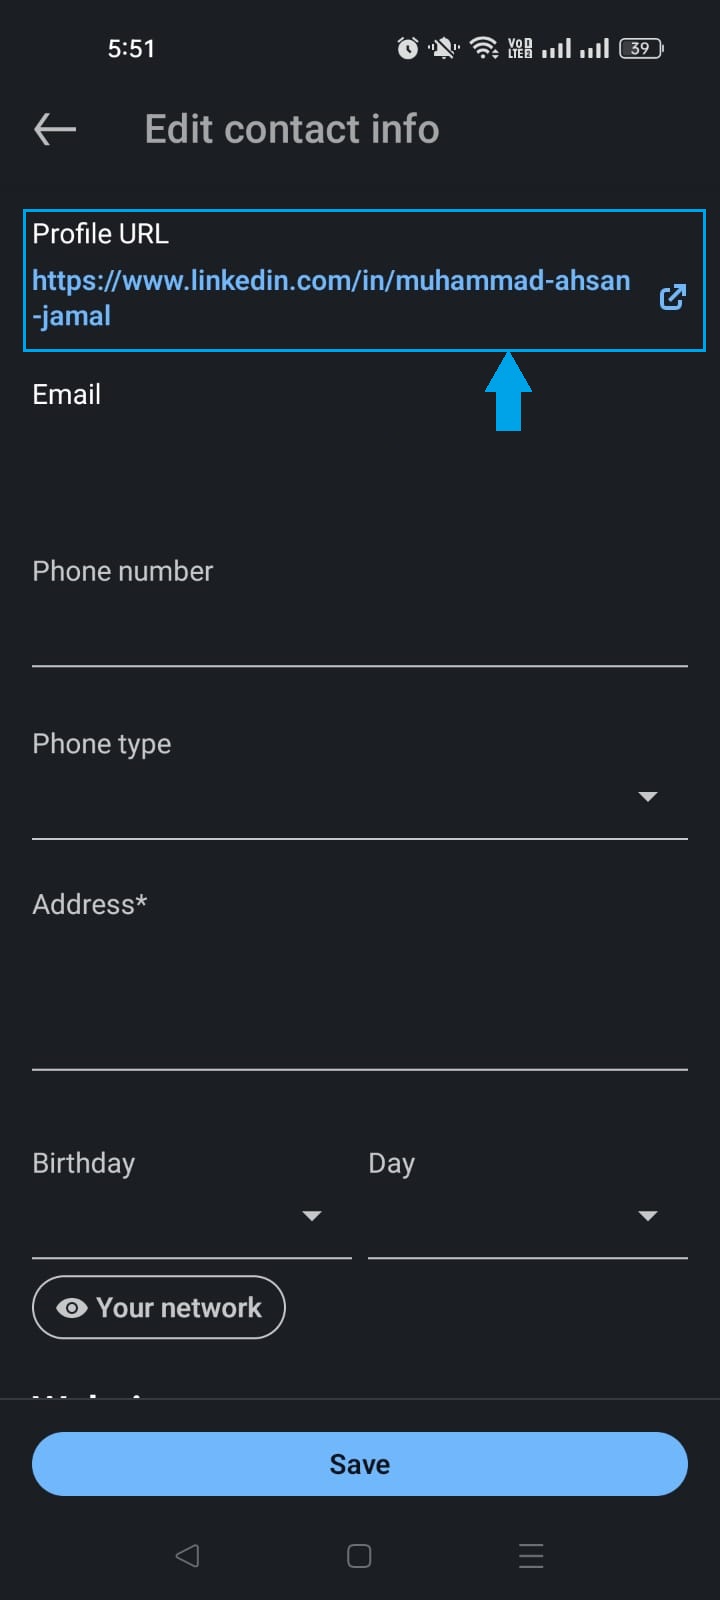
Step #06: Tap “Profile URL”
At the top of the page, you will see the “Profile URL” option. Tap on it. This will take you to the section where you can finally edit your LinkedIn URL.
Step #07: Tap the pencil icon under “Edit your custom URL”
Tap the pencil icon next to your current URL, delete the existing string of text, and type in your new custom URL. Ideally, your name or a clean variation of it.
Step #08: Tap “Save”
Once you’re happy with your new URL, hit the “Save” button, and that’s it! Your custom LinkedIn URL is live and ready to share.
How to change LinkedIn URL on desktop
Prefer working on a bigger screen? No problem.
Changing your LinkedIn URL on desktop is just as simple.
Here’s how to edit a LinkedIn URL on the desktop app, step by step:
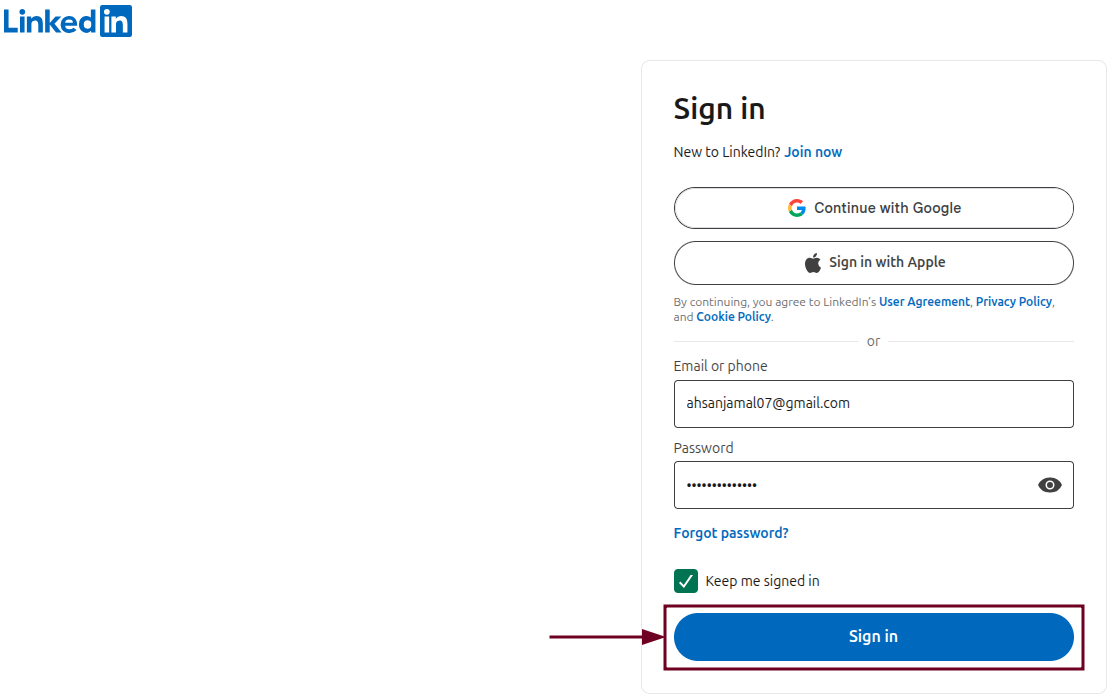
Step #01: Sign in to your LinkedIn account
Head over to linkedin.com and sign in with your email and password if you aren’t already logged in.
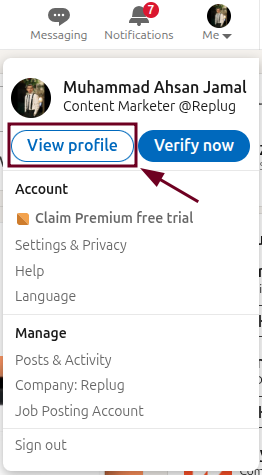
Step #02: Click the “Me” icon
Once you’re successfully signed in and are on the homepage, look for the “Me” icon at the top right of the navigation bar. It’s right next to the search bar. Click on it.
Step #03: Select “View profile”
A small dropdown menu will appear. Click on “View profile” to be taken directly to your LinkedIn profile page.
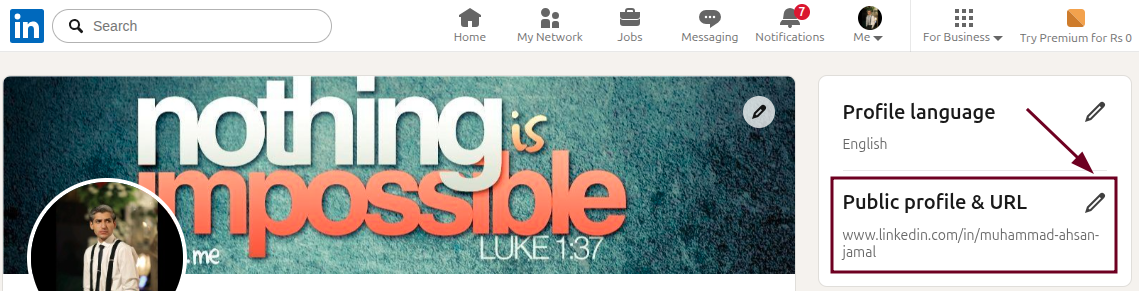
Step #04: Click the “Public profile & URL” option
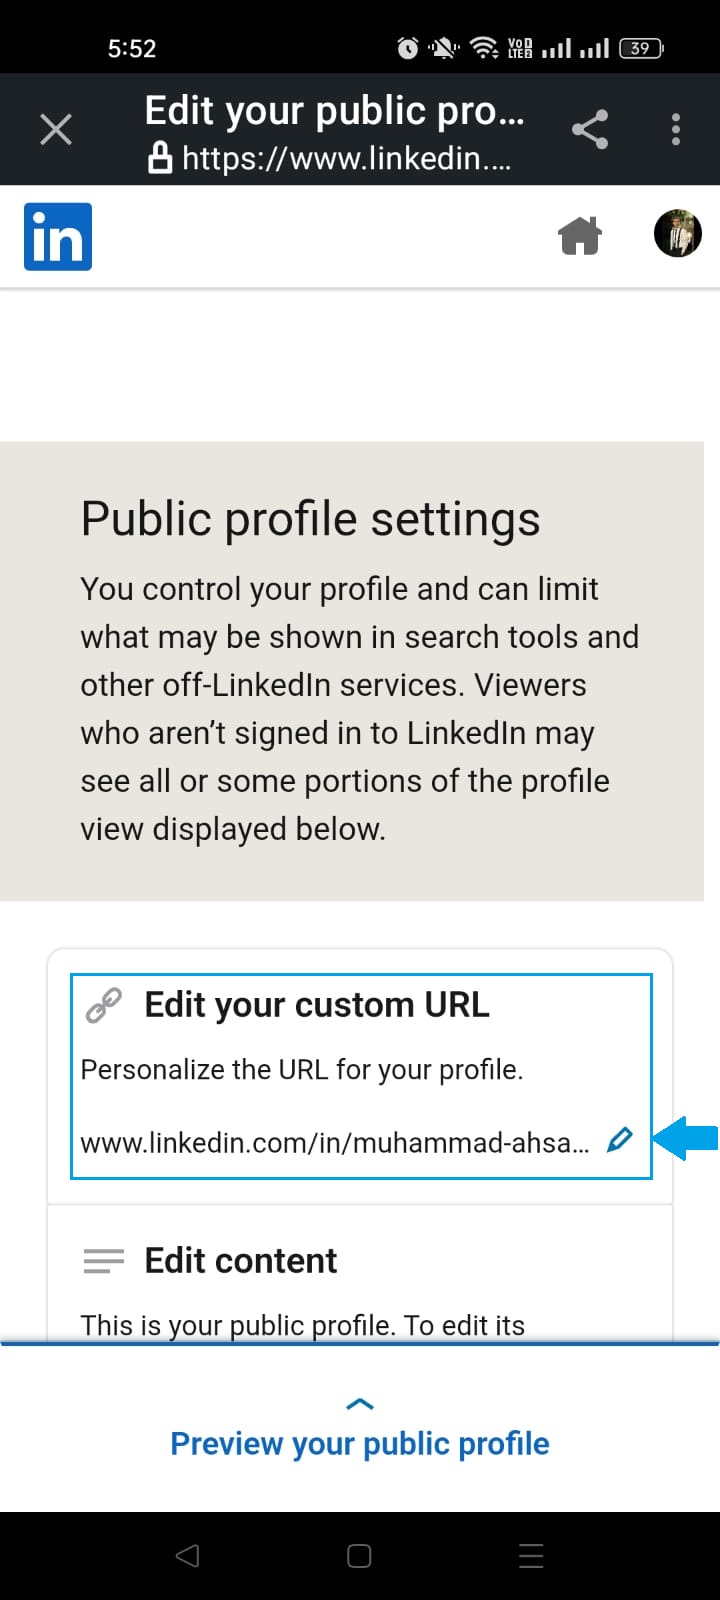
On your profile page, look toward the right side of the screen and click on the pencil icon next to “Public profile & URL”. This will open your public profile settings in a new page.
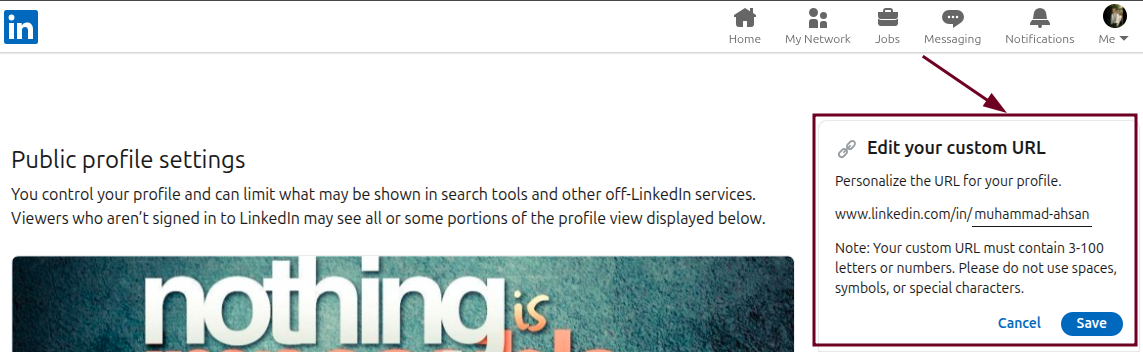
Step #05: Look for the “Edit your custom URL” section
On the right-hand side of the page, you’ll spot the “Edit your custom URL” section. This is exactly where you need to be.
Step #06: Click the Edit (pencil) icon
Click the small pencil icon right next to your current URL to unlock the text field and make it editable.
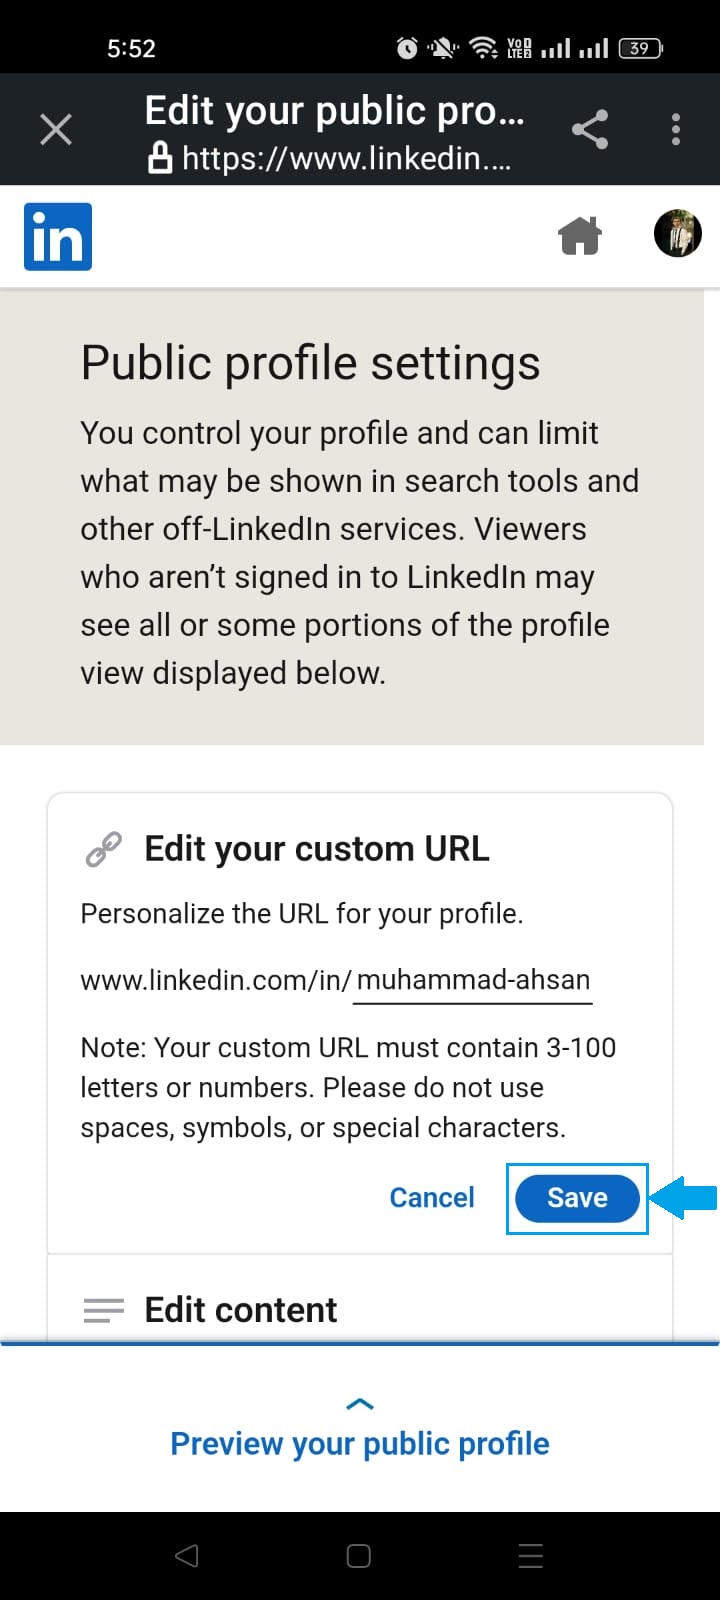
Step #07: Type the new desired URL
Delete the existing URL text and type in your new custom URL, i.e., your full name or a clean, professional variation. It works best here.
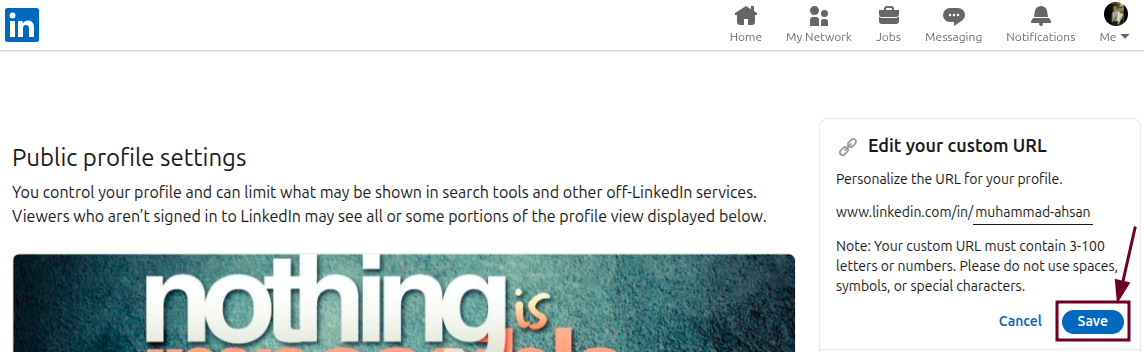
Step #08: Click “Save”
Once you’ve entered your new URL, click the “Save” button, and you’re all done! Your updated LinkedIn URL is now live and ready to go.
Not sure what to put as your custom LinkedIn URL? You’ve got more options than just your name. Here are some popular formats to help you pick one that fits your personal brand perfectly.
Simple Name
The most straightforward option. Just use your first and last name. Clean, professional, and easy to remember.
👉 linkedin.com/in/ahsan-jamal
Initials + Last Name
If your full name is already taken, try using your first initial combined with your last name.
👉 linkedin.com/in/ajamal
Name + Job Title/Specialization
Great for standing out in your field. Pairing your name with your role tells people exactly what you do before they even click your profile.
👉 linkedin.com/in/ahsanjamal-contentmarketer
Name + Industry
If you want to highlight the space you work in rather than a specific title, adding your industry works really well.
👉 linkedin.com/in/ahsanjamal-marketing
Name + Company
Ideal if you’re closely associated with a well-known brand or want to reinforce your current professional identity.
👉 linkedin.com/in/ahsanjamal-d4interactive
Professional Certification/Suffix
Have a well-recognized credential like an MBA, CPA, or PhD? Adding it to your URL is a subtle but effective way to establish authority instantly.
👉 linkedin.com/in/ahsanjamal-mba
Why can’t I change my LinkedIn profile URL: Troubleshooting common errors
Running into trouble while trying to update your LinkedIn URL? You’re not alone! It’s actually more common than you’d think. Here are the most frequent reasons it happens and how to fix them quickly.
Common reasons for URL change failures:
The desired URL is taken: LinkedIn URLs are unique, so if someone else has already claimed the URL you want, you simply won’t be able to use it. Try adding a middle initial, a number, or a slight variation to work around this.
Character limits & constraints: LinkedIn only allows between 3-100 characters in your custom URL, and it must contain only letters, numbers, or hyphens. No spaces, symbols, or special characters allowed.
Too many changes: LinkedIn doesn’t let you change your URL an unlimited number of times. If you’ve been editing it back and forth frequently, the platform may temporarily restrict further changes.
The 180-day rule: If you’ve recently changed your URL, you may need to wait up to 180 days before you can change it to a previously used URL again. So choose wisely before hitting save.
Troubleshooting steps:
Use unique variations: If your preferred URL is taken, try mixing in your middle name, initials, profession, or a relevant keyword to create a unique URL alternative that still feels on-brand.
Clear cache or change browser: Sometimes the issue is just a browser glitch. Clear your cache and cookies, or switch to a different browser, and try making the change again.
Check for “profile not found”: After saving your new URL, paste it into your browser to make sure it actually loads your profile correctly. Occasionally, there’s a short delay before it goes live.
Verify the URL: Double-check that your new URL doesn’t have any typos, extra spaces, or unsupported characters before saving. A small mistake can cause the whole thing to fail silently.
Shorten your LinkedIn URL in seconds using Replug!
Once you’ve got your custom LinkedIn URL ready, why not take it a step further?
Replug is an all-in-one link management platform that lets you shorten, track, and manage your links, all from one single dashboard.
Its reliable URL shortener feature is especially handy for professionals who want a super clean, branded short link that’s even easier to share than a standard LinkedIn URL.
Maximize marketing ROI
by transforming ordinary URLs into branded short links that convert.
Try Replug for free
Instead of sharing a long URL, Replug lets you generate something short, sharp, and fully customized within seconds.
No matter if you’re adding it to your professional bio, resume, or business card, a Replug short link just looks that much more polished and composed.
Wrapping up
And that’s really all there is to it!
Changing your LinkedIn URL takes just a few steps, whether you’re on your phone or sitting at your desktop, and the difference it makes to your professional image is totally worth it.
A clean, custom URL makes you easier to find, easier to remember, and just looks a whole lot more refined everywhere you use it.
Pick a format that fits your personal brand, avoid the common pitfalls we covered, and don’t forget to shorten it further with Replug for that extra professional touch.
Now go update that URL, your profile deserves it!
Frequently asked questions
Can you rename a link in LinkedIn?
Yes, you can! LinkedIn allows you to customize your profile URL by editing it through your profile settings. Just head to the “Public profile & URL” section and update it to something that better represents you. Keep in mind it has to meet LinkedIn’s character and formatting requirements before saving.
How to get the LinkedIn URL address and customize it?
Finding your LinkedIn URL is simple. Just go to your profile and look at the address bar in your browser. That’s your current LinkedIn URL right there. On mobile, you can find it under the “Contact info” section.
Now, here’s how to customize your LinkedIn URL:
1. Head to your profile settings. 2. Then, click on “Public profile & URL” on desktop or access it through the three-dot menu on mobile. 3. After that, tap the pencil icon next to your current URL and type in your preferred custom URL. 4. Finally, tap or click “Save” and you’re done.
Can we change the LinkedIn URL more than once?
Yes, you can change your LinkedIn URL more than once. LinkedIn allows users to change their custom public profile URL up to five times within a six-month period. After the fifth change, you must wait six months to change it again. Your previous URL remains linked to your profile for six months unless unlinked.
How to change LinkedIn URL for a company?
To change your LinkedIn company page URL, you need to be a super admin of the page. Go to your company page and select the “Page info” section. This is where you’ll find the option to edit your public URL. Keep in mind that company page URLs can be changed up to five times every 180 days.
How to change LinkedIn URL for a resume?
First, customize your LinkedIn URL using the steps we’ve already covered in this guide so it looks clean and professional. Once that’s done, adding your LinkedIn URL on resume is straightforward.
Place it in your contact information section at the top of your resume, right alongside your phone number and email address. Make sure the URL is clickable if you’re sharing a digital version of your resume.
A clean LinkedIn URL on your resume not only looks polished but also makes it super easy for recruiters to jump straight to your profile with a single click.
What happens to the old LinkedIn URL after you change it?
After you change your LinkedIn URL, the old URL remains linked to your account for six months. During this period, the old link will still redirect visitors to your profile. However, you can manually unlink it, after which it becomes available for other members to claim in seven days.
What are the key LinkedIn URL requirements & restrictions?
Here’s a quick rundown of what LinkedIn allows and doesn’t allow for custom URLs:
– Must be between 3 and 100 characters – Can only include letters, numbers, and hyphens – No spaces, symbols, or special characters are allowed – Cannot be a URL that someone else has already claimed – Previously used URLs cannot be reclaimed for 180 days – Cannot use the word “LinkedIn” in your custom URL
How to find LinkedIn URL on iPhone and Android?
Here’s how to do it:
1. Open the LinkedIn app. 2. Tap on your profile picture to go to your profile. 3. Then tap the (…) three-dot button. 4. Select “Contact info,” and you’ll find your LinkedIn URL listed right at the top. 5. You can tap on it to copy or share it directly from there.
How to copy and share your LinkedIn profile URL?
– On desktop, go to your LinkedIn profile. Your URL will be visible at the top of the page. Simply copy it from the address bar and share it wherever you want. – On mobile, follow the steps already mentioned above to find your URL under the Contact info section. From there, you can copy and share it anywhere (your resume, email signature, WhatsApp, wherever you need it!)
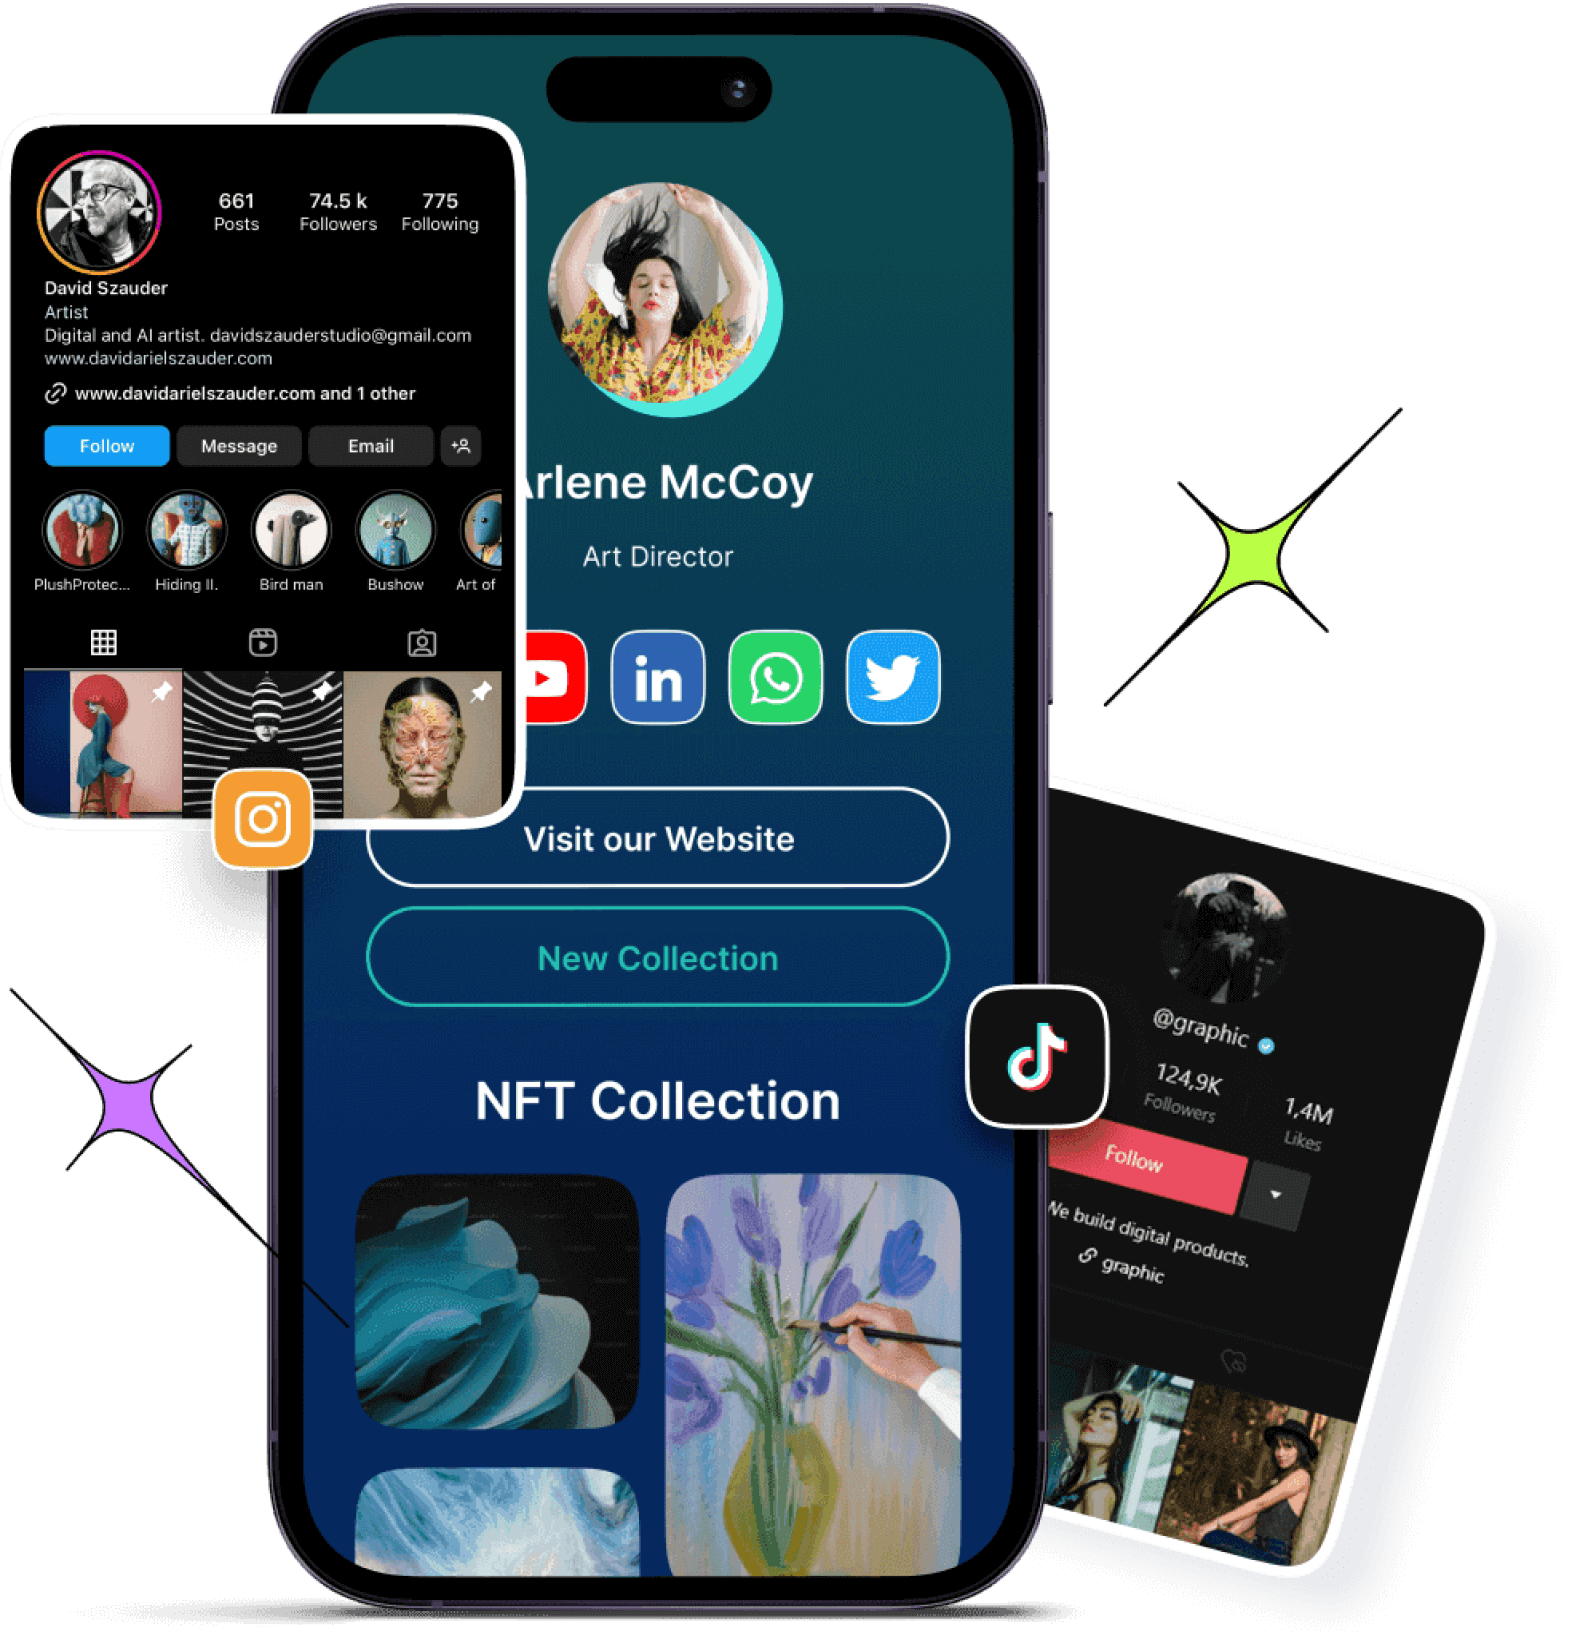
Let’s face it – our digital lives are everywhere. One minute it’s TikTok, the next it’s your Instagram, or YouTube.
Socials here. Portfolio there. Store somewhere else.
And expecting your audience to keep up? Not possible
Want to bring it all together?
That’s where a link gallery (bio link) comes in. It pulls everything together into one neat, clickable destination. So let’s get started.
Understanding link galleries
A link gallery (a bio link page) is a centralized landing page that houses all your important links in one convenient location. It’s an easy solution as it works as your business card or the modern equivalent of a website homepage, but streamlined for today’s fast-paced, mobile-first world.
Instead of asking followers to search for your various platforms or cramming multiple URLs into your social media bio, a link gallery provides a clean, branded solution where visitors can access multiple links with one URL.
Learn the link in bio meaning in detail for an even better idea of the concept!
What is the best way to create a link gallery(bio link)?
The best way to create a link gallery (also known as a bio link) is to use a dedicated link in bio tool. These platforms are designed to make it super easy to combine all your important links into a single, customizable page.
Introducing Replug.io: The Ultimate link gallery solution
While several link gallery tools have emerged, Replug.io stands alone as the comprehensive solution designed to address all the challenges of digital connection.
Go beyond generic link pages!
Create custom bio links that truly fit your brand
With Replug, you can create bio links that are unique, engaging, and built to convert.
First, log in to your Replug account. Don’t have one yet? Start with a 14-day free trial.
Once inside the dashboard, head over to the bio-links section and click on “Create new.” You’ll be taken to a setup window that’s divided into three tabs: branding, content, and settings.
Step 01: Customize your branding
Begin with the branding tab, where you can add your profile essentials, including:
Profile title
Verified badge
Bio description
Profile image
Background image
Custom theme
Once you’re done adding everything, click the “Update” button located in the corner.
Step 02: Add content that converts
Now for the fun part: adding your links and content blocks. Replug allows you to include a variety of rich media elements like:
Social media buttons (up to 8)
Website or landing page links
Text blocks, separators, and spacing for a clean layout
Before sharing your bio link page, give it an SEO boost:
Add a custom meta title, description, favicon, and featured image
Insert tracking pixels (Facebook, TikTok, Google, etc.) for retargeting and conversion tracking.
Now you’re good to go! Share your unique Replug bio link across all major platforms: Instagram, TikTok, Facebook, X (Twitter), LinkedIn, and beyond.
Moreover, beyond aesthetics, Replug galleries are built for performance. Lightning-fast loading speeds, mobile-optimized displays, and accessibility features ensure every visitor has a seamless experience, resulting in higher engagement and conversion rates.
More growth-oriented features
Replug goes far beyond basic link sharing. It’s packed with features built specifically to help creators, marketers, and businesses grow faster and smarter:
A complete link management solution
for marketing professionals & agencies.
Try Replug for free
Custom CTAs
Guide your audience to take meaningful actions, whether it’s signing up for a newsletter, watching a video, or making a purchase, right from your bio link page.
Retargeting pixels
Integrate Facebook, TikTok, LinkedIn, and Google Ads pixels to retarget every visitor who clicks your link. Perfect for running high-converting ad campaigns and increasing ROI.
Traffic routing
Send users to different destinations based on their device, location, or language, maximizing relevance and improving user experience.
Track your bio links efforts precisely by adding UTM parameters to each link, perfect for campaign performance monitoring in Replug.
Branded domains
Use your own custom domain to reinforce brand trust and consistency across all your marketing channels.
A/B testing
Test different versions of your bio link page to see what resonates best with your audience and optimize accordingly.
QR code integration
Generate QR codes for your link gallery and individual links, making it easy to share offline, on packaging, posters, business cards, or at live events.
Why link galleries have become essential
The rise of link galleries stems from genuine limitations in how we connect online:
Social media restrictions: Most platforms only allow one clickable link in your bio, creating the infamous “link in bio” problem.
Audience navigation: Followers shouldn’t need to hunt for your content across different platforms.
Professional presentation: Random link shorteners or multiple disjointed URLs look unprofessional and decrease click-through rates. (Pro Tip: Try this reliable link shortener to keep your links clean and branded.)
Analytics insights: Without a centralized link hub, tracking which destinations resonate with your audience becomes nearly impossible.
As our online presence continues to expand across an ever-growing landscape of platforms, having a centralized, branded hub for your digital identity isn’t just convenient, it’s essential.
Replug isn’t merely offering a product; it’s providing the solution to one of the most fundamental challenges in modern digital strategy.
Frequently asked questions
Can I use a link gallery as a mini-website for my brand or service?
Absolutely! A link gallery, especially with tools like Replug, can function as a sleek, mobile-first landing page that showcases your brand, portfolio, services, promotions, and contact links, all in one place.
What’s the difference between a link gallery and a traditional landing page?
A link gallery is simplified and optimized for social bios and mobile users. Unlike a full landing page, it focuses on multiple quick-access links and doesn’t require web development skills or hosting setup.
Is it possible to schedule content blocks to appear at specific times?
Yes! With advanced tools like Replug, you can schedule when each link or content block goes live, perfect for time-sensitive campaigns, limited offers, or event countdowns.
How do tracking pixels work in a link gallery?
Tracking pixels in Replug allow you to collect data on visitors and retarget them through ad platforms like Facebook, TikTok, and Google Ads – without them ever needing to leave your bio link page.
You know how TikTok is the place to discover new stuff – fashion, home inspo, DIY hacks, aesthetic mood boards; basically everything Pinterest is also known for?
Now imagine someone finds your TikTok, loves your vibe, and wants more. Maybe they’re looking for your outfit details, your vision board, or that recipe you teased.
They tap the link in TikTok bio, and it either goes nowhere or just dumps them on a random page.
That’s a missed opportunity.
If you’re using Pinterest to share your content, promote your blog, or even build a mood board-worthy brand, you need to connect the dots.
And that starts with adding your Pinterest link to your TikTok bio, the right way.
We’ll start with TikTok’s built-in features, and then show you how to do more (and better) with Replug’s link in bio generator. Especially handy if you’re stuck without the “Website” option or want to add more than just Pinterest.
Let’s make your bio work as hard as your content does!
Why add your Pinterest link to TikTok?
Because people don’t just watch content anymore — they click, scroll, and shop. Hence, it’s super important to create shareable content that makes your audience keep coming back for more.
Let’s say you’re:
A lifestyle creator who posts dreamy room decor on TikTok.
A DIY enthusiast sharing how-tos.
A fashion lover posting OOTDs and linking Pinterest boards with outfit inspo.
Pinterest helps you extend your content. It’s where the vibes live.
When you connect your TikTok to Pinterest, you give your followers a one-click path to your vision. It keeps them in your world longer, and that’s gold if you’re building a brand, growing your following, or even selling something.
Now let’s learn how to add your Pinterest link to TikTok bio.
Method 1: How to add Pinterest link to TikTok bio using TikTok’s built-in options
TikTok only allows one clickable link in your bio. So naturally, you’ll want to make it count.
How to get your Pinterest link:
Open the Pinterest app or website.
Tap your profile photo.
Copy the link from the browser
Got your link? Great! Now let’s add it to your TikTok bio.
Option A: How to add link to TikTok bio without 1000 followers
Stuck under 1K followers? No worries. You can still make it work. Here’s how:
Switch to a Business Account:
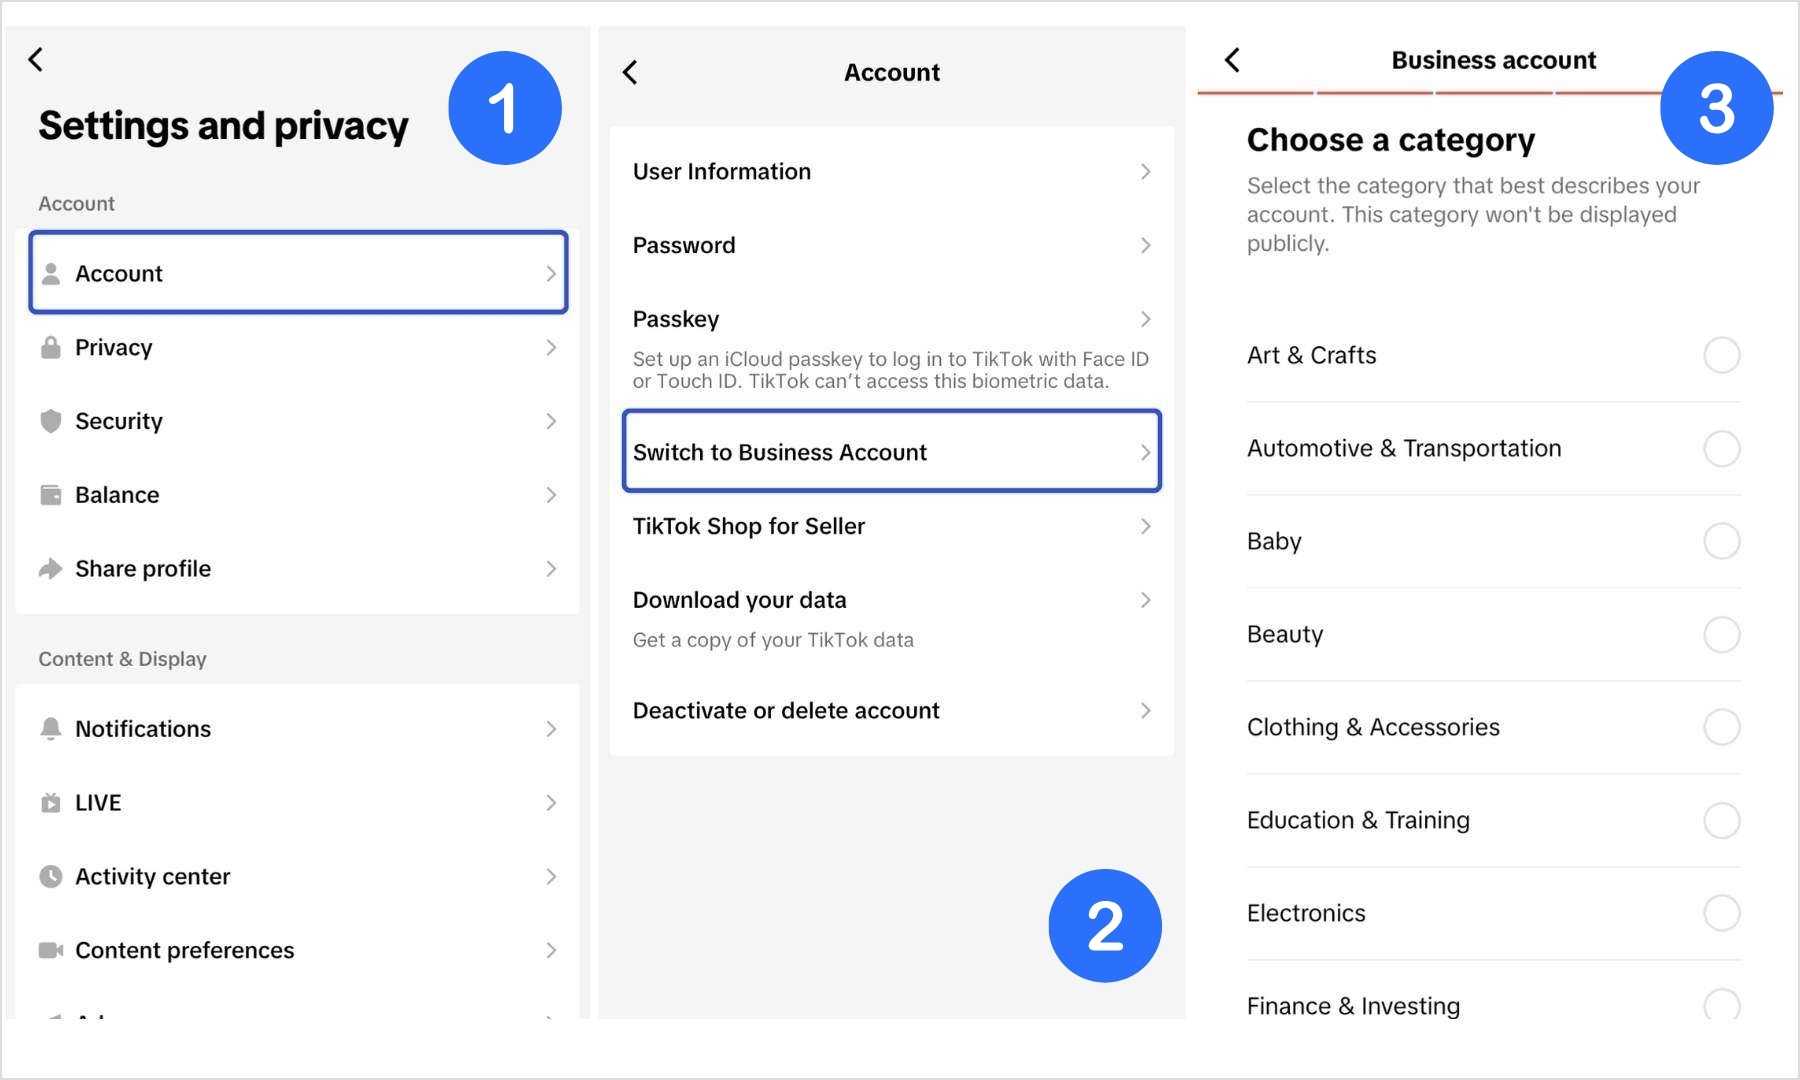
Go to your profile, then tap the three lines in the top-right corner.
Navigate to Settings & Privacy > Account > Switch to Business Account.
Head back to your profile > Edit > and now you’ll see the “Website” option available.
Option B: If you have 1000+ followers (personal account)
If you’re using a personal account and you’ve crossed the 1,000 followers mark, here’s how to add your Pinterest:
Open TikTok and tap your profile icon (bottom right).
Tap Edit Profile.
Under the “Website” section, paste your Pinterest URL.
And that’s about it! You just added a clickable link to your Pinterest. Now, your followers can tap your bio and go straight to your Pinterest boards.
Note: TikTok only allows one link, so make it work smarter… which brings us to Replug’s URL shortener free tool. With it, you can share one short link that leads people to all your important pages, making the most of your single TikTok bio link.
Method 2: How to add multiple links (including Pinterest) to TikTok bio using Replug
Instead of constantly switching the one link in your TikTok bio, Replug helps you build a bio site with all your links in one. It’s like a Pinterest board, but for your entire digital presence.
Log in to your Replug account (or create one for free).
Choose “Bio Links” from the dashboard.
Click “Content”
4. Add a social block for Pinterest and enter your Pinterest URL. Replug lets you add up to 8 social blocks for your bio link page.
5. Publish your bio link.
6. Add block.
Bonus tip: You can also use the card block for a visual touch! Just click on the “Card” block, enter your Pinterest URL, give your card a name, and add a screenshot of your Pinterest aesthetic.
7. Once your page looks good, Replug gives you one short link to paste in your TikTok bio. Copy that link and share it in your TikTok bio.
Replug lets you skip the basic and build bio links that actually work. Forget plain Pinterest drops; this amazing platform gives you control, flexibility, and aesthetic vibes that match your TikTok energy.
Here’s why creators, small biz owners, and content pros swear by it:
Branded links: Create custom URLs that match your brand. You can even connect your own domain to make your links look clean, credible, and totally you.
Mobile-optimized: Replug bio link pages are designed to look great on mobile (which is where everyone’s watching TikTok anyway).
Multiple links, one bio: Link your Pinterest, Instagram, blog, shop, freebies — all in one sleek landing page. No more picking just one.
Track your clicks: Replug’s link analytics let you see how many people click on your Pinterest board, shop link, or blog post. It’s like a behind-the-scenes look at what’s working.
Retargeting tools: Someone clicked but didn’t follow through? Replug lets you add retargeting pixels to your bio link so that they can’t resist coming back to your Pinterest profile.
Highlight TikTok videos: Add a video block to your bio link page to feature your latest or top-performing Tiktok video. Show visitors what you’re about before they scroll.
Easy updates: Running a new campaign or updating your Pinterest? Just drag, drop, and hit publish. No need to mess with your TikTok bio every time.
Design that fits your vibe: Choose layouts, colors, and fonts that reflect your aesthetic. Whether you’re cottagecore, Y2K, or minimalist, you’ll find a style that clicks.
Want to keep things fresh? Add your latest Pinterest board as a featured link. Running a TikTok challenge or campaign? Pin it right above your Pinterest section for more visibility.
Whether you’re promoting Pinterest boards, sharing content, or growing your personal brand, it’s important to make it easy for your audience to go from watching to clicking.
Add your Pinterest link in bio, and make your bio work for you. Because let’s be honest: your content deserves more than a dead-end bio.
Try Replug today and level up your TikTok profile with bio links.
Maximize marketing ROI
by transforming ordinary URLs into branded short links that convert.
Try Replug for free
Frequently asked questions
Can I add a clickable Pinterest link to my TikTok bio?
Yes! If you have 1K+ followers or a business account, you can add a clickable link under the “Website” section.
How to add a link to TikTok bio without 1000 followers?
Switch to a TikTok Business Account. This unlocks the Website option for all users.
Totally. With Replug, you can design your page to match your aesthetic. You can pick your colors, layout, fonts, and even add a TikTok video block to show off your latest or most viewed content.
Sharing just one link on Facebook is simple, but what if you have multiple links to promote at once? No worries. Instead of posting several times or cluttering one post with too many links, you can create a neat, all-in-one bio link page using a bio-link tool.
What is a bio link tool?
A bio link tool is a platform that lets you create a single, shareable link (usually for your social media bio) that leads to a custom landing page filled with multiple links, buttons, or content blocks. We recommend you use Replug, as it’s the best bio link tool available on the market right now. Replug.io not only allows you to design a personalized landing page with all your important links in one place but also offers powerful features.
Go beyond generic link pages!
Create custom bio links that truly fit your brand
With Replug, you can create bio links that are unique, engaging, and built to convert.
Now, let’s explore how you can add multiple links to your Facebook bio or post.
Method 1: Share all links in one post (not ideal)
You can simply paste all your links in a single post. But let’s be honest: it looks messy, may confuse your audience, and you can’t track how each link performs. This method lacks both flexibility and professionalism.
Method 2: Create a bio-link page using Replug (recommended)
Here’s how to create a landing page using Replug.
Step 1: Log in to Replug
Start by logging into your Replug account. Head to the “Bio-Link” dashboard from the main menu.
Step 2: Create a new bio-link page
Click the “Create new” button in the upper-left corner. You’ll be prompted to fill in a few basic details:
Brand name
Description
A matching theme, background image, or color
This helps your bio page reflect your brand’s identity.
Step 3: Add your links
In the branding category, you’ll see multiple options for adding links.
Navigate to the “Links” section to add multiple links to your page.
Want your links to stand out? Customize each block with different button colors, sizes, or even schedule when they go live.
Want a full preview with an image, title, and description for each link? Head to the “Cards” section. This gives your links a richer appearance, just like link previews on social media.
This is how your cards will appear; you can easily adjust their size and shape to match your style.
A complete link management solution
for marketing professionals & agencies.
Try Replug for free
You can also drag and drop blocks to reorder them or tweak the design to your liking.
Step 4: Save and share
Once everything looks good, click the “Update” button in the upper-right corner to save your bio link page.
Now just copy your unique bio link and paste it in your Facebook post or profile. Done!
This is a much more polished and trackable way to share multiple links on Facebook and across all your social platforms.
Why choose Replug?
If you’re looking for more than just a basic bio link tool, Replug is your top-tier choice. It goes beyond the basics by helping you share, track, and convert, all in one place.
All-in-one bio link page builder: Add unlimited links, embed videos, show social icons, display rich link previews (cards), and completely customize the layout to match your brand.
Built-in analytics:Track clicks, views, and engagement on each link block. Know exactly what’s working and where your audience is clicking.
Retargeting made simple: Add Facebook, Google, or TikTok pixels to your bio link page and retarget visitors with ads, something most other tools don’t offer.
UTM and branded link shortening: Add UTM parameters for deeper campaign insights, and create short links using branded domains for trust and consistency.
Schedule content and links: Plan your link blocks in advance, set visibility timers, and show or hide content at the right time automatically.
Whether you’re promoting products, sharing content, or managing clients, Replug offers features that scale with your needs.
Conclusion
Sharing multiple links on Facebook doesn’t have to be messy or unprofessional. Instead of cramming several URLs into a single post, you can use a smart, streamlined approach and create a bio link page using Replug.
It allows you to showcase multiple links beautifully, track performance, and even retarget visitors. Whether you’re a creator, marketer, or small business, Replug makes it easy to manage and share multiple links on Facebook like a pro.
FAQs on Facebook links
Can I really share multiple links on Facebook in one go?
Yes! While Facebook allows only limited clickable link in bios, you can use a bio link tool like Replug to create one link that leads to a page with multiple links inside.
Is Replug free to use?
Replug offers a free trial, along with different pricing plans. You can test out its features before committing to a paid plan.
How is Replug better than pasting all links in a Facebook post?
Unlike cluttered posts, Replug gives you a clean, customizable landing page where each link is presented clearly. Plus, you get link tracking, design control, and retargeting options.
Can I change my links after sharing the bio link?
Absolutely! You can update, remove, or rearrange the links on your Replug bio page anytime without changing the main bio link.
Does Replug work only for Facebook?
Nope! You can use your Replug bio link across platforms like Instagram, Twitter (X), TikTok, and LinkedIn, as well as in emails or YouTube descriptions.
Want to share a video without sending long links or bulky files?
A QR code makes it effortless. Whether it’s a YouTube tutorial, a product demo, or important information on Google Drive, just scan and watch.
In this guide, we’ll walk you through the easiest way to turn your video into a QR code that’s ready to share anywhere – flyers, packaging, presentations, or social media. No tech skills needed!
Methods for creating video QR codes
Creating a QR code for your video is simple and can be done in a few ways:
Free QR code generators: Use free tools like Replug’s QR Code Generator. Just paste your video link, customize, and download the code.
Drawback: Limited tracking features and customization options.
YouTube QR code tools: Some platforms offer direct options for YouTube videos, perfect for quick sharing. Replug also has a YouTube QR code generator that you can use to create dynamic and customized QR codes for your videos for free.
Drawback: Only works for YouTube videos, limiting flexibility for other platforms.
Dynamic QR code tools: Platforms like Replug let you create custom QR codes, track scans, retarget viewers, and update the video link anytime without reprinting.
Drawback: No drawbacks! Only benefits
Choose what suits your needs: simple share or full-featured marketing!
What is Replug, and why use Replug to make a QR code for your video?
Replug is a powerful link management and marketing tool that allows you to create optimal short links and manage branded, dynamic QR codes for your videos.
Unlike static QR codes, dynamic QR codes allow you to update the linked content without changing the QR code itself. This makes it ideal for marketing campaigns, promotions, and tracking video engagement.
Maximize marketing ROI
by transforming ordinary URLs into branded short links that convert.
Try Replug for free
Here’s why you should use Replug to make a QR code for your video:
Create branded dynamic QR codes
See how many people scanned your QR code
Retarget viewers with ads
Edit the link anytime without changing the QR code
Copy the video URL from the browser address bar or use the “Share” button to copy the link.
Step 02: Create a branded link in Replug
Log in to your Replug dashboard. In the top-left corner, you’ll see an empty field. Paste your video URL there and press enter. A pop-up will appear with options to customize your link.
Step 03: Customize your link
In the pop-up, you’ll find multiple features like link shortening, the ability to add tags, customization of the link preview, A/B testing, password protection, and more.
Customize your link as needed – this URL will appear when someone scans the QR code. For maximum visibility and reach, consider also consulting with the best YouTube SEO agencies to optimize how your link and content perform on the platform.
Step 04: Generate the QR code
In the link creation process, look for the QR code generation option.
It’s located right after the “Shortened link” bar.
Click it, and a new pop-up will appear. You can further customize the QR code’s appearance here.
Step 05: Download and use your QR code
Test the QR code by scanning it with your phone to ensure it directs to the correct YouTube video.
Once satisfied with your QR code, download it in your preferred format (PNG, SVG, etc.) and share it as needed
A complete link management solution
for marketing professionals & agencies.
Try Replug for free
Whether you use free online generators for quick sharing or go for Replug’s dynamic QR codes for tracking and retargeting, there’s an option for every need. Don’t forget to follow best practices, like ensuring scan quality and testing your code before distribution. With the right QR code, your video will reach your audience in no time – effortlessly!
Frequently asked questions
What are the best practices for creating video QR codes?
1.Test the code: Always scan the code yourself before sharing it to make sure it links to the correct video. 2. Ensure good scanning quality: Make sure the QR code is clear, large enough, and placed in a visible spot. 3. Use dynamic QR codes: This allows you to update the link without changing the code, offering greater flexibility. 4. Provide instructions: Include clear instructions next to the QR code, guiding users on how to scan it.
Where can I use video QR codes?
Video QR codes are versatile and can be used in various places, such as: – Product packaging: Link to instructional or promotional videos about the product. – Business cards: Share your introduction or portfolio video with potential clients. – Event posters: Link to event highlights, schedules, or behind-the-scenes footage. – Educational materials: Include video lessons or supplementary resources alongside written content. – Print advertisements: Drive traffic to video campaigns or product demonstrations.
What’s the difference between static and dynamic QR codes?
– Static QR codes: These are fixed once created. The content or URL cannot be changed without creating a new code. – Dynamic QR codes: These allow you to edit the linked content (e.g., update a video URL) without changing the QR code itself. They are perfect for marketing campaigns and tracking purposes.
How can I track the performance of my video QR code?
With dynamic QR codes like those generated with Replug, you can track: – Number of scans: See how many people scanned the code. – Location data: Learn where the scans are coming from. – Device and time information: Understand when and on what device your video was viewed. This data helps you measure the effectiveness of your campaigns and make improvements.
If you’re an active TikTok user, you know how tricky it can be to share multiple links when your bio only allows for one. You might want to share your website, your other social media pages, or maybe even a special offer, but there’s just no room. That’s where linktree enters the show. It’s a simple solution that lets you pack all your links into a single URL. In this guide, we’ll walk you through how to add a linktree on TikTok using Replug.io and why it’s a game-changer.
Why add a linktree to your TikTok bio?
TikTok is all about quick engagement, and your bio is prime real estate. But with only one link allowed, it can be tough to share everything you want your followers to check out. A linktree solves this by allowing you to bundle all your important links into one easy-to-find page, whether it’s your latest blog post, YouTube channel, or shop.
Using a linktree means you no longer need to constantly update your TikTok bio with different links whenever something new comes up. Instead, you can just add a single linktree link and let your audience find everything they need in one place.
How to add a linktree on TikTok?
Adding a linktree on your TikTok is quite simple, much like Instagram. It lets you feature a link directly on your profile, making it easy for followers to find your website, social pages, or any content you want to highlight.
Follow these simple steps to add a linktree to your TikTok bio in just a few minutes:
Open the TikTok app and go to your profile by tapping the profile icon in the bottom-right corner of the homepage.
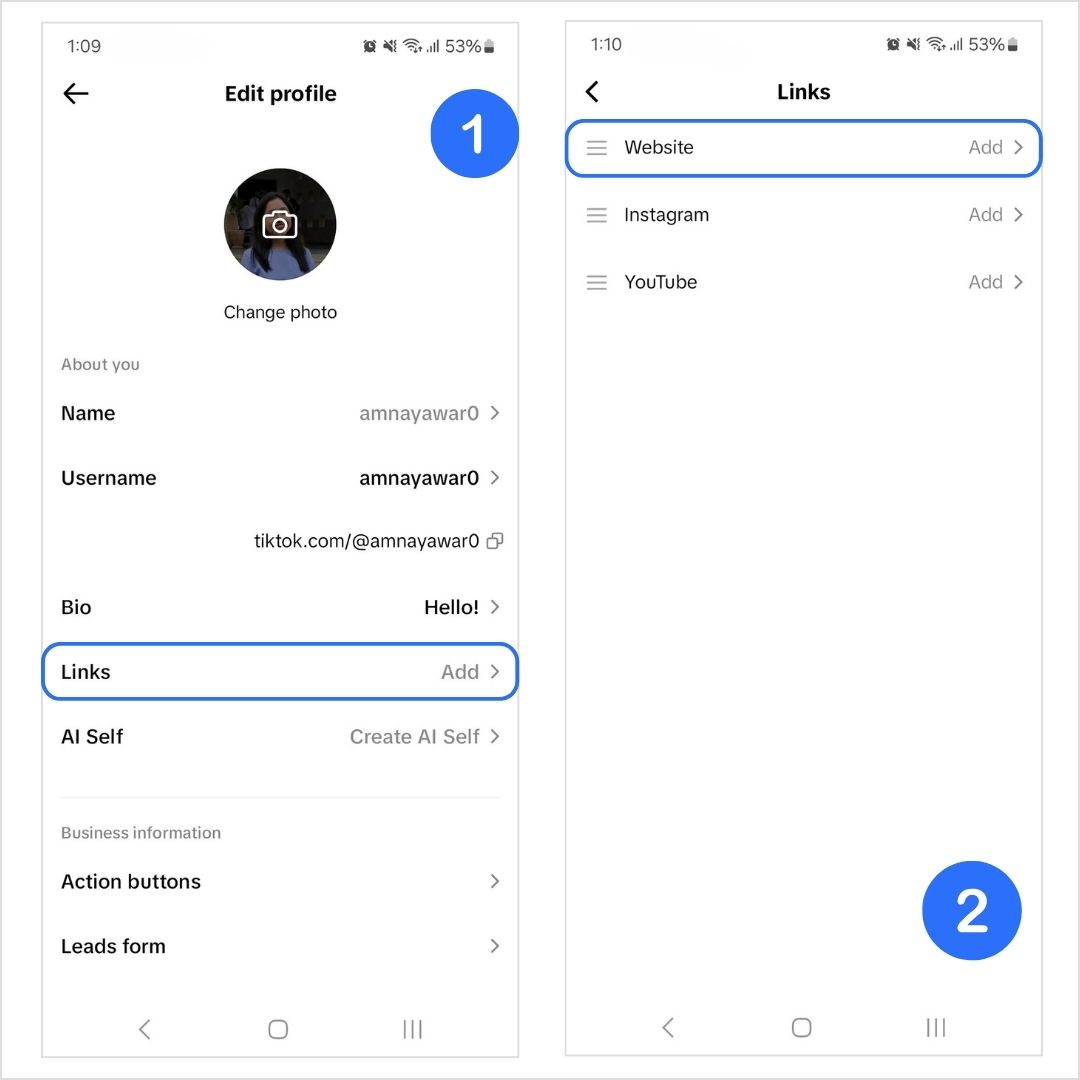
Tap “Edit Profile.”
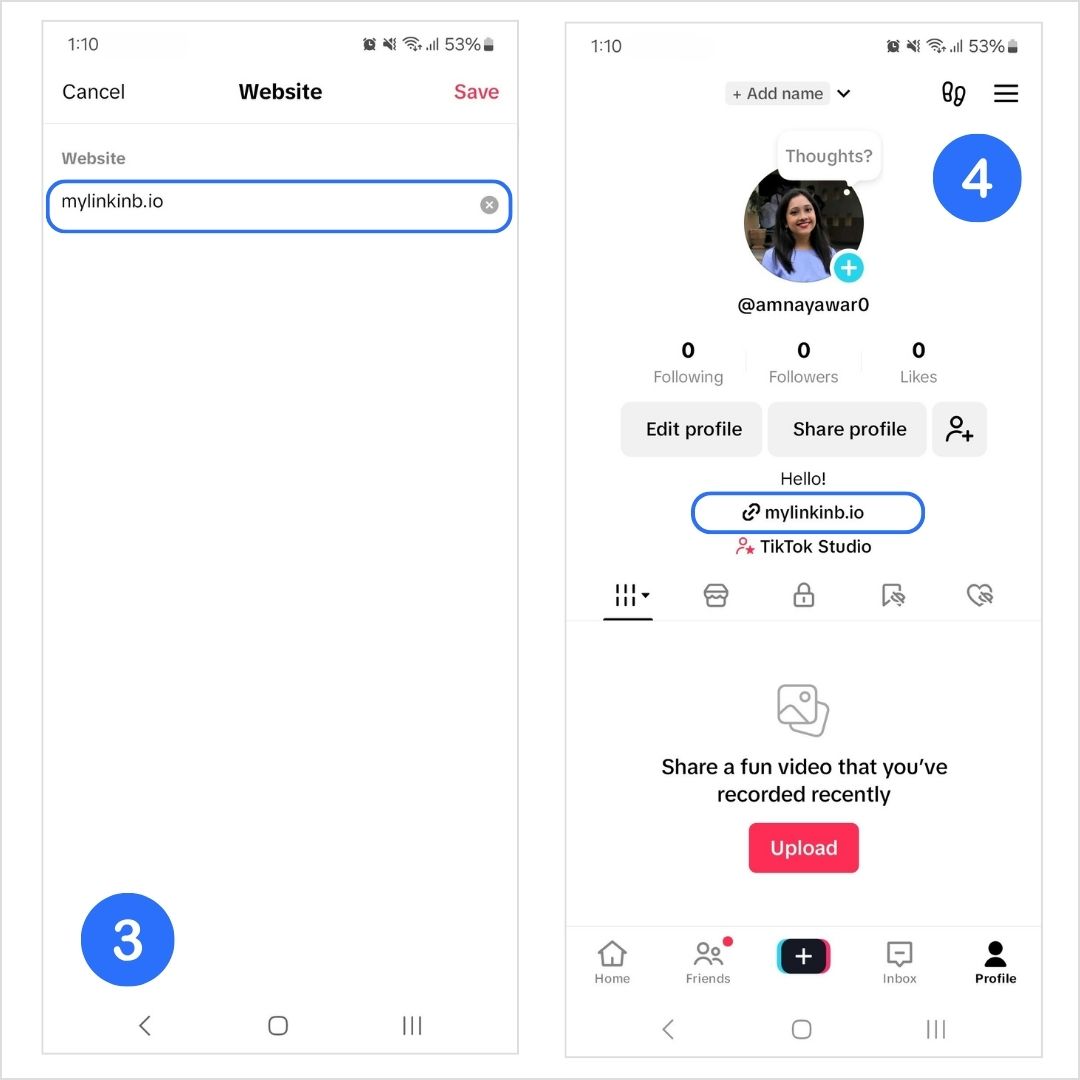
Click on “Links” to add your bio link to your TikTok profile. You can do this by clicking on “Website”
What to do if you can’t see the option for “Website”
The Website feature isn’t currently available everywhere. If the “Website” section isn’t showing up for you, there are a few things to consider:
Meet the follower requirement: Personal Accounts need at least 1,000 followers to add a website link.
Switch to a Business Account: Clickable links in bios without a follower limitation of 1,000 are only available for Business Accounts.
Use the Mobile app: Links can only be added through the TikTok mobile app, not the desktop version.
Switching to a TikTok business account
If you’re using a personal account but want to add a bio link for your business, consider switching to a Business Account. This will give you access to more features, including the ability to add a clickable link.
Here’s how to make the switch:
Tap on your profile icon in the bottom-right corner.
Tap the hamburger menu (three lines) in the top-right corner to open the Settings & Privacy menu.
Select Account.
Tap Switch to Business Account.
Once you’ve switched, head back to your profile, tap Edit Profile, add the linktree you’ve created using Replug under the Website section.
Now you’re all set to drive traffic to your website and other resources directly from your TikTok bio!
Replug is designed to elevate your TikTok linktree with advanced customization, powerful analytics, and other unique tools that can help you stand out and grow your audience.
Here’s why you should use Replug to generate a linktree for your TikTok bio:
Customize your linktree page: Replug gives you full control over the look of your linktree, making it easy to match the design with your TikTok vibe. With Replug, you can customize your template according to your brand personality, add a verification button, a custom favicon image, and multiple blocks (links, social, video, RSS, text, separator, and spacing) to your bio site. The possibilities are endless!
Custom and branded links: With this efficient link shortener, you can create a custom URL for your linktree. If you have a branded domain, even better! You can connect your domain to your custom URL and generate a branded short link that instantly tells your followers that your link it all about you.
Maximize marketing ROI
by transforming ordinary URLs into branded short links that convert.
Try Replug for free
Link analytics: Replug’s detailed analytics allow you to track a variety of metrics to understand what’s working and what’s not.
Advanced retargeting: Replug’s retargeting pixels feature allows you to reach out to people who have interacted with your linktree links but haven’t taken action yet. With personalized ads or follow-up campaigns, you can bring those users back to complete the conversion, whether that’s making a purchase, signing up for your newsletter, or another goal. Link management & quick updates: One of the best features of Replug is the ability to easily manage your links. TikTok moves fast, and what was relevant last week might not be today. With Replug, you can quickly update your linktree without having to constantly change your TikTok bio. Whether you’re pushing a limited-time offer or promoting a new TikTok video, you can ensure that your links are always up-to-date. Mobile-optimized: Since TikTok is a mobile-first platform, Replug’s linktree design is fully optimized for smartphones and tablets. You won’t have to worry about your linktree looking clunky or hard to navigate.
SEO-friendly: Replug allows you to adjust your linktree’s metadata, title, and description, making it easier to be discovered via search engines. This feature helps you increase your visibility, both on TikTok and beyond, driving organic traffic from Google and other search platforms to your linktree.
Conclusion
And that’s a wrap! Adding a linktree to your TikTok bio is an easy way to share multiple links in one place, making it easier for your followers to access all the important content you want to share. With Replug, you can take it a step further by customizing your linktree, tracking performance, and even retargeting visitors to drive more conversions.
If you haven’t created your linktree yet, now’s the time to give it a go and make your TikTok bio more impactful!
FAQs on how to add a linktree to Tiktok bio
Can I add a link to my TikTok bio without having 1,000 followers?
You can add a link to your TikTok bio without having 1,000 followers if you have a business account. However, this is not possible if you have a personal account.
What’s the best way to add multiple links to my TikTok bio?
Since TikTok only allows one bio link, using a bio link tool like Replug helps you create a mini landing page with multiple links, whether it’s your website, store, or latest content.
What are the requirements for adding a link to your TikTok bio?
To add a clickable link to your TikTok bio, you need:
– At least 1,000 followers if you have a personal account. Otherwise, you’ll need a registered business account. – You must have the TikTok app installed on your mobile phone. – Your account must comply with TikTok’s community guidelines and terms of service.
How can I put a link in my TikTok bio without having a business account?
– If you have 1,000 TikTok followers on your personal account, you’ll be able to add a website link or a linktree in your TikTok bio. – If you want to add a link with less than 1,000 followers, you can simply copy-paste your link in the bio section. It won’t be clickable, but it’s better than not having a link at all.
How do I add an Instagram link to my TikTok bio on iPhone?
To add an Instagram link to your TikTok bio on iPhone:
1. Open the TikTok app and go to your profile. 2. Tap “Edit profile.” 3. In the “Instagram/Youtube” section, tap “Instagram.” 4. Enter your Instagram username or link, then tap “Save.” 5. Your Instagram link will now be in your bio.
How can I measure the performance of my TikTok bio link?
Some bio link tools provide detailed insights, including total clicks, unique visitors, and traffic sources. This helps you understand what’s working and optimize your links for better engagement.
Instagram may have finally allowed multiple links in bios, but it’s still not the most user-friendly way to share all your important content. If you’re a creator, business owner, or marketer, you probably have more than just five links to share. That’s where a bio link tool, often called a ‘linktree’ tool, comes in handy. Instead of cluttering your bio or constantly swapping out links, you can create a single Instagram linktree that leads your followers to all your content.
In this blog, we’ll discuss how to add a linktree to Instagram and how linktree tools such as Replug can make your Instagram bio stand out.
How to add a linktree to Instagram using Replug
Step 1: Create a bio link using Replug
Replug’s bio link/linktree feature lets you add multiple links under one URL.
Copy the linktree URL that you want to display on your Instagram.
Step 3: Open the Instagram app and go to your profile
Open the Instagram app on your smartphone.
Tap the profile icon at the bottom right of your screen.
Step 4: Edit your profile
Once you’re on your profile, click on the Edit Profile button. This is where you can edit your bio and add links to your Instagram profile.
Step 5: Paste your linktree URL
Click Add Link
Click Add external link
Paste your Replug linktree in the URL bar and give it a title as well.
Save. Now, your linktree will be visible to your audience on your Instagram.
Why Replug is the best choice for your linktree
Your Instagram linktree should do more than just hold a few links. With Replug, you can create a fully customized, branded, and data-driven linktree that helps you drive more engagement and conversions.
Full customization: Replug allows you to create your bio site to match your brand’s look and feel. You can customize templates, colors, favicons, and add multiple content blocks, including links, videos, social icons, and more.
Branded links: Instead of a generic link, create a custom URL or connect your own domain to make your bio link look more professional and trustworthy, with this top-notch URL shortener.
Powerful analytics: Track total clicks, unique clicks, referral sources, and geographic data to see exactly where your audience is coming from and which links are performing best.
Retargeting features: Replug lets you add retargeting pixels so you can re-engage visitors with personalized ads and campaigns, helping you maximize conversions.
Easy link management: No need to change your Instagram linktree every time you have a new offer or post. With Replug, you can update your link page in seconds while keeping your bio link the same.
Optimized for mobile and SEO: Your link page will be mobile-friendly and optimized for search engines, helping you increase visibility beyond Instagram.
Conclusion
Adding a linktree to your Instagram bio is an easy yet effective way to share all your important content without cluttering your profile. By following the simple steps outlined above, you can quickly set up your Linktree using Replug and make your bio more organized and user-friendly.
Not only will this save you time and effort, but it will also give you the opportunity to personalize your linktree, track valuable data, and keep your audience engaged. With Replug’s powerful customization and analytics features, your Linktree will do much more than just link to your content; it will help drive conversions and boost your online presence.
So, get started today and optimize your Instagram bio like a pro!
FAQs for how to add linktree to Instagram
What are the best Linktree tools for Instagram?
There are several great Linktree tools, but Replug stands out with its advanced customization, analytics, and retargeting features, making it a top choice for creators and businesses.
Can I track the performance of my linktree links?
Yes, Replug offers detailed analytics that track clicks, sources, and geographic data, helping you understand your audience’s behavior and optimize your content.
Can I track the performance of my linktree links?
Yes, many linktree tools, including Replug, offer analytics to track clicks, sources, and engagement, helping you understand which content works best.
Can I update my linktree links without changing my Instagram bio?
Yes! You can update your linktree content in real-time using Replug, so your Instagram bio link stays the same while you refresh the links inside your linktree.
Can I customize the look of my Instagram linktree?
Yes! Replug is great for customizing your Instagram linktree. You can choose from a variety of templates, customize the colours, add blocks, and much more!
Is my Linktree mobile-friendly?
If you use a good linktree tool, then yes. Linktree pages are mostly optimized for mobile devices, ensuring they work well across all smartphones and tablets.
How do I manage multiple links in my bio?
Replug is great for managing multiple Instagram links in one place. With just one URL in your bio, you can guide your followers to all your important content.
You’ve got your Instagram bio all set up, but it feels like something’s missing. Maybe it’s neat, but it’s not “popping’’ the way you want it to. You’ve probably seen other profiles with those slick little threads in their bios and thought: That’s genius! How do I get in on this? Well, guess what? You’re in the right place because we’re about to show you exactly how to add threads to Instagram bio and make your profile stand out in a big way.
We’ll walk you through the three simple methods of adding threads to your Instagram bio, including a unique way to do it using Instagram bio links. It’s easier than you might think, and the results will be totally worth it. With threads, you can take your Instagram bio from basic to eye-catching in no time, creating a profile that feels fresh and dynamic.
So, let’s dive in and get your bio looking its best!
But wait… what even is “Threads”?
If you’re an Instagram pro, you’ve probably heard of Instagram Threads by now, and maybe even wondered how you can bring the two together.
Threads is Instagram’s text-based counterpart, built around promoting healthy conversations, while Instagram itself thrives on visual content.
Threads, the newer text-based app from Meta, is all about sparking meaningful conversations and staying connected with your audience in a more direct way. Since its launch in July 2023, Threads has skyrocketed to over 300 million monthly actives (Adam Mosseri, Head of Instagram), many of whom have come from Instagram. Why? Because these two platforms sync up perfectly, making it easy to link them and create a seamless experience.
Think of it as X’s/Twitter’s most popular alternative.
How to add threads to Instagram bio?
Now let’s get to the fun part! There are three methods to add threads in your Instagram bio:
Method 1: As a clickable icon directly through the Threads app
Method 2: Adding a Threads link using Instagram’s External link option.
Method 3: Using the Replug bio link feature
Method 1: How to add Threads to Instagram bio as a clickable icon directly through the Threads app
Open the threads app: If you don’t have the Threads app installed already, go to your Apple Store or Playstore to install it.
Sign in with Instagram: Before you start, make sure you have an active Instagram account to link with Threads. If you’re already logged into Instagram, Threads will automatically detect your profile and link the two.
Set up your experience: Choose whether you want to keep your profile public or private.
Tap “Join Threads”: Once done, you’ll see a button at the bottom to join Threads. Click on it to proceed.
Threads will be added to your Instagram profile: Once done, go to your Instagram profile. Here, you’ll see a clickable Threads icon at the top right, as well as in your bio section.
Note: You can easily hide your Threads badge inside your Instagram app by simply clicking “Edit profile” and toggling the “Show Threads badge” button.
Pros
Cons
Effortless setup: Threads automatically links to Instagram.
Easily overlooked: The icon is small and placed in a corner.
Minimalist look: No extra links cluttering your bio.
No clear call to action: The icon does not look like a clickable link.
Direct integration: Ensures a seamless experience between Instagram and Threads.
Limited awareness: Some users may not recognize the Threads icon yet.
Method 2: How to add Threads to Instagram bio using an external link
Access your Threads profile and click on Edit profile.
Copy your Threads link.
Open the Instagram app and click on Edit profile.
Click on Add external link
Paste your Threads URL.
Your Threads link will appear in your Instagram bio.
Pros and cons
Pros
Cons
Straightforward: Simply copy and paste the link.
Not visually appealing: A long URL can look messy and unprofessional.
Clickable and obvious: Users can clearly see it is a link.
Limited engagement: A single external link might not get much attention.
Recommendation: For maximum traffic, it’s optimal to duplicate the Threads link on your Instagram bio page through one of the best link in bio tool online.
The good news is that you can easily do that using Replug’s bio link feature! Which brings us to the next method.
Method 3: How to add Threads to Instagram bio using Replug’s bio link feature
Replug takes your Instagram bio to another level with its bio link feature. You can create a bio site that includes the link to your Instagram Threads account alongside other important links that you want to showcase to your audience.
Here are the simple steps that you need to follow if you use Replug’s Instagram link in bio tool to put Threads in your Instagram bio:
Open the Replug app and log in to your Replug account. If you don’t have an account, you can easily create one within minutes!
Access the Bio Links feature from your home page.
Click on Create new.
Click on Content and add a “Links” block.
Paste your Threads profile URLand give it a title.
Customize your bio link URL and copy it.
Go beyond generic link pages!
Create custom bio links that truly fit your brand
With Replug, you can create bio links that are unique, engaging, and built to convert.
Adding Threads to your Instagram bio helps you connect with your audience more effectively, but choosing the right method matters. While the built-in Threads badge and direct link options work, they come with limitations like low visibility and cluttered URLs.
This is where Replug stands out. With its bio link feature, you can create a branded, clickable landing page that includes your Threads profile along with other important links. This not only makes your Instagram bio look clean and professional but also boosts engagement and tracks clicks to see what’s working.
Replug is the ultimate solution if you want a seamless, customizable, and data-driven way to showcase your Threads profile. Start using it today!
What’s even better is that you can also enhance your links’ appearance with our free URL shortener with tracking, making it easier to share clean, trackable URLs across your desired platforms.
FAQs on how to add Threads to Instagram bio
How is Threads different from Instagram?
Threads focuses on text-based conversations, similar to Twitter (X), while Instagram is image and video-driven. Key differences include:
– Threads prioritizes discussions, updates, and engagement through text. Instagram is primarily used for sharing visual content like photos, reels, and stories. – Threads does not have hashtags, search trends, or a chronological feed, unlike Instagram.
Can I add Threads to my Instagram bio without using any third-party tools?
Yes! You can either use the Threads badge that appears automatically when you sign up for Threads or manually add your Threads profile link as an external link in your Instagram bio.
How to add Threads to Instagram bio after deleting it?
If you previously deleted your Threads profile from your Instagram profile, you cannot restore it. However, you can still add your Threads profile link again manually by using the methods listed above.
How to add Threads ID in Instagram bio?
Threads does not have a unique ID like Instagram usernames. Instead, your Threads profile is linked to your Instagram handle. To add it:
– Copy your Threads profile URL. – Paste it in your Instagram bio as text or add it as an external link under Edit Profile.
How to create a Threads account without Instagram?
Currently, you cannot create a Threads account without an Instagram account. Since Threads is an extension of Instagram, you must log in using your Instagram profile to access Threads.
Why can’t I see the Threads badge in my Instagram bio?
If the Threads badge is missing, it may have been hidden manually. You can check this by going to Edit Profile on Instagram and toggling the “Show Threads badge” option.
Will adding Threads to my Instagram bio improve engagement?
Yes! A well-placed Threads link makes it easier for followers to find your content. Using Replug’s bio link helps even more by organizing multiple links in a visually appealing way.