Amazon Wish Lists feel like mini mood boards for life’s special moments; from baby showers, to birthdays and weddings. Creating this Wish List is often the fun part; picking out things you love, imagining them in your life, and sharing that excitement with the people who care. But, sharing a messy Amazon Wish List URL into every invite or group chat? Not exactly pretty.
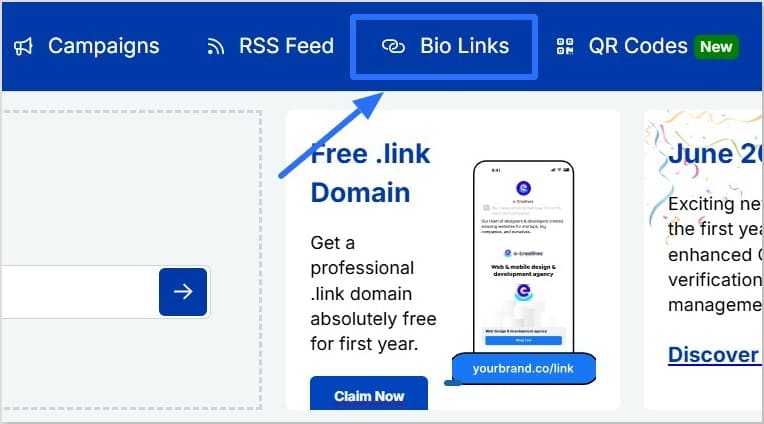
In this guide, you’ll discover how to make a QR code for Amazon Wish List with Replug so you can share your list easily, track its analytics, and keep it updated anytime.
Let’s begin!
Maximize marketing ROI
by transforming ordinary URLs into branded short links that convert.
Try Replug for free
Why create an Amazon Wish List QR code
A Wish List isn’t just a list of things; it’s part of the excitement around big moments and small celebrations.
Creating a gift registry QR code means your guests, friends, or followers don’t have to copy-paste long URLs. Instead, they can scan and instantly see your Wish List from anywhere: wedding placards, baby shower invites, thank-you cards, or even an Instagram story. It’s the easiest way to make your Wish List feel modern, thoughtful, and completely your own.
With Replug, your QR code can be:
Dynamic, so you can change the destination URL of your Amazon Wish List anytime without needing to recreate or resend your QR code.
Branded, with your colors, logo, and style.
Trackable, so you know how many times it’s been scanned and from where.
Now, let’s move on to how you can make an Amazon Wish List QR code using this efficient link management platform.
How to make a QR code for Amazon Wish List with Replug
Step 1: Find and copy your Amazon Wish List URL
First, you’ll need your Wish List link:
Log into Amazon and click ‘Accounts and Lists’ on the top right.
Pick ‘Wish List’ or ‘Your Lists’ to see what you’ve already created.
Choose permissions: View only (great for sharing) or Edit (if you want others to add items).
When you’re ready to share, simply click the “Invite” button at the top of your list. From there, you can copy the link directly or send it using the “Email” or “Text Message” options.
Tip: For smooth sharing, set your list to Public or Shared. Go to the three dots > Manage List to check this.
Step 2: Generate your Amazon Wish List QR code in Replug
Now for the fun part!
Sign in to the Replug app. If you don’t have an account, Sign up to get access to a 14-day free trial with full features
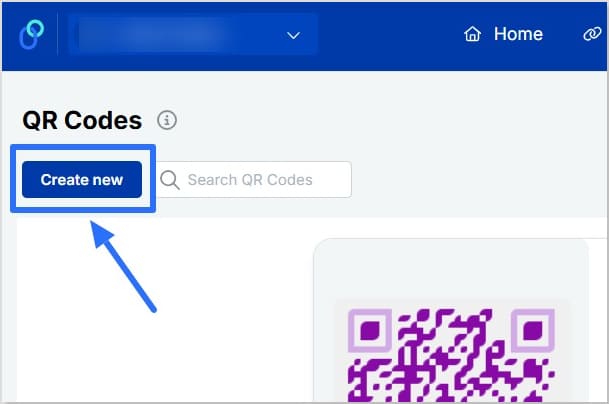
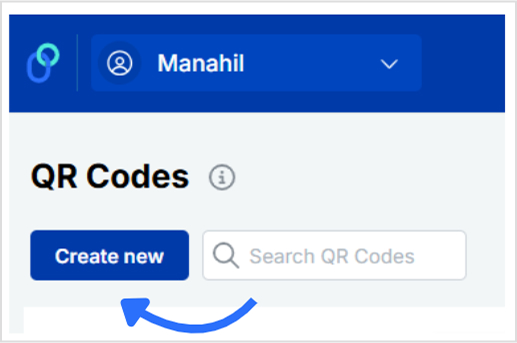
Click “QR Codes” on the left, then hit “Create new”
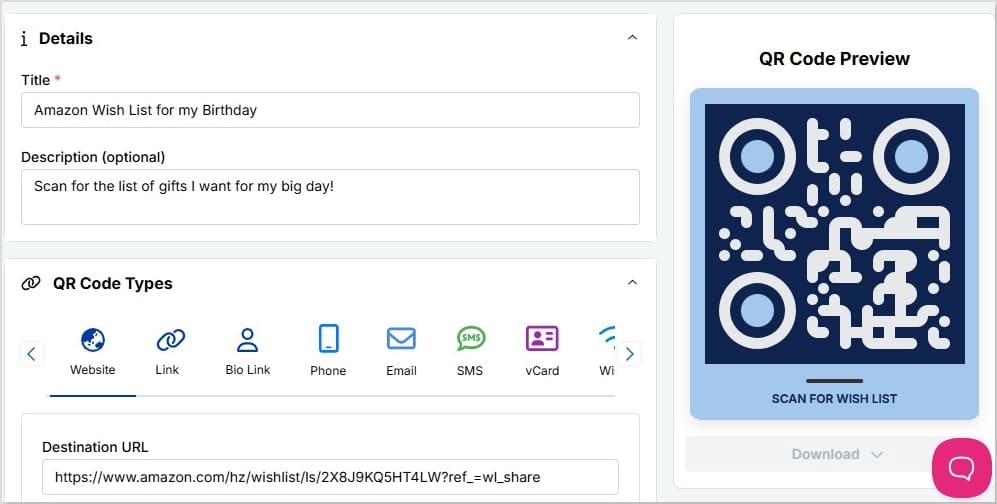
Add a title and description (optional) for your Amazon Wish List QR code
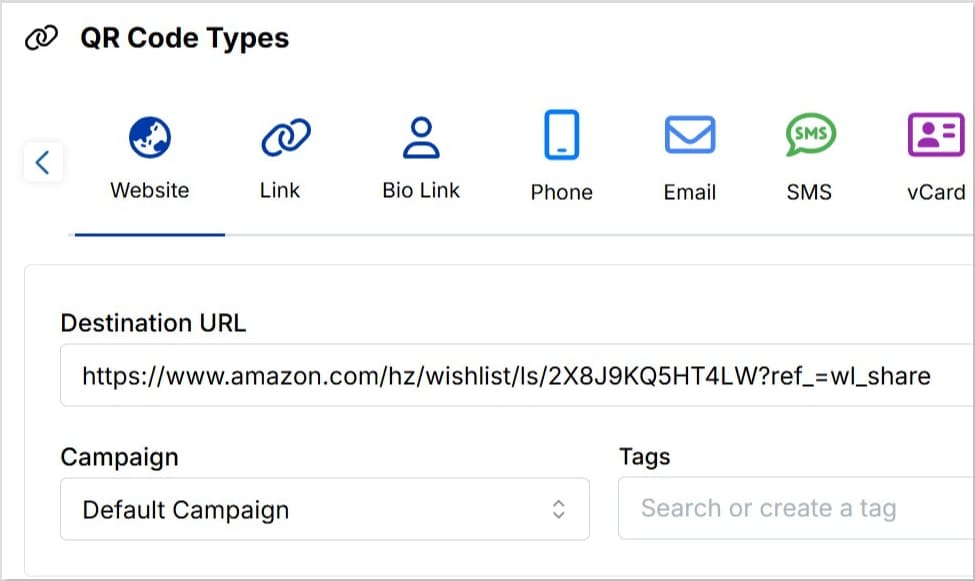
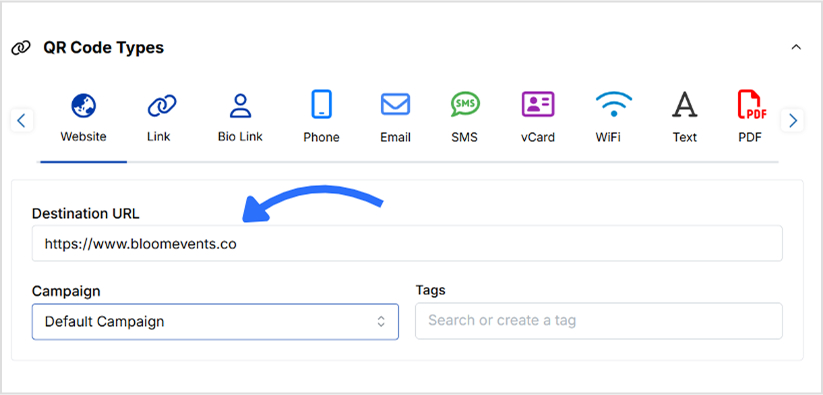
Choose “Website” as your QR code type and paste in your copied Amazon Wish List URL in the “Destination URL” bar
Connect it to a campaign if you want (optional)
In seconds, you’ve got the start of a Wish List QR code you can make yours uniquely.
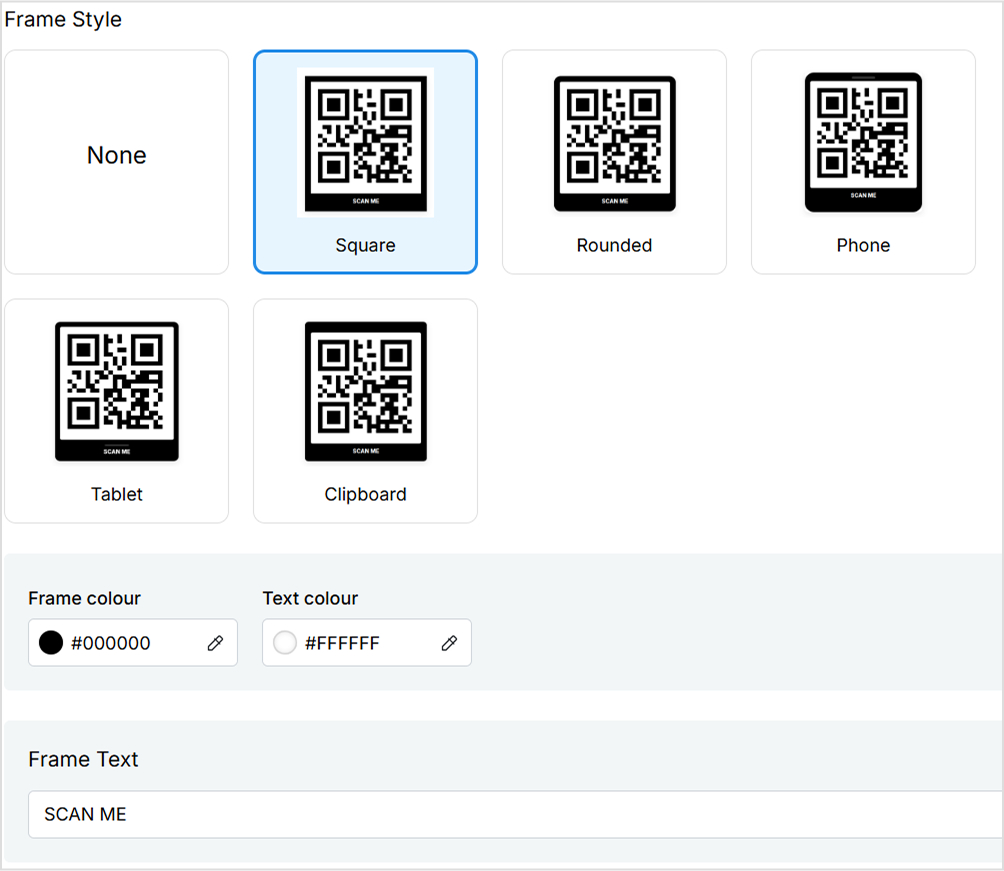
Step 3: Customize your QR code
A black-and-white square works, but why stop there?
Choose frames, shapes, and colors that match your event theme Upload your logo or icon
Creative ways to share your Amazon Wish List QR code
Your QR code isn’t limited to invitations or cards. You can share it almost anywhere people already connect with you:
Print it on wedding invitations, baby shower cards, or birthday party stationery
Add it to thank-you cards, menus, seating charts, or event signage so guests can scan it right at the venue
Share it on Instagram stories, TikTok videos, or include it in your bio links so your Wish List is always one tap away
Include it in email newsletters, holiday e-cards, or digital announcements
Place it on packaging inserts if you sell products online. It can double as a gift registry or curated list
Try adding seasonal or event-specific Wish Lists with unique QR codes to keep things fresh
Tip: Adding a short caption like “Scan to view our Wish List” makes it clear what the code leads to, especially for guests who might not be used to scanning QR codes.
Best practices to make your Amazon Wish List QR code
Here are some best practices to help your Amazon Wish List QR codes look polished, stay scannable, and feel personal wherever you share them:
Set your Amazon Wish List to Public or Shared, so anyone can view it after scanning.
Use Replug’s dynamic QR codes to update your Wish List link anytime without reprinting.
Match your QR code’s shape, colors, and frame to your event or brand style.
Add short text like “Scan to view our Wish List” near the code so people know what it links to.
Test your QR code on multiple devices and screen sizes before sharing widely.
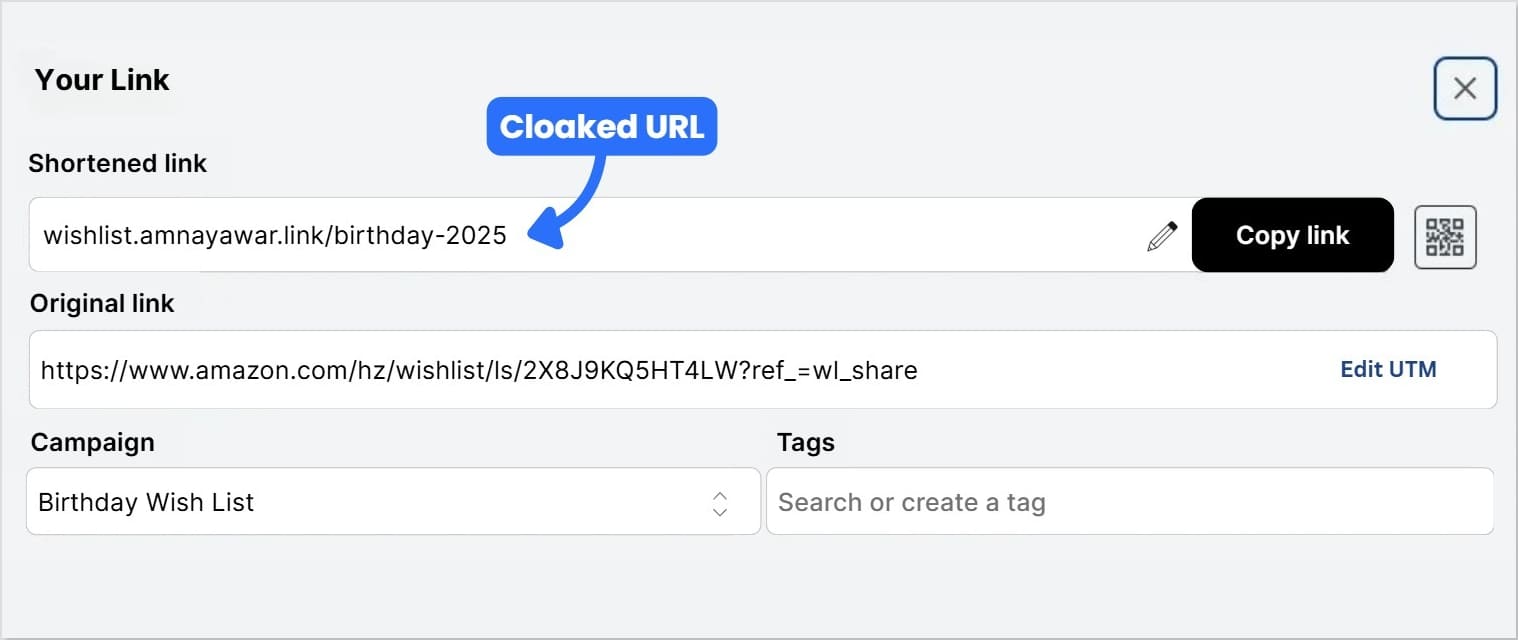
Cloak your Amazon Wish List URL with a branded short URL to keep it clean and trustworthy.
Add UTM parameters before shortening your link so you can track which channels drive scans.
Keep your Wish List updated, especially for seasonal events, so guests see your latest picks.
Print on high-quality materials to keep your QR code sharp and scannable.
Consider making separate Wish Lists (and QR codes) for special events or holidays.
Include a quick line of instructions for guests unfamiliar with scanning QR codes.
These small steps help your Wish List QR code feel personal, reliable, and easy for anyone to use, whether it be online or in print.
To wrap it up…
Your Amazon Wish List is about bringing people together to celebrate life’s moments, big and small. With Replug, you can easily learn how to make a QR code for Amazon Wish List, personalize it, keep it updated anytime, and see how people interact with it.
It’s a small step that makes sharing feel thoughtful, modern, and effortless.
FAQs for how to make a QR code for Amazon Wish List
Can I create a QR code for an Amazon Wish List?
Yes. Using a QR code generator, you can easily create a scannable code for your Amazon Wish List. Just copy your Wish List URL, paste it into the generator, and customize the design to match your style or event.
Can I track who scans my QR code?
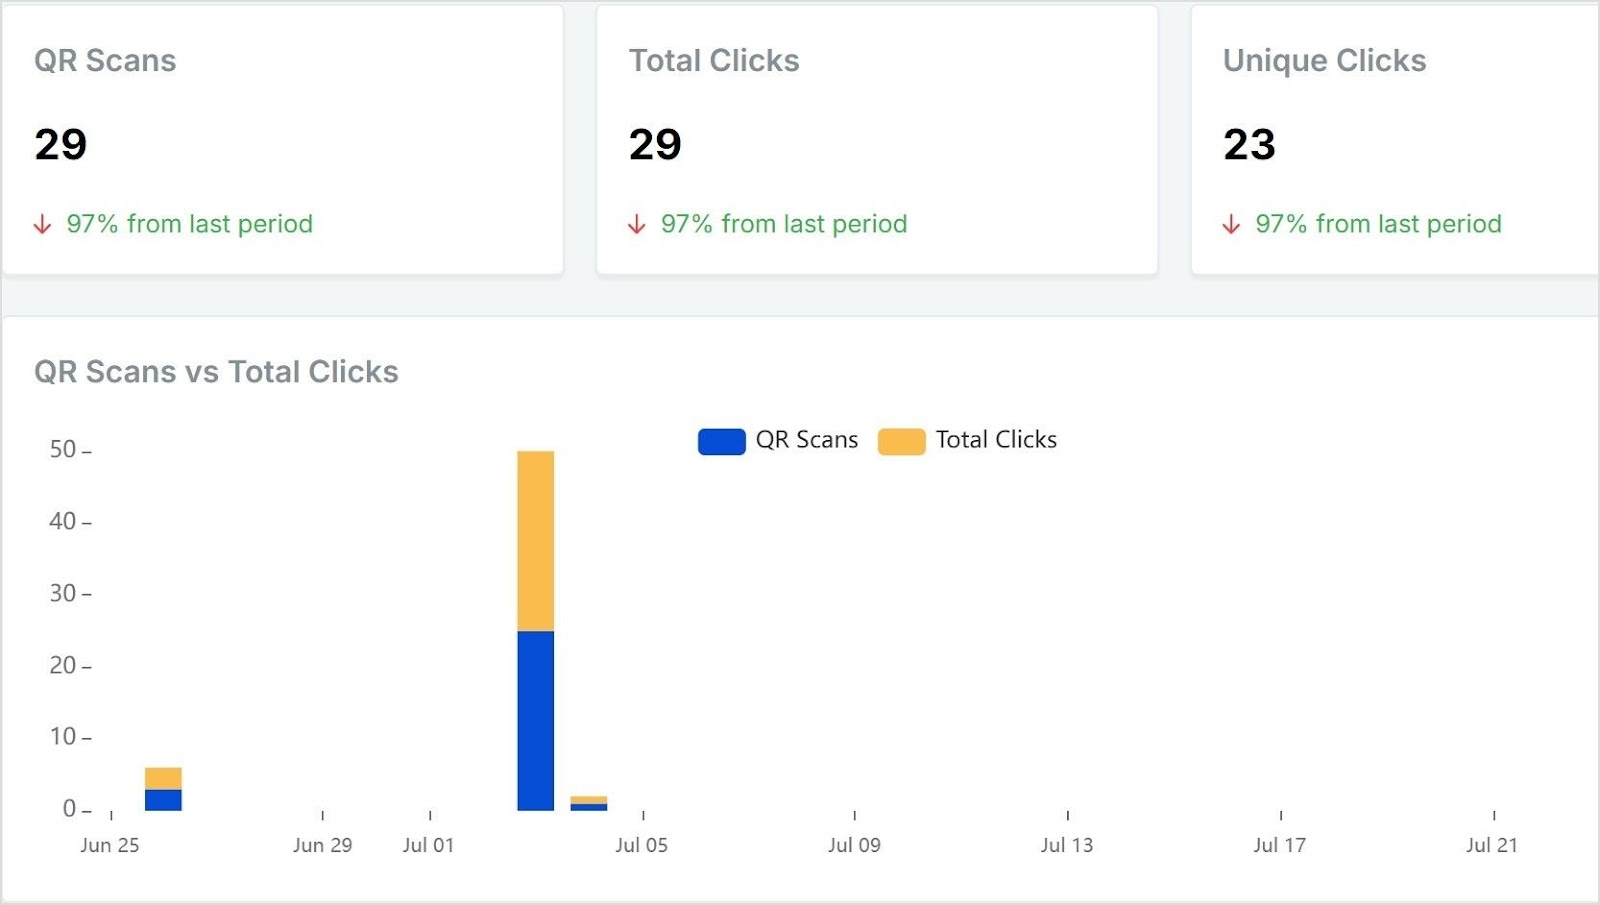
You can’t see individual names, but with tools like Replug you can track total scans, unique scans, clicks, locations, devices, and referral sources. This helps you see which channels (like Instagram, email, or printed cards) bring the most engagement.
What if I add new items to my Wish list later?
As long as you keep the same Amazon Wish List URL, your QR code will still work. And if you create a new Wish List with a different URL, you can simply update the destination link if you’re using a dynamic QR code in Replug.
Where should I share my Wish list QR code?
You can print it on wedding or baby shower invitations, thank-you cards, event signage, menus, and packaging inserts. You can also share it digitally in Instagram stories, TikTok videos, bio links, email newsletters, or even as part of seasonal campaigns.
How do I create a link for my Amazon Wish List?
Go to Amazon, click “Accounts and Lists,” choose your Wish List, then select “Send List to Others.” Choose your sharing permissions, click “Copy Link,” and you’ll get a shareable Amazon Wish List URL.
How to find a Wish List on Amazon?
In Amazon’s menu, go to “Accounts and Lists,” then click “Your Lists” to see your own lists. To find someone else’s Wish List, go to “Find a List or Registry” and search by name or email if their list is set to public.
Every marketing message needs a final spark; a clear, direct step that turns a passive visitor into an active customer. This is where the CTA, or call to action, plays its part. By guiding your audience from curiosity to action, it helps increase engagement and turns interest into measurable results.
But what is a CTA in marketing, and why does it matter so much?
In this blog, we’ll look at what CTA stands for in marketing, explain the difference between soft CTA and hard CTA, look at powerful CTA examples in marketing, explore practical tips, and how tools like Replug help you create a CTA that increases your conversion rate.
Boost your conversion rates with irresistable CTAs with
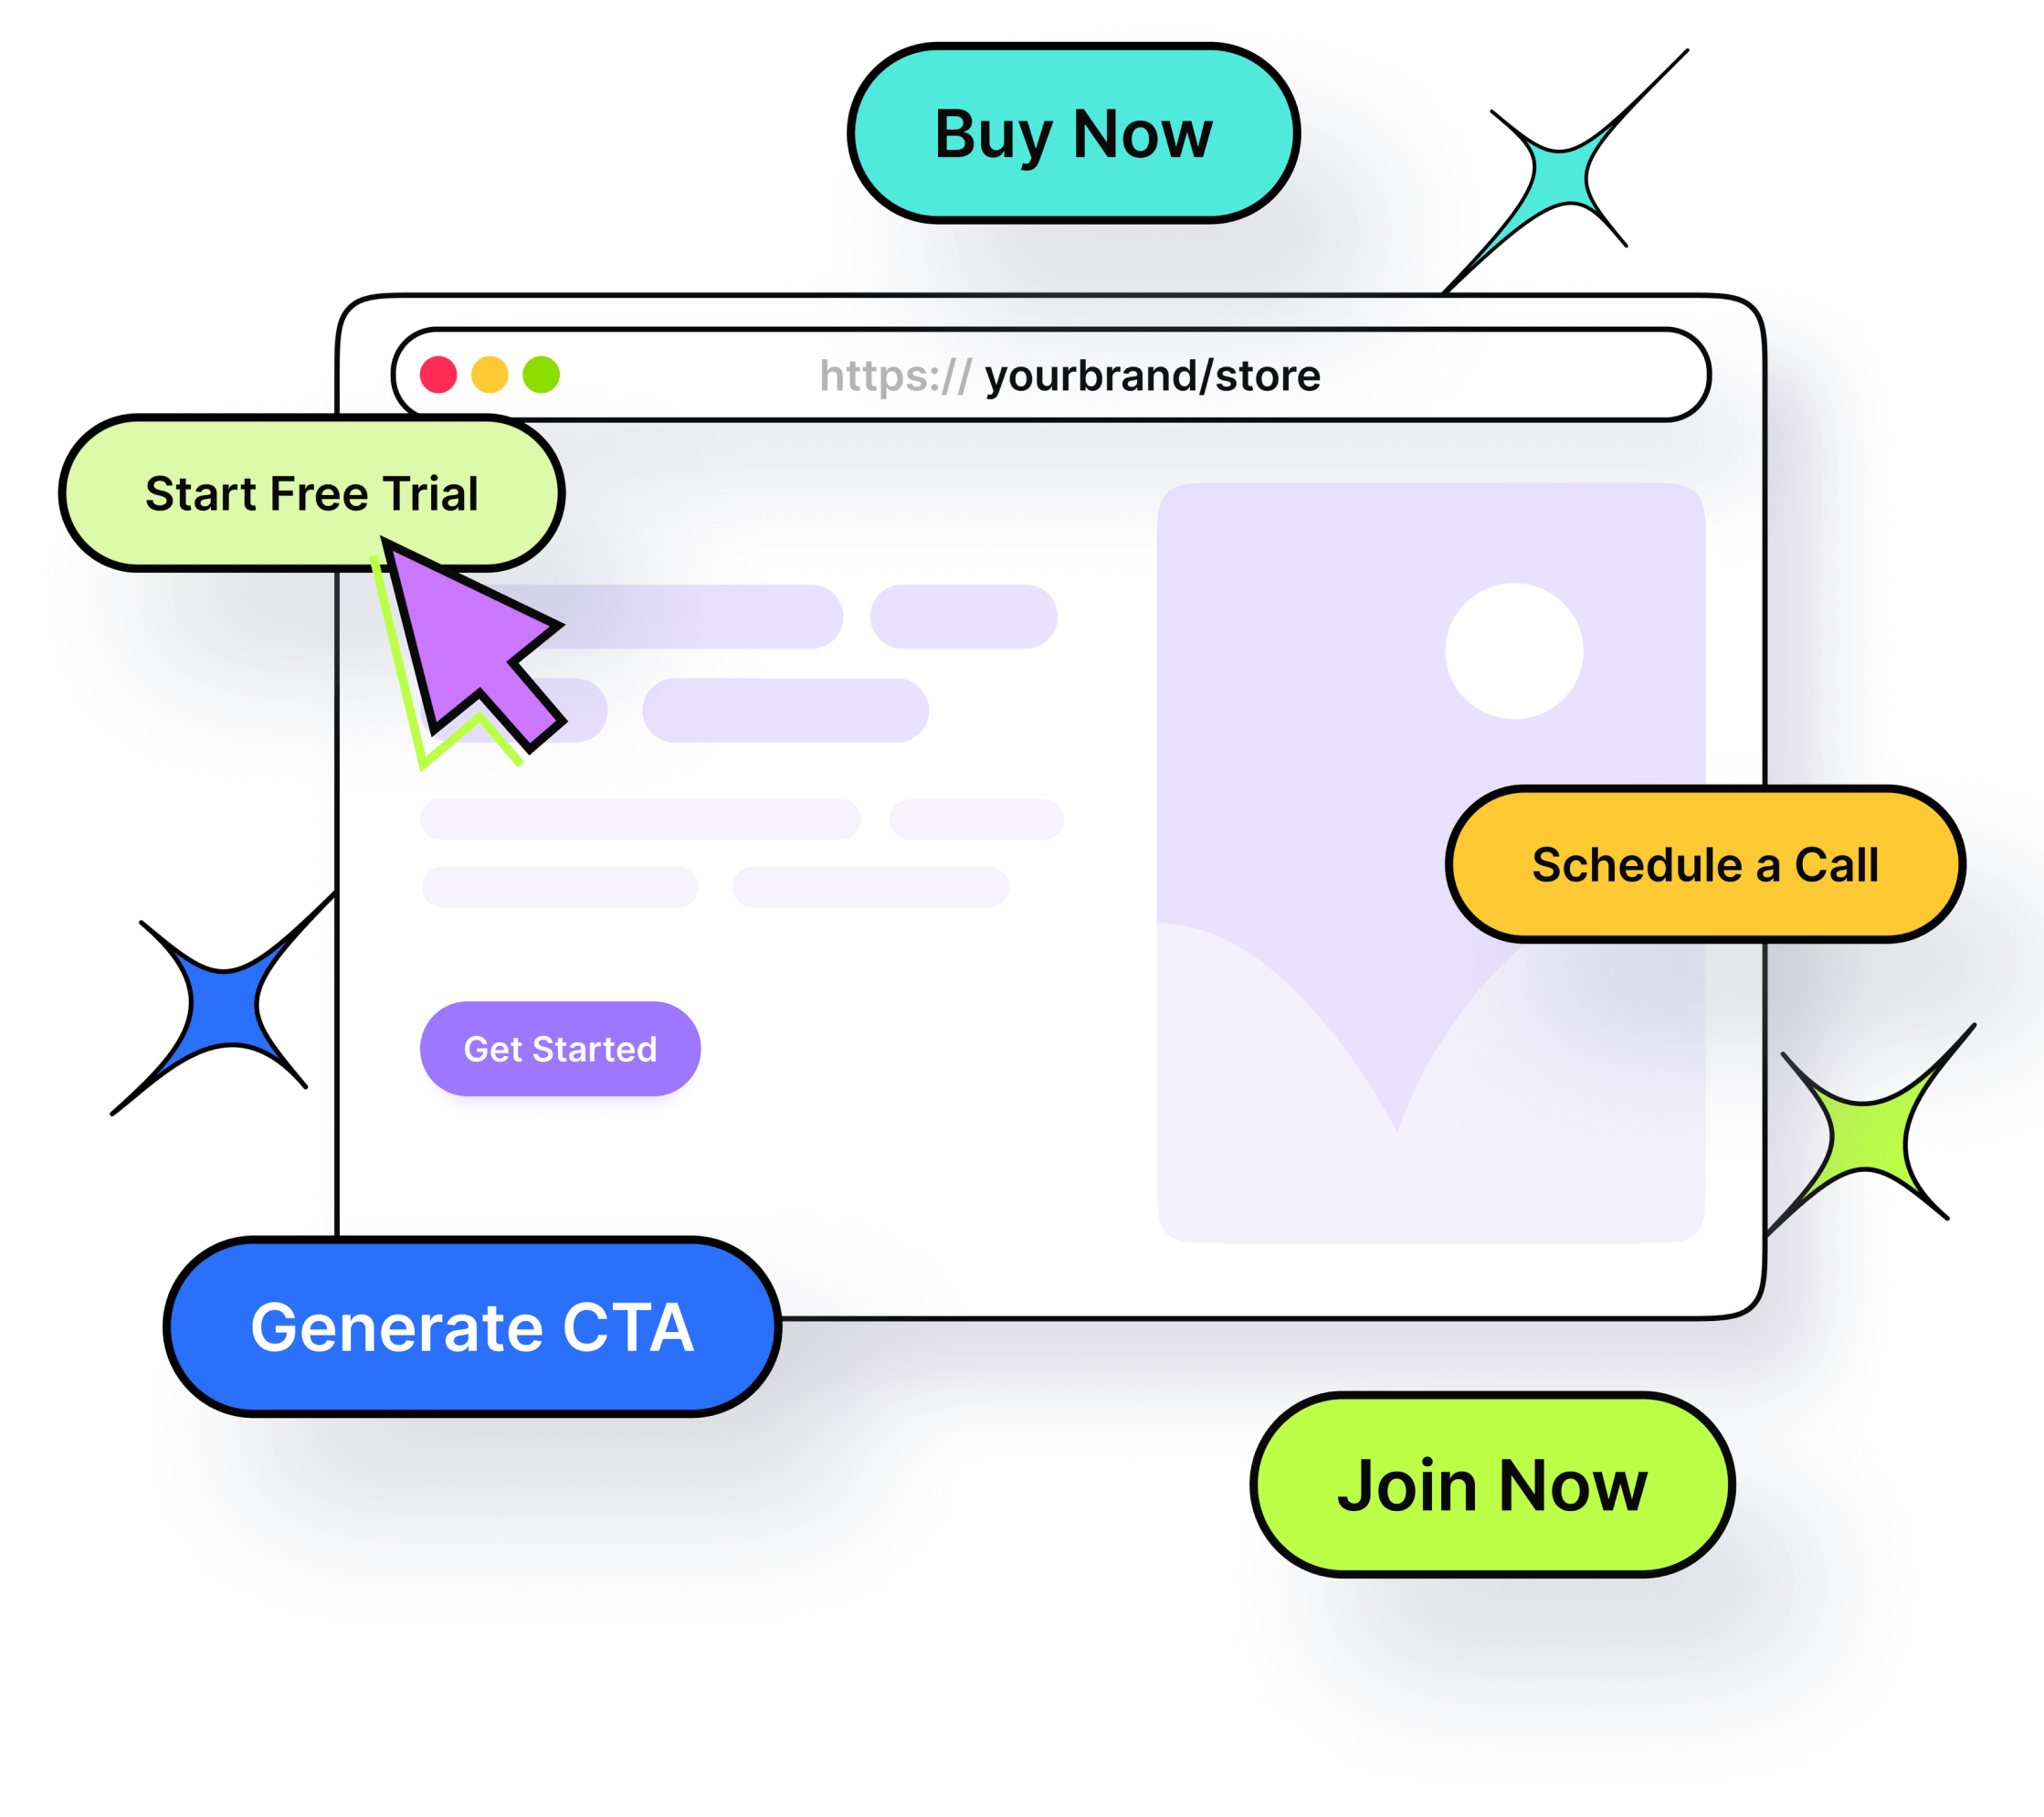
CTA stands for call to action. In marketing, it’s what tells your audience what to do next, like “buy now”, “subscribe”, or “download”.
The call to action marketing definition is simple: it’s about guiding your audience from just looking to actually doing. CTAs appear as buttons, hyperlinks, banners, or even phrases in videos and emails. They might be as direct as “start free trial” or as gentle as “discover more”, but their purpose stays the same: lead people toward action.
CTA in marketing: why it matters
What does CTA mean in marketing? It means turning curiosity into clicks, and clicks into measurable business results.
Think of your content as a conversation. Without a CTA, that conversation stops short; you’ve sparked interest, but you haven’t shown what to do next. Effective CTA marketing bridges that gap. It keeps visitors engaged, increases your ROI, and helps you guide each person through the customer journey, from awareness to consideration and finally to decision.
In other words, CTA in marketing isn’t just about adding a button; it’s about creating a clear path your audience wants to follow.
Even small branded elements, like custom pins, can serve as creative CTAs by drawing attention and encouraging action in a subtle way.
Types of CTAs: soft CTA vs. hard CTA
Successful marketing often uses a mix of soft CTA and hard CTA, matched to where your audience is in the funnel.
Type
What it does
Examples
When to use
Soft CTA
Encourages low‑commitment, exploratory steps
– Learn more – See how it works – Discover more
Early stages: Building trust and educating
Hard CTA
Pushes for a final, decisive action
– Buy now – Subscribe – Download now
Later stages: When your audience is ready to convert
Using both keeps your CTA marketing natural: soft CTAs spark interest; hard CTAs convert that interest into results.
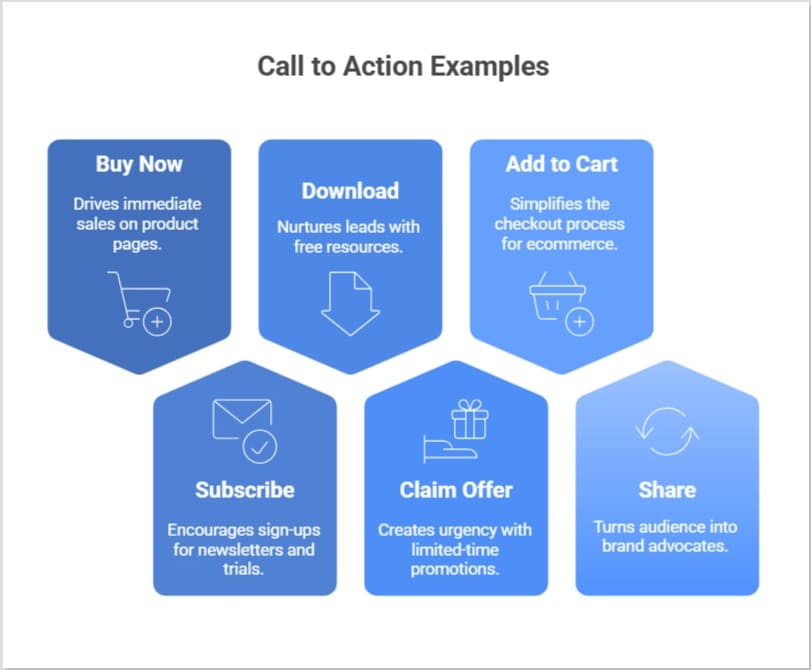
Here are some common yet, effective examples of effective CTAs in marketing and their primary purpose:
Buy now → ideal for product pages to drive immediate sales
Subscribe → great for email newsletters, free trials, or community sign‑ups
Download → offers free resources to nurture leads
Claim offer → works well with limited‑time promotions to create urgency
Add to cart → simplifies ecommerce checkout
Share → turns your audience into brand advocates by encouraging social sharing
Each CTA is short, clear, and purpose‑driven, showing exactly what action you want the user to take.
Want inspiration for call-to-action phrases for your marketing campaigns? Here’s our list of 100+ killer CTA phrases you don’t want to miss!
How to create an effective call to action for marketing?
There are many tools out there to help you craft a compelling call to action as part of your marketing strategy. However, Replug stands out because it offers a custom overlay creator designed to simplify the entire process.
Inside Replug, you can create a dedicated CTA campaign, choosing your message, button text (buy now, subscribe, or any custom copy), and styling it to match your brand’s look and feel. You can also create dynamic CTAs that adapt based on your audience or campaign goals, helping you keep messaging fresh and personalized without starting from scratch.
Moreover, you can decide where your CTA appears: as a pop‑up, using a banner template, or even on a bridge page when direct overlays aren’t supported on platforms like Facebook or Google.
Boost your conversion rates with irresistable CTAs with
This means you’re not just making a single button, you’re building a consistent, branded experience across all your links and content.
If you’d like to see exactly how to set this up, check out our step‑by‑step guide to creating CTA campaigns in Replug.
Best practices for effective CTA marketing
Crafting CTAs isn’t only about writing clever text; it’s about understanding what will truly motivate your audience to act.
Start by knowing your goal
Before writing your CTA, decide what you want to achieve. Are you trying to get sign‑ups, drive direct purchases, or increase downloads? A clear goal ensures your CTA aligns with your content and your business strategy.
Use action‑oriented language
Strong verbs like “start”, “discover’, “join”, “buy now”, or “subscribe” add energy and clarity. They don’t just tell users what to do; they help them feel ready to do it.
Focus on benefits, not just actions
People click when they see what’s in it for them. Instead of “submit”, try “get your free guide”. This approach shifts attention to the value your offer provides.
Design for visibility
A CTA button should catch the eye without overwhelming the design. Contrast with surrounding colors, add whitespace, and keep fonts bold yet clean.
Strategic placement matters
CTAs don’t always belong only at the bottom. Try placing them after product descriptions, in blog posts, or as exit pop‑ups. Replug even lets you add branded CTAs on curated content you share, so every link becomes part of your funnel.
Note on platform restrictions Some digital platforms like Facebook, Google, or YouTube restrict adding custom CTAs directly due to iframe or embed policies; which can be frustrating for users, especially affiliates. To work around this, you can use Replug to create a bridge page: a branded intermediate page that appears before the final destination. It hosts your CTA, so you still guide users to act, even when the original site doesn’t allow it.
Users often skim online. A short, direct CTA like “shop the collection” or “download” now usually outperforms longer, complex phrases.
Use CTAs in bio links and captions
Add CTAs to Instagram bios, TikTok profiles, and captions to drive clicks. With tools like Replug, you can turn one bio link into a branded landing page with multiple CTAs. It is the all-in-one link management platform that is perfect for affiliates and creators who want to track every click.
Phrases like today, “limited‑time offer”, or “don’t miss out” gently nudge users to act sooner rather than later.
Test, learn, repeat
Use analytics and A/B testing to see which CTA marketing ideas resonate most. Even a single word change can move your conversion rate.
Great CTA marketing is an ongoing process: set clear goals, test, learn, and refine.
Benefits of using the right CTA
A well‑planned CTA strategy does more than increase clicks. It transforms how your audience experiences your brand:
Guide visitors to act with confidence: Clear, well‑placed prompts remove hesitation. When visitors know exactly what to do next, they’re more likely to take action; whether that’s buy now, subscribe, or download.
Focus on real value, not just clicks: Effective CTAs highlight what matters most to your audience: exclusive access, discounts, or helpful content, turning curiosity into meaningful engagement.
Track performance and refine your strategy: With tools like Replug, every click can be tracked. This means you see which CTAs get real results, run A/B tests, and keep improving your conversion rate over time.
Add CTAs even where platforms restrict them: Some platforms (like Facebook, Google, or YouTube) limit direct CTAs because of iframe or embed restrictions. Replug solves this by letting you create customizable bridge pages.
Build brand trust through consistency When your CTAs match your design and tone everywhere, from emails to shared links visitors feel a seamless brand experience. This consistency builds confidence and makes users more comfortable saying yes.
Boost ROI with branded URLs!
Enhance your marketing campaigns by creating shareable, trackable, and fully multi-purpose
customizable branded URLs.
When using a CTA in digital marketing, what works best isn’t always obvious. That’s why A/B testing (also called split testing) is essential: it helps you compare two or more versions of a call to action to see which performs better and drives more conversions.
Split testing allows you to test different elements like copy, color, size, placement, or design, to identify the most effective combination for engagement and conversions.
For example, you might test:
Buy now vs. Get yours today
Button color or size
Placement at the top, middle, or end
Bold button vs. simple text link
By systematically running these experiments and analyzing the data, you make data‑driven decisions instead of relying on guesswork. Over time, you can refine your CTAs by iterating on successful variations and discarding the ones that don’t perform.
Tools like Replug make this process easier: you can quickly create multiple CTA versions, track clicks, and see what resonates best with your audience. That way, your CTA marketing strategy keeps improving, backed by real insights rather than assumptions.
Start crafting CTAs your audience wants to click
Using a CTA in your marketing campaigns isn’t just about telling people what to do. It’s about creating a moment that moves them from interest to action.
Using right wording, placement, and tools like Replug, you can craft CTAs that feel authentic and turn passive visitors into loyal customers.
You can take your CTA strategy even further by using a short URL to track performance and enhance user experience, ensuring every click brings you closer to meaningful engagement.
FAQs about CTA marketing
What does CTA stand for in online marketing?
CTA stands for Call to Action. It’s any prompt that directs your audience toward a desired action, like buying a product or signing up for updates.
What is an example of a CTA?
A CTA (call to action) can be as simple as “Buy now,” “Subscribe,” “Learn more,” or “Download your free guide.” It’s any prompt that encourages the audience to take a specific next step.
What are the disadvantages of a CTA?
If used poorly, CTAs can feel pushy, repetitive, or off‑brand. Overusing them may overwhelm visitors, while unclear or generic CTAs can confuse rather than guide, leading to lower conversion rates.
What is a CTA button in marketing?
A CTA button is a clickable element designed to stand out and prompt users to act. For example, adding an item to a cart, subscribing to a newsletter, or starting a free trial.
Is there a tool to create and test CTAs easily?
Yes. You can use tools like Replug to design, customize, and test CTAs across your marketing campaigns. It lets you create CTA campaigns, run A/B tests, track performance, and even add CTAs to shared links, including bridge pages when direct overlays aren’t supported on platforms like Facebook or Google. This makes it easier to refine what works and keep your branding consistent.
How do CTAs impact SEO?
While CTAs themselves don’t directly change your search ranking, they guide users to engage more deeply with your site. This can reduce bounce rates, increase time on page, and send positive user signals to search engines.
What does CTA mean on Instagram?
On Instagram, a CTA could be text in a caption like “Tap the link in bio,” stickers in Stories such as “Swipe up,” or buttons like “Shop Now” that encourage immediate engagement.
Artists and creators often need more than a simple link to share their work. That’s where a Spotify QR code comes in. It’s a quick, scannable way to connect audiences to playlists, albums, or podcasts.
In this step-by-step guide for Replug users, you’ll learn how to create, customize, and track a QR code that connects your audience directly to your Spotify content
Let’s tune in!
Maximize marketing ROI
by transforming ordinary URLs into branded short links that convert.
Try Replug for free
What is a Spotify QR code?
A Spotify QR code is a scannable code that links directly to any Spotify URL, such as a playlist, album, podcast, or song. Fans simply scan your code to access your content instantly, making it easier to share music anywhere, such as on posters, social media, websites, or even business cards.
Unlike Spotify’s built-in codes, Replug’s dynamic QR code for Spotify can be edited later and includes scan tracking, branding, and full customization options.
Why create a Spotify QR code with Replug?
Spotify has over 678 million users worldwide, and a QR code for Spotify bridges the gap between your online content and offline promotions. Replug is a link optimization platform that makes it easy to create, customize, and manage your QR code with features like:
Custom branding: colors, logo, frames, and CTAs
Flexibility to edit your Spotify link later
Real-time tracking data: scans by location, time, and device
Options to share any Spotify content: playlists, albums, podcasts, and more
Spotify QR codes vs “Spotify Codes”: What’s the difference?
In 2017, Spotify launched its in-app “Spotify Codes”. But here’s why many creators choose Replug’s dynamic QR codes for Spotify instead:
Feature
Spotify Codes
Replug’s QR codes
Accessibility
Must be scanned inside the Spotify app
Can be scanned by any camera or QR scanner
Edit anytime
Fixed once created
Update your Spotify link anytime without reprinting
Track scans
No scan data
QR code tracking: total scans, unique scans, location, referral, OS, browser, comparison graphs
Follow these quick steps to create your own custom Spotify QR code with Replug:
Step 1: Copy your Spotify URL
Choose what you want to share:playlist, album, song, podcast, or profile.
Right-click and copy the Spotify link.
Tip: Always double-check you’ve got the right link before generating yourcode
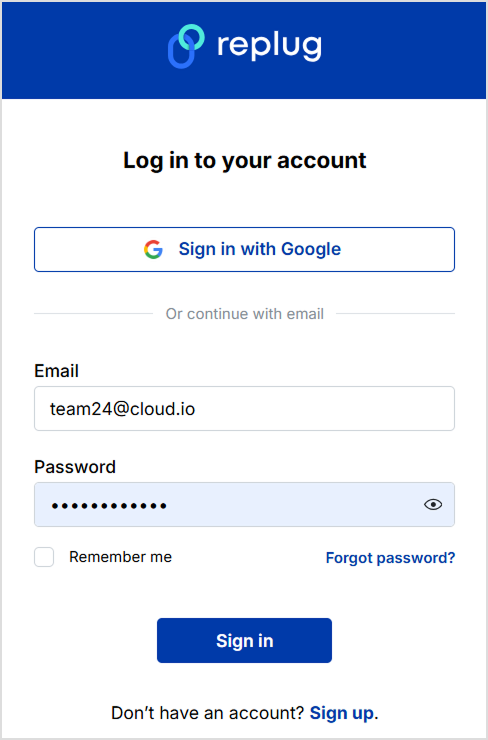
Step 2: Sign in to Replug
Go to Replug and log in to your account.
Don’t have one? Sign up to get a 14-day free trial with all our advanced features.
Step 3: Create a new QR code
Go to your Replug homepage.
Click on “QR Codes” from the navigation. From here, you’ll be led to your QR codes dashboard.
Once you’re in, click on the blue “Create new” button.
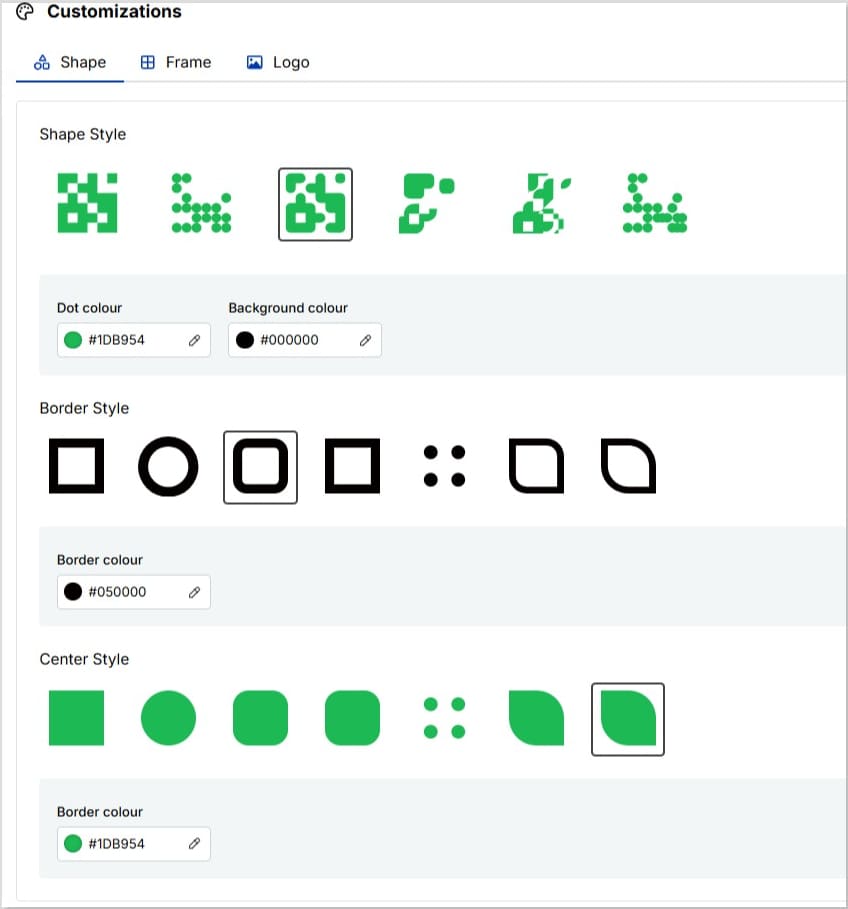
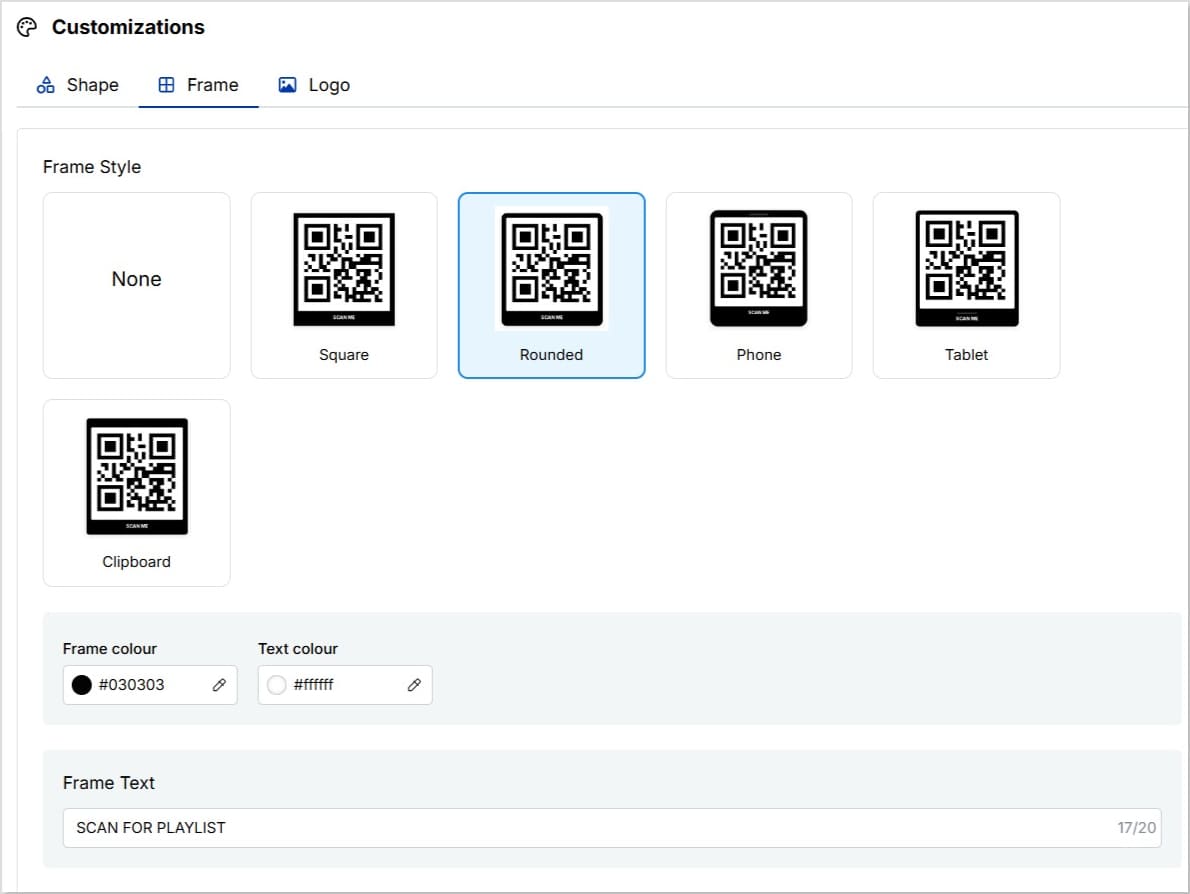
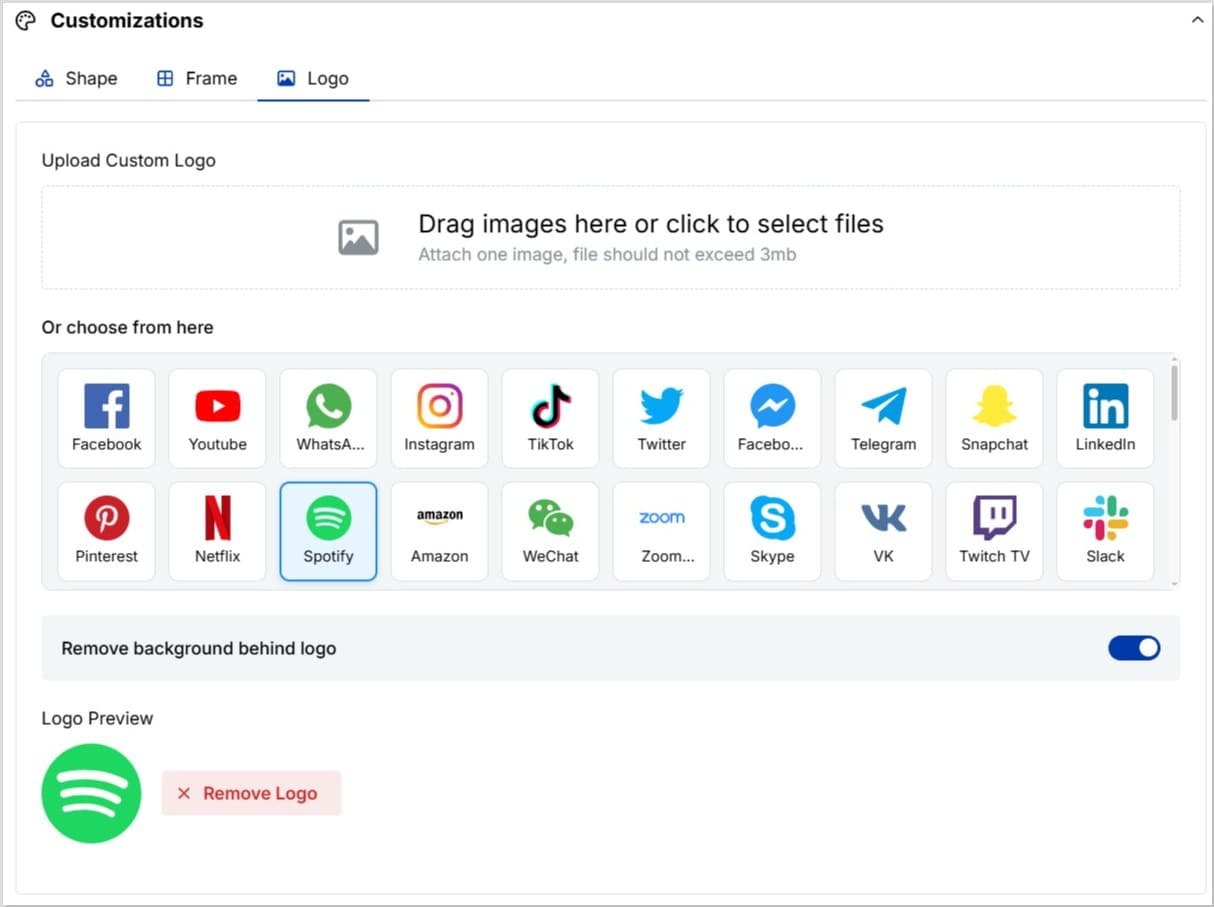
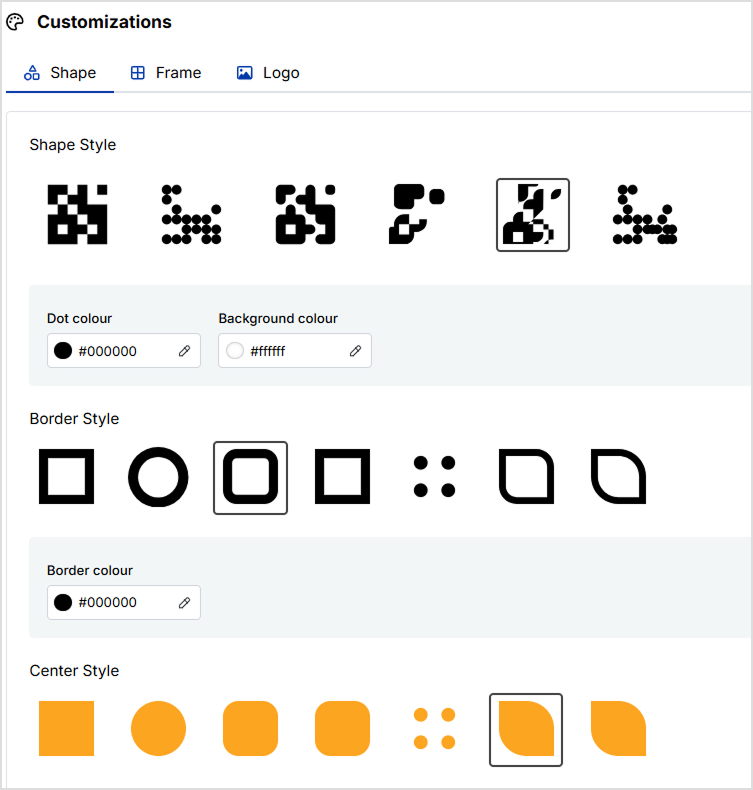
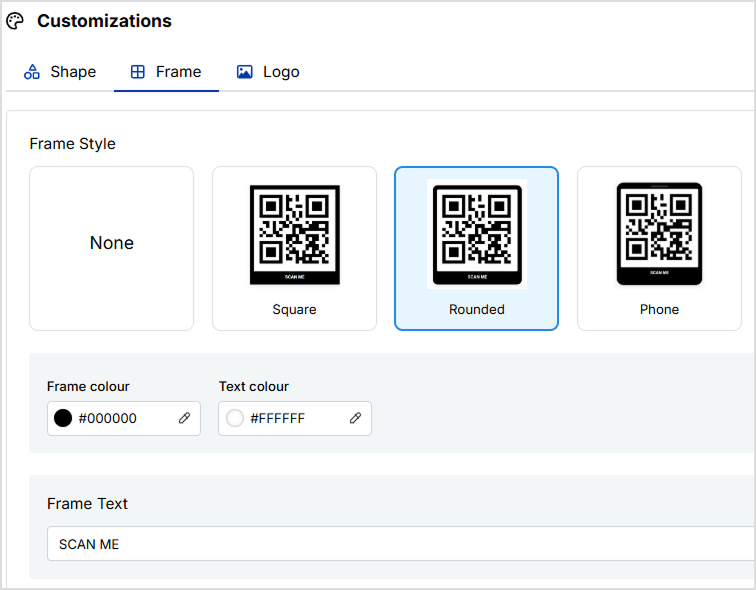
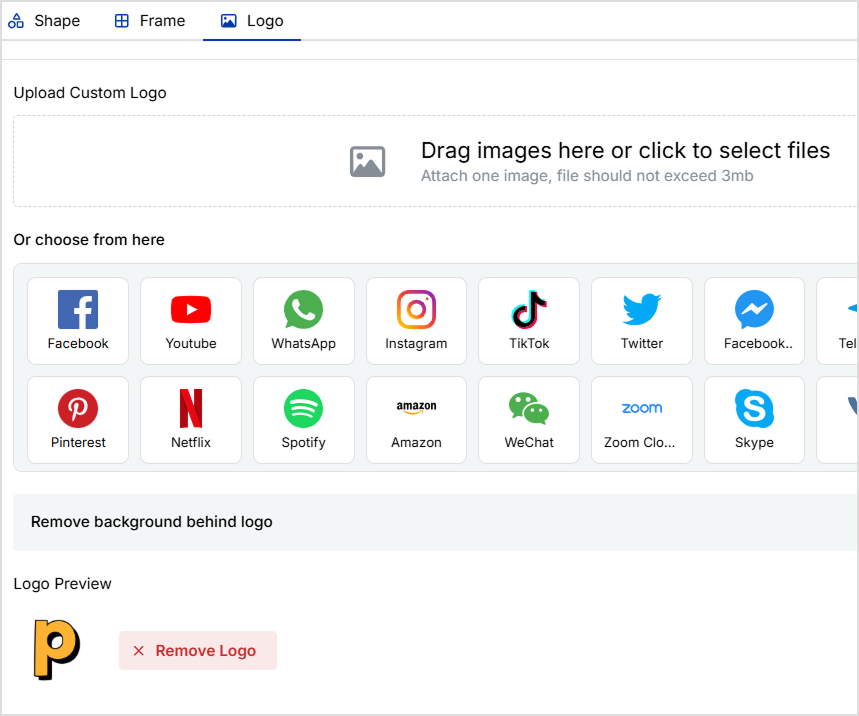
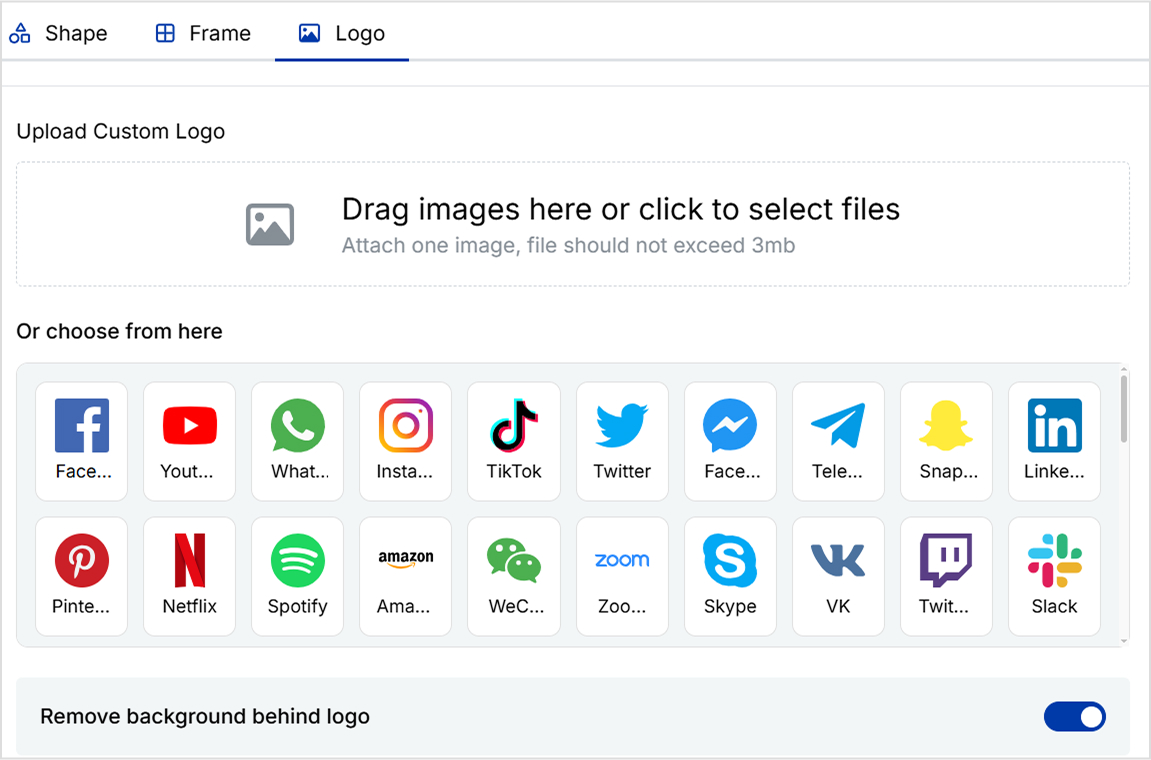
Step 4: Customize your QR code
Replug gives you the option to customize the shape, frame and logo of your QR code. Here’s a quick snapshot of how many customization options you have:
Customize shape
Customize frame
Customize logo
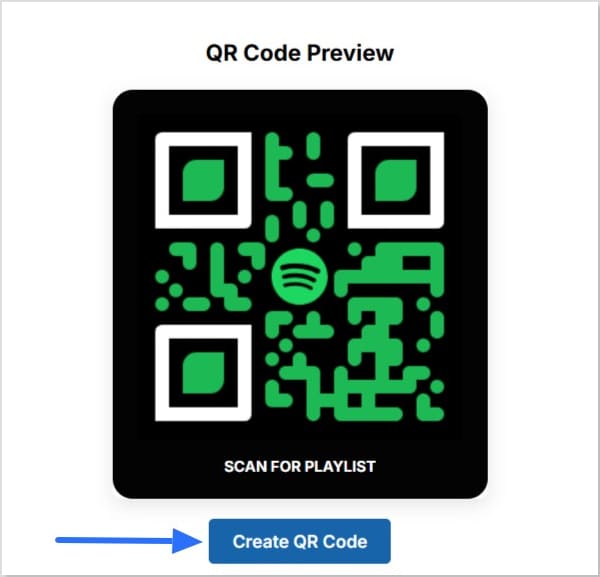
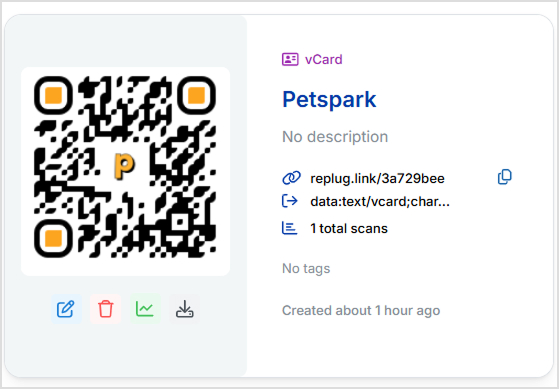
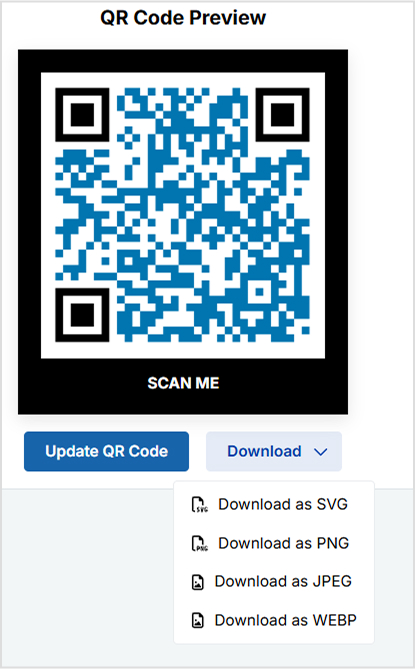
Step 5: Save and download
Click “Create QR code”
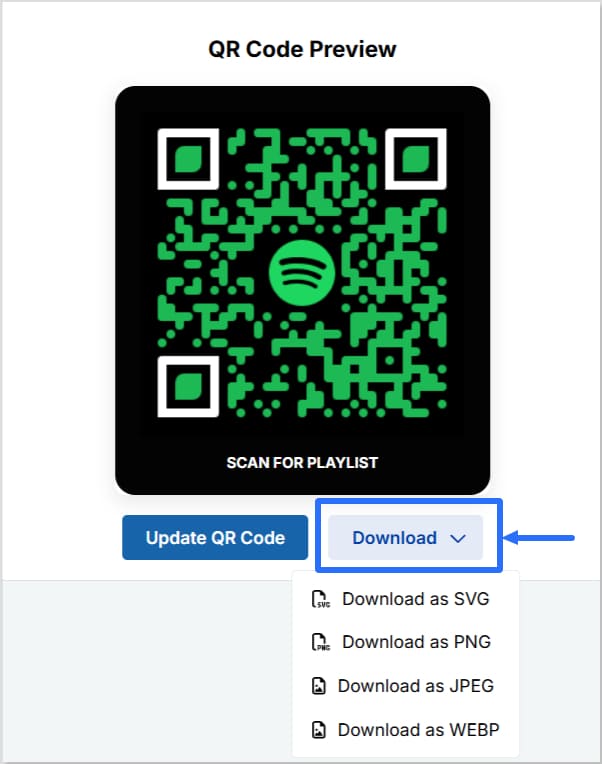
After creating your QR code, you’ll see the option to “Download”. Click on it to download your QR code for Spotify in either SVG, PNG, JPEG, or WEBP.
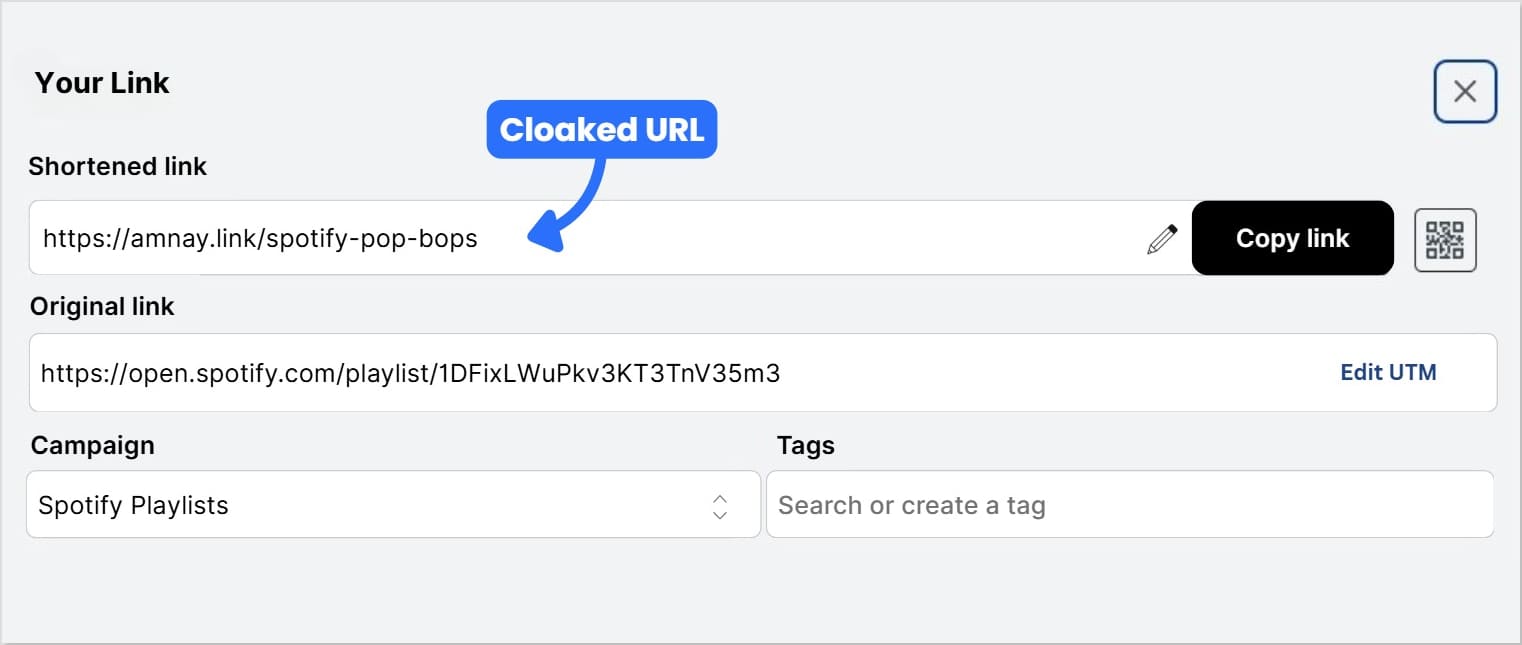
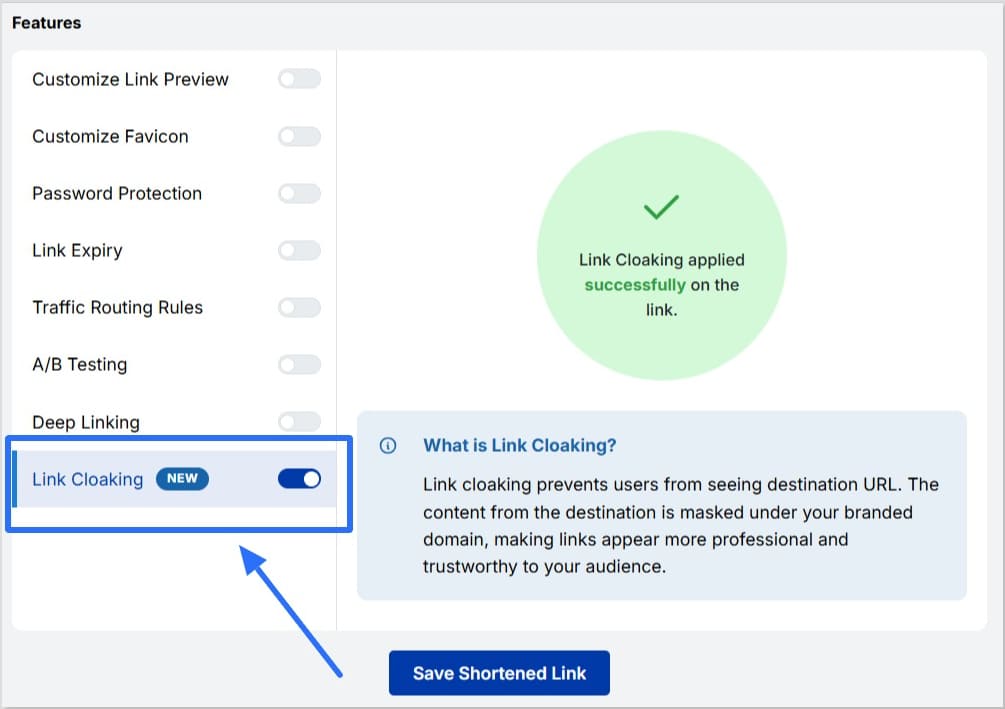
Step 6 (optional): Cloak your QR code
For cleaner, branded URLs, use Replug’s link cloaking feature. This hides the original Spotify URL behind your custom domain, making your QR code link look more professional and trustworthy.
First, go back to the homepage and find the shortened link you just created in your list of recent links, with Replug’s link shortener tool.
From the three-dot menu under Action, click on Edit
In the edit screen:
Connect your custom domain
Don’t have a custom domain? No worries! Get a free .link domain with Replug today!
Change the URL slug to something branded and memorable
Enable “Link Cloaking” to hide the original Spotify URL behind your custom URL
Save your shortened link. Now, each time someone scans your code, they’ll see your cloaked link in their browser.
By using Replug as your Spotify link shortener, you can not only cloak and brand your links but also track clicks, audience locations, and engagement metrics in one place. This ensures that every Spotify link you share, whether through QR codes, social media, or email, looks polished, performs better, and builds audience trust over time.
Replug’s dynamic QR code isn’t just a design asset; it’s also a powerful link analytics tool:
Track scans in real time
See when and where your QR code was scanned
Identify devices and locations that bring the most traffic
Use these insights to refine your campaigns and enhance engagement; whether you’re using a Spotify playlist QR code, Spotify song QR code, or a QR code to promote your concert.
Benefits of using Replug
Here are the benefits that make Replug’s QR code generator the best choice for creators and marketers alike:
Share playlists, podcasts, albums, or even a single track effortlessly
Edit Spotify links anytime without reprinting your QR code
Customize your code to match any campaign: colors, logos, and call-to-action
Reach offline listeners at events, gigs, or retail stores
Measure ROI with detailed scan tracking and performance data
It’s an easy way to promote music with a QR code and use QR code marketing for musicians to grow your audience.
A complete link management solution
for marketing professionals & agencies.
Try Replug for free
Best practices
Use high-contrast colors to ensure your code scans quickly
Keep the printed size at least 3 × 3 cm for clarity
Add a clear call-to-action like “Scan to Listen!”
Track scans and adjust your marketing strategy over time
By following these tips, your code will not only look professional but also perform better, helping you connect with more listeners wherever they are.
Spotify QR codes wrapped
A Spotify QR code is more than just a shortcut; it’s a smart, scannable bridge connecting your audience directly to playlists, albums, podcasts, or songs. With Replug, creating a QR code becomes an easy, flexible, and trackable process.
From designing a fully branded code to cloaking your link and measuring real-time scans, you’re equipped to take your music or podcast promotion further; online, offline, and everywhere in between.
Ready to share your sound with the world? Create your QR code with Replug today!
FAQs on how to create a QR code for Spotify
What is the difference between “Spotify Codes” and a Spotify QR code?
Spotify Codes are a built‑in feature from Spotify that lets users share and discover content easily within the app. A Spotify QR Code (like the one you create in Replug) is a standard QR code that anyone can scan using any camera or QR scanner.
How to make a Spotify Code?
Inside the Spotify app, tap the three dots next to any song, playlist, album, or podcast. You’ll see a code displayed below the artwork. Friends can scan this code within the Spotify app to access the content directly.
Can you create a QR code for Spotify?
Yes. With tools like Replug, you can turn any Spotify link, whether it’s a playlist, album, podcast, or song, into a scannable QR code. These codes can be customized, tracked, and shared anywhere online or offline.
How do I create a QR code for a song?
Copy the Spotify link for the song you want to share. Then, use Replug’s QR code generator: paste the link, customize the design, and download your QR code. You can then use this code on posters, social media, business cards, and more.
How do I find my QR code for Spotify?
In the Spotify app, go to the content you want to share, tap the three dots, and the Spotify Code will appear under the cover image. If you’ve created a QR code with Replug, you can find it in your Replug dashboard under your recent links.
Can I track how many people scanned my Spotify QR code?
Yes, if you use Replug to create a dynamic QR code. You’ll get detailed analytics like total scan and unique scans from different locations, browsers, referrals, and device types. “Spotify Codes” not offer this tracking feature.
Snapchat isn’t just about sharing photos and videos anymore; you can now attach a link to a Snap and easily direct your friends and followers to external content. Thanks to the Snapchat linking feature, sharing a website, article, or even a funny meme right inside your snaps and stories has never been simpler.
In this guide, we’ll walk you through how to add a link to Snapchat story and snaps on both iOS and Android. By the end, you’ll know exactly how to attach a clickable link on Snapchat and let your friends swipe up on Snapchat to visit your shared content.
Follow along with the steps below to start sharing your favorite websites and content in no time!
Maximize marketing ROI
by transforming ordinary URLs into branded short links that convert.
Try Replug for free
How to add a link to Snapchat story: iOS and Android
Adding a link to your Snapchat snaps and stories is a great way to share a website on Snapchat and engage your followers.
Note: Screenshots are provided for the Android version, but iOS users should be able to follow along.
Here’s a step-by-step guide on how to do it:
Step 1: Open the Snapchat app on your iOS or Android device.
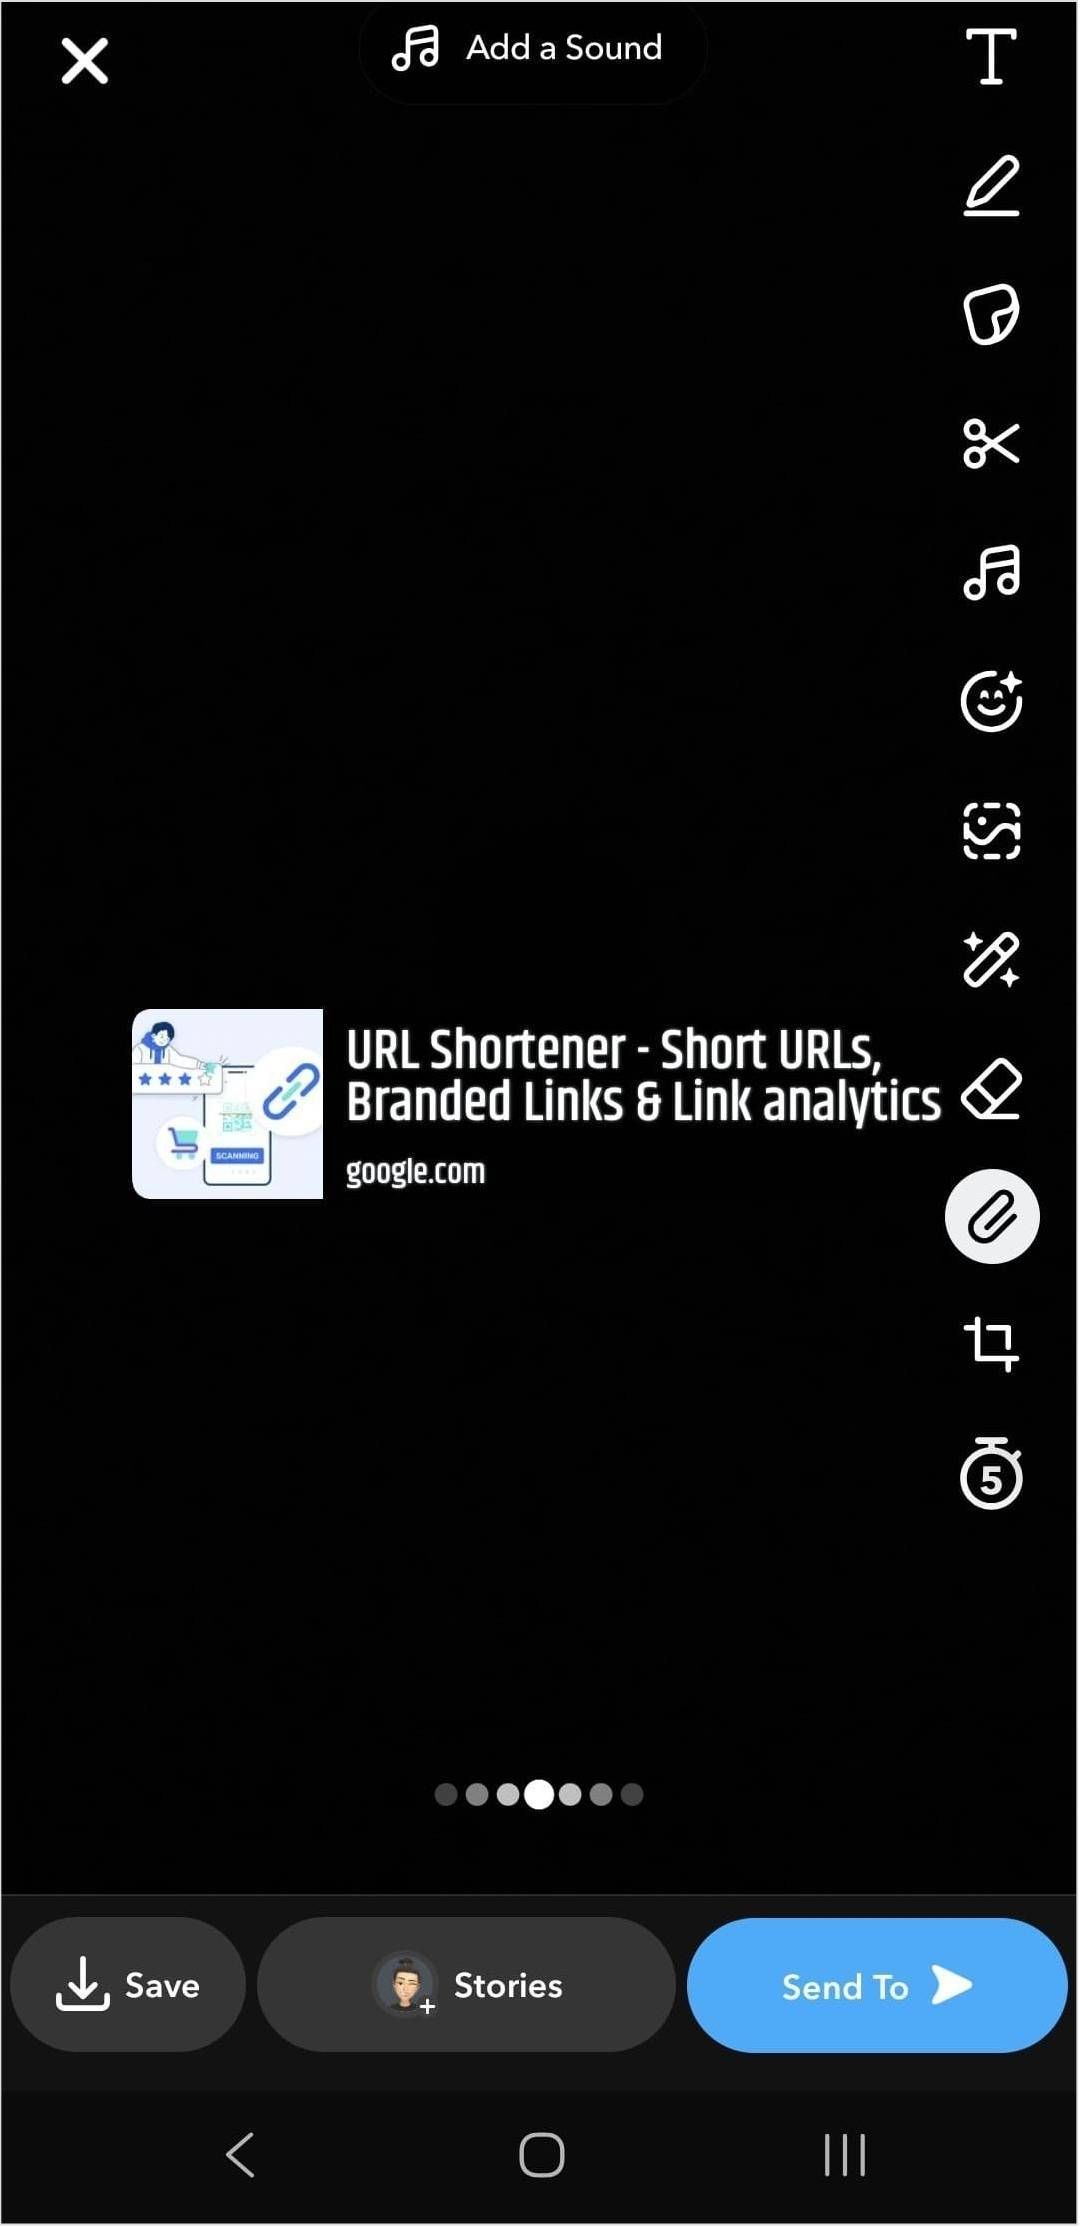
Step 2: Take a photo or film a video snap using the main camera tab or by uploading a photo/video from your device. Apply filters, stickers, emojis, text, or drawings to your snap as desired.
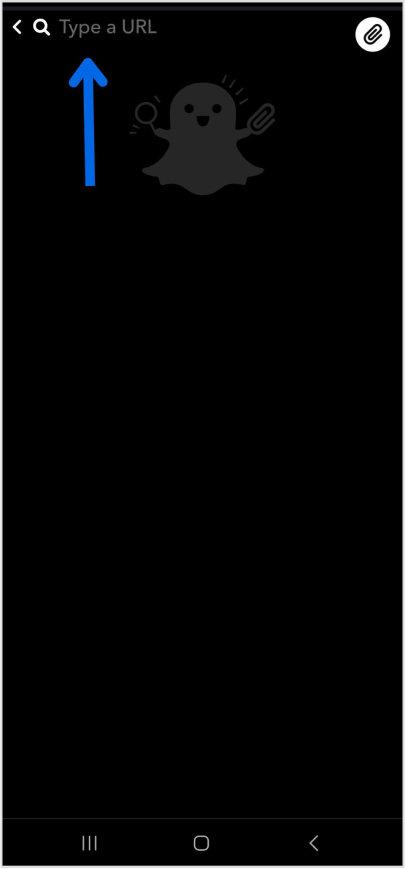
Step 3: Tap the Snapchat paperclip icon in the menu on the right to attach a link to Snap.
Tip: If the link is too long to type, copy it from your browser or another app before coming back to Snapchat.
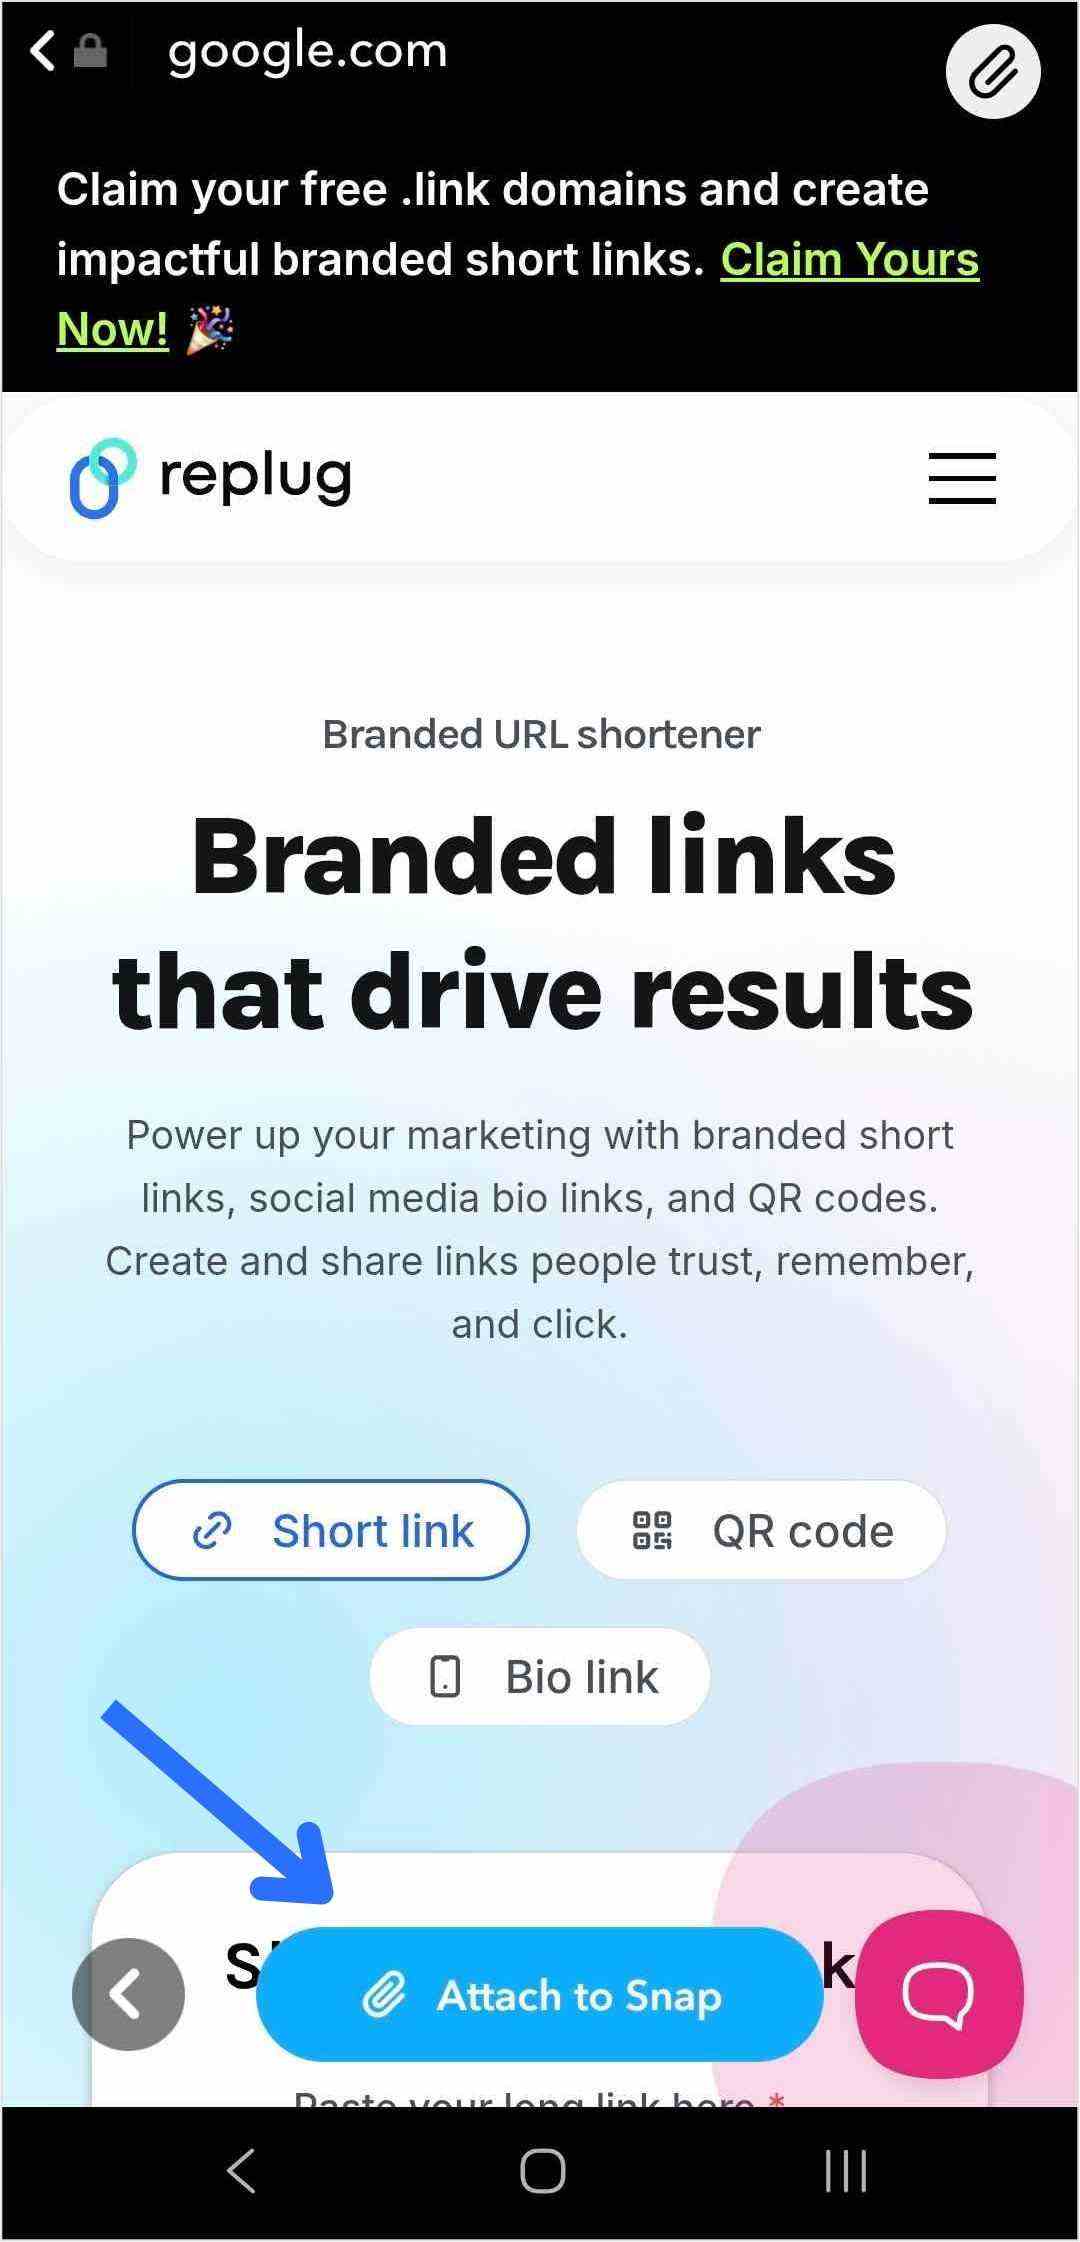
Step no 4: Paste the link into the “Type a URL” field and tap “Attach to Snap.”
Tip: Attaching a link to your Snap is just the first step. To drive traffic and get people to swipe up, dress up your snap! Use music, effects, emojis, and text to make your story more appealing and clickable.
Step 6:Tap the blue arrow to send your snap to friends, or tap the story button to add a link to your Snapchat story.
That’s it! Now your viewers can swipe up on Snapchat to visit the link directly.
A complete link management solution
for marketing professionals & agencies.
Try Replug for free
How brands can leverage Snapchat links?
Snapchat has approximately 460 million daily active users, making it a valuable platform for brands to effectively reach their target audience. Using the Snapchat linking feature is a smart way for brands to maximize engagement and guide followers to key content. Features like Snapchat Planets also offer brands new ways to understand user interactions and strengthen their community.
Here’s how brands can make the most out of their Snapchat link:
Control and direct traffic
By adding a Snapchat link, brands gain control over where their followers go next after swiping up on a snap. Whether directing users to the homepage, a specific product page, or a demo page, brands can guide their audience’s journey within the app.
To make these snaps more engaging, many teams now edit images with AI to quickly adapt visuals for different audiences, formats, and campaign goals while maintaining a consistent look.
Gain insights with powerful analytics
Each swipe up on Snapchat gives valuable engagement data. Analyzing these interactions enables brands to better understand the audience’s behavior and preferences, allowing for more targeted marketing strategies.
Utilizing tools like Replug not only shortens links but also provides valuable insights into user engagement and the effectiveness of different types of content. By tracking click data and analyzing other metrics, brands can refine their marketing initiatives and optimize their Snapchat presence.
Using a link shortener
Replug’s short URL generator free can provide short links and streamline the process of sharing them on Snapchat effortlessly. Shortened links are cleaner and take up less space, making them more visually appealing and easier for users to engage with.
A complete link management solution
for marketing professionals & agencies.
Try Replug for free
Craft comprehensive social media strategies
Maximizing the use of Snapchat features, including links, is crucial for developing a robust social media strategy. Brands that harness the full potential of Snapchat links can initiate conversations, explore relevant topics, and expand their reach to a wider audiences.
Frequently asked questions
How do I attach a link to Snap?
Tap the paperclip icon on the preview screen. Add your link — paste a copied URL, type one manually, or search for it Then tap “Attach to Snap”
Can I add multiple links to a single snap or story?
Currently, Snapchat only allows you to attach one link per snap or story. If you want to share multiple links, consider creating a series of snaps or stories.
Where is the paperclip icon on Snapchat?
It’s on the preview screen after you take a snap, in the vertical toolbar on the right side. Just tap the paperclip icon to attach a link to your snap.
Are there any restrictions on the type of content I can link to on Snapchat?
Snapchat’s community guidelines prohibit linking to certain types of content, such as illegal or explicit material. Ensure that the content you link to complies with Snapchat’s guidelines to avoid any issues.
Do users need to have the Snapchat app installed to view the linked content?
Yes, users need to have the Snapchat app installed on their devices to view linked content. When they swipe up on the link, it will open within Snapchat’s in-app browser.
Can I track engagement with the links I share on Snapchat?
While Snapchat does not provide built-in analytics for links shared on the platform, you can use link-shortening services like Replug to track clicks and engagement.
Do links expire on Snapchat?
Links attached to snaps or stories do not expire on Snapchat. However, you can remove a link anytime by editing the snap or story.
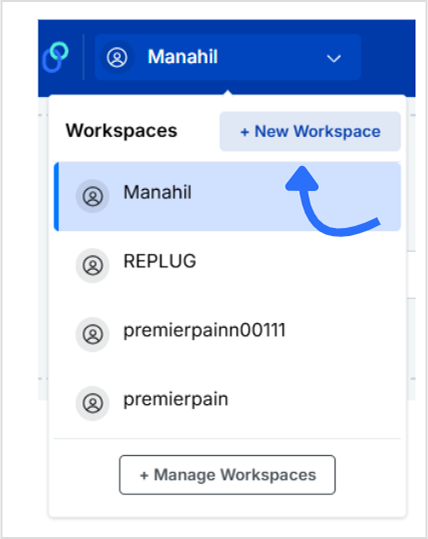
Today, we’re here with another guide, showing you how to create a workspace in Replug.
Replug’s workspace feature makes it super easy to keep everything organized. You can manage links, retargeting pixels, CTA campaigns, and team members, all in one place, without any mix-ups.
Each workspace acts like a separate space for a brand or project, so you stay focused and clutter-free. In this guide, we’ll show you how to create a workspace in just a few easy steps. Let’s get started!
A complete link management solution
for marketing professionals & agencies.
Try Replug for free
Invite team members (optional)
After creating your workspace, you can:
Add team members with different roles (admin, editor, viewer)
Grant access to only this specific workspace, great for clients or departments
Why use multiple workspaces?
Client separation: Avoid mixing links, campaigns, and analytics across different clients.
Team permissions: Assign specific access levels and keep internal processes secure.
Cleaner dashboard: Stay organized with clearly labeled, focused workspaces.
Scalability: Easily handle multiple projects, brands, or departments under one Replug account.
Final thoughts
Creating a workspace in Replug takes just a minute, but can massively improve how you manage your marketing tasks. Whether you’re running a solo project or handling multiple clients, workspaces keep things simple, secure, and scalable.
Besides, when paired with a reliable short URL shortener , your workspaces become even more powerful, helping you organize, track, and optimize every campaign with ease.
FAQs on Replug workspace
What is a workspace in Replug?
A workspace in Replug is a dedicated space where you can manage everything related to a specific project, brand, or client, including links, pixels, bio-links, campaigns, and team members, without mixing it with other workspaces.
Can I create multiple workspaces under one Replug account?
Yes! Replug allows you to create and manage multiple workspaces under a single account, making it ideal for agencies, marketing teams, or freelancers handling multiple clients or projects. Check the pricing page and choose teh required plan.
Do team members have access to all workspaces?
No. You can choose which team members have access to specific workspaces. This helps you maintain privacy and control while collaborating with clients, departments, or external partners.
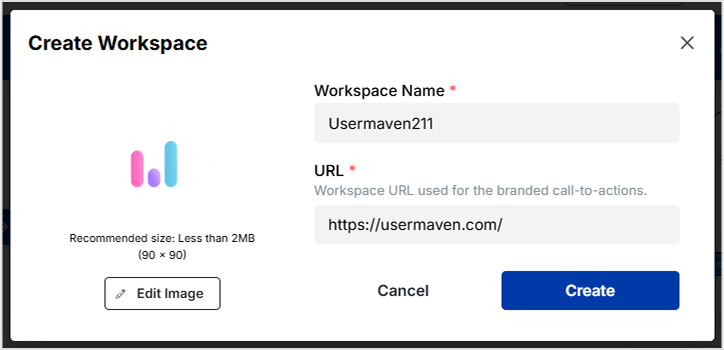
Can I brand each workspace differently?
Absolutely. Each workspace can have its own name, logo, custom domain/subdomain, and campaign settings, so you can tailor the experience for each brand or client.
Will deleting a workspace remove all its data?
Yes. Deleting a workspace will permanently remove all its associated data, including links, campaigns, and analytics. Make sure to back up anything important before deleting.
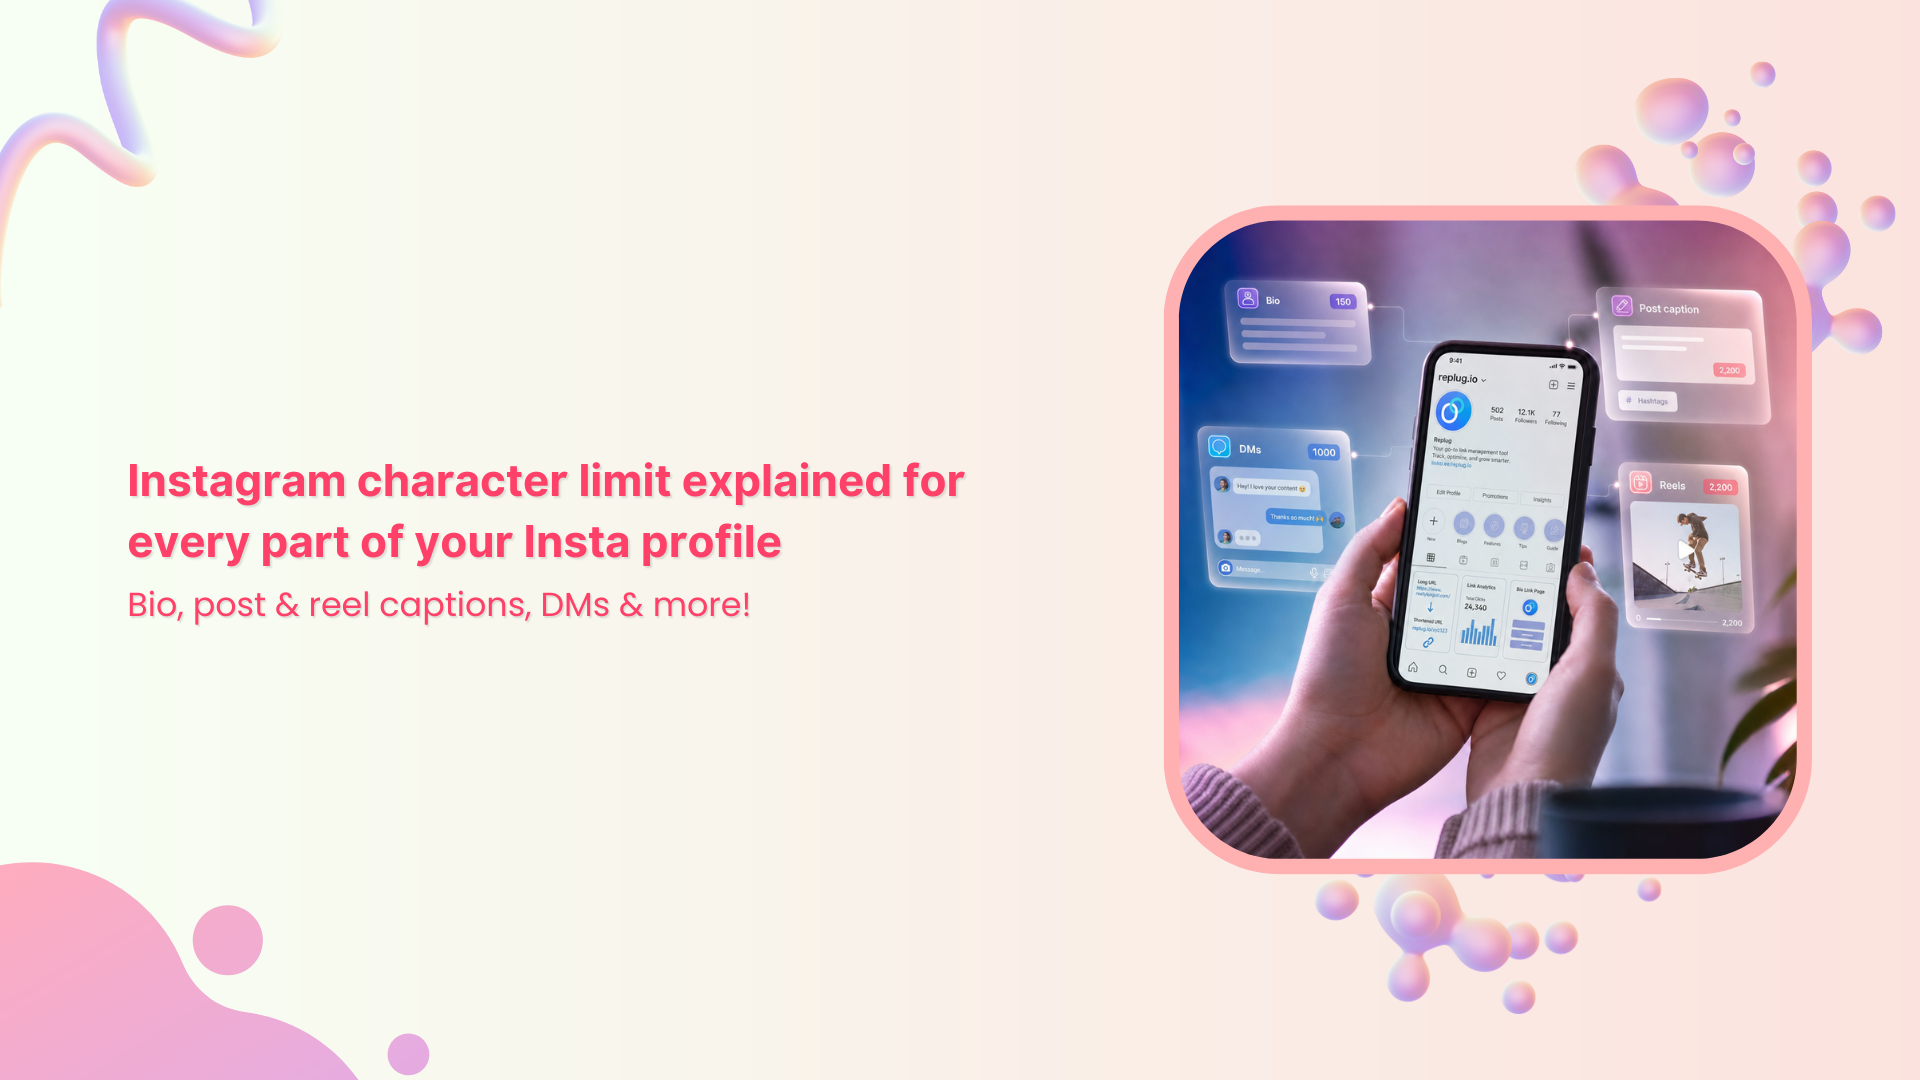
With Instagram now flaunting 3 billion monthly active users, it’s safe to say the platform is no longer just a place to post pretty pictures; it’s where brands grow, creators thrive, and audiences connect.
But here’s the thing most people overlook: every section of your Instagram profile comes with its own set of character limits, and going over (or way under) them can quietly hurt your reach and engagement.
Does Instagram have a character limit? Absolutely, and it’s different depending on where you’re typing. Your bio, captions, comments, and DMs all play by different rules.
Before you craft your next post or revamp your profile, let’s break down exactly what those limits are, starting with the basics.
What is the character limit on Instagram?
Instagram doesn’t have just one character limit. It has several, and each part of your profile plays by its own set of rules.
Your captions and comments allow up to 2,200 characters, your bio is capped at 150, and DMs max out at 1,000 characters per message. Your username and display name each get 30 characters.
So yeah, there’s a lot to keep track of! But don’t worry, we’re going to walk through each one, so you know exactly how much space you’re working with everywhere on the app.
Importance of Instagram character limit
Knowing Instagram’s character limits isn’t just a technicality; it directly affects how your content looks, performs, and connects with your audience. Get it wrong, and you’re leaving real engagement on the table.
Here’s why it actually matters:
Visibility & engagement (truncation)
Instagram only shows the first 125 characters of your caption in the feed before cutting it off with a “more” button. So if your hook isn’t in those first few words, most people will simply scroll past without reading the rest.
Algorithmic performance
Instagram’s algorithm pays close attention to how people interact with your content. If your caption is poorly structured or your bio is a confusing mess, engagement drops drastically. Plus, lower engagement signals the algorithm to push your content to fewer people.
User behavior & attention spans
People on Instagram are scrolling pretty fast. Captions around 125–150 characters tend to pull in more engagement because they’re quick to read and easy to digest. Long walls of text just don’t hold attention the same way.
Platform-specific constraints
Every section of Instagram has its own character limit defined, and they’re all different. What works in a caption won’t fit in a bio, so you need a slightly different approach for each placement.
Strategic optimization
When you know your limits upfront, you write with more intention. You front-load the important stuff, cut the fluff, and craft content that actually gets read. This ultimately means better results whether you’re a creator, a brand, or just someone trying to grow their presence.
A complete breakdown of different types of Instagram character limits
Instagram has a different character limit for pretty much every section of the app, and they’re not all the same. No matter if you’re writing a bio, dropping a caption, or running an ad, each field plays by its own specific rules.
Instagram character limits summary (2026)
Instagram element
Character limit
Quick note
Username
30 characters
Letters, numbers, periods & underscores only
Profile/Display name
30 characters
Bold name shown on your profile
Bio
150 characters
Includes spaces, emojis & punctuation
Post caption
2,200 characters
Only the first 125 show before “more”
Reel caption
2,200 characters
Keep it short; the video does the talking
Comment
2,200 characters
Same limit as captions
Direct message (DM)
1,000 characters per message
Split longer messages into parts
Notes
60 characters
Disappears after 24 hours
Hashtags per post
30 hashtags
Each hashtag is up to 24 characters long
Alt text
100 characters (recommended)
Technical limit goes up to 100-125
Story text overlay
~120–190 characters
No official hard limit; keep it readable
Ad primary text
125 characters (recommended)
The technical limit is 2,200
Ad headline
40 characters
Bold text below primary copy
Ad description
30 characters
Smallest ad element; keep it punchy
Here’s a full breakdown so you know exactly what you’re working with:
Instagram username character limit
Your Instagram username or handle (the one that starts with @) has a strict 30-character limit. Keep it short, simple, and easy to remember.
Stick to letters, numbers, periods, and underscores, and avoid anything too complicated that people would struggle to search for or tag.
Instagram profile name character limit
Your display name (the one that shows up in bold on your profile) also has a 30-character limit, the same as your username. This is different from your handle, so use it wisely (it allows up to 64 characters).
A lot of creators and brands use this field to include a keyword that helps people find them more easily.
Instagram bio character limit
Your Instagram bio gives you 150 characters to work with, and yes, that includes letters, spaces, emojis, and punctuation.
It sounds tight, but it’s enough to tell people who you are, what you do, and what they should do next (like check the link). Every character genuinely counts here, so be intentional with what you put in.
Instagram post captions give you a decent amount of room to tell your story, but there’s a catch you need to know about.
Instagram post caption character limit
Instagram allows up to 2,200 characters per caption, but only the first 125 characters appear before users have to tap “more” to read the rest.
So while you technically have plenty of space, your opening line is doing the toughest job. Lead with your hook, not your hashtags!
Instagram reel caption character limit
Reels captions also max out at 2,200 characters, the same as a regular post. That said, Reels is a fast-scrolling, video-first format, so shorter and incisive captions tend to work better here.
Don’t bury your message under a wall of text when the video itself is already doing the talking.
Instagram comment character limit
The Instagram comment character limit is 2,200 characters, the same as captions. That’s technically enough for a mini essay, but most people keep comments short and conversational.
Whether you’re replying to followers or engaging on other posts, concise comments tend to get way more back-and-forth than long ones.
Instagram DM character limit
If you’re wondering about the Instagram direct message character limit, it’s much shorter than captions. The ideal Instagram message character limit is 1,000 characters per message.
That’s usually more than enough for most conversations, but if you’re trying to send something longer, just split it into multiple messages. DMs also support emojis, links, photos, and videos, so you’ve got plenty of flexibility.
Instagram notes character limit
Instagram Notes are short status updates that appear at the top of your DMs inbox, and they come with a tight 60-character limit. They disappear after 24 hours, similar to Stories.
Think of them like a quick shoutout or a nudge to spark a conversation (not the place for anything long-form).
Instagram hashtags limit
Each post allows a maximum of 30 hashtags, and individual hashtags can be up to 24 characters long. However, stuffing all 30 in every post isn’t always the best move.
Most experts suggest using 3–5 well-chosen, relevant hashtags over a pile of generic ones for better reach and engagement.
Instagram alt text character limit
Instagram alt text has a recommended limit of around 100 characters, though the technical cap goes up to 100-125.
Alt text is what describes your image to screen readers and also helps with discoverability. Keep it clear and descriptive. A concise, accurate description in that 100-character sweet spot is all you need.
Instagram story text character limit
Instagram Stories don’t have a hard, published character limit for text overlays, but most schedulers and best practices cap it at around 120–190 characters for readability.
Since stories are visual-first, heavy text tends to clutter the screen. Keep it brief, make it bold, and let the visual do most of the work.
Instagram ad primary text character limit
While Instagram technically allows up to 2,200 characters for ad primary text, only the first 125 characters are immediately visible before the content gets cut off with a “more” link.
Most ad pros recommend sticking to that 125-character window. Pre-empt your strongest hook or offer, because that’s all most people will actually read.
Instagram ad headline character limit
The headline in an Instagram ad is limited to 40 characters. It shows up in bold right below your primary text, so it needs to be direct and punchy.
Think of it less like a full sentence and more like a sharp tagline; something that grabs attention and reinforces the main message of your ad.
Instagram ad description character limit
The description field in Instagram ads allows up to 30 characters. It’s the smallest text element in your ad and is not always visible depending on the placement.
Use it to add a quick supporting detail or a micro CTA phrase, but don’t rely on it to carry your full message. That’s what the primary text and headline are for.
Instagram character limit with spaces
A quick but important thing to know is that on Instagram, spaces count as characters just like letters do. So whether you’re writing your bio, a caption, or a DM, every blank space between words is eating into your limit.
The 2,200-character caption limit, for example, includes spaces, URLs, hashtags, and line breaks; all of it counts. Keep that in mind when you’re crafting tight copy, especially for your bio, where every character really matters.
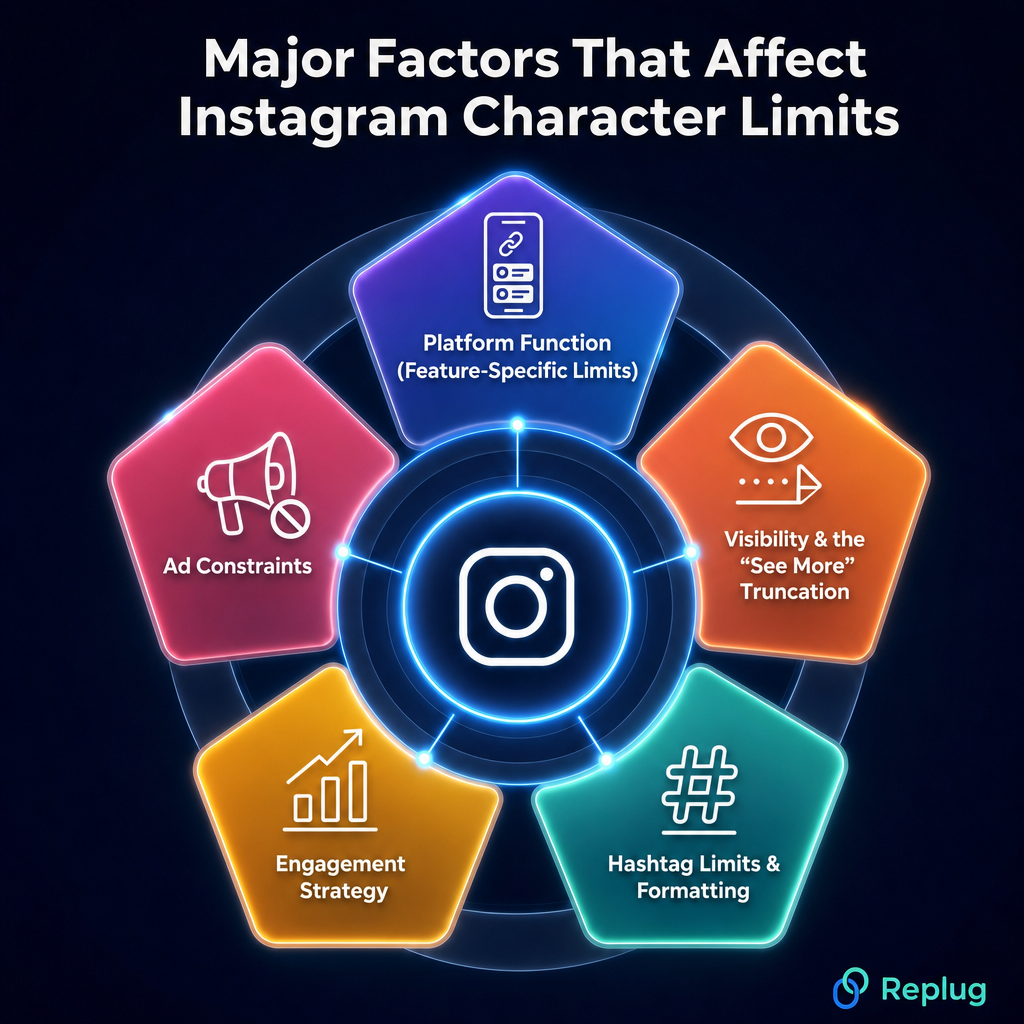
Major factors that affect Instagram character limits
Instagram’s character limits aren’t random; they’re shaped by a handful of key factors that influence how the platform works and how content gets consumed.
Understanding what’s behind these limits helps you make smarter decisions with every word you write.
Platform function (feature-specific limits)
Every section of Instagram serves a different purpose, and the character limits reflect that.
A bio is a quick introduction, so 150 characters makes sense.
A caption can tell a fuller story, hence the 2,200-character room.
A DM is a private conversation capped at 1,000 characters.
Instagram essentially sets the limit to match what each feature is actually designed to do.
Visibility & the “See More” truncation
Only the first 125 characters of your caption appear before users have to tap “more” to read the rest. This is Instagram’s way of keeping feeds clean and visual-first.
In practice, it means your real character limit for visible content is much tighter than 2,200. So if your hook isn’t in those first few words, most people will scroll right past it.
Hashtag limits & formatting
Instagram allows up to 30 hashtags per post, and they’re clickable and functional whether placed in the caption or the first comment.
Hashtags also eat into your caption’s character count, which affects how much room you have for actual copy. That’s why it’s worth being selective.
A few targeted hashtags will serve you better than maxing out all 30 with generic tags.
Engagement strategy
Character limits quietly push you toward writing better content. When you have a ceiling, you’re forced to cut the fluff and lead with what matters the most.
Captions around 125–150 characters tend to drive the strongest engagement. This is not because longer captions don’t work, but because concise, well-structured copy is simply easier for people to read and respond to while scrolling.
Ad constraints
Instagram ads have tighter limits than organic posts because ad placements are more competitive for attention.
Your ad primary text is recommended at 125 characters, the headline at 40, and the description at just 30. These constraints exist because ads appear across different placements and devices, and text gets truncated differently on each.
The tighter the space, the sharper your copy needs to be!
👉 Useful tip: Use a character counter or word count checker to ensure your content fits within these constraints.
How do different Instagram character limits impact engagement and growth on the platform?
Character limits on Instagram affect your growth more than most people realize.
The biggest thing to keep in mind is the 125-character “hook” rule(that’s all the visible text you get before Instagram cuts it off with “more”). If your opening line doesn’t grab attention, most people won’t bother tapping to read the rest.
When it comes to optimal lengths, shorter captions under 150 characters tend to work really well for straightforward messages and promotional content. They’re quick, punchy, and easy to engage with.
That said, longer captions ranging from 500 to 2,200 characters shine when you’re storytelling or sharing detailed, educational content (the kind that builds a real connection with your audience).
The magical trick is matching your caption length to what your content actually needs.
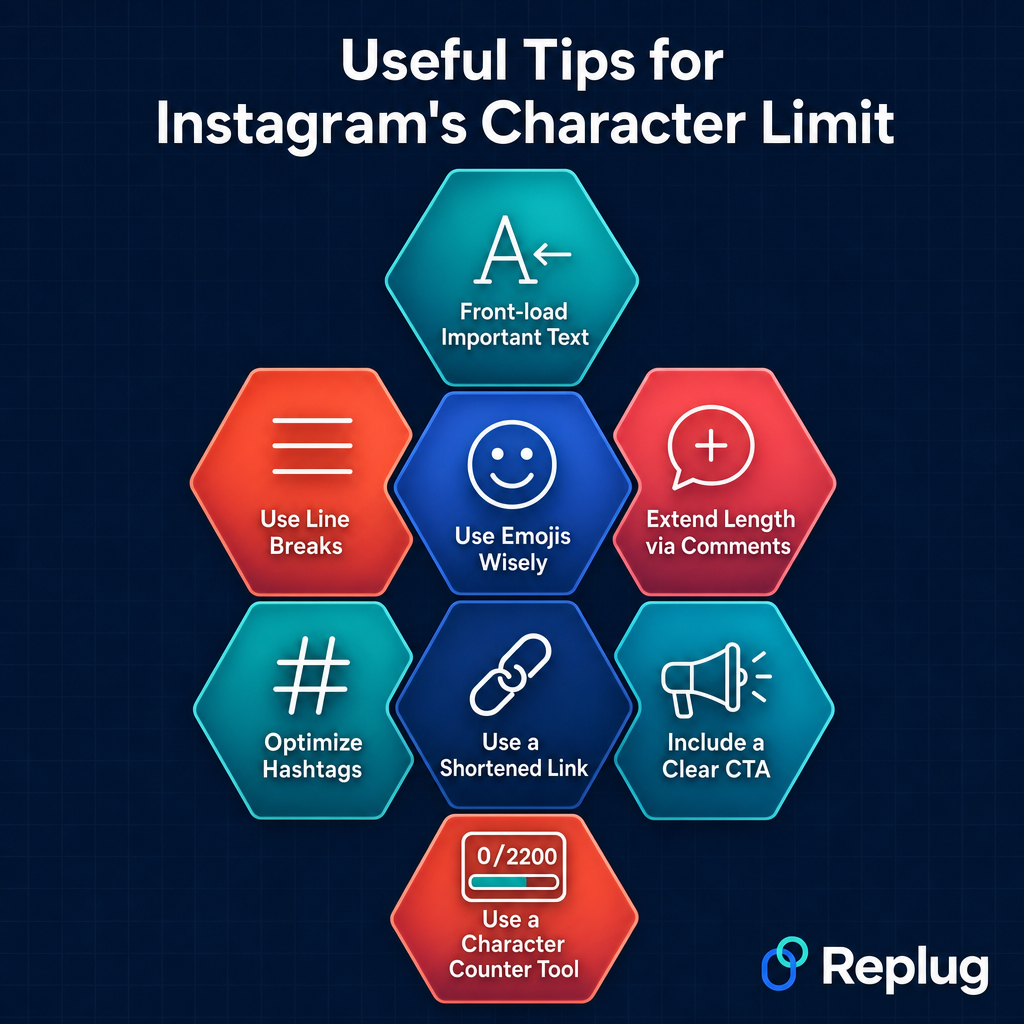
Take complete advantage of Instagram’s character limit with these useful tips
Knowing the limits is one thing, but actually working with them is where most people slip up. Here are some straightforward, practical tips to help you get the most out of every character you use on Instagram.
Tip #01: Front-load important text
Since only the first 125 characters show up before the “see more” cutoff, put your strongest line, hook, or key message right at the top. Don’t save the good stuff for the end, because most people won’t get there.
Tip #02: Use line breaks
Breaking your caption into short paragraphs makes it way easier to read and keeps people from bouncing off a wall of text. A clean, spaced-out caption feels more inviting and naturally encourages people to read all the way through.
Tip #03: Use emojis wisely
Emojis can add personality, break up text, and draw the eye to key points, but they also count toward your character limit. Use them to complement your message, not replace it, and avoid overdoing it, or they’ll make your caption or message look cluttered.
Tip #04: Extend length via comments
If you’ve hit the 2,200-character cap and still have more to say, drop the rest in the first comment. You can continue your text in the comments or split it across carousel posts.
Both are clean workarounds that keep your caption tight while still delivering the full message.
Tip #05: Optimize hashtags
Rather than stuffing all 30 hashtags into your caption and eating up valuable space, keep your caption copy clean and place hashtags at the very end or in the first comment. Focus on relevance over quantity.
A handful of well-chosen hashtags will outperform 30 random ones every time.
Tip #06: Use a shortened link
Instagram doesn’t make links in captions clickable, but if you’re mentioning a URL, a long one looks messy and eats up characters fast compared to a short link.
Use a free Instagram URL shortener to keep it neat, save space, and make it easier for people to type out if needed.
Tip #07: Include a clear CTA
Don’t let your caption just trail off; tell people what to do next. Whether it’s “drop a comment below,”“save this for later,” or “check the link in bio,” a simple and direct call to action phrase gives your audience a nudge and helps drive the engagement you’re actually looking for.
Tip #08: Use a character counter tool
Before you paste your caption or message into Instagram, run it through a character counter tool to make sure you’re within limits.
A social media character counter helps you check your caption, bio, or message word count before posting. It’s a small habit that saves a lot of last-minute editing.
Use Replug free tools & optimize Instagram character limits
If you’re serious about making every character count on Instagram, Replug is a tool worth knowing about.
It’s an all-in-one link management platform that lets you shorten custom links and create stunning bio link pages. A perfect tool for squeezing more value out of that tiny bio section without wasting precious characters on long URLs.
A complete link management solution
for marketing professionals & agencies.
Try Replug for free
But that’s not all! Replug also offers free tools that make content creation a whole lot easier.
Struggling to stay within the Instagram caption character limit? The free Instagram caption generator helps you craft engaging captions that fit just right. And if your bio needs a refresh, the Instagram bio generator gives you a solid starting point in seconds.
Go ahead and give them a try. Your profile will thank you for it!
Frequently asked questions
Is there a character limit on Instagram?
Yes, absolutely! Instagram has different character limits depending on which part of the app you’re using.
– Your bio is capped at 150 characters. – Captions go up to 2,200 characters. – Your username and display name each allow 30 characters, and – DMs max out at 1,000 characters per message.
Every field has its own limit, so it’s worth knowing them before you start typing.
Is there a word limit on Instagram?
Instagram doesn’t set a word limit; it works on characters instead. The Instagram word limit people usually refer to is really a character limit in disguise.
A 2,200-character caption roughly translates to around 338–440 words, depending on word length and spacing. So technically, you have plenty of room, but you still need to be smart about how you use it.
What is the character limit on Threads?
The Thread’s character limit for a standard post is 500 characters. However, in September 2025, Threads introduced text attachments that allow up to 10,000 characters. Besides, 1,000 characters are allowed per comment.
Remember,all letters, numbers, spaces, punctuation, and URLs count toward the limit. However, images, videos, and GIFs do not reduce the character count.
How do I post more than 2200 characters on Instagram?
You can’t go over 2,200 characters in a single caption; Instagram won’t let it post. But there are a couple of smart workarounds.
You can continue your text in the first comment below your post or split your content across carousel slides. Both keep things clean while getting your full message across without breaking any rules.
What is the DM meaning in text?
DM stands for “Direct Message”. It’s a private conversation between social media users that only the sender and recipient can see.
When someone says “DM me,” they’re asking you to message them privately rather than commenting publicly. It’s used as both a noun (“send me a DM”) and a verb (“just DM me”), and you’ll find it across pretty much every major social platform today.
What is the Instagram bio character limit 2026?
The Instagram bio character limit in 2026 remains at 150 characters, and that includes everything: letters, numbers, spaces, emojis, and punctuation.
Unlike the TikTok bio character limit, which was recently doubled to 160 characters, Instagram has kept its bio limit the same. So every single character in your bio still counts; use it wisely.
How can I optimize my content within Instagram character limits?
– Start with your strongest line first. Remember, only the first 125 characters show before the “more” cutoff. – Use line breaks to make captions easier to read, and keep your bio tight with a clear CTA. – For your target audience, make sure your message is front-loaded and relevant to them from the very first word. – A character counter tool can also help you stay within limits before you post.
Are hashtags included in the Instagram character limit?
Yes, they are! Hashtags count toward your caption’s 2,200-character limit. Each character in a hashtag, including the # symbol, counts toward this total limit.
This is why many creators place them at the very end of the caption or drop them in the first comment instead. That way, your actual copy gets the full breathing room it deserves, and your hashtags don’t eat into your storytelling space.
Does the Instagram character limit have an impact on SEO?
It does, indirectly! Instagram isn’t a traditional search engine, but keywords in your bio, captions, and alt text do help with discoverability on the platform.
Since your bio is capped at 150 characters, choosing keyword-rich words carefully matters. The Insta caption also plays a key role. Relevant keywords in those first 125 visible characters can help your content surface in Instagram search results.
Is the line break counted as a character on Instagram?
Yes, line breaks do count as characters on Instagram. Each time you press Enter, it uses up one character from your total limit.
It’s a small thing, but if you’re working with a tight bio or trying to hit the caption max precisely, it’s worth keeping in mind. Don’t go overboard with spacing just to make things look clean; every gap adds up.
Are emojis counted as a character on Instagram?
Yes, emojis count toward your character limit on Instagram. Your bio’s 150-character limit includes text, emojis, and spaces, all of it. The same applies to captions and DMs.
Most emojis take up one or two characters depending on how they’re encoded, so while they’re great for adding personality, use them with purpose rather than going overboard.
How to increase your Instagram character limit?
Honestly, you can’t increase Instagram’s character limits. They’re set by the platform and apply to everyone equally. What you can do is work smarter within them.
Use the first comment to extend a caption, split content across carousel posts, or use a link-in-bio tool to pack more value into that 150-character bio without stuffing everything in. Work with the limits, not against them.
What is the best app for Instagram character count?
There are several solid free tools out there for this:
Replug offers a free Instagram caption generator that helps you craft and check your content. Other popular options include Character Counter(charactercounter.com), QuillBot Character Counter, and Postpone Instagram Character Counter.
These let you see your total character count in real time before you copy anything over to Instagram, saving you the frustration of hitting a wall mid-post.
You’ve got that one link in bio carrying your shop, your latest drop, or your best video, all in a single click. But do you really know what happens after someone taps it? Are people exploring your links, or dropping off after the first click?
That’s where link in bio analytics comes in. It shows which links get the most love, where your audience is coming from, and when they’re most active. And with tools like Replug, checking it all is as simple as open, tap, scroll.
Let’s break down how to use these insights to get real results.
Maximize marketing ROI
by transforming ordinary URLs into branded short links that convert.
Try Replug for free
What is the best way to track link in bio analytics?
The most effective way to track link in bio analytics is by combining detailed tracking with the best bio link tools that help you act on what you learn easily.
Replug makes this simple. It shows how many clicks your link in bio is getting, where your audience is coming from, and when engagement peaks, all in real time. Beyond numbers, it helps you create branded short links that build trust and boost click-through rates with the help of its efficient URL shortener free tool.
By adding UTM parameters, you can track the performance of your link in bio, all within Replug’s dashboard. This way, you get a clear view of what’s working and can refine your strategy as you go. Together, these features turn your link in bio from a basic list of links into a powerful, data-driven marketing asset.
Let’s discuss the two easy ways to track your link in bio analytics using a top-notch link in bio generator.
How to track your link in bio analytics (two easy ways)
First things first: make sure you’re signed into your Replug account.
Haven’t signed up yet? You can start with a 14-day free trial and get full access to your link in bio analytics.
Now, here are two quick ways to see what’s really happening behind your bio links:
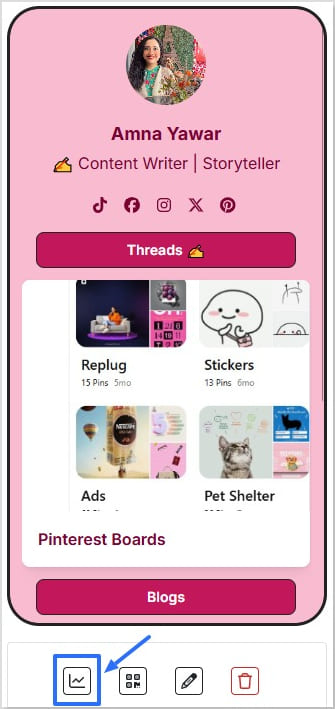
Method 1: Quick check from the bio links tab
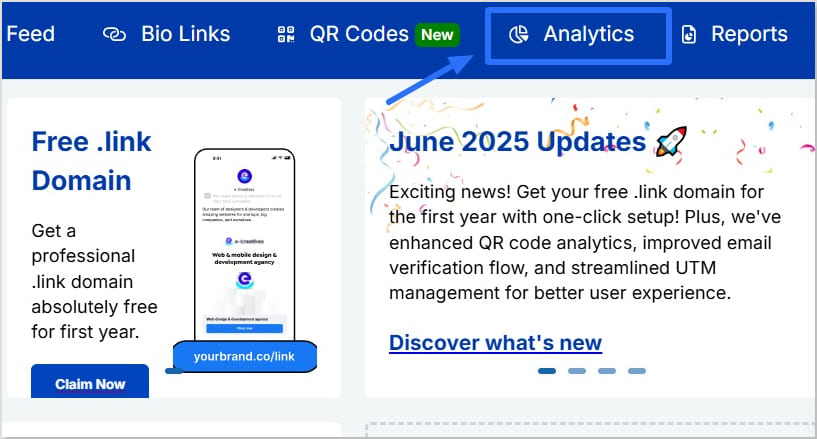
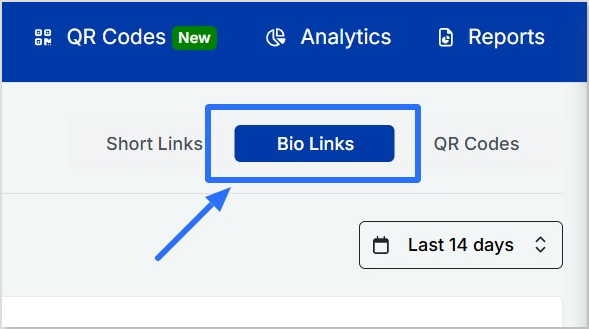
Go to “Bio Links” in your Replug dashboard.
Find the bio link you want to check.
Click the small line chart icon right under it.
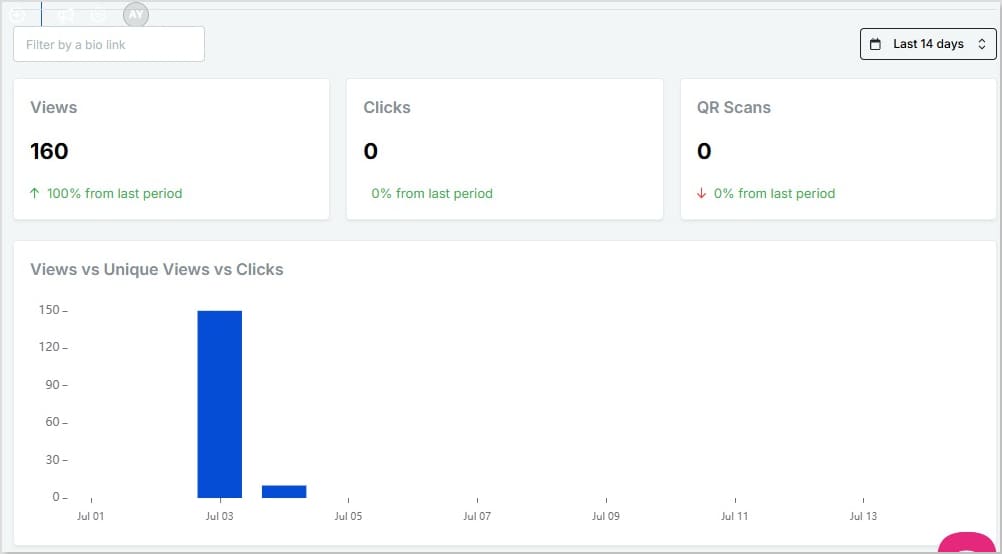
This opens up your analytics for that specific bio link, showing:
Views, unique views, clicks, and QR scans
A bar chart comparing views vs. unique views vs. clicks
Geotargeting filters so you can see data by referral source, location, browser, and operating system
Real-time stats and custom date ranges (check today, last month, or all time — no limits)
They’re little tags you add to the end of a URL so tools like Replug can track where each click came from.
For example:
Share the same link in a reel and a story
Add utm_medium=reel to one and utm_medium=story to the other
Now you’ll know which actually brings traffic, and which just looks good. Inside Replug, you can create and manage UTM-tagged links easily, so you can track smarter without extra hassle.
Another handy tip: Create a QR code for your bio link
Replug also lets you create a QR code for any of your bio links. So, if you share your link in bio offline on posters, packaging, slides, business cards, or anywhere else; you’re still not flying blind.
Data is great, but action is what makes it matter:
Move your best-performing links higher up
Swap out links that aren’t getting clicks
Post when your audience is most active
Test different headlines, emojis, or thumbnails to see what bumps up clicks
Focus promotion on platforms that actually send traffic
Conclusion
Your bio link shouldn’t just look pretty. It should work. Clicks, sign-ups, sales, traffic – whatever your real goal is.
And the good news? It’s simpler than you think.
With Replug’s link in bio analytics, you can see what’s working, what’s getting ignored, and where your audience is coming from, all in a few clicks.
Add UTM parameters to track which posts drive traffic, and use QR codes to bring in offline scans too. Then adjust: move your best links up, drop the ones that flop, and post when your audience is most active.
Your link in bio is more than a link. It’s your quiet traffic driver and digital storefront.
Now you know how to use link in bio analytics to make it deliver.
A link in bio is the clickable URL on your Instagram, TikTok, or other profiles. Since most platforms allow only one, tools like Replug let you turn it into a mini landing page with multiple links to your shop, videos, or content.
What is a tracking link?
A tracking (or trackable) link has extra tags, like UTM codes, that show where your clicks come from and what drives traffic. Tools like Replug can create these automatically.
How to track link in bio analytics on Instagram?
In Replug’s analytics dashboard, you can see referral sources, so you’ll know how much traffic is coming from Instagram.
How to track link in bio analytics on TikTok?
In Replug’s analytics dashboard, you can check referral sources to see how many visitors came from TikTok.
Your business card shouldn’t just sit in someone’s wallet; it should make them act. In a world where everyone’s glued to their phones, no one wants to type out links. A QR code on your business card gives them instant access to your contact details, portfolio, or LinkedIn. Just a quick, and they have all your details.
With Replug’s QR code generator, you can create a branded, trackable QR code for a business card that links directly to your vCard, website, resume, or any digital touchpoint. It’s modern, efficient, and adds a smart edge to your printed card.
Ready to upgrade your first impression? Let’s walk through the simple steps to create a QR code for your business card using Replug.
A complete link management solution
for marketing professionals & agencies.
Try Replug for free
Step 1: Log in to your Replug account
Visit this amazing link optimization platform and log in to your dashboard. If you don’t have an account yet, you can sign up for a free trial.
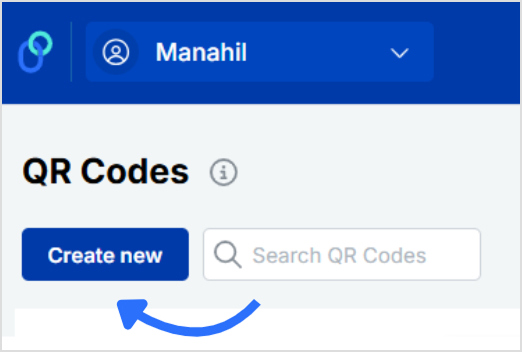
Step 2: Go to the “QR codes” section
From the top navigation bar, click on “QR codes.” Once inside the QR code dashboard, click the “Create new” button in the top-right corner.
Step 3: Add your contact info for the QR code on the business card
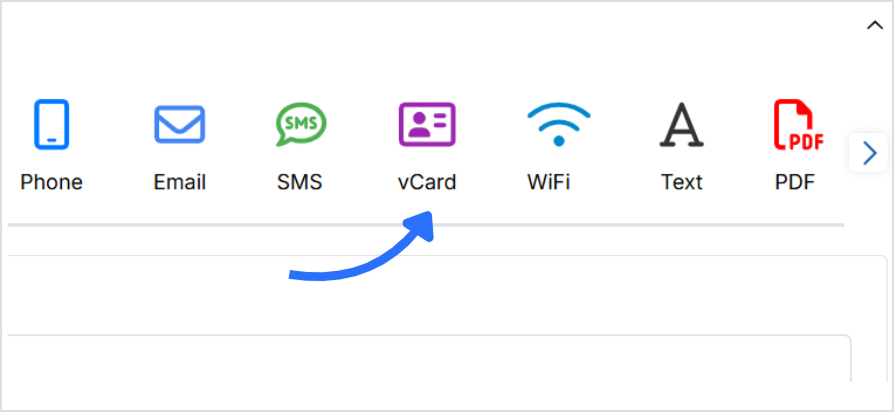
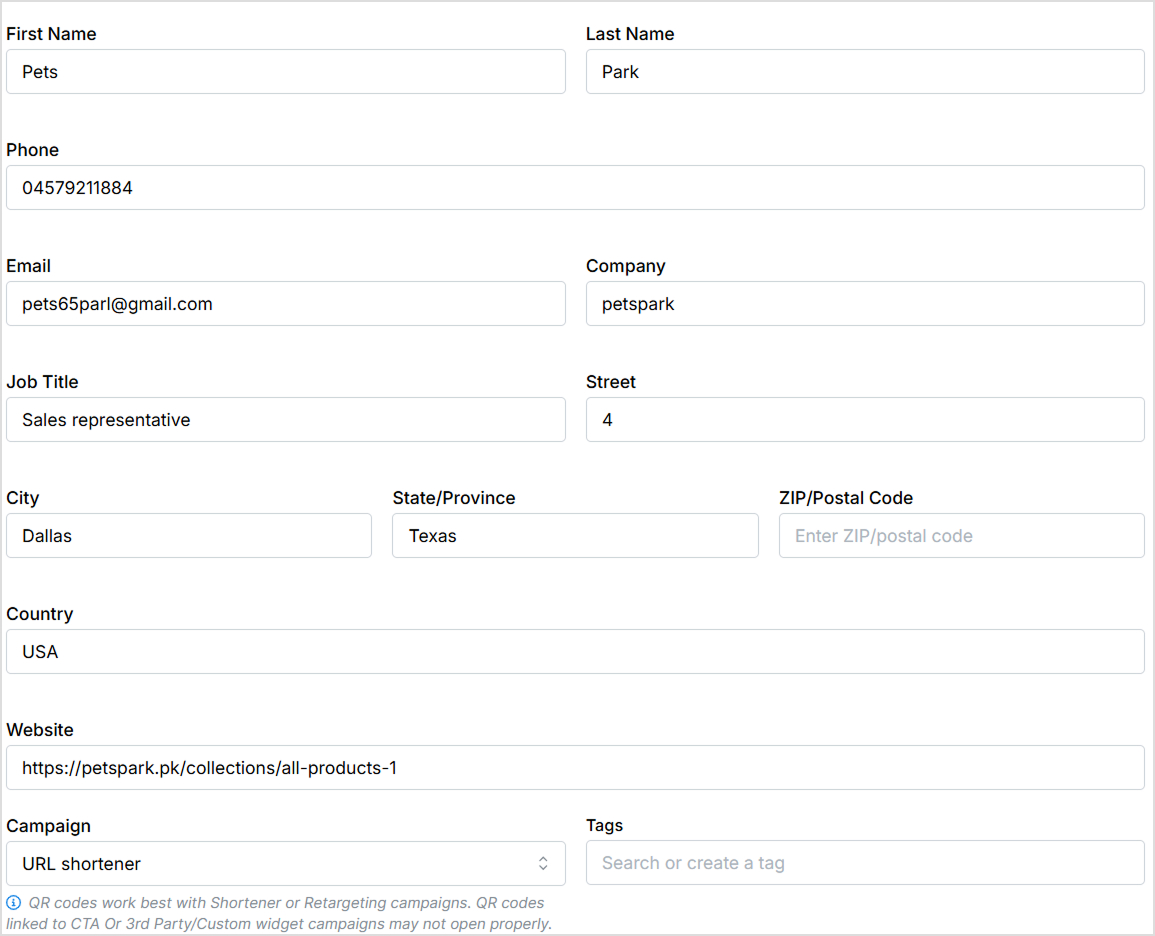
In the QR code type category, choose the vCard QR type, it’s the best format for creating a QR code for a business card that lets users save your details with one scan.
This allows people to save their contact details instantly with just one scan. Next, fill in your business card details:
Replug lets you create your QR code and design it exactly how you want it. You can:
Choose from different QR shapes, styles, and colors
Add your preferred frame and frame text
Add your brand logo if you want
Step 5: Create, save, and download
Once your design is complete, click the “Create QR Code” located below your QR code preview. Now your QR code for business card can be downloaded in high-resolution formats like PNG, SVG, PDF, or WebP, ready to be added to your design and printed professionally.
PNG (for most uses)
SVG (for scalable designs)
PDF (for print-ready files)
WebP (for fast-loading on websites and mobile platforms)
Now you can add it to your business card layout and print with confidence.
Benefits of adding a QR code to your business card
Adding a QR code to your business card isn’t just trendy, it’s strategic. It blends traditional networking with digital convenience, making it easier for people to engage with you on the spot. Here’s why every professional should consider using QR advertising for business interactions:
1. Instant contact sharing
One scan saves your full contact details to the recipient’s phone, no manual typing required.
Your business card is no longer just a printed rectangle; A QR code for a business card makes it easier for people to connect, remember, and engage with you instantly. You’re giving every contact the power to connect with you instantly, without typing or searching. Whether you’re a freelancer, entrepreneur, or corporate professional, this simple upgrade can dramatically boost your networking game.
With Replug, you don’t need a designer or a developer, just a few clicks and you’re done. Whether you’re attending conferences, networking events, or casual meetups, your QR-enhanced card ensures you’re remembered, saved, and contacted faster.
Ready to make your business card unforgettable? Create your QR code for business card with Replug today and step into a smarter, more connected way of networking.
And while you’re at it, don’t forget to try our this short URL shortener to make your links cleaner and more professional, perfect for your next digital business card!
Frequently asked questions
What type of QR code should I use for my business card?
The best option is a vCard QR code, which allows people to save your contact details instantly. Replug supports this format, letting you include your name, email, phone number, website, and more.
Can I update my QR code’s destination after printing my business cards?
Yes, if you use Replug’s dynamic QR code feature. You can change the URL or content anytime without needing to reprint your business cards.
Where should I place the QR code on my business card?
Common placements include the bottom corners or the back side of the card. Just make sure the code has enough white space around it to remain scannable and clean.
What file format should I download for printing?
Replug offers several formats. For print, use PDF or SVG for the best quality. For web use, PNG and WebP work great; WebP is especially fast-loading for mobile and online platforms.
Will people actually scan my QR code on a business card?
Definitely! A well-placed, branded QR code on a business card with a clear CTA is highly effective in modern networking.
If you’re still running ads that drop people straight onto an affiliate product page, we need to have a talk.
It’s like texting someone and saying, “Hey nice to meet you! Wanna buy this $300 course?”
No context. Minimal warming up. Zero chance it’ll go well.
Because here’s the deal: When you’re an affiliate marketer, you don’t control the product page. You can’t tweak the copy, add testimonials, or even change a single headline. All you can do is hope that random visitors magically feel convinced enough to buy.
And let’s not forget: Platforms like Facebook and Google hate it. They’ll shut your ads down if your landing page is just a sales pitch or direct affiliate link.
So, what do smart affiliate marketers do?
They build something in between: a bridge page, also known as a pre-sell page, warm-up page, or primer page.
In this guide, you’ll learn:
What exactly a bridge page is (without the jargon)
Why it works so ridiculously well
Different ways to set it up
Real-life examples
And finally, how you can create a bridge page easily (even if you hate design or coding), with Replug, i.e., an all-in-one link optimization platform.
Let’s break it down.
What is a bridge page?
At its simplest, a bridge page is an intermediate landing page between your ad (or traffic source) and the final affiliate offer.
But, it’s more than that.
It’s your chance to:
Tell a story
Build trust
Address objections
Qualify your leads
And most importantly, prime visitors to buy
That’s why people also call them:
Pre-sell pages (because you’re selling the click, not the product… yet)
Warm-up pages (because you’re taking cold traffic and making them toasty)
Primer pages (focusing on mental “priming”)
Transition pages (guiding traffic smoothly to the offer)
Affiliate landing pages (if it feels more natural in your niche)
Whether you’re an Amazon affiliate trying to boost your commissions or promoting high-ticket digital offers, the goal is the same: create an intentional step that makes people care before they see the price.
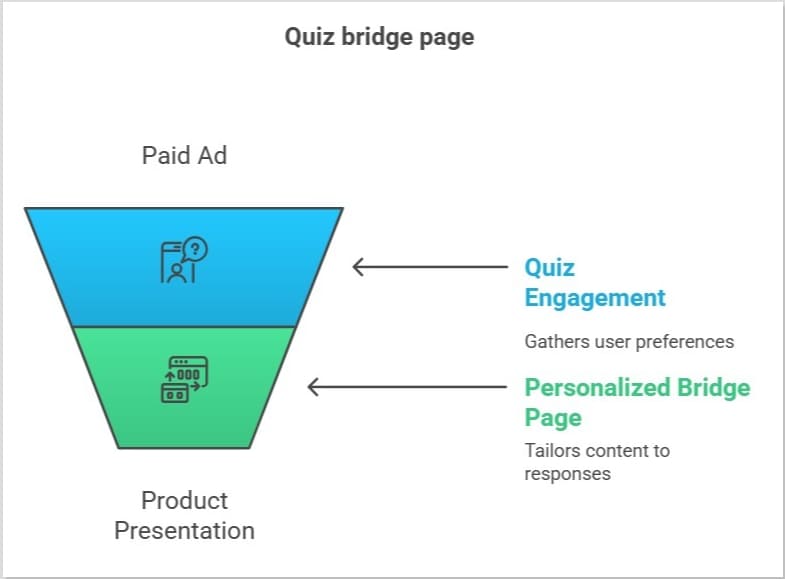
Why bridge pages work: the psychology behind them
Bridge pages (and the broader bridge funnel strategy) tap into a powerful psychological principle: priming.
When you show someone a persuasive copy, engaging content, or even a quick quiz before asking them to buy, you do more than just inform them; you change their mental state.
Instead of landing cold on a product page and wondering:
“Do I really need this?”
They arrive already thinking:
“Wow! This actually fixes a problem I have.”
That’s the beauty of a bridge page: You’re not selling right away. You’re setting the stage so the sale becomes the next logical step.
Why bridge pages work: a quick example
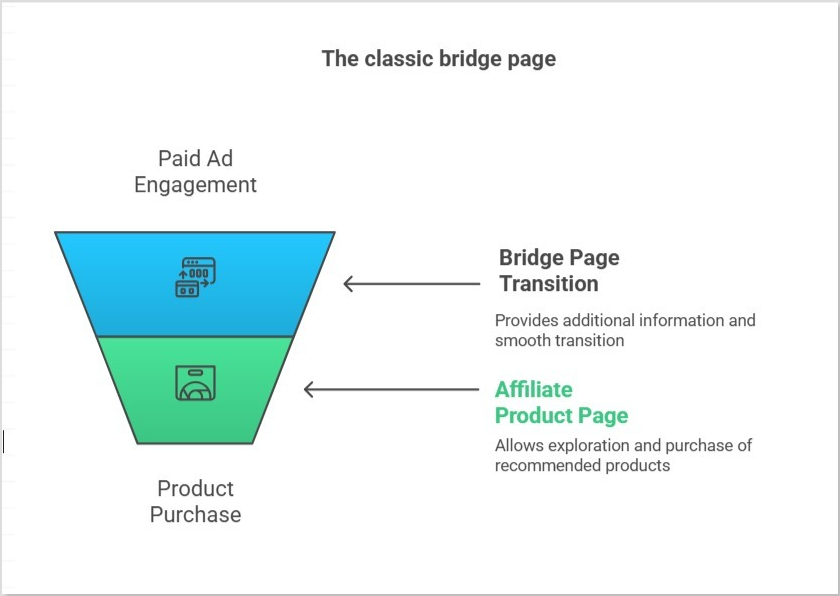
Let’s say you’re running an affiliate ad for a high-ticket coffee machine. If someone clicks and lands straight on Amazon or the brand’s sales page, what happens?
They see a price tag, specs, and maybe some reviews; but no context. No storytelling. No reason why this coffee machine should matter to them.
Result? They bounce.
A bridge page fixes this.
It adds a warm-up step in between:
Your ad
A bridge page you control (with persuasive copy, testimonials, benefits)
The affiliate offer page
Instead of asking cold traffic to buy right away, you guide them, answer objections, and prime them to click “buy.”
That’s the “bridge”: You move people from just being curious to actually wanting the product.
Now let’s move to the fun part: b?
How to create a bridge page for affiliate marketing?
There are plenty of ways to create a bridge page; from hiring a designer to wrestling with WordPress plugins. But if you want a faster, cleaner, and ad-friendly solution, Replug makes the whole process refreshingly simple.
With Replug, you can design a branded, persuasive bridge page without any coding. Add your story, images, and call-to-action, cloak your affiliate links so they look professional, and track everything from clicks to conversions, all in one place.
In the next section, we’ll walk you through the steps on how to create a bridge page in Replug, whether you want a classic bridge, or even a squeeze page to grow your email list. Let’s dive in!
How to create a bridge page in Replug (step by step)
Step 1: Sign in or create an account
Start by signing up for Replug. If you don’t have an account, sign up and you’ll get a free 14-day trial to explore all the features without any risk.
Once you’re in, you’ll have everything you need to build, brand, and track your bridge page.
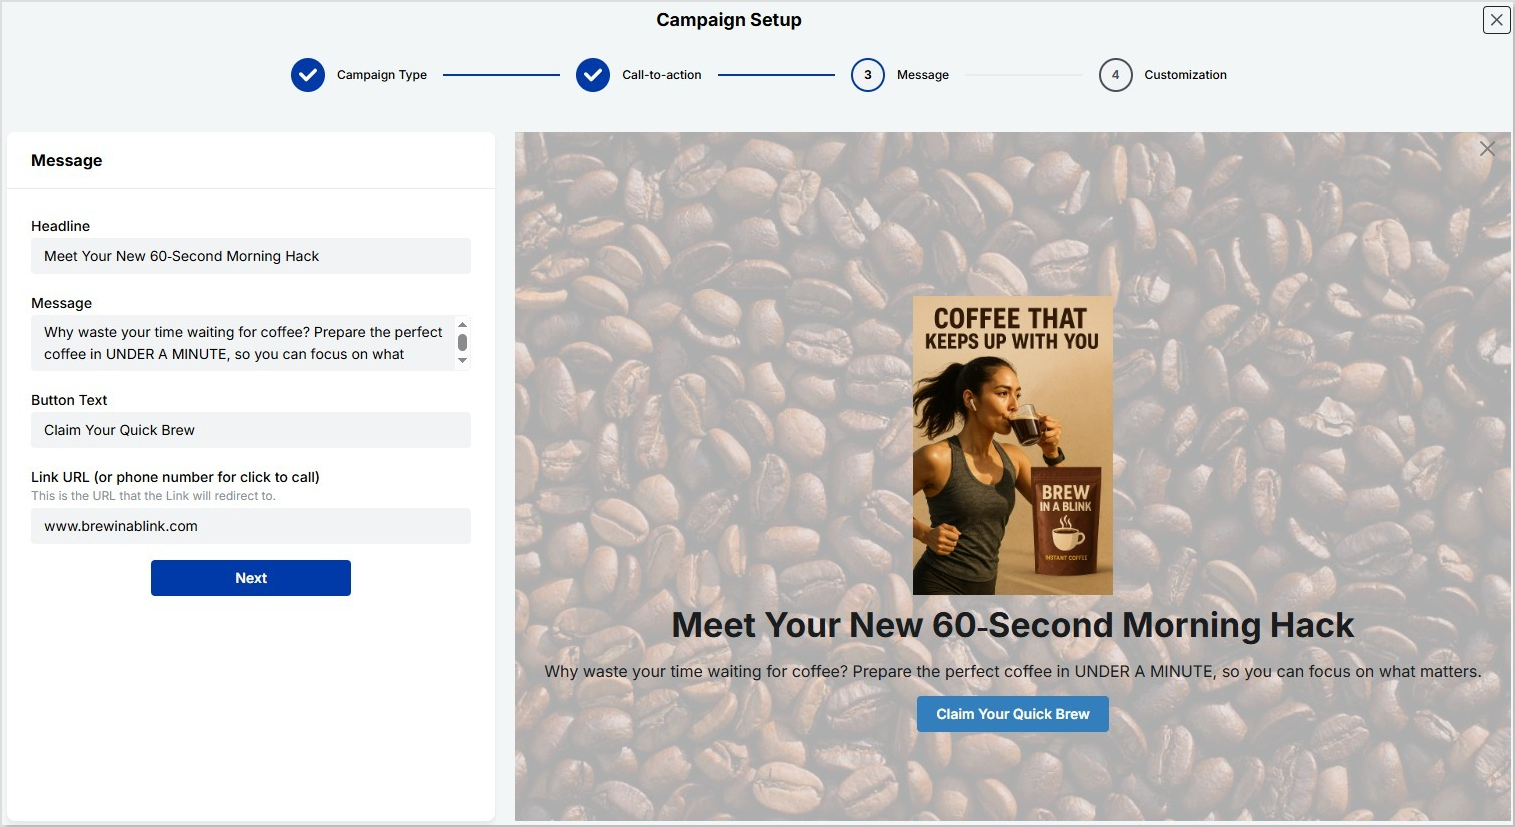
Step 2: Create your campaign
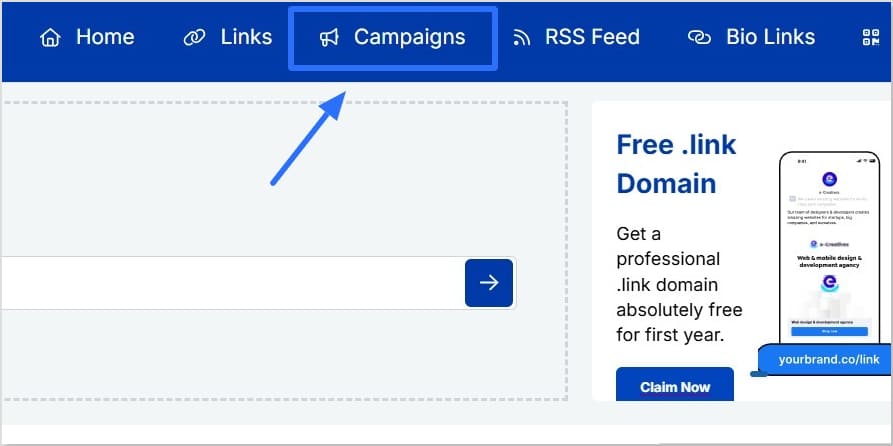
Inside your Replug dashboard, head to Campaigns → Create New
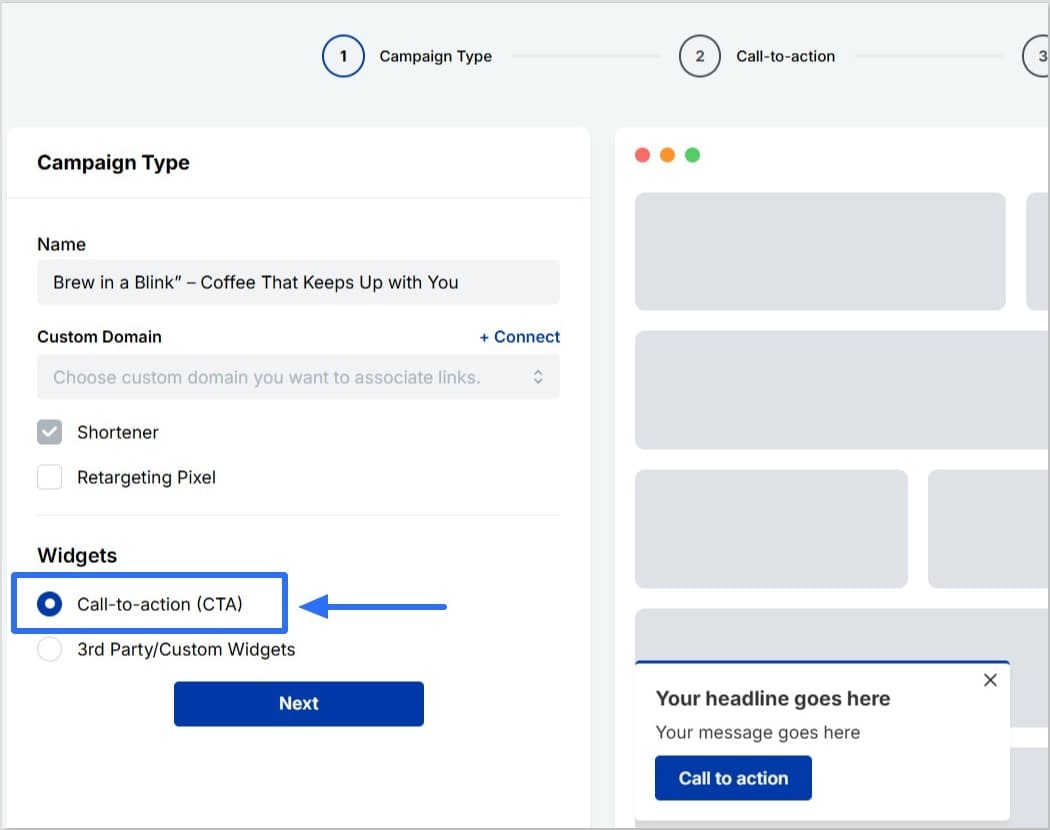
When prompted, choose the “Call to Action” campaign type.
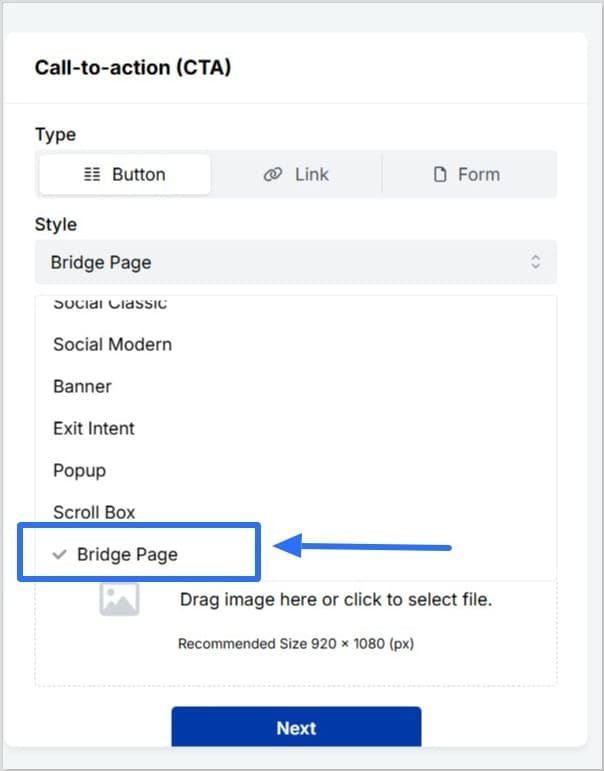
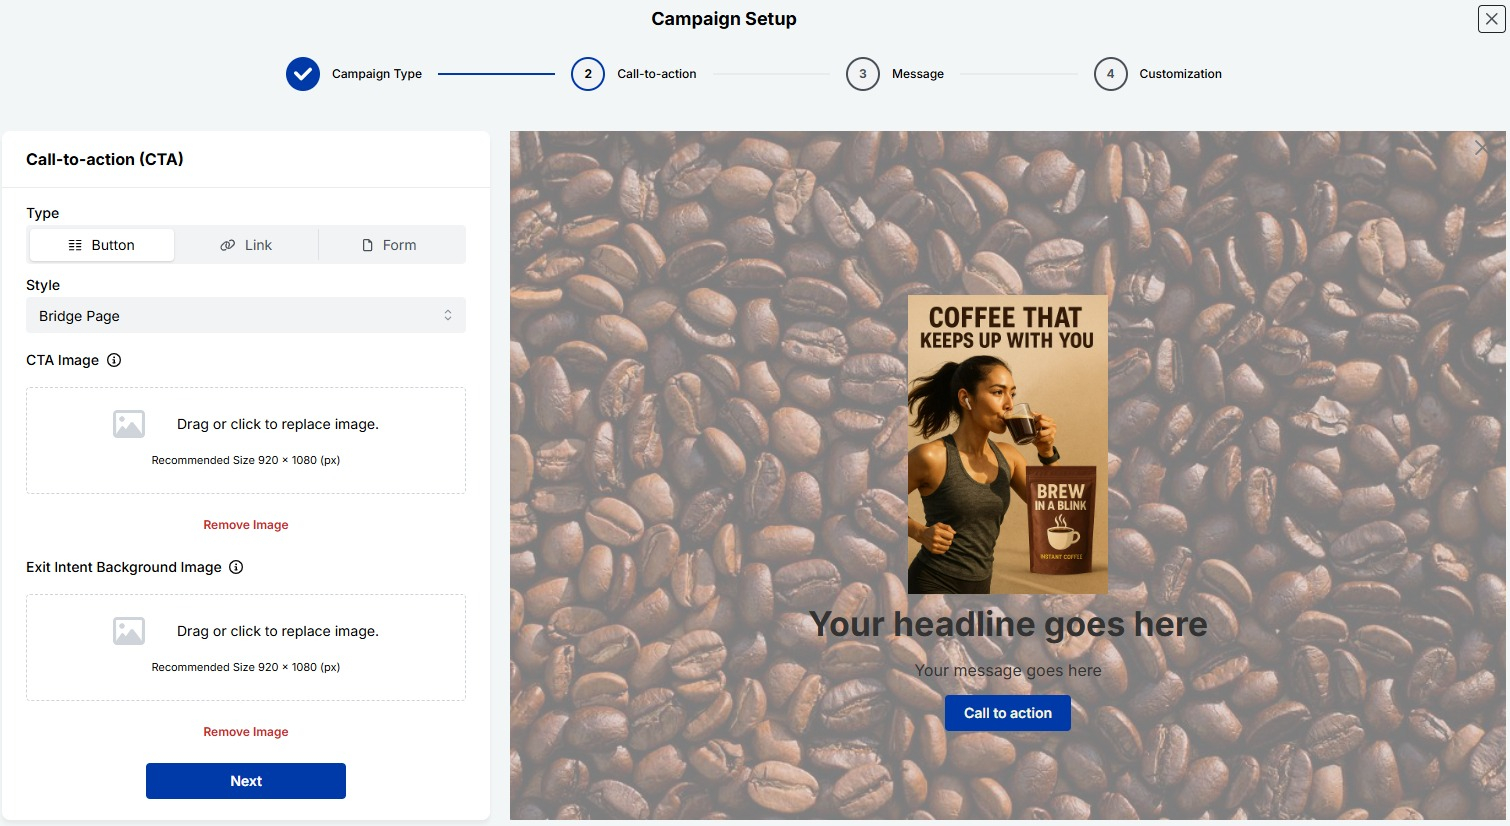
Select “Bridge Page” as the style from the dropdown. This will let you design a bridge page (or pre-sell page) that does more than just redirect. You can choose from CTA button, link, or form as your preferred CTA type. It’s your call!
Add your CTA Image and Exit Intent Background Image.
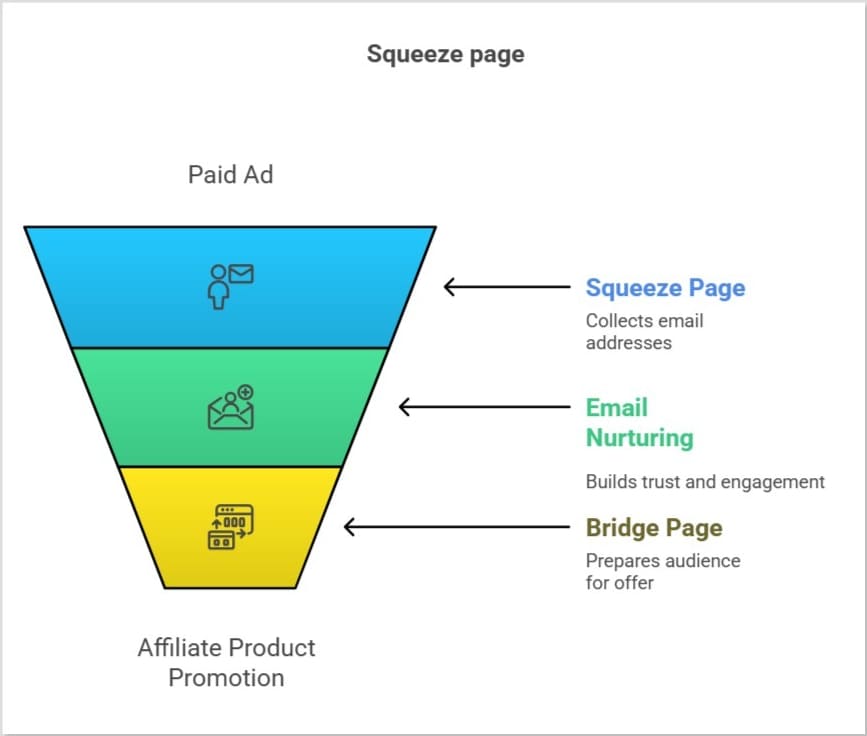
Tip: If you want to create a squeeze page, you’ll simply choose “Form” as your call-to-action type. This lets you capture emails right on your bridge page and build your list while warming up leads.
Now it’s time to create a compelling copy for your bridge page. Here’s what to do:
Write a clear, attention-grabbing headline that makes people want to click
Add a short message or story that explains why the product matters
Write acatchy call-to-action button text
Finally, add the affiliatelink for the affiliate product you’re promoting, or your phone number if you’re using a click-to-call option
Remember: you’re not pitching the product directly; you’re helping people see why the product matters to them.
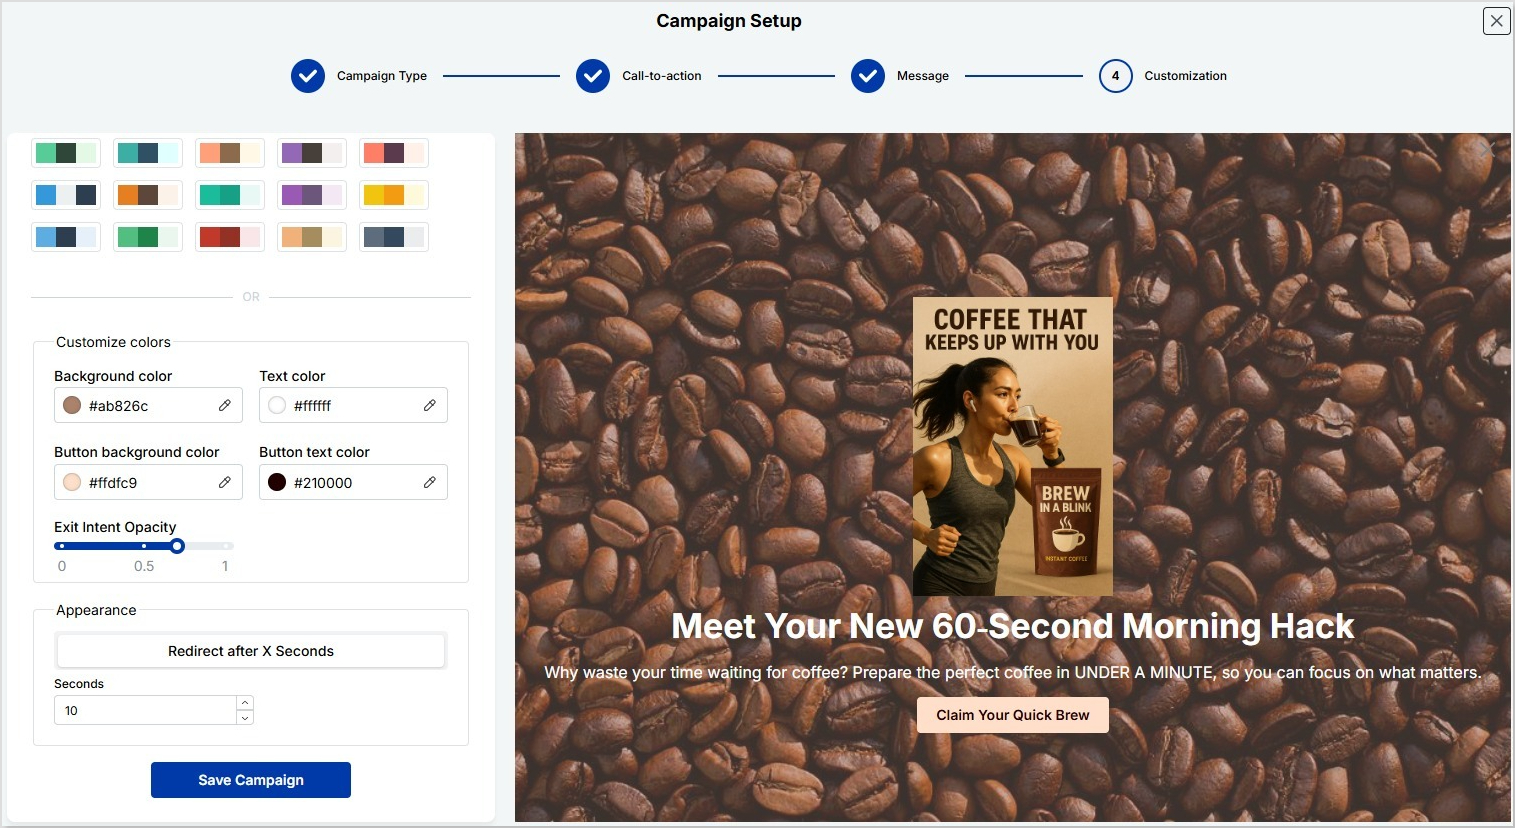
Step 4: Customize your bridge page
Make your page stand out by matching it to your brand or product vibe. Here’s what you can adjust:
Color palette: Choose from preset themes or set your own colors:
Background color
Text color
Button background color
Button text color
Redirection time: Decide how long visitors stay on your bridge page before being redirected to the affiliate offer. Example: set it to 10 seconds for a smooth experience
Exit intent opacity: Control how your bridge page appears if someone tries to leave early
This small customization step helps your page look professional and keeps it consistent with your branding.
If you’ve built affiliate bridge pages the “old school” way, you know how time-consuming it can be. But with Replug, it’s completely different. You can launch, track, and optimize your bridge pages in minutes; without coding, plugins, or tech headaches.
Why Replug makes it so easy
Old way
With Replug
Hire a designer and build pages in WordPress
Use ready-made templates to launch bridge pages quickly
Example: Collect emails with a lead magnet (e.g., “Free guide: 5 mistakes to avoid when buying X”) → build trust → send them to bridge page → offer page.
Keep it mobile-friendly (most clicks come from phones)
Use one clear CTA
Test different headlines & images
Add urgency or scarcity only when it’s real
Stop losing sales and start building bridges
If you’re still sending cold ad traffic directly to an affiliate product page, you’re leaving money (and trust) on the table.
A bridge page changes everything: it gives visitors context, tells your story, answers objections, and makes buying feel natural. Instead of hoping your ad clicks magically convert, you guide them to that “yes.”
And if you’ve been wondering how to create bridge page content You get ready-made templates, branded short links, retargeting pixels, A/B testing, and detailed analytics; all without touching a single line of code.
Build smarter funnels, keep your ads compliant, and see what difference a bridge can make for your affiliate campaigns.
Ready to try? Your free 14-day trial is waiting!
FAQs on how to build a bridge page for affiliate marketing
What is an example of a bridge page?
A classic example: you run an ad for a high-ticket coffee machine. Instead of sending traffic straight to Amazon, you send them to your bridge page first. This page has a short story, benefits, maybe a video review, and a CTA like “See price on Amazon.” It warms them up before they see the offer.
What is a bridging page?
It’s the same thing as a bridge page: an intermediate page that sits between your ad (or traffic source) and the affiliate product page.
What is an example of bridging?
Think of a quiz funnel: “Which running shoe fits your style?” After the quiz, people see a personalized bridge page recommending one product, instead of dropping them directly on a store page.
Can I build a bridge page in Replug?
Yes! Replug makes it super simple. You can create branded bridge pages, add retargeting pixels, cloak affiliate links, A/B test different versions, and track everything; all without coding. Plus, you can rotate links, share anywhere, and keep your ads compliant.
What’s the difference between a bridge page and a landing page?
A landing page is any standalone page designed for a single goal (sign-up, download, sale, etc.). A bridge page is a specific type of landing page used mainly in affiliate marketing to “bridge” the gap between your ad and the final offer, warming up visitors so they’re more likely to convert.
A website QR code lets you turn any URL into a scannable code, making it easy for users to visit your webpage without typing a thing. Just point, scan, and go.
It’s one of the easiest ways to connect your offline materials with your online presence. Whether you’re sharing your website on flyers, packaging, menus, business cards, or storefronts, a custom QR code for your website helps users reach your site instantly. It’s fast, convenient, and highly effective for driving traffic and boosting engagement.
What is the best way to create a QR code for a website?
The best way is by using an advanced QR code generator that offers customization, analytics, and flexibility. We recommend Replug, a powerful tool that lets you design on-brand QR codes, track real-time scan data, and even update the destination link without reprinting the code.
A complete link management solution
for marketing professionals & agencies.
Try Replug for free
Step 1: Log in to your Replug account
Visit Replug and log in to your dashboard. If you don’t have an account yet, you can sign up for a free trial.
Step 2: Go to the “QR codes” section
From the top navigation bar, click on “QR codes.” Once inside the QR code dashboard, click the “Create new” button in the top-right corner.
You’ll be redirected to a new window with three tabs:
Details, QR code types, and Customization.
(optional)
Details tab: Give your QR code a name and an optional description for easier management.
Step 3: Add your website URL
Here’s what to do:
Move to the QR code types tab and select Website.
Paste the URL of your website.
Step 4: Customize your QR code
Replug lets you design your QR code exactly how you want it. You can:
Choose from different QR shapes, styles, and colors
Add your preferred frame and frame text
Add your brand logo if you want
💡 Tip: Use high-contrast colors to ensure your QR code scans correctly. And always test it before finalizing.
And you’re done.
Step 5: Save and download your QR code
Once your design is ready, click “Create QR Code” at the bottom left.
After the QR code is created, you can download it in high-resolution formats like PNG, SVG, or PDF, perfect for both digital and print use.
Track QR code performance from your Replug dashboard
Once your QR code is live, Replug doesn’t just leave you hanging, it gives you full visibility into how it’s performing. With dynamic and trackable QR codes, you can access real-time data right from your dashboard. Monitor how many people have scanned your code, what devices they used, where they scanned it from, and even the time of each scan.
A complete link management solution
for marketing professionals & agencies.
Try Replug for free
Need to update the destination URL after printing? No problem. Replug is a top-notch link management platform that lets you edit your link anytime without needing to create or reprint a new code. You can also pause or restart campaigns with a single click. These insights help you make smarter marketing decisions and continuously improve your offline-to-online strategy.
Final thoughts
With Replug, creating a custom QR code for your website is not only easy, it’s smart. You get full design control, dynamic editing options, and built-in analytics to measure real-world impact. Pair it with our URL shortener for enhanced link tracking.
Skip the plain black-and-white codes now. Create one that’s uniquely yours with Replug, today!
Frequently asked questions
Can I edit the website link after printing the QR code?
Yes, if you create a dynamic QR code in Replug, you can update the destination URL anytime without needing to reprint your QR code.
What is a QR code?
A QR code (Quick Response code) is a two-dimensional barcode that can be scanned using a smartphone camera. When scanned, it instantly redirects users to a website, landing page, contact details, or other digital content. It’s fast, contactless, and perfect for marketing.
Does Replug track how many people scan my QR code?
Absolutely! Replug offers real-time analytics showing scan counts, locations, devices used, and more, right from your dashboard.
Can I add my brand logo to the QR code?
Yes! Replug allows you to upload your logo and place it in the center of your QR code for stronger brand visibility and trust.
Why choose Replug for your website QR code?
Easy-to-use interface (no tech skills required) Fully customizable designs Dynamic QR codes (edit anytime) In-depth analytics GDPR-compliant and secure