Category: Social media

Browse blogs on social media strategies, content, and trends. Stay ahead with tips to grow engagement and reach.

  • How to start a YouTube channel for beginners [2026]: Step-by-step YT channel setup + tips for success!

    How to start a YouTube channel for beginners [2026]: Step-by-step YT channel setup + tips for success!

    Are you the one wondering if starting a YouTube channel in 2026 is too late? Think again, please!

    YouTube now has over 2.7 billion monthly active users, which is more than a third of the entire planet tuning in every single month. 

    And here’s the wild part: only about 4.4% of those users actually own or run a channel. That means the audience is massive, but the creator space still has plenty of room for ‘you’.

    No matter if you want to share a hobby, build a personal brand, or eventually earn real income from your content, YouTube remains the best long-form video platform on earth to do it. And, the bar to entry is lower than ever.

    In this guide, we’ll walk you through every step, from zero to your first published video. But before we get into the setup, let’s make sure we’re on the same page about the basics: what exactly is a YouTube channel, and how does it work?

    What is a YouTube channel?

    Think of a YouTube channel as your own personal TV station, but on the internet, and completely free to set up. 

    It’s basically a dedicated space on YouTube where you upload, organize, and share your videos with the world. Anyone with a Google account can create one in just a few minutes.

    When someone visits your YT channel, they’ll see everything you’ve posted: your videos, playlists, an About section, and even a banner that represents your brand. Viewers can also hit that “Subscribe” button to stay updated whenever you post something new.

    In short, it’s your home on YouTube, and you decide what goes up there!

    Important things to know before starting a YouTube channel

    Before you hit that “Create a channel” option, there are a few things worth knowing upfront. Starting a YouTube channel is exciting, but going in with the right mindset and realistic expectations will save you a lot of frustration down the road. 

    Here’s what you should keep in mind:

    • Consistency is key: Posting regularly tells both YouTube’s algorithm and your audience that you’re serious. Channels that upload consistently tend to grow faster than those that post randomly.
    • Patience is mandatory: Most successful YouTubers didn’t blow up overnight. Growth takes time, so don’t get discouraged if the first few months feel slow (keep going anyway).
    • Focus on value over high-end equipment: You don’t need a fancy camera to start. A decent smartphone and good lighting can take you far. What truly matters is whether your content is actually useful or entertaining to your viewers.
    • Identify a specific niche: Trying to make content about everything usually leads to attracting no one. Pick a focused topic you genuinely enjoy, and build your channel around that.
    • Prioritize compelling thumbnails & titles: Your thumbnail and title are the first things people see before clicking. If they don’t grab attention, even great videos get ignored. So, spend real time getting these right.
    • Commit to a regular, sustainable posting schedule: Don’t burn yourself out by over-committing. It’s far better to post once a week consistently than to upload daily for a month and then disappear.
    • Focus on authentic content: Viewers can spot fakeness pretty quickly. Just be yourself! People connect with real personalities far more than overly polished, scripted ones.
    • Learn editing & SEO basics: You don’t need to be a pro editor, but knowing how to trim clips, add some music, and optimize your titles and descriptions for search can make a big difference early on.
    • Create a backlog: Before launching, try to have at least 3–5 videos ready to go. This gives you a buffer and helps you maintain your posting schedule without scrambling for ideas at the last minute.
    • Embrace imperfection: Your first videos probably won’t be great, and that’s completely fine. Every creator started somewhere. Ship the video, learn from it, and improve as you go.
    • Be prepared for feedback: Comments won’t always be kind. Develop a thick skin, take constructive criticism on board, and learn to ignore the noise that adds no real value.
    • Use analytics: YouTube’s built-in analytics show you what’s working and what isn’t, things like watch time, click-through rate, and audience retention. Check them regularly and let the data guide your decisions.
    • Avoid “shiny object syndrome”: It’s tempting to constantly switch styles, formats, or niches every time you see another creator doing something cool. Stick to your lane, stay focused, and give your strategy enough time to actually work.
    • Avoid Sub4Sub: Sub4Sub means subscribing to someone’s channel in exchange for them subscribing back. It sounds like a shortcut, but it only inflates your numbers with people who don’t care about your content, which bombs your engagement and hurts your channel long-term.

    How to start a YouTube channel: Create a personal YT channel in no time!

    Setting up a YouTube channel is honestly simpler than most people think. You don’t need any technical skills, just a Google account and a few minutes of your time. Follow the next steps, and you’ll have your channel up and running before you know it.

    Steps on how to start a YouTube channel:

    Step #01: Sign in to YouTube

    Head over to www.youtube.com and click the “Sign in” button at the top right corner. Use your existing Google account to log in, or create a new one if you don’t have one yet.

    Sign in to YouTube

    Step #02: Create channel

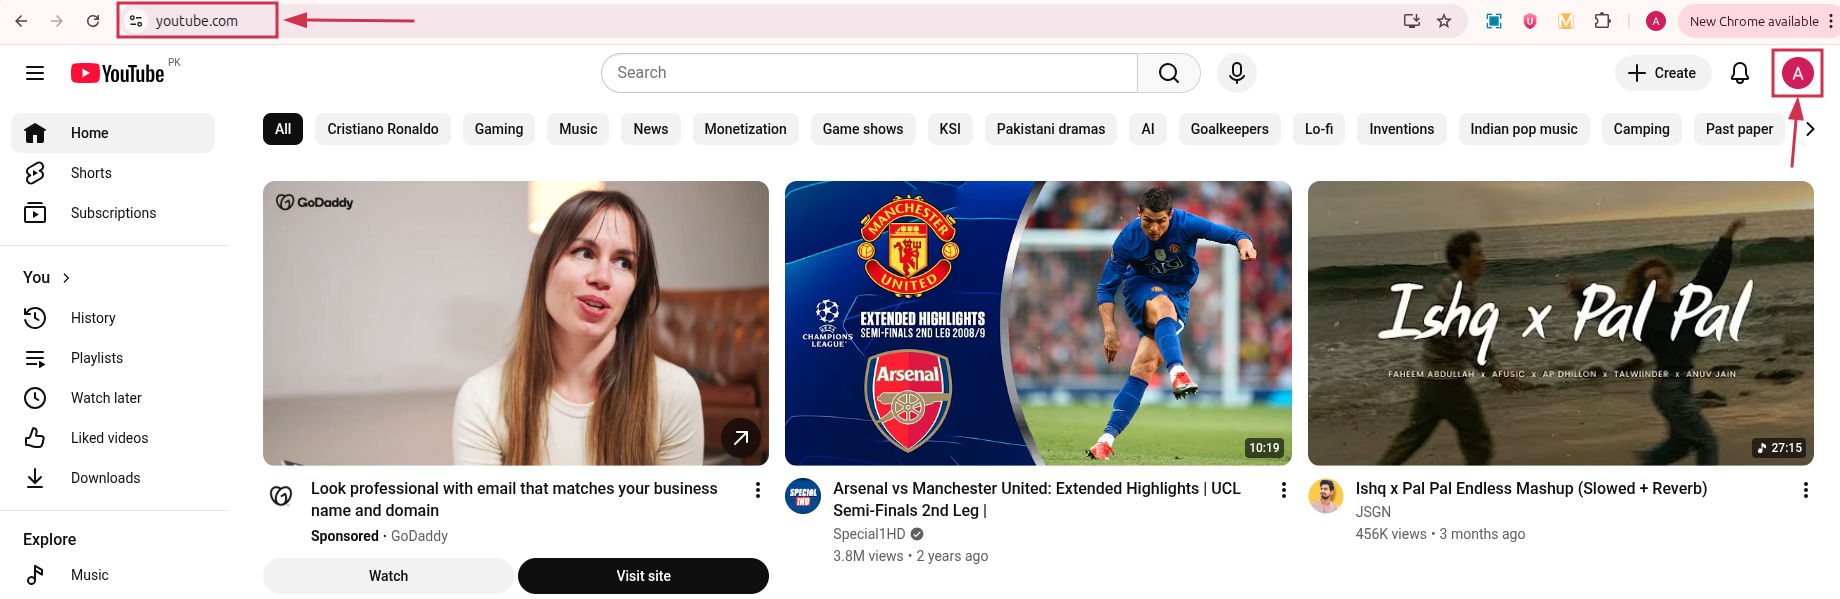
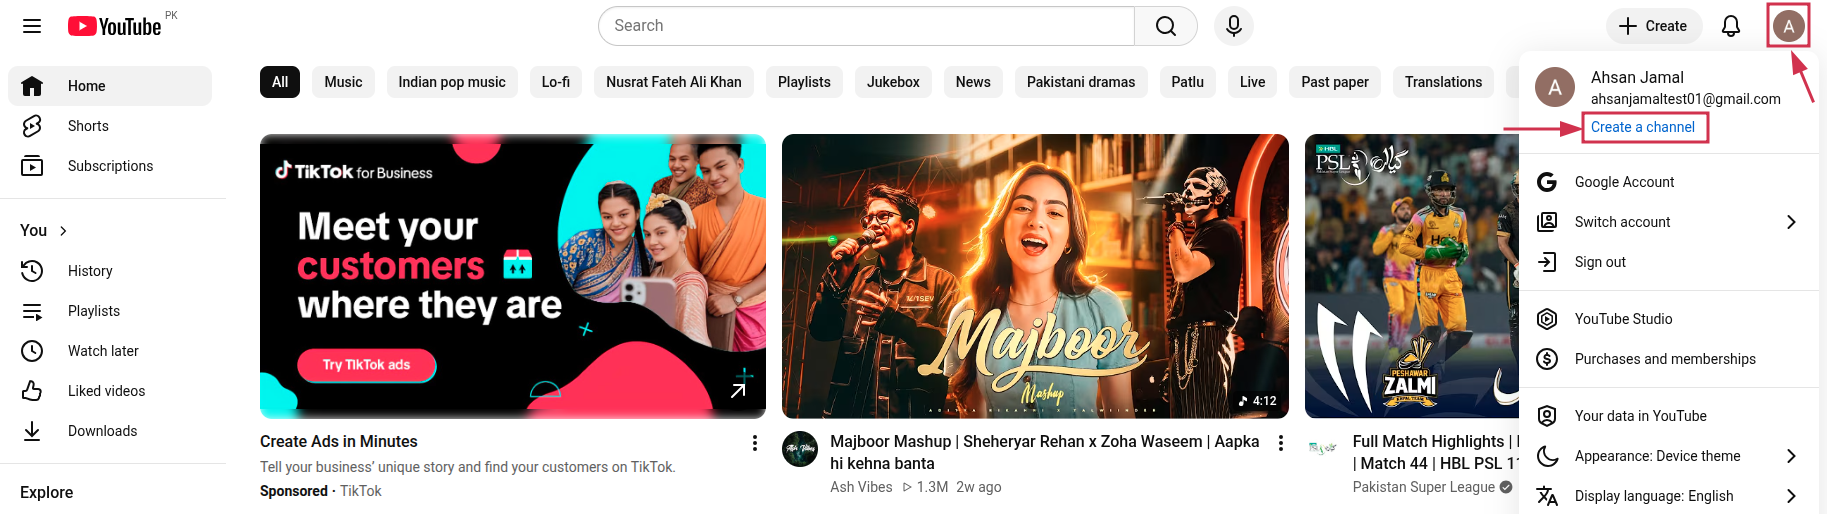
    Once you’re signed in, click on your profile icon at the top right, then select “Create a channel” from the dropdown menu.

    Create channel on YouTube

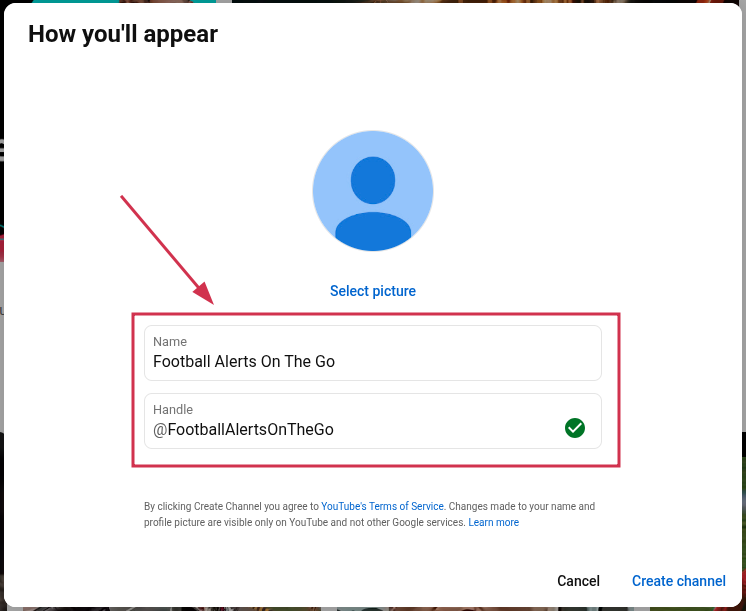
    Step #03: Customize channel name & handle

    Choose a channel name that reflects what your content is about and is easy to remember. You’ll also get to set your unique handle (that’s the @username people use to find and tag you on the platform).

    Customize channel name & handle on YouTube

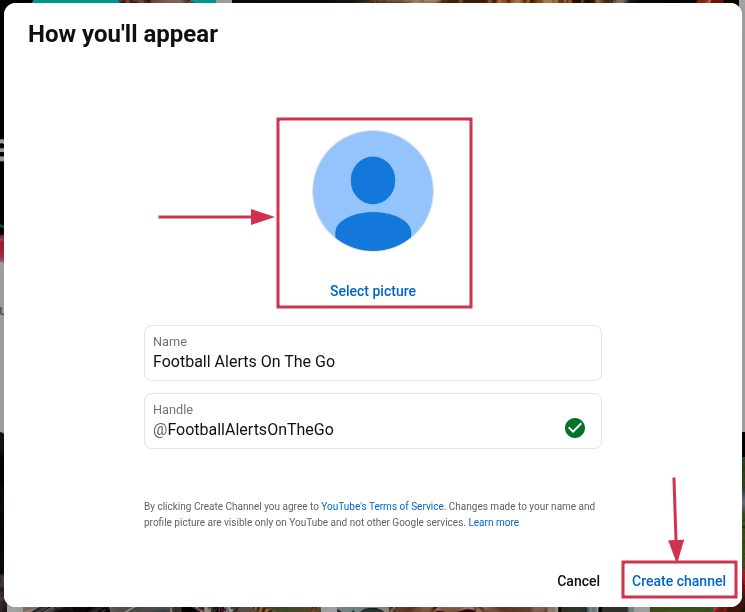
    Step #04: Customize branding

    This is where you give your channel its look and feel. Upload a profile picture to make your channel look professional and recognizable from day one. Then, click on “Create channel”.

    Customize branding of channel on YouTube

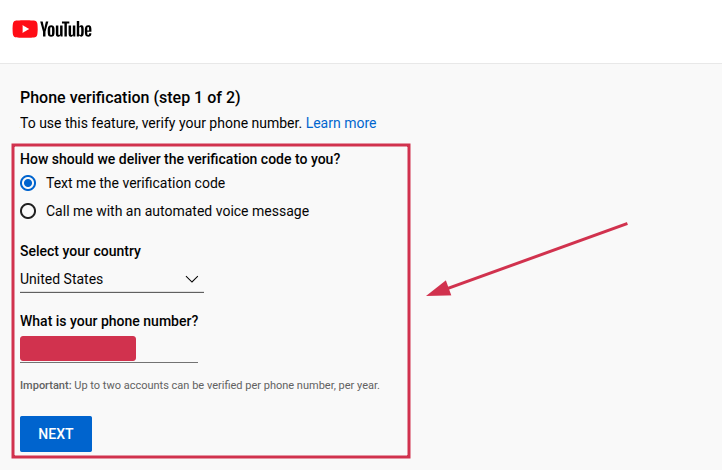
    Step #05: Verify channel

    Head to youtube.com/verify and enter your phone number to verify your account. Then, click on “Next.”

    Verify YouTube channel

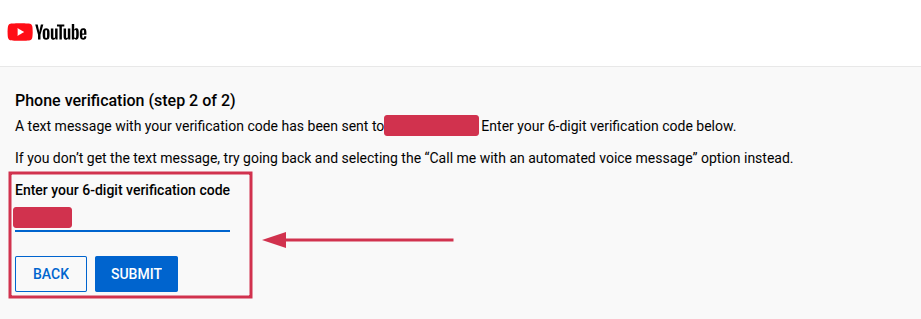
    Now, you will receive a 6-digit verification code. Please enter it and click the “Submit” button.

    6-digit verification code for YouTube channel

    And that’s all there is to it!

    How to start a YouTube channel for business

    A business YouTube channel works a little differently from a personal one, and setting it up the right way from the start actually matters. The key difference is that you’ll want to create it under a Google Brand Account, so it stays separate from your personal profile and can be managed by multiple people if needed.

    Here’s how to do it step-by-step:

    Step #01: Create a dedicated Google Brand Account

    Go to myaccount.google.com, click on “Create an account,” and select the option to create it for a business or brand. This keeps your business channel completely separate from your personal Google account.

    Step #02: Create a brand channel

    Sign in to YouTube using your new Google Brand Account, click your profile icon, and select “Create a channel.” This channel will represent your business, which is exactly what you want.

    Step #03: Customize channel branding

    Upload your business logo as the profile picture and design a clean, on-brand banner that reflects your business identity. First impressions count, so make sure everything looks consistent with your overall brand.

    Step #04: Fill out the ‘About’ section

    Write a clear, concise description of what your business does and what kind of content viewers can expect. Don’t forget to add your website link, business email, and any relevant social media handles here, too.

    Step #05: Verify your channel

    Just like with a personal channel, head to youtube.com/verify and complete phone verification. This unlocks custom thumbnails, longer video uploads (more than 15 minutes), and live streaming, all essential features for a business channel.

    Step #06: Set up default upload settings

    Go to YouTube Studio, navigate to Settings, and configure your default upload preferences – things like default visibility, license type, category, and tags. This saves you time with every upload and keeps your settings consistent across all videos.

    How to start a YouTube channel on your phone

    Don’t have a laptop or PC at hand? No problem!

    You can set up a fully functional YouTube channel right from your smartphone in just a few minutes. The process is super straightforward, and the YouTube app makes it pretty intuitive.

    Here’s how to create a YouTube channel in mobile:

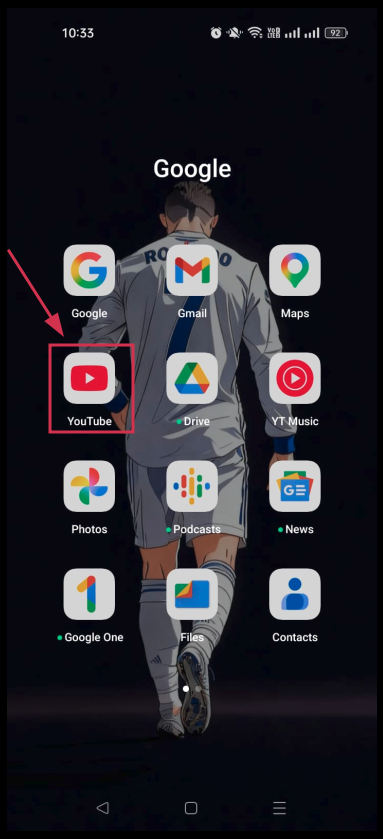
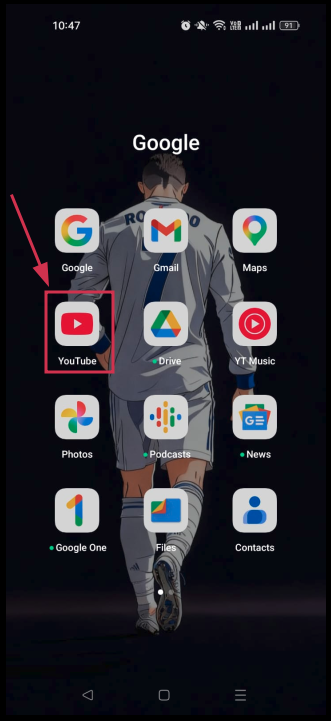
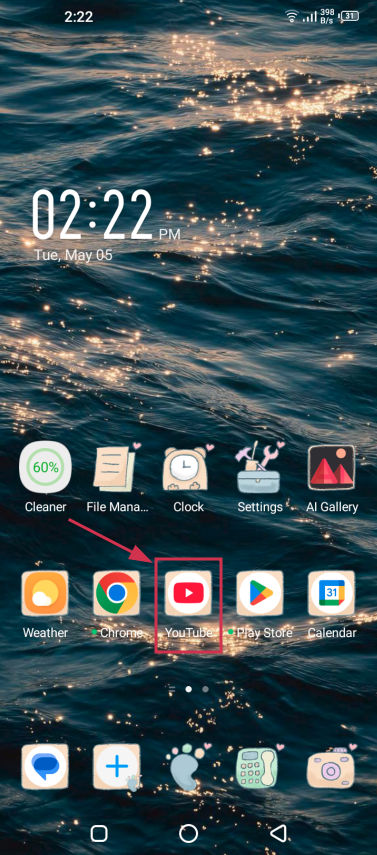
    Step #01: Open YouTube app

    Download the YouTube app from the App Store (iPhone) or Google Play Store (Android) and install it. Then go ahead and open it up.

    Open YouTube app

    Step #02: Sign in with a Google account

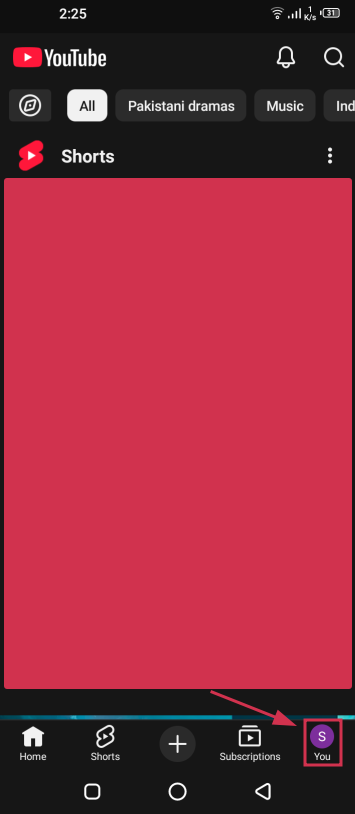
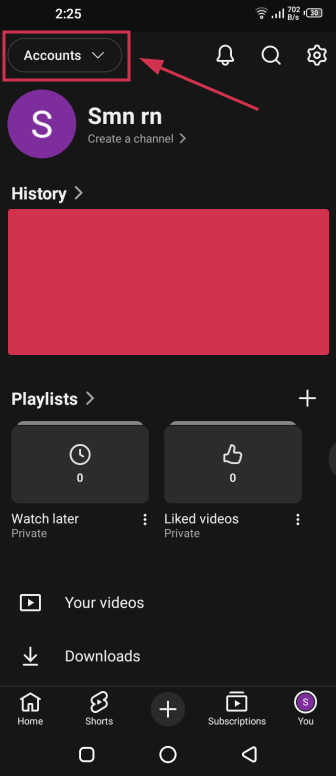
    Tap your profile icon, followed by tapping the “Accounts” button.

    Profile icon on YouTube app
    Accounts button inside YouTube app

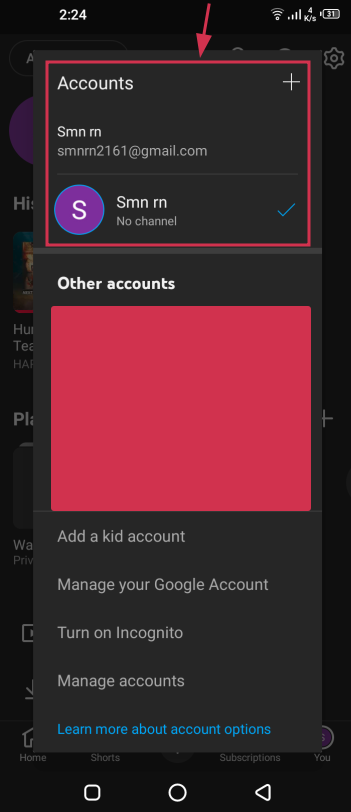
    Log in with your existing Google account. If you don’t have one, you can create a new Google account right from the app in just a couple of minutes.

    Sign in to YouTube app with your Google account

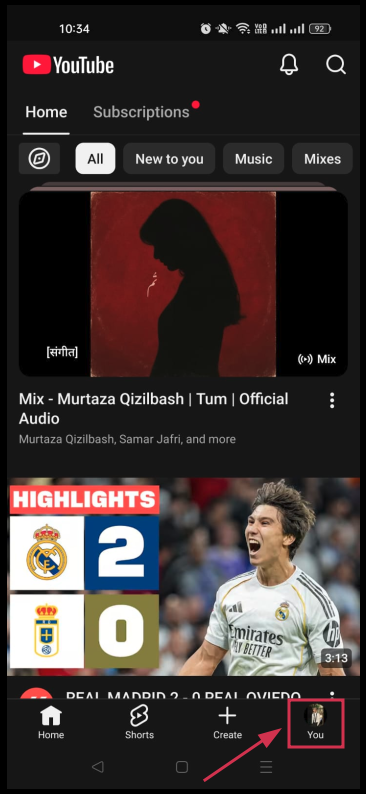
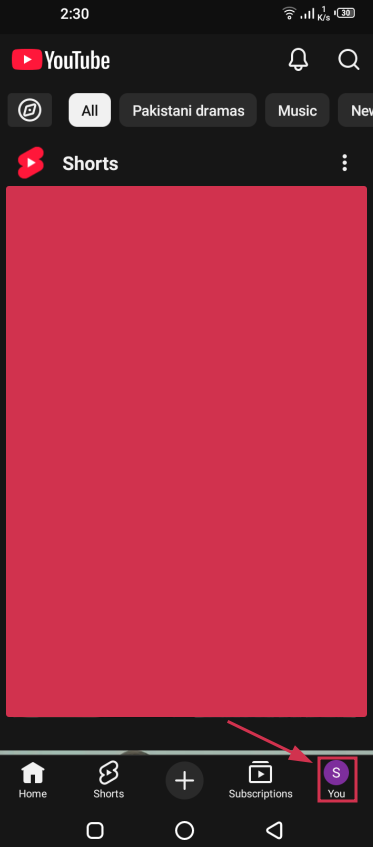
    Step #03: Tap your profile picture

    Once you’re successfully signed in, tap your profile picture or icon again in the bottom right corner of the screen. This opens up your account menu, where all the important options live.

    Profile icon inside YouTube app

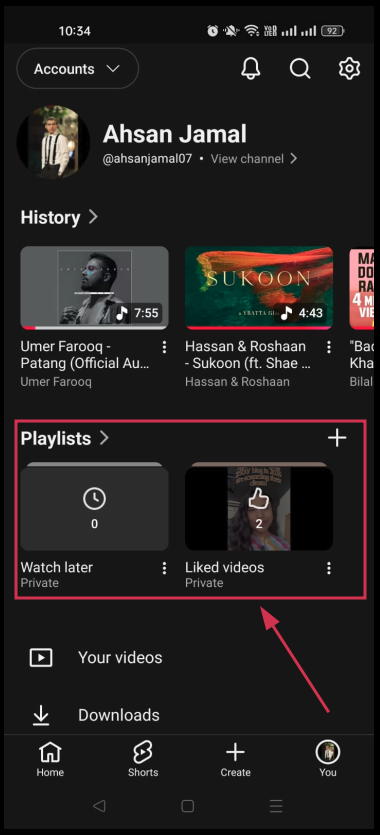
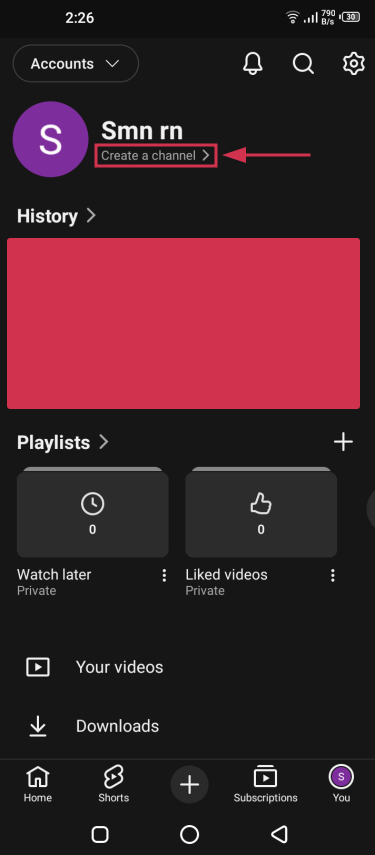
    Step #04: Select “Create a channel”

    From the opened screen, tap “Create a channel.” This is where YouTube will prompt you to set up your channel if you haven’t already. Just follow the quick on-screen steps to get it created.

    Create a channel option inside the YouTube app

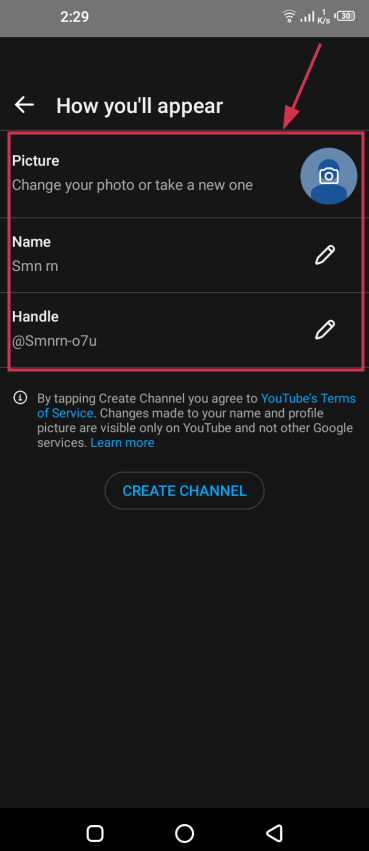
    Step #05: Customize your channel name, handle, & picture

    Now, add your channel name, set your unique handle, and upload a profile picture. Keep it clear and relevant to what your channel is going to be about.

    Customize your channel name, handle, & picture inside the YouTube app

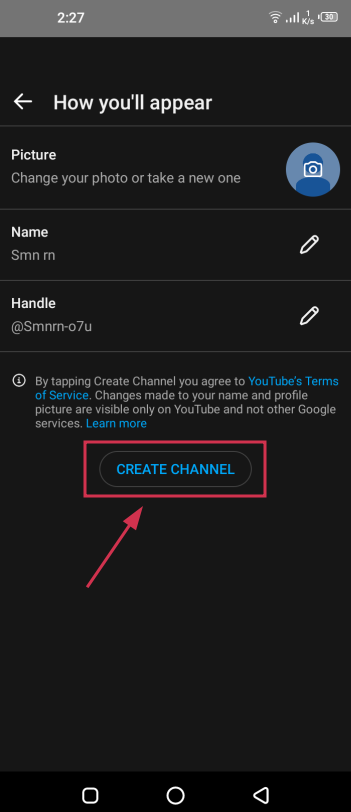
    Finally, tap on the “CREATE CHANNEL” button. That’s all!

    Create Channel button inside the YouTube app

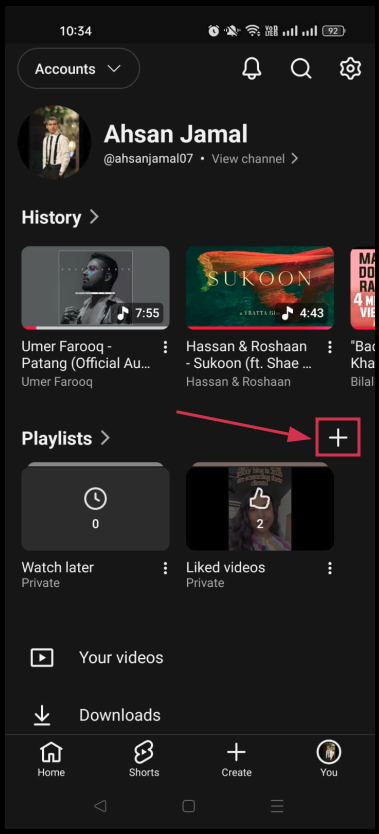
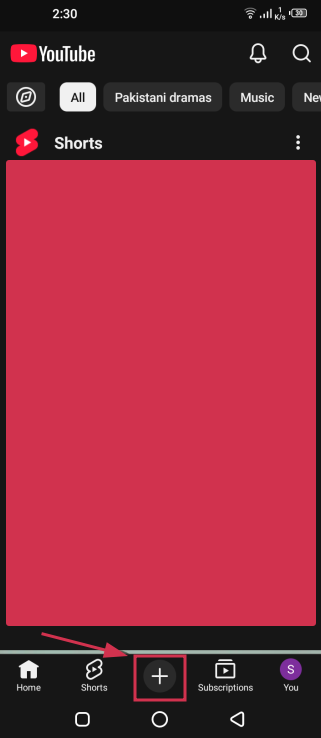
    Step #06: Use the “+” button to create or upload content (additional step)

    Tap the “+” icon at the bottom center of the app to start uploading videos, record content directly, or even create a YouTube Short. This is your go-to button for getting content live on your channel.

    “+” button inside the YouTube app

    How to start a YouTube channel for kids

    Starting a YouTube channel for kids is a bit different from a regular channel; safety and parental oversight come first, always. 

    Whether your child wants to share creative videos, gaming content, or just have fun on camera, it’s important to set everything up the right way before posting anything publicly.

    Here’s how to create a YouTube channel for a kid properly:

    Step #01: Set up account & channel

    Since YouTube requires users to be at least 13 years old, a parent or guardian needs to create and own the Google account and YouTube channel. The child can create content, but an adult should always be in control of the account itself.

    Step #02: Set safety settings

    Go to YouTube Studio and mark the channel as “Made for kids” to filter out inappropriate content. Also, make sure to turn off or carefully manage features like comments, as unmoderated comments on kids’ content can get problematic quickly.

    Step #03: Enable supervised mode

    YouTube offers a supervised experience through the YouTube Family Center, which lets parents control what their child can watch and do on the platform. It’s a solid extra layer of protection worth setting up.

    Step #04: Content creation

    Always be involved when your child is filming or editing. Keep videos fun and age-appropriate, and make sure no personally identifiable information (like your home address, school name, or daily routine) ever makes it into the content.

    Step #05: Manage privacy

    Consider setting videos to “Unlisted” initially so only people with the direct link can view them. If you do go public, make sure to mark your content as “Made for Kids” in YouTube Studio. This is actually a legal requirement under COPPA if your content targets children.

    Step #06: Content strategy

    Focus on content your child genuinely enjoys, no matter if that’s crafts, storytelling, toys, or educational videos. Keep it consistent, light, and fun rather than chasing trends, and always prioritize your child’s comfort and well-being over views or growth.

    How to start a YouTube channel and make money

    Making money on YouTube is absolutely possible, but it’s important to understand that it rarely happens overnight. 

    The good news is that there are multiple ways to monetize your channel, and you don’t even need millions of subscribers to start earning.

    Here’s how to create a YouTube channel and make money using these effective ways:

    Method #01: YouTube Partner Program (AdSense)

    This is YouTube’s official monetization program, where you earn money from ads shown on your videos. 

    To qualify, you currently need:

    • at least 1,000 subscribers and 4,000 watch hours in the past 12 months, or 
    • 1,000 subscribers and 10 million Shorts views in the last 90 days

    Method #02: Alternative monetization (smaller channels)

    If you haven’t hit YPP requirements yet, you can still earn through YouTube’s early monetization features like channel memberships and Super Thanks, which are available to smaller creators. These let your audience support you directly without you needing to wait for ad revenue.

    Method #03: Affiliate marketing

    This involves promoting other companies’ products or services in your videos and dropping your unique affiliate link in the description. Every time someone makes a purchase through your link, you earn a commission, and this method can work even with a relatively small audience.

    Method #04: Brand sponsorships

    Brands pay creators to feature or review their products within videos, and this can be one of the most profitable income streams on YouTube. You don’t necessarily need a massive channel either. Brands often love working with smaller, highly engaged niche audiences.

    Method #05: Sell own products/services

    If you have something to sell, whether that’s an online course, merchandise, coaching, or a digital download, your YouTube channel can act as a powerful free marketing tool to drive sales. This method puts the most money in your pocket since there’s no middleman involved.

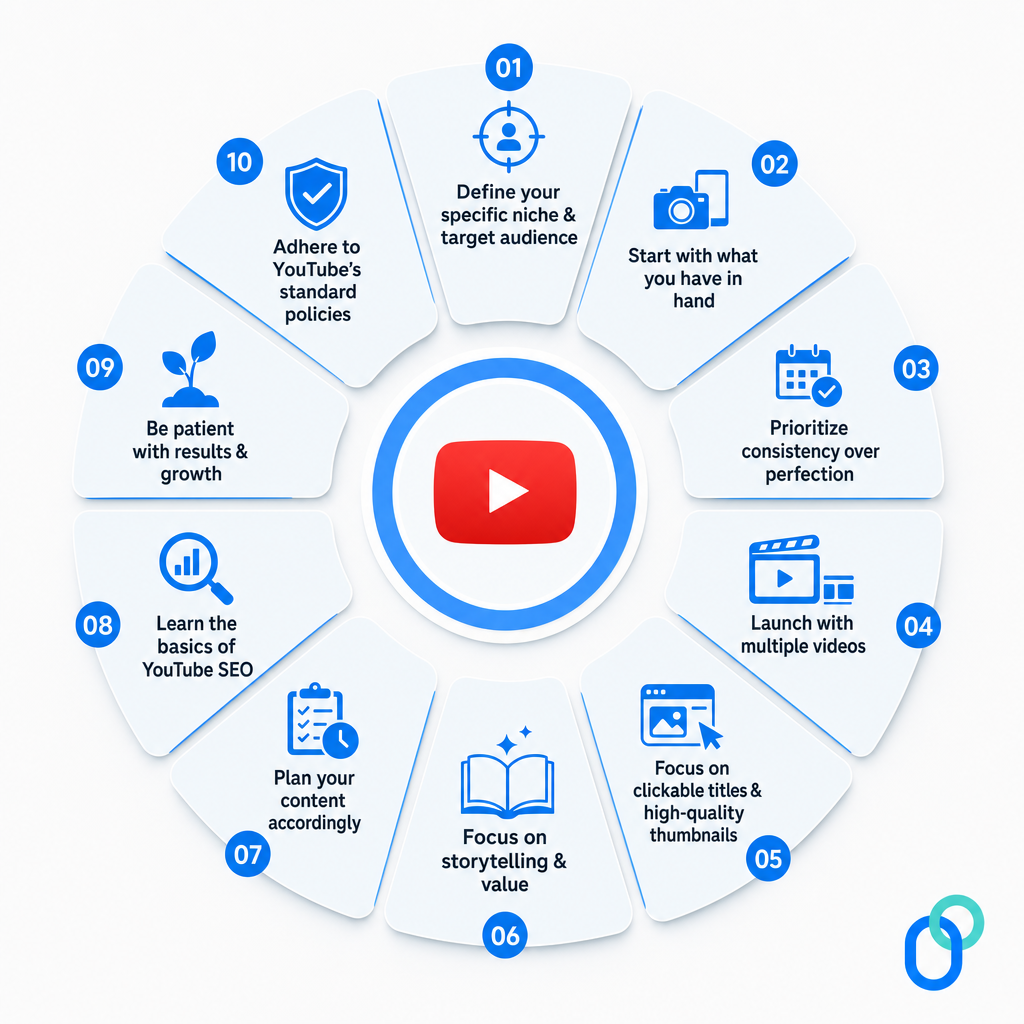
    Tips on how to start a YouTube channel

    Setting up a channel is the easy part; growing it is where most beginners struggle. These tips won’t guarantee rapid success, but they will help you avoid the most common mistakes and set your channel up for long-term growth. 

    Let’s get into it:

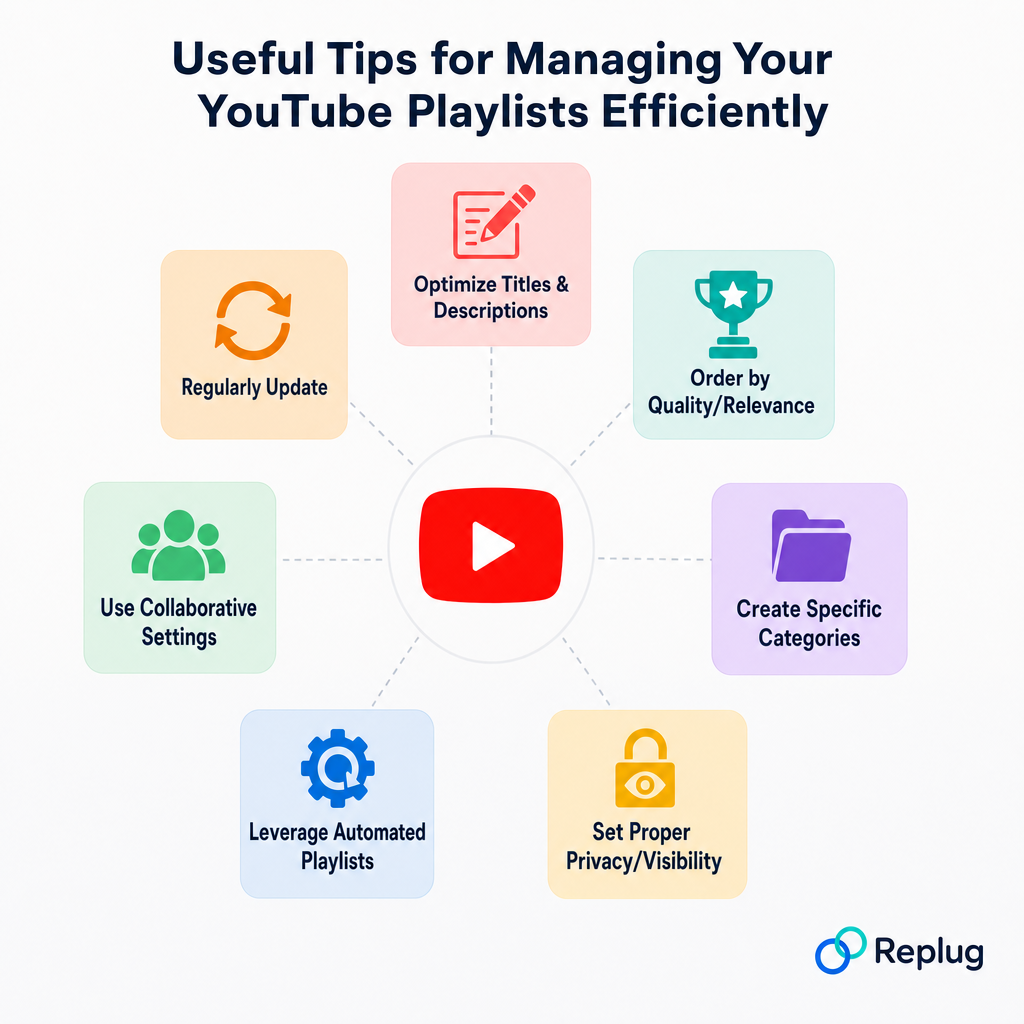
    Tips on how to start a YouTube channel

    Tip #01: Define your specific niche & target audience

    Before you record a single video, get crystal clear on what your channel is about and who it’s for. The more specific your niche, the easier it is to attract a loyal, relevant audience rather than random one-time viewers.

    Tip #02: Start with what you have in hand

    Don’t wait until you can afford better gear. Start with your smartphone and whatever you already own. Waiting for the “perfect setup” is just procrastination in disguise, and your audience cares far more about your content than your camera quality.

    Tip #03: Prioritize consistency over perfection

    Posting regularly (even if the videos aren’t flawless) will always beat uploading perfect videos once in a blue moon. Consistency builds trust with your audience and signals to YouTube’s algorithm that your channel is active and worth promoting.

    Tip #04: Launch with multiple videos

    Instead of launching with just one video, try to have at least 3–5 videos ready on day one. This gives new visitors more content to indulge in, which increases watch time and makes your channel look more established right from the start.

    Tip #05: Focus on clickable titles & high-quality thumbnails

    Your title and thumbnail are basically your video’s billboard. They determine if someone clicks or keeps scrolling. Spend real time crafting curiosity-driven titles and clean, eye-catching thumbnails that actually represent your content honestly.

    Tip #06: Focus on storytelling & value

    Every video you make should either solve a problem, entertain, or teach something useful. Wrapping that value in a good story keeps viewers watching longer, and watch time is one of the biggest factors YouTube uses to decide how widely to push your content.

    Tip #07: Plan your content accordingly

    Don’t just act without preparation every time you sit down to record. Have a content calendar or at least a running list of video ideas ready. Planning ahead keeps you consistent, reduces creative burnout, and ensures your content stays aligned with your niche.

    Tip #08: Learn the basics of YouTube SEO

    Understanding how to use the right keywords in your titles, descriptions, and tags can significantly improve how easily people discover your videos through search. You don’t need to be an SEO expert; just learn the fundamentals and apply them to every upload.

    Tip #09: Be patient with results & growth

    Most channels take anywhere from 6 to 12 months before they see meaningful growth, and that’s completely normal. Trust the process, keep improving your content, and resist the urge to quit just because the numbers aren’t moving as fast as you’d like.

    Tip #10: Adhere to YouTube’s standard policies

    Always follow YouTube’s Community Guidelines and Terms of Service. Violating them can get your videos removed, your channel demonetized, or worse, permanently banned. When in doubt, check YouTube’s official policy pages before posting anything that feels borderline.

    How to manage a YouTube channel as a beginner

    Once your channel is live, managing it well is what separates creators who grow from those who fizzle out. It doesn’t have to be complicated, though a few smart habits and the right tools can keep everything running smoothly. 

    Here’s what to focus on:

    Tip #01: Use YouTube Studio to upload, edit, & analyze content

    YouTube Studio is your channel’s control room. It’s where you upload videos, make basic edits, write descriptions, and check how your content is performing. Get comfortable with it early because you’ll be spending a lot of time there.

    Tip #02: Ensure consistent branding (banner/logo)

    Your channel banner and profile picture should look cohesive and instantly reflect what your channel is about. Consistent branding makes your channel look professional and helps viewers remember you more easily.

    Tip #03: Focus on channel customization & verification

    Take time to completely fill out your channel layout and verify it. Featured videos, channel trailers, playlists, and sections all make a big difference in how new visitors experience your page. A well-organized, verified channel page encourages people to stick around and explore more.

    Tip #04: Activate 2-step verification for security

    Your channel is an asset worth protecting, so make sure to enable 2-step verification on your Google account right away. It takes two minutes to set up and significantly reduces the risk of your account getting hacked or compromised.

    Tip #05: Engage with viewers through comments

    Replying to comments (especially early on) builds a real sense of community and shows your audience that there’s an actual human behind the channel. Even a short, genuine reply goes a long way in building loyalty with your viewers.

    Tip #06: Enable “Intermediate Features” for custom thumbnails

    Custom thumbnails are one of the most powerful tools for getting clicks, but they’re locked until you enable “Intermediate Features” in YouTube Studio. It usually just requires phone verification, so it’s a quick win.

    Tip #07: Set up video defaults for efficiency

    In YouTube Studio settings, you can pre-fill default values for things like video descriptions, tags, category, and license type. This saves you a surprising amount of time with every upload and keeps your metadata consistent across all your videos.

    Tip #08: Batch produce & set up permissions

    Recording and editing multiple videos in one sitting (rather than one at a time) saves a ton of time and keeps your upload schedule on track. If you ever bring on a collaborator or editor, you can also manage their access through YouTube Studio’s permissions settings without sharing your login.

    Tip #09: Use Creator Insider & Audio Library

    Creator Insider is YouTube’s official channel where they share platform updates, algorithm changes, and feature announcements directly from the YouTube team (well worth following). The YouTube Audio Library, meanwhile, gives you free, copyright-safe music and sound effects to use in your videos without any worries.

    Tip #10: Use analytics to track performance

    Dig into your YouTube analytics regularly to understand what’s working. Pay close attention to metrics like click-through rate, average view duration, and impressions. These numbers tell you more about your channel’s health than subscriber count alone ever will.

    You may also like: How to build your brand on YouTube – Branding on YouTube the right way!

    Join hands with Replug and make your YouTube channel stand out in 2026!

    Growing a YouTube channel gets a whole lot easier when you have the right tools backing you up. 

    Replug is an all-in-one link management platform packed with features designed to help creators and businesses manage their online presence more effectively. 

    Its custom link shortener lets you generate clean, branded short links within seconds. Perfect option for dropping in your YT video descriptions, bio, or anywhere else you share content. No more messy, long URLs!

    Replug Branded Short Links CTA
    Maximize marketing ROI
    by transforming ordinary URLs into
    branded short links that convert.
    Try Replug for free

    And if you ever get stuck on what to title your next video, Replug’s free YouTube title generator has got you covered. It helps you craft catchy, click-worthy titles without the headache. 

    Give it a try today, you’ll wonder how you managed without it!

    Frequently asked questions

    How much does it cost to start a YouTube channel?

    Creating a YouTube channel is completely free! There are no signup fees, monthly charges, or hidden costs involved. All you need is a Google account and an internet connection. 

    The only costs you might encounter are optional ones, like investing in a microphone, lighting, or editing software down the line. But those are upgrades, not requirements. 

    Plenty of successful creators started with nothing more than a smartphone.

    How to start a YouTube channel for free?

    Learning how to start a YouTube channel with no money is simpler than most people think. Just head to www.youtube.com → create a YouTube account using your existing Google account → fill in your channel name and handle, and you’re good to go.

    For content creation, use your smartphone camera, shoot near a window for natural lighting, and use free editing tools like CapCut or DaVinci Resolve. There’s genuinely no need to spend a single penny to get started.

    How do I start a YouTube channel and get paid?

    To start earning from your channel, you’ll first need to qualify for the YouTube Partner Program (YPP), which requires 1,000 subscribers and 4,000 watch hours within the past 12 months. Once accepted, you’ll earn money through ads running on your YouTube videos. 

    Beyond AdSense, you can also make money through affiliate marketing, brand sponsorships, channel memberships, and selling your own products or services, even before hitting YPP thresholds.

    How to make a YouTube channel with parental controls?

    If you’re setting up a channel for a child, a parent or guardian should own and manage the account since YouTube requires users to be at least 13 years old. 

    Use Google Family Link to enable supervised access, turn on “Restricted Mode” to filter inappropriate content, and disable comments on uploaded videos for safety. 

    For viewing, the YouTube Kids app offers the most controlled and child-friendly experience overall.

    What is a good name for a YouTube channel?

    Figuring out what is a good YouTube channel name comes down to a few simple rules:

    – Keep it short, easy to spell, and relevant to your content. 
    – Ideally, it should give people an instant idea of what your channel is about while still being memorable. 
    – Avoid using too many numbers or special characters, as these make it harder for people to find you through search. 
    – Try to pick something unique enough that it isn’t already taken across other social platforms, too, so your branding stays consistent everywhere.

    How to make a second channel on YouTube on phone?

    To create a second YouTube channel on a phone, use a mobile browser (like Safari or Chrome) to navigate to studio.youtube.com, rather than the YouTube app. 

    Go to Settings → Channel → Advanced Settings → Manage YouTube Account → Add or manage your channels, then click “Create a channel.”

    How to make your first YouTube video with no experience?

    Here’s how to do it efficiently:

    – Start by picking one topic you know well and can talk about comfortably. 
    – Write a loose script or bullet-point outline, so you stay on track while recording. 
    – Film using your smartphone in a quiet, well-lit spot, speak naturally, and don’t stress about getting everything perfect in one take. 
    – Edit using a free tool like CapCut or iMovie, add a simple intro and some background music, and keep the video focused and concise.

    Your first video won’t be flawless, but that’s completely okay. Just hit publish and learn as you go.

    Provide a list of popular YouTube channel genres in 2026?

    Here are some of the most popular and consistently growing YouTube channel genres right now:

    – Gaming & game walkthroughs
    – Personal finance & investing
    – Health, fitness & wellness
    – Technology & product reviews
    – Food, cooking & recipes
    – Education & how-to tutorials
    – Travel & lifestyle vlogs
    – Beauty, fashion & skincare
    – True crime & documentary-style content
    – AI, tools & productivity
    – Parenting & family content
    – Motivational & self-improvement content

    Provide top-notch YouTube channel optimization and content strategy tips and tricks?

    Here are some of the most effective ones to focus on:

    Optimize your titles with relevant keywords people are actually searching for, but keep them natural and compelling to click on.
    Write detailed video descriptions. Include your main keyword in the first couple of lines and add relevant links, timestamps, and a channel CTA.
    Use tags wisely. Add a mix of broad and specific tags that relate directly to your video topic.
    Design eye-catching thumbnails. Use bold text, bright colors, and clear visuals that stand out in search results and suggested feeds.
    Focus on the first 30 seconds of every video. Hook your viewer immediately, or they’ll click away, which hurts your retention rate badly.
    Create playlists to group related videos together, which encourages binge-watching and increases overall watch time on your YouTube channel.
    Post at consistent times so your subscribers know when to expect new content from you.
    Add end screens and cards to keep viewers on your channel longer by directing them to other relevant videos.
    Engage in the comments section early after posting. It boosts engagement signals that YouTube’s algorithm loves.
    Study your analytics regularly and double down on the content formats and topics that are already performing well.

    How to verify your YouTube account?

    Verifying your YouTube account is quick and straightforward:

    Go to youtube.com/verify while logged in → enter your phone number, and choose whether you’d like your verification code sent via text or call. Enter the 6-digit code once you receive it, and you’re done.

    The YouTube channel login stays the same. Verification just unlocks additional features like custom thumbnails, live streaming, and the ability to upload videos longer than 15 minutes, all of which are worth having from day one.

  • How to get LinkedIn URL on mobile & desktop: Find your profile link within minutes!

    How to get LinkedIn URL on mobile & desktop: Find your profile link within minutes!

    With over 1.3 billion active members, LinkedIn is the world’s largest professional network. Whether you’re job hunting, building your personal brand, or reaching out to potential clients, your profile is your digital handshake.

    But here’s a problem many people run into: They have no idea where to find their own LinkedIn URL to share it when it matters most.

    Sending someone your profile link shouldn’t feel like solving a puzzle. No matter if you want to add it to your resume, drop it in an email signature, or create a URL that reflects your name professionally, it’s a lot simpler than you think, once you know where to look.

    In this guide, we’ll walk you through exactly how to find your LinkedIn URL on both mobile and desktop in just a few clicks. 

    But first, let’s make sure we’re on the same page, i.e., getting to know what actually is a LinkedIn URL?

    What is my LinkedIn URL?

    Think of your LinkedIn URL as your profile’s home address on the internet. It’s the unique web link (or URL) that takes anyone directly to your LinkedIn profile; no searching required. 

    A standard LinkedIn URL looks something like this:

    linkedin.com/in/yourname

    Its main job is simple: Make it easy for people to find and visit your profile on the go!

    Whether you’re adding it to your resume or putting it on a business card, your LinkedIn URL gives others a one-click shortcut straight to your professional story.

    How to get LinkedIn URL from app (Android & iOS)

    Getting your LinkedIn URL on mobile is super easy and only takes a few minutes. 

    Here’s how to find LinkedIn URL on iPhone & Android smartphone (mobile app steps):

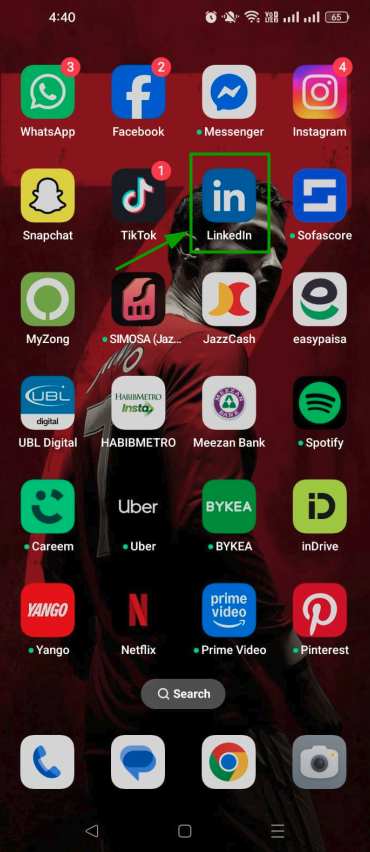
    Step #01: Open the LinkedIn app

    Grab your phone and open the LinkedIn app. It works the same way on both Android and iOS.

    Open the LinkedIn app

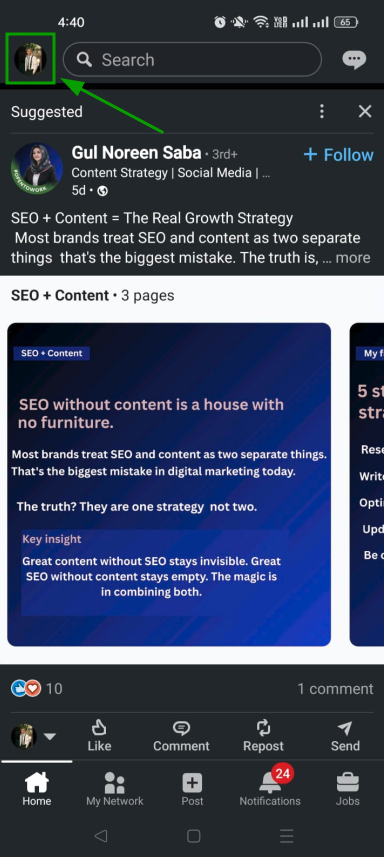
    Step #02: Tap your profile photo

    Once you’re on the home feed, tap your profile photo in the top-left corner to open the side menu.

    Your profile photo on LinkedIn app

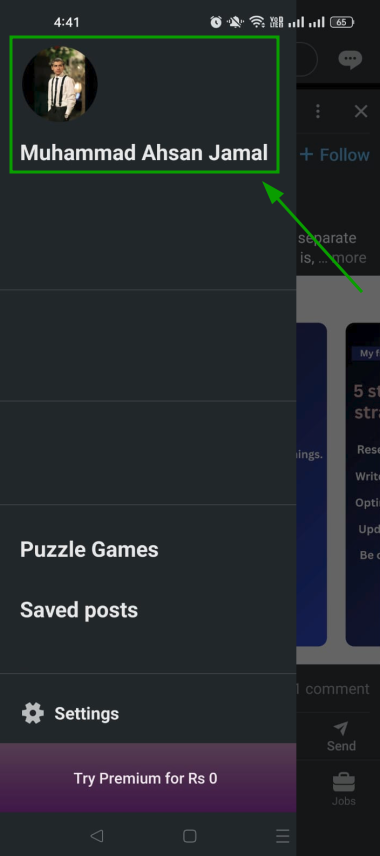
    Step #03: Tap view profile (or your name)

    In the menu that appears, tap on your name to open your profile page.

    View profile (or your name) on LinkedIn app

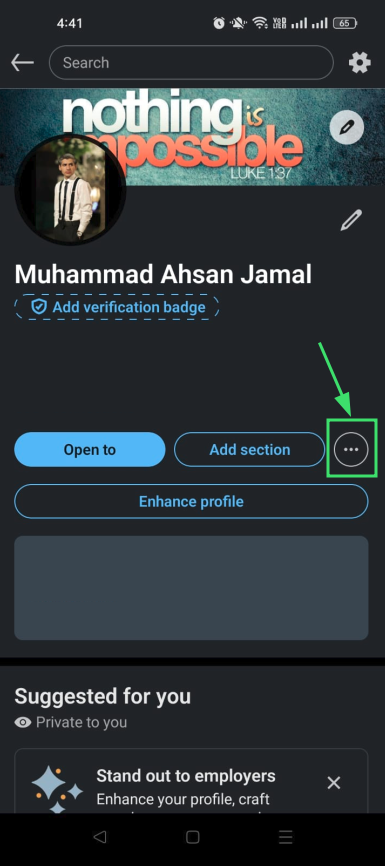
    Step #04: Tap the three dots (…) icon

    On your profile page, look for the three dots (…) icon. You’ll usually find it next to the “Add section” button. Tap on it.

    Three dots (...) icon inside LinkedIn app

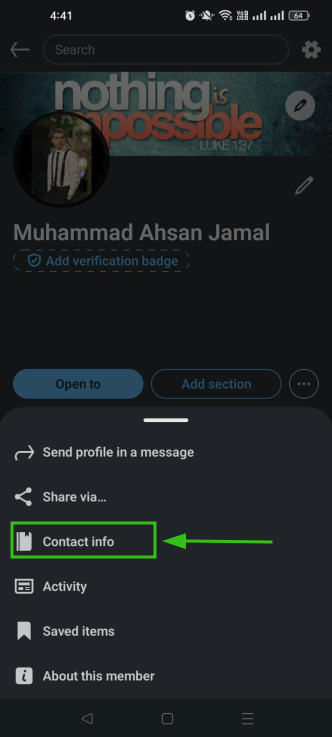
    Step #05: Tap “Contact info”

    A small menu will pop up. Tap on “Contact info” to open your contact details.

    Contact info option inside LinkedIn app

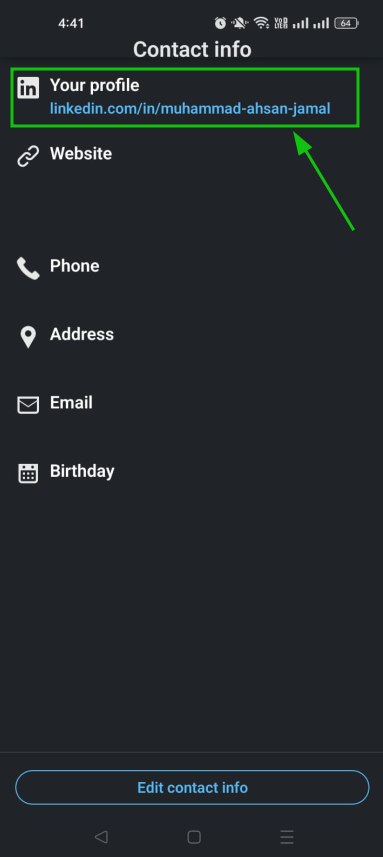
    Step #06: Get your LinkedIn URL under “Your profile”

    Your LinkedIn URL will be right there under the “Your Profile” section. Tap on it to copy or share it instantly.

    Get your LinkedIn URL under “Your profile” inside LinkedIn app

    👉 Note: These steps apply to a public LinkedIn profile. If your profile is set to private, others won’t be able to access it through the URL.

    How to get my LinkedIn URL from desktop

    Prefer working on a laptop or PC?

    Here’s how to get your LinkedIn URL in just a few clicks (desktop steps):

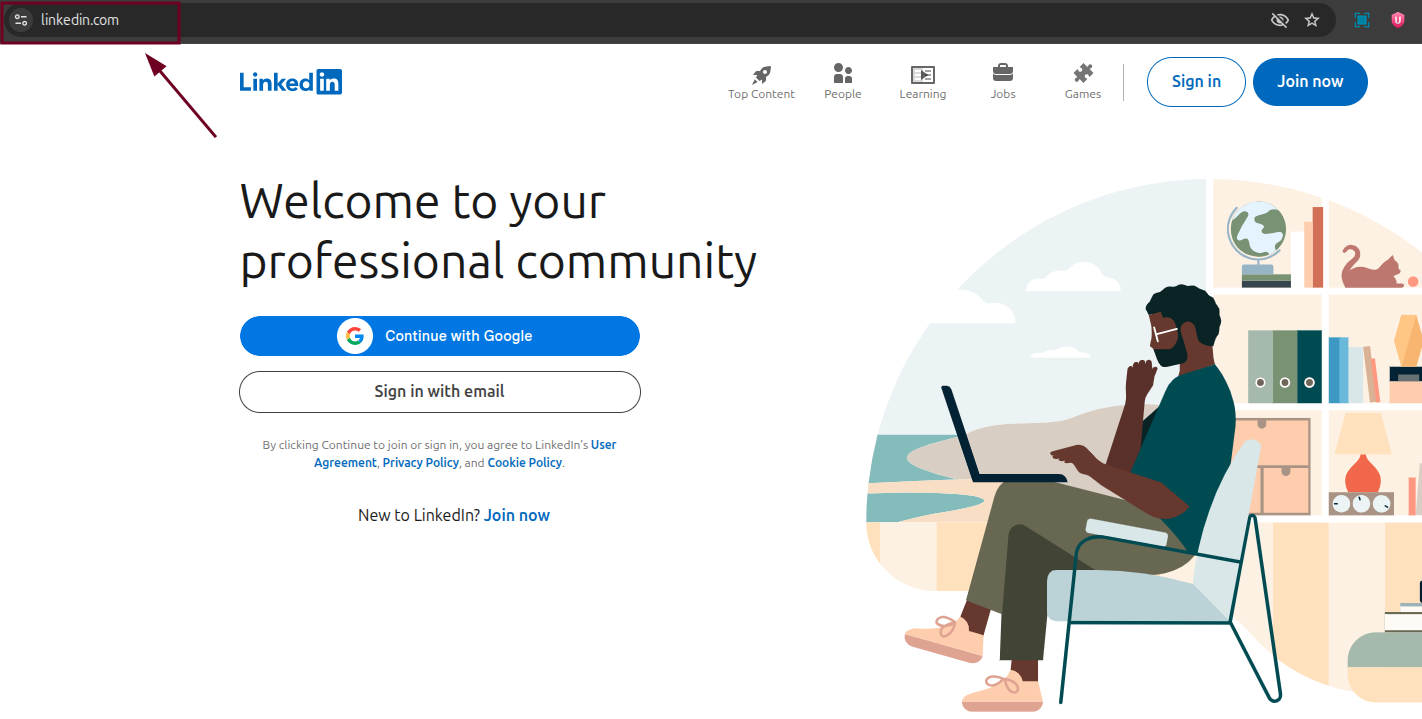
    Step #01: Go to LinkedIn.com

    Open your browser (Google Chrome, Edge, or any other of your choice) and head over to linkedin.com. Log in to your account if you aren’t already.

    Go to LinkedIn.com

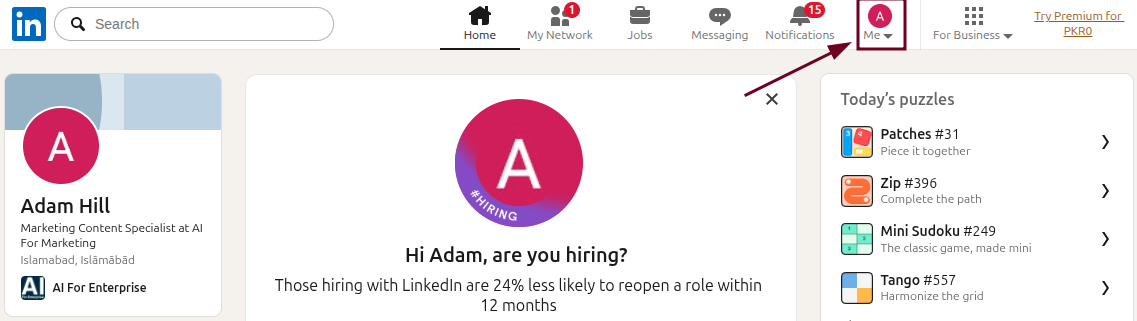
    Step #02: Click the “Me” icon

    Once you’re on the homepage, look for the “Me” icon at the top-right navigation bar and click on it.

    Me icon on the LinkedIn profile homepage

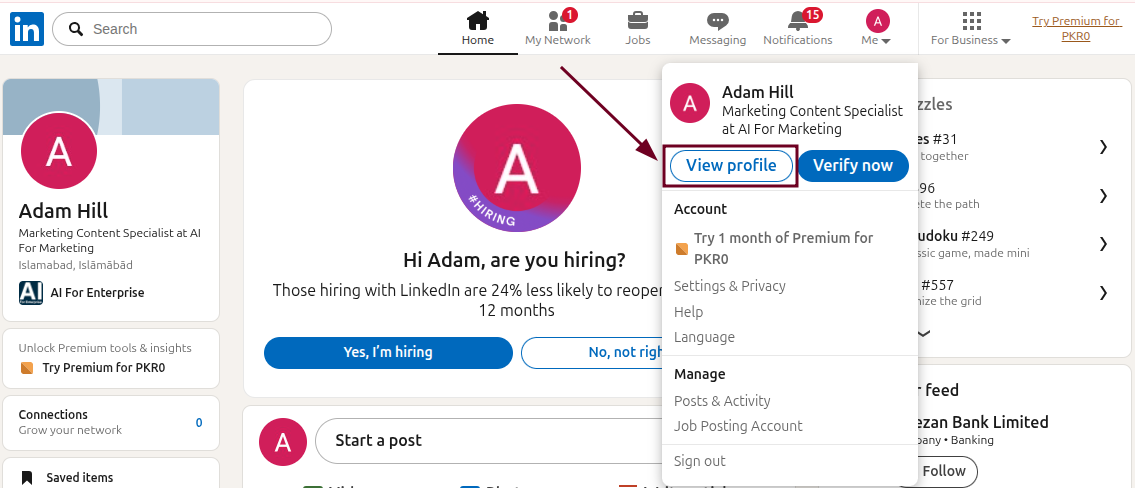
    Step #03: Click “View profile”

    From the dropdown menu that appears, click “View profile” to land directly on your LinkedIn profile page.

    View profile option on the LinkedIn web app

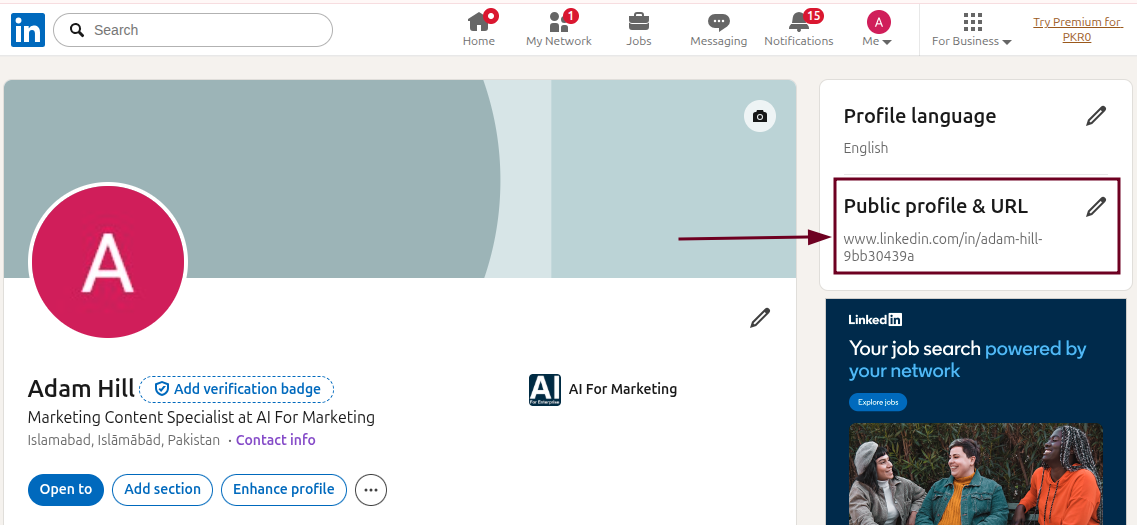
    Step #04: Look under “Public profile & URL”

    On the right-hand side of your profile, you’ll spot the “Public profile & URL” section. Your LinkedIn URL is right there. Simply copy and use it wherever you need.

    Public profile & URL option on the LinkedIn web app

    👉 Quick tip: The fastest way to grab your LinkedIn URL on desktop is even simpler. Just head over to your LinkedIn profile and copy the web address directly from your browser’s address bar. Done!

    And if you ever want to update or personalize your URL, just click the pencil icon right under the “Public profile & URL” section. It lets you edit and change your LinkedIn URL to something cleaner and more on-brand.

    You may also like: How to share LinkedIn profile URL with connections & others in 2026: Easy and effective ways discussed!

    Shorten your LinkedIn profile link to make it look more professional with Replug!

    So now you have your LinkedIn URL, but let’s be honest, the default link can look a little long and messy, especially when you’re putting it on a resume or business card. That’s where Replug comes in!

    Replug is an all-in-one link management platform that helps you take full control of your links (tracking, retargeting, bio links, and more). But one of its standout features is the custom URL shortener, which lets you create clean, branded short links within seconds.

    Replug Branded Short Links CTA
    Maximize marketing ROI
    by transforming ordinary URLs into
    branded short links that convert.
    Try Replug for free

    Using Replug as your LinkedIn link shortener, you can easily shorten your LinkedIn URL into something sharp and professional. 

    It could turn into something like “yourbrand.co/linkedin” instead of a long string of random characters. It’s a small change, but the one that instantly makes your profile link look more polished and trustworthy.

    No matter if you’re sharing your profile in an email, a portfolio, or a cold outreach message, a short branded link always makes a stronger first impression than a generic one.

    Also check out: How to get more views on LinkedIn: 9 proven ways

    Wrapping up

    Finding your LinkedIn URL really isn’t as complicated as it might seem. Whether you’re on your phone or sitting at your desktop, it only takes a handful of steps to locate, copy, and share your profile link with the world. And once you have it, don’t just stop there; take it a step further by personalizing it and keeping it neat. 

    A clean, professional LinkedIn URL is a small detail that can leave a big impression on recruiters, clients, and collaborators alike. So go ahead, grab your link, and if you want to make it look even sharper, give Replug a try today!

    Frequently asked questions

    What is a URL link?

    A URL (Uniform Resource Locator) link is simply the web address that takes you to a specific page on the internet. Think of it as a digital street address; every webpage has its own unique one. For example, your LinkedIn profile URL link leads people directly to your profile page.

    Where do I find my LinkedIn URL?

    You can find it in two easy ways:

    On desktop, go to your LinkedIn profile and check the right-hand side under “Public profile & URL.” 
    On mobile, open the app → tap your profile photo → view profile → three dots (…) → Contact info, and your URL will be listed right there under “Your Profile”.

    How to get LinkedIn profile link?

    Head to your LinkedIn profile, either on the app or desktop. 

    On desktop, simply copy the web address directly from your browser’s address bar.
    On mobile, it’s tucked under the “Contact info” section. 

    You can copy it from either place and share it wherever you need.

    How do I copy my LinkedIn URL from the mobile app?

    Here’s how to copy LinkedIn profile link from the mobile app:

    1. Open the LinkedIn app and tap your profile photo in the top-left corner. 
    2. Tap “View profile,” then hit the three dots (…) icon on your profile page. 
    3. Select “Contact info” and you’ll see your LinkedIn URL under the “Your Profile” section. 
    4. Simply tap on it, and you will find the “Copy” option. Tap it, and your URL will be copied to the clipboard.

    That’s all there is to it!

    How do I find my LinkedIn URL on my iPhone?

    Here’s how to do it, step-by-step:

    1. Open the LinkedIn app on your iPhone.
    2. Tap your profile photo in the top-left corner. 
    3. Then tap your name or “View profile”.
    4. Next, tap the three dots (…) icon on your profile page.
    5. After that, select “Contact info,” and you’ll find your LinkedIn URL right there under the “Your Profile” section.

    How to get LinkedIn URL for resume?

    Here’s how to get LinkedIn URL to add in resume:

    First, grab your LinkedIn URL (following the steps already discussed above) by visiting your profile on either desktop or mobile. Once you have it, consider customizing it to something clean like linkedin.com/in/yourname before adding it to your resume. It looks a lot more polished than a default link with random characters.

    How to add LinkedIn URL on resume?

    Once you have your LinkedIn URL copied, place it in the contact information section at the top of your resume, right alongside your phone number and email address. Keep it as a clean, readable link. 

    If you’re working on a digital resume, you can also hyperlink it to your name or a short label like “My LinkedIn Profile” so it’s clickable. Just make sure the URL is up to date and your LinkedIn profile is set to public before sending your resume out!

    How to get LinkedIn URL for business page?

    Go to your LinkedIn Company Page and look at the URL in your browser’s address bar. That’s your business page link. It typically looks like linkedin.com/company/yourbusinessname. You can copy it directly from there and share it anywhere you’d like.

    Provide some good and bad LinkedIn URL examples?

    Good LinkedIn URL examples:

    – linkedin.com/in/ahsanjamal
    – linkedin.com/in/ahsan-jamal-marketing
    – linkedin.com/in/ahsanjamal-creator

    These are clean, simple, and easy to recognize at a glance.

    Bad LinkedIn URL examples:

    – linkedin.com/in/ahsanjamal-4b3z9x2
    – linkedin.com/in/j0hnd0e123456789
    – linkedin.com/in/ahsan-jamal-marketer-consultant-developer-nyc

    These look messy, hard to remember, and don’t exactly scream “professional.” 

    Always aim to keep your LinkedIn URL short, clean, and ideally just your name or name with a relevant or niche-specific keyword.

  • 150+ best LinkedIn headline examples that actually get you noticed & hired fast in 2026!

    150+ best LinkedIn headline examples that actually get you noticed & hired fast in 2026!

    Your LinkedIn headline is doing more work than you might think, but unfortunately, most people are wasting it.

    With over 1.3 billion members on LinkedIn and 89% of recruiters actively using the platform to source candidates, the competition for attention is real. 

    LinkedIn powers six hires every minute, which means opportunities are flying by constantly. And your headline is often the first (and sometimes only) thing a recruiter sees before deciding to click or scroll past.

    Accounts with personalized headlines attract up to 30% more profile views, yet most people still default to just their job title. That’s like showing up to a job interview in an invisible suit.

    No matter if you’re actively job hunting, building your personal brand, or just want to stop being ignored on LinkedIn, your headline is the place to start. 

    We’ve pulled together 150+ real examples across industries to help you craft one that actually works. But first, let’s learn what exactly a LinkedIn headline is, and why it carries so much weight.

    What is a headline for LinkedIn?

    Your LinkedIn headline is the short line of text that appears right below your name on your profile. It’s one of the first things anyone sees, whether they find you through search, a comment, or a connection request.

    But it’s more than just a label. Its primary job is to tell people who you are, what you do, and why they should care, all in a single glance. LinkedIn gives you 220 characters for the headline, so make the most of it.

    Here’s why it matters so much: LinkedIn’s search algorithm treats your headline as prime real estate. Recruiters searching for candidates will see your headline before almost anything else on your profile. A strong one gets you noticed right away, whereas a weak one gets you skipped.

    Key elements that make a LinkedIn headline

    • Professional title: This is your foundation. Use the title recruiters actually search for, not your company’s internal label.
    • Relevant keywords: These help LinkedIn’s algorithm surface your profile in the right searches. Think of them as your discoverability tools.
    • Expertise & key skills: Highlight what you’re genuinely good at. This tells people exactly what you bring to the table.
    • Unique value proposition: What makes you different from the other candidates with the same job title? This is your chance to answer that.
    • Target audience: The best headlines speak directly to people. Who are you trying to attract: recruiters, clients, collaborators?
    • Major achievements: Numbers speak louder than words. A quick win (“grew revenue by 40%”) instantly builds credibility.
    • Present role & career goals: Give people context about where you are now and where you’re headed. It makes your profile feel current and intentional.

    Structure to follow for your LinkedIn headline

    Think of this as your go-to formula when you’re not sure where to start.

    [Title] | [Key Skills/Industry] | [Value Proposition or Accomplishment]

    • The first part is your professional title (what you do). 
    • The second is your key skills or the industry you work in (your area of expertise). 
    • The third is where you seal the deal (a result you’ve driven, a problem you solve, or something that makes you stand out).

    For example: “Digital Marketing Manager | SEO & Content Strategy | Helped 20+ B2B brands 3x their organic traffic.” Simply clean, clear, and instantly compelling.

    That said, this is just one of the most widely used templates. Feel free to tweak it, flip it around, or build something entirely your own. What matters most is that it sounds like “you” and speaks directly to the right people.

    A complete catalog of strong LinkedIn headline examples for any industry or role [copy & customize]

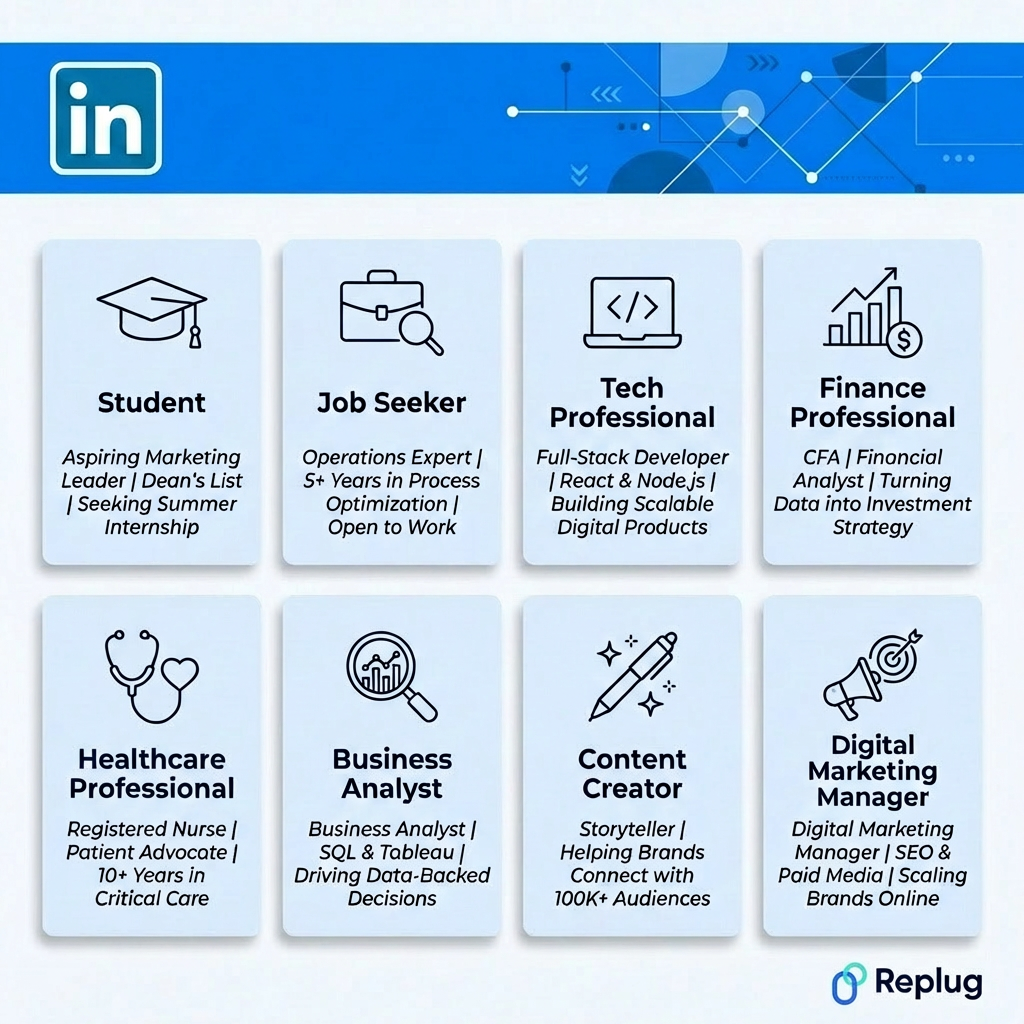
    No matter where you are in your career, the right headline can open doors you didn’t even know existed. Below is a hand-picked collection of headline examples across different roles and industries. Just find your relevant category, pick what fits, and make it your own.

    A complete catalog of strong LinkedIn headline examples for any industry or role

    LinkedIn headline examples for students

    • Computer Science student at XYZ University | Passionate about web development & problem solving
    • Business Administration student | Exploring marketing & finance | Seeking internship opportunities
    • Psychology student | Interested in human behavior, research & mental health advocacy
    • Mechanical Engineering student | CAD & Prototyping enthusiast | Looking for summer internship
    • Journalism student | Storyteller & Content Creator | Campus Writer at XYZ University Press

    LinkedIn headline examples for college students

    • Junior at XYZ University | Studying Data Science | Actively looking for research & internship roles
    • College student | Finance & Economics major | Passionate about investment strategies & market trends
    • Sophomore | Graphic Design student | Freelancing for small businesses while finishing my degree
    • Pre-med student at XYZ University | Healthcare advocate | Volunteer at local community clinic
    • CS student | Software Engineering major | Building apps on the side & open to co-op opportunities

    LinkedIn headline examples for more creative students

    • Aspiring Brand Strategist | Turning big ideas into campaigns that actually get people talking
    • Design student by day, freelance illustrator by night | Making brands look too good to scroll past
    • Film & Media student | Obsessed with visual storytelling | Short films, scripts & everything in between
    • Creative Writing student | Crafting stories that stick | Blogger, poet & future content strategist
    • Architecture student | Where art meets structure | Passionate about sustainable & human-centered design

    LinkedIn headline examples for recent graduates/freshers

    • Recent Marketing graduate | SEO, social media & content creation | Ready to help brands grow
    • Fresh Computer Science graduate | Java, Python, & Full-Stack Development | Open to entry-level roles
    • Finance graduate | Skilled in financial modeling & data analysis | Actively seeking analyst roles
    • HR graduate | Passionate about people, culture & talent acquisition | Open to work
    • Recent Mass Communication graduate | Content writing, PR & media relations | Eager to make an impact

    Professional LinkedIn headline examples for job seekers

    • Experienced Project Manager | PMP certified | Helping teams deliver results on time & within budget
    • Sales professional | B2B & SaaS sales expert | Consistently hitting 120%+ of quarterly targets
    • Digital Marketing Specialist | SEO, paid ads & email marketing | Open to new opportunities
    • Software Engineer | React, Node.js & AWS | 5+ years building scalable web applications
    • Customer Success Manager | Reducing churn & driving retention | Open to remote opportunities

    LinkedIn headline examples for career change

    • Former teacher transitioning into corporate training & L&D | Passionate about building workplaces that actually learn
    • Ex-military professional | Bringing leadership, strategy & discipline to operations & project management
    • Pivoting from retail management to HR | People-first leader | SHRM-CP in progress
    • Transitioning from journalism to UX writing | Turning complex ideas into clear, user-friendly content
    • Finance professional moving into data analytics | SQL & Power BI | Bridging numbers with actionable insights

    LinkedIn headline examples for unemployed

    • Experienced Operations Manager | Supply chain & process improvement expert | Open to new opportunities
    • Seasoned Graphic Designer | Branding, UI & visual storytelling | Currently available & actively looking
    • IT Support Specialist | Network troubleshooting & Cybersecurity fundamentals | Ready to hit the ground running
    • Bilingual Customer Service Professional | English & Spanish | CRM expert | Open to full-time roles
    • Certified Digital Marketer | Google Ads, SEO & Analytics | Between roles & excited for the next chapter

    LinkedIn headline examples for accounting

    • Certified public accountant | Tax planning, financial reporting & audit | Helping businesses stay compliant & profitable
    • Senior Accountant | GAAP, QuickBooks & ERP Systems | 8+ years streamlining financial operations for mid-size firms
    • Accounts Payable Specialist | Invoice processing & vendor management | Reducing errors & keeping books clean
    • Financial Accountant | Month-end close, budgeting & forecasting | Passionate about turning numbers into strategy
    • Accounting graduate | Excel, SAP & financial analysis | CPA candidate actively seeking entry-level opportunities

    LinkedIn headline examples for QA

    • QA Engineer | Selenium, Jira & Agile Testing | Catching bugs before your users do
    • Senior Quality Assurance Analyst | Manual & automated testing | 7+ years delivering flawless software releases
    • QA lead | API testing, Postman & CI/CD pipelines | Helping dev teams ship faster without breaking things
    • QA tester | Functional, regression & performance testing | Detail-obsessed & deadline-driven
    • Entry-level QA analyst | ISTQB Foundation certified | Passionate about clean code & bug-free user experiences

    Marketing LinkedIn headline examples

    • Content Marketing Manager | SEO-driven storytelling & lead generation | Helped SaaS brands grow organic traffic by 200%+
    • Performance Marketing Specialist | Google Ads, Meta & Programmatic | Turning ad spend into measurable ROI
    • Brand Strategist | Positioning, messaging & go-to-market strategy | Helping startups build brands people actually remember
    • Social Media Manager | Instagram, LinkedIn & TikTok growth | Built communities of 100k+ from scratch
    • Email Marketing Specialist | Klaviyo & HubSpot | Crafting campaigns that convert subscribers into loyal customers

    Sales LinkedIn headline examples

    • Enterprise Sales Executive | SaaS & Cloud Solutions | Closed $5M+ in new business annually for 3 consecutive years
    • B2B Sales Development Representative | Cold outreach, pipeline building & CRM | Booking 30+ qualified meetings per month
    • Regional Sales Manager | Medical devices & healthcare sales | Consistently ranked in the top 10% of national sales team
    • Inside Sales Specialist | HubSpot & Salesforce | Turning prospects into long-term clients through consultative selling
    • Sales Engineer | Technical pre-sales & product demos | Bridging the gap between complex solutions & customer needs

    Supply Chain LinkedIn headline examples

    • Supply Chain Manager | End-to-end logistics, procurement & inventory optimization | Reduced operational costs by 25%
    • Demand Planning Analyst | SAP & advanced Excel | Improving forecast accuracy & minimizing stockouts for retail brands
    • Procurement Specialist | Vendor negotiation & strategic sourcing | Saved $2M+ annually through smarter supplier contracts
    • Logistics Coordinator | Freight management, customs compliance & last-mile delivery | Keeping supply chains moving smoothly
    • Supply Chain Consultant | Lean Six Sigma Certified | Helping manufacturers build faster, leaner & more resilient operations

    LinkedIn headline examples for technology professionals

    • Full-Stack Developer | React, Python & AWS | Building scalable web applications that solve real business problems
    • Cloud Architect | Azure & Google Cloud | Designing secure, cost-efficient infrastructure for enterprise organizations
    • Cybersecurity Analyst | Threat detection, SIEM & incident response | Keeping networks safe in an increasingly risky world
    • DevOps Engineer | Kubernetes, Docker & CI/CD | Automating pipelines & cutting deployment time by 60%
    • AI & Machine Learning Engineer | TensorFlow, NLP & Predictive Modeling | Turning raw data into intelligent business solutions

    LinkedIn headline examples for finance professionals

    • Investment Banking Analyst | M&A, valuation & capital markets | Advised on $500M+ in transactions across multiple sectors
    • Financial Planning & Analysis Manager | Budgeting, forecasting & business partnering | Driving smarter decisions through data
    • Risk & Compliance Officer | Basel III, AML & Regulatory Reporting | Helping financial institutions stay ahead of risk
    • Wealth Management Advisor | CFP Certified | Helping high-net-worth individuals build & protect long-term wealth
    • Corporate Finance Manager | Cash flow optimization, M&A due diligence & capital allocation | CFA charterholder

    LinkedIn headline examples for healthcare professionals

    • Registered Nurse | ICU & Critical Care Specialist | Passionate about patient advocacy & evidence-based practice
    • Healthcare Administrator | Hospital operations, budgeting & regulatory compliance | Improving patient outcomes through smarter systems
    • Physical Therapist | Sports rehabilitation & orthopedic care | Helping patients recover faster & move better
    • Clinical Data Analyst | EHR systems & healthcare analytics | Turning patient data into better care decisions
    • Pharmacist | Medication management, patient counseling & drug safety | Committed to safe & effective patient care

    LinkedIn headline examples for customer service

    • Customer Service Manager | Call center operations & team leadership | Reduced average handle time by 35% across 50+ agent teams
    • Senior Customer Support Specialist | Zendesk & Salesforce CRM | Maintaining 98% customer satisfaction score consistently
    • Customer Experience Lead | Omnichannel support & complaint resolution | Turning unhappy customers into brand loyalists
    • Technical Support Specialist | SaaS & IT Helpdesk | Solving complex problems quickly & keeping users happy
    • Customer Service Representative | Live chat, email & phone support | Bilingual English & French | Open to remote roles

    LinkedIn headline examples for human resource coordinator

    • HR coordinator | Talent acquisition, onboarding & employee relations | Helping organizations build teams that actually thrive
    • Human Resources Coordinator | HRIS, Benefits administration & compliance | Supporting 500+ employees across multiple locations
    • HR coordinator | Recruitment, payroll processing & policy implementation | SHRM-CP certified | Passionate about people-first culture
    • Junior HR coordinator | Employee engagement, training & labor law compliance | Eager to help companies grow the right way
    • Senior-level HR coordinator | Workforce planning & performance management | Bridging the gap between leadership goals & employee needs

    LinkedIn headline examples for business analyst

    • Senior Business Analyst | Process mapping, requirements gathering & stakeholder management | Delivered $1M+ in efficiency gains
    • Business Analyst | Agile & Scrum | SQL, Tableau & Power BI | Turning messy data into clear business decisions
    • IT Business Analyst | ERP Implementation & System Integration | Helping tech & business teams speak the same language
    • Junior Business Analyst | E-commerce & retail analytics | Identifying growth opportunities through data-driven insights
    • Entry-level Business Analyst | Excel, Jira & Process Improvement | CBAP in progress | Actively seeking BA roles

    Keyword-rich LinkedIn headline examples for content creators

    • Content Creator & Strategist | SEO blogging, video scripts & social media copy | Helping brands show up where their audience already hangs out
    • YouTube & Instagram Content Creator | Lifestyle & personal finance niche | 200K+ combined followers | Brand partnerships open
    • Freelance Content Creator | Long-form articles, email newsletters & lead magnets | Driving traffic & conversions for B2B SaaS brands
    • UGC Content Creator | Product reviews, reels & testimonial videos | Helping e-commerce brands build trust & boost sales
    • Content Creator & Podcast Host | Marketing, entrepreneurship & mindset | Building an engaged community one episode at a time

    LinkedIn headline examples for software engineers

    • Senior Software Engineer | Java, Microservices & Kubernetes | Building high-performance backend systems for Fintech applications
    • Frontend Software Engineer | Vue.js, TypeScript & Figma-to-Code | Creating fast, accessible & visually polished user interfaces
    • Software Engineer | Python, Django & REST APIs | 6+ years delivering clean code & scalable solutions for startups & enterprises
    • Mobile Software Engineer | iOS & Android development | Swift & Kotlin | Shipped 10+ apps with 4.8+ star ratings on app stores
    • Software Engineer | Open Source Contributor | Cloud-native development & system design | Passionate about writing code that actually lasts

    LinkedIn headline examples for freelancers

    • Freelance Copywriter | B2B & SaaS brands | Writing emails, landing pages & ad copy that convert readers into paying customers
    • Freelance Web Developer | WordPress & Shopify expert | Building fast, mobile-friendly websites for small businesses & startups
    • Freelance Social Media Manager | Instagram & LinkedIn Growth Strategist | Helping personal brands & SMBs grow without the guesswork
    • Freelance Video Editor | YouTube, Reels & corporate videos | Turning raw footage into polished content that keeps viewers watching
    • Freelance SEO Consultant | Technical SEO, link building & content strategy | Helping businesses rank higher & get found by the right target audience

    LinkedIn headline examples for entrepreneurs & founders

    • Founder & CEO at XYZ | Helping e-commerce brands scale past $1M revenue through performance marketing & retention strategies
    • Serial Entrepreneur | Built & exited 2 SaaS startups | Now investing in & advising early-stage B2B founders
    • Co-founder at XYZ | Democratizing access to mental health support through affordable & scalable digital therapy solutions
    • Entrepreneur & Product Builder | Turned a weekend side project into a 10K+ user SaaS tool | Obsessed with solving real-world problems
    • Startup Founder | EdTech & online learning space | On a mission to make quality education accessible to every corner of the world

    LinkedIn headline examples for consultants & coaches

    • Leadership Coach | Helping mid-level managers step into executive roles with confidence, clarity & a concrete game plan
    • Business Consultant | Growth strategy, market expansion & operational efficiency | Worked with 50+ SMBs across North America
    • Career Coach | Resume writing, Interview prep & LinkedIn optimization | Helped 300+ professionals land jobs they actually desired
    • Marketing Consultant | Go-to-market strategy & Demand generation | Helping B2B startups build pipelines that don’t dry up
    • Executive Coach | C-suite leadership development & organizational culture | Partnering with leaders who want to lead better, not just harder

    LinkedIn headline examples for creatives & designers

    • Brand Identity Designer | Logo, Typography & Visual Systems | Helping startups & small businesses look established from day one
    • UX & Product Designer | Figma, User Research & Prototyping | Designing experiences that feel effortless & actually make sense
    • Motion Graphics Designer | After Effects & Cinema 4D | Bringing brands to life through animation that stops the scroll
    • Creative Director | Integrated campaigns, art direction & brand strategy | Turning bold ideas into work that wins awards & drives results
    • Freelance Illustrator & Visual Artist | Editorial, packaging & digital art | Creating distinctive visuals that make brands impossible to forget

    Project Manager LinkedIn headline examples

    • PMP Certified Project Manager | Agile & Waterfall | Successfully delivered 30+ cross-functional projects on time & under budget
    • Senior IT Project Manager | Digital Transformation & ERP Implementations | Keeping complex projects on track from kickoff to closeout
    • Construction Project Manager | Commercial & residential builds | Managing multi-million dollar projects with zero compromise on quality
    • Agile Project Manager | Scrum Master Certified | Helping software teams move faster, collaborate better & ship with confidence
    • Junior Project Manager | CAPM Certified | Risk Management & Stakeholder Communication | Eager to grow & deliver real impact

    Product Manager LinkedIn headline examples

    • Senior Product Manager | SaaS & Mobile Apps | Leading cross-functional teams to ship products users actually want & keep coming back to
    • Product Manager | Agile, Roadmapping & User Research | Turned 3 underperforming features into top revenue drivers through data-led decisions
    • Technical Product Manager | API integrations & Platform Products | Bridging the gap between engineering complexity & business goals
    • Growth Product Manager | Experimentation, Funnel Optimization & Retention | Helped grow Maus from 50K to 500K in under 18 months
    • Associate Product Manager | UX-driven & Metrics-Obsessed | Building my product craft one sprint at a time | Open to APM roles

    Account Manager LinkedIn headline examples

    • Senior Account Manager | Enterprise SaaS & Technology | Managing $8M+ book of business while maintaining 96% client retention rate
    • Account Manager | Digital Advertising & Media | Building long-term client partnerships that deliver measurable ROI, quarter after quarter
    • Strategic Account Manager | Financial Services & Fintech | Upselling, cross-selling & turning single-product clients into full portfolio partners
    • Account Manager | E-commerce & retail brands | Balancing relationship building with revenue growth to keep both clients & leadership happy
    • Junior Account Manager | CRM, Client Onboarding & Renewal Management | Passionate about delivering value & growing accounts from the inside out

    Digital Marketing Manager LinkedIn headline examples

    • Digital Marketing Manager | Paid Search, SEO & Conversion Rate Optimization | Scaled organic traffic by 300% for a Series B SaaS startup
    • Digital Marketing Manager | E-commerce & DTC brands | Managing $2M+ annual ad spend across Google, Meta & TikTok with consistent ROAS
    • Digital Marketing Manager | Content Strategy, Marketing Automation & Lead Generation | Helping B2B companies fill their pipelines without burning their budgets
    • Digital Marketing Manager | Integrated Campaigns & Brand Awareness | Launched 20+ multi-channel campaigns that delivered above-target engagement
    • Digital Marketing Manager | ContentStudio, Google Analytics & CRO | Turning website visitors into qualified leads through smart strategy & constant testing

    Senior Sales Manager LinkedIn headline examples

    • Senior Sales Manager | Enterprise & Mid-market SaaS | Built & coached a 15-person team that exceeded $12M annual revenue target two years running
    • Senior Sales Manager | FMCG & Retail Distribution | Opening new markets, growing key accounts & developing sales talent from the ground up
    • Senior Sales Manager | Cybersecurity & IT Solutions | Consultative selling, deal structuring & closing complex 6-figure contracts with confidence
    • Senior Sales Manager | Healthcare & Medical Devices | Grew regional revenue by 45% in 2 years by rebuilding territory strategy from scratch
    • Senior Sales Manager | Financial Products & Wealth Management | Leading high-performance teams to deliver results while keeping clients at the center

    Executive Assistant LinkedIn headline examples

    • Executive Assistant to C-Suite | Calendar Management, Board Coordination & Confidential Correspondence | Keeping executives focused on what matters most
    • Senior Executive Assistant | Travel Logistics, Budget Oversight & Stakeholder Communication | Supporting Fortune 500 leaders with precision & discretion
    • Executive Assistant | Project Coordination, Event Planning & Office Operations | Anticipating needs before they become problems
    • Virtual Executive Assistant | Remote-first & Tech-savvy | Notion, Slack & Asana expert | Helping busy founders reclaim their time & headspace
    • Executive Assistant | Legal & Financial Services | Handling high-stakes schedules, sensitive documents & executive communications with full confidentiality

    Standout LinkedIn headline examples that turn your prospects’ heads

    Sometimes you don’t just want to be found; you want to be remembered. These headlines go beyond the standard formula and add a little personality, creativity, and punch that make people stop and actually read what you have to say.

    • I help SaaS founders stop losing customers they worked hard to win | Customer success & retention strategist
    • Ex-accountant turned Financial Educator | Making money management simple for people who hate spreadsheets
    • I write emails people actually want to open | Email copywriter for e-commerce brands tired of being ignored in the inbox
    • Recruiter who’s been on both sides of the table | Helping job seekers land offers without playing the guessing game
    • I turn complicated tech into plain English | Technical Writer & Content Strategist for SaaS & IT brands
    • Built a 6-figure freelance business from just a laptop | Now helping other freelancers do the same
    • I don’t just manage projects, I make sure they actually get done | PMP Certified | Agile & hybrid environments
    • Your brand’s next marketing hire is probably me | Performance Marketer | $10M+ in revenue generated for DTC brands
    • People don’t quit companies — they quit bad managers | Leadership coach helping organizations fix that from the top down
    • I help fresh brands become ones people actually talk about | Brand Strategist & Messaging Consultant for B2B companies

    More highly engaging LinkedIn profile headline examples

    If you’ve been scrolling through multiple LinkedIn profile examples and still haven’t found a headline that feels quite right, this list is for you. 

    The best headlines don’t just show what you do, they make people feel something, and that’s where emotional intelligence quietly does its job.

    • I’ve helped over 500+ professionals rewrite their career story | Career Coach | Resume & LinkedIn profile strategist
    • Data tells you what happened — I tell you what to do next | Business Intelligence Analyst | SQL, Power BI & Tableau
    • From $0 to $2M in 18 months | E-commerce Growth Consultant helping online brands scale without the guesswork
    • I make HR feel less like HR | People & Culture Lead focused on building workplaces where employees actually want to stay
    • Not your average finance guy | CFO & Financial Strategist helping startups make smarter money decisions before it’s too late
    • I help overwhelmed small business owners get their time back | Operations Consultant | Systems, Automation & Workflows
    • Sold 3 companies, learned a lot | Now helping other founders avoid the mistakes I made along the way
    • I speak both as a developer & human | Product Manager bridging the gap between engineering teams & business stakeholders
    • My clients don’t just rank higher on Google — they actually get more customers | SEO Strategist for service-based businesses
    • I train leaders who don’t need a title to lead | Corporate Trainer & Facilitator | Leadership, communication & team dynamics

    Proven & effective LinkedIn post headline examples

    A lot of people confuse their LinkedIn profile headline with a LinkedIn post headline. They’re actually two different things. 

    Your post headline is that opening line of your LinkedIn post, the one that either hooks people in or sends them scrolling right past you.

    Have a look at some of the examples:

    • I got rejected by 27 companies before landing my dream job. Here’s what finally changed everything.
    • We grew our startup from $0 to $1M ARR without spending a single dollar on paid ads. This is exactly how we did it.
    • I reviewed 200+ LinkedIn profiles this month. These are the 5 mistakes almost everyone is making without realizing it.
    • Unpopular opinion: Working harder is not the reason successful people get ahead. Here’s what actually is.
    • I quit my $120K corporate job to freelance full-time. Six months later, here’s the honest truth about how it’s going.
    • Nobody talks about the mental side of job hunting. After 4 months of searching, I need to share this.
    • I asked 10 hiring managers what instantly kills a candidate’s chances in an interview. Their answers were eye-opening.
    • Hot take: Your LinkedIn headline is costing you job opportunities every single day. Here’s how to fix it in 10 minutes.
    • I went from 0 to 50K followers on LinkedIn in 8 months. No hacks, no tricks! Just one simple strategy repeated consistently.
    • Three years ago, I was completely broke and unemployed. Today, I run a 7-figure consulting business. Here’s the turning point nobody talks about.

    Value-driven & impactful LinkedIn article headline examples

    LinkedIn articles are a fantastic way to showcase your expertise and build real credibility in your space. But even the best-written article goes unread if the headline doesn’t give people a good enough reason to click in the first place.

    • The career advice nobody gave me in my 20s: Why it would have changed everything
    • Why most marketing strategies fail in the first 90 days & what smart teams do differently
    • I’ve interviewed over 1,000 candidates in my career: Here’s what separates the good from the truly great
    • The leadership mistake almost every first-time manager makes & how to avoid it before it’s too late
    • What 10 years in sales taught me about people, rejection & building relationships that actually last
    • The real reason your LinkedIn profile isn’t getting any recruiter attention — and it’s not what you think
    • 5 financial decisions I wish I had made in my 30s: An honest reflection for anyone still in that chapter
    • Why emotional intelligence will matter more than technical skills in the workplace over the next five years
    • How we rebuilt our company culture from scratch after losing 40% of our team in a single quarter
    • The uncomfortable truth about work-life balance that most business leaders are still refusing to acknowledge

    Different types of LinkedIn headlines

    Not every headline needs to follow the same formula. In fact, the best ones usually don’t. Depending on your personality, industry, and goal, there are several different styles you can lean into to make your profile stand out.

    Headline typeWhat it doesExample
    The direct headlineGets straight to the point (no fluff, no clever wordplay). Just clearly states who you are, what you do, and who you help. Works great for people who want to be found fast.Senior UX Designer | Figma & User Research | Designing digital products that are simple to use & hard to put down
    The authentic headlineFeels personal and real. It lets your personality come through and makes you feel like an actual human being rather than a walking job description.Small-town kid who figured out digital marketing & helped brands grow | Still learning every single day
    The humorous headlineUses a light touch of wit to grab attention and make people smile. Works best in creative, marketing, or personal branding spaces where personality is valued.Professional overthinker turned UX researcher | Turning “what if” into “what works” for product teams
    The benefit-focused headlineLeads with the outcome you deliver rather than your title. Speaks directly to what your target audience actually cares about most.I help B2B founders generate consistent leads without cold calling or burning out their sales team | Open to work
    The “humble brag” headlineWeaves in an impressive achievement or credential naturally without sounding like you’re showing off. Builds instant credibility in a subtle way.Forbes 30 under 30 | Helping startups build marketing engines that drive revenue while they sleep

    How to write a compelling LinkedIn headline that recruiters love

    Writing a great LinkedIn headline isn’t about being the most creative person in the room; it’s about being the clearest. These simple but useful tips will help you craft a headline that gets you noticed by the right people at the right time.

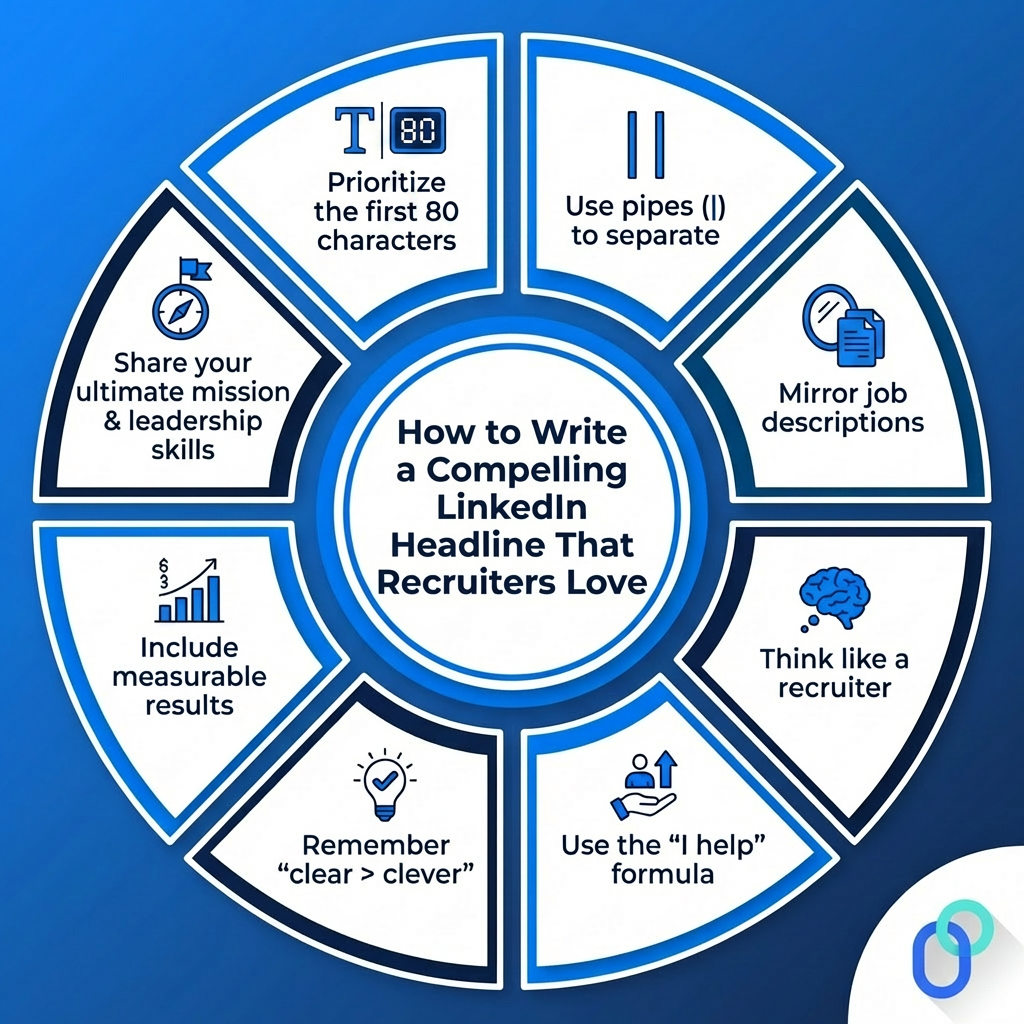
    How to write a compelling LinkedIn headline that recruiters love

    Check out the practical tips below for crafting a creative & unique LinkedIn headline:

    Tip #01: Prioritize the first 80 characters

    LinkedIn truncates your headline on mobile and search results, so make sure your most important information (your title and top skill) appears right at the beginning before anything gets cut off.

    Tip #02: Use pipes (|) to separate

    Pipes are the cleanest and most widely used way to break up different parts of your headline. They make it easy to scan quickly and give your headline a neat, organized look without taking up extra characters.

    Tip #03: Mirror job descriptions

    Pay close attention to the exact words used in job postings you’re targeting and fix those same terms into your headline. LinkedIn’s algorithm rewards exact keyword matches, so speaking the same language as recruiters puts you higher in search results.

    Tip #04: Think like a recruiter

    Ask yourself: If you were hiring for your own role, what would you type into the search bar? Build your headline around that answer, focusing on the title, skills, and industry terms a recruiter would actually search for.

    Tip #05: Use the “I help” formula

    The “I help [target audience] achieve [specific outcome]” format is one of the most effective ways to communicate your value instantly. It’s simple, human, and tells people exactly what’s in it for them.

    Tip #06: Remember “clear > clever”

    A witty headline might get a smile, but a clear one gets you hired. Always make sure a stranger can understand exactly what you do within three seconds of reading your headline (clarity wins every single time).

    Tip #07: Include measurable results

    Numbers instantly make your headline more credible and specific. Instead of saying “experienced sales professional,” try “Sales Manager | Closed $3M+ in Annual Deals.” Concrete results give recruiters a solid reason to click.

    Tip #08: Share your ultimate mission & leadership skills

    If you’re in a senior or leadership role, give people a glimpse of what drives you beyond the day-to-day. A headline that reflects your bigger mission and leadership approach shows depth and attracts opportunities that align with who you actually are.

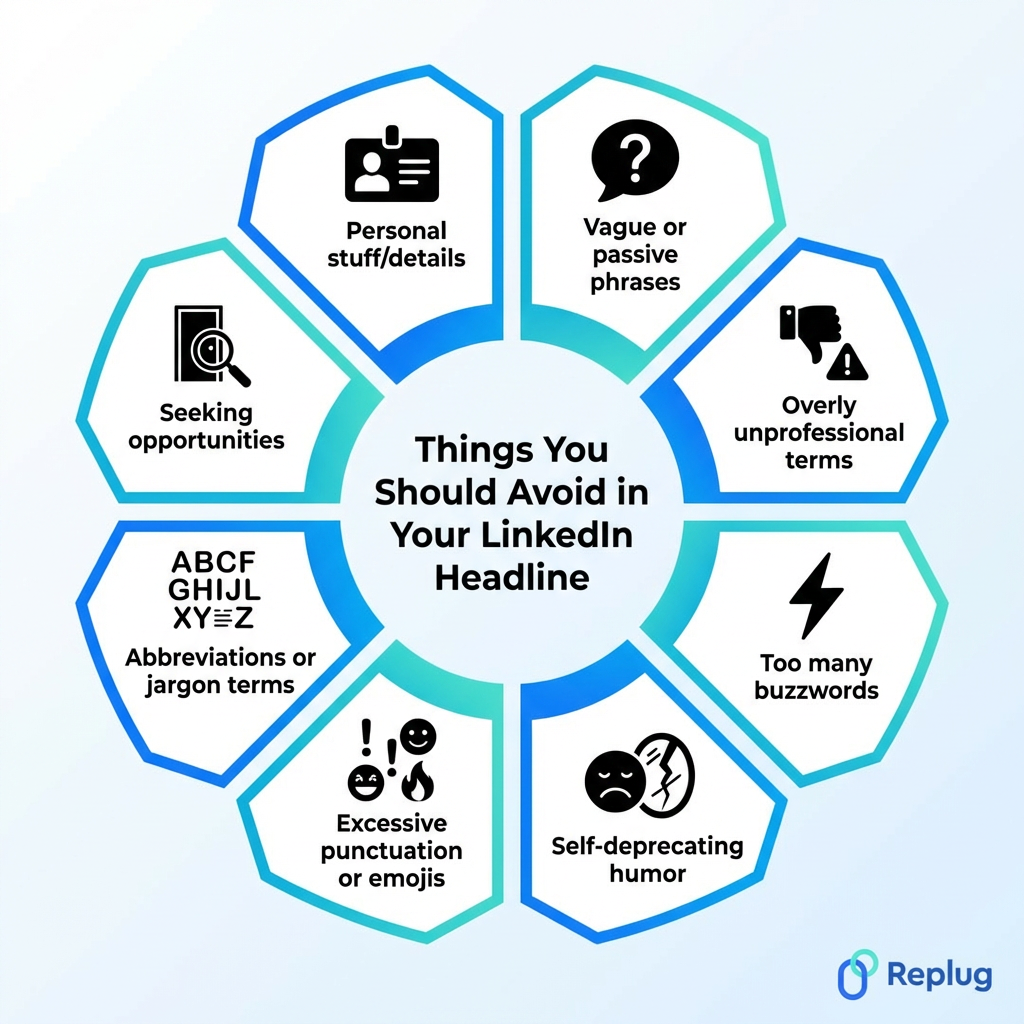
    Things you should avoid in your LinkedIn headline

    Your LinkedIn headline can work really hard for you, but only if you’re not accidentally sabotaging it. Here are some of the most common mistakes people make that quietly hurt their chances of getting noticed by the intended people.

    Things you should avoid in your LinkedIn headline

    Personal stuff/details

    Your LinkedIn profile headline is professional real estate. Keep your personal life, beliefs, or unrelated hobbies out of it. Things like relationship status, political views, or personal quotes take up valuable space that could be used to showcase your actual skills and value.

    Vague or passive phrases

    Phrases like “passionate professional” or “results-oriented individual” tell recruiters absolutely nothing specific about you. Be direct and concrete! If you can’t picture exactly what someone does from reading your headline, it needs to be rewritten immediately.

    Overly unprofessional terms

    Words like “ninja,” “guru,” “wizard,” or “rockstar” might feel fun, but most recruiters don’t search for them, and they can actually make your profile look less credible and professional. Stick to real, recognized industry titles that people actually use when hiring.

    Too many buzzwords

    Stacking your headline with trendy terms like “innovative,” “dynamic,” “synergistic,” or “thought leader” makes it feel hollow and hard to read. Pick words that are specific and meaningful rather than ones that sound impressive but say very little.

    Self-deprecating humor

    Jokes like “just a humble marketer” or “trying to figure it all out on my own” might seem relatable, but they quietly undermine your credibility. Your headline should build confidence in what you offer, not make people question whether you’re the right person for the job.

    Excessive punctuation or emojis

    One or two emojis used strategically can add personality, but going overboard makes your headline look cluttered and unprofessional. The same goes for excessive exclamation marks or ellipses. Keep it clean and easy to read at a glance.

    Abbreviations or jargon terms

    Unless your abbreviation is a universally recognized credential like CPA or PMP, avoid shortening things without context. Industry-specific jargon or internal company terms can confuse recruiters outside your niche and hurt your searchability.

    Seeking opportunities

    Phrases like “seeking new opportunities” or “looking for my next role” take up precious headline space without adding any real value. Instead, use that space to showcase your skills and let your “Open to Work” setting do the job of signaling your availability.

    Optimize your LinkedIn profile using Replug!

    Once your headline is sorted, the next step is making sure your overall LinkedIn presence is just as strong. That’s where Replug comes in. 

    Replug is a powerful link shortener and bio link tool that helps you shorten, manage, and track your branded links from a single dashboard. But what most people don’t know is that it also offers a completely free LinkedIn post generator tool.

    Simply tell it what you want to post about, and it comes up with a well-structured, engaging LinkedIn post within seconds. This saves you the time and headache of staring at a blank screen. 

    Whether you’re building your personal brand, growing your network, or trying to stay consistently active on LinkedIn, Replug makes the whole process a lot smoother and smarter without needing to be a professional writer.

    Summing up

    Your LinkedIn headline is one of the smallest things on your profile, but it carries some of the biggest weight. It’s:

    • The first thing recruiters see, 
    • The first impression you make on potential clients, and 
    • The biggest factor in whether someone clicks on your profile or keeps scrolling.

    No matter if you’re a student just starting out, a seasoned professional eyeing your next big move, or someone switching careers entirely, the right headline can genuinely change the trajectory of your opportunities. 

    Use the examples, tips, and templates we’ve covered throughout this post as your starting point, then make it your own. 

    Always remember, a great LinkedIn headline doesn’t just describe you, it works for you around the clock.

    Frequently asked questions

    What is a good headline for LinkedIn?

    A good LinkedIn headline clearly states who you are, what you do, and the value you bring, all in one quick read. It combines your professional title, a key skill or two, and ideally a result or unique value proposition. 

    Think less “Marketing Professional” and more “Digital Marketing Manager | SEO & Paid Ads | Helping B2B brands generate consistent leads without blowing their budget.”

    How to brainstorm your LinkedIn profile headline?

    Start by asking yourself three simple questions:

    – What do I do, 
    – Who do I help, and 
    – What result do I deliver? 

    Then look at job postings in your target field and note the keywords that keep showing up. Check out profiles of people in similar roles for inspiration, jot down a few different versions, and pick the one that feels most like you while still being clear and searchable.

    What is the ideal LinkedIn headline length?

    LinkedIn gives you 220 characters for your headline, and you should aim to use most of them. Studies show that longer, keyword-rich headlines tend to perform better in search results. 

    That said, make sure the most important information appears within the first 60-80 characters since that’s what shows up on mobile screens and in search previews before getting cut off.

    How do I edit my LinkedIn profile headline?

    It’s pretty straightforward:

    1. Log in to your LinkedIn account.
    2. Go to your profile page.
    3. Tap the pencil/edit icon near your profile photo and name. 
    4. A pop-up window will appear where you’ll see the “Headline” field. Just click on it.
    5. Type your new headline, and tap on “Save”.

    The changes go live on your profile immediately.

    How often should I update my LinkedIn headline?

    A good rule of thumb is to revisit your headline every 3-6 months or whenever something significant changes in your career. 

    If you’ve landed a new role, gained a valuable certification, shifted your career focus, or are actively job hunting, that’s your cue to update it. 

    Keeping it current ensures your profile always reflects where you are and where you’re headed.

    How does LinkedIn’s search algorithm use your profile headline?

    LinkedIn’s search algorithm treats your headline as one of the highest-weighted fields when ranking profiles in search results. 

    When a recruiter or potential client types in a keyword, LinkedIn scans your headline first before looking at other sections of your profile. 

    This means having the right keywords in your headline directly determines whether your profile shows up in relevant searches or gets buried pages deep, where nobody will ever find it.

    Why your LinkedIn headline is much more than a simple job title?

    Your job title tells people what you are, whereas your headline tells people why they should care. 

    It appears in search results, connection requests, comments, and “People Also Viewed” sections across LinkedIn. This means it’s constantly representing you even when you’re not actively on the platform. 

    A well-crafted headline communicates your value, attracts the right opportunities, and positions you as someone worth clicking on rather than just another name in a long list of results.

    What is the best LinkedIn headline generator online?

    There are several solid options out there. LinkedRadar is a great starting point. It’s quick, easy to use, and produces clean, professional results. 

    Other popular tools include Copy.ai, Jasper, and Waalaxy, which can all help you brainstorm and refine headline ideas. 

    That said, always treat generated headlines as a first draft. Personalize them with your actual skills, results, and personality before putting them on your profile.

    Provide a top-notch MBA candidate LinkedIn headline example?

    Here are a few strong options depending on where you are in your MBA journey:

    – MBA candidate at XYZ University | Concentrating in strategy & finance | Former operations manager, leveling up for leadership roles
    – MBA student | Entrepreneurship & Marketing focus | Startup enthusiast | Actively seeking summer internship opportunities
    – Incoming MBA candidate at XYZ business school | Background in investment banking | Passionate about private equity & corporate strategy
    – Full-time MBA candidate | Specializing in data-driven marketing & consumer behavior | Open to brand management & growth roles
    – MBA candidate | Ex-software engineer transitioning into product strategy | Bridging technology & business to build products that actually matter

  • How to add resume to LinkedIn: 4 quick methods explained (step-by-step)

    How to add resume to LinkedIn: 4 quick methods explained (step-by-step)

    If you’re job hunting in 2026, LinkedIn isn’t an optional choice; it’s essential. 

    With over 1.2 billion registered users and 310 million actively using the platform every month, it’s where recruiters and hiring managers actually go to find candidates. 

    And here’s the thing: every minute, six people get hired through LinkedIn. That’s not a small number!

    But having a polished profile isn’t always enough. Uploading your resume directly to LinkedIn gives you an extra edge. It makes applying faster, helps recruiters see your full experience at a glance, and keeps everything in one place.

    The good news?

    It takes less than five minutes, and there are actually four different ways to do it depending on what you need. 

    Not sure which one to use or where to even start? That’s exactly what we’ll cover. But first, let’s talk about why adding your resume to LinkedIn is worth it in the first place.

    Why add your resume to LinkedIn?

    Adding your resume to LinkedIn does more than just store your work history in one place. It actively works in your favor behind the scenes. 

    Whether you’re actively job hunting or just open to opportunities, having your resume on LinkedIn puts you in a stronger position from day one.

    Boost visibility to recruiters

    LinkedIn’s algorithm surfaces your profile to recruiters based on the skills and experience mentioned in your resume. The more complete your profile, the higher you rank in recruiter searches, which means more eyes on your candidacy without any extra effort from you.

    Streamline job applications

    Many job listings on LinkedIn let you apply with a single click using your uploaded resume. This cuts out the hassle of digging through folders every time you apply, making the whole process faster, more consistent, and more efficient.

    Provide detailed information

    Your LinkedIn profile has various character limits and a fixed structure. However, your resume can include specifics (exact metrics, project details, certifications) that give recruiters a fuller picture of what you bring to the table.

    Enhanced networking and opportunities

    When connections or recruiters visit your profile, having a resume available makes it easy for them to share your details with the right people. It quietly keeps the door open for opportunities even when you’re not actively looking.

    Personalized job recommendations

    LinkedIn uses the data from your resume to fine-tune the job recommendations it shows you. The more accurate your resume, the more relevant the suggestions will be. This ultimately saves you time and helps you discover roles you might have otherwise missed.

    How to upload resume to LinkedIn: Check out the various methods!

    There are a few different ways to add your resume to LinkedIn, and the right one depends on how you plan to use it. Some methods are better for job applications, while others make your resume visible directly on your profile. 

    Let’s walk through each one so you can pick what works best for you.

    Method #01: Add a resume to LinkedIn via “Job Application Settings”

    • Step #01: Go to your LinkedIn profile

    Open LinkedIn on your browser or app and log in to your account to land on your homepage.

    Go to your LinkedIn profile
    • Step #02: Click the “Jobs” icon

    Look at the top navigation bar and click the “Jobs” icon. It looks like a small briefcase. This takes you to LinkedIn’s job search section.

    Jobs icon on LinkedIn
    • Step #03: Click “Preferences”

    From the page opened, find and click on “Preferences”. It is usually located on the left-hand side or near the top of the page. This opens your job-related settings.

    LinkedIn profile Preferences option
    • Step #04: Click “Resumes and application data”

    Inside Preferences, select “Resumes and application data” under the My qualifications section.  This is where LinkedIn manages the resume tied to your Easy Apply applications.

    Resumes and application data option in LinkedIn
    • Step #05: Click the “Upload resume” button

    Hit the “Upload resume” button and select your resume file from your device.

    Upload resume button in LinkedIn

    LinkedIn supports PDF and Word formats. PDF is recommended to keep your formatting intact.

    PDF resume uploaded on LinkedIn
    • Step #06: Click the “Done” button

    Once your file uploads successfully, click “Done” to save it. Your resume is now stored and ready to auto-fill your future Easy Apply job applications.

    Resume uploaded Done button on LinkedIn

    Method #02: Add your resume to LinkedIn via “Easy Apply”

    • Step #01: Click “Easy Apply” on a job posting

    Browse LinkedIn’s job listings and open a role that interests you. If you see an “Easy Apply” button (rather than “Apply”), click it to begin the in-platform application process.

    Easy Apply on a job posting in LinkedIn
    • Step #02: Fill in the requested information

    A form will pop up asking for basic details like your email address, phone number, and work experience. Fill these in accurately, since this info accompanies your resume when it reaches the recruiter. Then, click on “Next”.

    Fill in the requested information on LinkedIn
    • Step #03: Click “Upload resume”

    When you reach the resume section, click the “Upload Resume” button and select your file from your device.

    Apply to a job Upload resume button on LinkedIn

    Once uploaded, review everything and hit “Submit application” to send it off.

    Submit application button in LinkedIn

    Method #03: Add resume to LinkedIn profile via “Settings & Privacy”

    • Step #01: Click the “Me” icon

    Head to your LinkedIn homepage and click the “Me” icon at the top-right corner of the navigation bar. It’s just below your profile photo. This opens a small dropdown menu.

    Me icon in LinkedIn
    • Step #02: Select “Settings & Privacy”

    From the dropdown menu, click on “Settings & Privacy”. This takes you to the central hub where you can manage all your LinkedIn account preferences.

    Settings & Privacy option in LinkedIn
    • Step #03: Click “Data privacy”

    On the left-hand sidebar, locate and click on “Data privacy”. This section controls how your personal data (including your resume) is stored and used on LinkedIn.

    Data privacy option in LinkedIn
    • Step #04: Click “Resumes and job applications data”

    Scroll through the data privacy options and click on “Resumes and job applications data” under Job seeking preferences. This is where LinkedIn keeps the resume linked to your Easy Apply submissions.

    Resumes and job applications data option in LinkedIn
    • Step #05: Click the “Upload resume” button

    Click the “Upload resume” button and choose your resume file from your device.

    Upload resume button under Resumes and application data in LinkedIn

    Once it’s uploaded, LinkedIn saves it automatically. No extra steps needed!

    PDF resume uploaded under Resumes and application data in LinkedIn

    Method #04: Add resume to LinkedIn profile page via “Featured” section

    • Step #01: Go to your profile page

    Click on your profile photo or your name anywhere on LinkedIn to navigate directly to your profile page.

    Go to your LinkedIn profile page
    • Step #02: Click “Add section”

    You’ll find the “Add section” button just below your name and headline. Click it to expand a menu with various profile section options.

    Add section option in LinkedIn profile section
    • Step #03: Select “Recommended”

    From the pop-up box, click on “Recommended”. This expands a list of suggested sections you can add to strengthen your profile.

    Recommended option under Add to profile section on LinkedIn
    • Step #04: Click “Add featured”

    Inside the Recommended options, select “Add featured”. This creates a Featured section on your profile where you can showcase documents, posts, and links.

    Add featured option under Add to profile section on LinkedIn
    • Step #05: Click the “+” icon

    Now, from the opened page, click the “+” icon at the top right of the Featured section.

    The “+” icon next to Featured section on LinkedIn
    • Step #06: Click “Add a document”

    From the options that appear, select “Add a document”. This is the option that lets you upload a file (in this case, your resume) directly to your profile.

    Add a document option under Featured section on LinkedIn
    • Step #07: Upload your resume

    Select your resume file from your device and upload it. You’ll see a preview once it is successfully uploaded.

    Upload your resume under Add media section on LinkedIn
    • Step #08: Add details

    Give your document a clear title like “My Resume” or “Adam Hill — Resume”, and add a brief description if you’d like. This helps visitors immediately understand what the document is.

    Add details under Add media section on LinkedIn
    • Step #09: Click “Save”

    Hit the “Save” button to publish it. Your resume will now appear in the Featured section of your profile, visible to anyone who visits your page.

    Save button under Add media section on LinkedIn

    What to include in your resume before adding on LinkedIn

    Before you upload your resume to LinkedIn, it’s worth taking a few minutes to make sure it’s actually working in your favor. 

    A polished, well-structured resume doesn’t just impress recruiters; it also aligns better with LinkedIn’s algorithm and the applicant tracking systems (ATS) many companies use.

    Quantifiable achievements

    Don’t just list responsibilities, show real results. Use specific numbers wherever possible, like “increased sales by 35%” or “managed a team of 15,” to give recruiters a concrete sense of the impact you’ve made.

    Targeted keywords

    Review the job descriptions you’re targeting and naturally plug in the relevant skills and terms they use. This helps your resume get past ATS filters and signals to recruiters that you’re a strong match for the role.

    Detailed experience

    For each role, include your job title, company name, employment dates, and a few bullet points highlighting your key contributions. The more relevant and specific your experience section, the easier it is for recruiters to assess your fit quickly.

    Updated education

    Make sure your education section reflects your most recent qualifications, including any certifications, online courses, or training you’ve completed recently. Outdated or incomplete education details can leave gaps that work against you.

    Single-column layout

    Stick to a clean, single-column format for your resume when uploading to LinkedIn. Multi-column resumes often break or become unreadable when parsed by ATS software, which can cause key information to be missed entirely.

    Professional summary

    Add a 2-3 line summary at the top of your resume that captures who you are, what you do, and what you’re looking for. Think of it as your elevator pitch. It sets the tone before a recruiter even reads the rest.

    Hyperlinked contact info

    Make it easy for recruiters to reach or research you by including a clickable email address, LinkedIn profile URL, and any relevant portfolio or website links. It’s a small touch that makes a noticeable professional impression.

    Best practices for uploading your resume on LinkedIn

    Uploading your resume is just the first step, but how you upload it matters just as much. Following a few simple key practices ensures your resume reaches the right people, looks professional, and works effectively, no matter if you’re actively applying or just staying open to opportunities.

    Use the “Featured” section for high visibility

    If you want your resume to be publicly visible to recruiters and profile visitors, LinkedIn’s “Featured” section is your best bet. It puts your resume front and center on your profile, making it easy for anyone to find and download without you having to send it manually.

    Use the “Jobs” section for private applications

    If you’d rather keep your resume private and only share it when applying, upload it through the “Jobs” section instead. This way, your resume is only seen by recruiters of the specific roles you apply to, giving you more control over who accesses it.

    Use PDF format (recommended)

    Always upload your resume as a PDF unless a job posting specifically requests a Word document. PDFs preserve your formatting across all devices and software, ensuring your resume looks exactly the way you intended when a recruiter opens it.

    Remove personal contact information

    Since your LinkedIn profile already has your contact details, there’s no need to include your home address or personal phone number on a publicly visible resume. Removing this information also protects your privacy, especially if your resume is accessible to all profile visitors.

    Create tailored versions

    Avoid using a one-size-fits-all resume for every application. Keep a few targeted versions on hand (each tweaked to match a specific role or industry) and upload the most relevant one depending on the job you’re applying for.

    Use a professional title

    Name your resume file clearly and professionally before uploading, something like “Adam_Hill_Marketing_Resume.pdf” rather than “Resume_Final_v3.pdf.” It’s a small detail, but it leaves a tidy, professional impression on anyone who downloads it.

    Create a winning post for your resume with Replug’s free LinkedIn post generator

    Once your resume is on LinkedIn, why not let people know about it? 

    Replug is an all-in-one link management platform packed with powerful features, and one of its standout free tools is the LinkedIn Post Generator

    Instead of staring at a blank screen trying to craft the perfect post, Replug’s reliable tool does the job for you. Just enter a few details, and it generates a professional, engaging LinkedIn post within seconds. 

    Whether you’re announcing a new role, sharing your expertise, or simply putting your resume out there, Replug helps you make a strong first impression (no writing experience needed).

    👉 Try Replug’s LinkedIn Post Generator and get your resume the attention it deserves!

    Optimize your LinkedIn profile with Replug today!

    You’ve successfully uploaded your resume, polished your profile, and crafted the perfect post. Now it’s time to make sure every link you share works harder for you. 

    Replug’s efficient URL shortener lets you transform long, messy links into clean, branded short links that look professional on your LinkedIn profile. 

    No matter if it’s a link to your portfolio, personal website, or a specific job application, short links are far more clickable and visually appealing.

    Replug Branded Short Links CTA
    Maximize marketing ROI
    by transforming ordinary URLs into
    branded short links that convert.
    Try Replug for free

    Plus, Replug lets you track clicks and engagement, so you can actually see who’s interacting with your links. It’s a simple but effective way to present yourself more professionally and understand your audience better. 

    Start using Replug today and give your LinkedIn profile the professional edge it deserves!

    Frequently asked questions

    How do I get my uploaded resume on LinkedIn?

    To find or manage your uploaded resume on LinkedIn, go to the “Jobs” tab, click “Preferences,” and select “Resumes and application data” to view, upload, or download your files.

    How do I edit a resume in LinkedIn?

    LinkedIn doesn’t have a built-in resume editor. To make changes, update your resume file on your device first, then re-upload it through whichever method you originally used. Your new file will simply replace the old one.

    How do I remove my resume from LinkedIn profile?

    To remove a resume from your LinkedIn profile, go to the “Jobs” tab and select “Application Settings” in the left sidebar. Then, click the three dots next to the resume you want to remove, and select “Delete”. Alternatively, navigate to Settings & Privacy → Data Privacy → Job Application Settings to manage and delete uploaded resumes.

    Why can’t I upload my resume on LinkedIn?

    This is usually down to one of three things:

    – Your file size exceeds LinkedIn’s 5MB limit, 
    – The file format isn’t supported, or 
    – You’re experiencing a temporary browser glitch

    Try converting your resume to PDF, clearing your browser cache, or switching to a different browser and uploading again.

    How can I upload my resume to LinkedIn without letting my entire network know?

    Upload your resume through “Job Application Settings” or the “Settings & Privacy” route instead of the “Featured” section. These methods store your resume privately, so it’s only shared when you apply for a job. Your network won’t receive any notification about it.

    What is the difference between a resume and a LinkedIn profile?

    A resume is a tailored, concise document (usually one or two pages) customized for a specific job application. Your LinkedIn profile, on the other hand, is a living, comprehensive snapshot of your entire professional journey, visible to anyone on the platform. Think of your profile as the expanded version and your resume as the focused pitch.

    How to attach my resume to a LinkedIn message?

    Open a LinkedIn message conversation, click the attachment icon (paperclip) at the bottom of the message box, and select your resume file from your device. Keep in mind this shares the file directly with that person, so make sure your resume is updated before sending.

    What is the ideal format to upload a resume on LinkedIn?

    PDF is the way to go. It keeps your formatting clean and consistent regardless of what device or software the recruiter uses to open it. Word documents can sometimes shift in layout depending on the version of software being used, so PDF is simply the safer and more professional choice.

    How to add resume to LinkedIn profile for recruiters?

    The best way to make your resume visible to recruiters is by uploading it to the “Featured” section of your profile. This makes it publicly accessible to anyone who visits your page. Pair this with an optimized profile (strong headline, relevant skills, and a solid summary) to make sure recruiters can actually find you in searches.

    How to optimize the visibility and usage of your uploaded resume on LinkedIn?

    Start by making sure your resume is keyword-rich and aligned with the roles you’re targeting. Upload it to the “Featured” section for public visibility, keep it updated every few months, and make sure your LinkedIn profile itself complements your resume rather than just repeating it word for word. Also, turn on the “Open to Work” feature to signal recruiters that you’re available. It works hand in hand with having your resume on your profile.

  • How to make a Facebook post shareable on mobile & desktop (within minutes)

    How to make a Facebook post shareable on mobile & desktop (within minutes)

    You’ve probably tapped “Share” on a Facebook post, only to realize later that nobody outside your friends could actually see it. Frustrating, right? You’re not alone!

    Facebook has over 3 billion monthly active users, and yet so many people still miss out on reach simply because their sharing settings aren’t configured correctly. 

    Whether you’re promoting a small business, spreading awareness for a cause, or just sharing something your whole neighborhood must see, making your posts publicly shareable is a game-changer. And it literally takes minutes to fix.

    The best part? It works the same no matter if you’re on your smartphone or PC. 

    But before we walk through the steps, it helps to understand why some posts won’t share in the first place, and that comes down to one thing: Facebook’s privacy settings.

    Getting a know-how of Facebook’s privacy settings

    Before you start changing anything, it’s worth knowing how Facebook’s privacy settings actually work. Think of them as a control panel for who gets to see your stuff. 

    Every post you make has an audience selector. A little dropdown that lets you choose between:

    • Public
    • Friends
    • Friends except…
    • Specific friends
    • Only me, or 
    • Close friends

    If that’s set to anything other than “Public,” people outside your friends list won’t be able to share your post. Simple as that!

    Once you know where to look and what to change, the whole thing becomes super easy to manage (on both mobile and desktop).

    Facebook’s post shareability cheat sheet

    Not every post gets the same reach, and a lot of that comes down to how you set it up in the first place. Here’s a quick cheat sheet to help you get it right every time:

    FactorWhat works best
    Privacy settingSet to “Public” so anyone can view and share your post beyond just your friends list.
    Optimal timingPost between 12 PM-8 PM on weekdays. Tuesday & Wednesday tend to see the highest engagement.
    Visual standardsUse bright, clear images or short videos. Avoid blurry or heavily watermarked visuals.
    Content formatVideo and image posts get shared far more than plain text. Reels are currently getting the most organic reach.
    Content lengthKeep captions between 40-80 characters for feed posts. Short and punchy wins over long and wordy.
    Engagement triggersAsk a question, use a clear call-to-action like “Tag someone who needs this,” or tap into trending topics.

    Quite simple to follow, right? Now, let’s get into the actual steps to make your posts shareable.

    How to make a new Facebook post shareable

    When you’re creating a brand new post on Facebook, making it shareable takes just a few quick taps or clicks before you hit publish. Here’s exactly how to do it, whether you’re on your phone or desktop.

    On mobile (Android & iOS):

    • Step #01: Open Facebook and tap “What’s on your mind?”

    Tap that status box at the top of your feed. This is where you’ll create your new post.

    What's on your mind box inside Facebook app
    • Step #02: Add your content

    Type your caption, upload a photo or video, or add whatever you want to share. Get it looking the way you want before tapping “Done”.

    Add content inside status box on Facebook app
    • Step #03: Tap the audience selector button

    In the bottom left-hand corner, you’ll see a small button that shows your current audience. It might say “Friends,” “Public,” or something else. Tap it!

    Audience selector button in Facebook app
    • Step #04: Select the “Public” option

    From the page that appears, choose “Public”. This means anyone on or off Facebook can see and share your post. Then, tap on “Done”.

    Set post audience to Public in Facebook app
    • Step #05: Tap the “Post” button

    That’s it! Your post is now fully shareable by anyone who comes across it.

    Post button inside the Facebook app

    On desktop:

    • Step #01: Click “What’s on your mind?” on your homepage

    You’ll find this at the top of your News Feed or on your profile page. Click it to open the post composer.

    What's on your mind box inside Facebook web app
    • Step #02: Add your content

    Write your caption or drop in your media, whatever your post is about. Take a second to make sure everything looks good.

    Add content inside status box on Facebook web app
    • Step #03: Click the audience selector

    Right below your name, there’s a dropdown button showing who can currently see your post. Click on it.

    Audience selector option in Facebook web app
    • Step #04: Choose the “Public” option

    Select “Public” from the list of options. This opens your post up to everyone, not just your Facebook friends. Click on “Done”.

    Set post audience to Public in Facebook web app
    • Step #05: Click “Post”

    Hit that blue “Post” button, and you’re all set. Your new post is live and fully shareable.

    Post button inside the Facebook web app

    That’s genuinely all it takes! Once it’s set to Public, anyone who sees your post can hit Share and spread it further. No extra steps needed.

    How to make an existing Facebook post shareable

    Already posted something but forgot to make it shareable? 

    No worries, you can go back and change the privacy setting on any existing post in just a few taps or clicks. Here’s how to make a Facebook post shareable after posting:

    On mobile (Android & iOS):

    • Step #01: Go to your FB profile and scroll down to the post you want to edit.
    • Step #02: Tap the three dots (⋯) in the top right corner of the post. This opens a quick options menu for that specific post.
    • Step #03: Tap “Edit Privacy”. You’ll see this option right there in the menu.
    • Step #04: Select “Public” and tap on the “Save” button. That’s it, your post is now shareable.

    On desktop:

    • Step #01: Click your name or profile picture to go to your Facebook profile, then scroll to find the post.
    • Step #02: Click the three dots (⋯) in the top right corner of the post. A small dropdown menu will appear with several options.
    • Step #03: Click “Edit audience” from the dropdown menu.
    • Step #04: Pick “Public” from the audience options and click “Done”. Your post is now open for everyone to share.

    Quick, easy, and done in under a minute. And what’s the best part? No need to delete and repost anything.

    How to make a Facebook post shareable without making it “Public”

    Not comfortable making your post fully public? That’s fair. 

    Facebook actually lets you share posts with a specific group of people without opening them up to the entire internet.

    On mobile (Android & iOS):

    • Step #01: Open Facebook and tap your profile picture to head to your profile.
    • Step #02: Find the post you want to adjust and tap the three dots (⋯) in the top right corner of it.
    • Step #03: Tap “Edit Privacy” from the menu that pops up.
    • Step #04: Choose “Friends”, “Specific friends”, or “Close friends”. This lets your friends’ connections see and share your post, without it being fully public.
    • Step #05: Tap “Save” to save your changes.

    On desktop:

    • Step #01: Click your profile picture or name to go to your Facebook profile.
    • Step #02: Locate the post you want to change, then click the three dots (⋯) in the top right corner of the post.
    • Step #03: Click “Edit audience” from the dropdown menu.
    • Step #04: Select the option “Friends” or “Custom”. A solid middle ground that expands your reach beyond just your friend list without going fully public.
    • Step #05: Click “Done” and you’re all set.

    It’s not as wide a reach as “Public,” but it’s a great option if you want a bit more control over who’s seeing and sharing your content.

    How to make a Facebook post shareable in a private group

    If you’re posting inside a private Facebook group, the sharing rules work a little differently. Group admins control whether members can share posts outside the group or not. Here’s how to enable it.

    For Group Admins (mobile & desktop):

    • Step #01: Open Facebook and tap the profile menu icon (≡). 
    • Step #02: Then go to “Groups”“Your groups” and select the group you manage.
    • Step #03: Tap the shield icon in the top right-hand corner.
    • Step #04: Scroll down and find the “Group settings” option under the “Settings” section.
    • Step #05: Toggle the “Post Sharing” on to allow members to share posts from the group to their own profiles or other places on Facebook.
    • Step #06: Tap “Save” to confirm your changes.

    👉 Keep in mind that if you’re just a member (not an admin), you won’t have the ability to change this setting. You’d need to reach out to the group admin and ask them to enable post sharing for the group.

    How to make a post shareable on Facebook Marketplace

    Are you the one selling something on Facebook Marketplace? 

    Making your listing shareable can get it in front of way more potential buyers without spending a single dollar on ads. 

    Here’s how to do it:

    • Step #01: Open Facebook and tap the “Marketplace” icon. It looks like a little storefront.
    • Step #02: Tap “Your Account” or your profile icon, then go to “Your Listings” to find the listing you want to share.
    • Step #03: Tap on the listing to open it, then tap the “Share” button. It usually appears as an arrow icon at the bottom or top of the listing.
    • Step #04: Choose “Share to your feed”, “Share to a group”, or “Send in Messenger” to push your listing out to a wider audience.
    • Step #05: Add a quick caption if you want, then tap “Post” to share it.

    How to make a Facebook business page post shareable

    If you’re running a Facebook business page, making your posts shareable is a must. It’s one of the easiest ways to grow your reach organically without paying for ads. 

    Here’s how to set it up:

    • Step #01: Open Facebook and tap the menu icon, then select your “Business Page” from the “Pages” section.
    • Step #02: Tap “Page Settings”. You’ll find it by tapping the three dots or the settings icon on your page.
    • Step #03: Scroll down to “Privacy” settings and make sure your page visibility is set to “Public” so anyone can view and share your posts.
    • Step #04: Head back to your page, find the post you want to make shareable, and tap the three dots (⋯) in the top right corner of the post.
    • Step #05: Tap “Edit audience” and set it to “Public,” then tap “Done” to save.

    Why is it important to make your Facebook post shareable?

    Making your Facebook post shareable isn’t just a nice-to-have. It’s one of the simplest ways to multiply your reach without spending a dime. When people can share your content freely, it works for you around the clock.

    Why is it important to make your Facebook post shareable

    Here’s why it really matters:

    • Massively expanded reach & traffic: Every time someone shares your post, it gets exposed to their entire friend list, people who’ve never even heard of you. That’s free traffic you didn’t have to chase.
    • Increased engagement & visibility: Shareable posts naturally attract more likes, comments, and reactions. The more engagement your post gets, the more Facebook pushes it in front of even more people.
    • Builds authority & brand awareness: When your content gets shared repeatedly, people start recognizing your name or brand. Over time, that consistent visibility builds a reputation you can’t easily buy.
    • Viral potential & growth: One great post shared by the right person can skyrocket into thousands of views overnight. Shareability is basically the foundation of anything going viral on Facebook.
    • Trust & credibility: People trust content that others willingly share. When your post gets passed around, it acts as a word-of-mouth endorsement, which is far more powerful than any ad.
    • Algorithm boost & free marketing: Facebook’s algorithm loves content that gets shared. More shares signal that your post is worth showing to more people. This gives you organic reach that would otherwise cost money to achieve.

    Key tips for Facebook post shareability

    Want more people sharing your posts? These simple but effective tips can make a real difference in how far your content travels on Facebook.

    TipWhat to do
    Set to publicAlways double-check your audience setting before posting. If it’s not set to Public, sharing is either limited or completely blocked.
    Create value/utilityPost content that teaches, informs, or solves a problem. People share things that genuinely help them or their loved ones.
    Evoke emotionContent that makes people laugh, feel inspired, or even surprised gets shared far more than flat, emotionless posts.
    Use strong headlinesYour first line is the key. Make it catchy, curious, or bold enough to stop someone mid-scroll.
    Tell a storyPeople connect with real stories a lot more than promotional fluff. So, always keep it relatable and genuine.
    Keep it shortDon’t make people work to read your post. Get to the point quickly and leave them wanting more.
    Ask for sharesSometimes all it takes is simply saying, “Share this with someone who needs it.” A direct nudge works surprisingly well.
    Time it rightPost when your audience is actually online. Weekday mornings and early afternoons tend to get the most traction.
    Be responsiveReply to comments quickly after posting. Early engagement signals to Facebook that your post is worth pushing to more people.
    Avoid private groupsPosts inside private groups can’t be shared outside easily, and need admin permissions. If reach is the goal, stick to your public profile or business page.

    Troubleshooting common Facebook post sharing problems

    Sometimes everything looks fine, but your post still won’t share properly, and that’s more common than you’d think. Before you panic, most sharing issues on Facebook come down to a handful of easy fixes. 

    Here’s what to check:

    • Check privacy settings: This is always the first place to look. If your post is set to “Friends” or “Only Me,” sharing will be restricted or blocked entirely. Switch it to “Public,” and that usually solves it instantly.
    • Fix link previews (debugger): If your shared link is showing a broken or outdated preview, head over to Facebook’s Sharing Debugger tool and paste your URL in. It’ll refresh the preview and pull the correct image and title.
    • App glitches (Android/iOS): If the share button isn’t responding on your phone, try clearing the Facebook app’s cache first. If that doesn’t work, uninstall and reinstall the app. This fixes most mobile-related sharing bugs quickly.
    • Desktop/browser issues: Sharing problems on the desktop are often browser-related. Try clearing your cookies and cache, switching to a different browser, or disabling any extensions that might be interfering with Facebook’s functionality.
    • Reconnect accounts: If you’re trying to share Facebook posts to a linked Instagram or third-party platform and it’s not working, the connection may have dropped. Go to Settings → Accounts Center and reconnect the relevant accounts to get things flowing again.

    👉 Unfortunately, still stuck after trying all of the above. Try logging out and back into your Facebook account or reaching out to Facebook Support. This is always worth a shot as a last option.

    Generate an engaging Facebook post within minutes with Replug!

    If you want to skip the guesswork and create scroll-stopping Facebook posts in seconds, Replug is worth checking out. 

    It’s a powerful URL shortener and link management tool packed with features like branded links, bio links, retargeting pixels, and detailed analytics.

    Replug Branded Short Links CTA
    A complete link management solution
    for marketing professionals & agencies.
    Try Replug for free

    But one of its most underrated free tools is the Facebook Post Generator, and it’s genuinely a time-saver. 

    Just plug in your prompt or a few details, and it comes up with a ready-to-post caption that’s engaging, on-point, and share-worthy. No staring at a blank screen, no second-guessing your wording. 

    No matter if you’re a business owner, content creator, or just someone who wants their posts to actually get noticed, Replug makes the whole process incredibly simple and fast.

    Summing up

    Making your Facebook posts shareable really isn’t as complicated as it seems, and now you’ve got everything you need to get it done. 

    Whether you’re tweaking privacy settings on a new post, fixing an existing one, managing a business page, or troubleshooting a sharing issue, it all comes down to a few simple steps. 

    The bigger picture here is that shareability directly impacts how far your content travels, how many people discover you, and how fast you grow, all without spending a penny. 

    So go ahead, apply what you’ve learned, and start putting your content in front of the audience it deserves. 

    The Share button is waiting. Make the most of it!

    Frequently asked questions

    How to make a Facebook post shareable in a group?

    If you’re a group admin, go to group settings and turn on the Post Sharing option under posting permissions. This allows members to share posts outside the group. However, if you’re just a member, you’ll need to ask the admin to enable it. It’s not something regular members can control.

    How to make a Facebook post shareable by friends?

    When creating or editing a post, tap the audience selector and choose “Friends.” This makes your post visible to your friends, and they’ll have the option to share it further. Just keep in mind that “Custom” gives you a slightly wider sharing reach than “Friends” alone.

    How to make a Facebook post shareable on Android and iPhone?

    Open the post, tap the three dots (⋯) in the top corner, and select “Edit Privacy” or “Edit audience.” From there, switch the audience to “Public” and save. The steps are pretty much identical on both Android and iOS. Facebook’s mobile app works the same way across both platforms.

    How do I allow others to share my Facebook posts?

    Here’s how to make a Facebook post shareable by others:

    Set your post audience to “Public,” that’s really all it takes. Once a post is public, anyone who sees it will have a Share button available. If this button is missing, it means the post is set to a restricted audience, like “Friends” or “Only Me.”

    How to make a memory post shareable on Facebook?

    When Facebook surfaces a memory, open it and tap the “Share” option to post it to your feed. Before sharing, tap the audience selector and set it to “Public” if you want others to be able to reshare it. Memory posts follow the same privacy rules as regular posts.

    How to make a Facebook post not shareable?

    Set your post audience to “Friends” or “Only Me”. This removes the Share button for anyone viewing it. If you’re in a group, admins can turn off post sharing entirely through Group Settings. It’s the simplest and most effective way to keep your content from being passed around.

    Why is my post not shareable on Facebook?

    The most common reason is that the post is set to a restricted audience, like “Friends” or “Only Me.” Other reasons could include:

    – being inside a private group where sharing is disabled, 
    – a temporary app glitch, or 
    – a browser issue on a desktop

    Start by checking your privacy settings. That fixes the issue most of the time.

    Is it possible to control who shares my Facebook post?

    No. Facebook lets you control who can see your post, but you can’t specifically control which individuals can share it. If it’s set to Public, anyone can share it. Your best option for limiting shares is restricting the audience to “Close Friends” or “Only Me.”

    Does making a Facebook post shareable increase reach and engagement?

    Absolutely! When a post is shareable and people actually share it, it gets exposed to entirely new audiences beyond your own followers. More shares also signal to Facebook’s algorithm that your content is worth promoting. This means even more organic reach without spending anything on ads.

    What types of Facebook posts are harder to make shareable on the platform?

    Posts inside private or secret groups can’t be shared outside the group unless the admin enables it. Similarly, posts set to “Only Me” have limited or no sharing ability. Facebook Stories also can’t be shared the same way regular feed posts can. They work differently by design.

    Is it possible to make certain Facebook posts shareable and others not?

    Yes, and it’s actually pretty straightforward. Every post has its own individual privacy setting, so you can set one post to “Public” and another to “Friends” or “Only Me”, all on the same profile. You’re in full control of each post’s shareability separately.

    What is the best time to post on Facebook?

    Generally, weekdays between 12 PM and 8 PM tend to perform best. Tuesday and Wednesday in particular see strong engagement. That said, the best time really depends on where your audience is located and when they’re most active. Checking your Facebook Page Insights can give you a much more accurate picture of your specific audience.

    How to create more shareable content on Facebook?

    Focus on content that genuinely helps, entertains, or resonates with people. That’s what gets shared. 

    – use eye-catching visuals, 
    – write a strong opening line, 
    – keep captions concise, and 
    – don’t be afraid to ask people to share

    Relatable, emotional, or surprisingly useful content almost always outperforms purely promotional posts when it comes to shares.

  • How to use linktree to promote your social media presence

    How to use linktree to promote your social media presence

    It only takes a few seconds for someone to decide if they’ll click your link or not. 

    Social platforms like Instagram and TikTok limit the number of links you have in your bio; but what if you have multiple offers, pages, or products to share? This is where knowing how to use a linktree (bio link or link in bio) on your social media profile, becomes essential.

    Done right, your linktree becomes a mini home page that drives clicks, engagement, and even sales, all in one place. In this guide, we’ll cover what a linktree is, why it matters for social media, its benefits, how to set it up effectively, and how tools like Replug can take your link management and marketing to the next level.

    Boost ROI with branded URLs - Replug dashboard showing performance metrics and branded URL creation
    Turn your bio links into click-boosting machines
    Check

    Drive up to more clicks than plain URLs

    Check

    Share multiple destinations with one link

    Create bio links free

    What is a linktree and why it matters for social media presence

    A linktree or “link in bio” tool allows you to create a simple, mobile-friendly landing page that houses multiple links. Instead of swapping out your single bio URL for every new campaign, you use one permanent link that directs followers to a list of all your important destinations.

    This solves the “one link” problem by creating a centralized hub for your audience. Whether they want to visit your website, read your latest blog, shop your store, or connect on other platforms, they can find everything in one organized space. This makes it easy for followers to find everything from your website and blog to online stores and affiliate links, all accessible from your Instagram link in bio or TikTok profile.

    Benefits of using a linktree for social media

    Using a linktree offers numerous benefits that can transform your social media presence from simply having followers to actively engaging and converting them into customers or fans. 

    Here’s why investing time in setting up and optimizing your bio link is so powerful:

    1. Centralizes your content and simplifies user experience

    A linktree creates a centralized hub where all your important URLs live together. This means followers don’t have to guess where to find your website, blog, store, or affiliate links. Everything is organized and accessible in one clean place.

    Here’s an example of Lilly Singh, a popular YouTube content creator. Her linktree page has a list of all her important links; from her Spotify Playlist to Amazon Storefronts:

    Lilly Singh linktree example

    2. Improves follower engagement and click-through rates

    When followers have multiple relevant options to explore, they’re more likely to engage with at least one of your links. This increases your overall click-through rate (CTR) compared to a single generic link.

    Take an online artist who links to their portfolio, commission page, and Behance. Fans who may not be ready to commission can still visit the portfolio or support on Behance, increasing total engagement. Here’s an example of Pascal Blanche:

    Pascal Blanche linktree example

    3. Boosts conversions and drives sales

    A linktree enables you to direct followers toward specific calls to action such as buying products, signing up for newsletters, or downloading resources. By placing your highest priority links at the top, you funnel your audience toward conversions more efficiently.

    Meow Meow Tweet, an ecommerce shop, placed a strong and unique call-to-action button as the first link, driving direct traffic and purchases.

    Meow Meow Tweet linktree example

    4. Builds brand consistency and professionalism

    Customizing your link-in-bio page with your brand’s colors, fonts, and logos reinforces your identity and professionalism. This consistency builds trust and encourages followers to engage with your links confidently.

    Brands that neglect this risk appearing generic or untrustworthy, which can reduce click rates. Here’s an example of the famous clothing brand Gap and how they use pastel blue throughout their branding:

    Gap linktree example

    5. Offers detailed tracking and data-driven insights

    Unlike static links, a bio link set up provides valuable analytics showing which links get the most clicks, the time of day followers engage, and where your traffic comes from. This data lets you understand your audience better and refine your social media and marketing strategies.

    For example, Walgreens, an online store, might discover that their “Weekly Deals” link gets more clicks in the evenings, prompting them to schedule product announcements or Instagram Stories for that time to maximize engagement.

    Walgreens linktree example

    6. Enables easy updates and real-time campaign management

    A linktree lets you update and reorder your links anytime without changing your bio URL. This flexibility means you can respond quickly to new product launches, promotions, or seasonal campaigns without confusing your followers with new URLs.

    For instance, a musician promoting a new album release, upcoming tour dates, and merch drops can update their linktree instantly to match the current focus. Here’s an example of Katy Perry’s bio link page. She can easily edit her tour dates without changing her bio link:

    Katy Perry linktree example

    7. Enhances cross-platform promotion and reach

    Your followers are spread across multiple platforms like Instagram, TikTok, X (Twitter), and even LinkedIn. Using a single linktree URL across all profiles creates a consistent user experience and maximizes your reach.

    A fitness coach, Alexia Clark, for instance, uses the same linktree URL on Instagram and TikTok, helping fans from both channels access workouts, nutrition plans, and coaching services seamlessly.

    Alexia Clark linktree example

    8. Supports affiliate marketing and influencer partnerships

    A linktree is ideal for affiliate marketers and influencers who want to share multiple product links without cluttering their captions or bios; especially useful for Amazon products. A clear, well-organized bio link page makes it easier for followers to shop and supports higher affiliate commissions.

    For example, Erica Taylor, a beauty influencer, places all their favorite product affiliate links on their linktree page, simplifying shopping for followers.

    Erica Taylor linktree example

    9. Reduces friction and builds trust with followers

    When followers see a neat, branded bio link page, it reduces doubts about clicking links. Using branded short URLs and customizing your page increases perceived legitimacy; especially important on platforms like Instagram, where phishing attempts can be common.

    Taylor Swift uses a branded bio link in her Instagram bio:

    Taylor Swift linktree example
    Boost ROI with branded URLs - Replug dashboard showing performance metrics and branded URL creation

    Go beyond generic link pages!

    Create custom bio links that truly fit your brand

    With Replug, you can create bio links that are unique, engaging, and built to convert.

    Start free trial

    Why Replug is the best choice to boost your linktree and social media presence

    While linktree setups help you organize your bio links, Replug takes it a step further by integrating advanced marketing features designed to maximize engagement, conversions, and brand growth.

    Branded short URLs for credibility and recall

    Replug allows you to create custom branded short URLs that match your business name or brand identity. This not only builds trust with your audience but also makes your links memorable and professional-looking, a crucial factor when promoting on platforms like Instagram and TikTok.

    Retargeting pixels to reconnect with your audience

    One of Replug’s standout features is the ability to add retargeting pixels (from facebook, google, linkedin, etc.) to your shortened links. This means you can continue marketing to users who clicked your bio link but didn’t convert immediately, turning casual visitors into loyal customers over time.

    In-depth analytics to optimize your strategy

    Understanding which links get the most clicks and from which platform is key to refining your social media marketing. Replug’s click analytics dashboard gives you detailed reports on click-through rates, geographic data, devices used, and referral sources so you can make data-driven decisions to improve your linktree effectiveness.

    Seamless integration with your favorite platforms

    Whether you’re driving traffic from Instagram stories, TikTok videos, or Amazon affiliate marketing posts, Replug integrates smoothly with your existing tools and campaigns. This ensures your bio link strategy is unified and easy to manage across all channels.

    Easy customization for brand consistency

    Replug lets you customize your linktree landing pages with your brand colors, logos, and fonts, creating a consistent and polished look that builds follower trust. A cohesive brand experience across your social profiles increases the likelihood that users will click through and take action.

    Also read: How to Create a Brand Identity: A Quick Guide

    Dynamic link management for real-time updates

    Keep your linktree fresh by adding, removing, or rearranging links in real time without changing the bio link URL. Replug’s intuitive dashboard makes managing multiple campaigns, affiliate links, and promotions effortless.

    Support for affiliate marketing and e-commerce

    If you’re using linktree for Amazon affiliate marketing or selling products directly, Replug’s advanced tracking and retargeting tools can boost your affiliate commissions and sales. Segment your audience and target them with personalized ads based on their interaction with your bio links.

    Boosts SEO with valuable backlinks
    Including a link in your bio can also provide important SEO benefits. Each bio link acts as a backlink to your website, helping to establish your site as a credible resource. This can improve your search engine rankings and drive more organic traffic over time.

    Also read: How to create an SEO-friendly URL: Ultimate tips

    Offers customization and flexibility to keep content fresh
    Replug’s linktree pages are flexible and editable. You can include multiple types of links, such as social profiles, booking systems, product pages, and more, all in one place. This makes it easy to keep your content fresh and relevant by adding or updating links as needed.

    Enhances call-to-action effectiveness
    Strong, clear calls to action in your social posts and on your bio link page encourage followers to click and engage. Phrases like “head to the link in our bio to learn more” or “Shop now” help direct followers and increase conversions.

    How to use Replug to get the most out of your linktree presence

    Follow these steps to optimize your bio link strategy:

    1. Set up your replug profile
      Choose a clear profile name and add your brand’s logo. write a compelling description that invites users to explore your links.
    2. Organize and customize your links

    Arrange your top offers first, followed by secondary links, while customizing the page with Replug’s branding tools, images, and videos to keep it engaging and on-brand.

    1. Analyze link performance regularly
      Check Replug’s analytics to see what’s working. A/B test your bio link page for different calls to action and link arrangements to maximize clicks.
    2. Update links frequently
      Keep your page dynamic by refreshing links to reflect current promotions, seasonal campaigns, or trending content. This encourages repeat visits.
    3. Create a custom URL

    Connect your custom domain and customize the slug of your bio link. This strengthens brand identity and improves visibility.

    Replug Branded Short Links CTA
    Maximize marketing ROI
    by transforming ordinary URLs into
    branded short links that convert.
    Try Replug for free

    Best practices for maximizing linktree’s impact

    Here are some simple strategies to ensure your bio link drives results:

    • Keep it simple: Limit your linktree to 3–7 focused, high-value links. Too many options can overwhelm visitors and reduce clicks.
    • Use branded short URLs: Swap out long, cluttered links for clean, branded short URLs. This builds trust and boosts professionalism. This is where link management tools like Replug come in handy.
    • Add clear, action-oriented CTAs: Use compelling CTAs like “Shop now,” “Download free guide,” or “Watch the tutorial.” Clear calls to action guide your audience and increase clicks.
    • Show social proof: Include testimonials, user reviews, or follower counts to enhance credibility and encourage more conversions on your linktree.
    • Monitor analytics regularly: Track link performance closely. With Replug, you’ll get a dedicated bio link dashboard where you can track all how many clicks your linktree got according to location, browser, referral sources, and OS.
    • Promote your Linktree everywhere: Share your linktree across Instagram stories, reels, posts, and other channels to maximize reach and engagement.

    Common mistakes to avoid when using linktree

    Avoid these pitfalls for a smooth and effective bio link:

    • Linking to outdated or irrelevant pages
    • Overloading your page with too many links
    • Using generic, long URLs instead of branded ones
    • Neglecting analytics and performance tracking
    • Forgetting to update your links for new campaigns
    • Ignoring mobile optimization since majority users come from mobile

    Also check out: How to create a Linktree QR code?

    Conclusion

    Mastering how to use a linktree effectively is key to boosting your social media presence. It centralizes your links, engages followers, and drives conversions from Instagram, TikTok, and beyond. By following best practices and leveraging tools like Replug, you can transform that one bio link into a powerful growth engine for your brand.

    Boost ROI with branded URLs - Replug dashboard showing performance metrics and branded URL creation
    Turn your bio links into click-boosting machines
    Check

    Drive up to more clicks than plain URLs

    Check

    Share multiple destinations with one link

    Create bio links free

    FAQs on using a linktree for social media

    What is Linktree, and how do you use it?

    Linktree (also known as bio link or link in bio) is a digital service that lets you create a single page containing multiple links, making it easy to share all your important content from one URL. The bio link meaning is exactly the same. You simply add your links, customize the layout, and share your linktree on platforms like Instagram, TikTok, or in your email signature.

    Is it free to create a linktree?

    Yes, you can create a free linktree with Replug’s 14-day trial. After that, you can choose and pay for the plan of your choice.

    Do I need a website if I have a linktree?

    No, you don’t necessarily need a website if you have a linktree. However, having both can work well together. Your linktree can serve as a quick-access hub, while your website can provide more detailed information.

    Can I track how many people click my linktree?

    Yes, you can track your linktree analytics with Replug. You can see how many people clicked your links, where your audience is from, and which links perform best. This helps you make data-driven decisions.

    What’s the best tool for creating a Linktree?

    Replug is one of the best link in bio tool for creating a linktree. It offers advanced features such as branded short URLs, retargeting pixels, and in-depth analytics that can help you drive more traffic and conversions. If you want both style and performance, Replug is a great choice.

    Can I change the links in my linktree?

    Yes, you can edit your linktree at any time; adding, removing, or rearranging links as needed. Changes update instantly, so your audience always sees the most current version.

  • How to add a link to Snapchat story: 6 simple steps

    How to add a link to Snapchat story: 6 simple steps

    Snapchat isn’t just about sharing photos and videos anymore; you can now attach a link to a Snap and easily direct your friends and followers to external content. Thanks to the Snapchat linking feature, sharing a website, article, or even a funny meme right inside your snaps and stories has never been simpler.

    In this guide, we’ll walk you through how to add a link to Snapchat story and snaps on both iOS and Android. By the end, you’ll know exactly how to attach a clickable link on Snapchat and let your friends swipe up on Snapchat to visit your shared content.

    Follow along with the steps below to start sharing your favorite websites and content in no time!

    Replug Branded Short Links CTA
    Maximize marketing ROI
    by transforming ordinary URLs into
    branded short links that convert.
    Try Replug for free

    How to add a link to Snapchat story: iOS and Android

    Adding a link to your Snapchat snaps and stories is a great way to share a website on Snapchat and engage your followers.

    Note: Screenshots are provided for the Android version, but iOS users should be able to follow along.

    Here’s a step-by-step guide on how to do it:

    Step 1: Open the Snapchat app on your iOS or Android device.

    Step 2: Take a photo or film a video snap using the main camera tab or by uploading a photo/video from your device. Apply filters, stickers, emojis, text, or drawings to your snap as desired.

    Step 3: Tap the Snapchat paperclip icon in the menu on the right to attach a link to Snap.

    Click on the paperclip icon

    Tip: If the link is too long to type, copy it from your browser or another app before coming back to Snapchat.

    Enter snapchat URL

    Step no 4: Paste the link into the “Type a URL” field and tap “Attach to Snap.”

    Attach link to snap

    Tip: Attaching a link to your Snap is just the first step. To drive traffic and get people to swipe up, dress up your snap! Use music, effects, emojis, and text to make your story more appealing and clickable.

    Also read: How to Add a Link to Your Instagram Story?

    Step 5: The paperclip icon will now be highlighted in white, showing your link is attached.

    Link attached to snapchat story

    Also read: How to Create Password-Protected Links: Step-by-Step Guide

    Step 6: Tap the blue arrow to send your snap to friends, or tap the story button to add a link to your Snapchat story.

    That’s it! Now your viewers can swipe up on Snapchat to visit the link directly.

    Replug Branded Short Links CTA
    A complete link management solution
    for marketing professionals & agencies.
    Try Replug for free

    How brands can leverage Snapchat links?

    Snapchat has approximately 460 million daily active users, making it a valuable platform for brands to effectively reach their target audience. Using the Snapchat linking feature is a smart way for brands to maximize engagement and guide followers to key content. Features like Snapchat Planets also offer brands new ways to understand user interactions and strengthen their community.

    Here’s how brands can make the most out of their Snapchat link:

    Control and direct traffic

    By adding a Snapchat link, brands gain control over where their followers go next after swiping up on a snap. Whether directing users to the homepage, a specific product page, or a demo page, brands can guide their audience’s journey within the app.

    To make these snaps more engaging, many teams now edit images with AI to quickly adapt visuals for different audiences, formats, and campaign goals while maintaining a consistent look.

    Gain insights with powerful analytics

    Each swipe up on Snapchat gives valuable engagement data. Analyzing these interactions enables brands to better understand the audience’s behavior and preferences, allowing for more targeted marketing strategies.

    Utilizing tools like Replug not only shortens links but also provides valuable insights into user engagement and the effectiveness of different types of content. By tracking click data and analyzing other metrics, brands can refine their marketing initiatives and optimize their Snapchat presence.

    Using a link shortener

    Replug’s short URL generator free can provide short links and streamline the process of sharing them on Snapchat effortlessly. Shortened links are cleaner and take up less space, making them more visually appealing and easier for users to engage with.

    Replug Branded Short Links CTA
    A complete link management solution
    for marketing professionals & agencies.
    Try Replug for free

    Craft comprehensive social media strategies

    Maximizing the use of Snapchat features, including links, is crucial for developing a robust social media strategy. Brands that harness the full potential of Snapchat links can initiate conversations, explore relevant topics, and expand their reach to a wider audiences.

    Frequently asked questions 

    How do I attach a link to Snap?

    Tap the paperclip icon on the preview screen.
    Add your link — paste a copied URL, type one manually, or search for it
    Then tap “Attach to Snap”

    Can I add multiple links to a single snap or story?

    Currently, Snapchat only allows you to attach one link per snap or story. If you want to share multiple links, consider creating a series of snaps or stories.

    Where is the paperclip icon on Snapchat?

    It’s on the preview screen after you take a snap, in the vertical toolbar on the right side. Just tap the paperclip icon to attach a link to your snap.

    Are there any restrictions on the type of content I can link to on Snapchat?

    Snapchat’s community guidelines prohibit linking to certain types of content, such as illegal or explicit material. Ensure that the content you link to complies with Snapchat’s guidelines to avoid any issues.

    Do users need to have the Snapchat app installed to view the linked content?

    Yes, users need to have the Snapchat app installed on their devices to view linked content. When they swipe up on the link, it will open within Snapchat’s in-app browser.

    Can I track engagement with the links I share on Snapchat?

    While Snapchat does not provide built-in analytics for links shared on the platform, you can use link-shortening services like Replug to track clicks and engagement.

    Do links expire on Snapchat?

    Links attached to snaps or stories do not expire on Snapchat. However, you can remove a link anytime by editing the snap or story.

  • Instagram character limit explained for every part of your Insta profile: Bio, post & reel captions, DMs & more!

    Instagram character limit explained for every part of your Insta profile: Bio, post & reel captions, DMs & more!

    With Instagram now flaunting 3 billion monthly active users, it’s safe to say the platform is no longer just a place to post pretty pictures; it’s where brands grow, creators thrive, and audiences connect. 

    But here’s the thing most people overlook: every section of your Instagram profile comes with its own set of character limits, and going over (or way under) them can quietly hurt your reach and engagement.

    Does Instagram have a character limit? Absolutely, and it’s different depending on where you’re typing. Your bio, captions, comments, and DMs all play by different rules.

    Before you craft your next post or revamp your profile, let’s break down exactly what those limits are, starting with the basics.

    What is the character limit on Instagram?

    Instagram doesn’t have just one character limit. It has several, and each part of your profile plays by its own set of rules. 

    Your captions and comments allow up to 2,200 characters, your bio is capped at 150, and DMs max out at 1,000 characters per message. Your username and display name each get 30 characters. 

    So yeah, there’s a lot to keep track of! But don’t worry, we’re going to walk through each one, so you know exactly how much space you’re working with everywhere on the app.

    Importance of Instagram character limit

    Knowing Instagram’s character limits isn’t just a technicality; it directly affects how your content looks, performs, and connects with your audience. Get it wrong, and you’re leaving real engagement on the table. 

    Here’s why it actually matters:

    Visibility & engagement (truncation)

    Instagram only shows the first 125 characters of your caption in the feed before cutting it off with a “more” button. So if your hook isn’t in those first few words, most people will simply scroll past without reading the rest.

    Algorithmic performance

    Instagram’s algorithm pays close attention to how people interact with your content. If your caption is poorly structured or your bio is a confusing mess, engagement drops drastically. Plus, lower engagement signals the algorithm to push your content to fewer people.

    User behavior & attention spans

    People on Instagram are scrolling pretty fast. Captions around 125–150 characters tend to pull in more engagement because they’re quick to read and easy to digest. Long walls of text just don’t hold attention the same way.

    Platform-specific constraints

    Every section of Instagram has its own character limit defined, and they’re all different. What works in a caption won’t fit in a bio, so you need a slightly different approach for each placement.

    Strategic optimization

    When you know your limits upfront, you write with more intention. You front-load the important stuff, cut the fluff, and craft content that actually gets read. This ultimately means better results whether you’re a creator, a brand, or just someone trying to grow their presence.

    A complete breakdown of different types of Instagram character limits

    Instagram has a different character limit for pretty much every section of the app, and they’re not all the same. No matter if you’re writing a bio, dropping a caption, or running an ad, each field plays by its own specific rules.

    Instagram character limits summary (2026)

    Instagram elementCharacter limitQuick note
    Username30 charactersLetters, numbers, periods & underscores only
    Profile/Display name30 charactersBold name shown on your profile
    Bio150 charactersIncludes spaces, emojis & punctuation
    Post caption2,200 charactersOnly the first 125 show before “more”
    Reel caption2,200 charactersKeep it short; the video does the talking
    Comment2,200 charactersSame limit as captions
    Direct message (DM)1,000 characters per messageSplit longer messages into parts
    Notes60 charactersDisappears after 24 hours
    Hashtags per post30 hashtagsEach hashtag is up to 24 characters long
    Alt text100 characters (recommended)Technical limit goes up to 100-125
    Story text overlay~120–190 charactersNo official hard limit; keep it readable
    Ad primary text125 characters (recommended)The technical limit is 2,200
    Ad headline40 charactersBold text below primary copy
    Ad description30 charactersSmallest ad element; keep it punchy

    Here’s a full breakdown so you know exactly what you’re working with:

    Instagram username character limit

    Your Instagram username or handle (the one that starts with @) has a strict 30-character limit. Keep it short, simple, and easy to remember. 

    Stick to letters, numbers, periods, and underscores, and avoid anything too complicated that people would struggle to search for or tag.

    Instagram profile name character limit

    Your display name (the one that shows up in bold on your profile) also has a 30-character limit, the same as your username. This is different from your handle, so use it wisely (it allows up to 64 characters)

    A lot of creators and brands use this field to include a keyword that helps people find them more easily.

    Instagram bio character limit

    Your Instagram bio gives you 150 characters to work with, and yes, that includes letters, spaces, emojis, and punctuation. 

    It sounds tight, but it’s enough to tell people who you are, what you do, and what they should do next (like check the link). Every character genuinely counts here, so be intentional with what you put in.

    Related: Instagram bio character limit explained: How many characters are allowed?

    Instagram post character limit

    Instagram post captions give you a decent amount of room to tell your story, but there’s a catch you need to know about.

    Instagram post caption character limit

    Instagram allows up to 2,200 characters per caption, but only the first 125 characters appear before users have to tap “more” to read the rest. 

    So while you technically have plenty of space, your opening line is doing the toughest job. Lead with your hook, not your hashtags!

    Instagram reel caption character limit

    Reels captions also max out at 2,200 characters, the same as a regular post. That said, Reels is a fast-scrolling, video-first format, so shorter and incisive captions tend to work better here.

    Don’t bury your message under a wall of text when the video itself is already doing the talking.

    Instagram comment character limit

    The Instagram comment character limit is 2,200 characters, the same as captions. That’s technically enough for a mini essay, but most people keep comments short and conversational.

    Whether you’re replying to followers or engaging on other posts, concise comments tend to get way more back-and-forth than long ones.

    Instagram DM character limit

    If you’re wondering about the Instagram direct message character limit, it’s much shorter than captions. The ideal Instagram message character limit is 1,000 characters per message. 

    That’s usually more than enough for most conversations, but if you’re trying to send something longer, just split it into multiple messages. DMs also support emojis, links, photos, and videos, so you’ve got plenty of flexibility.

    Instagram notes character limit

    Instagram Notes are short status updates that appear at the top of your DMs inbox, and they come with a tight 60-character limit. They disappear after 24 hours, similar to Stories. 

    Think of them like a quick shoutout or a nudge to spark a conversation (not the place for anything long-form).

    Instagram hashtags limit

    Each post allows a maximum of 30 hashtags, and individual hashtags can be up to 24 characters long. However, stuffing all 30 in every post isn’t always the best move. 

    Most experts suggest using 3–5 well-chosen, relevant hashtags over a pile of generic ones for better reach and engagement.

    Instagram alt text character limit

    Instagram alt text has a recommended limit of around 100 characters, though the technical cap goes up to 100-125. 

    Alt text is what describes your image to screen readers and also helps with discoverability. Keep it clear and descriptive. A concise, accurate description in that 100-character sweet spot is all you need.

    Instagram story text character limit

    Instagram Stories don’t have a hard, published character limit for text overlays, but most schedulers and best practices cap it at around 120–190 characters for readability. 

    Since stories are visual-first, heavy text tends to clutter the screen. Keep it brief, make it bold, and let the visual do most of the work.

    Instagram ad primary text character limit

    While Instagram technically allows up to 2,200 characters for ad primary text, only the first 125 characters are immediately visible before the content gets cut off with a “more” link. 

    Most ad pros recommend sticking to that 125-character window. Pre-empt your strongest hook or offer, because that’s all most people will actually read.

    Instagram ad headline character limit

    The headline in an Instagram ad is limited to 40 characters. It shows up in bold right below your primary text, so it needs to be direct and punchy. 

    Think of it less like a full sentence and more like a sharp tagline; something that grabs attention and reinforces the main message of your ad.

    Instagram ad description character limit

    The description field in Instagram ads allows up to 30 characters. It’s the smallest text element in your ad and is not always visible depending on the placement. 

    Use it to add a quick supporting detail or a micro CTA phrase, but don’t rely on it to carry your full message. That’s what the primary text and headline are for.

    Instagram character limit with spaces

    A quick but important thing to know is that on Instagram, spaces count as characters just like letters do. So whether you’re writing your bio, a caption, or a DM, every blank space between words is eating into your limit. 

    The 2,200-character caption limit, for example, includes spaces, URLs, hashtags, and line breaks; all of it counts. Keep that in mind when you’re crafting tight copy, especially for your bio, where every character really matters.

    Also read: How to add long links within TikTok character limits?

    Major factors that affect Instagram character limits

    Instagram’s character limits aren’t random; they’re shaped by a handful of key factors that influence how the platform works and how content gets consumed. 

    Understanding what’s behind these limits helps you make smarter decisions with every word you write.

    Major factors that affect Instagram character limits

    Platform function (feature-specific limits)

    Every section of Instagram serves a different purpose, and the character limits reflect that.

    • A bio is a quick introduction, so 150 characters makes sense. 
    • A caption can tell a fuller story, hence the 2,200-character room. 
    • A DM is a private conversation capped at 1,000 characters.

    Instagram essentially sets the limit to match what each feature is actually designed to do.

    Visibility & the “See More” truncation

    Only the first 125 characters of your caption appear before users have to tap “more” to read the rest. This is Instagram’s way of keeping feeds clean and visual-first. 

    In practice, it means your real character limit for visible content is much tighter than 2,200. So if your hook isn’t in those first few words, most people will scroll right past it.

    Hashtag limits & formatting

    Instagram allows up to 30 hashtags per post, and they’re clickable and functional whether placed in the caption or the first comment. 

    Hashtags also eat into your caption’s character count, which affects how much room you have for actual copy. That’s why it’s worth being selective. 

    A few targeted hashtags will serve you better than maxing out all 30 with generic tags.

    Engagement strategy

    Character limits quietly push you toward writing better content. When you have a ceiling, you’re forced to cut the fluff and lead with what matters the most.

    Captions around 125–150 characters tend to drive the strongest engagement. This is not because longer captions don’t work, but because concise, well-structured copy is simply easier for people to read and respond to while scrolling.

    Ad constraints

    Instagram ads have tighter limits than organic posts because ad placements are more competitive for attention. 

    Your ad primary text is recommended at 125 characters, the headline at 40, and the description at just 30. These constraints exist because ads appear across different placements and devices, and text gets truncated differently on each. 

    The tighter the space, the sharper your copy needs to be!

    👉 Useful tip: Use a character counter or word count checker to ensure your content fits within these constraints.

    How do different Instagram character limits impact engagement and growth on the platform?

    Character limits on Instagram affect your growth more than most people realize.

    The biggest thing to keep in mind is the 125-character “hook” rule (that’s all the visible text you get before Instagram cuts it off with “more”). If your opening line doesn’t grab attention, most people won’t bother tapping to read the rest.

    When it comes to optimal lengths, shorter captions under 150 characters tend to work really well for straightforward messages and promotional content. They’re quick, punchy, and easy to engage with.

    That said, longer captions ranging from 500 to 2,200 characters shine when you’re storytelling or sharing detailed, educational content (the kind that builds a real connection with your audience). 

    The magical trick is matching your caption length to what your content actually needs.

    Take complete advantage of Instagram’s character limit with these useful tips

    Knowing the limits is one thing, but actually working with them is where most people slip up. Here are some straightforward, practical tips to help you get the most out of every character you use on Instagram.

    Useful tips for Instagram's character limit

    Tip #01: Front-load important text

    Since only the first 125 characters show up before the “see more” cutoff, put your strongest line, hook, or key message right at the top. Don’t save the good stuff for the end, because most people won’t get there.

    Tip #02: Use line breaks

    Breaking your caption into short paragraphs makes it way easier to read and keeps people from bouncing off a wall of text. A clean, spaced-out caption feels more inviting and naturally encourages people to read all the way through.

    Tip #03: Use emojis wisely

    Emojis can add personality, break up text, and draw the eye to key points, but they also count toward your character limit. Use them to complement your message, not replace it, and avoid overdoing it, or they’ll make your caption or message look cluttered.

    Tip #04: Extend length via comments

    If you’ve hit the 2,200-character cap and still have more to say, drop the rest in the first comment. You can continue your text in the comments or split it across carousel posts. 

    Both are clean workarounds that keep your caption tight while still delivering the full message.

    Tip #05: Optimize hashtags

    Rather than stuffing all 30 hashtags into your caption and eating up valuable space, keep your caption copy clean and place hashtags at the very end or in the first comment. Focus on relevance over quantity. 

    A handful of well-chosen hashtags will outperform 30 random ones every time.

    Tip #06: Use a shortened link

    Instagram doesn’t make links in captions clickable, but if you’re mentioning a URL, a long one looks messy and eats up characters fast compared to a short link

    Use a free Instagram URL shortener to keep it neat, save space, and make it easier for people to type out if needed.

    Tip #07: Include a clear CTA

    Don’t let your caption just trail off; tell people what to do next. Whether it’s “drop a comment below,” “save this for later,” or “check the link in bio,” a simple and direct call to action phrase gives your audience a nudge and helps drive the engagement you’re actually looking for.

    Tip #08: Use a character counter tool

    Before you paste your caption or message into Instagram, run it through a character counter tool to make sure you’re within limits. 

    A social media character counter helps you check your caption, bio, or message word count before posting. It’s a small habit that saves a lot of last-minute editing.

    Use Replug free tools & optimize Instagram character limits

    If you’re serious about making every character count on Instagram, Replug is a tool worth knowing about. 

    It’s an all-in-one link management platform that lets you shorten custom links and create stunning bio link pages. A perfect tool for squeezing more value out of that tiny bio section without wasting precious characters on long URLs.

    Replug Branded Short Links CTA
    A complete link management solution
    for marketing professionals & agencies.
    Try Replug for free

    But that’s not all! Replug also offers free tools that make content creation a whole lot easier.

    Struggling to stay within the Instagram caption character limit? The free Instagram caption generator helps you craft engaging captions that fit just right. And if your bio needs a refresh, the Instagram bio generator gives you a solid starting point in seconds.

    Go ahead and give them a try. Your profile will thank you for it!

    Frequently asked questions

    Is there a character limit on Instagram?

    Yes, absolutely! Instagram has different character limits depending on which part of the app you’re using.

    – Your bio is capped at 150 characters
    – Captions go up to 2,200 characters.
    – Your username and display name each allow 30 characters, and 
    – DMs max out at 1,000 characters per message.

    Every field has its own limit, so it’s worth knowing them before you start typing.

    Is there a word limit on Instagram?

    Instagram doesn’t set a word limit; it works on characters instead. The Instagram word limit people usually refer to is really a character limit in disguise. 

    A 2,200-character caption roughly translates to around 338–440 words, depending on word length and spacing. So technically, you have plenty of room, but you still need to be smart about how you use it.

    What is the character limit on Threads?

    The Thread’s character limit for a standard post is 500 characters. However, in September 2025, Threads introduced text attachments that allow up to 10,000 characters. Besides, 1,000 characters are allowed per comment. 

    Remember, all letters, numbers, spaces, punctuation, and URLs count toward the limit. However, images, videos, and GIFs do not reduce the character count.

    How do I post more than 2200 characters on Instagram?

    You can’t go over 2,200 characters in a single caption; Instagram won’t let it post. But there are a couple of smart workarounds. 

    You can continue your text in the first comment below your post or split your content across carousel slides. Both keep things clean while getting your full message across without breaking any rules.

    What is the DM meaning in text?

    DM stands for “Direct Message”. It’s a private conversation between social media users that only the sender and recipient can see. 

    When someone says “DM me,” they’re asking you to message them privately rather than commenting publicly. It’s used as both a noun (“send me a DM”) and a verb (“just DM me”), and you’ll find it across pretty much every major social platform today.

    What is the Instagram bio character limit 2026?

    The Instagram bio character limit in 2026 remains at 150 characters, and that includes everything: letters, numbers, spaces, emojis, and punctuation

    Unlike the TikTok bio character limit, which was recently doubled to 160 characters, Instagram has kept its bio limit the same. So every single character in your bio still counts; use it wisely.

    How can I optimize my content within Instagram character limits?

    – Start with your strongest line first. Remember, only the first 125 characters show before the “more” cutoff. 
    – Use line breaks to make captions easier to read, and keep your bio tight with a clear CTA. 
    – For your target audience, make sure your message is front-loaded and relevant to them from the very first word. 
    – A character counter tool can also help you stay within limits before you post.

    Are hashtags included in the Instagram character limit?

    Yes, they are! Hashtags count toward your caption’s 2,200-character limit. Each character in a hashtag, including the # symbol, counts toward this total limit. 

    This is why many creators place them at the very end of the caption or drop them in the first comment instead. That way, your actual copy gets the full breathing room it deserves, and your hashtags don’t eat into your storytelling space.

    Does the Instagram character limit have an impact on SEO?

    It does, indirectly! Instagram isn’t a traditional search engine, but keywords in your bio, captions, and alt text do help with discoverability on the platform. 

    Since your bio is capped at 150 characters, choosing keyword-rich words carefully matters. The Insta caption also plays a key role. Relevant keywords in those first 125 visible characters can help your content surface in Instagram search results.

    Is the line break counted as a character on Instagram?

    Yes, line breaks do count as characters on Instagram. Each time you press Enter, it uses up one character from your total limit. 

    It’s a small thing, but if you’re working with a tight bio or trying to hit the caption max precisely, it’s worth keeping in mind. Don’t go overboard with spacing just to make things look clean; every gap adds up.

    Are emojis counted as a character on Instagram?

    Yes, emojis count toward your character limit on Instagram. Your bio’s 150-character limit includes text, emojis, and spaces, all of it. The same applies to captions and DMs. 

    Most emojis take up one or two characters depending on how they’re encoded, so while they’re great for adding personality, use them with purpose rather than going overboard.

    How to increase your Instagram character limit?

    Honestly, you can’t increase Instagram’s character limits. They’re set by the platform and apply to everyone equally. What you can do is work smarter within them. 

    Use the first comment to extend a caption, split content across carousel posts, or use a link-in-bio tool to pack more value into that 150-character bio without stuffing everything in. Work with the limits, not against them.

    What is the best app for Instagram character count?

    There are several solid free tools out there for this:

    Replug offers a free Instagram caption generator that helps you craft and check your content. Other popular options include Character Counter (charactercounter.com), QuillBot Character Counter, and Postpone Instagram Character Counter. 

    These let you see your total character count in real time before you copy anything over to Instagram, saving you the frustration of hitting a wall mid-post.

  • How to disguise a link in Discord: 5 tricks you should know

    How to disguise a link in Discord: 5 tricks you should know

    Dropping random links in your Discord server chat can look a little shady sometimes.

    Long URLs flood your message with previews. Affiliate links raise red flags. And those random characters? Yeah. They scream “don’t click me.”

    You can disguise a link in Discord using a few formatting tricks. But if you’re serious about growing clicks, building trust, and keeping your brand looking clean, you’ll want to go beyond the basics.

    In this guide, we’ll cover:

    • How to disguise a link in Discord (basic methods)
    • Why Replug is a smarter, more professional solution
    • What you can do with Replug beyond just shortening links

    Let’s get into it.

    Why Discord links can hurt your clicks

    If you’re a Discord server, you’ve probably seen a suspiciously long link dropped into a Discord chat that no one dares to click. Something like:

    Example of random Discord link

    It’s long and distracting.

    On top of that, Discord hyperlink text isn’t naturally supported. You can’t just make a clean, clickable word unless you’re using embeds or bots.

    This creates a big problem for:

    • Affiliate marketers
    • Content creators
    • Community leads
    • Anyone trying to get clicks, not confusion

    So if you’re wondering how to hide a link in Discord, there are a few formatting tricks. But if you’re thinking long-term, you’ll want a better method.

    Basic ways to disguise a link in Discord

    If you’re just trying to reduce the messiness and avoid previews, here are three simple ways to go about masking links in Discord:

    1. Angle brackets

    Wrap the link like this:

    disguise a link in Discord using Angle brackets

    This disables the preview and keeps the message clean.

    2. Spoiler tags

    Hide the link behind spoiler formatting:

    disguise a link in Discord using spoiler tags

    Users have to click to reveal it. This is useful if you’re sharing sensitive or exclusive content.

    3. Asterisks

    Grab the link you want to share and wrap the link like this:

    disguise a link in Discord using asterisks

    This disables the preview and keeps the message clean. The link still works; it just looks less intrusive.

    Note: To hide both the link and its preview, use spoiler tags or asterisks. If you only want to stop the preview but still show the link, angle brackets are your best bet.

    4. Turn off previews

    For your personal settings:

    • Go to Settings > Text & Images
    • Toggle off “Show embed and preview website links pasted into chat”

    These three options cover basic Discord link formatting. They’re temporary fixes. Not solutions. If your link still looks like a mess of random letters and tracking IDs, most people still won’t click.

    Let’s be real: hiding a link ≠ building trust

    Disguising your link should do more than just “hide” it. It should make it look professional. On-brand. Click-worthy.

    That’s where Replug comes in.

    How to disguise a Discord link in Replug?

    Step 1: Log in to Replug

    Head over to Replug and sign in to your account. If you don’t have one yet, you can create a free account in just a few clicks.

    Step 2: Shorten link

    Copy the link you want to shorten and paste it in the bar under “Quickly Shorten your link”

    Paste link in Replug and shorten

    Step 3: Disguise your link

    Disguise your URL by connecting your custom domain and changing the slug of your shortened link.

    Disguise link

    Step 4: Enable link cloaking

    Turn on link cloaking in Replug so users only see your custom, disguised link in the browser’s address bar, instead of the original URL. It keeps your video link clean, branded, and more trustworthy.

    Enable link cloaking

    Step 5: Save your link

    The final step is to save your shortened link. Once done, your disguised or masked URL is ready to be shared in Discord with your community!

    Why Replug is a smarter way to disguise links in Discord

    Think of Replug as your Discord link’s glow-up. Instead of looking like a raw affiliate dump, your links get a clean, branded, professional look, and you can track everything behind the scenes.

    Here’s what you can do:

    1. Create branded short links

    Forget pasting this:

    Long Discord link

    With Replug, you can share this instead:

    Disguised link
    Boost ROI with branded URLs - Replug dashboard showing performance metrics and branded URL creation
    Boost ROI with
    branded URLs!

    Enhance your marketing campaigns by creating shareable, trackable, and fully multi-purpose customizable branded URLs.

    Try Replug for free

    This is more than shortening. It’s called a vanity URL, a link that matches your brand and earns trust.

    You can create one easily using this short URL shortener, designed to help you share branded, trackable links with ease.

    However in Discord, that goes a long way.

    2. Get full analytics and link tracking

    While Discord gives you zero visibility into link clicks, Replug gives you the full picture through the link analytics dashboard:

    • Who clicked
    • When they clicked
    • Where they came from
    • What device they used

    Perfect for understanding which Discord channels, DMs, or announcements are performing best.

    3. Customize your preview and text

    With Discord hyperlink text being limited, Replug gives you control over how your link appears elsewhere.

    You can:

    • Set a custom title
    • Add a preview image
    • Write your own description

    Instead of letting Discord embed something random (or nothing), you own how it shows up.

    4. Use dynamic QR codes

    Need your link offline? On merch? In event banners? Replug creates dynamic QR codes for every link. And if your destination changes later, you can just edit it, no need to reprint.

    That’s especially useful for cross-promotion across social, physical, and community spaces.

    5. Add clickable bio pages

    If you’re a creator, streamer, affiliate, or run a community, Replug helps you avoid spamming multiple links. You get a bio link page; one smart link that hosts everything.

    So instead of choosing one link, you just post one clean URL. You can even customize it for specific audiences, ideal if you’re targeting Discord traffic.

    Boost ROI with branded URLs - Replug dashboard showing performance metrics and branded URL creation
    Turn your bio links into click-boosting machines
    Check

    Drive up to more clicks than plain URLs

    Check

    Share multiple destinations with one link

    Create bio links free

    6. Works everywhere, not just Discord

    Once you’ve got your short link, it’s ready to drop anywhere:

    • Instagram
    • TikTok
    • Twitter
    • Email campaigns
    • Blog bios
    • YouTube descriptions
    • And of course, Discord

    Whether you’re sending it in a DM, using it in a bot, or adding it to a server announcement, your link stays clean and consistent.

    Recap: Discord formatting vs Replug

    FeatureDiscordReplug
    Hide previews
    Use custom domain (vanity URL)
    Track link clicks
    Customize preview title/image/text
    Add all your links in one✅ (bio link)
    Generate dynamic QR codes
    Look professional across all platforms

    Final thoughts

    So, how to disguise a link on Discord?

    Yes, you can hide it using brackets, spoiler tags, or by turning off previews. But those are just band-aids.

    If you’re building a brand, sharing affiliate links, or running a community, you need a tool that helps your links stand out, not disappear.

    That’s what Replug does.

    From clean, branded links to full analytics, bio pages, and custom QR codes, Replug helps you do more than just shorten your links.

    It stands out as a complete link optimization platform, designed to maximize engagement and simplify your marketing efforts.

    Ready to upgrade your links?

    • Make your links click-worthy
    • Track performance
    • Build trust in every server

    👉 Start using Replug for free

    Frequently asked questions

    Can I create clickable text on Discord like “click here”?

    Not in regular messages. Discord doesn’t support embedded hyperlinks. But with Replug, you can create clean, branded links that look more professional and trustworthy than raw URLs.

    How do I prevent a link preview on Discord?

    To stop Discord from showing a preview of your link, wrap the URL in angle brackets like this: <https://yourlink.com>. This hides the embed while keeping the link clickable.

    Can I hide an entire link in Discord?

    Yes, you can use spoiler tags like ||yourlink.com|| or wrap it in asterisks (*yourlink.com*) to hide it. Users will have to click to reveal the link, making it less intrusive.

    How to hyperlink on Discord mobile?

    You can’t create embedded hyperlinks (like “click here”) on Discord mobile or desktop in regular chats. Discord doesn’t support that kind of formatting. Your best option is to share a clean, short link, ideally a branded one using a tool like Replug.

    What’s the difference between hiding and disguising a Discord link?

    Hiding a link (e.g., with spoiler tags) just makes it less visible. Disguising a link (e.g., using Replug) makes it look professional and credible. One’s a quick fix. The other builds trust and boosts clicks.
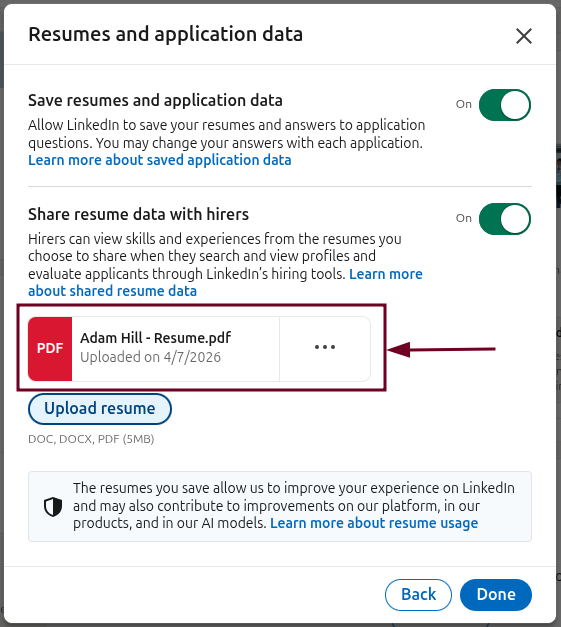
  • How to disguise a YouTube link: The complete guide

    How to disguise a YouTube link: The complete guide

    Just dropped a fire YouTube video? Maybe it’s a tutorial, a product drop, or some BTS magic. You’re hyped to share it, but that standard YouTube URL? Yeah… not the vibe.

    This is where using a branded, shortened link steps in. With the right link management tool, you can turn that generic link into a polished, professional URL that reflects your brand and builds trust at a glance.

    But it’s not just about aesthetics. A disguised YouTube link builds trust, gets more clicks, and keeps the spotlight on your content. Let’s break down why this tiny switch can level up your share game.

    Replug Branded Short Links CTA
    A complete link management solution
    for marketing professionals & agencies.
    Try Replug for free

    What does it mean to disguise a link?

    Disguising a link means hiding the original URL behind a cleaner, branded, or shortened version. Instead of showing a long, complex link, like a default YouTube or affiliate URL, you present a custom link that’s easy to read, memorable, and trustworthy.

    Tools like Replug let you disguise links using your own domain, add custom slugs, and even enable link cloaking so users only see the disguised version in the browser. It’s a simple way to make your links look more professional and boost clicks.

    How to disguise a YouTube video link using Replug?

    Replug is an amazing link management platform that makes it easy to disguise long YouTube URLs with custom short links. This results in improving visibility, uplifting trust, and driving more engagement.

    Here’s how to hide your YouTube link step-by-step using Replug:

    Step 1: Copy YouTube URL

    Go to the YouTube app and copy the URL you want to disguise from the search bar.

    Step 2: Log in to Replug

    Log in to Replug or create a free account if you don’t have one already. You’ll get access to a 14-day trial with full features.

    Step 3: Shorten your link

    Paste your YouTube embed link into Replug’s dashboard.

    Shorten YouTube link

    Related: How to shorten a YouTube URL?

    Step 4: Disguise your YouTube video link

    Create custom URL

    Step 5: Enable link cloaking

    Turn on link cloaking in Replug so users only see your custom, disguised link in the browser’s address bar, instead of the original YouTube URL. It keeps your video link clean, branded, and more trustworthy.

    Enable link cloaking

    Step 6: Save link

    Once you’re set, hit “Save Shortened link” and Replug will generate a clean, trackable short YouTube URL that’s ready to share.

    How to Embed a YouTube Video Using YouTube’s Built-in Feature

    YouTube also lets you embed videos directly onto your website or blog. Here’s how:

    1. Go to the YouTube video

    Navigate to the video you want to embed on YouTube.

    2. Click the “Share” Button

    Below the video player, click the “Share” button.

    3. Select “Embed

    In the pop-up, click the “Embed” option (</> icon).

    4. Copy the embed code

    A preview window with an HTML <iframe> code will appear. Click “Copy” to copy the code.

    5. Paste the code into your website

    Go to the backend of your website or blog and paste the embed code into the HTML where you want the video to appear.

    Tips:

    • Make sure your site/platform supports embedding HTML (e.g., WordPress, Webflow, Blogger).
    • You can manually adjust the width and height in the iframe code.
    • Some website builders also let you paste the YouTube URL directly, and they’ll auto-embed it.

    Want a code snippet with your video link in it? Just share the URL!

    Benefits of disguising your YouTube video link

    1. Make your link memorable and on-brand

    Custom short links are easy to remember and look far more professional than default YouTube URLs. When you add your own domain, it reinforces brand recognition across all platforms.

    2. Build trust across platforms

    Generic or affiliate-style YouTube links can appear suspicious, especially in emails or chats. A clean, branded URL instantly looks more credible.

    Boost ROI with branded URLs - Replug dashboard showing performance metrics and branded URL creation
    Boost ROI with
    branded URLs!

    Enhance your marketing campaigns by creating shareable, trackable, and fully multi-purpose customizable branded URLs.

    Try Replug for free

    3. Boost your click-through rates

    Disguised links are not just visually appealing; they’re also proven to get more clicks. Shorter, clearer links perform better across marketing channels and potentially have a higher CTR.

    4. Keep your messaging clean

    Long URLs can clutter up your posts or trigger previews that take focus away from your content. Disguising your YouTube link helps keep things neat and distraction-free.

    5. Track every click and conversion

    With Replug, you can monitor performance in real-time. See how many clicks your YouTube link gets, where traffic is coming from, and what content drives results.

    6. Create a QR code instantly

    Want to share your video offline? Replug lets you create a custom, dynamic QR code for any short link, making it easy to promote your video through print or packaging.

    7. A/B test multiple video links

    Wondering which custom link will make your video stand out? Use Replug to split test up to 10 URLs or more versions and optimize based on actual data.

    8. Use link rotators for smarter sharing

    Need to promote different videos to different audiences? Replug’s link rotator lets you route users to different YouTube videos without changing the link.

    9. Add calls-to-action directly to your link

    Don’t stop at just getting clicks, turn them into actions. With Replug, you can add CTA buttons, and create bridge and summary pages that display while your video plays.

    Boost ROI with branded URLs - Replug dashboard showing performance metrics and branded URL creation
    Boost your conversion rates with irresistable CTAs with

    for your marketing campaigns.

    Check

    Higher clicks

    Check

    More leads

    Check

    Better ROI

    Generate free CTAs

    Wrapping it up

    If you’re serious about growing your YouTube presence, your link strategy shouldn’t be an afterthought. Disguising your YouTube video link with a branded short URL isn’t just about looks; it’s about boosting trust, engagement, and performance across every platform you share on.

    With Replug, you get full control over how your video links appear, perform, and convert. From link cloaking to CTAs, QR codes, analytics, and more, it’s your one-stop solution for turning any video drop into a brand moment.

    So the next time you’re ready to share your content, skip the clunky links. Share it smart. Share it with Replug.

    👉 Try Replug free for 14 days and start transforming your YouTube links today.

    Frequently asked questions

    How do I disguise a YouTube video link?

    You can disguise a YouTube video link by using a link shortener like Replug. It allows you to create a clean, branded short link that hides the original YouTube link. This improves trust, looks more professional, and gives you access to analytics, CTAs, and link cloaking options.

    How to send a YouTube link without showing the thumbnail preview?

    Use the embed link or shorten it with Replug to avoid auto-thumbnails. Some apps also let you manually remove the preview before sending. With Replug, you can go a step further by customizing or disabling the preview entirely for a cleaner, on-brand look.

    What is the benefit of using a custom URL for a YouTube video?

    A custom URL makes your YouTube video link more memorable, branded, and trustworthy. It helps with click-through rates, especially on social and professional platforms, and gives you control over tracking and performance using tools like Replug.

    Can I track who clicks my disguised YouTube link?

    Yes. With Replug, you can track clicks, traffic sources, devices, locations, and even retarget viewers. It turns your YouTube link into a data-rich marketing asset instead of just a plain video drop.

    What’s the difference between link shortening and link disguising?

    Link shortening creates a shorter version of a long URL, while link disguising goes a step further. It hides the original URL, applies branding (like a custom domain), and can include cloaking so only your branded link shows in the browser bar.