Instagram and VSCO go hand in hand. While Instagram is all about sharing curated content, VSCO is where creators showcase their raw, aesthetic side. If you’re an avid VSCO user, it’s crucial to know how to put your VSCO link to your Instagram bio so that you can drive traffic to your profile and share your creative portfolio with your followers.
However, simply adding a VSCO link isn’t always enough. To make your bio more effective, using Replug to shorten and customize your link can enhance both its appearance and functionality. Plus, if you want to share multiple links, whether it’s for your VSCO, personal website, blog, or other social profiles, you can also use Replug’s bio link feature to organize them all in one place.
Ready to know how? Let’s get started!
How to add VSCO link to Instagram bio
Adding your VSCO link to your Instagram profile can easily lead your followers to your stunning VSCO portfolio without them having to hunt for it. After all, Instagram has a staggering 500 million daily users.
So, what’s more to think about? Let us guide you on how to add your VSCO link to your Instagram bio in a few easy steps:
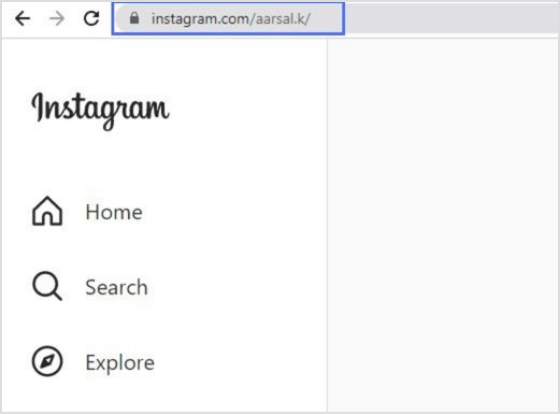
Step 1: Copy your VSCO profile link
Before you can shorten your VSCO link, you need to find it.
Open your VSCO app.
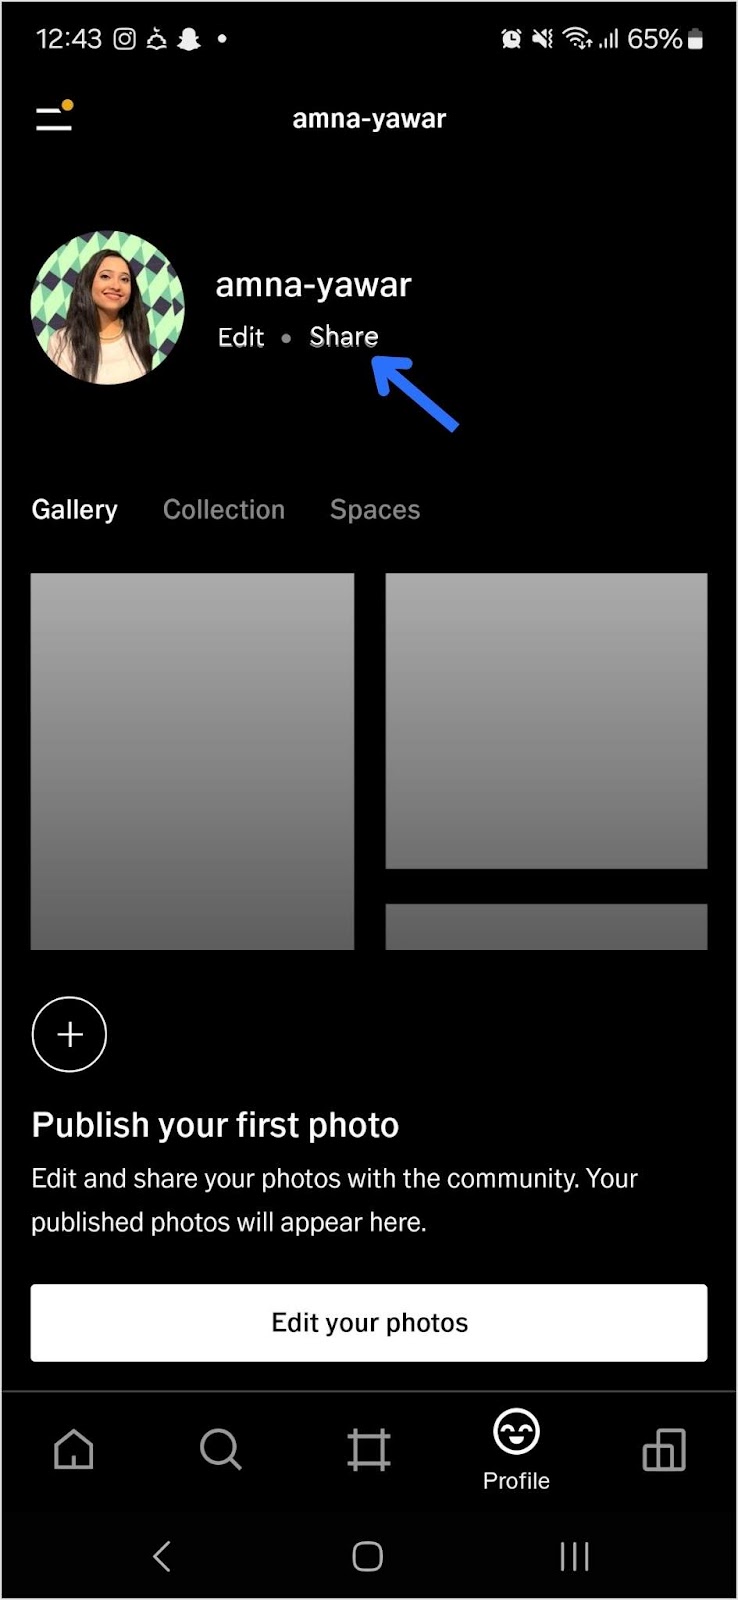
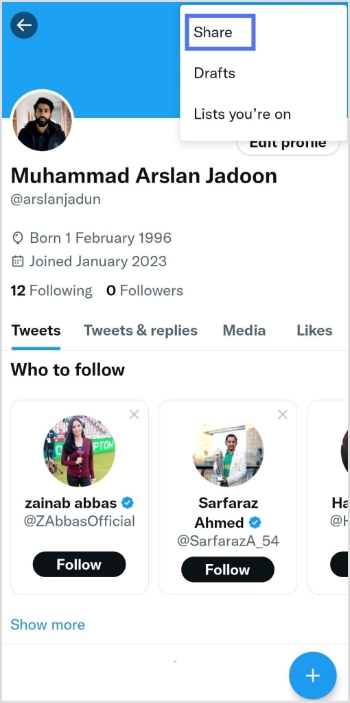
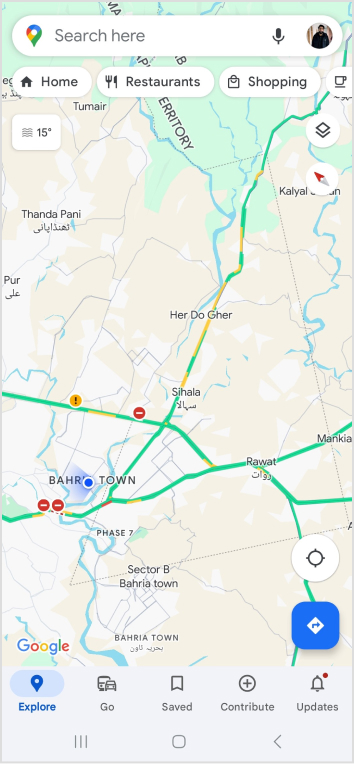
Navigate to your profile and tap “Share”:
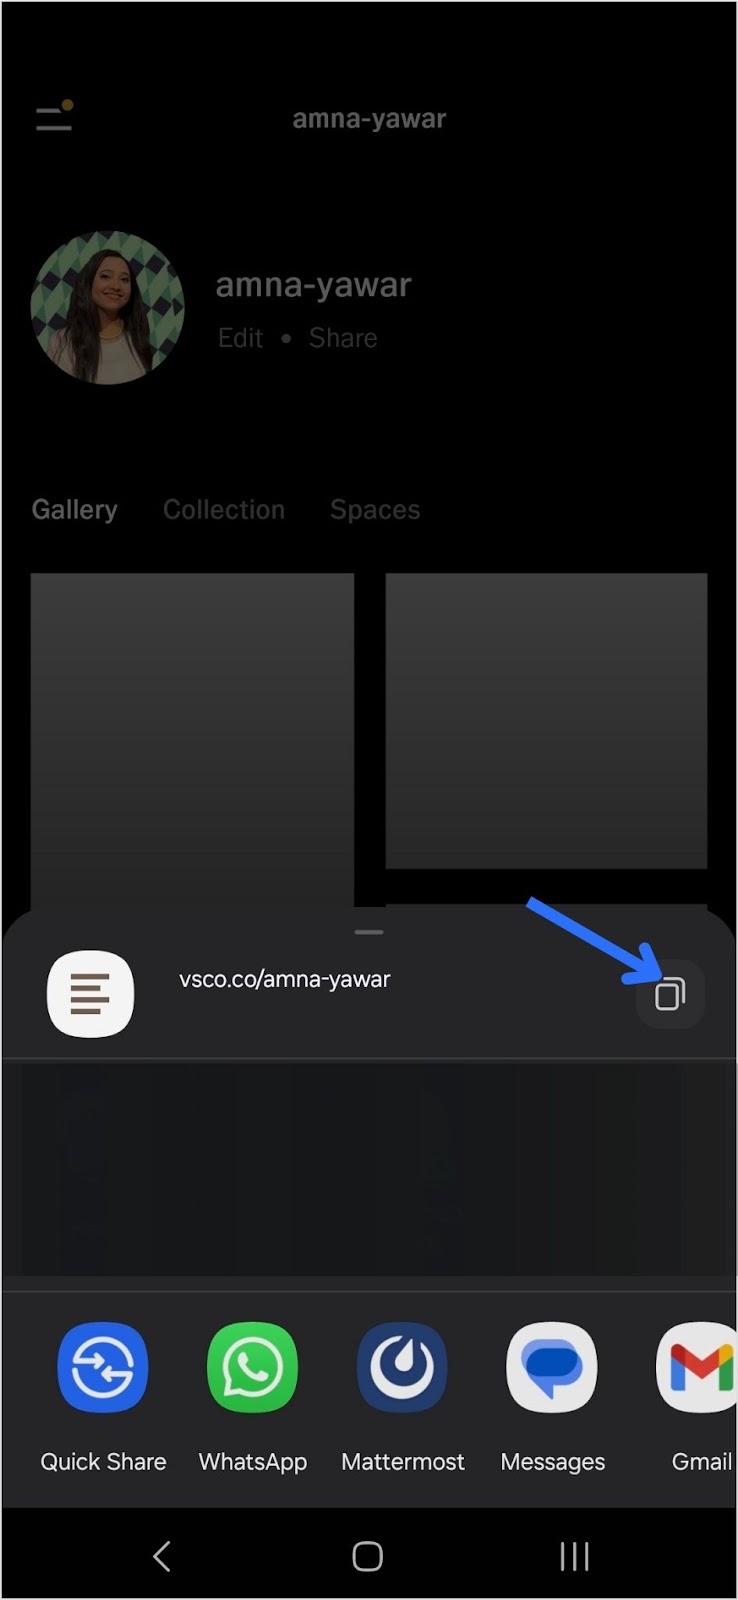
Copy your VSCO link:
Step 2: Add your VSCO link to your Instagram bio
Now that you have your short VSCO link, follow these steps to add it to your Instagram bio:
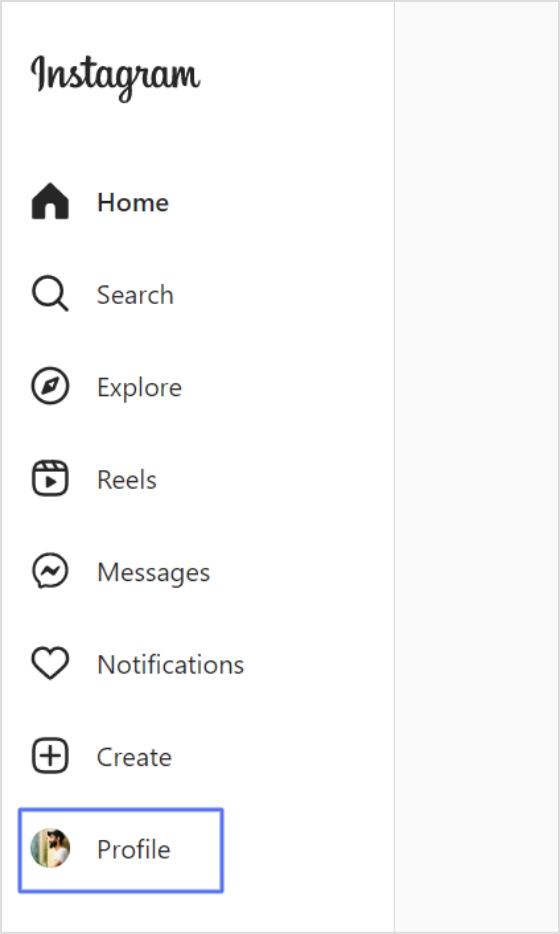
Open Instagram and go to your profile.
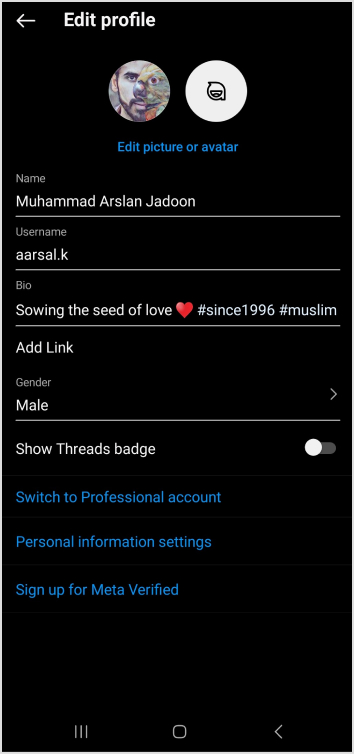
Tap “Edit Profile.”
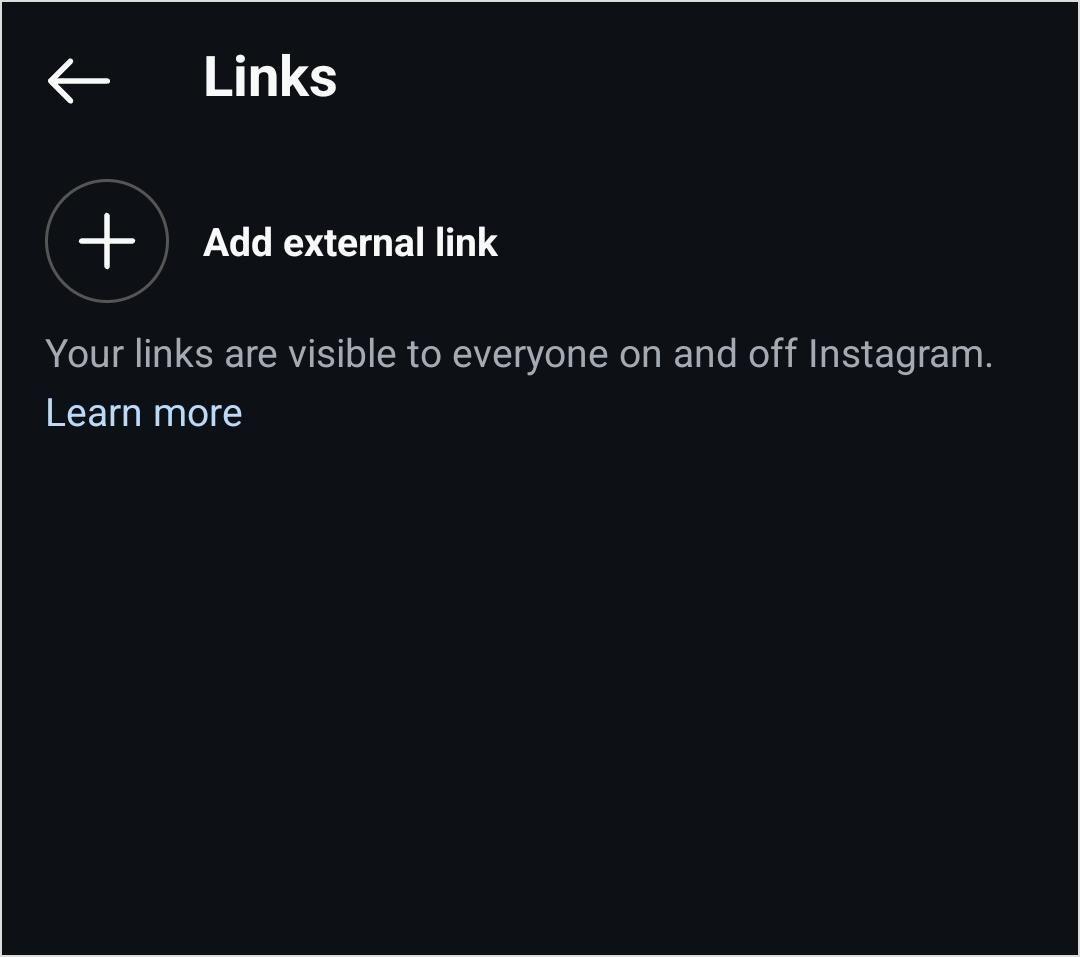
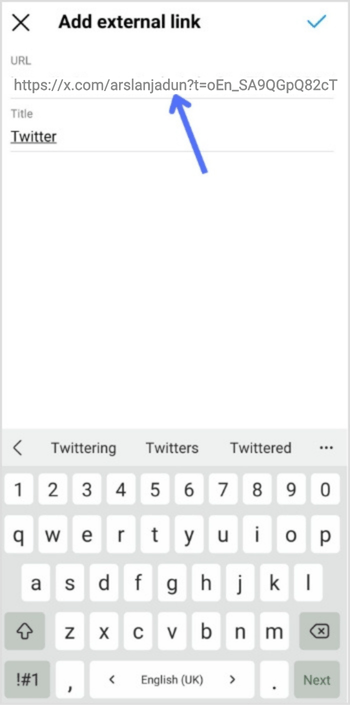
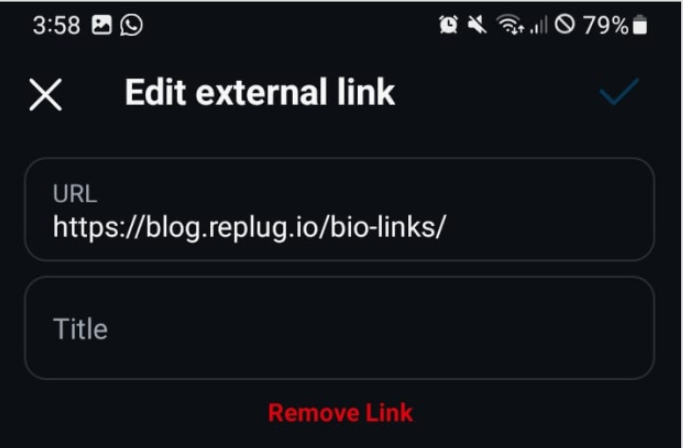
Find the “Add Link” field and click on “Add external link”
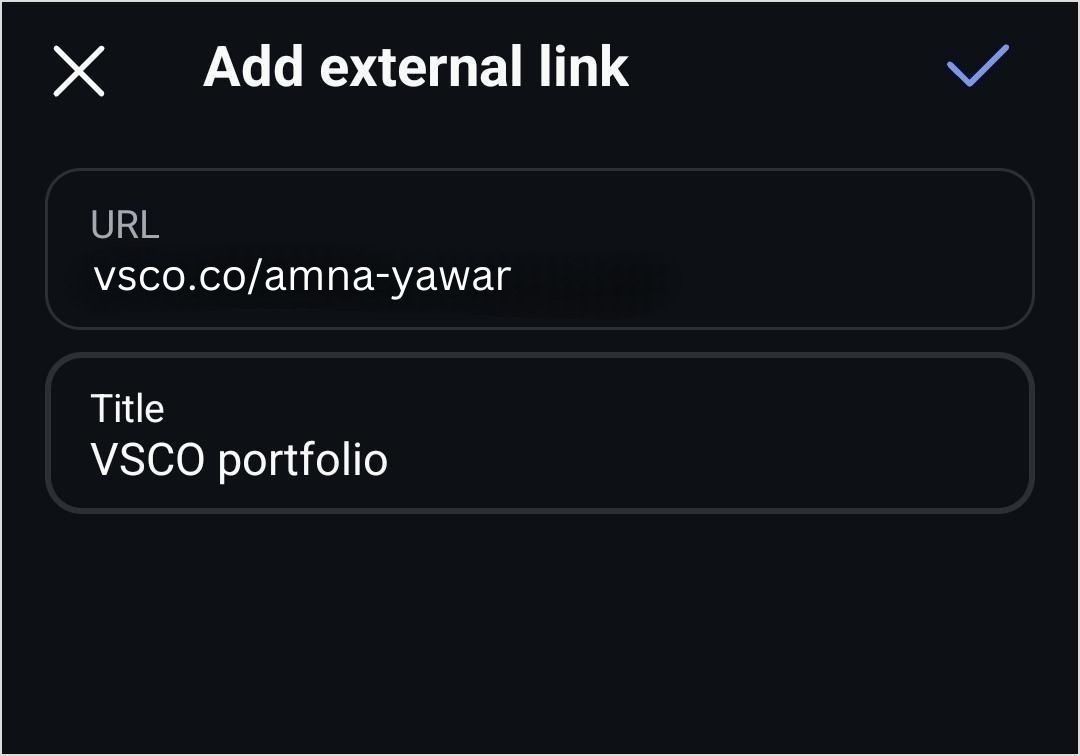
4. Add your VSCO link and click on the blue tick to save it.
Your followers will now be able to see your VSCO profile in your bio!
Shorten your VSCO link with Replug
Now, let’s make your link more presentable, branded, and optimized using Replug’s custom link shortener free:
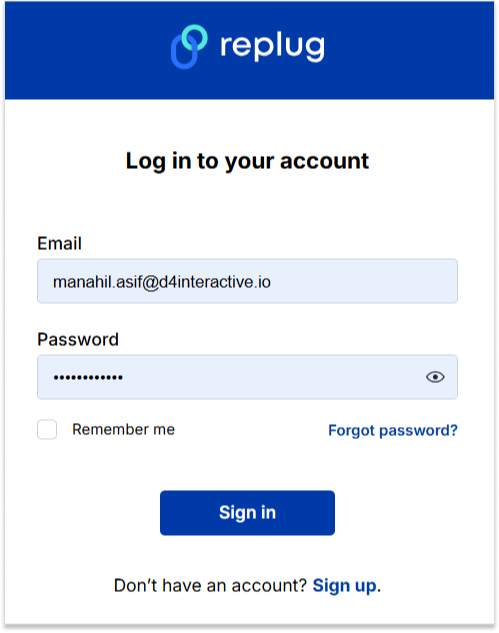
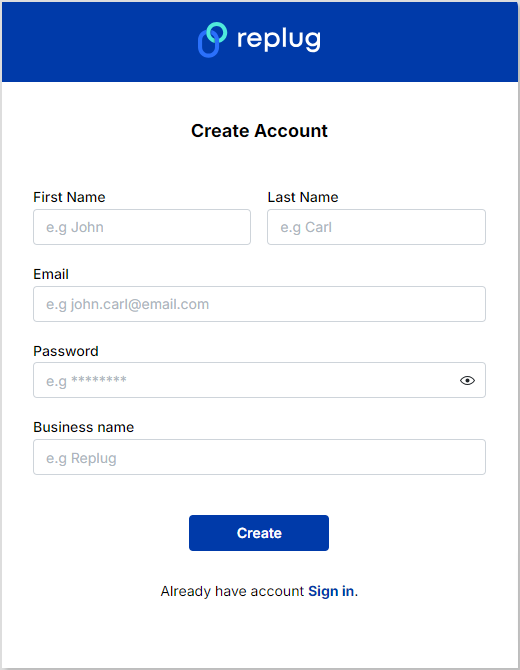
Sign in to your Replug account or create an account if you don’t already have one:
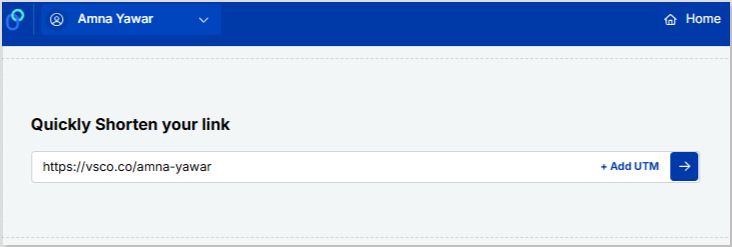
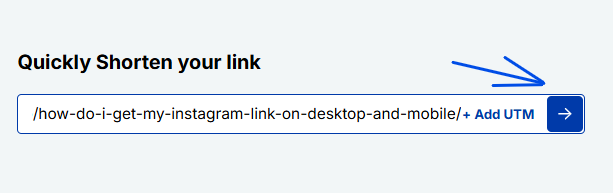
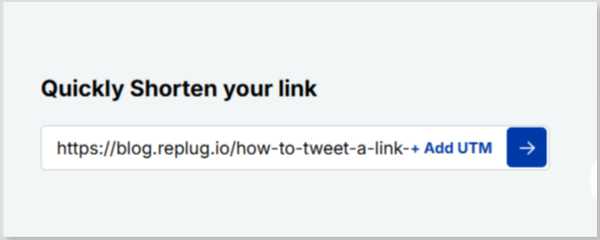
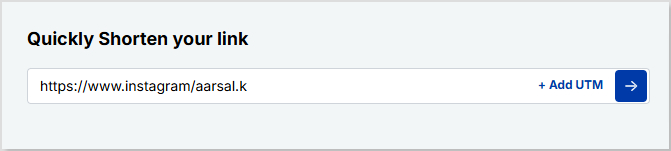
Paste your VSCO profile under “Quickly Shorten your link”
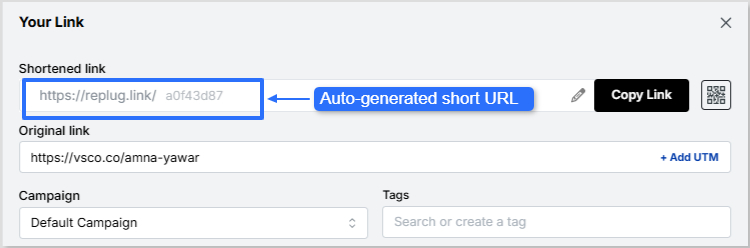
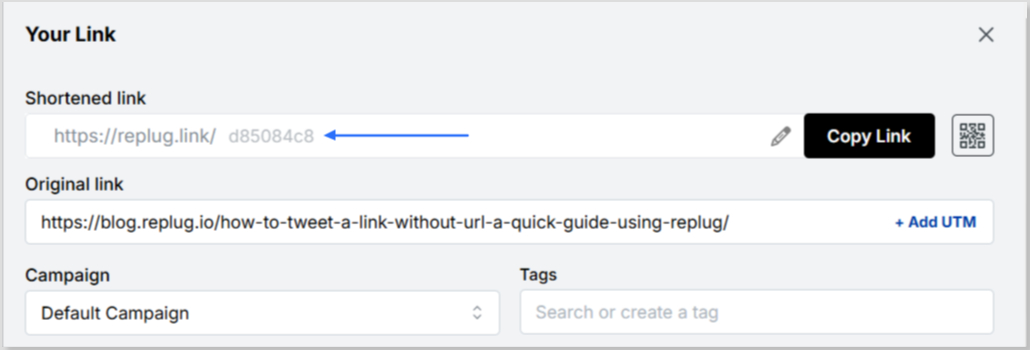
Customize the shortened link with a branded or neat alias:
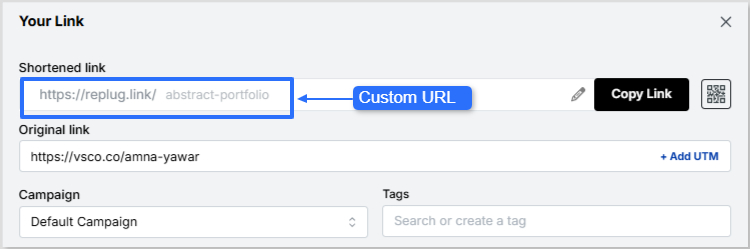
Now it’s time to give your VSCO short link a glow-up! You can easily create a custom URL by simply optimizing the slug. This will let your audience know exactly where your short link will lead them.
Auto-generated short URL:
Custom URL:
Maximize marketing ROI
by transforming ordinary URLs into branded short links that convert.
Try Replug for free
4. Save your custom URL. Now it’s ready to be shared!
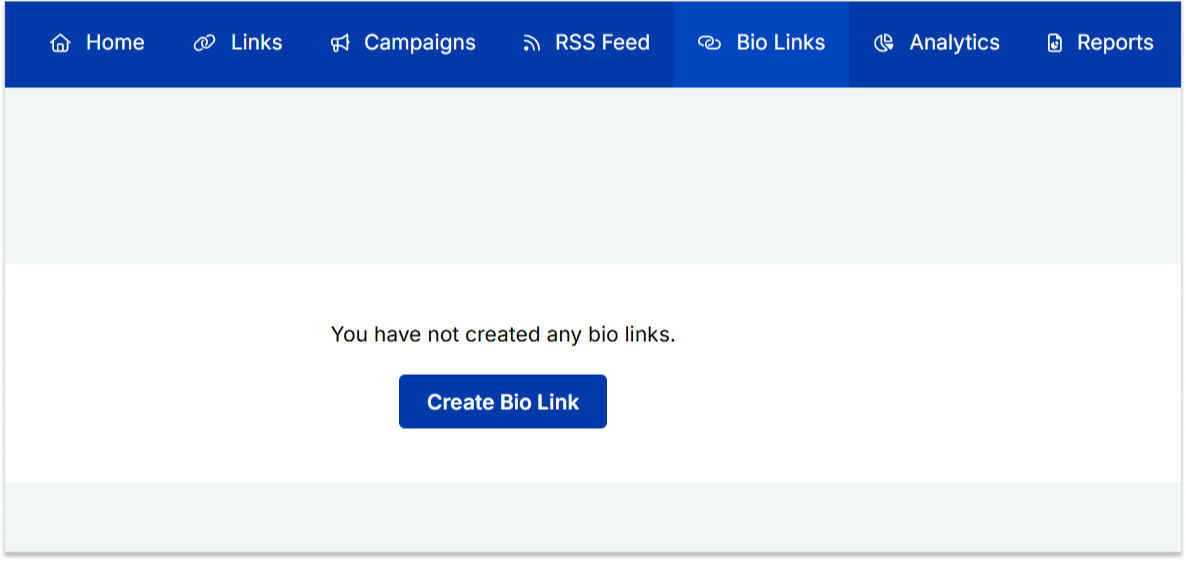
Replug offers a bio link feature if you want to share more than just your VSCO link. This allows you to create a single, customizable landing page containing multiple links. Instead of being restricted to just your VSCO, you can include:
Your VSCO profile
Your Instagram, Twitter, TikTok, and other social links
1. Neat and professional links: Even if your VSCO link looks fine, using Replug ensures that your bio remains visually clean while giving you a customizable and trackable link.
2. Track link performance: Want to know how many people are clicking your VSCO link? Replug provides detailed analytics so you can track engagement and optimize your links for better performance.
3. Share multiple links Beyond just VSCO, you can share links to all your social profiles, content, and projects with Replug’s bio link feature.
4. Custom branding: Unlike generic link shorteners, Replug allows you to customize your shortened links and bio link page with brand colors, themes, and even a custom domain.
5. Better user experience: Instead of constantly changing your Instagram bio link, you can set up your Replug page once and update it anytime without modifying your Instagram profile.
A complete link management solution
for marketing professionals & agencies.
Try Replug for free
Final thoughts
Adding a VSCO link to your Instagram bio is great, but making it look neat and professional is even better. Replug helps you shorten your VSCO link for a cleaner appearance while also offering a bio link feature for those who want to share multiple links in one place. Whether you’re a photographer, influencer, or content creator, Replug makes your Instagram bio more effective and aesthetically pleasing.
Ready to clean up your Instagram bio? Sign up for Replug and start shortening your links today!
FAQs on how to put VSCO link in your Instagram bio
Can I make my VSCO link look more aesthetic in my Instagram bio?
Absolutely! Using Replug, you can create a clean, custom-branded short link that fits your aesthetic and keeps your bio clutter-free.
Will my Instagram followers know my VSCO link is legit?
A customized, branded short link reassures your audience that your VSCO profile is safe to click, unlike long, messy URLs that may look suspicious.
What if I want to share more than just my VSCO link?
No problem! Replug’s bio link feature lets you showcase multiple links, whether it’s your VSCO, website, TikTok, or latest projects—all in one place.
Can I see how many people are clicking my VSCO link?
Yes! With Replug’s analytics, you’ll get real-time insights on link clicks, helping you understand how well your bio is driving traffic.
Do I have to update my Instagram bio every time I change my VSCO link?
Not if you use Replug! Simply update your link inside Replug’s dashboard, and your Instagram bio link stays the same.
Marketing experts have embraced the power of vanity domains as transformative branding tools. These domains elevate simple links into potent instruments for building brand identity and driving website traffic.
In this comprehensive guide, we’ll explore the intricacies of using vanity domains to enhance your brand’s visibility and draw in visitors. We’ll also delve into the process of creating a vanity domain using a link management platform.
What is a vanity domain?
A vanity domain is a personalized and often shortened web address that is designed to reflect a brand, individual, or specific purpose. Unlike a standard domain name, which might consist of a generic combination of words and characters, a vanity domain is tailored to be more memorable, brand-focused, and aligned with a particular identity or message.
Vanity domains are often chosen to enhance brand recognition, create vanity URLs, and create a more engaging online presence.
For example, if a company named “ABC Widgets” wants to establish a strong online presence, it might opt for the vanity domain “ABCWidgets.com” instead of a more generic domain name. Similarly, an individual named John Smith might choose the vanity domain “JohnSmithDesigns.com” to showcase his portfolio as a graphic designer.
Vanity domain vs vanity URL: What’s the difference?
In the realm of online branding and link management, the terms “vanity domain” and “vanity URL” often surface. These terms are closely related but hold distinct meanings, serving different functions in the digital landscape. Let’s delve into the nuances of each concept to understand how they differ:
Vanity domain
A vanity domain refers specifically to the branded and personalized web address that serves as the main entry point to a website. This domain is carefully chosen to reflect a brand’s name, individual identity, or particular purpose. The primary goal of a vanity domain is to establish a memorable, recognizable, and often concise web address that aligns with the brand’s identity and message.
For instance, if a company named “ABC Innovations” wants a distinct online presence, they might select the vanity domain “ABCInnovations.com” as their main web address. This domain encompasses the entirety of their website and serves as the central location for their online activities.
Vanity URL
On the other hand, a vanity URL involves a combination of the branded domain name and a specific, often shortened, path or identifier that leads to a particular page or content within the website. Vanity URLs are strategically crafted to create user-friendly and easy-to-share links, particularly for marketing campaigns, social media sharing, and other scenarios where succinct links are preferable.
For example, if the company “ABC Innovations” is running a special summer promotion, they might use the vanity URL “ABCInnovations.com/SummerPromo” to lead users directly to the promotional page on their website. The inclusion of “/SummerPromo” specifies the exact destination within the website.
Key distinctions
Scope and purpose: Vanity domains encapsulate the entire website and serve as its main address, while vanity URLs target specific pages or content within the website.
Link components: A vanity domain consists solely of the branded domain name, whereas a vanity URL combines the branded domain name with a path or slug that directs users to a particular location.
Branding focus: Both concepts are used for branding, but vanity domains establish the overall brand identity and web presence, while vanity URLs provide branded and user-friendly links for targeted content.
A complete link management solution
for marketing professionals & agencies.
Try Replug for free
What is the difference between a vanity domain and your primary domain?
A vanity domain and a primary domain are related concepts but serve different purposes and have distinct characteristics. Let’s explore the differences between the two:
Primary domain
An original domain, also known as a standard domain or primary domain, is the standard web address that represents a website on the internet. It’s the unique address users type into their browsers to access a website.
Original domains are typically chosen based on the name of the business, brand, individual, or purpose of the website.
They are designed to provide a direct and clear representation of the website’s identity.
A primary domain encompasses the entire website and serves as its main entry point.
Examples of primary domains include “Google.com,” “Apple.com,” and “Amazon.com.“
Vanity domain
A vanity domain is a customized, branded web address that is often shorter and more memorable than an original domain.
It serves as an alternative or additional domain that redirects to the main website.
Vanity domains are chosen to enhance branding, improve link sharing, or create a more memorable online presence.
While vanity domains can redirect to the main website, they can also serve as standalone addresses with unique content or landing pages.
Examples of vanity domains include “YourBrand.link” or “JohnDoeDesigns.com.”
Key differences:
Purpose: An primary domain is the primary address of the website, representing the website’s identity and content. A vanity domain can be an alternative, shortened, or branded address used for specific purposes.
Branding and memorability: Vanity domains are often chosen for their branding and memorability, while original domains are selected based on brand identity and relevance.
Redirection: Vanity domains may redirect users to the main website or specific pages, whereas original domains are the main entry points to websites.
Length: Vanity domains are more concise than original domains.
Usage: Vanity domains are used strategically for marketing campaigns, specific content, or enhancing link sharing. Original domains are the primary addresses for websites.
How to choose an unforgettable vanity domain name?
Selecting a vanity domain name requires careful consideration to ensure it aligns with your brand identity and resonates with your audience. Much like choosing a brand name, the process involves creating a memorable and recognizable online presence.
Here’s a step-by-step guide to help you make an informed decision:
Catchy and memorable
Opt for a domain name that’s easy to remember and recall.
Choose words that are catchy and resonate with your brand’s personality.
Ease of pronunciation and spelling
Ensure your domain name is easy to pronounce and spell.
Avoid complex words or combinations that might confuse users.
Intuitive and clear
Your domain name should intuitively reflect your brand’s identity or the purpose of your website.
Make it clear to visitors what your website is about just from the domain name.
Avoid special symbols
Stick to letters and numbers in your domain name.
Avoid using hyphens or special characters that can complicate the name.
Capitalization for clarity
If your domain name consists of multiple words, consider capitalizing the first letter of each word.
This improves readability and makes the name easier to understand.
Brand value communication
Your domain name should communicate the value or essence of your brand.
Incorporate keywords or terms that resonate with your target audience.
Alignment with the brand name
Choose a domain name that’s closely aligned with your brand name.
If your brand name is short and distinctive, consider using it as your domain name.
Print advertising considerations
Think about how your domain name will appear in traditional print advertising.
Ensure it’s easy to remember and understand at a glance.
Vanity domain name extensions
Top-level domain (TLD) consideration
The TLD is the extension that appears after the dot in your domain name (e.g., .com, .net, .org).
Generic TLDs, like .com and .net, are widely used and recognized.
Custom TLDs for branding
Explore custom TLDs that align with your brand or industry.
Newer TLDs like .blog, .tech, and .store can offer unique branding opportunities.
Types of TLDs
Generic TLDs cover widely used extensions.
Sponsored TLDs are specific to organizations like governments or universities.
Country TLDs are related to specific countries.
Choosing TLDs
If your website isn’t affiliated with a specific country or organization, you’ll likely choose from generic TLDs.
Consider TLDs that best resonate with your brand identity and content.
Unconventional TLDs
Unconventional TLDs, such as “virg.in,” “nytim.is,” and “es.pn,” can add a creative touch to your domain.
Exploring new extensions
If your desired domain name isn’t available with traditional TLDs, explore new extensions or variations.
ICANN application
If needed, you can apply for a new TLD through the Internet Corporation for Assigned Names and Numbers (ICANN).
By following these steps, you can choose a vanity domain name that not only captures your brand essence but also enhances your online presence and user experience.
How to create a vanity domain?
The process of setting up a vanity domain depends on your intentions and goals. Follow these steps to create a vanity domain using a link management platform:
How to create a vanity domain using Replug?
Step 1: Sign up for Replug
Visit Replug’s app and sign up for an account. You’ll need at least a basic Replug account to create a vanity domain.
Step 2: Log in to your Replug account:
After creating your account, log in to your Replug home page.
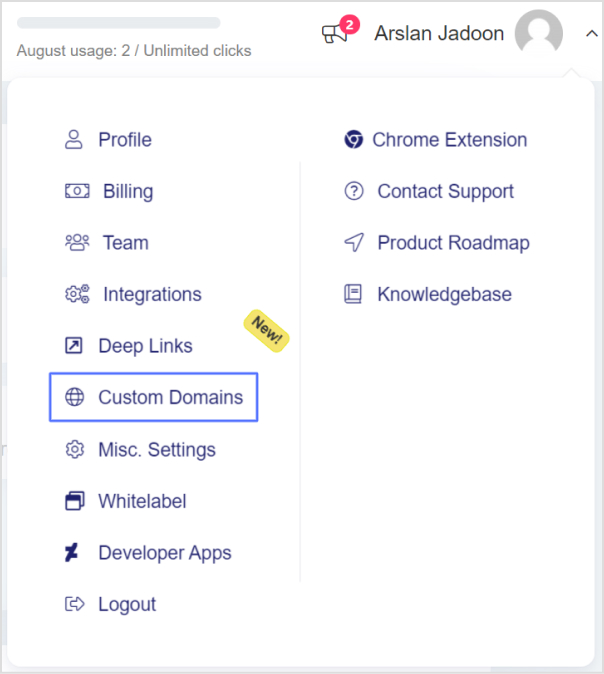
Step 3: Access custom domains
Click the drop-down icon next to your profile picture and select “Custom Domains” then click on the blue “Add Domain” button.
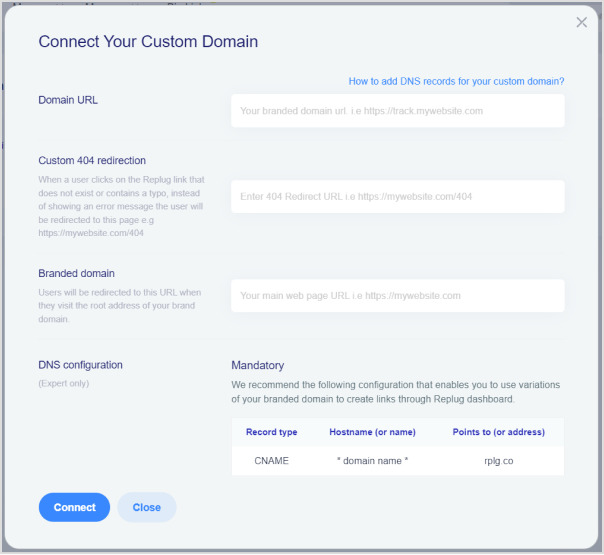
Step 4: Enter domain details:
In the next screen, where you need to enter your Domain URL, Custom 404 redirection, and Branded Domain.
Afterward, click on the Connect button as shown in the image below.
Domain URL: Your branded or custom domain is included here.
404 redirect URL: When a user visits your platform and lands on 404 pages.
Branded domain: Whenever the user visits the root address of your brand domains, they will be redirected toward the URL.
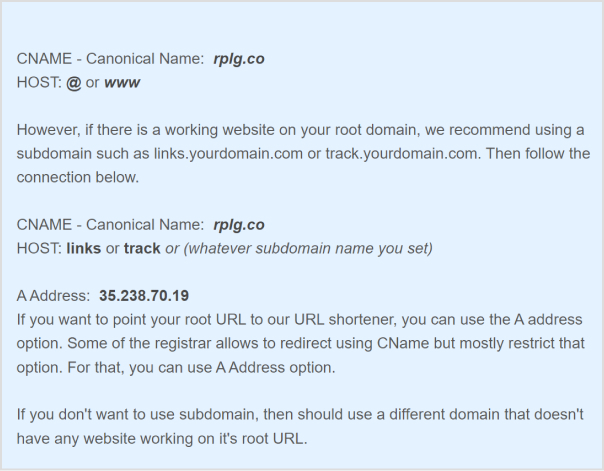
Note: Once you have added your domain to the platform, the next step is to point CNAME in your domain registrar’s DNS. If you would like to redirect your root domain, please try adding @ or www. Some of the registrars do not allow the @ option, for that, you will have to add www as a HOST value.
Replug offers real-time analytics that provides valuable insights into link performance, including click-through rates. Take advantage of these analytics to refine your approach and better target your audience. Additionally, Replug seamlessly integrates with various social media and digital marketing tools, enabling you to create and manage vanity links at scale.
Important note: Every short URL or link created through Replug comes with HTTPS encryption by default, ensuring the security of your content and the protection of user data.
By following these steps, you can effectively create and manage your vanity domain, enhancing your online branding efforts and maximizing your digital presence. Replug, in particular, offers a user-friendly platform to simplify the process and provide valuable insights into link performance.
Maximize marketing ROI
by transforming ordinary URLs into branded short links that convert.
Try Replug for free
FAQs on vanity domains
Why are vanity domains important for branding?
Vanity domains help enhance brand recognition, make web addresses more memorable, and improve the overall aesthetics of a brand’s online presence. They contribute to building a strong brand identity.
How do I choose the right vanity domain name?
When selecting a vanity domain, consider factors such as brand identity, memorability, ease of pronunciation, and relevance to your business. It should reflect your brand’s essence and be easy for users to remember.
Can a vanity domain improve my website’s search engine ranking?
While vanity domains themselves may not directly impact search engine ranking, they can contribute to a consistent and memorable brand identity, which indirectly can influence user engagement and recognition, potentially leading to improved SEO.
Can I use a vanity domain for social media links?
Yes, using a vanity domain for social media links can help create a cohesive and recognizable online presence. Shortened vanity URLs are particularly useful for sharing content on platforms with character limits.
Can I change my vanity domain once it’s set up?
Yes, it’s possible to change your vanity domain, but it may involve some technical steps and potentially impact your online branding. Consider the implications before making any changes.
Are there any security considerations when using a vanity domain?
Ensure that the domain registrar or link management platform you use provides proper security measures, including HTTPS encryption. This helps protect user data and maintains the integrity of your brand.
Do vanity domains work well for businesses of all sizes?
Yes, vanity domains can benefit businesses of all sizes. They provide an opportunity to create a memorable and distinct online identity, regardless of the scale of the business.
Can I use multiple vanity domains for different marketing campaigns?
Yes, using multiple vanity domains for different campaigns can be effective in tracking campaign performance and targeting specific audiences. Just ensure that the domains align with your brand’s overall messaging.
Curious about those square patterns you see on product packaging, restaurant menus, and even event tickets? These special grids, known as QR codes, provide a fast way to connect your smartphone with digital information. All it takes is a quick scan.
But have you ever wondered how to read them correctly?
Below, you’ll find a complete QR code scanning guide with tips, troubleshooting ideas, and safety recommendations. If you’re searching for steps to scan a QR code on any device, look no further!
How to scan a QR code on iPhone, iPad, or iPad Touch
Apple makes QR code scanning straightforward. Most Apple phones and tablets have a built-in scanner that works through the Camera app, so you likely won’t need extra tools.
Using the built-in camera app
Open the Camera app.
Point your camera at the QR code, making sure it’s inside the viewfinder.
Hold steady for a moment. A notification banner will pop up at the top of your screen.
Tap the banner to open the link or carry out the action.
If your phone’s camera is slow to respond, try adjusting the distance between your phone and the QR code. Good lighting can also speed up recognition.
Enabling QR code scanning:
In rare cases, the Camera app might not detect QR codes right away. You can activate the feature in the system settings:
Open the Settings app.
Scroll down and tap “Camera.”
Turn on “Scan QR Codes.”
Here’s a sample QR code we created using Replug’s custom QR code generator so that you can see if scanning works for you:
Note: If your Apple device’s default camera doesn’t support QR scanning, you can easily download a dedicated QR scanner app from your app store. This might happen if you haven’t upgraded to a newer iOS model.
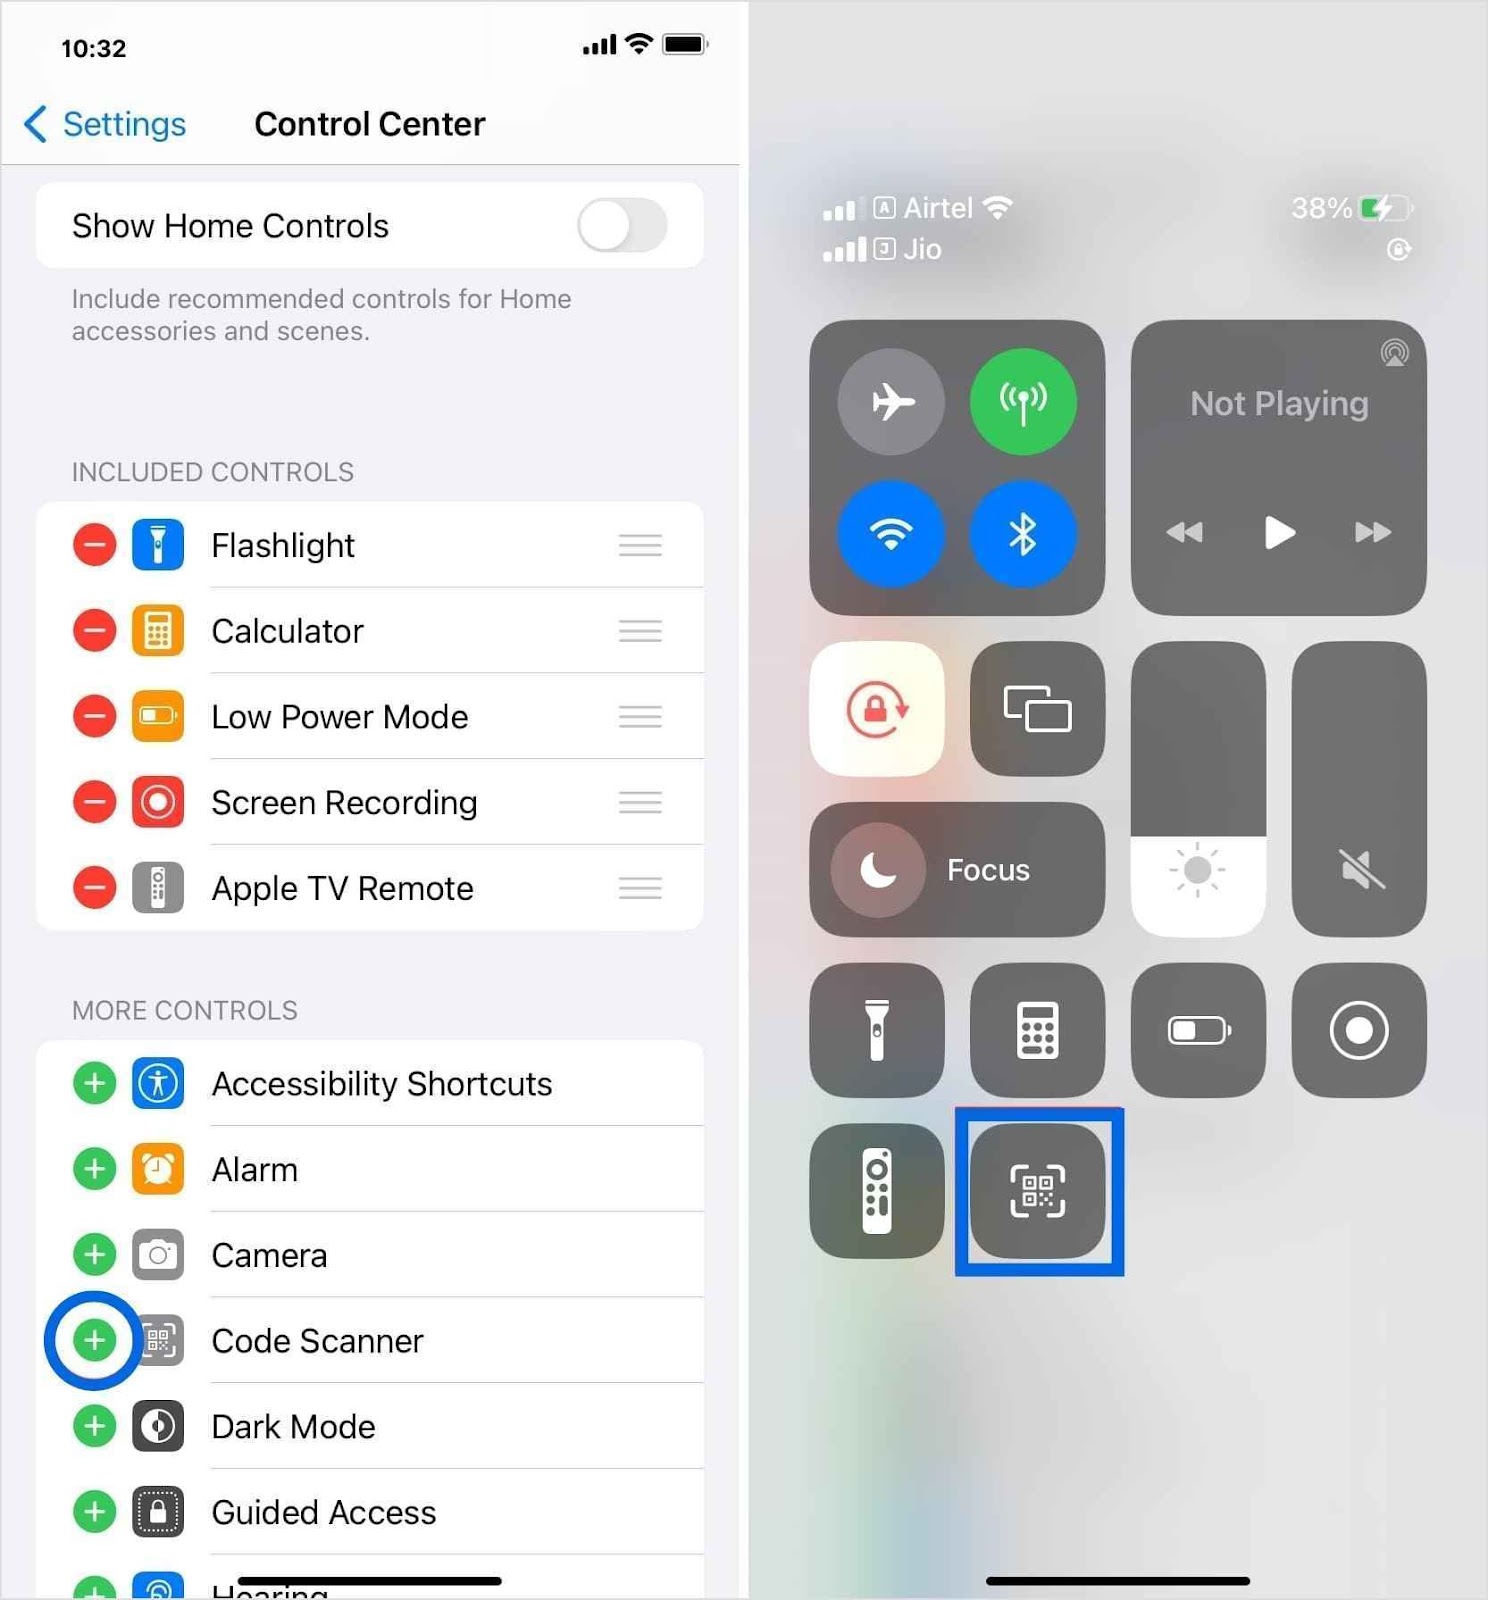
Using the Control Center QR code scanner
Some find it even easier to launch a scanner from the Control Center:
Go to Settings > Control Center.
Tap the green plus sign next to “Code Scanner.”
Open the Control Center by swiping from the top-right corner (on newer iOS devices) or bottom (on older iOS devices).
Tap the QR scanner icon and aim your camera at the code.
Scanning from photos or screenshots
Ever received a QR code in a text or image? You can scan that, too. Here’s how:
In the Photos app, pick the picture that has the QR code.
Touch and hold the code on your screen.
A pop-up appears with an option to open the link or carry out the relevant task.
Android devices come in many models, but they share similar ways to read QR codes. From Samsung phones to Pixel devices, you’ll usually have at least one built-in method.
Using the default camera app
Most newer Android phones handle QR codes directly:
Launch your camera app.
Aim at the QR code.
Wait for a prompt or banner with a link or action.
Tap it to open.
Keep your camera clean and well-focused. Poor focus can affect scanning speed.
Enabling QR code scanning in settings:
If nothing happens when you point your camera at a code, you might need to switch on scanning:
Open your Camera app.
Look for the gear icon or similar to open settings.
Find an option such as “Scan QR codes” and turn it on.
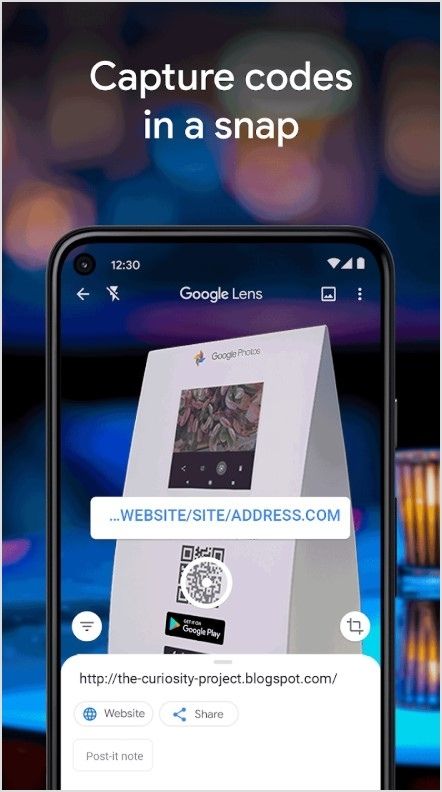
Using Google Lens
Source: Google Playstore
If the default camera fails to read QR codes, Google Lens usually works:
Open the Google app or say, “Hey Google, open Lens.”
Point the camera at the QR code.
Tap the on-screen code to see the information.
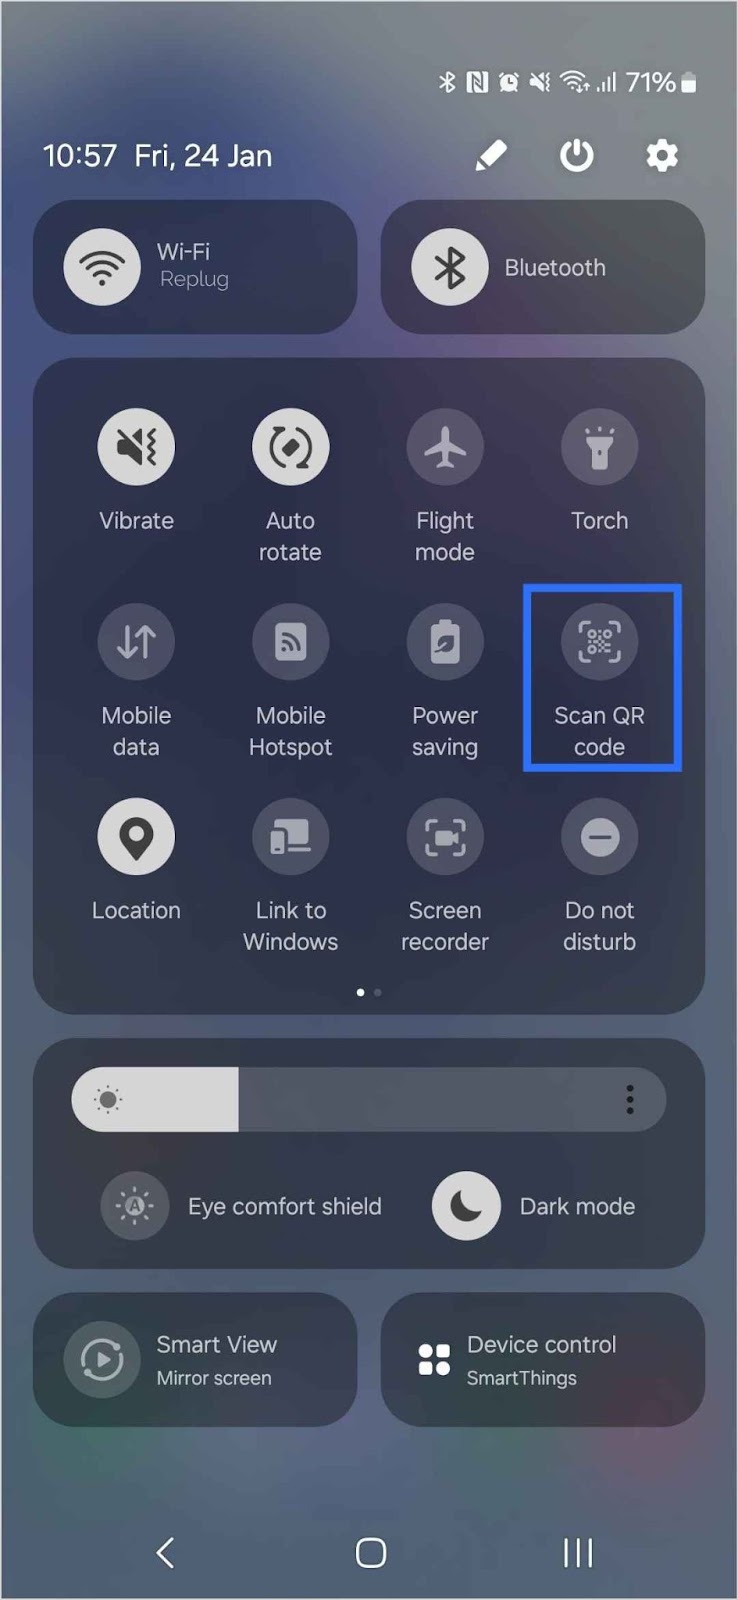
Using the quick settings drop-down
Here’s how to scan a QR code using Quick Settings drop-down on Android phones:
Swipe down your notification bar and tap on “Scan QR Code.”
The scanner will activate your camera. Just point it at any QR Code.
If you’ve saved a QR Code as an image, tap the image icon in the scanner app to access your gallery and scan it.
The QR Code data will instantly appear as a pop-up.
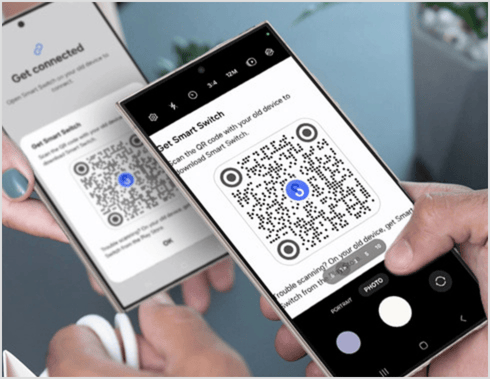
Samsung-specific methods
Samsung devices often include extra features via Bixby Vision or the Samsung Internet browser for QR code scanning:
With Bixby Vision:
Open the camera and tap the Bixby Vision icon.
Point at the QR code.
Tap the pop-up box to open the link.
With Samsung Internet:
Open the Samsung Internet browser.
Tap the QR code icon in the search bar.
Aim the camera at the QR code.
Alternative methods for older Android versions
Some older phones might not support built-in scanning:
Sometimes, your QR code might not work. Here are some reasons why that could happen and quick fixes:
Poor lighting can stall detection, so boost your phone’s brightness or switch on your flashlight.
Damaged or blurry codes can be harder to identify. Try moving your phone slightly to refocus.
Holding your device at extreme angles can make it tough for the camera to read the squares. A flat, head-on angle works best.
Double-check your camera settings to confirm QR scanning is active.
Some codes link to sites or apps that need internet access, so ensure you have a stable connection.
Important safety tips for QR code scanning
Scan codes only from places or platforms you trust.
Check the link before tapping it if your phone shows a preview.
If a code looks mismatched or tampered with, avoid scanning.
Rely on well-known scanners such as your smartphone’s default camera or a reputable third-party tool.
If you need to share or shorten a link attached to your QR code, consider using Replug. It is a powerful link management platform that helps streamline your URL sharing and tracking.
Besides, you can also give Replug’s URL shortener a go for quick and efficient link shortening. You will be amazed with the results!
A complete link management solution
for marketing professionals & agencies.
Try Replug for free
FAQs on how to scan a QR code
Do I need a special app to scan a QR code?
Most recent smartphones handle QR code scanning through their camera apps. For older devices, a scanner app from your app store can work fine.
Can I scan a QR code from a screenshot?
Yes. Open the screenshot in your Photos or Gallery app, then hold your finger on the code until an option appears to open the link.
Why isn’t my phone scanning QR codes?
Check if scanning is activated in your camera settings. Also, confirm your phone’s software is up to date. If it still won’t work, install a specialized scanning app.
Are QR codes safe to scan?
They are usually safe, but it’s best to be cautious. Look over the link if your phone displays it, and avoid codes that look suspicious or are from unknown sources.
You’ve got a hot product, and your online store makes few weekly sales. It’s time to turn the dial on your Shopify game and set your sales on a growth trajectory. But how? That’s the million-dollar question.
This guide has your back, delivering straightforward techniques that drive traffic and boost sales. And the best part? They’re quick and easy to implement!
So, let’s dive into the strategies that will boost your Shopify success without any unnecessary fuss.
Why do you need to increase your Shopify sales?
Shopify is an ecommerce platform that empowers entrepreneurs to launch and quickly grow their online stores. It’s user-friendly, packed with features, and highly customizable to suit many businesses. In fact, Shopify stores have collectively generated over $1 trillion in global sales, making it a powerhouse in online retail! Mindblowing, isn’t it?
That being said, with the stats to back it up, increasing your sales on Shopify could be the cherry on top to level up your ecommerce game. Also, consumer behavior has shifted drastically after the pandemic, with more people shopping online than ever before. This makes optimizing your Shopify store the ultimate game-changer for your business.
That’s exactly why we’re blessing you with this golden content: to help you win the Shopify Hunger Games.
But before we spill the tea, let’s take a moment to pinpoint the reasons why you might be falling behind. Time to turn those weaknesses into winning strategies!
To succeed in online marketing, focusing on a specific niche and target audience is essential. Trying to appeal to everyone often dilutes your efforts. Instead, identify your ideal customer and tailor your marketing message to resonate with them. This increases engagement and improves conversion rates. You need to:
Attract the right customers: Craft your message to meet your ideal customer’s needs and pain points.
Boost conversions: When your marketing is relevant, you’re more likely to turn visitors into loyal customers.
Use first-party data: Understand your audience better and refine your targeting using data like customer behavior, purchase history, and interactions.
Unlike third-party data, which is less personalized, first-party data allows you to create more effective marketing strategies. Here’s a video by Dan Shaffer from WebFX, sharing tips on how first-party data can amplify ecommerce sales:
2. Enrich the customer experience
For an ecommerce platform, positive customer experience is crucial for retaining customers and driving repeat sales. From the first interaction with your brand to post-purchase support, each touchpoint shapes their perception of your business. Customers encountering difficulties or dissatisfaction along the way are more likely to look elsewhere. Here’s how you can enrich the customer experience:
Create a streamlined shopping journey: Ensure your website is easy to navigate, with clear product descriptions and simple checkout processes.
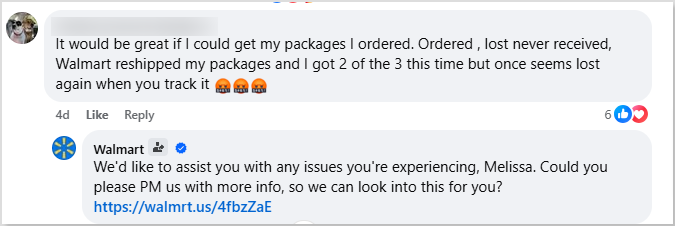
Responsive customer support: Offering timely and helpful support can resolve issues quickly and build customer trust.
Here’s an example of Walmart’s responsive customer support. Their excellent customer service is one of their biggest secrets behind ecommerce success:
The key to keeping customers happy is providing exceptional customer service. If you go the extra mile, customers are more likely to return and recommend your brand, leading to long-term success.
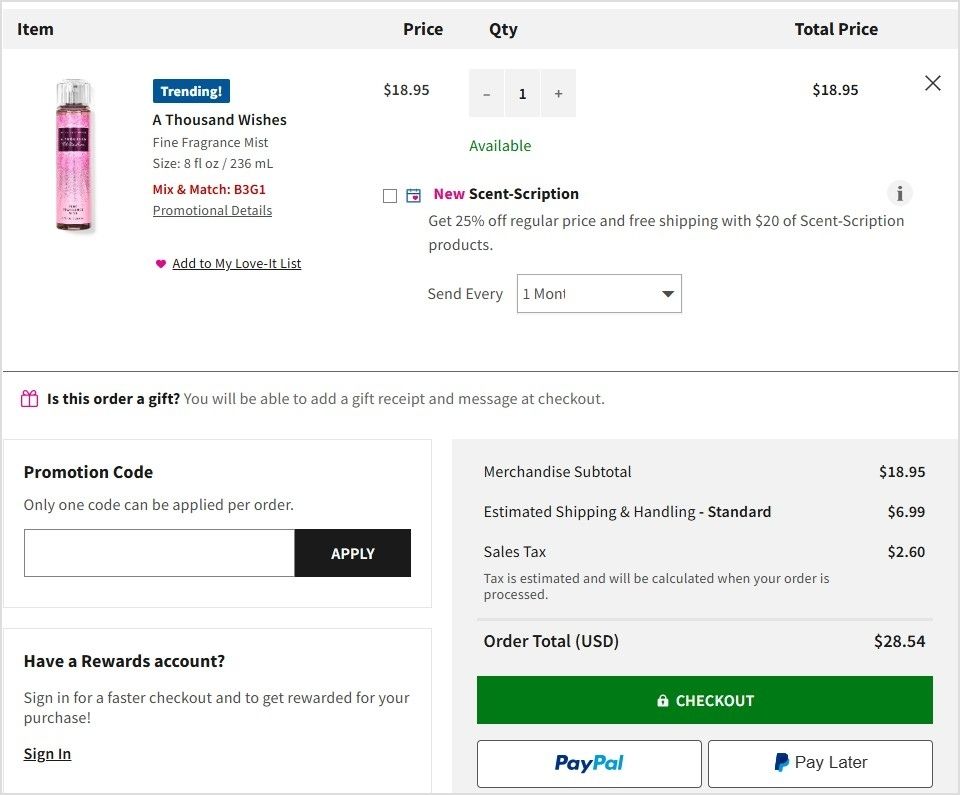
3. Streamline and optimize your checkout process
To reduce cart abandonment and boost conversions, simplify your Shopify checkout with these key strategies:
Allow guest checkout: Allow users to make purchases without registration to reduce friction.
Minimize steps: Eliminate unnecessary form fields or pages to make the process quicker.
Offer clear payment options: Ensure an intuitive, easy-to-follow process with progress indicators.
Enhance page design: Keep it clean, easy to navigate, and visually appealing.
Use secure payment gateways: Ensure a reliable and safe transaction.
For registered or returning customers, a one-step checkout can further streamline the process and encourage completion. Here’s an example of Bath & Body Works:
Following the above strategies can easily improve user experience and increase sales on your Shopify store!
Your website copy plays a pivotal role in converting visitors into customers. It should be clear, concise, and persuasive, guiding users to take the desired actions, whether it’s making a purchase, signing up, or getting in touch.
Focus on benefits: Clearly articulate how your product or service improves your customers’ lives. Instead of just listing features, explain the specific, tangible benefits they’ll experience.
Use a conversational tone: Speak directly to your audience in a way that resonates with them. A friendly and approachable tone can make your message more relatable and engaging.
Proofread for perfection: Small errors like typos or grammatical mistakes can undermine your credibility and professionalism. Ensure your copy is polished before it goes live to maximize its effectiveness. Using a plagiarism checker can also help you maintain originality and ensure your content is completely authentic before publishing.
You’ll build trust and increase Shopify sales by refining your web copy to address your audience’s needs and showcase your offering’s true value. When paired with a E-commerce SEO agency’s expertise, your website can become a powerful tool for driving conversions.
5. Enhance website navigation
A smooth and intuitive website navigation keeps visitors engaged and increases conversions. Studies show that the average bounce rate benchmark is approximately 55.43%, hence, making it easy for customers to find what they’re looking for is essential.
Use a straightforward, visible menu: Your homepage should feature a prominent navigation menu that’s easy to spot and use. Include categories like vendor, product type, or tags so users can quickly narrow their search.
Organize products logically: Group similar items together to help customers easily find related products. This improves the browsing experience and boosts sales by encouraging additional purchases.
Streamlining the navigation makes it easier for customers to explore your products, increasing engagement and ultimately leading to more conversions.
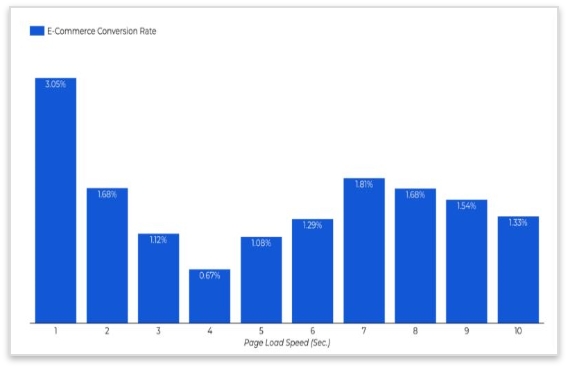
6. Make your store load fast
A fast-loading ecommerce store is crucial for both customer satisfaction and SEO performance. Here’s why it matters:
Customer experience: A slow-loading site frustrates users and leads to high bounce rates. Visitors may leave before they even have a chance to explore your products.
Search engine ranking: Google favors fast-loading websites, meaning slow speeds can hurt your visibility.
Business sense: Fast sites run more efficiently, improving user experience and operational effectiveness.
Research shows that conversion rates can drop by an average of 0.3% for every second of delay in load time. So, making sure your site loads quickly directly impacts your sales.
To improve speed:
Choose a reliable hosting service that can handle high traffic volumes.
Optimize your images to reduce load time without compromising quality.
Ensure your URLs are SEO optimized for faster indexing.
Clean up your code to ensure smooth site performance.
A fast store enhances user satisfaction, boosts conversions, and improves search engine rankings, helping you increase sales on Shopify.
7. Create a landing page that converts
A well-designed landing page can significantly boost your sales on Shopify. Here’s how to make sure your page works to convert visitors into leads or customers:
Attention-grabbing headline: Make sure your headline clearly communicates the value of what you’re offering and grabs visitors’ attention immediately.
Clear and concise offer: Ensure that your offer is easy to understand. Visitors should immediately know what they will get in exchange for information or purchase.
Strong CTAs: Use compelling calls-to-action that motivate visitors to take the next step. Make the action clear, such as “Buy Now” or “Sign Up for Exclusive Offers.”
By focusing on these key elements, you can create a Shopify landing page that not only attracts visitors but also converts them into customers.
8. Design a great CTA (Call-to-action)
A well-designed call-to-action phrase is essential to driving conversions and guiding visitors to take action. Here’s how to make your CTAs compelling:
The offer: Ensure you’re offering something valuable or desirable to your audience. Whether it’s a discount, free trial, or more information, the offer should align with their needs.
The copy: Use clear, action-driven language. Words like “Get Started,” “Buy Now,” or “Claim Your Offer” give readers a clear direction on what to do next.
The design: Make your CTA button stand out. Use contrasting colors, enough whitespace, and clear visuals so it grabs attention without overpowering the rest of the content.
The prompt: Consider CTA buttons like “Get a Demo” or “Book Your Demo,” especially when the customer journey involves more touchpoints.
Here’s an example of Replug’s catchy call to action:
By designing CTAs that are appealing, action-focused, and strategically placed, you’ll increase engagement and drive sales.
9. Optimize product pages
Optimizing your Shopify product pages is key to driving conversions. Here’s how you can elevate your product pages:
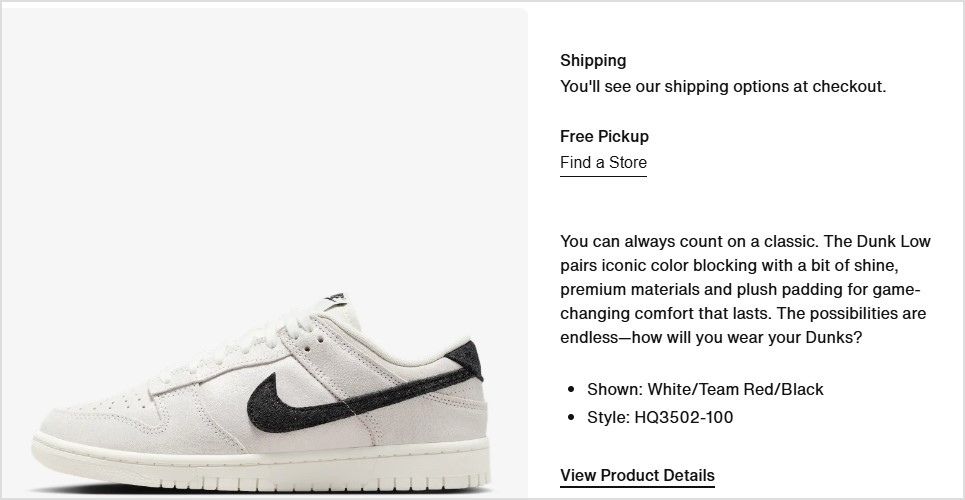
Clear, detailed descriptions: Ensure your descriptions are informative, covering size, material, color, and usage. Here’s how Nike is doing it:
High-quality images: Use 4-5 images from different angles to view your product comprehensively. High-quality visuals increase trust and make your offerings more attractive.
Infographics: Use infographics to explain product benefits or provide comparisons in a visually engaging way.
Videos: Create product demos or behind-the-scenes content to build trust and connect with customers.
For your Shopify store, it’s essential to use visuals that grab attention and enhance the shopping experience. By crafting well-optimized product pages on Shopify, you help customers quickly find what they need, encouraging them to make a purchase and boosting your sales.
In addition to strong visuals and persuasive descriptions, many Shopify merchants leverage Shopify product bundles to showcase related items together, encouraging larger purchases and increasing average order value as part of their overall sales strategy.
Here’s an example of Apple’s unique and interactive product page:
Killer tip: Incorporate GIFs! These dynamic, eye-catching animations can showcase product features or add a playful touch, making your store stand out and keeping visitors engaged longer.
10. Focus on customer retention
Retaining customers is key to increasing Shopify sales. Keeping them happy encourages repeat business, reducing the need for constant new customer acquisition. Here are ways to increase customer retention:
Loyalty incentives: Offer discounts or rewards for repeat purchases.
Stay in touch: Send follow-up emails or personalized messages to maintain engagement.
Refunds: A hassle-free return policy builds trust and encourages future shopping.
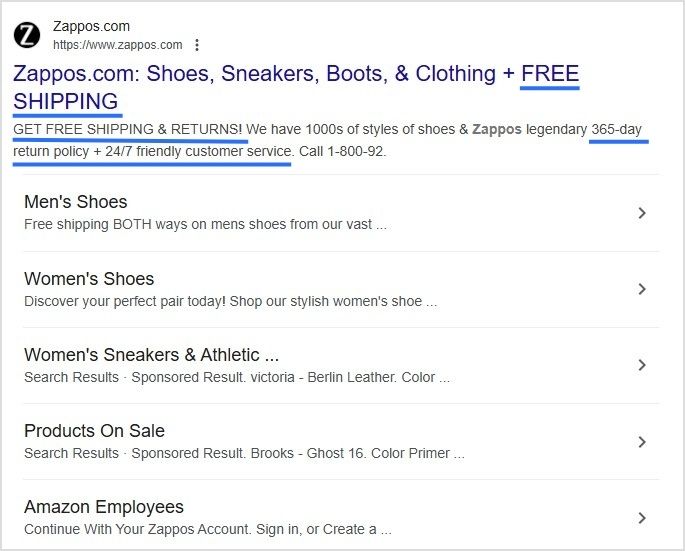
Free shipping: Offering free shipping, especially on high-margin products, boosts conversions and customer loyalty. 62% of customers don’t purchase without free shipping costs, so consider incorporating shipping costs into product prices to create a more transparent and appealing checkout experience.
Zappos generated a total of $1,063.9M in global net sales by focusing on customer retention through free shipping and incentives.
Smartphones constituted around 68 percent of online shopping orders in 2024, so providing a seamless mobile experience is crucial. Here’s how to optimize your Shopify store:
Responsive design: Ensure your site adjusts perfectly to all screen sizes.
Fast loading speed: Mobile users expect quick page loads. So, optimize your images and reduce unnecessary elements.
Easy navigation: Simplify menus and ensure buttons are easy to click.
Mobile-friendly checkout: Optimize for mobile and integrate dynamic QR codes to let customers easily complete purchases.
Optimizing for mobile devices improves user experience and boosts engagement and conversion rates.
12. Build brand trust
Building trust with your customers is essential for driving conversions. Here’s how you can do it:
Professional design: Ensure your Shopify store has a clean, well-organized layout that reflects your brand’s quality and professionalism.
Social proof: Display customer reviews and testimonials prominently on product pages and throughout your site. Positive feedback from satisfied customers reassures new visitors that your products and services are reliable. Here’s an example of ContentStudio:
Trust signals: Use security badges (such as SSL certificates) and clearly state your return policy, shipping terms, and satisfaction guarantees. These elements make customers feel more secure about making a purchase.
Since over 99.9% of customers read reviews when they shop online, showcasing social proof builds credibility and enhances customer loyalty, leading to increased conversions and repeat business.
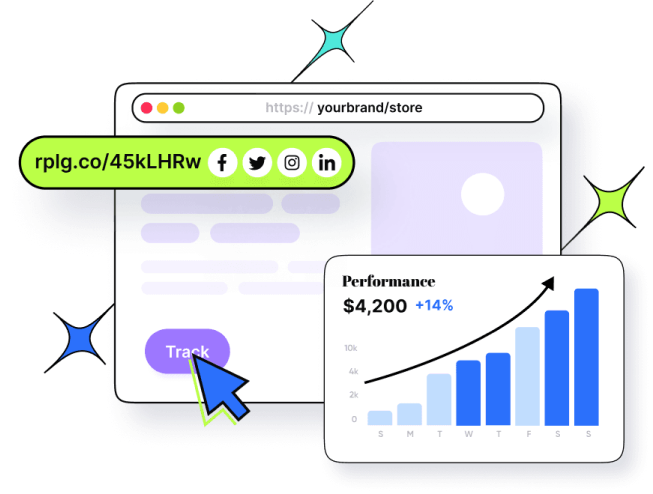
Customized URLs are a powerful way to enhance your branding efforts. By generating and using branded short links, you can reflect your brand’s identity exceptionally while boosting click-through rates.
Stand out with your brand: Replug is a top-notch link management platform that allows you to craft personalized URLs that align with your branding, making your links more memorable and professional.
Track performance: With built-in click-tracking capabilities, you gain valuable insights into how your links and campaigns are performing, helping you refine your marketing strategy.
Branded URLs go beyond simple link shortening; they offer a more sophisticated and effective way to distinguish your brand in the crowded online marketplace.
Boost ROI with branded URLs!
Enhance your marketing campaigns by creating shareable, trackable, and fully multi-purpose
customizable branded URLs.
To stand out in the competitive ecommerce space, it’s crucial to communicate your main selling points clearly. Whether it’s your competitive pricing, superior quality, strong brand identity, fast delivery, or problem-solving capabilities, ensure these strengths are front and center in your marketing efforts.
Focus on what matters: Identify the key benefits that set your store apart from the competition and weave them into your product descriptions, ads, and website content.
Create a consistent message: Reinforce your unique value proposition across all customer touchpoints to ensure that your brand message is clear and resonates with your audience.
Check out how Usermaven, a product and website analytics tool, highlights its selling point on its website:
You can build trust and loyalty by emphasizing your strengths, ultimately driving more sales and conversions for your Shopify store.
Search engine optimization (SEO) drives organic traffic to your Shopify store. You can attract more visitors and generate more sales by improving your site’s ranking in search results. Here’s how to optimize for SEO:
Use relevant keywords: Integrate keywords naturally into product titles, metadata, and URL slugs. This helps search engines understand your products and boosts your rankings.
Leverage content marketing: Create valuable content like blog posts, guides, and other resources targeting specific keywords. This not only enhances SEO but also attracts more visitors who are interested in your products.
Optimize product listings: Ensure each product listing is optimized for SEO and conversions. Use compelling descriptions, titles, and high-quality images to entice potential customers and improve your search ranking.
Drive traffic through SEM: Consider using search engine marketing (SEM) to pay for placement in search results, making it easier for customers to find your store.
By focusing on SEO and optimizing your store for search engines, you can increase its discoverability, improve traffic, and ultimately boost Shopify sales.
16. Leverage social media to increase sales
Social media is a powerful way to drive sales and strengthen customer relationships. You can turn followers into loyal customers by actively engaging with your audience and leveraging key strategies. Here’s how:
Engage with your audience: Monitor comments, host live streams, and run polls to connect and understand customer preferences. Tools like Talkwalker help monitor and track consumer sentiments.
Find and nurture leads: Use hashtags to discover new customers, engage authentically, and build trust.
Sell everywhere: Expand your reach by selling on multiple platforms. Tools like ContentStudio and Replug simplify inventory and performance tracking.
Seal the deal: Close sales through direct messages or personalized interactions.
A complete link management solution
for marketing professionals & agencies.
Try Replug for free
With the right approach, social media can turn followers into loyal customers and drive real results.
Paid advertising (PPC) is vital to boosting the visibility of your store:
Paid advertising: Use PPC to appear at the top of search results by bidding on relevant keywords. Ads on Google and social media platforms like Facebook, Instagram, and Pinterest help target specific audiences and increase visibility.
Social media ads: Engage customers through creative ads on platforms like Facebook and Instagram to raise brand awareness and drive traffic.
Here’s an example of paid Google search ads of Mascaras by different brands:
Paid advertising can maximize your reach and effectively engage with customers, driving immediate traffic and long-term growth.
Content marketing helps attract customers organically. By creating valuable content, you can boost your store’s visibility and strengthen your brand.
Content creation: Produce original and engaging content like blogs, videos, and social media posts that resonate with your brand and products. This helps define your brand while improving SEO.
SEO benefits: Quality content boosts search rankings, driving organic traffic to your store.
Brand awareness: Engaging content builds trust and visibility, leading to increased customer engagement.
Start using content marketing today to improve SEO, engage customers, and increase Shopify sales!
19. Use Bio Links on social media
Maximize your sales on Shopify by leveraging the bio link feature, particularly on platforms like Instagram. Here’s how to use it effectively:
Update regularly: Keep the link fresh by updating it to highlight specific products, promotions, or important content on your Shopify store.
Guide your audience: Use the link to drive users directly to key areas of your store, enhancing their journey and improving conversions.
Capitalize on engagement: Turn your social media activity into sales by linking to relevant pages, ensuring seamless navigation from your posts to your store.
Here’s an example of Canva’s bio link page:
Using bio link strategically can help you drive more traffic and sales from your social media platforms.
Email generates $42 for every $1 spent. That’s a staggering 4,200% ROI! Building a strong email list and sending targeted, personalized messages can increase sales, maintain customer recall, and enhance brand loyalty.
Here’s how to make the most of email marketing:
Build a high-quality email list: Acquire genuinely interested subscribers in your products or services. Use pop-ups, landing pages, and lead magnets to capture email addresses.
Send targeted emails: Craft relevant content based on customer interests and needs. For example, offer special promotions, share product launches, or provide tips that align with customer preferences.
Special offers & reminders: Email marketing is perfect for promoting sales, special offers, and new products. Regular updates keep customers informed and connected, increasing loyalty.
Here’s a vibrant and unique email subscription example of Passionfruit:
By utilizing email marketing, you can drive conversions on your Shopify store, boost customer engagement, and stay top of mind.
22. Building customer relationships and brand loyalty
Building strong customer relationships and brand loyalty are crucial for long-term business success. Here are effective ways to nurture these connections after the sale:
Send a thank-you note: A simple, personalized note can go a long way in showing appreciation and building trust.
Follow-up: Checking in with customers through emails, phone calls, or social media ensures satisfaction and shows you care about their experience.
Offer discounts: Providing exclusive discounts or coupons for future purchases rewards customers and encourages repeat business.
Ask for feedback: Demonstrating openness to improvement by soliciting feedback helps enhance the customer experience and shows you value their input.
Reward loyalty: Implement loyalty programs offering perks like early access to sales, discount codes, and exclusive offers to keep customers engaged and coming back.
Use user-generated content: Featuring content from your customers on social media makes them feel valued and strengthens brand loyalty.
We absolutely love how Blume is building customer relationships through their loyalty program, Blumetopia:
Check out the full page here for inspiration: Blumetopia
By focusing on these strategies, you’ll turn satisfied customers into loyal advocates, leading to increased sales for your Shopify store.
23. Monitor your inventory for smooth operations
Keeping track of your inventory on Shopify is essential to meet customer demand and prevent stockouts. Here’s how to effectively manage your stock:
Review sales data: Use Shopify’s sales analytics to understand which products sell well, helping you identify high-demand items to restock.
Track inventory levels: Shopify’s inventory management system makes it easy to monitor stock levels, ensuring you never run out of popular products.
Reorder in time: Leverage Shopify’s inventory alerts and trend analysis to reorder products before they run out, ensuring continuous availability.
By staying on top of inventory management on Shopify, you can maintain a seamless shopping experience for your customers while avoiding lost sales opportunities.
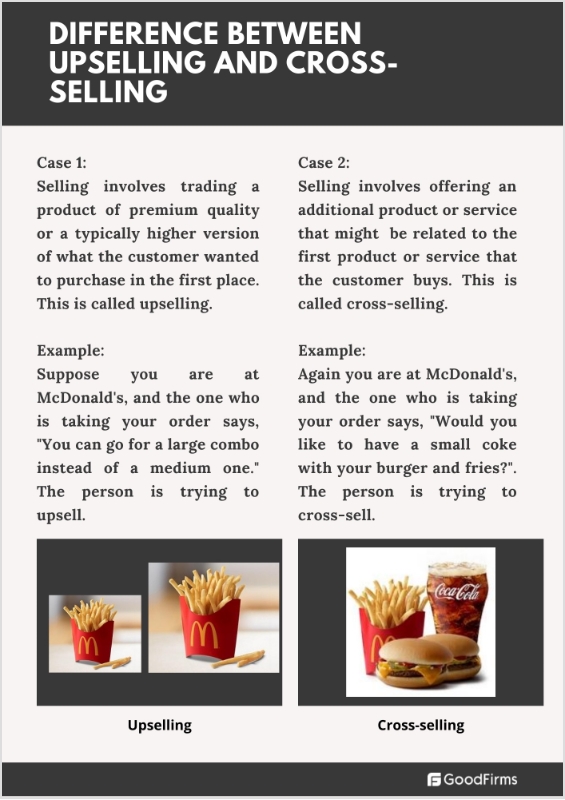
24. Up-sell & cross-sell to boost your sales
Up-selling and cross-selling are powerful techniques to increase your revenue by encouraging customers to purchase more. Here’s a quick breakdown:
Cross-selling: This involves offering a related product to complement the customer’s initial purchase, like pairing a burger with chips. The goal is to suggest products that enhance the customer’s experience.
Upselling: Upselling encourages customers to upgrade their purchase, such as upgrading from a 500ml Coke to a 1000ml Coke. It’s about offering a higher-value version of the original item, often with added benefits.
Here’s an image to demonstrate:
Source: goodfirmsdotco
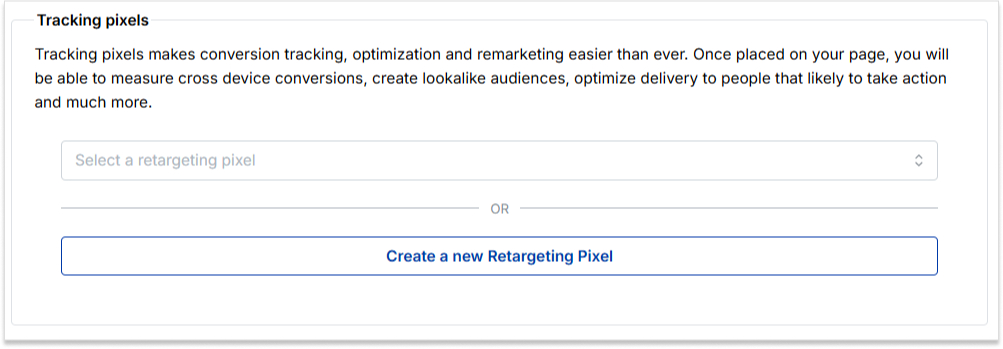
25. Retargeting ads for Shopify stores
Retargeting ads are a powerful tool to re-engage visitors who’ve shown interest in your products but left without making a purchase. By displaying ads for products they’ve already viewed, you increase the chances of bringing them back to your Shopify store.
Benefits of retargeting ads:
Reduces cart abandonment: Target shoppers who’ve added items to their cart but didn’t complete the purchase.
Increases conversions: Show ads with relevant products to keep your store top-of-mind to increase Shopify sales.
Here is an example of a Facebook retargeting ad run by Myfix Cycles. The ad boosted their CTR by 6.38% and gained a revenue of $3,043.20 from an ad spend of $199.07, meaning that they earned $15 for a $1 ad spend.
Check the retargeting ad below:
How to set up retargeting ads:
Use platforms like Facebook/Google ads: Integrate your Shopify store with these platforms to easily set up retargeting campaigns.
Segment your audience: Create different campaigns targeting users based on their actions such as cart abandoners or product page visitors.
Design engaging ads: Highlight the products users were interested in and include incentives like discounts or free shipping to encourage them to return.
Retargeting ads can significantly increase your Shopify store’s sales by bringing back potential customers who are already interested in your products. Tools like Replug allow you to add retargeting pixels to recover lost sales.
Conclusion
Increasing sales on Shopify is about implementing tactics and building a sustainable strategy that focuses on customer experience, brand trust, and data-driven decisions. By combining niche targeting, optimized websites, SEO, and personalized customer interactions, you can create a holistic approach to driving growth.
Whether leveraging social media, crafting compelling web copy, or utilizing tools like email marketing and retargeting ads, these strategies will help you stand out in a competitive market.
Remember: Consistency and customer-centricity are the keys to long-term success!
FAQs for how to increase sales on Shopify
What are the most effective strategies to increase Shopify sales?
Focus on niche targeting, optimizing product pages, using SEO, and implementing social proof. Combining these strategies with personalized customer experiences can significantly increase conversions.
How can I improve my Shopify store’s checkout process?
Simplify the checkout process by minimizing steps, allowing guest checkouts, and integrating secure payment gateways. A one-step checkout for registered users can also enhance the experience.
How does social media help to increase Shopify sales?
Social media enables you to engage with your audience, promote your products, and direct traffic to your store using bio links, hashtags, and targeted advertising. It’s a cost-effective way to build customer relationships and drive conversions.
Why is SEO important for my Shopify store?
SEO improves your store’s visibility in search engines, driving organic traffic and increasing sales. Use relevant keywords in product descriptions, meta tags, and URLs to enhance discoverability.
How can I retain customers for repeat purchases?
Offer loyalty programs, personalized follow-ups, and exclusive discounts. Providing excellent customer service and seamless shopping experiences also encourages repeat business.
Are paid ads worth investing in for Shopify?
Yes, paid ads can drive immediate traffic and sales by targeting specific audiences. Platforms like Google Ads and Facebook Ads help boost visibility and engage customers effectively.
Imagine this: your website’s link lands in the search results. Isn’t that a good start?
But then you notice it reads like a random string of nonsense, full of messy parameters and no clues about what the page is about.
That’s the problem with non-optimized URLs. With around 13.7 billion searches happening on Google every single day, each URL becomes a tiny battleground for clicks and visibility.
Now here’s where it gets even worse. A confusing, long URL won’t just annoy visitors; it can drag down your search ranking and click-through rate, spoiling your chances even before users arrive.
The perfect solution?
Crafting SEO-friendly URLs that both search engines and real humans love. In the following sections, we’ll discuss exactly what an SEO-friendly URL looks like and why it matters so much.
So, let’s get started!
What is an SEO-friendly URL?
An SEO-friendly URL is simply a web address that’s easy to read, meaningful to both people and search engines, and gives a quick clue about what the page is all about.
According to experts, “such URLs are unique URLs or links designed to meet the high standards of Google search engines and users”.
Key characteristics of SEO-friendly URLs:
Descriptive: It clearly describes the content of the page, so someone taking a quick look at it can guess what it’s about.
Keyword-rich: It includes the page’s main topic or keyword, not in a spammy way, but naturally.
Human-readable: It treats humans in a really nice way. No strings full of code, numbers, or random characters.
Short & precise: It doesn’t carry on forever. The shorter and more to the point it is, the easier it is to remember and share.
Lowercase letters: Using all lowercase letters avoids confusion and problems with case-sensitive systems.
Static (not dynamic): It avoids long query strings, lots of URL parameters, and IDs, keeping the link stable and meaningful.
Use hyphens: Words are separated by hyphens (“-”) rather than underscores (“_”) or no separators, because search engines treat hyphens as word breaks.
By sticking to these attributes, your URLs become far more user-friendly, shareable, and better understood by both search engines and humans.
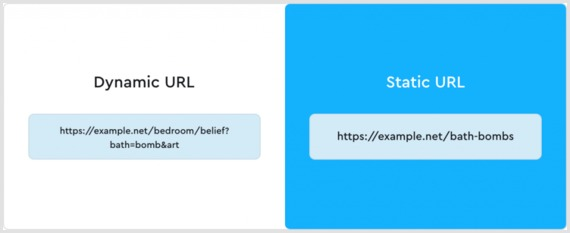
Example of an SEO-friendly URL (bad one):
Example of an SEO-friendly URL (good one):
Why SEO-friendly URLs are important
Your URL is more than a link. It’s a sneak peek into your content!
When your URLs speak the same language as your audience and search engines, you win on multiple fronts — more clicks, better rankings, greater trust, and ease of use.
Here’s why SEO-friendly URLs matter:
Improves search engine rankings: A clean, descriptive URL gives search engines helpful context about your page. Even if it’s a moderate factor, it adds up.
Enhances click-through rates: When users see a URL that makes sense and reflects the content, they’re more likely to click. Descriptive URLs like “exampledotcom/best-coffee-recipes” attract more clicks than generic ones like “exampledotcom/page123”.
Better user experience: Easy-to-read URLs help users understand what a page is about before they click, which builds confidence.
Enhances user trust & avoids confusion: A cluttered or disorganized URL full of parameters and random numbers looks inadequate; a clean and readable one feels trustworthy and credible.
Make search results more meaningful: When the URL itself contains readable words relevant to the content, search results become more transparent and aligned with user intent.
Enhances crawlability & indexing: Search engines prefer logical, structured URLs. They’re quite easier to crawl and index.
Optimizes link sharing: Clean, short URLs are easier to copy, paste, and share on social media and other sites, boosting visibility.
Simplifies site navigation: A well-organized URL structure helps users and crawlers understand your site’s hierarchy and navigate more intuitively.
Supports a long-term SEO strategy: Rather than quick fixes, an SEO-friendly URL structure lays the foundation for scalable, maintainable SEO over time. This helps in fewer redirects, no broken links, and less confusion.
20 best practices for creating SEO-friendly URLs
Crafting SEO-friendly URLs isn’t just about adding keywords; it’s about building clear, meaningful links that both users and search engines can easily understand.
To help you get it right every time, here’s a quick breakdown of the essential do’s and don’ts. Simple rules you can follow to make every link count.
Do’s
Don’ts
Use descriptive keywords: Include primary keywords relevant to the content.
Avoid keyword stuffing: Repeating the same keyword excessively.
Keep it short and simple: Aim for concise and easy-to-read URLs.
Avoid long URLs: Don’t include unnecessary words or parameters.
Use hyphens to separate words: Makes URLs more readable for both users and search engines.
Avoid underscores or spaces: These can confuse search engines and users.
Ensure the URL structure matches the site hierarchy: Helps users navigate more easily.
Avoid complex structures: URLs with excessive parameters or IDs are harder to read and rank lower in search results.
Use lowercase letters: Prevents duplicate content issues.
Avoid mixed-case URLs: They can cause confusion and potential errors.
Make it evergreen: Use URLs that remain relevant even as content updates.
Avoid dates in URLs: Limits the perceived freshness of content.
Optimize for mobile users: Ensure URLs are user-friendly on mobile devices.
Avoid unintuitive URLs: Random strings of letters and numbers are off-putting.
Use secure URLs: Always use HTTPS to build trust and boost rankings.
Avoid HTTP: Non-secure links can harm rankings and trust.
Test URLs periodically: Ensure they lead to the correct pages and load properly.
Avoid broken links: Damages SEO and user experience.
Incorporate branding when possible: Branded URLs boost recognition.
Avoid generic URLs: URLs like “page1.html” lack context.
Let’s take a closer look!
1. Optimize the URL slug
The URL slug is the part of the URL after the domain name, such as:
Keep it relevant and descriptive, clearly signaling the webpage’s content.
Take out non-essential words in the slug, such as random characters, special symbols, and numbers that don’t contribute to clarity.
Helpful Tip: If you’re updating content, avoid changing the slug unless necessary, to retain backlinks and traffic.
2. Choose a top-level domain (TLD)
Your domain extension (e.g., .com, .edu, .net, .org) influences user trust. While TLDs don’t directly affect SEO, “.com” is widely recognized and preferred by users, which creates a sense of credibility and reliability.
3. Keep the URL short & precise
Short links, or URLs, perform better in search engines and are easier to remember and share. Aim for a URL length of under 60 characters. While Google doesn’t penalize long URLs, shorter URLs contribute to a better user experience and higher click-through rates.
Maximize marketing ROI
by transforming ordinary URLs into branded short links that convert.
Try Replug for free
4. Avoid using the full blog title as the URL
Don’t use complete blog titles as your URL slug, as they can use up unnecessary characters. Long blog titles result in lengthy URLs.
Optimize your URL by choosing a relevant focus keyword related to that web page. The aim should be to create descriptive URLs, so users are not confused about the particular page’s content.
5. Remove punctuation marks
Punctuation can unnecessarily complicate URLs, making them harder to handle efficiently. By eliminating them, you can create clean, user-friendly URLs that are easy for both visitors and search engines to interpret.
6. Incorporate the primary keyword (must)
Including the primary keyword in your URL contributes to improved SEO. This practice reinforces the topic of your page, increasing its likelihood of matching search queries and ranking higher in search results.
For instance, if you’re offering SEO services in a specific region or state, using a URL that emphasizes “SEO services in California” helps signal both the service and location to search engines. Pairing this approach with a local citations service further strengthens local signals, improving search rankings and attracting users specifically looking for SEO services in California.
7. Use lowercase letters
Some servers treat uppercase and lowercase URLs differently, potentially causing duplicate content issues. Stick to lowercase to avoid complications and ensure SEO-friendly URLs.
Note: WordPress users shouldn’t worry, as it automatically puts URLs in lowercase and adds hyphens.
8. Use hyphens, not underscores
Google treats hyphens as spaces, making it easier to analyze your links. Underscores, however, can obscure your meaning.
For example:
Good: seo-friendly-url
Bad: seo_friendly_url
Using hyphens makes it easier for Google’s web crawlers to understand and estimate the information on your website, helping in generating steady results.
9. Incorporate keywords strategically
Keywords in URLs can boost SEO and enhance user understanding. But it is a good practice to avoid keyword stuffing.
1–2 keywords are enough. You must never repeat a keyword in a URL. Google will never reward you for using the same keyword in a URL more than once.
For instance:
Good practice:
Bad practice:
10. Limit folders & subfolders in the URL structure
Keep URLs short and straightforward by minimizing the use of folders and subfolders. This practice improves readability and user experience, as excessively nested subfolders can make navigation complex for visitors and search engines.
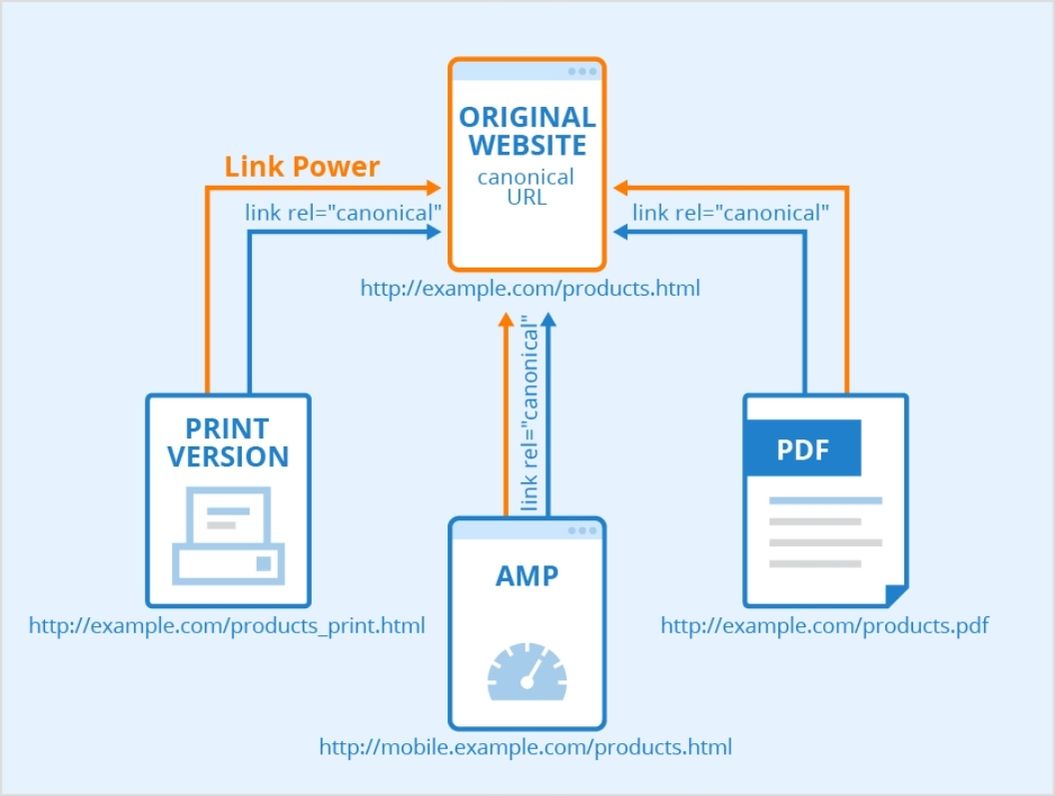
11. Use canonical tags for duplicate content
If the same content exists on multiple URLs, canonical tags tell search engines which version is the original. This prevents duplicate content issues and ensures proper indexing.
Look at the figure below to know how canonical tags work:
12. Prefer static over dynamic URLs
Static URLs are more straightforward, easier to read, and more SEO-friendly. Dynamic URLs, on the other hand, are less search-engine-friendly, include UTM parameters, and are complex to understand.
Pro Tip: Using a first-rate, SEO friendly short URL generator gives you more control over your links through customization and tracking.
Minimizing redirect loops improves site speed and user experience. While redirects are sometimes necessary, excessive use can lead to issues with search engine crawlers. When needed, opt for 301 redirects for better SEO results.
Besides, regularly check for and fix broken links, as they can harm your site’s credibility, disrupt user journeys, and negatively impact your SEO performance.
14. Utilize futureproof URLs
Refrain from incorporating dates in URLs to prevent content from becoming outdated. Futureproofing URLs by excluding time-sensitive information enables content updates without altering the URL structure.
15. Hide “www” and HTTPS prefixes
Modern browsers already indicate secure connections with a lock icon, so hiding prefixes like “www” or “https” can streamline your URLs.
Sub-domains can help organize content for specific markets or purposes. Anyhow, use them conservatively to avoid diluting your website’s authority.
These domains improve navigation and organize your website. The end goal of SEO is to improve user experience, and sub-domains just do that.
17. Eliminate stop words
Words like “the,” “is,” or “of” are often unnecessary in URLs. Removing them reduces URL length while retaining clarity.
For example:
Before (👎):
After (👍):
18. Use “safe” characters
Stick to alphanumeric characters and hyphens in your URLs. Avoid spaces, &, %, #, and other special symbols that require encoding and may confuse both users and search engines.
19. Prioritize readability
Your URL should clearly convey what the page is about. Use meaningful words, separate them with hyphens, and keep it easy to read so both users and crawlers understand it at a glance.
20. Avoid over-optimization
Don’t force keywords into the URL or make it unnaturally long. Overloaded, spammy URLs harm user trust and may reduce SEO value even if technically allowed.
Make every link count: Build SEO-friendly URLs with Replug!
And there you have it!
Everything you need to know about creating SEO-friendly URLs that rank higher, attract clicks, and keep your visitors coming back.
Remember, a clean, clear URL isn’t just suitable for search engines; it’s a trust signal for real people, too. So, take a few minutes to clean up your links, and you’ll see the difference in your traffic and engagement.
Ready to take things up a notch? Give Replug a try today! It’s one of the best tools out there for generating short, branded, and truly SEO-friendly URLs!
Frequently asked questions
Which URL is best for SEO?
A “vanity URL”, like “yourbrand.com/seo-guide”, is ideal because it’s short, easy to remember, and clearly communicates the page’s topic. That kind of clean address helps both users and search engines alike.
How to check SEO-friendly URL?
Use a tool like an SEO-friendly URL checker to evaluate whether your URL is readable, descriptive, uses hyphens, and avoids unnecessary parameters.
Should a URL include keywords?
Yes, including one relevant keyword helps users and gives a minor context signal to search engines. However, just don’t stuff in multiple keywords redundantly.
Which is the best example of a SEO-friendly URL?
Something like this:
example.com/how-to-create-seo-friendly-urls
Human-readable, descriptive, hyphen-separated, lowercase, and no weird characters or long query strings.
How long can a URL be for SEO?
There’s no strict character limit for SEO. Aim for ~60–70 characters or fewer to keep it clean and share-friendly, but readability and clarity matter more than exact length.
Are long URLs bad for SEO?
Not necessarily bad, but longer, cluttered URLs can hurt readability and user trust. They might cut off in search results or be harder to share.
How to use SEO-friendly URLs in your site?
Make sure when you publish or edit content, you:
– use lowercase letters – hyphen-separate words – keep the slug short & meaningful – avoid dynamic parameters and session IDs – maintain a logical folder structure
Important note: Throughout this guide, we will refer to Twitter as “X”.
Looking to expand your social media presence and connect with a wider audience? If you’re already active on Instagram, adding an X link to your bio can be a game-changer.
Not only does it allow you to cross-promote your content and reach new followers, but it also opens up a world of new possibilities for networking, sharing your thoughts and ideas, and building your personal brand.
Adding an X link to your Instagram bio is a smart move for many reasons, and this guide explores how to make the most of it. So, let’s dive in and discover how to add an X link to an Instagram bio!
Why add an X link to your Instagram bio?
Adding an X link to your Instagram bio can be a smart move for several reasons:
Cross-promotion: By linking your Instagram and X profiles, you can reach a wider audience and drive traffic to both platforms. This means more visibility for your content and potentially more followers.
Networking: X is a powerful networking tool. By linking it to your Instagram account, you can make it easier for people to find and connect with you. This can be especially useful if you’re looking to build relationships with influencers or other industry professionals.
Sharing your thoughts: While Instagram thrives on visuals, X is all about the power of words. By linking to your X account, you can share your thoughts, opinions, and ideas with your followers in a way that’s not possible on Instagram.
Building your personal brand: By maintaining an active presence on both Instagram and X, you can build a strong personal brand that resonates with your target audience. Linking the two accounts creates a cohesive online identity that helps you stand out from the crowd.
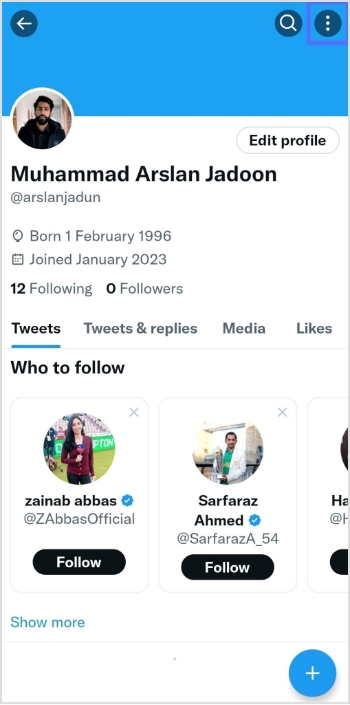
Step 2: Click “profile” on the left side of the menu.
Step 3: From the URL bar,copy the URL. That’s your profile URL.
For a cleaner look in your Instagram bio, especially with character limits, a free link shortener can transform that lengthy “X” URL into something concise and branded. Tools like Replug, a powerful link optimization platform, make this effortless by not only shortening links but also adding tracking and customization options to boost your cross-platform engagement.
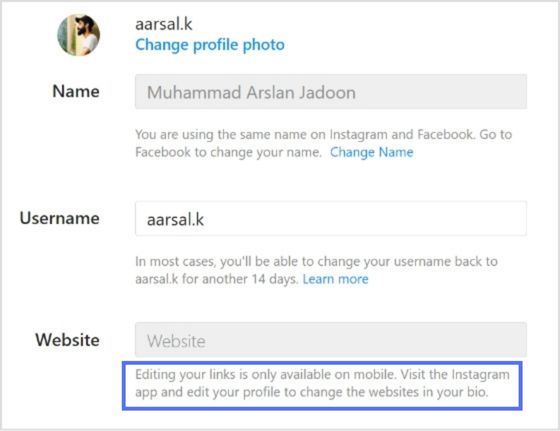
Note: You can only edit your links on mobile devices. Visit the Instagram app and follow the steps above to edit your bio and add the X link.
FAQs about how to add a Twitter (X) link to Instagram bio?
How to link Instagram and X for auto-tweeting photo links?
To link your Instagram account to X and automatically tweet links to your photos, follow these steps: 1. Open the Instagram app on your mobile device and go to your profile. 2. Tap the three horizontal lines in the upper right-hand corner of your screen. 3. Select “Settings” from the menu that appears. 4. Tap “Account” and then “sharing to other apps.” 5. Tap “X” and enter your X login information when prompted. 6. Once you’ve linked your accounts, toggle on “Share your posts to X” to automatically share your Instagram posts on X. 7. To customize what gets shared on X, you can toggle on or off the options for sharing your Instagram photo, caption, or location. That’s it! Now every time you post a photo on Instagram, it will automatically be shared as a link on your X account.
Can I choose which Instagram posts get shared on X?
Yes, you can customize what gets shared on X by toggling the options for sharing your Instagram photo, caption, or location on or off.
Can I still share my Instagram posts on X if I didn’t link my accounts during the initial setup?
Yes, you can manually share your Instagram posts on X by copying the link to your Instagram post and pasting it into a tweet on X. However, automatic sharing can only be enabled if you link your accounts.
Your Instagram bio is your brands first impression, and it matters. It’s more than just a few lines of text. It’s a powerful tool to establish your brand identity and drive traffic to your brand.
Brands lose potential leads and drop conversion rates instantly as they’re not familiar with the platform’s algorithm or best practices. Some of the most important pointers to maximize your Instagram profile’s bio is knowing
How to remove link from Instagram bio?
How to maximize the limited space in your bio?
How to rename your bio links?
When crafting your Instagram bio, consider including some of the following:
Don’t forget that the URL in your bio channels your followers to an external website, a new landing page, a microsite, or other relevant destinations, expanding your influence beyond Instagram.
Why I can’t remove the link from my Instagram bio?
There are a few potential reasons why you might be unable to remove a link from your Instagram bio:
Instagram glitch: Sometimes, Instagram experiences temporary glitches. Try closing the app completely and reopening it. This might resolve the issue.
Link shortener or third-party app: If you’re using a link shortener or a third-party app to manage your bio link, you might need to remove the link from that service first.
Outdated app: Ensure you’re using the latest version of the Instagram app. Outdated apps can sometimes cause issues.
Cache issues: Clear your app’s cache or use a different device to see if the issue persists. Cached data can sometimes cause unexpected behavior.
Account issues: Verify that your account hasn’t been flagged or restricted in any way, which might affect your ability to make changes.
Additional troubleshooting steps:
Check internet connection: A poor internet connection can interfere with app functions.
Try a different device: If possible, log in to Instagram from a different device to see if the issue persists.
Wait it out: Sometimes, Instagram experiences temporary server issues. Waiting a few hours might resolve the problem.
If you’ve tried these steps and still can’t remove the link, contact Instagram support directly for further assistance.
How to remove a link from your Instagram bio?
Removing a link from your Instagram bio is a quick and easy process. Follow these steps to update your bio:
Step 1: Open the Instagram app on your device.
Step 2: Go to your profile
Tap on your profile picture in the bottom right corner of the screen to go to your profile page.
Step 3: Edit your profile
On your profile page, tap the “Edit Profile” button. This is usually located directly below your profile picture and bio.
Step 4: Update the website field
In the “Edit Profile” screen, look for the “Link” field. This is where your current link is located.
Step 5: Remove the link
Tap on the “Link” field to edit it. Delete the existing link or text from the field.
Step 6: Save your changes
Once you’ve removed the link, tap “Done” (iOS) or the checkmark (Android) in the top right corner to save your changes.
Refresh your profile: Go back to your profile page and refresh it to ensure that the link has been successfully removed.
And that’s it! You’ve successfully removed or updated the link from your Instagram bio.
Go beyond generic link pages!
Create custom bio links that truly fit your brand
With Replug, you can create bio links that are unique, engaging, and built to convert.
Renaming a link on Instagram involves using link shortener tools that not only condense your URL but also allow customization of the link text to make it more appealing and memorable.
One of the best options is Replug. It is a top-notch, free link shortener tool that offers customization features.
Introducing Replug.io
Replug.io is a link management platform that simplifies URL sharing by creating branded short links and provides in-depth click tracking for performance optimization.
Steps to rename bio links on Instagram using Replug
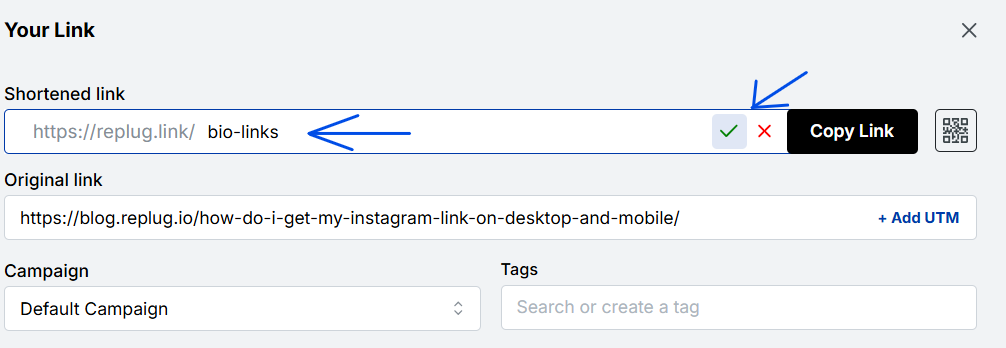
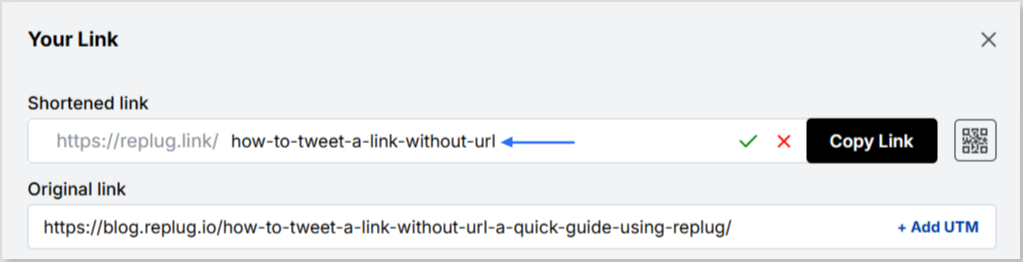
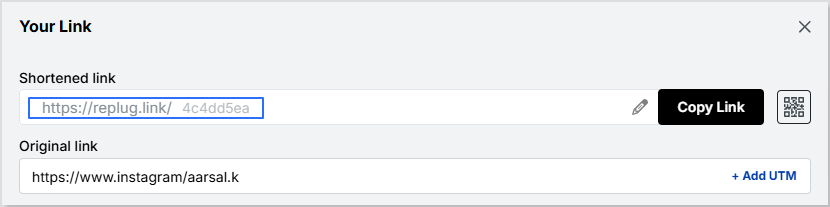
Step 1: In the top-left corner, paste the link you want to shorten into the input bar. Then, click the arrow icon next to it to proceed.
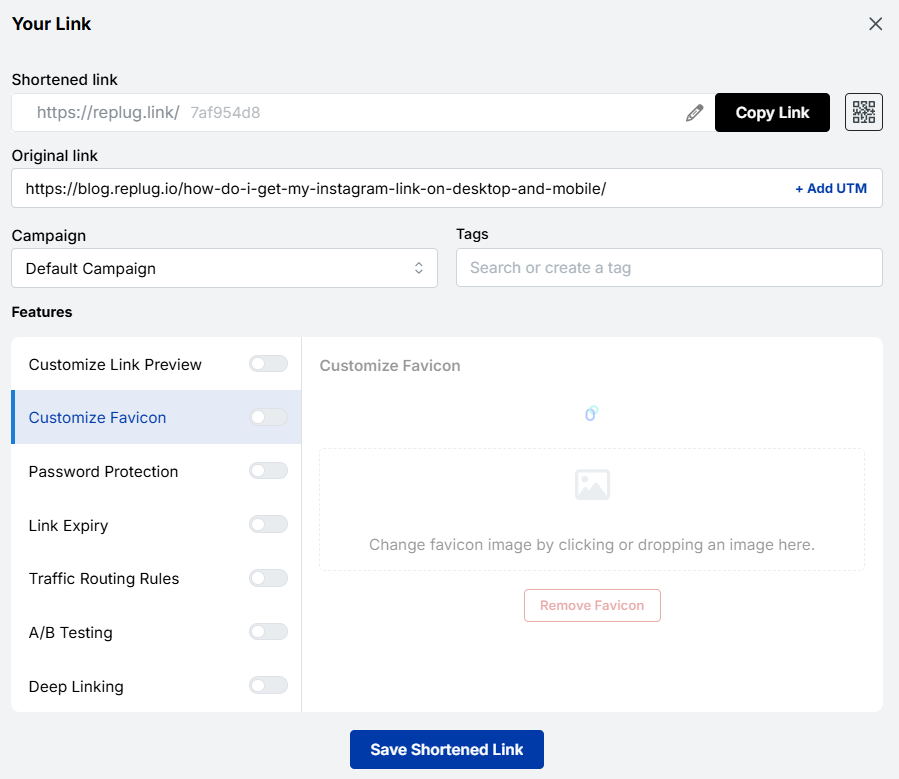
Step 2: You’ll be redirected to this page
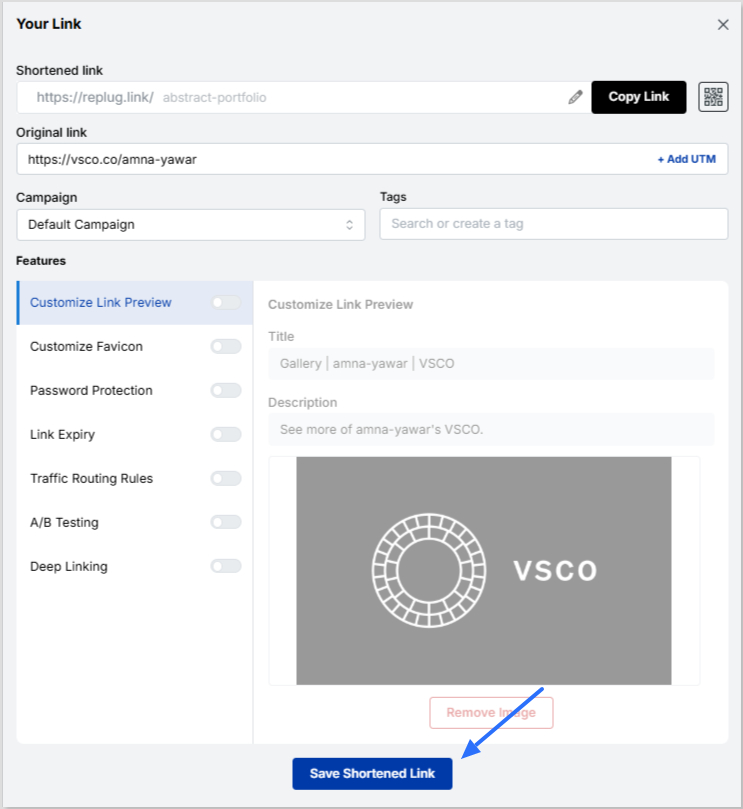
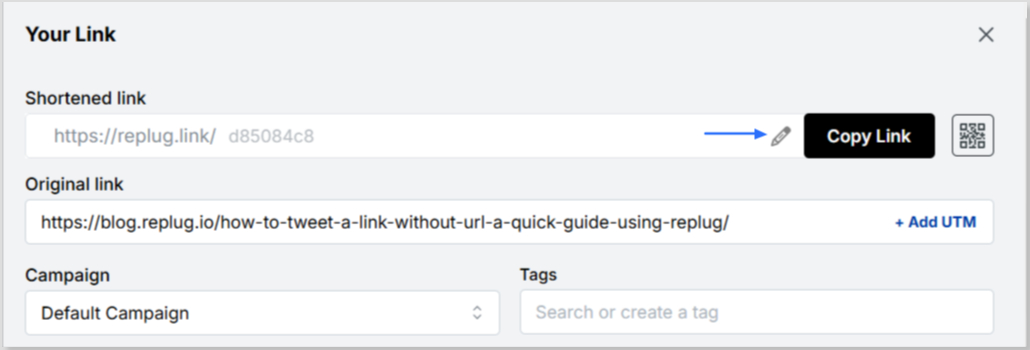
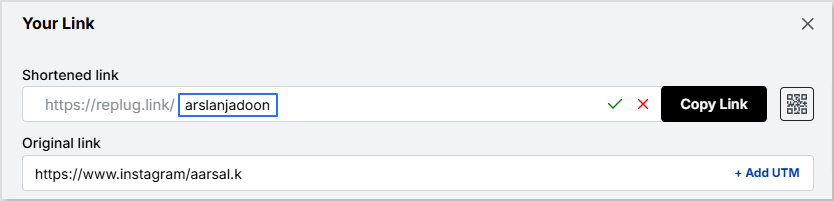
Click the pencil icon in the top bar to rename or customize your link.
After editing, click the green checkmark to confirm the changes.
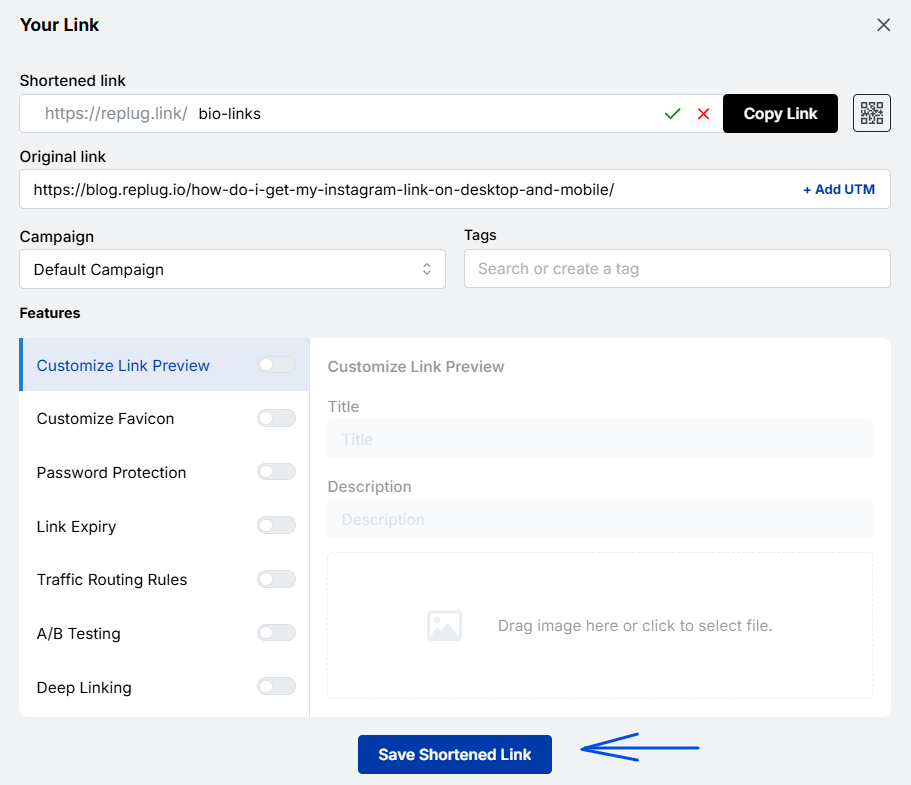
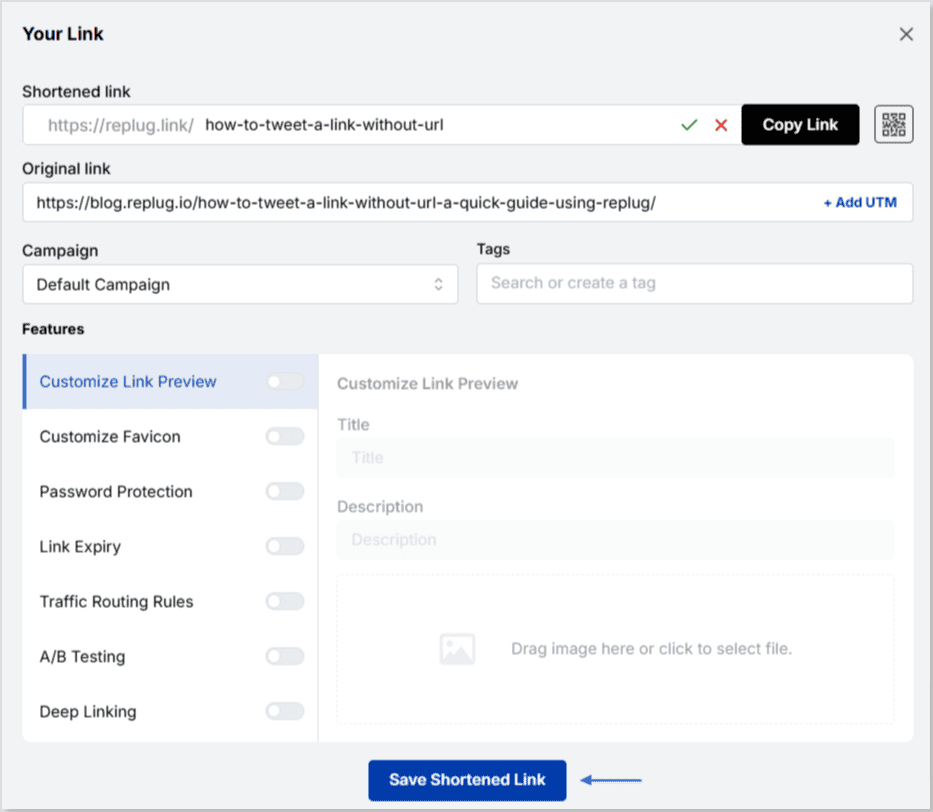
Step 3: Once you’ve finalized your changes, click the “Save Shortened Link” button at the bottom to complete the process.
Viola! Your link is renamed.
Step 4: Update your Instagram bio
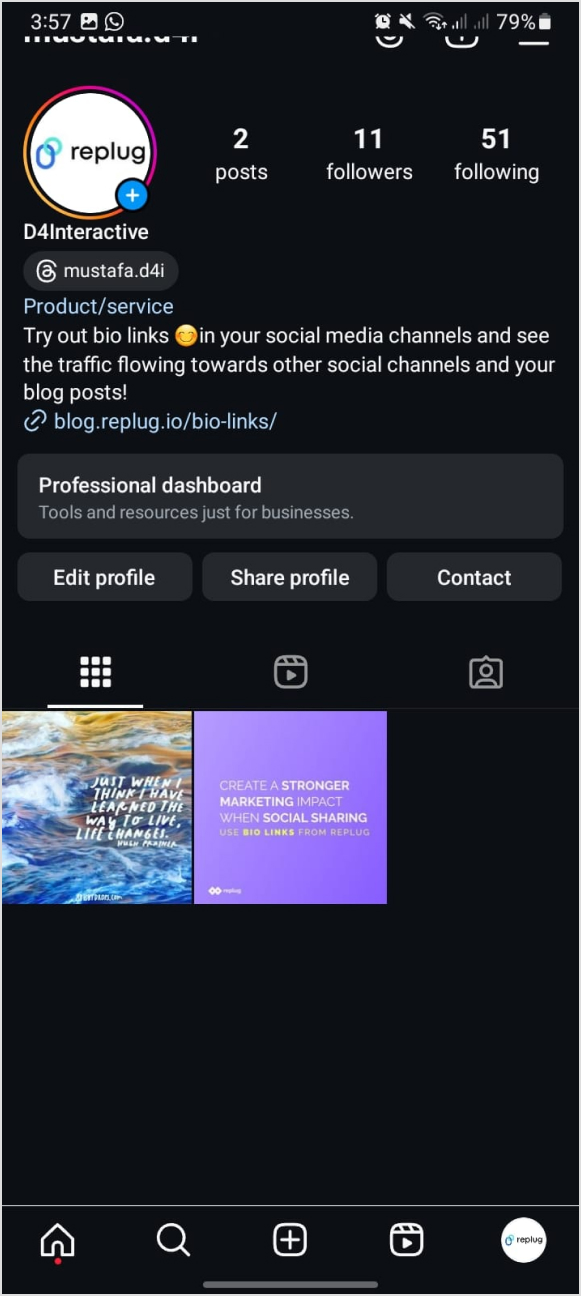
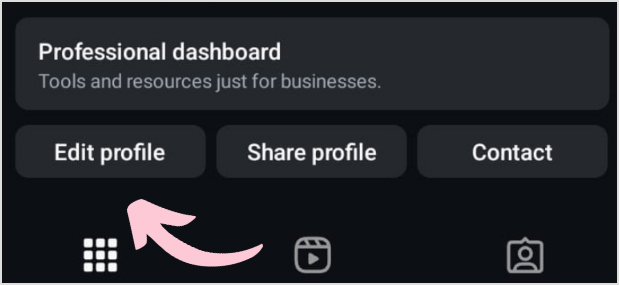
Open Instagram and go to your profile.
Tap on “Edit profile”.
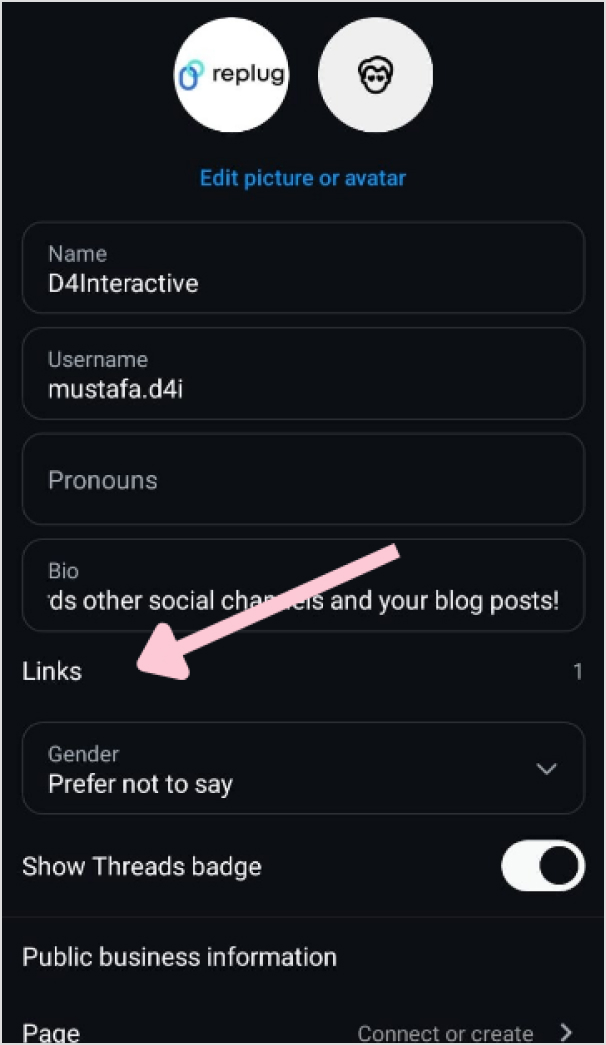
Find the “Website” field and paste your customized short link.
Save your changes.
Double-check your profile or wherever the link is used to ensure that the new name is correctly reflected and that the link still functions properly.
Maximize marketing ROI
by transforming ordinary URLs into branded short links that convert.
Try Replug for free
Replug: Link-in-bio feature
You can achieve this effortlessly with the Replug bio-link feature. This tool lets you consolidate all your important content and links into a single, accessible location for your audience.
Here are amazing features of Replug’s link in bio tool
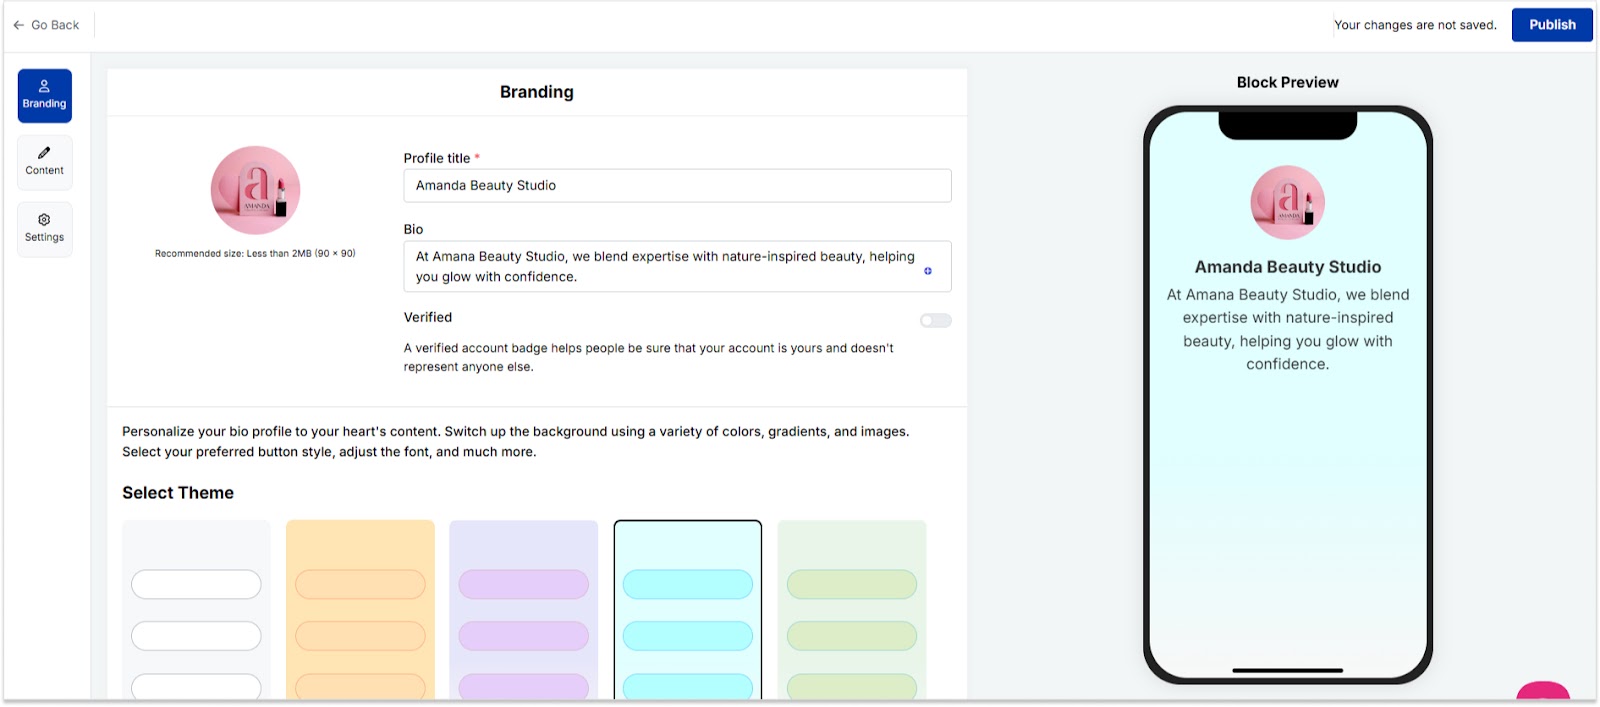
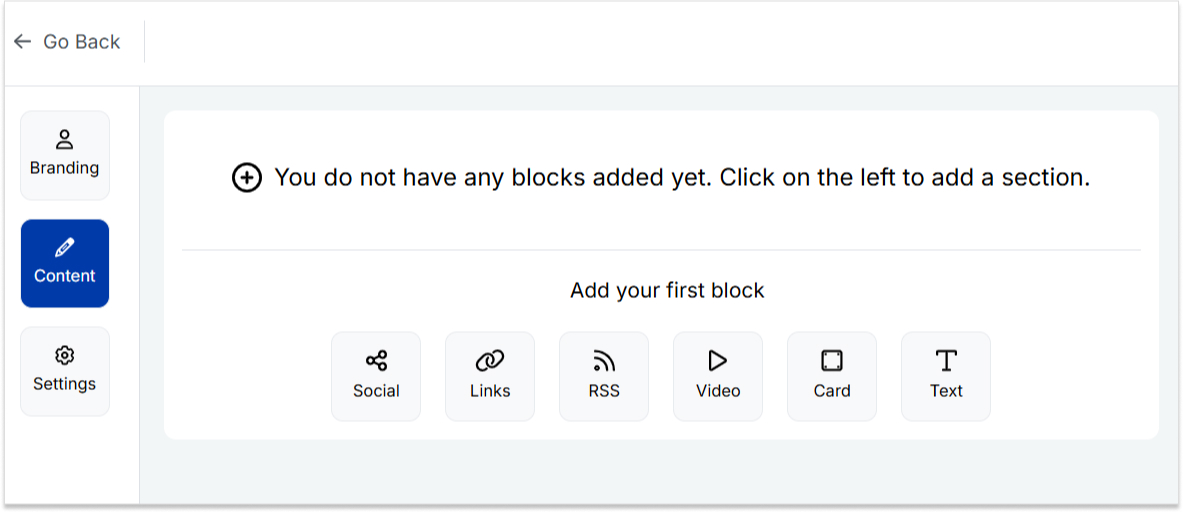
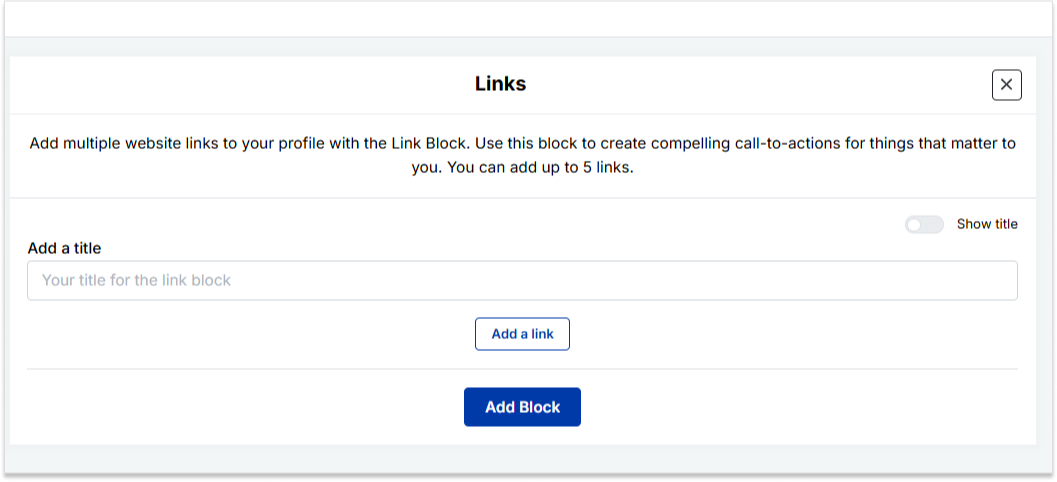
1. Add your favorite content in one place
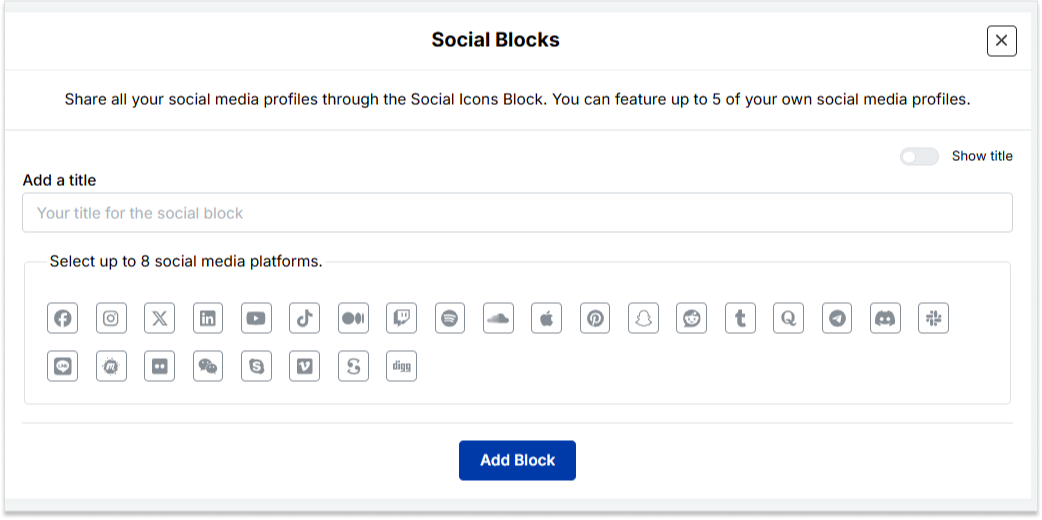
Bring your brand to life with social media icons, essential links, the recent blog with an RSS feed, audio clips, important text, and cards for stunning images.
2. With Replug, you don’t just get a link in bio – you get to own it by renaming your links.
Also, customize their appearance and match your landing page blocks from colors to favicons to your brand’s vibe.
3. Track bio link performance
With performance tracking features, you can monitor the total number of clicks, conversion rates, and other valuable metrics. The best part is that you can view your analytics in both a summary list view and a detailed view.
Go beyond generic link pages!
Create custom bio links that truly fit your brand
With Replug, you can create bio links that are unique, engaging, and built to convert.
Top tips to maximize the limited space in your bio:
Quick tips
Maximize your impact
Less is more
Add a short description about your brand or page.
Try adding a bio landing page
Conclude your website link, portfolio, contact information etc.
Identify your unique selling point (USP)
Clearly communicate what sets you apart.
Include a clear call to action (CTA)
Tell people what you want them to do next.
Keep on experimenting
Try different stuff. See what clicks. You might surprise yourself!
Conclusion
Removing a link from your Instagram bio is a simple process that can be done in a few steps through the app’s profile settings. By keeping your bio updated and free of outdated or broken links, you ensure a professional and effective presence on the platform. This helps maintain a clear and engaging profile, optimizing your brand’s impact and user experience.
So that was it for today’s guide. If you have more questions regarding link name changers, link removers, or the best link in bio tools, feel free to visit our website.
FAQs related to Instagram bio-link
How do I make my Instagram bio catchy?
1. Clearly state what your business does. 2. Use relevant keywords to improve searchability. 3. Include contact information and a call to action. 4. Utilize Instagram’s business features like adding a category, contact options, and action buttons (e.g., “Book Now” or “Shop”).
How do I add a website link to my Instagram bio?
Edit your profile and paste the URL into the “Website” field.
How often should I update my Instagram bio?
Update your bio whenever there are significant changes to your brand, achievements, or contact information.
Can I use hashtags in my Instagram bio?
Yes, you can use hashtags in your Instagram bio to make your profile more discoverable and to highlight key interests or topics.
Imagine this: you’ve just opened your store in a lively new neighborhood. Now, picture potential customers on Instagram, craving a nearby spot. They stumble upon a post about a cozy local cafe close by. Intrigued, they visit, and bam – you’ve become their new favorite.
This magic is possible when businesses, like yours, add a custom location to their Instagram bio. It’s not just a digital tag; it’s a smart way to connect with locals, boost visibility, and amp up sales.
Ready to try it yourself? Here’s a quick guide on adding a location to your Instagram bio – an easy trick to effortlessly connect with your audience and boost your digital presence.
Here’s how to add a location to your Instagram bio:
Whether you’re using a personal or business account, adding a location to your Instagram bio is a breeze. Just a heads up, you can only do this on your mobile, not your computer. Stick around, and we’ll show you how in a moment.
Choose a location on Google Maps on your phone:
Step 1: Open Google Maps on your phone and search for the specific location you want to add. Type the address into the search bar if needed.
Step 2: Once you find the right spot on Google Maps, tap “Share,” then select “Copy.” This action copies the link to that exact location.
Step 3: Close Google Maps and open Instagram. Go to your profile by tapping your profile picture at the bottom right of the app’s home screen.
Step 4: Tap “Edit Profile.”
Step 5: Under the “Links” section, select “Add Link.”
Step 6: On the next screen, choose “Add External Link” and paste the link you copied from Google Maps. You can also give it a title, like your business name.
Step 7: Hit “Done” and go back to your profile.
Refresh the page by pulling the screen down, and there you have it! You’ve successfully added a location to your Instagram bio.
Expand your Instagram profile’s impact using Replug to add multiple links to your bio. Overcome Instagram’s single-link constraint, by using our Instagram link in bio tool to create a single bio link page offering followers easy access to diverse content and destinations.
Replug also serves as a comprehensive link management platform, helping you organize, track, and optimize all your links from one convenient dashboard.
Streamline engagement and maximize your online presence with a dynamic and efficient bio link solution.
Here’s how to add multiple links to your Instagram bio using Replug:
Step 1:Sign in to Replug or create a free account.
Step 2: Locate the “Bio Links” feature in the top banner. The bio link dashboard will appear in front of you.
Step 3: Click the “New Bio Link” button to start setting up your Tumblr bio. You’ll be directed to a new page where you’ll find three main categories: branding, content, and settings.
Step 4: In the branding section, add a brand title and description, select themes, and choose button styles to match your aesthetic.
Once you’re done, click “Publish” in the upper right corner to save your changes.
Step 5: Head to the content category. Here, you can add social icons, links, RSS feeds, videos, cards, text, and more.
For example:
Social icons: Add up to 8 platforms, customize colors, and link to your profiles.
Links block: To include website links, use the “links” block. Add titles and URLs for each link.
Step 6: Once you’ve added the necessary blocks, click “update” to save each one.
Step 7: Go to the settings section to further customize your bio link’s SEO and social media preview. Add a title, description, favicon image, and even retargeting pixels if desired.
Now you can add this bio link to your Instagram bio following the steps mentioned above and you’re done.
How do I change my location on my Instagram business account?
Update your location by tapping “Edit Profile” on your Instagram profile and adjusting it under the “Public Business Information” section.
Can I add multiple locations to my Instagram bio?
No, Instagram allows only one location link, but you can use services like Replug to create a bio link with multiple links, including locations.
Additionally, you can simplify and track your links effortlessly using this URL shortener free tool, making your shared URLs more manageable and professional.
Why can’t I add a location to my Instagram bio on my computer?
Editing Instagram bio links, including locations, is a mobile-only feature. You can make these changes using the Instagram app on your smartphone.
Is it possible to remove a location from my Instagram bio later?
Absolutely, to remove a location from your Instagram bio, go to “Edit Profile,” click on the location link, and either delete or replace it with a new one.
In the vast landscape of social media, X (formerly Twitter) is a prominent platform connecting people from all walks of life. In this guide, we’ll uncover the secrets of tweeting links with finesse.
Ready? Let’s get tweeting!
How to tweet a link without a URL?
When crafting a tweet on X, the URL you include will be initially visible within the tweet text. However, upon posting the tweet, Twitter automatically generates a preview for certain URLs (not all), transforming the appearance of the tweet.
This preview showcases essential details from the linked page, such as a headline, description, and often an accompanying image.
As a result, the full URL is no longer prominently displayed in the tweet, offering a cleaner and more engaging presentation for users.
Here’s how to tweet a link without URL:
Step 1: Log in to X and paste your link into the compose box at the top of your Home timeline.
Step 2: Twitter will automatically generate a preview of your pasted link. Hit the Tweet button and Twitter will share the link without showing the URL.
That’s it! You’ve your link tweeted without the URL!
Important note:
Not all URLs will trigger a preview; some links, such as specific file types or websites with restricted access, may still display the full URL in the tweet. In addition, you only have 280 characters to use in a tweet. In this situation, you could:
Use a URL shortener service
Describe the link in your tweet.
And guess what? We have a solution for your long X URL problem!
Introducing Replug: Your solution for shortening X URLs
With Replug, you can transform lengthy URLs into concise links for your tweets. Say goodbye to character count woes and hello to engaging, impactful content.
Let’s dive into the simple process of Replug’s URL shortening and bring your X sharing to the next level!
Step 2: Next, you’ll be led to the main dashboard. To shorten your URL, enter the desired URL you want to track in the bar under “Quickly Shorten your link”:
Step 3: After entering your URL and clicking on the blue arrow button, Replug will automatically generate a shortened link that you can copy:
Step 4: You can also customize the URL with the slug of your choice by clicking on the pencil icon:
Step 5: Simply save your URL and you’re done! Share away, whenever, wherever.
Replug Analytics: Measure link success
Are your X links making the impact you desire?
With Replug Analytics, you can dive deep into your link performance and discover the key to boosting engagement, maximizing reach, and achieving your Twitter goals like never before!
Replug’s Analytics feature empowers you to make data-driven decisions and revolutionize your link-sharing strategy.
Yes, you can embed an image in a tweet by directly uploading it to x (formerly Twitter). When composing your tweet, upload the image, and it will be hosted on X’s servers, appearing within the tweet’s content for all users to see.
What are the benefits of using shortened links on Twitter?
Shortened links offer cleaner tweets, free up character space, and encourage more user interactions.
Are there any character limits for links on Twitter?
Yes, the X character limit is 280, and sharing lengthy URLs can consume valuable space. A reliable short URL generator helps keep tweets concise and engaging.
Social networks like Instagram are mobile-friendly. However, because Instagram is mobile-first, tracking down your Instagram URL can sometimes be tricky because it works differently than a traditional website.
This guide will show you how to quickly grab URLs on both mobile and computer devices, including your Instagram links, in just a few simple steps.
Let’s get searching!
How to get an Instagram link on a computer device:
Step 1: Go to Instagram and type in your login credentials.
Step 2: Click on your username at the top-right of the screen.
Alternatively, you can click the profile icon in the left menu.
Step 3: Your Instagram link will appear in the search bar. Copy the link, and you’ll have a ready-to-use Instagram link.
How to get an Instagram link on a mobile device:
Step 1: Open the Instagram app on your iPhone or Android and log in.
Step 2: Tap on your profile in the bottom right-hand corner of the menu.
Step 3: You will find your Instagram username at the top of your profile page.
Note: Instagram URLs consist of two components: Instagram’s website address and your Instagram username. The URL format is generally instagram.com/username. So, the Instagram username for the case is aarsal.k. To get this link, just type Instagram.com/aarsal.k. You can do the same for your iPhone or Android device.
You can easily change your Instagram URL in seconds with Replug.io by following the next mentioned simple and easy steps.
Then simply paste that link into this top-notch short URL shortener to get a tidy, share-friendly version ready for your social bio.
Step 1: Follow the above steps to get your Instagram link on mobile or desktop.
Step 2: Go to any browser on your desktop and type app.replug.io. You will be redirected to the login page, where you can sign in or create an account if you don’t already have one.
Step 3: You will see the Replug dashboard once you are signed in.
Step 4:Paste or type your Instagram URL in the box under “Quick Shorten your link” to customize it:
Step 5: Now you have your updated URL, which will look like the one below in the picture.
You can customize the URL slug to let people know exactly what you’re sharing. Click the edit button at the end of the URL bar and type the URL slug you want.
For example:
Now save your shortened link and get sharing! It’s that easy.
Note: Find your newly created Instagram link by going to Main Dashboard > Manage > Replug links.