Category: Help guides

Read Replug’s help guides blog for expert tips, insights, and resources on link management, tracking, branded URLs, QR codes, and audience growth.

  • How to add threads to Instagram bio: 3 easy methods

    How to add threads to Instagram bio: 3 easy methods

    You’ve got your Instagram bio all set up, but it feels like something’s missing. Maybe it’s neat, but it’s not “popping’’ the way you want it to. You’ve probably seen other profiles with those slick little threads in their bios and thought: That’s genius! How do I get in on this? Well, guess what? You’re in the right place because we’re about to show you exactly how to add threads to Instagram bio and make your profile stand out in a big way. 

    We’ll walk you through the three simple methods of adding threads to your Instagram bio, including a unique way to do it using Instagram bio links. It’s easier than you might think, and the results will be totally worth it. With threads, you can take your Instagram bio from basic to eye-catching in no time, creating a profile that feels fresh and dynamic. 

    So, let’s dive in and get your bio looking its best!

    But wait… what even is “Threads”?

    If you’re an Instagram pro, you’ve probably heard of Instagram Threads by now, and maybe even wondered how you can bring the two together. 

    Threads is Instagram’s text-based counterpart, built around promoting healthy conversations, while Instagram itself thrives on visual content. 

    Threads, the newer text-based app from Meta, is all about sparking meaningful conversations and staying connected with your audience in a more direct way. Since its launch in July 2023, Threads has skyrocketed to over 300 million monthly actives (Adam Mosseri, Head of Instagram), many of whom have come from Instagram. Why? Because these two platforms sync up perfectly, making it easy to link them and create a seamless experience.

    Think of it as X’s/Twitter’s most popular alternative.

    How to add threads to Instagram bio?

    Now let’s get to the fun part! There are three methods to add threads in your Instagram bio:

    Method 1: As a clickable icon directly through the Threads app 

    Method 2: Adding a Threads link using Instagram’s External link option.

    Method 3: Using the Replug bio link feature 

    Method 1: How to add Threads to Instagram bio as a clickable icon directly through the Threads app

    1. Open the threads app: If you don’t have the Threads app installed already, go to your Apple Store or Playstore to install it.
    1. Sign in with Instagram: Before you start, make sure you have an active Instagram account to link with Threads. If you’re already logged into Instagram, Threads will automatically detect your profile and link the two.
    Sign in to Threads
    1. Set up your experience: Choose whether you want to keep your profile public or private.
    Set up your Threads experience
    1. Tap “Join Threads”: Once done, you’ll see a button at the bottom to join Threads. Click on it to proceed.
    Join threads
    1. Threads will be added to your Instagram profile: Once done, go to your Instagram profile. Here, you’ll see a clickable Threads icon at the top right, as well as in your bio section.
    Threads link added to Instagram bio

    Note: You can easily hide your Threads badge inside your Instagram app by simply clicking “Edit profile” and toggling the “Show Threads badge” button.

    Hide Threads badge
    ProsCons
    Effortless setup: Threads automatically links to Instagram.Easily overlooked: The icon is small and placed in a corner.
    Minimalist look: No extra links cluttering your bio.No clear call to action: The icon does not look like a clickable link.
    Direct integration: Ensures a seamless experience between Instagram and Threads.Limited awareness: Some users may not recognize the Threads icon yet.

    Related: How to add a Twitter (X) link to Instagram bio?

    Method 2: How to add Threads to Instagram bio using an external link

    1. Access your Threads profile and click on Edit profile.
    2. Copy your Threads link.
    Copy Threads link
    1. Click on Add external link
    Add external link to Instagram bio
    1. Paste your Threads URL.
    2. Your Threads link will appear in your Instagram bio.
    Threads link added to Instagram bio

    Pros and cons

    ProsCons
    Straightforward: Simply copy and paste the link.Not visually appealing: A long URL can look messy and unprofessional.
    Clickable and obvious: Users can clearly see it is a link.Limited engagement: A single external link might not get much attention.

    Recommendation: For maximum traffic, it’s optimal to duplicate the Threads link on your Instagram bio page through one of the best link in bio tool online.

    The good news is that you can easily do that using Replug’s bio link feature! Which brings us to the next method.

    Method 3: How to add Threads to Instagram bio using Replug’s bio link feature

    Replug takes your Instagram bio to another level with its bio link feature. You can create a bio site that includes the link to your Instagram Threads account alongside other important links that you want to showcase to your audience.

    Here are the simple steps that you need to follow if you use Replug’s Instagram link in bio tool to put Threads in your Instagram bio:

    1. Open the Replug app and log in to your Replug account. If you don’t have an account, you can easily create one within minutes!
    2. Access the Bio Links feature from your home page.
    Access Bio Links through the Replug home page
    1. Click on Create new.
    Create new bio link
    1. Click on Content and add a “Links” block.
    Add links block
    1. Paste your Threads profile URL and give it a title.
    Paste threads URL
    1. Customize your bio link URL and copy it.
    Customize your bio link
    Copy custom bio link
    Boost ROI with branded URLs - Replug dashboard showing performance metrics and branded URL creation

    Go beyond generic link pages!

    Create custom bio links that truly fit your brand

    With Replug, you can create bio links that are unique, engaging, and built to convert.

    Start free trial
    1. Use this link on your Instagram by adding an external link (refer to method 2).
    1. You’ll now see your bio link in your Instagram bio!
    Threads link added to Instagram bio

    Pros and cons

    ProsCons
    Customizable and professional: You can brand your bio link page.Requires an extra step: You need to create and manage a Replug account.
    Multi-link capability: Add other important links alongside your Threads profile.One extra click for users: Instead of clicking directly on a Threads link, users go through a bio link page first.
    Better user experience: Visitors see all your links in one place, increasing engagement.
    Link analytics: You can track how many people clicked on your Threads profile and optimize your CTR.

    Related: How to put your VSCO link in your Instagram bio?

    Conclusion

    Adding Threads to your Instagram bio helps you connect with your audience more effectively, but choosing the right method matters. While the built-in Threads badge and direct link options work, they come with limitations like low visibility and cluttered URLs.

    This is where Replug stands out. With its bio link feature, you can create a branded, clickable landing page that includes your Threads profile along with other important links. This not only makes your Instagram bio look clean and professional but also boosts engagement and tracks clicks to see what’s working.

    Replug is the ultimate solution if you want a seamless, customizable, and data-driven way to showcase your Threads profile. Start using it today!

    What’s even better is that you can also enhance your links’ appearance with our free URL shortener with tracking, making it easier to share clean, trackable URLs across your desired platforms.

    FAQs on how to add Threads to Instagram bio

    How is Threads different from Instagram?

    Threads focuses on text-based conversations, similar to Twitter (X), while Instagram is image and video-driven. Key differences include:

    – Threads prioritizes discussions, updates, and engagement through text.
    Instagram is primarily used for sharing visual content like photos, reels, and stories.
    – Threads does not have hashtags, search trends, or a chronological feed, unlike Instagram.

    Can I add Threads to my Instagram bio without using any third-party tools?

    Yes! You can either use the Threads badge that appears automatically when you sign up for Threads or manually add your Threads profile link as an external link in your Instagram bio.

    How to add Threads to Instagram bio after deleting it?

    If you previously deleted your Threads profile from your Instagram profile, you cannot restore it. However, you can still add your Threads profile link again manually by using the methods listed above.

    How to add Threads ID in Instagram bio?

    Threads does not have a unique ID like Instagram usernames. Instead, your Threads profile is linked to your Instagram handle. To add it:

    – Copy your Threads profile URL.
    – Paste it in your Instagram bio as text or add it as an external link under Edit Profile.

    How to create a Threads account without Instagram?

    Currently, you cannot create a Threads account without an Instagram account. Since Threads is an extension of Instagram, you must log in using your Instagram profile to access Threads.

    Why can’t I see the Threads badge in my Instagram bio?

    If the Threads badge is missing, it may have been hidden manually. You can check this by going to Edit Profile on Instagram and toggling the “Show Threads badge” option.

    Will adding Threads to my Instagram bio improve engagement?

    Yes! A well-placed Threads link makes it easier for followers to find your content. Using Replug’s bio link helps even more by organizing multiple links in a visually appealing way.
  • 3 easy steps to shorten your VSCO link using Replug

    3 easy steps to shorten your VSCO link using Replug

    VSCO is a popular platform for photographers and creators to showcase their work, but sometimes, its links can be long and unappealing. Whether you’re sharing your VSCO profile on social media or adding it to your Instagram bio, a branded short link makes it cleaner, more professional, and easier to track. 

    That’s where Replug.io comes in!

    With Replug, you can shorten, customize, and track your links effortlessly. In this guide, we’ll walk you through the simple steps to shorten a VSCO link using Replug.

    Let’s begin!

    3 steps to shorten a VSCO link using Replug

    Step 1: Copy your VSCO link

    • Open VSCO on your browser or app.
    • Navigate to your profile or the specific post you want to share.
    • Tap the Share button and select copy your profile URL.
    Share VSCO profile
    Copy VSCO profile link

    Step 2: Create a new shortened link

    • Go to the Replug app and log in to your account. If you don’t have an account, create a new one.
    • Once logged in, paste the VSCO link in the bar under Quickly Shorten your link.
    Quickly Shorten your VSCO link using Replug
    • Here’s what the auto-generated short VSCO link looks like:
    Auto-generated short VSCO link

    Step 3: Save and copy your shortened link

    • Click Save Shortened Link to generate your final short URL.
    Save and copy your short VSCO link

    Useful tip: Copy the shortened link and test it in your browser to ensure it redirects correctly.

    Link shortener tools like Replug not only help you create short links but also make your link cleaner and more shareable, thus improving click-through rates. Plus, you’ll also save space, making them perfect for platforms with character limits.

    What else can you do with Replug?

    With Replug, you can do much more than just shorten and track your VSCO links. Here are a few ways Replug can enhance how you share your VSCO content:

    1. Create custom links: You can personalize your shortened VSCO link to match your brand or make it more recognizable. Whether it’s for your photography portfolio or a specific post, shortening a URL ensures that your link is memorable and professional.
    Custom VSCO link
    Replug Branded Short Links CTA
    Maximize marketing ROI
    by transforming ordinary URLs into
    branded short links that convert.
    Try Replug for free
    1. Track engagement: Replug allows you to add tracking and UTM parameters to your VSCO links. You can monitor which social platforms, websites, or campaigns drive the most traffic to your VSCO profile or posts. It’s a great way to measure your success and refine your strategy.
    2. Create expiring links: Replug allows you to set expiration dates for links if you’re offering limited-time access to exclusive VSCO content (like behind-the-scenes shots or premium presets). Once the time is up, the link automatically redirects to another page, keeping your audience engaged with fresh content.
    3. A/B test your links: Not sure which post or portfolio format attracts more visitors? With Replug, you can A/B test up to 10 VSCO links and track which one gets the most engagement.
    4. Sharing across multiple platforms: Once you’ve shortened your VSCO link, sharing it becomes much easier. You can use your branded short link across various platforms, such as in your Instagram bio, social media posts, email newsletters, or even direct messages, without worrying about clutter or space limitations.
    5. Optimizing for SEO: Creating an SEO-friendly URL builds trust with your audience and improves click-through rates. Plus, your VSCO link will always stay professional and on-brand with Replug.

    Conclusion

    Shortening your VSCO link with Replug makes it more professional, user-friendly, and trackable. Whether you’re sharing your photography portfolio or a specific post, a short and clean URL improves the user experience. 

    Start using Replug today and optimize how you share your VSCO content!

    Frequently asked questions

    Will a shortened VSCO link affect my profile’s visibility?

    No, shortening your link won’t impact your profile’s visibility. In fact, a clean, branded short link can make it more appealing and clickable, leading to more visits.

    How to get VSCO link for my profile or post?

    To get a link for your VSCO profile or specific post, simply open the VSCO app or website, navigate to the profile or photo you want to share, and click the “Share” button. From there, you’ll see an option to “Copy Link,” which will give you the direct URL to your profile or post that you can share on social media, emails, or anywhere else!

    Can I edit a shortened VSCO link later?

    Yes! With Replug, you can edit the destination URL without changing the short link itself, which is super handy for updating content without resending a new link.

    Will my VSCO link expire after shortening it?

    No. Most link shorteners, including Replug, do not have an expiration date for standard shortened links. Your VSCO link will remain active unless you delete or modify it. 

    Does VSCO allow link sharing on social media?

    Yes, you can share your VSCO link anywhere. It can be on your Instagram bio, X (Twitter), Facebook, or even in emails. However, some platforms may require you to use a bio link tool if you want to display multiple links.

    Why should I track my VSCO link clicks?

    Tracking helps you see where your audience is coming from and which platforms drive the most traffic to your VSCO content. It’s useful for creators who want to understand their audience better and optimize their sharing strategy.

  • How to shorten a YouTube URL?

    How to shorten a YouTube URL?

    YouTube is the world’s second-largest search engine and a powerhouse for content sharing, with billions of videos uploaded and watched daily. If you’re a brand with a vast presence on YouTube, a content creator, a marketer, or a casual user, sharing YouTube links is essential for reaching a wider audience. 

    However, long URLs can appear cluttered and unprofessional, especially on social media, in emails, and in marketing campaigns.

    Shortening a YouTube URL makes it cleaner, easier to share, and increases the chances of getting clicks on it. In this guide, we’ll explore two simple ways to shorten YouTube links, using YouTube’s built-in short URL feature and Replug’s short link generator.

    Let’s get started!

    Replug Branded Short Links CTA
    Maximize marketing ROI
    by transforming ordinary URLs into
    branded short links that convert.
    Try Replug for free

    Method 1: Using YouTube’s built-in short URL feature

    This is the easiest and quickest way to shorten a YouTube URL directly from the platform.

    Step 1: Play the video

    Search for a video of your choice on YouTube and play it.

    Step 2: Click the share button

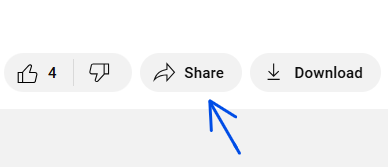
    Below the video, you’ll see the “Share” button. Click on it! This will open a window with sharing options.

    Youtube share button

    Step 3: Copy the shortened URL

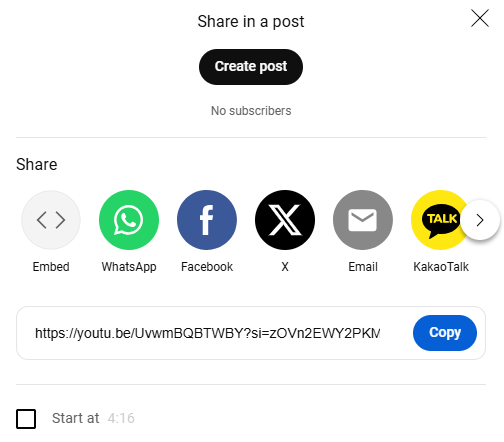
    In the pop-up window, you’ll see a shorter version of the video’s URL. This link is much shorter and cleaner than the one in the address bar (URL bar).

    automated short url

    Simply click the “Copy” button to copy the shortened URL to your clipboard. Then, share it as you like.

    Also read: How to add links to YouTube bio?

    Method 2: Shorten YouTube links using Replug

    If you want a more professional and branded short URL that doesn’t look spammy or messy, you can use a Youtube URL shortener tool like Replug.

    Unlike the previous method, this advanced link shortener lets you customize URLs for your YouTube channel, shorts, and videos, making them more memorable and trustworthy.

    Getting started is simple:

    Sign up for a free Replug account, or log in if you already have one, and start creating short, branded links in seconds! 

    Step 1: Copy and paste your URL

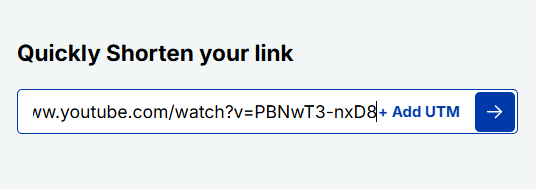
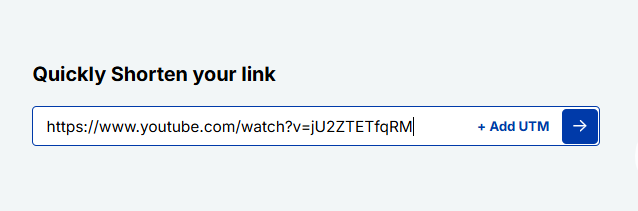
    Once logged in, go to the Home page and paste the original YouTube URL into the provided “Quickly Shorten your link” field.

    paste your Youtube URL

    Click the arrow button, and a pop-up window will appear.

    Step 2: Shorten your YouTube URL

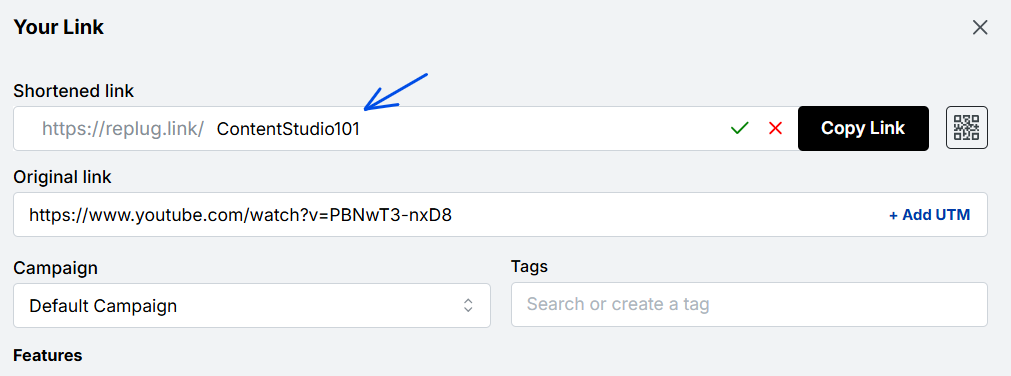
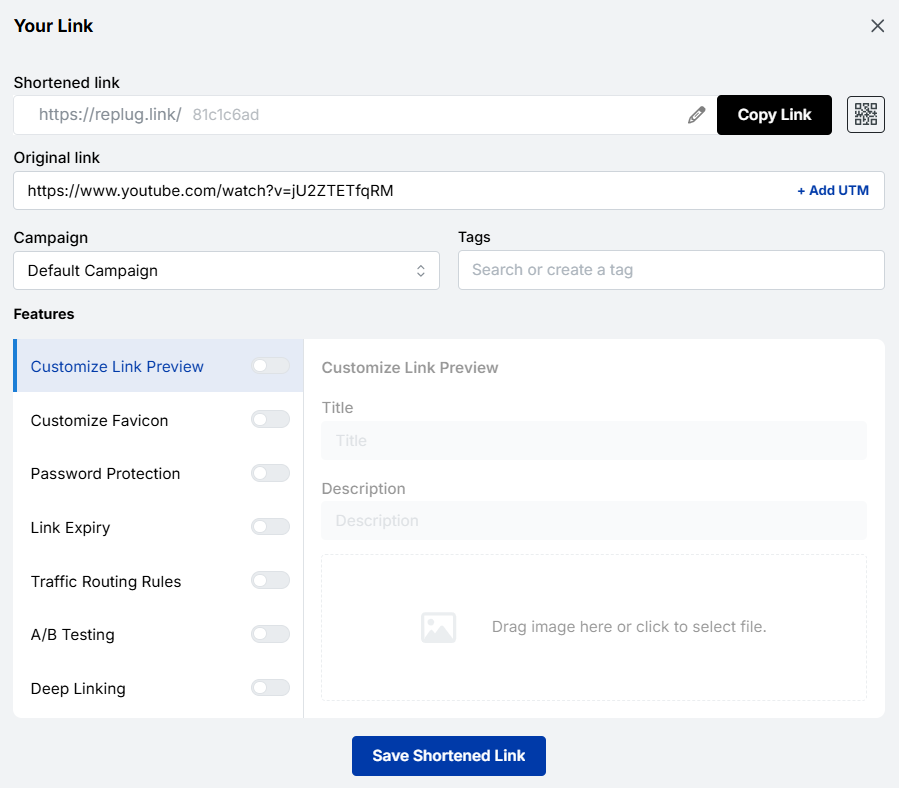
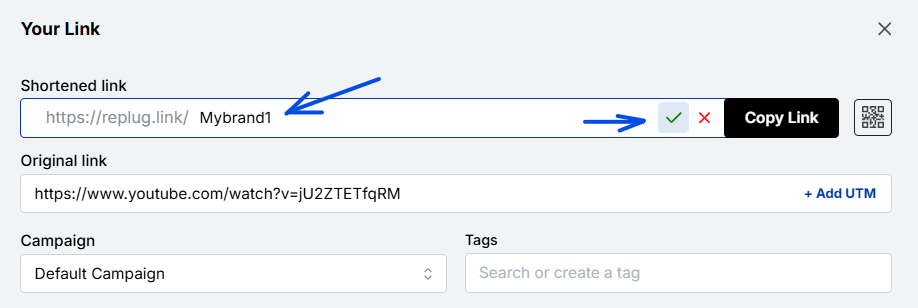
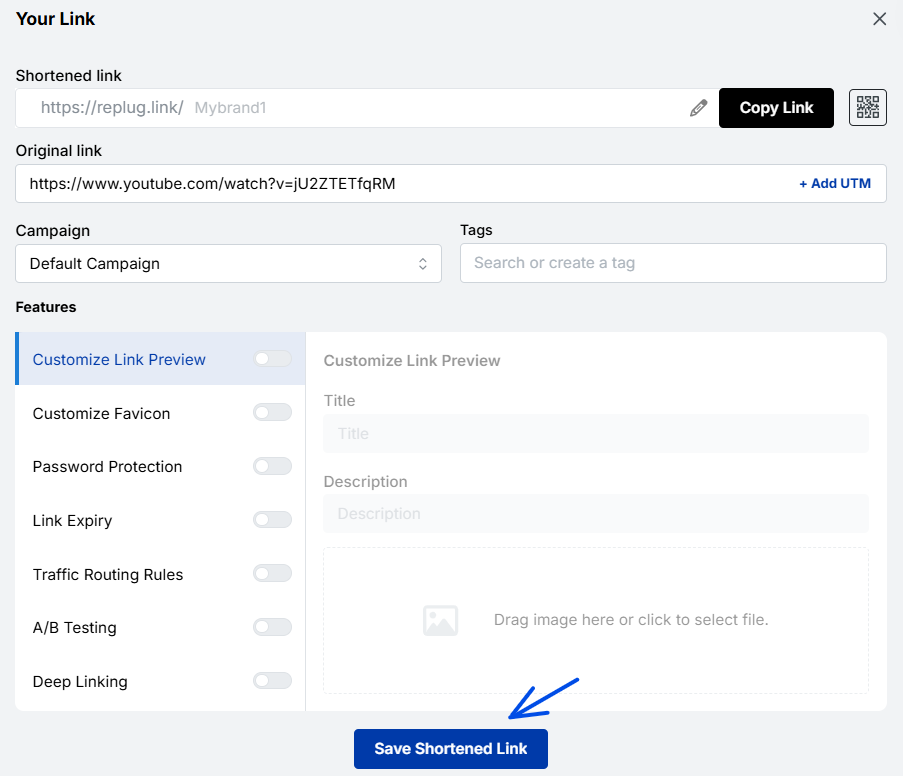
    Personalize your shortened link by adding a branded keyword or phrase to make it more recognizable. Then, click the checkmark, and your shortened YouTube link will be saved.

    shorten Youtube URL
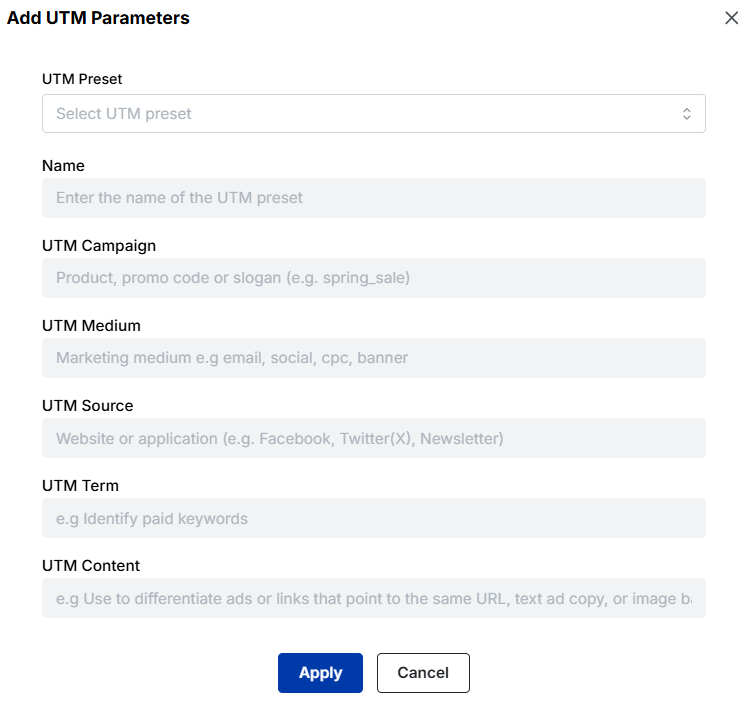
    Add UTM parameters: If you’re sharing the link for marketing purposes, you can add UTM parameters to track clicks and analyze performance. Replug makes it easy to add these parameters without manually editing the URL.

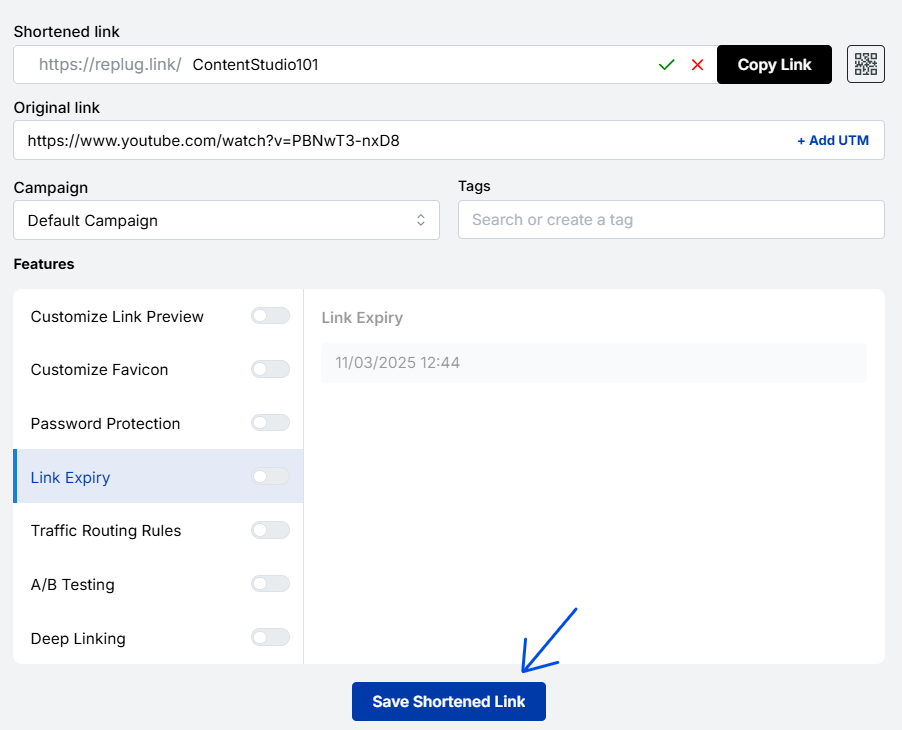
    Step 3: Enhance your link with advanced features

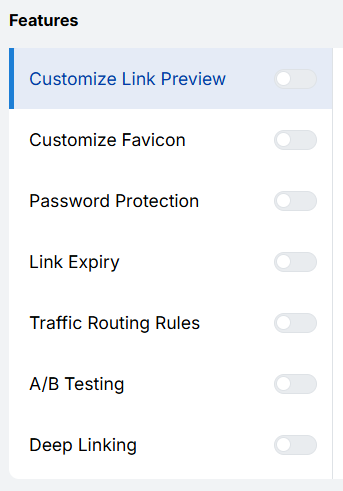
    Within the same pop-up window, you’ll find additional customization options, including:

    • Customize link preview: Control how your link appears when shared.
    • Customize favicon: Add a branded icon to your link.
    • Password protection: Restrict access to various users.
    • Link expiry: Set a time limit for link validity.
    • A/B testing: Compare different versions for performance.
    • Retargeting pixels:  Track and retarget users who click your link.

    Choose any of these features to maximize engagement and security.

    Step 4: Copy and share your branded URL

    Once you’ve customized your link, click “Save shortened link.”

    Save shortened link

    Copy it and share this link directly with friends or post it on social media platforms like Twitter, Facebook, Reddit, Blogger, Tumblr, or Pinterest.

    Also read: How to shorten a link using a URL shortener?

    Key benefits of using a URL shortener

    A URL shortener offers many benefits, from making your links cleaner and easier to share to boosting trust and engagement with your audience. 

    Replug not only shortens your YouTube URLs but also adds powerful features like branding, analytics, and retargeting. This means you can share polished links while tracking and improving engagement.

    • Custom domains & vanity URLs: Brand your links with your own branded short domain to make them look professional and credible.
    • Click tracking & analytics: Track every click by device, location, time, and more, all viewable in your dashboard or exportable as CSV.
    • Retargeting integration: Add tracking pixels from Facebook, Google, Twitter, and others to retarget viewers and build warm audiences.
    • QR codes for YouTube videos: Instantly generate scannable and dynamic QR codes for offline promotions, packaging, or event marketing.
    • Shorter, shareable links: Clean, compact URLs that look professional and fit perfectly in bios, emails, and captions.
    • Better engagement rates: Short links appear more trustworthy, increasing the chances of clicks and views.
    • A/B testing with smart links: Test different YouTube thumbnails, CTAs, or landing pages to see what drives the most engagement.
    • UTM parameter support: Add campaign tags to track YouTube traffic in Google Analytics without messy long links.
    • Seamless social sharing: Optimized links that look polished across platforms like Instagram, X (Twitter), TikTok, and LinkedIn.
    • Centralized link management: Manage all your YouTube links, campaigns, and analytics from one easy dashboard.

    Conclusion

    In this blog, we discussed how to shorten a YouTube URL, its significance, and walked through two simple methods to do it. First, we looked at YouTube’s built-in short URL feature for quick sharing. 

    Then, we explored how Replug.io helps you create custom, branded short links with advanced features like UTM tracking, retargeting, A/B testing, and centralized link management.

    If you haven’t already, give Replug’s URL shortener a try and experience the difference it can make in managing and optimizing your links.

    Frequently asked questions

    Why should I shorten a YouTube URL?

    Long YouTube URLs can look cluttered and unprofessional, especially on social media and in marketing campaigns. Shortening them makes links cleaner, easier to share, and more clickable.

    What’s the benefit of using a branded short URL with Replug?

    Replug lets you customize your YouTube links with branded keywords, making them more recognizable, trustworthy, and engaging. It also provides tracking, retargeting, and link management features for marketers and businesses.

    Is shortening YouTube URLs with Replug free?

    Yes, you can start shortening YouTube links for free with Replug. Paid plans unlock advanced features like branded domains, retargeting pixels, and A/B testing.

    Can I track clicks on my shortened YouTube URL?

    Yes! Replug allows you to add UTM parameters and access detailed link analytics, tracking clicks, engagement, and campaign performance.

    Where can I share my shortened YouTube URL?

    You can share it anywhere, on social media (Twitter, Facebook, Pinterest, etc.), emails, blogs, SMS, or even QR codes, to reach a wider audience.

  • How to scan a QR code from an image?

    How to scan a QR code from an image?

    QR codes have become a staple in our daily digital interactions. From restaurant menus to payment links, they simplify access to important information. But what if you receive a QR code as an image rather than a printed version? Fortunately, both iOS and Android provide easy ways to scan QR codes from images.

    In this guide, we will walk you through the simple steps for both iOS and Android devices. We’ll explore smart techniques, troubleshooting tips, and best practices to get the best results. As you read on, you might even consider how tools like Replug can boost your digital campaigns by offering advanced QR code tracking and analytics.

    Let’s get started!

    Why scan a QR code from an image?

    QR code scanning from images means reading a QR code that is stored as a picture rather than captured in real-time by your camera.

    The user perspective

    Scanning a QR code from an image is practical for users because it allows them to interact with QR code content at their own pace. You can store and revisit QR codes, making it easy to keep a record of important information without worrying about losing a physical copy. 

    There are many scenarios where you might need to scan QR code from image rather than using your camera:

    • A friend sends a QR code via WhatsApp or email.
    • You take a screenshot of a QR code from a website.
    • A business shares a digital flyer containing a QR code.
    • You save QR codes for later use.

    The marketer perspective

    The ability to scan a QR code from an image opens up new pathways in digital engagement and record-keeping. Some key marketing benefits of QR codes for marketers include:

    • Longer campaign visibility: QR codes in images can be shared and saved, extending the life of a campaign beyond a single interaction.
    • Increased engagement: Users can interact with QR codes whenever they want, making them more likely to scan and take action.
    • Better tracking and insights: Marketers can analyze QR scan data using link management tools such as Replug, to refine their strategies and optimize conversions.

    How to scan QR code from image on iOS devices

    Apple devices are designed to make QR code scanning straightforward. Most modern iPhones and iPads feature built-in tools that simplify the process. Here’s how you can scan a QR code from an image on iOS:

    Using live text feature (iOS 15+)

    If you’re running iOS 15 or later, you can use Live Text to scan QR codes:

    1. Open the Photos app and select the image.
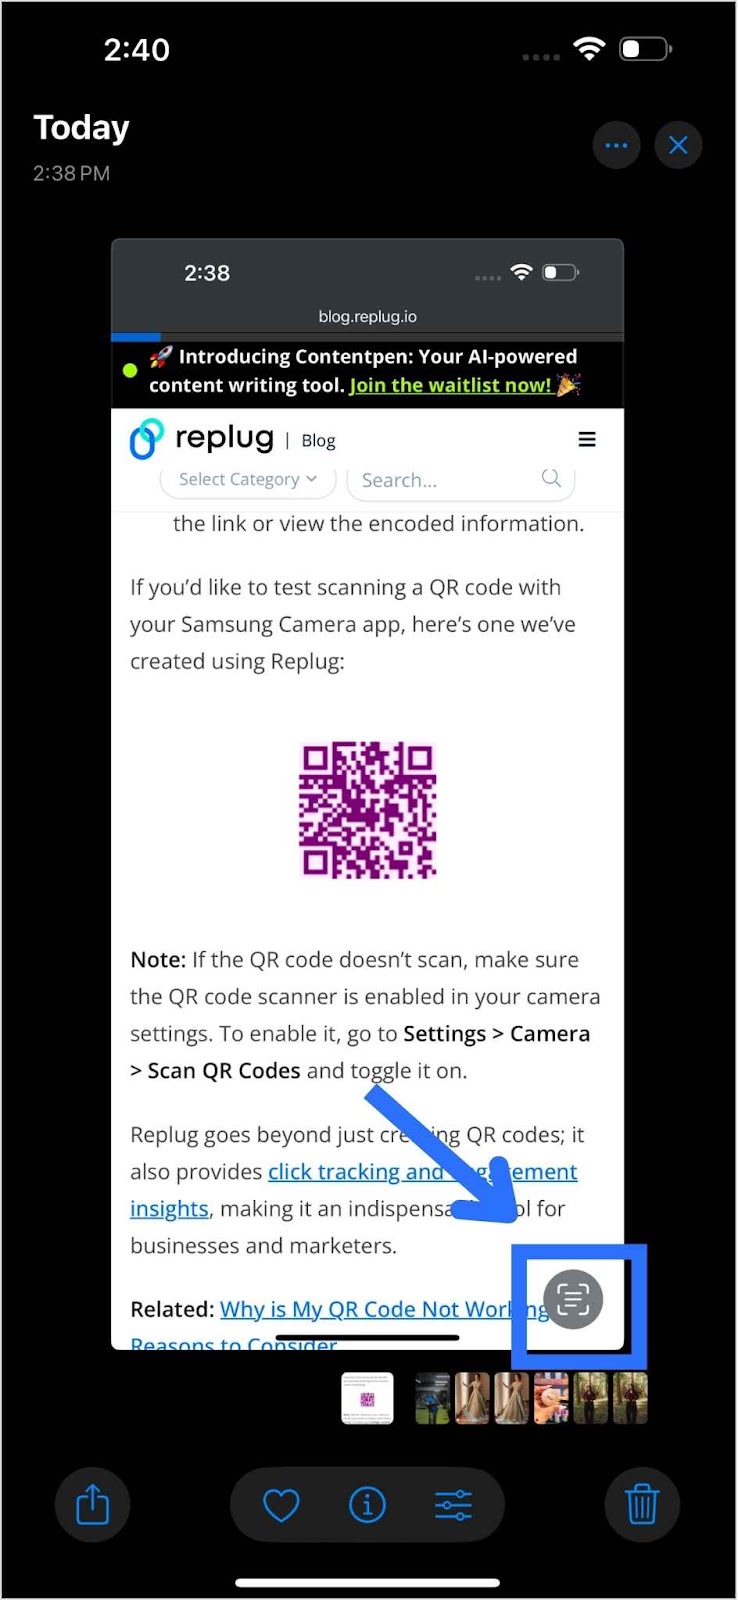
    2. Tap the Live Text button (a small square with lines inside).
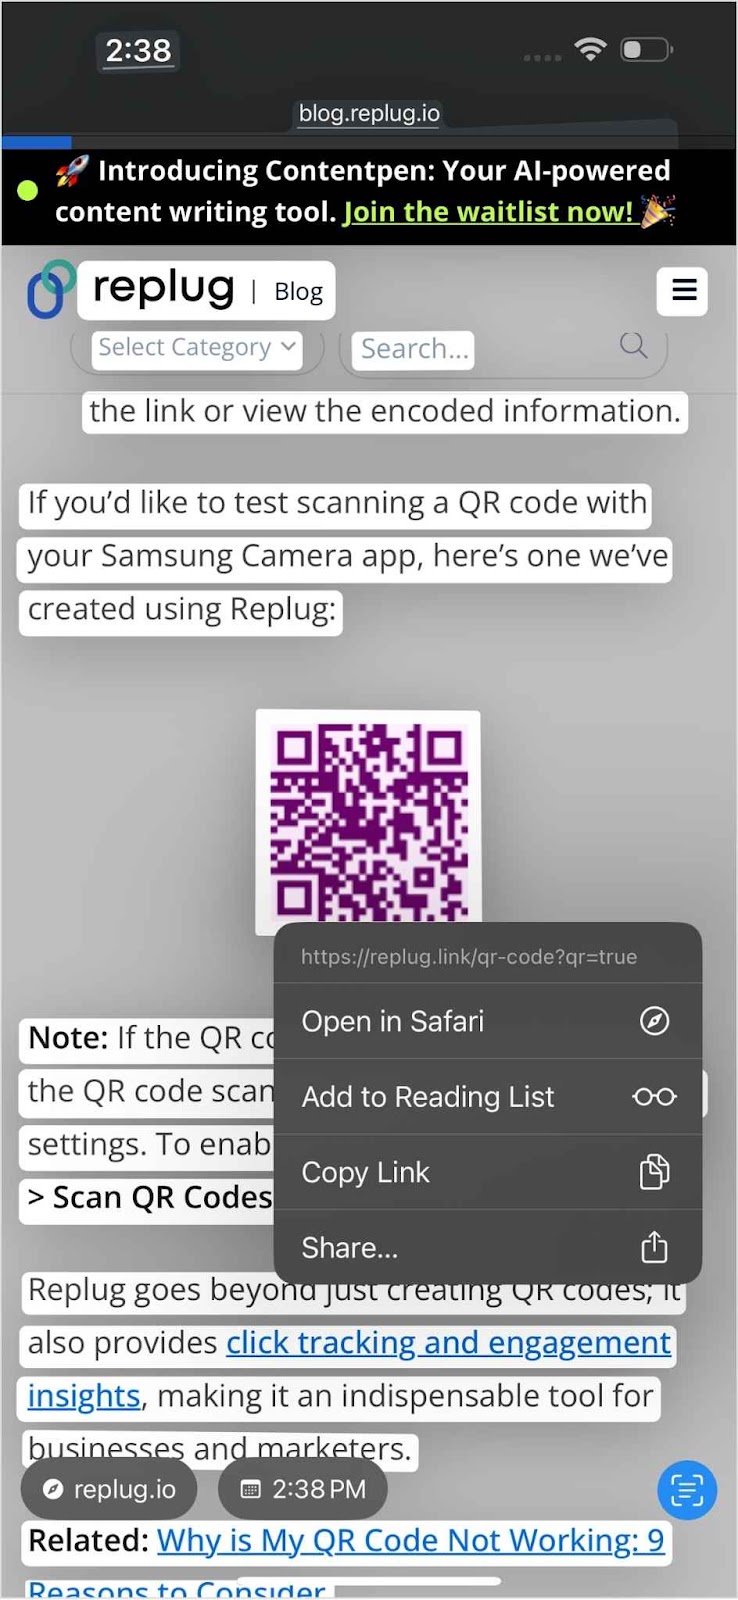
    Scan QR code on iOS using Live Text Feature
    1. Tap on the QR code. A menu will appear with options like “Open in Safari” if the QR code directs you to a web link.
    1. Choose your desired action based on the QR code content.

    Related: How to scan a QR code on your iPhone?

    How to scan QR Code from image on Android

    Android devices offer multiple ways to scan QR code from image using built-in features or online tools.

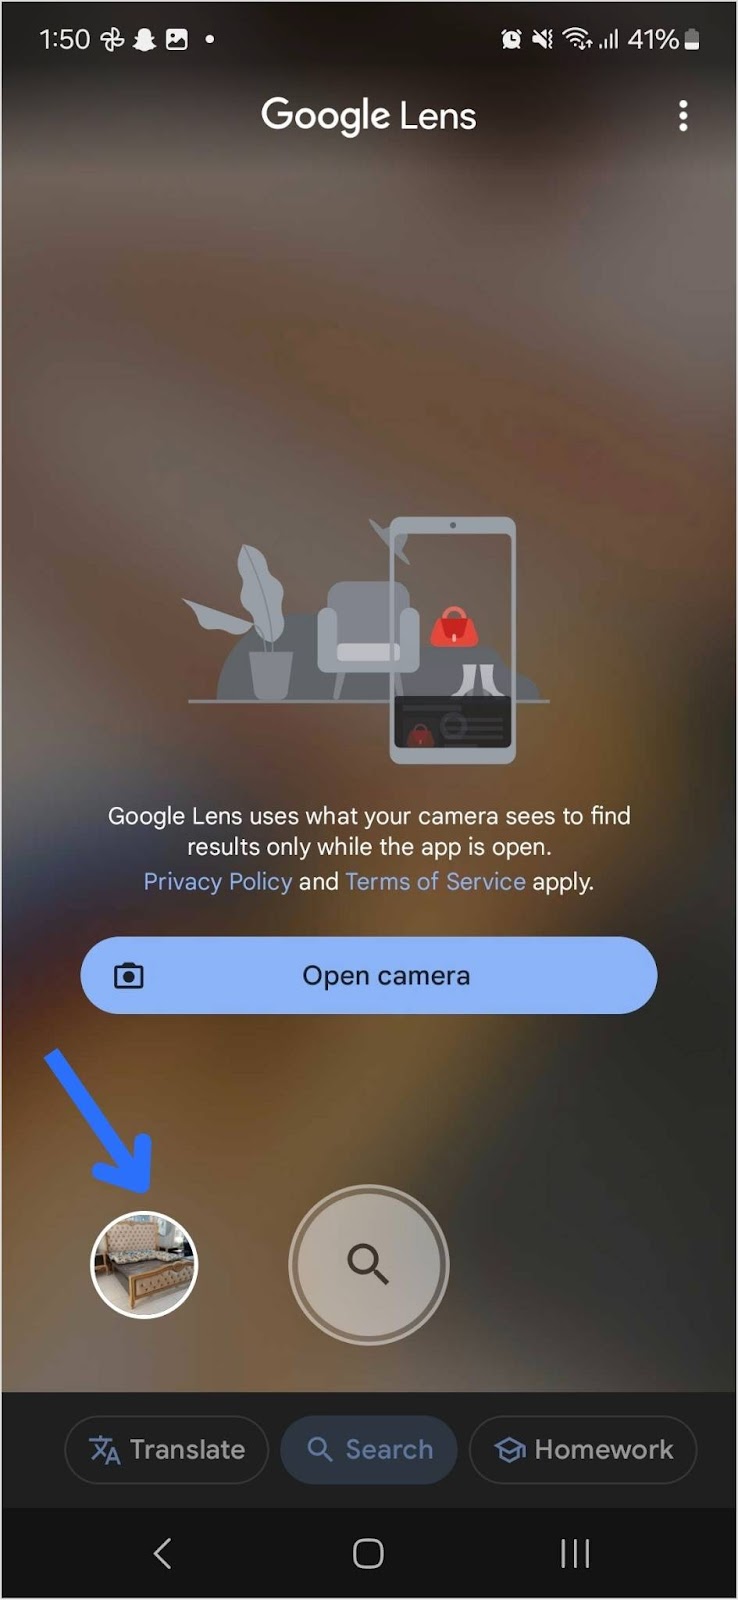
    1. Using Google Lens

    Google Lens is one of the easiest ways to scan QR code from image on Android devices support.

    1. Open the Google Photos app.
    2. Select the image with the QR code.
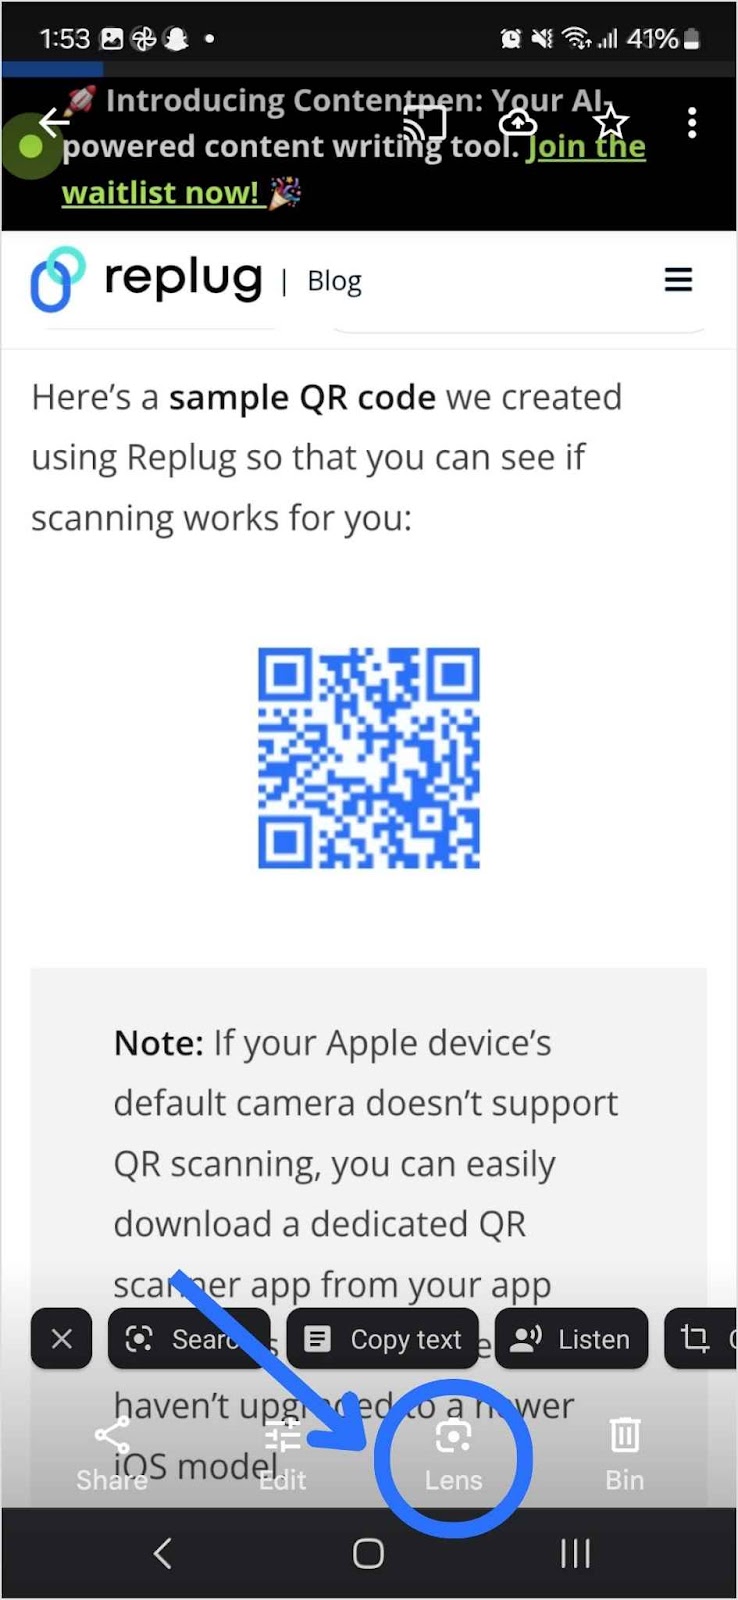
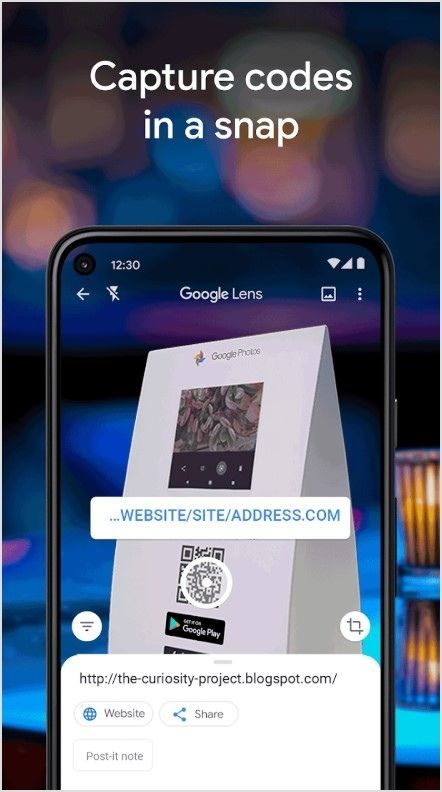
    3. Tap the Google Lens icon (a small camera inside a square).
    Scan QR code on Android using Google Lens
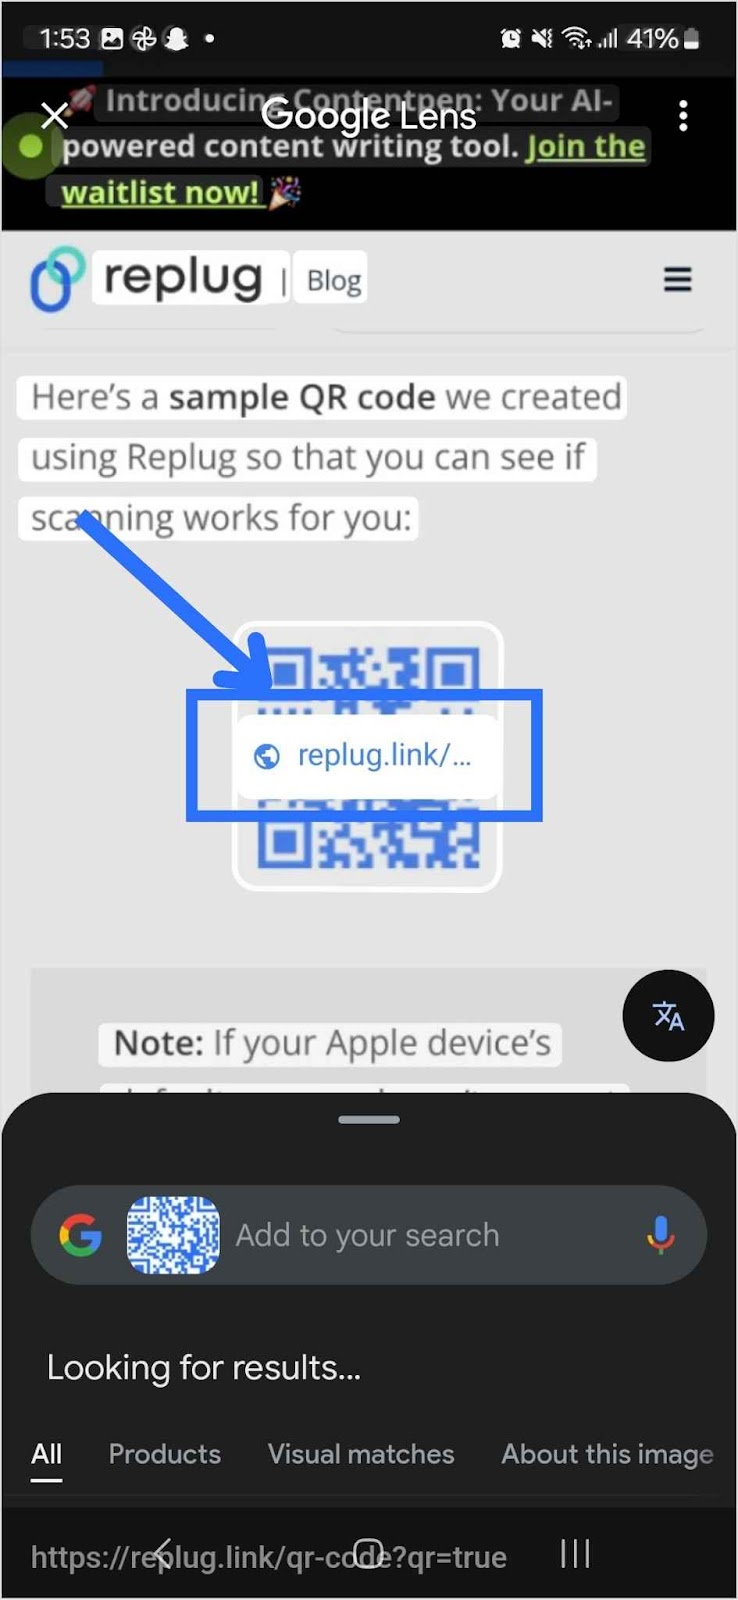
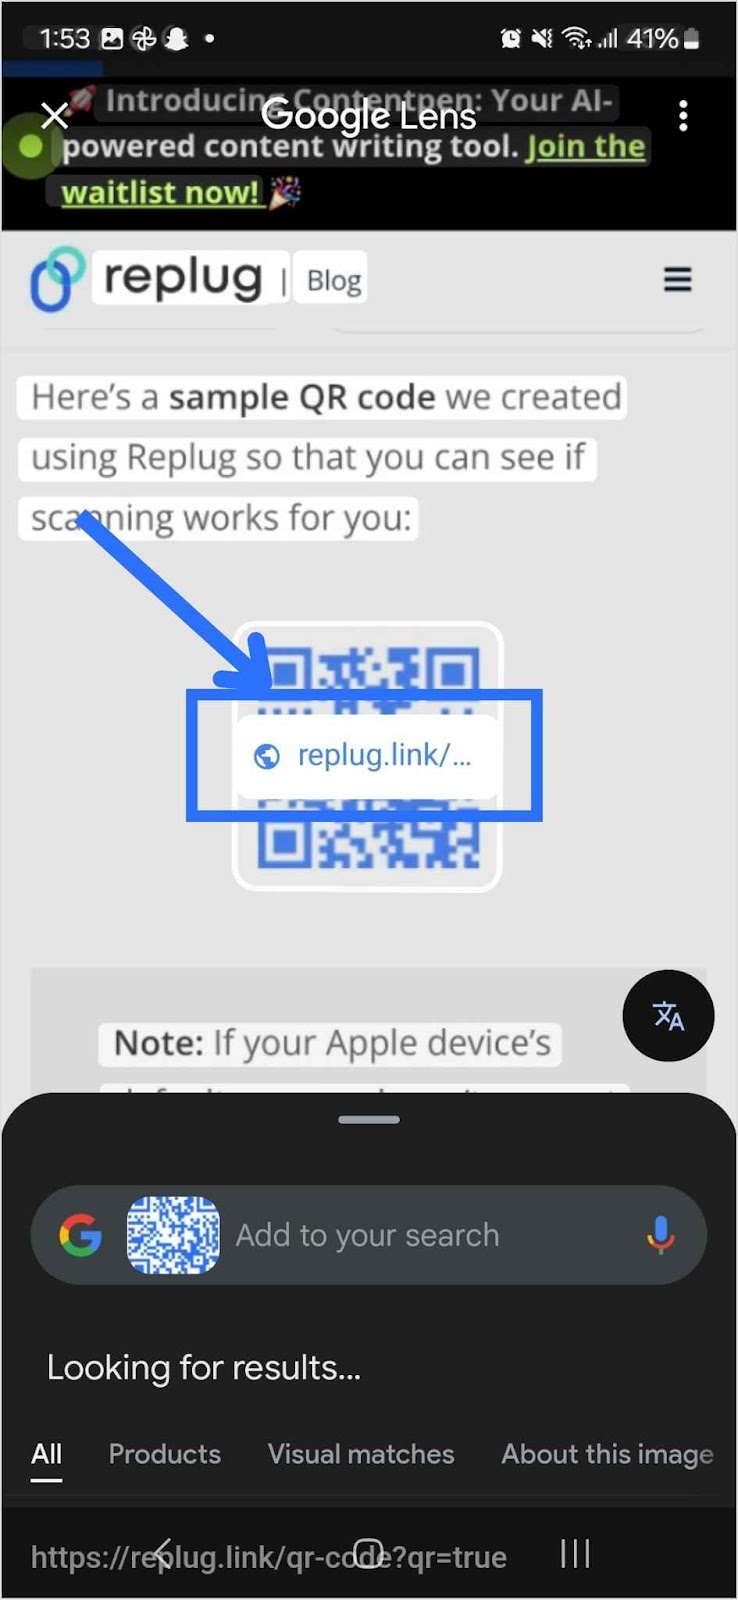
    1. Google Lens will scan the QR code and display the link or information.
    Scanned QR code using Google Lens

    2. Using Google Assistant

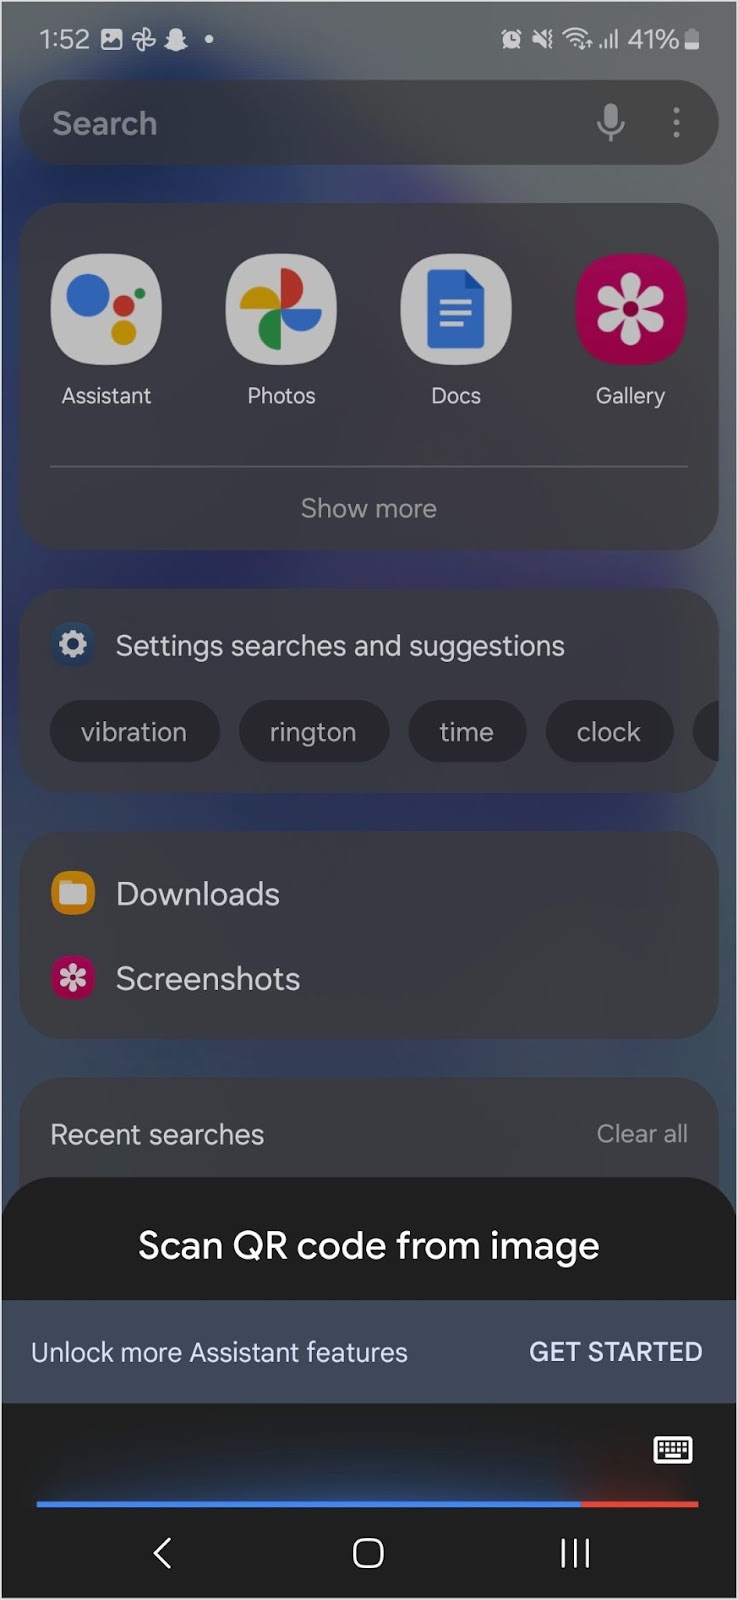
    Google Assistant can also help you scan QR code from image:

    1. Activate Google Assistant (say “Hey Google” or press the Assistant button).
    2. Say “Scan QR code from image”.
    Scan QR code on Android using Google Assistant
    1. Go to your Gallery and select the image containing the QR code.
    Open gallery and choose image
    1. Google Assistant will process the image and extract the QR code data.
    Scanned QR code using Google Assistant

    Related: How to scan a QR code on Samsung?

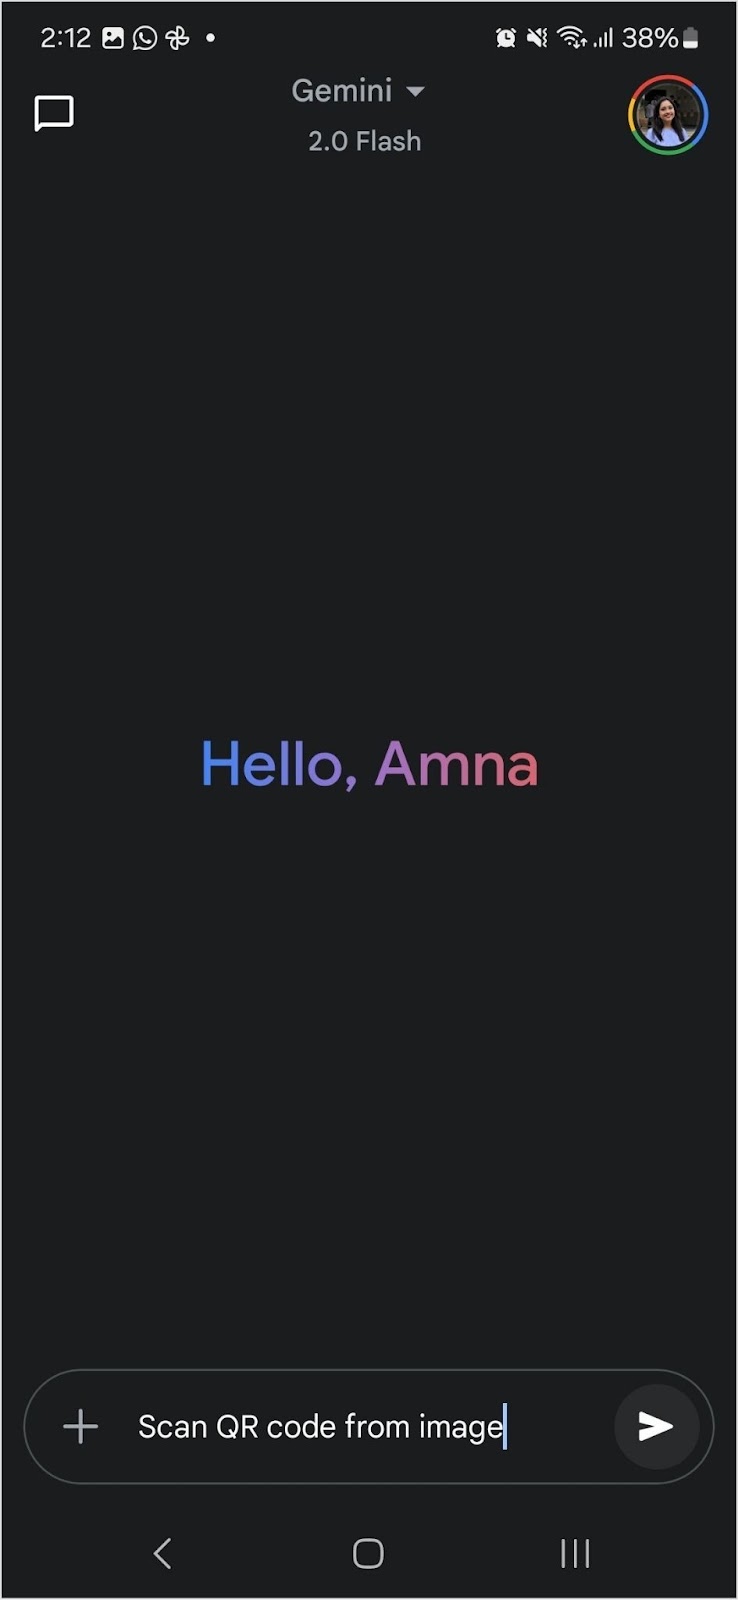
    3. Using Google Gemini

    There might be a setting change where Gemini is the default assistant. This change might affect how your device responds to voice commands. If you prefer to use Google Gemini to scan QR code from image, here’s how to do it:

    1. Look for Google Assistant on your Android device and Open Gemini.
    2. Type Scan QR code from image and enter.
    Scan QR code on Android using Google Gemini
    1. Google Gemini will automatically lead you to a QR scanner app. Select Scan from the given options.
    2. Go to Gallery.
    3. Select the image with the QR code from Photos.
    4. The QR scanner app will process the image and extract the QR code data.

    How to scan a QR code from an image online

    If you don’t want to install an app, you can scan QR code from image online using a browser. Several websites allow you to upload an image and extract the QR code content. Here’s how:

    • Visit a QR-scanning website.
    • Click on the Upload Image button.
    • Select the image containing the QR code.
    • The website will decode the QR code and display the result.

    Maximize your brand with scans and more

    QR codes aren’t just about scanning; they play a crucial role in marketing, branding, and link management. This is where a comprehensive link optimization platform such as Replug can help:

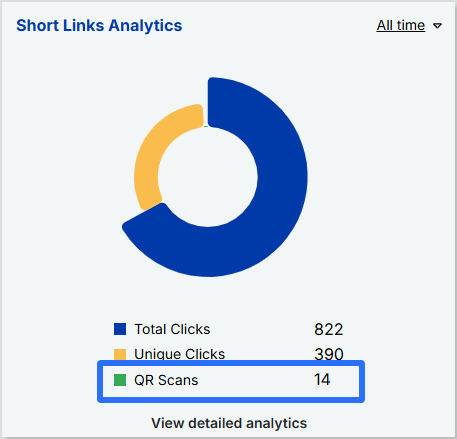
    Track QR code scans

    • Monitor the performance of QR code scans in real-time.
    Replug QR code scans
    • Gather insights into user engagement and behaviour.
    • Identify the best-performing campaigns to optimize your strategy.

    Manage QR campaigns

    • Create custom, branded short links with this efficient link shortener to attach to your QR codes to reinforce brand identity.
    • Manage all your QR code campaigns through a sleek and easy-to-navigate dashboard. 
    Replug analytics dashboard
    • Give access to team members easily so that they can collaborate on campaigns, manage QR code designs, and share valuable insights.
    • Adjust campaigns based on what works best to increase engagement.
    Replug Branded Short Links CTA
    Maximize marketing ROI
    by transforming ordinary URLs into
    branded short links that convert.
    Try Replug for free

    Benefits of using Replug for QR code campaigns:

    • Customization: Create custom QR codes with this efficient QR code generator. Change your QR code’s background and foreground colours to reflect your brand.
    • Dynamic QR codes: Edit the destination URL anytime without generating a new code.
    • Multiple download formats: Download your QR code in PNG or SVG format for flexible sharing.

    With Replug, QR codes are more than just a gateway; they’re a valuable tool for tracking and enhancing your marketing campaigns!

    Best practices for scanning QR codes from images

    • Ensure the QR code is clear and not blurry.
    • If a QR code is cropped or incomplete, it may not scan properly.
    • Adjust the brightness if the image is too dark.
    • Use trusted apps or built-in tools to avoid security risks.
    • If your device does not have an in-built QR scanning feature for images, download a third-party QR code scanning app from Play Store or Apple Store.
    • Always preview the link before opening it to prevent phishing attacks.

    Conclusion

    Now you know multiple ways to scan QR code from image on iOS, Android, and online platforms. Scanning a QR code from an image is quick and easy whether you’re using Google Lens, the Photos app, or an online tool.

    It’s a convenient way to access important links without needing a physical code. Whether for personal use or marketing, having the right tools makes all the difference. With Replug, you can create customizable, trackable, and dynamic QR codes to enhance your campaigns and maximize engagement.

    FAQs on how to scan QR code from image

    Can I scan a QR code from an image without using an app?

    Yes! Both iOS and Android devices have built-in tools like Live Text (iOS) and Google Lens (Android) that allow you to scan QR codes from images without needing a third-party app.

    Why isn’t my phone detecting the QR code from an image?

    This may happen if the image is blurry, cropped, or too dark. Try zooming in, adjusting brightness, or using a dedicated QR scanner app for better results.

    Is it safe to scan QR codes from images?

    Generally, yes. However, always preview the link before opening it to avoid phishing scams. 

    What should I do if my iOS device isn’t detecting the QR code?

    Ensure your device is updated to the latest OS version.
    If the code isn’t detected, zoom in to improve clarity.
    Check the image for blurriness and capture again if needed.
    Use the Notes app to scan the QR code by creating a new note, tapping the camera icon, and selecting “Scan Documents”.

    Can I change the destination of a QR code after it’s been shared?

    If you’re using a dynamic QR code, you can update the URL without changing the QR code itself. Replug allows you to edit and track QR codes in real-time.

  • How to scan a QR code on Samsung?

    How to scan a QR code on Samsung?

    It has become easier than ever to scan QR codes, especially if you’re using a Samsung device. You’ll find a QR code almost everywhere, from product labels and restaurant menus to posters and even emails! They’re a fast and convenient way to access websites, deals, and more.

    If you’re using a Samsung phone, you’re in luck! Samsung has built-in tools that make scanning QR codes effortless. Let’s look into the different methods you can use to scan QR codes on your Samsung device!

    6 methods to scan a QR code on Samsung

    Method 1: Scan a QR Code with the Camera App

    Samsung devices come with a native QR code scanner embedded directly in the Camera app. It’s simple, fast, and perfect for everyday use.

    1. Launch the Camera App: Open your Camera app on your Samsung phone.
    2. Point at the QR Code: Aim the camera at the QR code, ensuring it’s centered and clearly visible.
    3. Tap the notification: A pop-up notification will appear once the QR code is recognized. Tap on the notification to open the link or view the encoded information.

    If you’d like to test scanning a QR code with your Samsung Camera app, here’s one we’ve created using Replug.io

    QR code example

    Note: If the QR code doesn’t scan, make sure the QR code scanner is enabled in your camera settings. To enable it, go to Settings > Camera > Scan QR Codes and toggle it on.

    Replug goes beyond just creating QR codes. It also provides click tracking and engagement insights, making it an indispensable free link shortener for businesses and marketers.

    Method 2: Scan a QR Code with Samsung Internet

    Did you know Samsung’s built-in Internet browser also offers a QR code scanner? This method comes in handy if you’re already browsing and come across a QR code.

    1. Open Samsung Internet: Launch the Samsung Internet app.
    2. Tap the Menu button: Tap the three horizontal lines at the bottom-right corner to open the menu.
    3. Enable the QR scanner: Navigate to Settings > Layout and menu > Customize menu. Ensure the QR Code Scanner option is added to your menu.
    4. Scan the code: Once the scanner is enabled, tap the QR code icon in the menu to start scanning.

    Method 3: Scan a QR Code using Quick Settings

    For those times when you need to scan a QR code instantly, Samsung’s Quick Settings feature is a time-saver.

    Scan QR code using Samsung Quick Settings
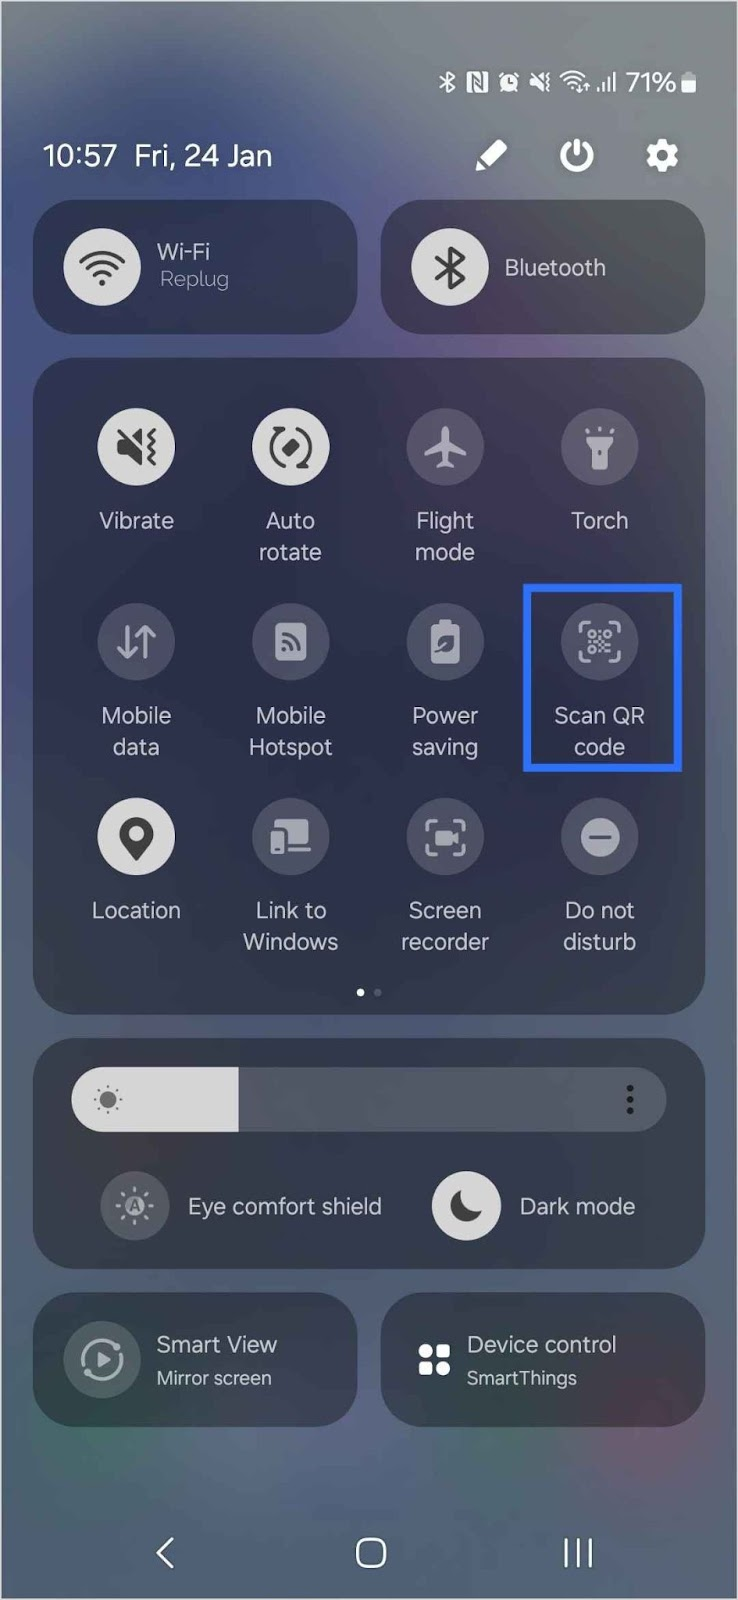
    1. Swipe down: Swipe down from the top of your screen to access the Quick Settings menu.
    2. Locate the QR scanner: Look for the Scan QR Code option. Tap Edit and drag it into your Quick Settings if it’s not visible.
    3. Tap to scan: Once it’s set up, just tap Scan QR Code to start scanning quickly.

    Method 4: Scan a QR Code with Bixby Vision

    Bixby Vision is a Samsung feature that lets you get more information about the world around you using your phone’s camera. It can also scan QR codes and provide you with the link or content embedded within them.

    1. Open the Camera App: Launch the Camera app on your Samsung device.
    2. Activate Bixby Vision: Tap the Bixby Vision icon. You may need to grant it permission if it’s your first time using it.
    3. Scan the QR Code: Point the camera at the QR code, and Bixby Vision will recognize it.
    4. Tap “Go”: A prompt will appear with the URL or information embedded in the QR code. Tap Go to open the link.

    Note: Bixby Vision may not be available on all Samsung devices. If you don’t see the Bixby Vision icon, check if your device supports this feature by visiting Samsung’s official site or looking through your device’s settings. If your device doesn’t support it, you can always rely on other methods like the Camera app or Samsung Internet.

    Method 5: Scan a QR Code from Photos in Your Gallery

    What if you’ve saved a picture of a QR code, and now you need to scan it? No worries! Samsung makes it easy to scan QR codes directly from your photo gallery using Google Lens or Bixby Vision.

    Using Google Lens

    Scan QR code using Google Lens
    Source: Google Play Store
    1. Open Google Lens: Launch the Google Lens app.
    2. Select the photo: Choose the image from your gallery that contains the QR code.
    3. Click the link: Once Google Lens detects the QR code, it will show a clickable link. Tap on it to visit the website.

    Using Bixby Vision from the Gallery

    1. Open Your Gallery: Go to your phone’s gallery and find the saved image.
    2. Activate Bixby Vision: Tap the Bixby Vision icon on the image.
    3. Scan and open: Once Bixby Vision detects the QR code, it will present the link. Tap to open it.

    Method 6: Scan a QR code using third-party scanners

    If for some reason your Samsung phone doesn’t support the built-in QR code scanner, there’s always the option of using third-party QR code scanning apps. A quick search on the Play Store will give you plenty of reputable options to download and use. Simply install one, open the app, and follow the on-screen instructions to scan any QR code.

    Smart QR Codes: Track, analyze, and optimize with Replug

    QR codes aren’t just for quick link sharing—they’re a strategic tool for tracking engagement and optimizing marketing performance. Whether your audience scans a QR code on an iPhone or a QR code on Samsung devices, Replug helps you gather real-time insights and refine your campaigns for maximum impact.

    Why choose Replug for QR code management?

    FeatureWhat it doesWhy It matters
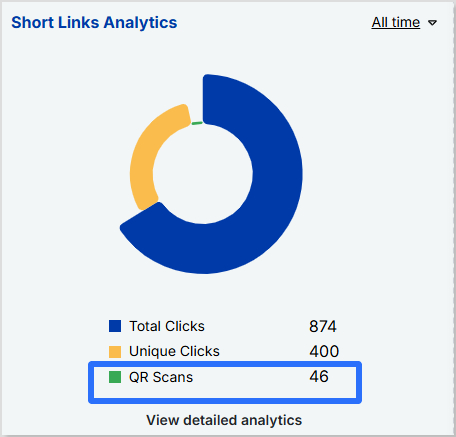
    Real-time trackingMonitors QR scans, unique clicks, and total interactions.Understand audience engagement instantly.
    In-depth analyticsProvides scan locations, device types (including iPhone and Samsung), and referral sources.Gain insights into how and where your QR codes are being scanned.
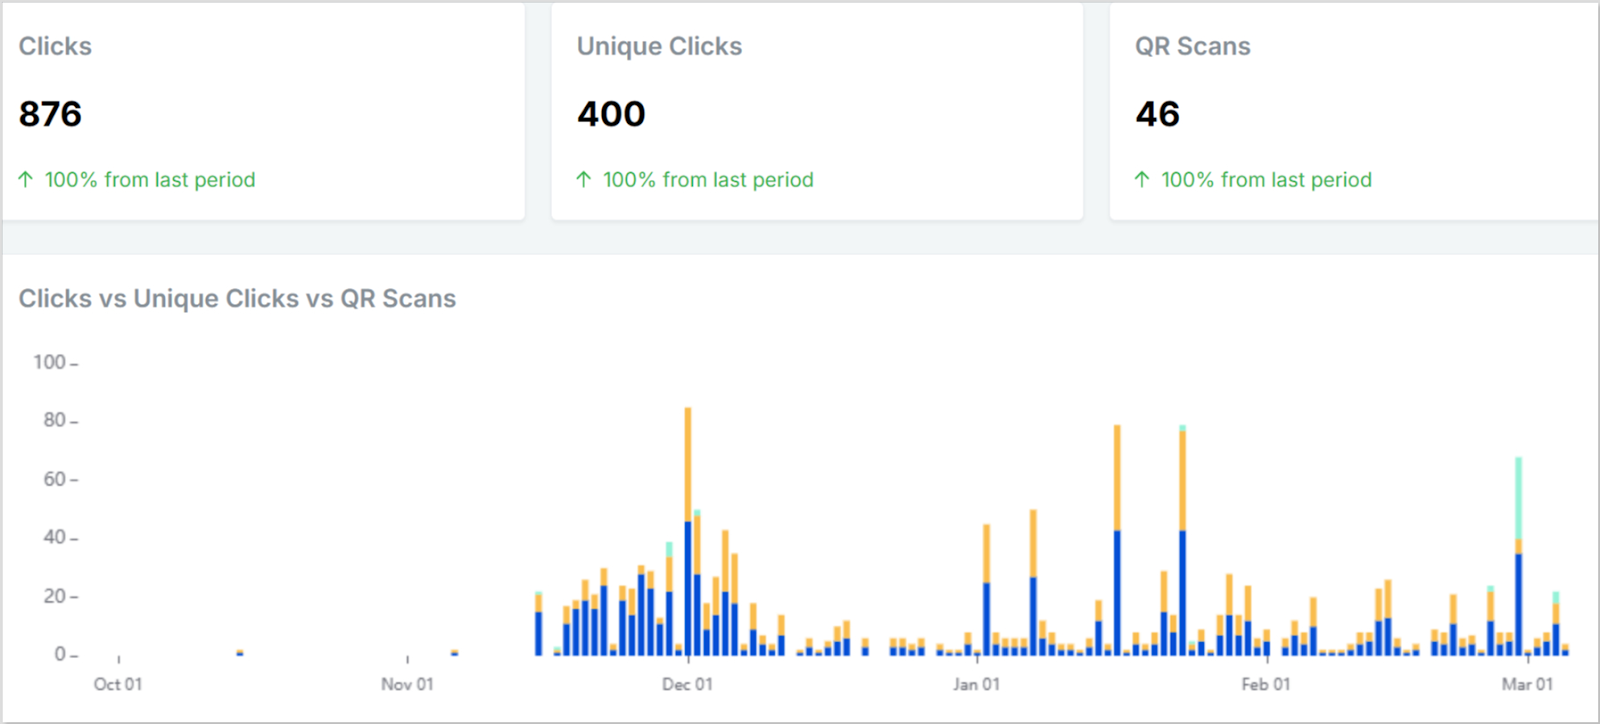
    QR performance chartsVisualizes scan trends over time.Identify patterns and optimize your strategy.
    Dynamic QR codesAllows URL changes without reprinting the code.Keep links updated without added costs.
    UTM codesTracks campaign performance across multiple channels.Measure marketing effectiveness with precision.
    Multiple download formatsExports QR codes in high-quality formats (PNG, SVG).Maintain a professional and branded appearance.

    Final Thoughts

    With all these options available, scanning QR codes on your Samsung phone has never been easier! Whether you’re using the Camera app, Samsung Internet, Quick Settings, Bixby Vision, or even third-party apps, you’ll be able to scan codes in no time.

    Now that you’ve mastered QR code scanning, it’s time to enjoy seamless access to links, promotions, and content on the go. 

    FAQs for how to scan a QR code on Samsung

    Why won’t my Samsung phone scan QR codes?

    If your Samsung phone isn’t scanning QR codes, make sure your camera lens is clean, the code is well-lit, and you’re holding your phone steady. Also, check if QR scanning is enabled in your camera settings. If it’s still not working, try using Google Lens or a third-party QR code scanner app.

    How to scan a QR code on Android?

    Most Android phones allow you to scan QR codes directly from the Camera app. Just open the camera, point it at the QR code, and tap the link that appears. If that doesn’t work, try using Google Lens from the Camera app or Google Assistant.

    How to scan a QR code on Samsung from the Gallery?

    To scan a QR code from an image in your Samsung Gallery, open the image, tap the three-dot menu, and select “Scan QR Code” (if available). If your phone doesn’t have this option, use Google Photos or Samsung’s built-in Bixby Vision.

    How can I track engagement on my shared QR codes?

    If you’re using QR codes for business or marketing, a dynamic QR code generator like Replug helps track scans, clicks, and engagement. It also lets you edit the destination URL without needing to reprint the code.

    Can I change a QR code’s destination link after creating it?

    Standard QR codes are static, meaning the link cannot be changed. However, with Replug’s dynamic QR codes, you can update the destination anytime without reprinting or regenerating a new code.

    What’s the best way to test a QR code before sharing it?

    Scan it using your Samsung Camera app or Quick Settings. For added accuracy, generate and test your QR codes with Replug, ensuring they work across different devices.

  • How to scan a QR code on your iPhone?

    How to scan a QR code on your iPhone?

    QR codes make accessing links, menus, and information effortless. Whether you’re on the go or browsing a menu, QR codes simplify the process. If you’re using an Apple device, scanning a QR code on your iPhone is a breeze, thanks to the built-in scanner in the Camera app.

    Below, we’ve outlined three simple methods to scan a QR code using your iPhone’s camera.

    3 methods to scan a QR code on an iPhone

    Method 1: Using the Camera app to scan QR Codes

    Apple has made QR scanning a breeze. Just follow these steps:

    1. Open the Camera app.
    2. Point your camera at the QR code, ensuring it’s within the frame.
    3. Hold still for a moment—your device will recognize the code and display a notification banner at the top.
    4. Tap the banner to open the link or perform the action associated with the QR code.

    Note: If your camera doesn’t pick up the code immediately, try adjusting the distance or ensuring there’s good lighting.

    Activating QR Code scanning in settings

    In rare cases, QR scanning might not work right away. If that happens, make sure the feature is turned on:
    1. Open the Settings app.
    2. Scroll down and select Camera.
    3. Toggle Scan QR Codes on.

    Want to test it out? Try scanning this QR code we generated using Replug!

    QR code example

    Replug not only helps generate QR codes but also tracks clicks and engagement, making it an excellent free link shortener online for businesses and marketers.

    Method 2: Using the QR Scanner in the Control Center

    For quicker access, you can add a QR scanner shortcut to your Control Center:

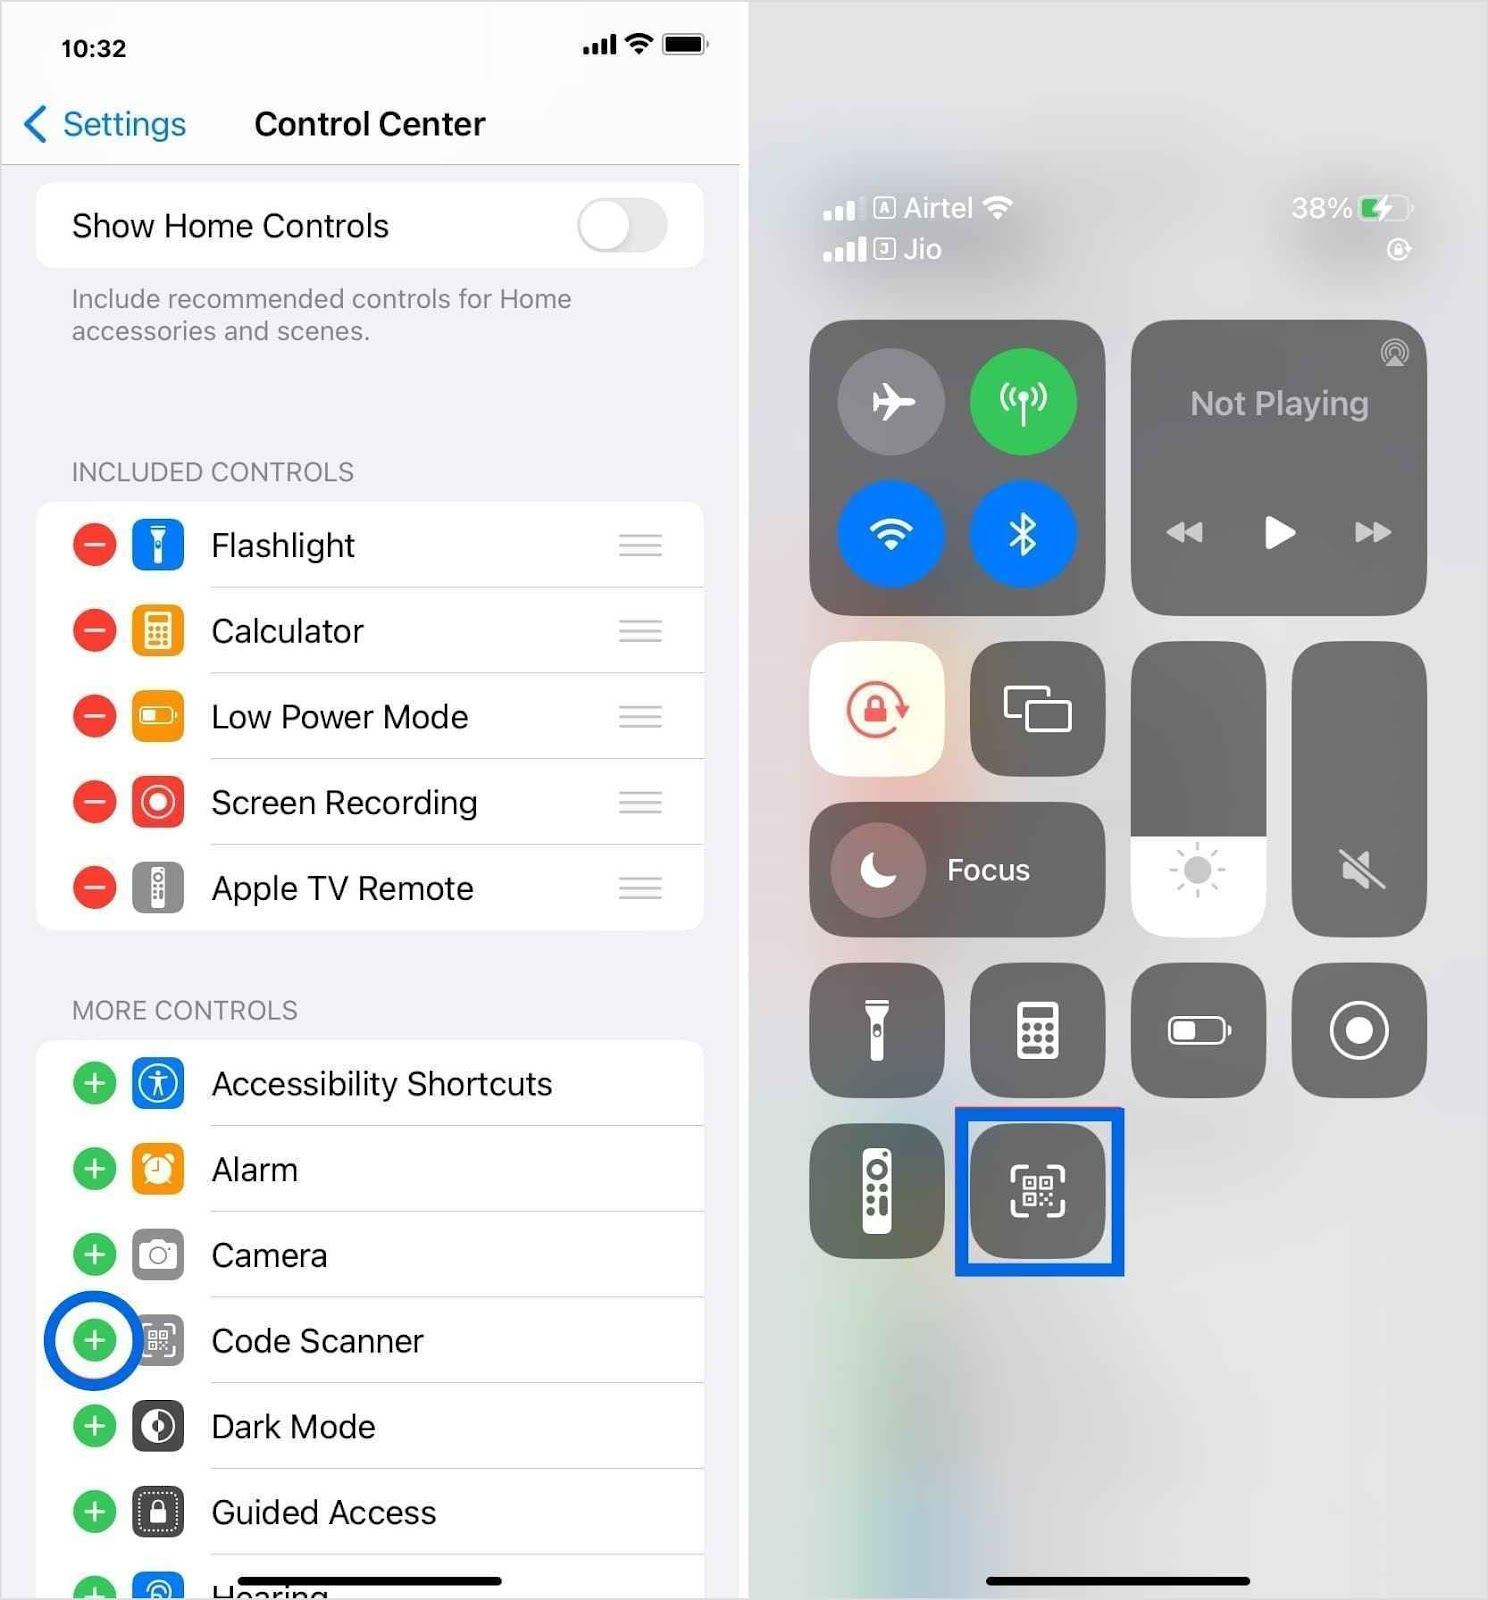
    Scan a QR code using the iPhone control center
    1. Go to Settings > Control Center.
    2. Tap the green plus icon next to the Code Scanner.
    3. Open Control Center by swiping down from the top-right corner (on newer iOS models) or up from the bottom (on older models).
    4. Tap the QR scanner icon and point your camera at the code.

    Method 3: Scanning QR Codes from photos or screenshots

    Received a QR code in a message or saved an image with one? No problem! Here’s how you can scan it directly from your gallery:

    1. Open the Photos app and select the image with the QR code.
    2. Touch and hold the QR code on your screen.
    3. A pop-up will appear with the option to open the link or take action.

    Note: If your device doesn’t support QR scanning through the camera, you can always download a third-party QR scanner app from the App Store. 

    Similarly, you can explore other productivity tools, like Call Recorder for iPhone, to safely record and manage your phone conversation.

    Scan, track, and optimize Your QR Codes with Replug

    QR codes are more than just a way to share links—they’re a powerful marketing tool when used strategically. With Replug’s custom QR code generator, you can go beyond basic QR generation and track every scan, analyze performance, and optimize your campaigns for better results.

    Track every scan in real-time

    • Monitor QR scans, unique clicks, and total interactions.
    • Get insights into scan locations, devices, and referral sources.
    • View QR graph charts to analyze trends and optimize performance.
    Track QR scans in real time

    Optimize for maximum impact

    • Create dynamic QR codes that allow you to update the destination URL without reprinting the code.
    • Add UTM parameters to track campaign effectiveness across different marketing channels.
    • Download your QR codes in multiple formats (PNG, SVG) for high-quality use.

    Final thoughts

    Scanning QR codes on an iPhone is incredibly easy, whether through the Camera app, Control Center, or even from saved images. For businesses and marketers, using tools like Replug can take QR code functionality to the next level by providing tracking, analytics, and customization options.

    FAQs for how to scan a QR code on your iPhone

    How can you scan a QR code on an iPhone without a camera?

    If your camera isn’t working or you prefer an alternative method, you can use the Code Scanner in the Control Center or a third-party QR scanner to scan codes directly from images or files.

    How do I scan a QR code inside my phone without using another phone?

    You can scan a QR code from an image stored on your iPhone by using the Live Text feature in the Photos app or a third-party QR scanning app that allows you to upload and scan codes effortlessly.

    Can I customize my QR code’s appearance?

    Yes! While iPhones can scan basic QR codes, tools like Replug let you customize colors, add logos, and even create branded QR codes to match your business identity.

    How to scan QR code iPhone from a photo?

    1. Open the Photos app and select the image containing the QR code.
    2. Tap and hold the QR code until a pop-up appears.
    3. Select the option to open the link or take action.

    How to scan a QR code on your screen?

    If you come across a QR code while browsing online, take a screenshot and follow the steps to scan a QR code.

    How can I track the number of times my QR code has been scanned?

    Apple’s default scanner doesn’t track scans, but Replug lets you monitor scan activity, view analytics, and measure engagement in real-time.

  • Linktree 101: How it works and why you need it

    Linktree 101: How it works and why you need it

    We all know that a link-in-bio tool lets you share multiple links through a single URL. And we’ve already talked about how Replug stacks up against other options.

    But here’s a question: do you know what a “linktree” actually is?

    Most people assume it’s just the name of a tool. But in reality, a linktree refers to any landing page that gathers multiple links in one spot, making it easier for people to access your content, shop, or connect with you.

    So, if you’ve clicked on an Instagram or TikTok bio and landed on a page full of links, that’s a linktree. But how does it actually work? And how can you use it to your advantage?

    In this guide, we’ll break it down, keeping it light, easy to follow, and packed with useful insights. Whether you’re a social media pro or just getting started, you’ll walk away knowing exactly how to make the most of your linktree.

    What is a Linktree?

    A common question heard nowadays is, ” What is bio link or a Linktree?” Here’s the answer!

    A linktree (also called a link-in-bio or bio link page) is a landing page that holds multiple links in one place.

    Instead of being stuck with just one clickable link in your social media profile, you can create a hub with buttons that lead to different pages—your latest blog, YouTube video, online store, or anything else you want people to check out.

    A well-structured linktree boosts clicks and engagement since it helps visitors find exactly what they need without extra searching.

    Linktree setups are simple to create and work on Instagram, TikTok, X (Twitter), and other platforms. When someone taps your linktree URL, they land on a clean, easy-to-navigate page with all your important links. Whether you’re promoting a podcast, selling products, or driving traffic to multiple platforms, a linktree makes sure everything is just one tap away.
    For many creators and brands, Instagram is the go-to place for a linktree since the platform only allows one link in the bio. Instead of constantly swapping links in and out, a linktree keeps everything in one place—making life easier for both you and your audience.

    Related: How to add long links within TikTok character limits?

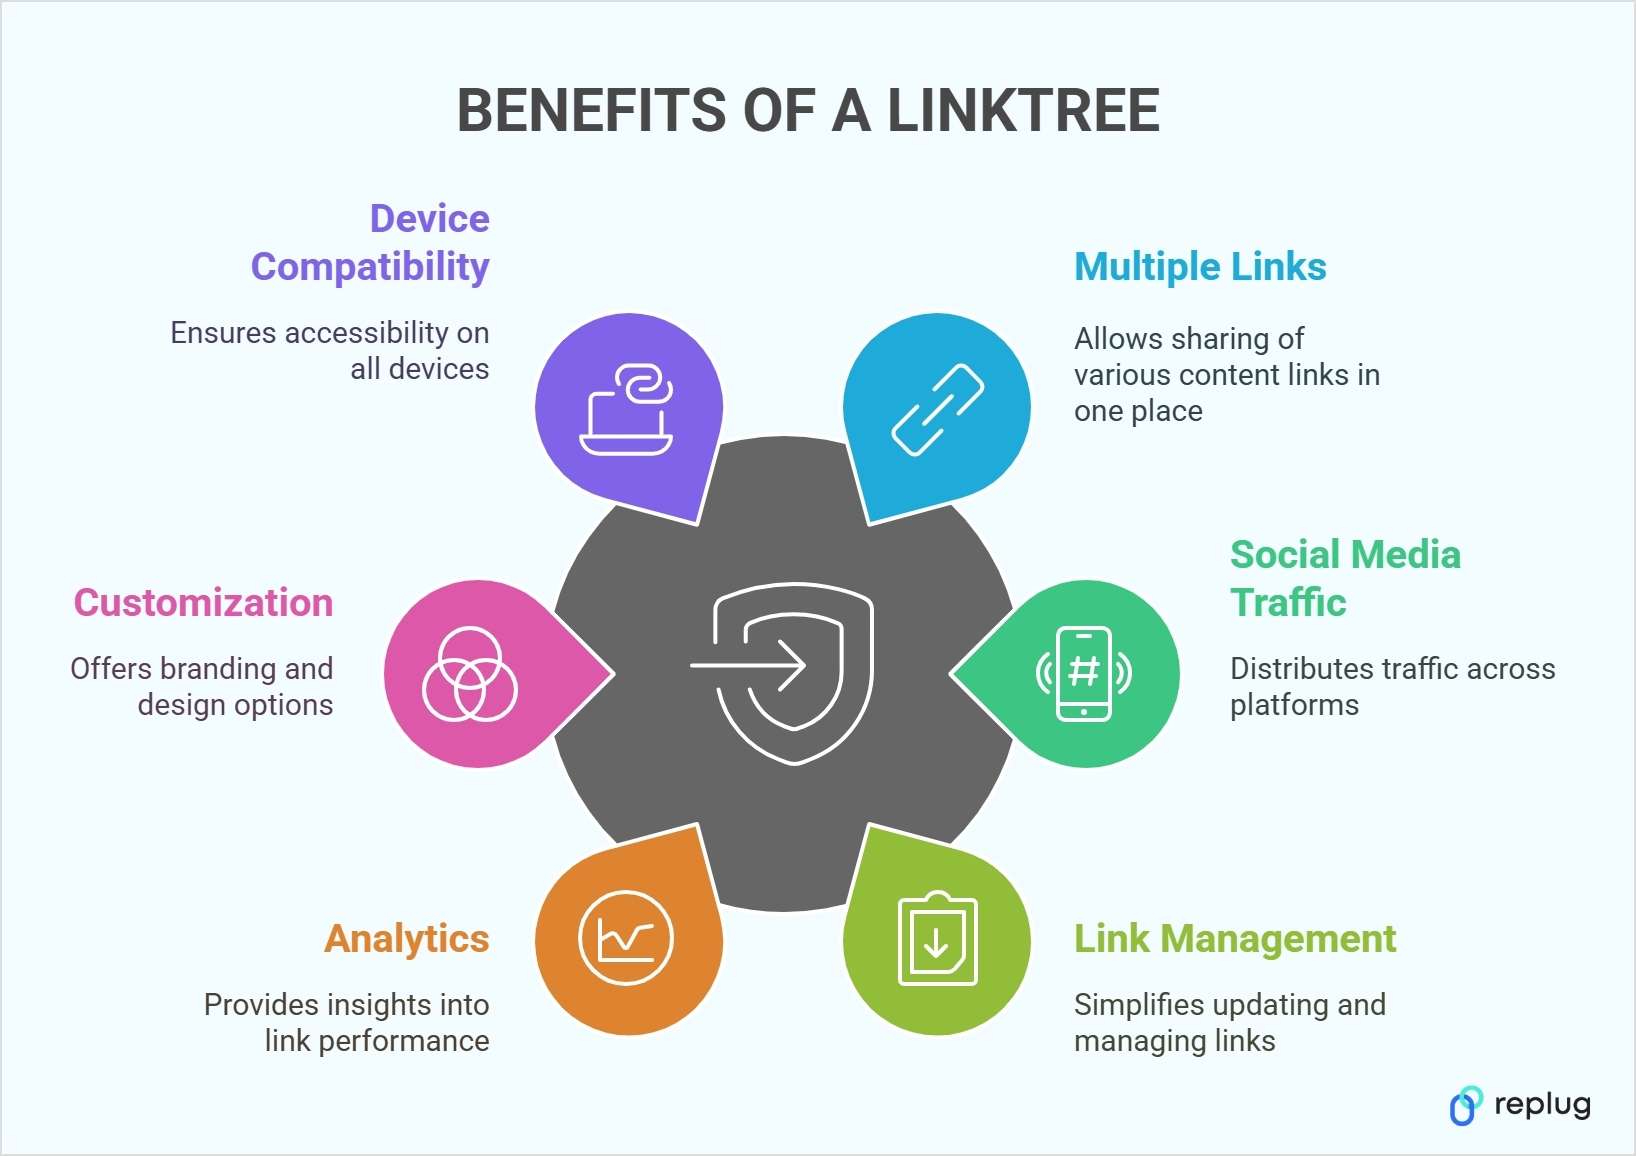
    Key features and benefits of a Linktree

    Benefits of a linktree
    • You can share multiple links: A linktree lifts lets you add as many links as you’d like in your social media bios. That can mean product pages, sign-up forms, blog posts, or any other relevant content.
    • Maximize social media traffic: A single linktree can drive visitors to multiple platforms, helping you distribute traffic across various channels.
    • Simplify link management: No need to update your bio link constantly. Instead of replacing links every time, you can simply update your linktree dashboard, making the process seamless and efficient.
    • Analytics and insights: A linktree can collect data on how many views and clicks each link receives. Tracking these numbers can reveal which pieces of content resonate most with your audience.
    • Customization options: Some tools allow deeper customization, including custom background images, color palettes, and even the ability to add your branded domain.
    • Designed for mobile and desktop: Linktree pages are responsive, ensuring they look neat and readable on any device.
    • Various integrations: A reliable bio link tool supports integrations seamlessly, like embedding videos or adding an email sign-up form straight onto your page.
    • Consistent branding: Matching your Linktree’s landing page look to the rest of your brand identity can make your channels feel more unified.
    • Save time and effort: Managing all your important links in one place reduces hassle and streamlines the user experience.

    Related: 7 benefits of bio links you need to know: your ultimate manual

    How to create a linktree using Replug?

    Now let’s discuss how to create a stunning Linktree using Replug:

    1. Create your account: Instead of settling for a basic linktree tool, choose a platform that gives you more control. Create an account on Replug to create a branded linktree experience with built-in tracking and retargeting options.
    2. Set up your profile: Once inside your Replug dashboard, upload your profile image, add a compelling bio, and customize your landing page to reflect your brand.
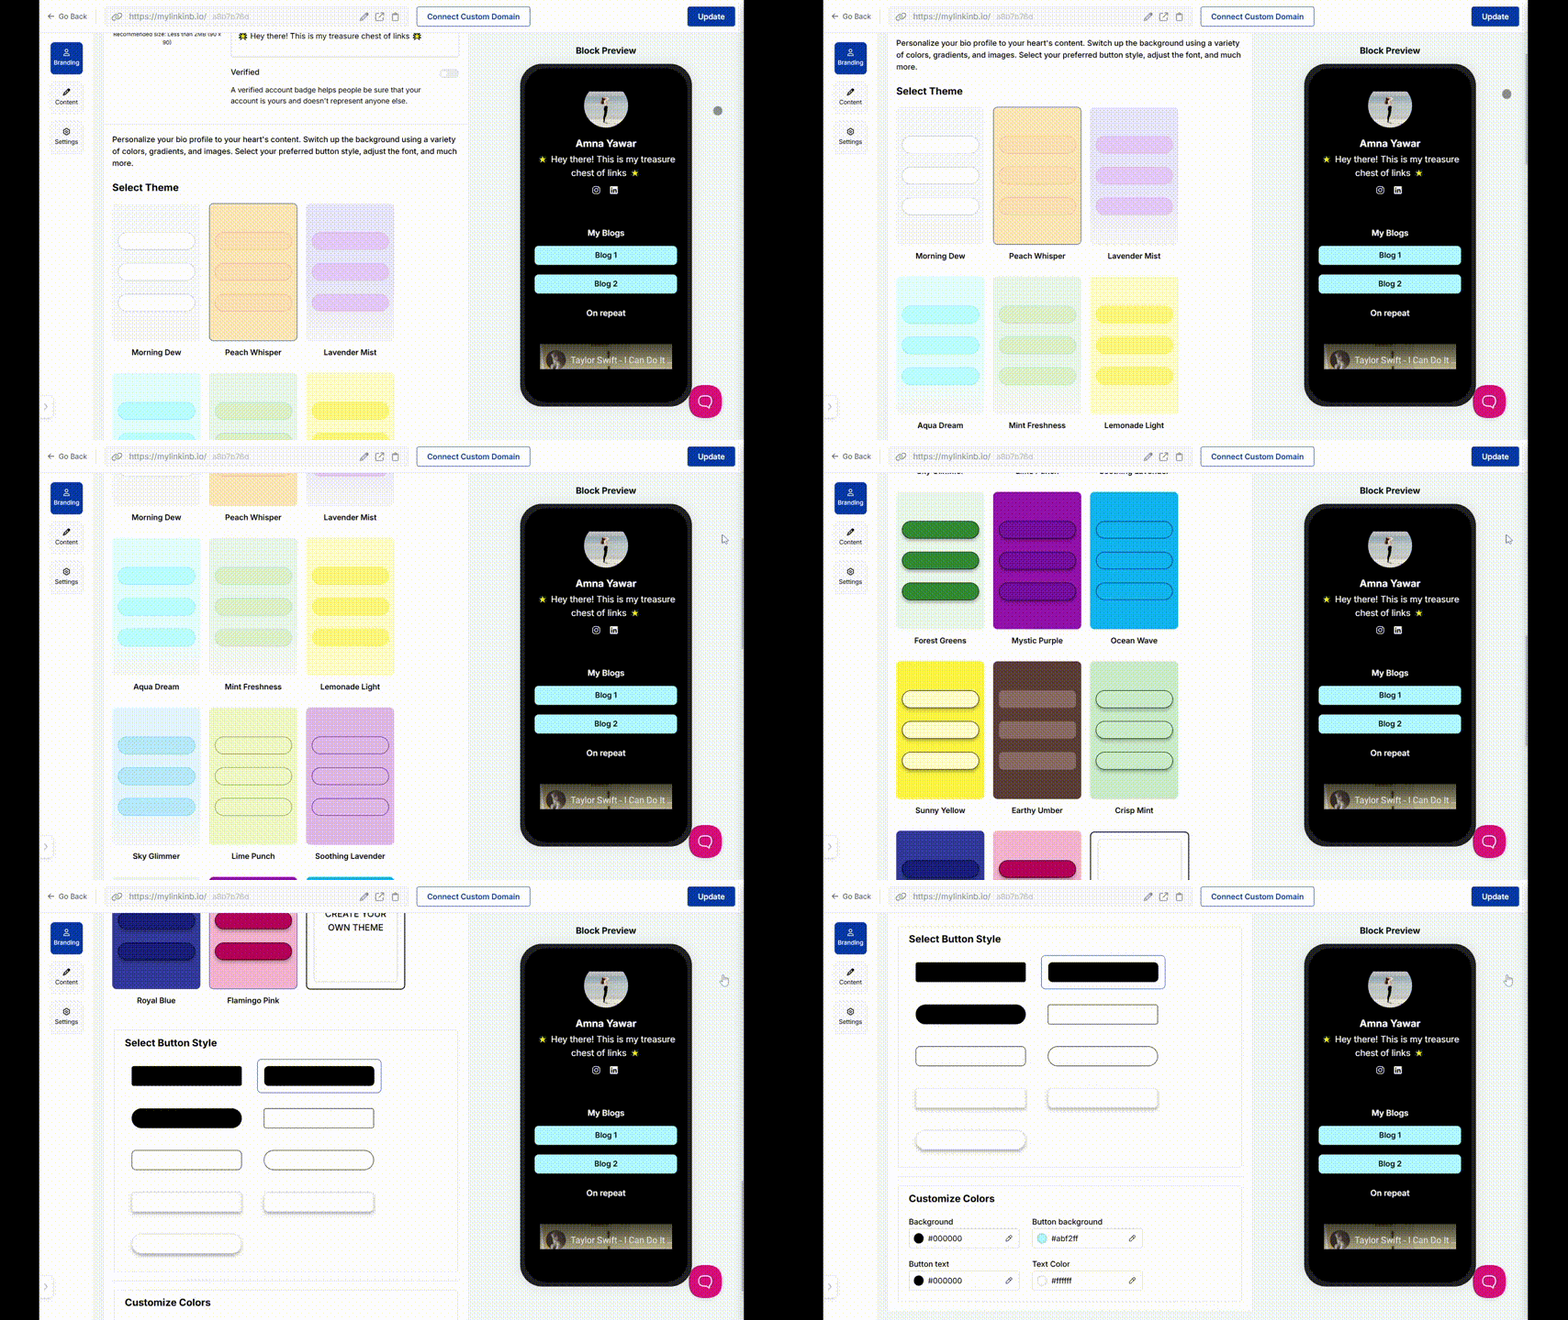
    Set up your linktree on Replug

    Unlike traditional linktree tools, Replug offers custom domain options, ensuring your link-in-bio matches your brand identity.

    1. Add and organize your links: Replug allows you to add multiple links, but with a twist. You can track clicks, analyze engagement, and even A/B test your links to maximize conversions.
    2. Share your link: Copy your Replug bio link and place it in your social media bios across Instagram, TikTok, X (Twitter), Pinterest, LinkedIn, and more. With Replug’s analytics, you can track which platform drives the most traffic to your links.
    3. Experiment with advanced features: While basic linktree tools offer simple customization, Replug goes beyond by enabling retargeting and deeper branding options. Whether you want to add a call-to-action pop-up or integrate remarketing pixels, Replug ensures your bio link works harder for your business.

    Best practices for link management

    Managing your linktree effectively ensures your audience finds what they need without confusion. Here are some key best practices:

    • Keep your links fresh: Regularly update your linktree to reflect new products, blog posts, or announcements. A stale link page can lead to missed opportunities.
    • Use clear and engaging text: Instead of generic phrases like “Click here,” use compelling, action-driven labels such as “Get 20% off” or “Watch my latest video.”
    • Prioritize your most important links: Place your most valuable links at the top so they’re seen first. Whether it’s a new launch, a limited-time offer, or an event registration, make sure it stands out.
    • Keep it clean and organized: Avoid overwhelming visitors with too many links. If you have a long list, rotate them based on priority or group them strategically.
    • Leverage mobile tools: Need to make quick updates? Some link-in-bio tools offer mobile apps for easy link management on the go.

    By following these best practices, you ensure your linktree remains effective, user-friendly, and optimized for engagement.

    If you need more than link sharing, like retargeting, A/B testing, or advanced analytics, Replug goes beyond just creating a linktree. It offers short links, conversion tracking, and remarketing pixels, making it a powerful choice for marketers and businesses.

    Boost ROI with branded URLs - Replug dashboard showing performance metrics and branded URL creation
    Turn your bio links into click-boosting machines
    Check

    Drive up to more clicks than plain URLs

    Check

    Share multiple destinations with one link

    Create bio links free

    Who should use a Linktree?

    1. Digital marketers and agencies

    Campaigns often include multiple landing pages or offers. A single linktree page puts them all in front of your audience at once. 

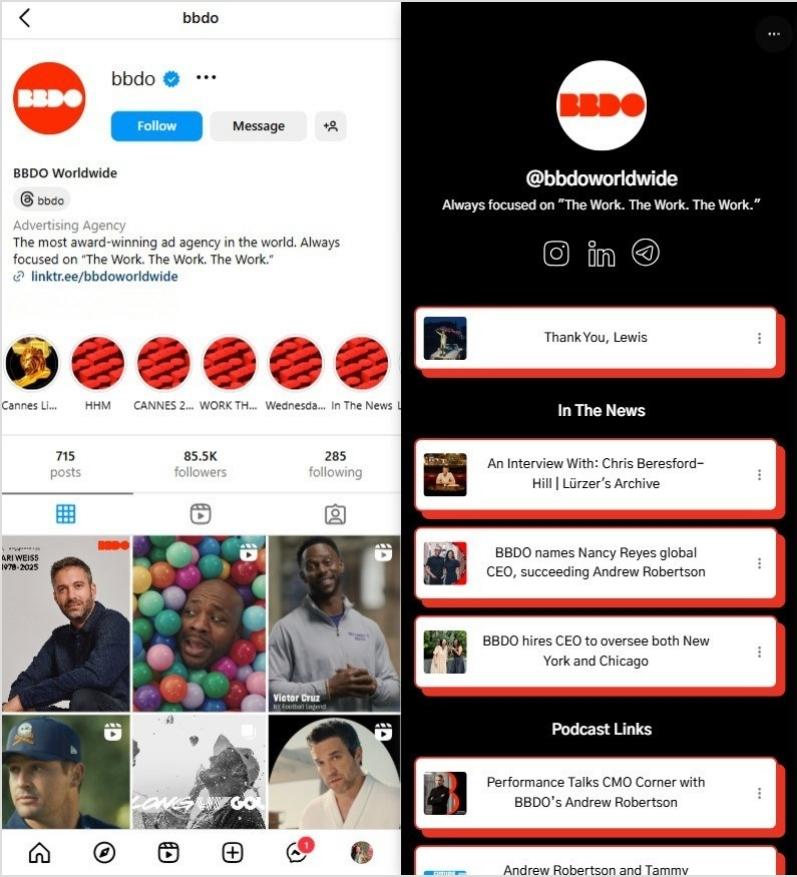
    BBDO Linktree example
    Source: BBDO Worldwide
    1. Content creators and influencers

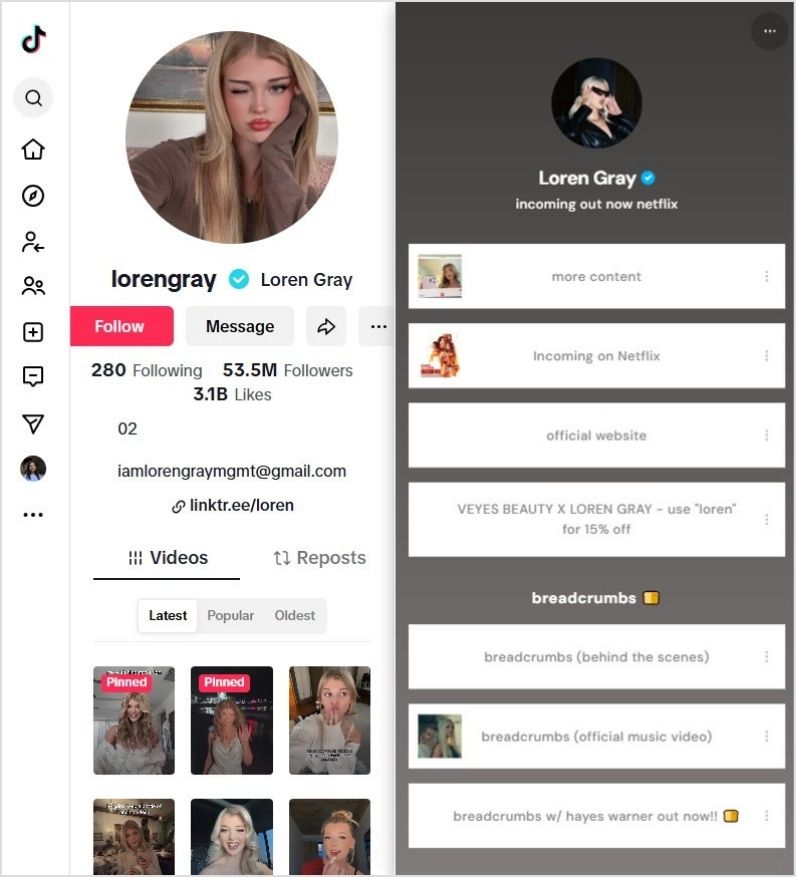
    YouTube channels, blogs, and social feeds can be shared in one neat menu. This approach is easier than asking followers to dig through different links themselves.

    Lauren Gray Linktree example
    Source: Lauren Gray
    1. E-commerce businesses

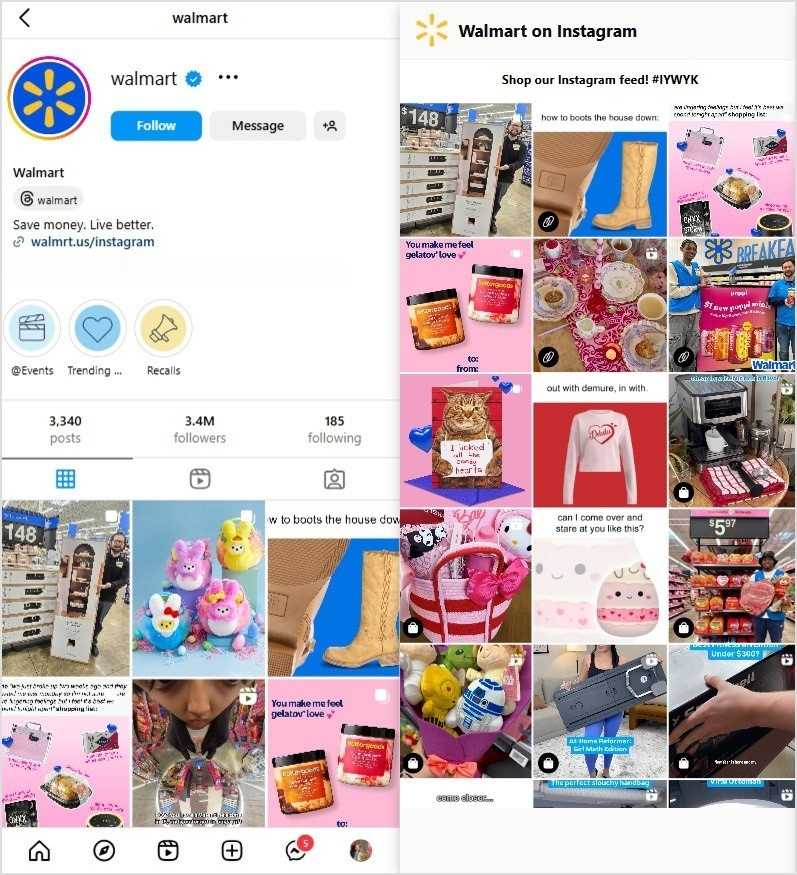
    If you have special discounts, new product collections, or various sales channels, linktree can showcase them all side by side. This setup helps shoppers decide where to go next.

    Walmart linktree example
    Source: Walmart
    1. Musicians & artists

    Bands and solo artists can share their latest singles, merch stores, and concert tickets easily.

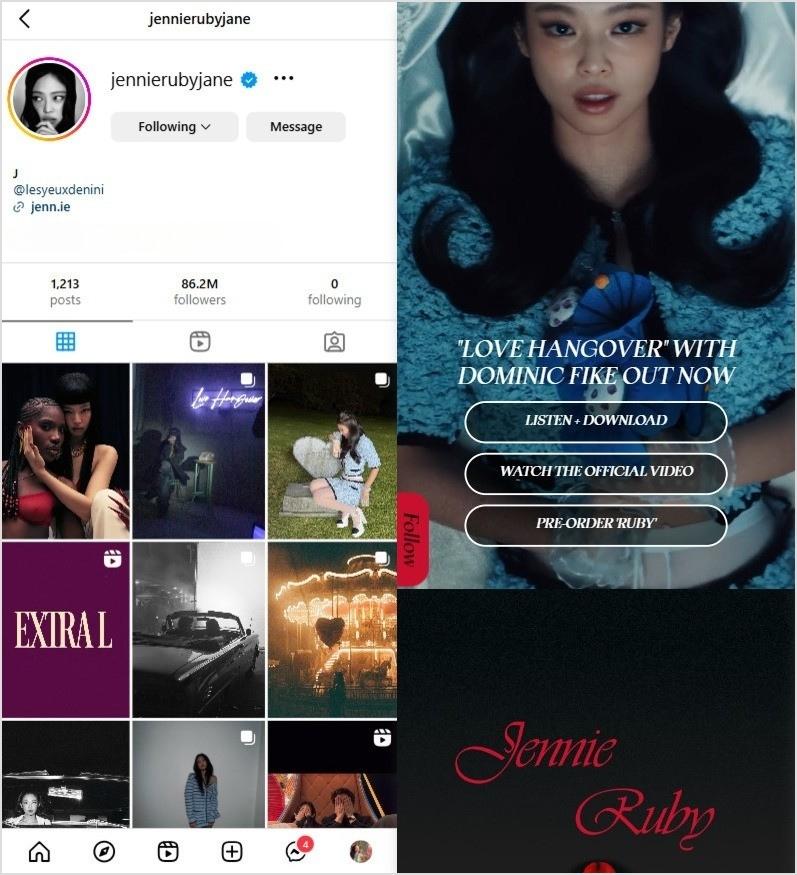
    Jennie linktree example
    Source: Jennierubyjane

    Related: Elevate Your Bio: Smart Links for Music Artists

    1. Affiliates

    Affiliates can use linktree to streamline their links, making it easy for their audience to access all their offers in one place.

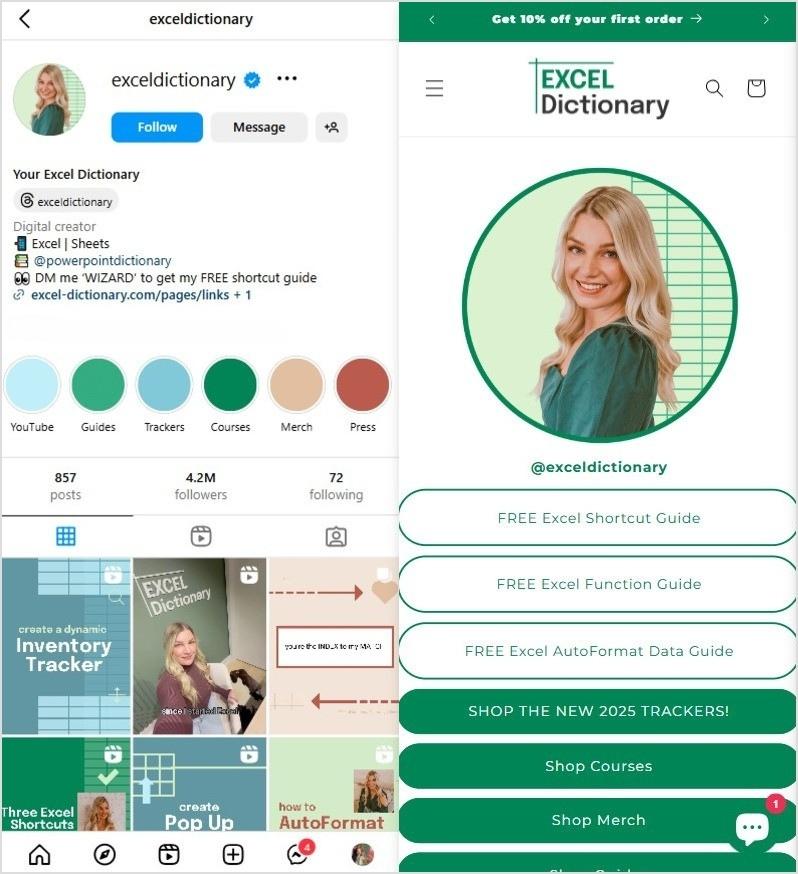
    Excel Dictionary Linktree example
    Source: Excel Dictionary
    1. Nonprofits & community organizations

    Charities and advocacy groups can use linktree to centralize donation pages, petitions, and event details.

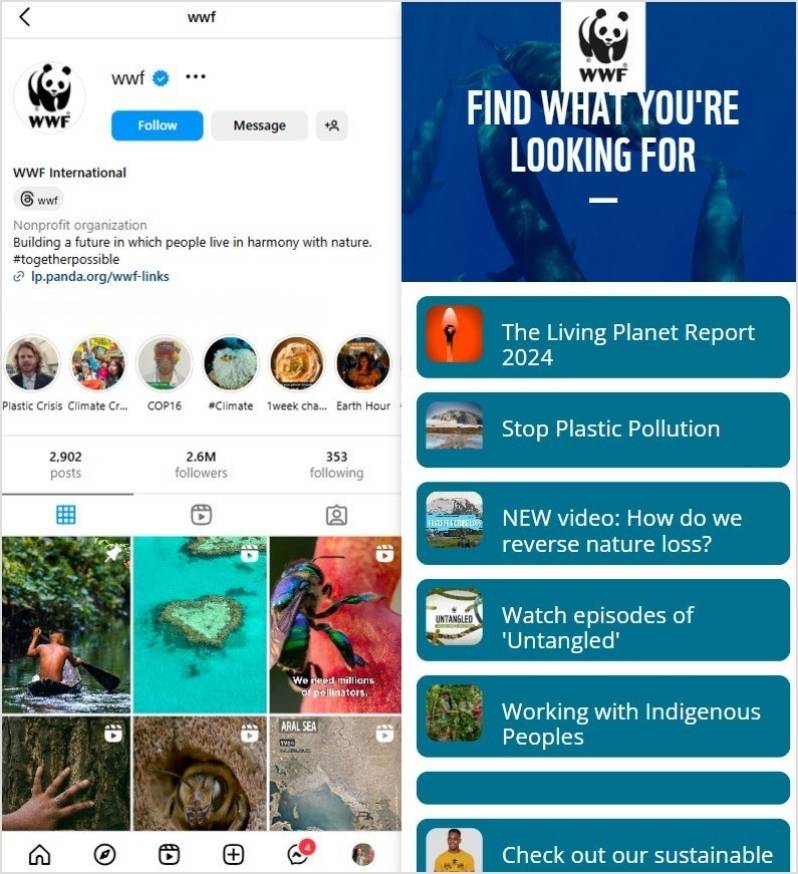
    WWF Linktree example
    Source: WWF
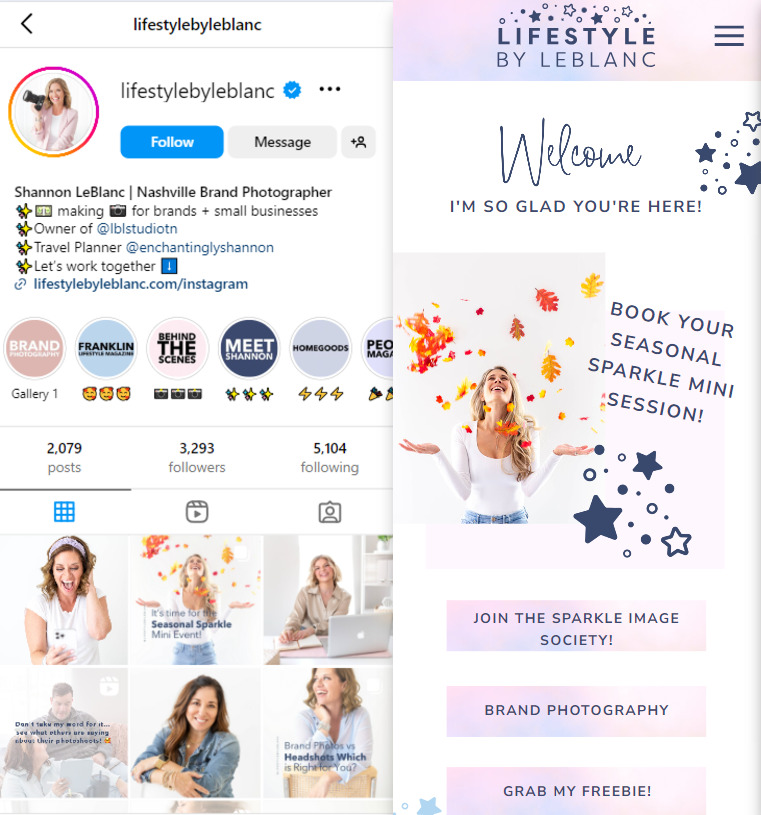
    1. Freelancers and professionals

    Portfolios, rate sheets, and client testimonials can be grouped together on one landing page. This setup helps clients access the full scope of your services.

    Source: lifestylebyleblanc

    Conclusion

    Linktree offers a stress-free way to centralize your links. Instead of juggling different URLs across platforms, you can direct people to one well-organized menu. Whether you’re a business, content creator, or marketer, this approach saves time and keeps things clear for visitors.

    As the concept of link management grows, it’s worth an advanced tool like Replug for creating a linktree. It includes link shortening, retargeting features, and detailed performance metrics. Exploring which tool fits your needs best can save you trouble and keep your promotional efforts running smoothly.

    Replug Branded Short Links CTA
    A complete link management solution
    for marketing professionals & agencies.
    Try Replug for free

    FAQs on Linktree

    What is the difference between a linktree and a link-in-bio page?

    A linktree is a specific tool that provides a link-in-bio landing page, but the term “linktree” is also used generically to describe any page that consolidates multiple links into one.

    Does using a linktree impact SEO?

    While most link-in-bio tools do not directly improve SEO, using a custom domain can enhance brand authority. Additionally, analytics tools can help you optimize which links get the most engagement.

    How many links can I add to my linktree?

    Most link-in-bio tools allow unlimited links, but the number may depend on your plan. With Replug, you can add multiple links while tracking clicks and engagement to optimize your strategy.

    Can I customize my linktree page?

    Yes! Many platforms offer customization, including background colors, fonts, and button styles. Replug allows even deeper branding, such as adding a custom domain and link analytics.

    Where can I use my linktree link?

    You can place your linktree URL in social media bios (Instagram, TikTok, Twitter, LinkedIn, etc.), email signatures, business cards (via Linktree QR codes), and even YouTube video descriptions.


  • How to convert a video to a link (the easy way)

    How to convert a video to a link (the easy way)

    Sharing videos shouldn’t be a struggle. No one likes huge files, slow uploads, or email limits. 

    So, what’s the solution? Convert your video into a simple, shareable link! It makes sharing easier, keeps things organized, and makes your content accessible on any device.

    In this guide, we’ll walk you through how to convert a video to a link in a few easy steps. Plus, we’ll show you how Replug can help you enhance your video-sharing experience with branded links, analytics, and more.

    Whether you need to convert a video to a URL online or you’re looking for free methods, we’ve got you covered. 

    Why convert a video to a link?

    Let’s be real: Sending large video files is a hassle. 

    Attachments take forever to upload, emails have size limits, and some messaging apps compress videos into a blurry mess. 

    But you don’t have to worry about that anymore. Converting a video to a link solves all these problems. Here’s why it’s a game-changer:

    • Easy sharing: A simple link lets anyone access your video instantly.
    • Saves storage: No need to clog up your device with massive files.
    • No quality loss: Unlike compressed videos, links keep the quality intact.
    • Better accessibility: Anyone with the link can view it without downloading.

    Related: How to Convert video to Link?

    Now, let’s get into the step-by-step process.

    How to convert a video to a link

    Step 1: Upload your video to a hosting platform

    To get a shareable link, your video needs to be hosted online. Here are some popular (and free) options:

    PlatformBest forStorage limitPrivacy controls
    YouTubePublic videosUnlimitedYes
    Google DrivePrivate sharing15GB (free)Yes
    DropboxCloud storage2GB (free)Yes
    VimeoHigh-quality videos500MB/week (free)Yes
    WeTransferTemporary sharing2GB (free)No

    Choose the platform that fits your needs and upload your video.

    Popular video formats for sharing:

    When uploading your video, make sure it’s in a format supported by your chosen platform. Here are some of the most commonly accepted video formats:

    • MP4: The most widely supported format with good quality and compression.
    • MOV: High-quality format, often used for professional video editing.
    • AVI: Large file size but high-quality; not ideal for web sharing.
    • WMV: Good for Windows users but less compatible with other devices.
    • FLV: Used mainly for older web-based video players.
    • WEBM: Optimized for web use and supported by most modern browsers.

    For the best compatibility, MP4 is the safest choice as it works on almost every platform.

    Step 2: Copy the video URL

    Once uploaded, each platform will generate a unique URL for your video. Here’s where to find it:

    • On YouTube and Vimeo, open your video and copy the URL from the address bar.
    • In Google Drive or Dropbox, right-click your video, select ‘Get link,’ and copy it.
    • In WeTransfer, upload your file, click ‘Get link,’ and copy the URL provided.

    Related: How do I find my URL on Youtube?

    Step 3: Shorten the video link (optional, but recommended)

    A long URL can look messy, especially if you’re sharing it on social media or in marketing campaigns. Using a high-quality link shortener makes it clean and clickable.

    Here’s how to shorten your video link with Replug:

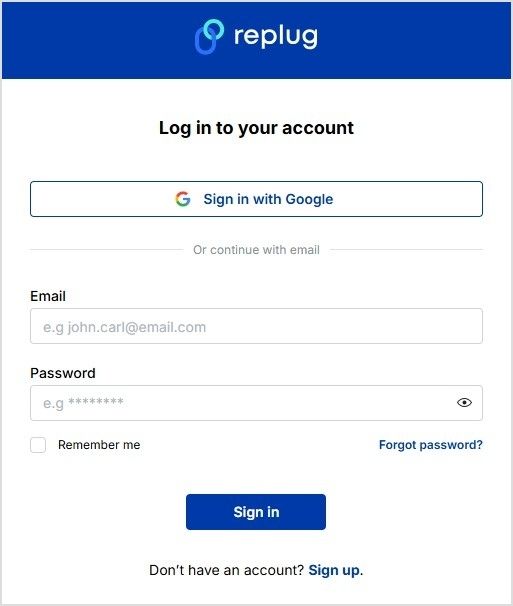
    1. Sign up or log in to Replug.
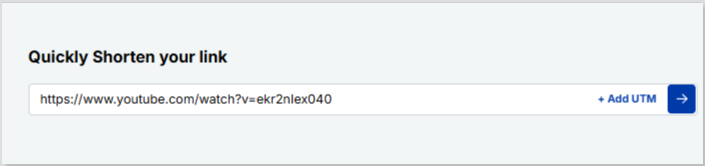
    1. Paste your video URL into the link shortener.
    Screenshot of link shortening through Replug
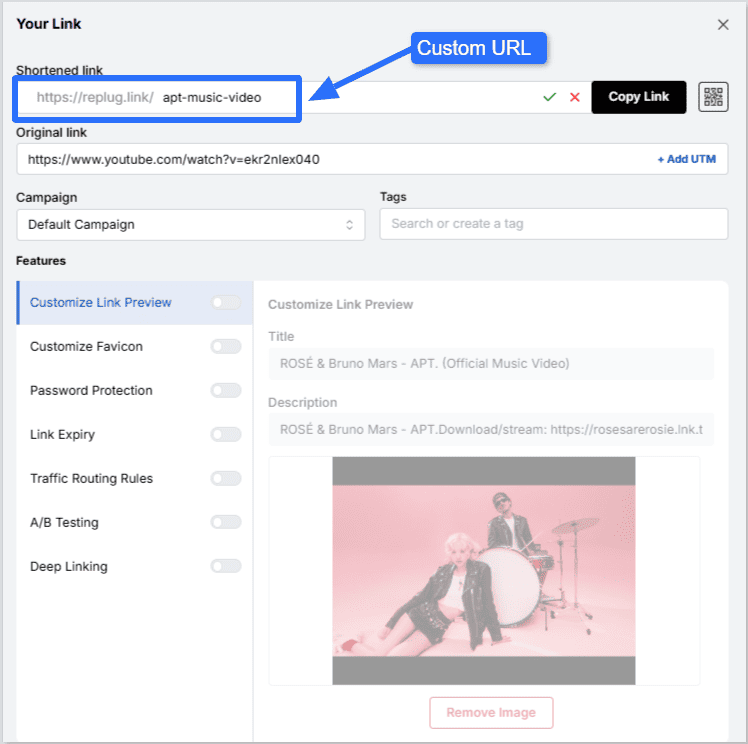
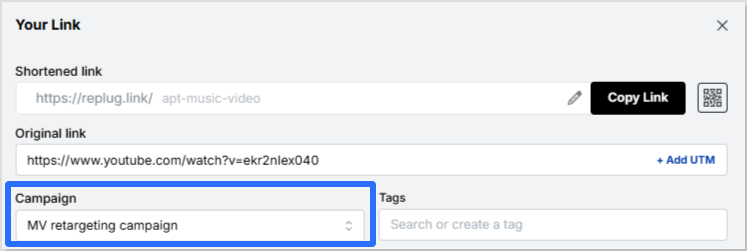
    1. Create a custom URL if you want. This will give your video link a more branded look and feel. Here, we decided to shorten the YouTube music video link for APT. by Rosé and Bruno Mars.
    Create a custom URL using Replug
    1. Copy your shortened link and share it anywhere!

    With Replug, you can also track link clicks, engagement, and performance, making it a great tool and a top-notch link optimization platform for marketers, content creators, and businesses.

    Read also: How to convert PDF to URL link online for free: Instant conversion within seconds!

    Boost ROI with branded URLs - Replug dashboard showing performance metrics and branded URL creation
    Boost ROI with
    branded URLs!

    Enhance your marketing campaigns by creating shareable, trackable, and fully multi-purpose customizable branded URLs.

    Try Replug for free

    Best free ways to convert a video to a URL link online

    If you don’t want to use cloud storage, here are some free tools that can host your video and generate a link:

    ToolFeaturesLink expiry
    KapwingUpload, edit, and get a shareable linkNo expiry
    StreamableFree video hosting with a simple URL90 days (free plan)
    File.ioUpload and share videos with an expiring linkExpires after one download
    MediaFireFree cloud storage with file-sharing optionsNo expiry (free with ads)

    These tools work well if you need a quick, free way to convert a video to a URL link online.

    How to share your video link

    Now that you have your link, you can share it anywhere! Here are a few ways:

    • Social media: Post it on Facebook, Twitter, LinkedIn, or Instagram.
    • Emails: Add it to your newsletters or personal messages.
    • WhatsApp & Messenger: Send it directly in a chat.
    • Websites & blogs: Embed the link in your content.

    Enhance your video links with Replug

    If you’re using Replug, you’re not just sharing a video—you’re optimizing it for maximum reach, engagement, and conversions. Here’s how you can do it:

    • Re-engage viewers with retargeting pixels: Add tracking pixels to your video links to retarget users across platforms like Facebook, Google, and LinkedIn.
    Add retargeting pixels to your video links
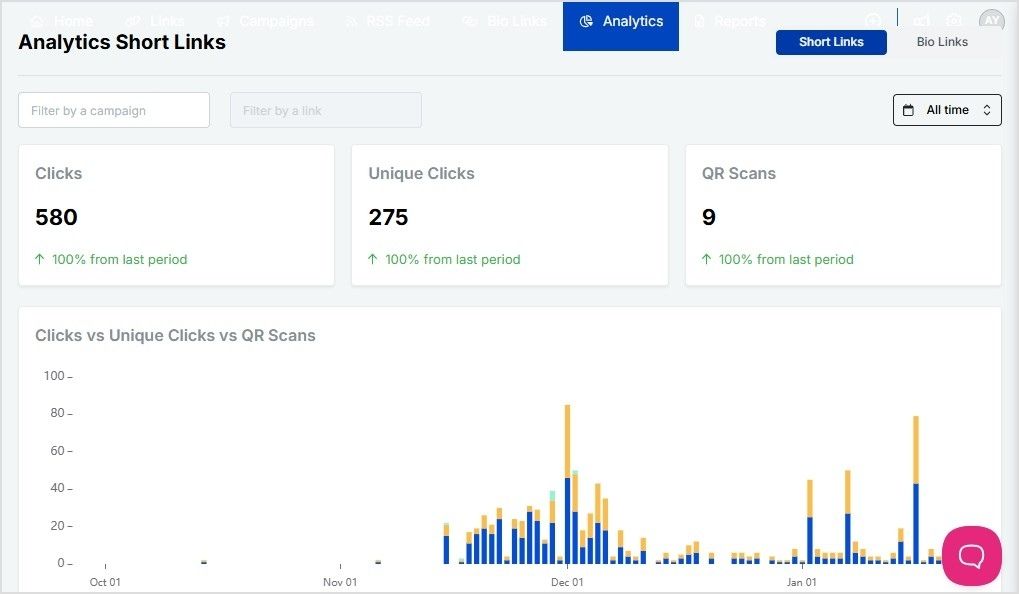
    • Track performance with advanced analytics: See who’s clicking, where they’re coming from, and how they interact with your video with Replug’s link analytics.
    Replug analytics
    • Create branded, short video links: Replace long, clunky URLs with branded short links that look professional and boost credibility.
    Replug Branded Short Links CTA
    Maximize marketing ROI
    by transforming ordinary URLs into
    branded short links that convert.
    Try Replug for free
    • Enhance visibility with a bio link page: Add your video link to a Replug bio link page, giving your audience a single destination to access all your content.
    • Leverage deep linking for seamless navigation: Guide users straight to the right platform or app where your video is hosted with deep links. No extra clicks, no confusion.
    • Generate scannable QR codes: Convert your video link into a QR code that people can scan to watch instantly. This is perfect for business cards, posters, and in-person events.

    Replug turns your video into a powerful marketing asset that drives results.

    Final thoughts

    Converting a video to a link is the easiest way to share content without dealing with large files or quality loss. Whether you use Google Drive, YouTube, or a free online tool, the process is quick and simple. If you want a professional touch, don’t forget to shorten your link with Replug for better branding, tracking, and engagement analytics.

    Ready to make video sharing effortless? Convert your videos to links today and simplify your workflow!

    Frequently asked questions

    Can I convert a video to a link without uploading it?

    No, the video must be uploaded somewhere to generate a link. However, you can use temporary file-sharing services like WeTransfer if you don’t want long-term hosting.

    What’s the best free platform to convert a video to a URL link online?

    Google Drive and YouTube are the best free options. If you want a quick, no-login solution, try Streamable or File.io.

    Will my video lose quality when I convert it to a link?

    Not necessarily. If you upload it to platforms like Google Drive or Dropbox, it retains the original quality. YouTube and other social platforms may compress the video slightly.

    How long will my video link be available?

    It depends on the platform. Google Drive and Dropbox links stay active as long as the file exists, while WeTransfer and File.io links may expire after a set period.

    Can I make my video link private?

    Yes! Google Drive, Dropbox, and Vimeo allow you to set privacy controls, so only certain people can access your video.

    How can I track video link performance?

    Using a link management tool like Replug, you can track clicks, engagement, and audience insights to see how your video is performing.

    Which video format is best for online sharing?

    MP4 is the best format for online sharing due to its balance of quality and compatibility across most platforms.

  • How to sell on Amazon: A complete guide for beginners

    How to sell on Amazon: A complete guide for beginners

    Amazon is the world’s largest online marketplace, and learning how to sell on Amazon can open up endless opportunities for entrepreneurs and established businesses alike. Whether you’re looking to start a side hustle, expand your existing business, or dive into e-commerce for the first time, Amazon provides a vast customer base and a streamlined selling process. However, with approximately 1.9 million sellers actively competing for attention, success requires strategy, research, and the right approach.

    In this guide, we’ll break down the steps to help you start selling on Amazon, from setting up your account to marketing your products effectively.

    Let’s get started!

    The algorithm has changed

    Imagine launching your Amazon store, excited to see sales rolling in, only to find your product buried on page seven of search results.

    Ouch!

    That’s because Amazon’s A10 algorithm doesn’t work like it used to. Gone are the days when you could simply throw money at PPC ads and expect to rank.

    Previously, the A9 algorithm prioritized PPC sales, meaning you could run ads, generate sales, and climb the rankings quickly. A10 focuses more on relevance, customer satisfaction, and organic sales. Today, organic ranking, customer engagement, and external traffic play a much bigger role in your success.

    What’s new?

    • Organic sales matter more: The algorithm favors products that sell well without paid ads.
    • External traffic is king: Amazon rewards sellers who bring traffic from Google, blogs, or social media.
    • PPC ads have less impact: You still need ads, but PPC sales don’t boost rankings like before.
    • Customer engagement counts: Good reviews, seller ratings, and response time affect ranking.

    So, how do you win with A10? Let’s break it down.

    Understanding Amazon seller accounts and costs

    Before we begin, it’s wise to learn how Amazon structures its selling options. The platform offers two main selling plans: Individual and Professional. Both plans connect through Amazon Seller Central. Whether you aim to sell on Amazon for free or build a large-scale business, understanding these plans helps you pick the right path.

    Individual vs. professional selling plans

    Individual sellers

    • Pay a per-item fee of $0.99 whenever they sell a product.
    • Have no monthly subscription fee.
    • Rely on basic tools for selling on Amazon.
    • Often allows listing fewer than 40 items per month.

    Professional sellers

    • Pay a monthly subscription fee of $39.99.
    • Don’t pay that extra $0.99 fee per item.
    • Can access advanced selling features, such as bulk listing tools and reports.
    • Sell in certain restricted categories that aren’t open to individual sellers.

    Think about how many products you plan to list each month. If you expect higher sales, the Professional plan typically offers better value. However, the Individual plan is a solid choice if you’re selling fewer than 40 items per month.

    Fees you should expect

    One of the most common questions is: How much does it cost to sell on Amazon? Beyond your selling plan charges, here are additional fees to keep in mind when increasing sales on Amazon:

    • Referral fees: Amazon takes a percentage (often 8–15%) of each sale. This varies by product category.
    • Fulfillment fees: Using Amazon FBA requires payment for storage and shipping services.
    • Closing fees: These are charged on certain media categories (books, DVDs, and so on).

    Setting up your seller account

    Wondering how to become an Amazon seller and set up your account?

    You’ll need the following:

    1. A valid email address or Amazon customer account.
    2. A credit card that Amazon can charge.
    3. Government-issued ID for verification.
    4. Tax details (depending on your country).
    5. Phone number for verification.
    6. Bank account to receive earnings.

    Once you gather these items, you can register through Amazon Seller Central. Be sure to read and agree to Amazon’s terms of service.

    After your account is live, you can start exploring how to sell products on Amazon, manage listings, and monitor performance. Let’s begin:

    5 ways to sell on Amazon

    1. Listing your first product
    2. Choosing your business model and products
    3. Creating and optimizing product listings
    4. Understanding fulfillment options
    5. Marketing and promoting your products

    1. Listing your first product

    To list a product on Amazon, you have two options:

    1. Existing products: If the product is already being sold on Amazon, it has an Amazon Standard Identification Number (ASIN). Your listing will be merged with the existing product page, showing all sellers offering that item.
    2. New products (Private label): If you’re introducing a product that’s not yet on Amazon, like your exclusive line of eco-friendly water bottles, you’ll create a brand new listing.

    Suppose you’re selling eco-friendly water bottles that you sourced from a supplier, and an existing listing is already on Amazon for the same product.

    • Start by copying the ASIN from the “product details” section of the current listing.
    • Log into Seller Central, click Catalog, and select Add Products. Paste the ASIN into the search bar to find the listing.
    • Choose the condition of your item (New, Used, etc.) from the dropdown and select Sell this product.
    • Set your price, select your fulfillment option (FBM or FBA), and follow the prompts.
    • You can create your SKU by clicking Save and Finish. The listing will be added to your Manage Inventory page in Seller Central.

    Now, let’s look at adding a completely new product, for instance, “BrewNest Coffee Dripper”:

    • From Seller Central, click Add a product, then select I’m adding a product not sold on Amazon.
    • Select your product category and fill in all necessary details (title, price, description, photos, and fulfillment method).
    • Once everything is filled out, click Save and Finish. Your product will be submitted for approval.
    • After approval, Amazon will assign an ASIN and list it for sale. You can manage it through your Manage Inventory page.

    When your product page goes live, customers can find it by searching Amazon. With the right marketing and a quality product, your orders should start coming in.

    Related: How to increase sales on Shopify: 25 winning strategies

    2. Choosing your business model and products

    A well-defined plan makes all the difference when figuring out what to sell on Amazon. Whether you’re interested in private label items, retail arbitrage, or something else, assessing each model and performing thorough product research is highly recommended. If you’re exploring print-on-demand, Podbase is a helpful platform that simplifies product creation and order fulfillment, making it easier to test and scale custom product ideas.

    Various selling methods

    1. Private label: You work with a supplier to manufacture goods under your own brand. This approach can yield notable margins but typically requires more upfront costs. Shops like Alibaba can help you find private-label products.
    2. White labeling: You sell generic products with your own brand name or logo. No manufacturing or design experience is needed.
    1. Wholesale: You buy existing branded items in bulk and resell them. It’s a stable method but can involve heavier competition.
    2. Retail arbitrage: You look for discounted items in retail stores and resell them on Amazon at a markup. This model can have minimal startup costs but takes time to hunt for bargains. Places like BestBuy, Target, and Walmart are useful examples to start with.
    3. Dropshipping: You connect buyers with a supplier who ships products directly. This can cut down on inventory management, though you might have less control over product quality.

    Product research tactics

    Effective product research answers the question, “Where to buy products to sell on Amazon in a profitable way?” Here are several strategies:

    • Check for Amazon’s Best Sellers list. Popular product categories may have fierce competition, so look for underserved niches to boost your brand awareness.
    • Study customer reviews and ratings. Gain insights into what aspects of the product customers appreciate or dislike. This feedback can help you improve your listings, address potential issues, and align your offerings with customer expectations.
    • Do keyword research. Use tools like Helium 10 or Jungle Scout to find high-volume, relevant keywords that potential customers are searching for. This will help improve your product’s visibility and increase sales.
    • Review Amazon’s product restrictions. Before selling, thoroughly go through Amazon’s product restrictions to ensure compliance. Some items, like fine art and surveillance equipment, are prohibited, while others require pre-approval.
    • Keep seasonality in mind. Consider how seasonality affects your cash flow. There might be a possibility that an item booms in the summer but slumps in the winter.

    What makes a good product?

    Wondering if your product is good enough to sell on Amazon? Here are some things to keep in mind if you want your product to sell like hotcakes:

    1. Profit margins: After subtracting Amazon fees, shipping, and any production costs, does your item still turn a strong profit?
    2. Moderate competition: Look for subcategories or specialized areas where you can differentiate your offering.
    3. Manageable size: Heavier or larger goods can mean bigger shipping expenses.
    4. Durability: Fragile items have a higher risk of returns and negative reviews.
    5. Year-round demand: Some products sell steadily all year round, while others are tied to holiday seasons or trends.

    When asking yourself, “How to sell my product on Amazon so it stands out?” focus on finding an item that balances demand, profitability, and strong branding opportunities.

    Boost ROI with branded URLs - Replug dashboard showing performance metrics and branded URL creation
    Boost ROI with
    branded URLs!

    Enhance your marketing campaigns by creating shareable, trackable, and fully multi-purpose customizable branded URLs.

    Try Replug for free

    3. Creating and optimizing product listings

    The best way to attract Amazon shoppers is through well-crafted product listings. You need to ensure that your product listing is clear and has engaging content so you don’t risk falling behind in Amazon search results.

    Essential elements of a winning listing

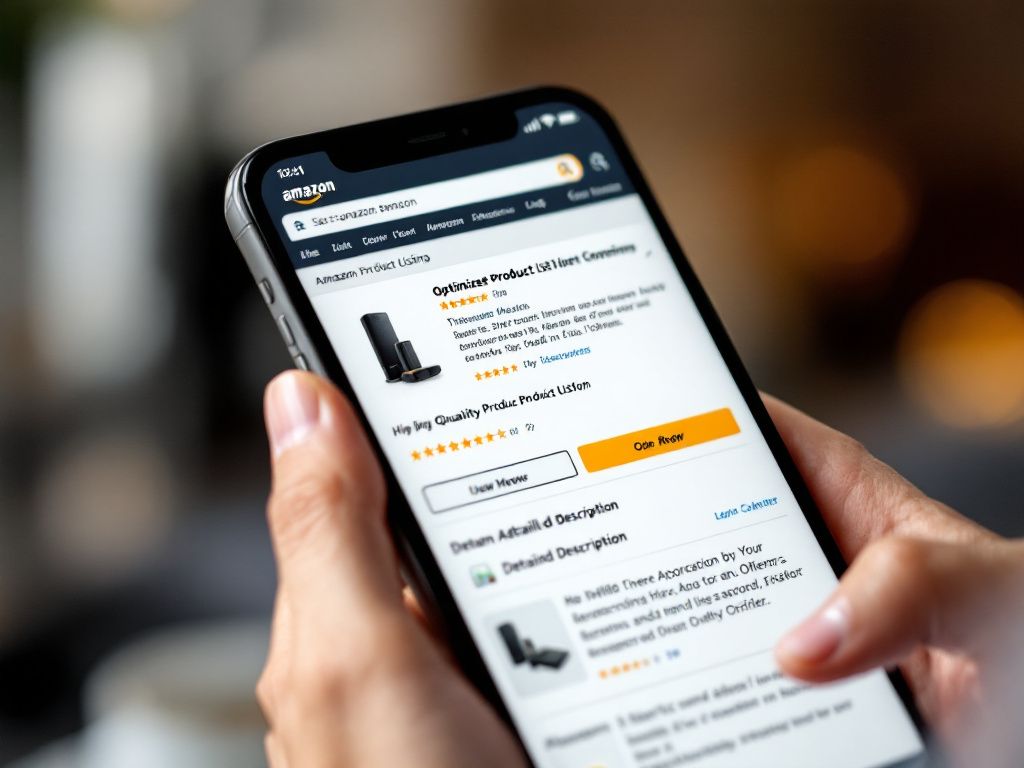
    Optimized Amazon product listing on smartphone
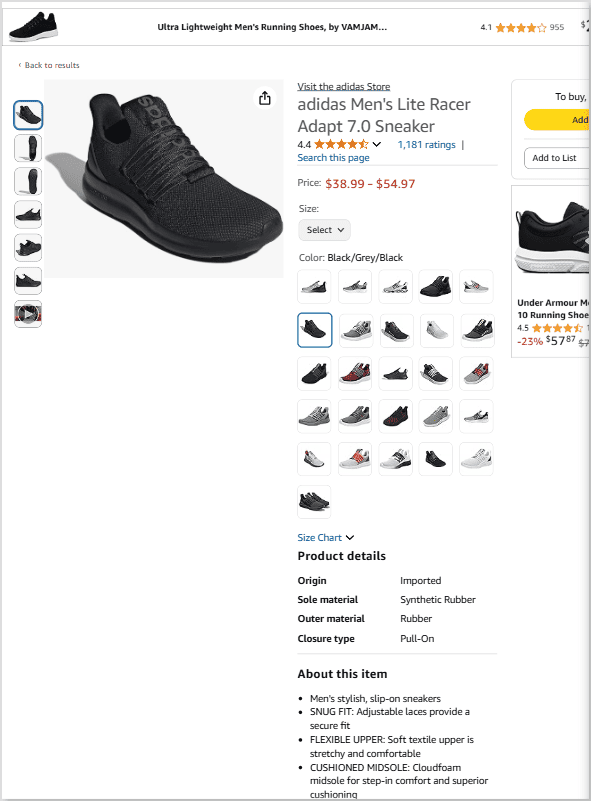
    1. Title: Include your main keyword—maybe “Bluetooth Headphones” or “Organic Dog Treats.” Keep titles concise (under 200 characters) and add main details (brand, model, color, size).
    2. Images: Crisp, high-resolution photos from different angles can make or break a sale. Lifestyle images that show your product in use help buyers visualize how they’ll benefit.
    3. Bullet points: Highlight key features or benefits in short statements. Use easy-to-read language and sprinkle in relevant keywords naturally, like “Amazon product reviews” or “Amazon bestsellers rank” when appropriate.
    4. Product description: Give more in-depth information and address common buyer questions. Break text into paragraphs to make it inviting and easy to scan.

    Here’s an example of Adidas:

    Choosing the right keywords

    Think about what a shopper would type when looking for your product. Conducting keyword research can involve the following:

    • Using Amazon’s autocomplete option to see common search terms.
    • Reviewing top-performing competitor listings for keyword ideas.
    • Checking specialized keyword research platforms like Semrush or Ahrefs to pinpoint relevant words with strong search volume.

    Place your most important keyword phrases in your listing title and bullet points. Spread secondary terms naturally throughout the product description.

    Tips for ongoing optimization

    • Update visuals as you receive better photography or user-generated images.
    • Adjust bullet points based on frequently asked questions.
    • Test different versions of your title, bullet points, or images to see what increases your conversion rate.
    • Monitor comments and star ratings to see if product improvements or listing tweaks are needed.
    • Regularly refresh product visuals and optimize listings to maximize sales potential.

    Related: Top 11 benefits of eCommerce SEO

    4. Understanding fulfillment options

    Comparison of Amazon FBA and FBM fulfillment methods

    Storing, packing, and shipping goods might be the biggest challenge for new sellers. That’s where the debate begins: Fulfillment by Amazon (FBA) vs. Fulfillment by Merchant (FBM).

    Amazon FBA (Fulfillment by Amazon):

    • Amazon handles storage, packing, and shipping. 
    • Eligible for Prime shipping, increasing sales potential. 
    • Amazon provides customer service & returns. 
    • Higher fees for storage and fulfillment.

    Amazon FBM (Fulfillment by Merchant):

    • You store and ship products yourself, reducing fees. 
    • More control over inventory and order processing. 
    • No Prime eligibility, meaning fewer conversions.

    So, which method is right for you? It often depends on how quickly you expect to increase sales, your product’s size, and your margin. Some sellers even use both approaches to optimize costs, known as multi-channel fulfillment.y.

    5. Marketing and promoting your products

    With millions of items on Amazon, standing out takes strategy. Don’t skip marketing if you’re launching your first item or expanding a popular brand. Here are ways to market your Amazon products for higher sales:

    Leverage external Traffic (Amazon loves this!)

    • Social media ads: Promote your products on Instagram, TikTok, and Facebook.
    • Google ads: Amazon rewards listings that receive traffic from Google.
    • Influencer marketing: Work with micro-influencers to create product buzz.

    Promotions and deals

    Here are some ways to drive an upswing in sales:

    • Lightning deals that appear on Amazon’s deals page.
    • Coupons that buyers can “clip” and see during checkout.
    • Prime-exclusive discounts reward Prime members with lower prices.

    Run Amazon PPC campaigns (but smartly!)

    • Sponsored products:Appear in search results for targeted keywords.
    • Sponsored brands: Showcase multiple products under your brand.
    • Sponsored display: Retarget potential buyers.

    Tip: PPC is still useful but should complement an organic ranking strategy rather than being the main driver of sales.

    Track your campaigns regularly using campaign tracking. If a keyword isn’t converting, reduce the bid or add it to negative keywords.

    That said, a well-structured campaign built by an experienced Amazon PPC agency can still accelerate early traction. It just needs to work alongside your organic and external traffic efforts, not replace them.

    Building brand awareness

    1. Register your brand on Amazon Seller Central if you meet the trademark requirements. You’ll gain access to extra branding tools.
    2. Create a branded short domain to showcase your product catalog.
    3. Use A+ Content (for registered brands) to add detailed descriptions, comparison charts, and images that help buyers see why your product is worth it.

    Related: How to increase sales on Amazon: Understanding A10 [Updated]

    Optimize Amazon selling with Replug

    Building your brand image outside of Amazon can push more visitors to your listing and help you boost e-commerce sales. Here are some ways you can do it with Replug:

    Link management
    Easily shorten long and cluttered Amazon links into clean, custom URLs with this reliable URL shortener. With Replug, you can also generate link previews, add custom favicons, create password-protected short links for Amazon, A/B test multiple links, and set up link rotation. Our Amazon URL shortener is a one link destination for all your link management needs.

    Affiliate link cloaking
    Messy and intimidating Amazon affiliate links can turn potential buyers away. Replug allows affiliates to cloak long URLs, making them cleaner, safer, and more appealing for clicks.

    Deep links
    Direct users to specific product pages within the Amazon app instead of a generic web page using Replug’s deep linking feature. This improves user experience and boosts conversion rates by reducing unnecessary redirects.

    Bio links

    Turn your single bio link into a high-converting landing page. Showcase multiple Amazon products, deals and discounts, new finds and launches, and more with Replug’s bio link feature. It’s perfect for influencers, content creators, and businesses looking to drive traffic from Instagram, TikTok, and other social platforms.

    Retargeting
    Enhance your Amazon ad performance by embedding retargeting pixels into your short links. This enables you to cross-promote across different platforms, re-engage lost customers, and drive more traffic to your Amazon storefront.

    White-label branding
    Create a customized white-label dashboard with Replug in just a few minutes and build a branded experience for your clients. With Replug’s white-label solution, you can add your own logos, colors, and domain, making it look like an extension of your brand rather than a third-party tool.

    Advanced analytics
    Replug provides in-depth analytics that goes beyond Amazon’s default URL shortener. Gain insights into total clicks, unique clicks, referral sources, and geographic data. Plus, you can add UTM parameters to your links for precise tracking across various channels.

    QR codes
    Easily generate QR codes for your Amazon links and share them across different marketing channels. Customers can simply scan the code to access your Amazon storefront, streamlining the shopping experience and increasing conversions.

    Replug Branded Short Links CTA
    A complete link management solution
    for marketing professionals & agencies.
    Try Replug for free

    Conclusion

    You’ve now seen the major steps for how to sell on Amazon for beginners, from setting up a Seller Central account to planning your product lineup and using thoughtful keywords. Selling on Amazon can feel like a real adventure, but a well-researched approach helps you stay on track.

    Think of each sale as a stepping stone. Keep testing different product ideas, gather feedback from buyer reviews, and tweak your listings often. For off-Amazon marketing, remember to simplify your links and measure click performance with tools like Replug so you can make smart decisions about your campaigns.

    Ready to take the next step? Launch a small batch of products, learn from the process, and keep evolving. With consistent effort and an eye on what customers value, you can build a successful Amazon seller account that grows in ways you never imagined.

    FAQs on how to sell on Amazon

    How much does it cost to start selling on Amazon?

    Costs differ by the type of products you sell and how you fulfill orders. If you pick the Individual plan, you’ll pay $0.99 per sale instead of a flat monthly fee. You’ll also face referral fees (8–15%, depending on the category) and optional FBA fees.

    Do I need a business license to sell on Amazon?

    Some sellers start without an official license. Still, it’s wise to consult local rules, especially if you plan to scale fast. Certain regions or product categories may require tax registrations or formal business structures.

    What are the best products to sell on Amazon?

    Many new sellers look to categories like home and kitchen, electronics, or beauty. Others focus on niche items that solve specific problems. The best products often have good profit margins, consistent demand, and moderate competition.

    Can I use Replug to create deep links for Amazon?

    Yes! Deep linking allows users to open Amazon product pages directly in the Amazon app, improving conversions.

    How long does it take to start making money on Amazon?

    Some see their first sale within days, while others might wait weeks. It depends on your item’s appeal, strategy around Amazon PPC, and how you optimize listings.

    Can I sell on Amazon without inventory?

    Yes. Dropshipping and FBA are two ways to avoid storing items in your own space. With dropshipping, your supplier ships directly to the buyer. With FBA, Amazon stores and fulfills your inventory.

  • Unique URLs: What they are and how to use them?

    Unique URLs: What they are and how to use them?

    Have you ever wondered what sets certain web addresses apart from the rest? Why do some URLs feel tailor-made to cater to your interests and preferences? 

    The answer lies within the domain of unique URLs. Unlike their conventional counterparts, these special links possess the ability to deliver customized experiences, guiding users to content that resonates with them on a deeper level.

    Follow along as we uncover the secrets behind creating and utilizing unique URLs and discover how they can uplift your online journey. 

    Get ready to unlock the potential of unique URLs and enhance your digital impact.

    What are unique URLs?

    Unique URLs are special web addresses that are customized and tailored to individual users or specific purposes. They go beyond the standard URLs you see on the web and add a personal touch. 

    These unique addresses can include elements like user identifiers, preferences, or customized URL parameters.

    The primary purpose of unique URLs is to enhance user experiences and provide personalized content. They allow businesses to deliver targeted information, track user behavior, and measure the effectiveness of their marketing efforts. 

    With unique URLs, website owners can create customized landing pages and provide a more personalized, engaging experience for their visitors. To plan those landing pages effectively, tools like Slickplan help map out site structure, sitemaps, and content flows before building.

    How to create unique URLs using Replug?

    When it comes to creating unique URLs, Replug.io offers a comprehensive suite of features that empowers businesses to take control of their online presence and deliver personalized experiences.

    What does Replug do?

    With Replug, you can add a call-to-action (CTA) to any link you share with your audience and drive traffic back to your site. You can collect leads by adding your own branded CTA to any page on the web. 

    Replug also provides analytics and insights, allowing you to track visits and conversions from the links you have shared.

    Replug Branded Short Links CTA
    A complete link management solution
    for marketing professionals & agencies.
    Try Replug for free

    Precisely, it is an efficient link shortener and a remarkable link-tracking platform that helps you build brand recognition and allows you to add eye-catching, branded call-to-actions or retargeting pixels to any page on the web.

    Additionally, Replug offers bio links that let you drive more traffic to your landing pages through platforms like Instagram and Twitter.

    Here’s how to get a unique URL with Replug

    Let’s explore how Replug simplifies creating unique URLs and releases their potential for your digital strategy.

    Step 1: Sign in to Replug or create a free account.

    Step 2: On the main home page, locate the “Quickly Shorten your link” bar in the top-left corner. Paste the URL you want to uniquely shorten, here.

    Replug's quickly shorten your link feature

    Step 3: Press Enter. The following screen will appear.

    unique url

    Here, you’ll spot the “Campaign” option. Go with the default campaign, or choose one from your existing campaigns in the dropdown menu.

    choose yoru campaign

    Note: Creating a campaign takes only a few seconds. It can be the name of your project, allowing you to navigate it easily. For instance, if you’re creating a unique URL, your campaign can be titled “unique URL”.

    Step 4: After that, customize your URL slug to make it unique. Once done, click the check mark to save the customization.

    customize your link

    Additional step:

    • You can also create a dynamic QR code for your link here.
    • Besides, by clicking the “+ Add UTM” option, you can add UTM parameters to your link, if needed.
    add UTM parameters

    Step 5: Now, in this step, you can add extra cool features to your URL, which include:

    Step 6: Once done, click the “Save Shortened Link” button.

    save your links

    And you’re done!

    Actionable link data: Replug’s analytics at your service

    unique urls analytics

    Replug not only provides powerful URL management capabilities but also offers rich analytics for each of your links. With Replug’s analytics feature, you can gain valuable insights into the performance and impact of your links, empowering you to make data-driven decisions and optimize your online strategies.

    By using this amazing feature, you can track key metrics such as click counts, traffic sources, and your audience’s geographic distribution. You can also dive deeper into user behavior by analyzing details like click times, devices used, and referring websites.

    Additionally, Replug lets you set up conversion tracking to measure the effectiveness of your campaigns and accurately assess the return on your marketing efforts.

    Other methods to generate unique URLs

    If you need to create distinct, trackable, or personalized URLs (rather than the same generic link everyone gets), there are some additional simple methods you can use. 

    These help with tracking, engagement, and giving users their own “space”, so you know exactly where traffic is coming from and who’s clicking what.

    Add campaign parameters

    One common way to make URLs unique and trackable is by adding tracking parameters (like UTM parameters) to the URL. 

    For example, you might append, 

    “?utm_source=facebook&utm_medium=social&utm_campaign=black_friday_sale” to the base link. 

    These parameters let you see where your visitors came from and which campaign drove them.

    Create personalized user links

    Another method is to generate links specific to each user, so that when “User A” clicks their link, it differs from “User B’s”

    These personalized URLs (sometimes called pURLs) can include a user-ID, name, or other unique identifier. They’re great for one-to-one campaigns, tracking individual engagement, or giving users their own landing space.

    Generate custom short links

    Instead of awkward long URLs, you can create short, branded vanity URLs that are easier to share and remember. These custom short links are not only cleaner visually but also offer analytics so you can track clicks, changes, or destinations.

    Customize a user profile URL

    Finally, when you have user profiles (on a site or network), you can allow each user to have a unique, customized URL (such as example.com/username) rather than something generic like example.com/profile/12345. This makes the link memorable, improves user experience, and can even help with SEO in some cases.

    Also Read: How to generate SEO-friendly URLs that rank higher & attract clicks

    Some top-notch unique URL examples

    Here are some great real-world examples of unique URLs to help inspire you.

    A clean example of a link tagged for a Facebook campaign

    https://www.example.com/?utm_source=facebook&utm_medium=social&utm_campaign=spring_sale

    URL showing how you can use custom tracking parameters

    https://example.com/?mtm_campaign=product_launch&mtm_source=twitter&mtm_medium=social&mtm_content=tweet

    Note: Here, “mtm_” instead of “utm_” to identify which social channel and what content type triggered the click.

    A link used in an email newsletter to track how many clicks came through that specific channel

    https://www.yourwebsite.com/landing-page?utm_source=newsletter&utm_medium=email&utm_campaign=monthly_update

    An example of using tracking parameters for print/offline campaigns by redirecting to a tagged URL

    http://www.domain.com/?utm_source=magazine&utm_medium=Magazine-A&utm_campaign=fall-2016-product-line&utm_content=full-page-ad

    Best use cases for unique URLs

    Unique URLs are special links you create so each recipient, source, or situation leads to a slightly different web address. This small tweak unlocks a lot of value.

    Check out the top scenarios for using unique URLs.

    Marketing & analytics

    You can use unique URLs (for instance, links with tracking codes) to see exactly where your traffic is coming from and how people behave once they land. 

    Using parameters like “utm_source” or “utm_medium” helps you measure campaign performance in tools like Google Analytics and Usermaven.  It also means you can compare which channels or messages are working best, and optimize accordingly.

    Branding & sharing

    When you give someone a link tailored for them (or their group), it feels more personal and thoughtful. People still click more when the link seems custom. 

    Also, unique URLs can help partner pages, influencer referrals, or social sharing be tracked and attributed back to your brand more cleanly.

    User personalization

    Finally, unique URLs allow you to customize what the user sees once they click. For example, the link might include a user ID or segment code, so the landing page shows their name, preferred product category, local currency, or language. This makes the experience feel relevant and boosts engagement.

    Make your links truly yours: Introducing Replug’s white-label feature

    Replug’s white-label solution empowers users to customize their experience like never before. With the ability to add their own branding elements to URLs, emails, reports, logos, and favicons, users can create a seamless brand identity.

    By rebranding Replug, users can make it appear as if they developed the product or service themselves without investing extensive time and resources in its creation. 

    White-labeling becomes the go-to choice for companies looking to expand their offerings and reach new customers without the expense of building new products from scratch.

    Unlocking the power of this top-notch feature allows users to establish a consistent and credible brand presence. By incorporating their own branding elements into Replug, they can deliver a personalized experience that captivates their audience and builds trust.

    With Replug’s white-label solution, users can maximize their brand’s impact, extend their reach, and conquer new markets. It’s a fantastic opportunity to customize Replug and effortlessly advance their brand to new heights.

    How to set up Replug’s white-label feature?

    how-to-create-white-label

    Navigate to Replug settings and click on the “white-label” option. You need to fill in the given field settings to set up your custom white-label URL shortener. The given field settings are:

    • General Settings
    • Domain Settings
    • Email Settings

    Note: Read this setup guide for a complete know-how!

    Once you have filled the required fields, switch to white-label. To do that, just click your profile name or icon in the top-right corner.

    FAQs on unique URLs

    What are the benefits of using unique URLs for tracking and analytics?

    Using unique URLs for tracking and analytics offers numerous benefits, including understanding user behavior, measuring engagement, and optimizing your marketing campaigns for better results.

    What role do unique URLs play in improving user experience?

    Unique URLs improve user experience by ensuring visitors are directed to relevant content, reducing the risk of broken or outdated links, and allowing for more accurate tracking and analytics.

    Can unique URLs be used for A/B testing and conversion rate optimization?

    Yes, unique URLs can be used for A/B testing and conversion rate optimization. By creating different variations of a URL and measuring their performance, you can identify the most effective elements and optimize your campaigns accordingly.

    Which is the best unique URL shortener online in 2026?

    For a top-tier unique URL shortener in 2026, go with Replug. It excels as a unique URL generator offering full link management, retargeting, custom domains, and robust analytics. Two other popular choices to consider are:

    Bitly, renowned for being a widely used, unique URL builder with strong tracking, and
    Rebrandly, which focuses intensely on branded short links and gives you a premium, unique URL link experience.

    What is Replug’s white label feature?

    Replug’s white-label feature lets users customize Replug with their branding elements. It helps businesses create a consistent brand experience without developing new products.