Smart URLs, also known as dynamic URLs, are generated automatically based on a set of rules. This contrasts static URLs, which are manually created and do not change. Smart URLs can be used to improve the user experience, track website traffic, and improve search engine optimization.
Smart URLs can be valuable for businesses of all sizes.
They can help businesses to:
Improve the user experience by making it easier for users to find the information they are looking for.
Track website traffic and see how users are interacting with the website.
Improve search engine optimization and make it easier for websites to rank higher in search engine results pages (SERPs).
Before using smart URLs, consider:
Make sure that the rules for generating smart URLs are clear and easy to understand.
Use a consistent naming convention for smart URLs.
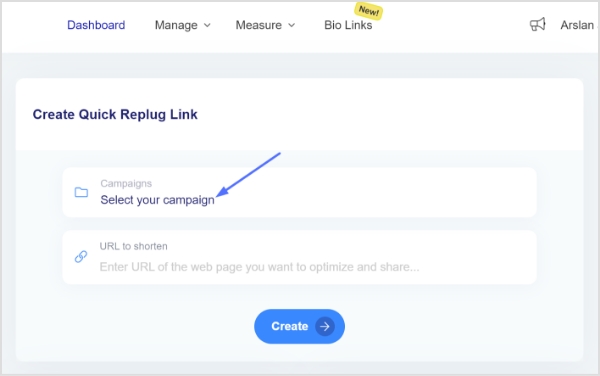
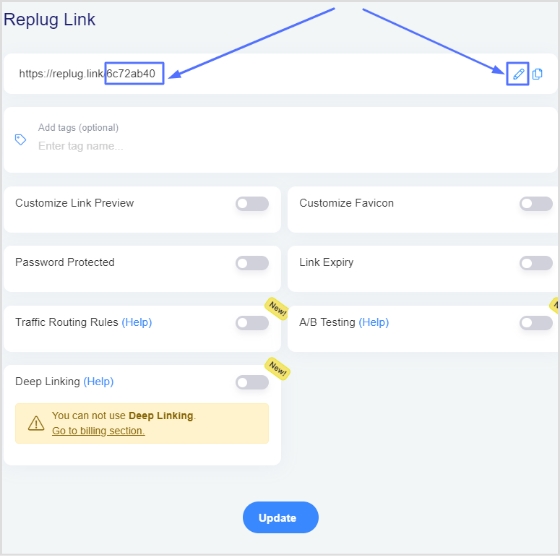
To create a smart URL link, you can use a custom link shortener online. Replug allows you to create short, easy-to-remember links for long URLs. When you create a smart URL link, you can also add keywords and other information to it. This can help people find your link more easily when they are searching for information online.
Here’s how to create a smart URL link using Replug
Make sure that the link is easy to remember and type.
Use keywords in the URL slug so that people can find it easily when they are searching for information online.
Keep the link short so that it is easy to share.
Track the number of clicks on your link to know how it’s performing.
Maximize marketing ROI
by transforming ordinary URLs into branded short links that convert.
Try Replug for free
Replug link analytics: Track your link’s performance
Replug empowers you to unleash the true potential of your links by providing a comprehensive suite of analytics.
No more flying blind – with Replug’s data-driven insights, you can make informed decisions that amplify your marketing efforts.
Picture this: a dashboard that paints a vivid picture of your link’s journey across the web.
From the number of clicks and unique visitors to geographical data, referral sources, and even the devices your audience prefers – it’s all there at your fingertips.
A smart URL is a short, descriptive URL that is easy to remember and share. It is also more likely to be clicked on than a long, complex URL. Smart URLs are often used for marketing and advertising purposes, as they can help to increase website traffic and brand awareness.
What is the difference between hyperlinks and smart links?
Hyperlinks are simply links that point to another web page. They are typically used to provide additional information or to direct users to a related resource. Smart links, on the other hand, are more sophisticated. They can be used to track user behavior, personalize content, and even trigger actions.
Are smart links safe?
The safety of smart links depends on the platform or service that generates them. Some smart links are designed to track users and collect data, while others are simply a way to shorten long URLs. It is important to be aware of the risks associated with any smart link before clicking on it.
Are you looking to make your website discoverable by millions of users across the web? Do you want to ensure that your content appears in Google’s search results?
If so, you’ve come to the right place! Submitting your URL to Google is an essential step in getting your website indexed and increasing its visibility online.
For marketers who care even more about both visibility and link performance, Replug.io provides an integrated way to shorten, brand, and manage all your shared URLs, so that every link counts.
In this guide, we will simplify the process and provide you with simple, easy-to-understand instructions on how to submit your URL to Google.
Let’s dive in and make your mark in the digital world!
Why submit URLs to Google?
Submitting URLs to Google is essential for several reasons:
Enhanced Visibility: Submitting URLs ensures that your web pages are indexed and appear in Google’s search results, increasing visibility among your target audience.
Faster Indexing: By submitting URLs, you expedite the process of indexing, allowing your content to be searchable sooner.
Increased Organic Traffic: Indexed URLs have the potential to appear in search engine results, attracting organic traffic to your website.
Control Over Search Results: URL submission allows you to prioritize your most valuable web pages in search results, giving you more control over your online presence.
Recognition of Updates: Submitting URLs alerts Google to crawl and index your updated content, ensuring users have access to the latest version.
Improved Rankings: Indexed URLs contribute to higher search engine rankings, boosting visibility and organic traffic.
A complete link management solution
for marketing professionals & agencies.
Try Replug for free
Method 2: Submit an XML Sitemap
Follow these steps to submit an XML Sitemap:
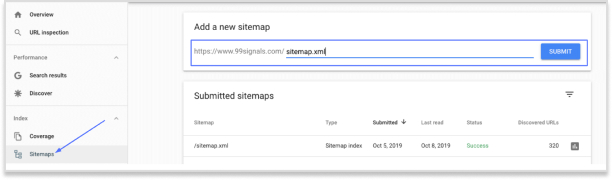
Step 1: Submit your XML Sitemap
On the Sitemaps page, click on the “Add/Test Sitemap” button.
In the text field that appears, enter the filename or path of your XML sitemap. It should typically be named “sitemap.xml” and located in the root directory of your website.
Click on the “Submit” button to add your XML sitemap to Google Search Console.
Step 2: Verify Successful Submission
After submitting your XML sitemap, Google Search Console will display the status and details of the submitted sitemap. It may take some time for Google to process the sitemap and index the included URLs.
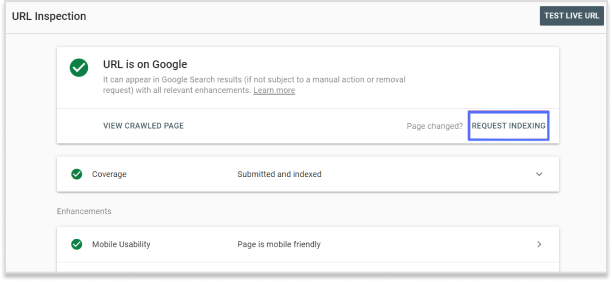
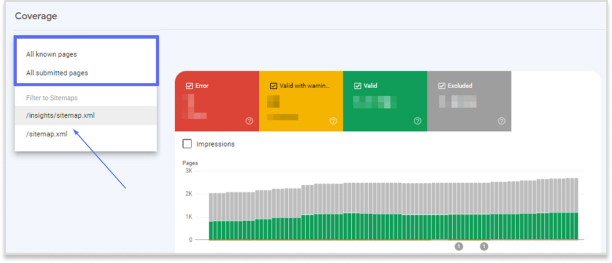
Check the “Coverage” report in Google Search Console to ensure that the submitted URLs are being indexed properly. Monitor any errors or warnings that may require attention.
It’s important to note that Google’s crawling and indexing process may take some time. Submitting a URL doesn’t guarantee immediate inclusion in search results, but it improves the chances of your web page being discovered and indexed by Google.
Repeat this process whenever you have new content or make significant updates to ensure timely indexing and visibility in search results.
And when you’re sharing your newly indexed links, you can shorten them through an efficient link shortener to brand them and track clicks easily. This will ultimately result in making your SEO efforts more measurable and powerful.
FAQs
What is the purpose of submitting URLs to Google?
The purpose of submitting URLs to Google is to enhance visibility and ensure that your web pages are indexed and included in search results.
How long does it take for Google to index submitted URLs?
The time taken for Google to index submitted URLs can vary, but it typically ranges from a few hours to a few days.
Can I submit multiple URLs at once to Google?
Yes, you can submit multiple URLs at once to Google using an XML sitemap or by requesting a crawl through Google Search Console.
Should I resubmit my URLs to Google if I make updates to my website?
Yes, it is advisable to resubmit your URLs to Google whenever you make updates to ensure timely indexing of the modified content.
What should I do if my submitted URLs are not getting indexed by Google?
If your submitted URLs are not getting indexed by Google, you should review potential issues such as crawl errors or content quality to troubleshoot and address the problem.
How often should I review and update my XML sitemap?
Regularly reviewing and updating your XML sitemap is recommended, especially when new content is added or existing content is modified.
You’re trying to visit a website, and instead of the page loading successfully, Chrome or Edge throws a cold, unhelpful error at you: ERR_SSL_PROTOCOL_ERROR.
Frustrating, right? You’re definitely not alone!
SSL is now the backbone of the modern web. 92.6% of the top 100,000 websites use HTTPS by default as of January 2026, and 99% of browsing time on Google Chrome now happens on HTTPS websites. That’s how standard secure connections have become.
So when something breaks that handshake between your browser and a server, it can stop you dead in your tracks, whether you’re a regular user trying to access a site or a website owner watching your visitors bounce.
The good news?
This error is almost always fixable. But first, you need to understand what’s actually going wrong.
Let’s start with the basics: what does ERR_SSL_PROTOCOL_ERROR mean exactly?
What is ERR_SSL_PROTOCOL_ERROR?
In simple terms, the ERR_SSL_PROTOCOL_ERROR meaning comes down to this: your browser tried to establish a secure, encrypted connection with a website, but something went wrong during that process, so it gave up.
When you visit a website or URL, your browser and the site’s server go through a quick “handshake” to verify security credentials. If that handshake fails for any reason, the browser blocks access entirely and displays “ERR_SSL_PROTOCOL_ERROR: This site can’t provide a secure connection.”
Think of it like showing up to a secure building without the right access card. The door doesn’t let you in (no negotiation). The error itself isn’t always the website’s fault, though. It could be coming from your browser, your device, or even your network. That’s exactly what we’re going to unwrap next.
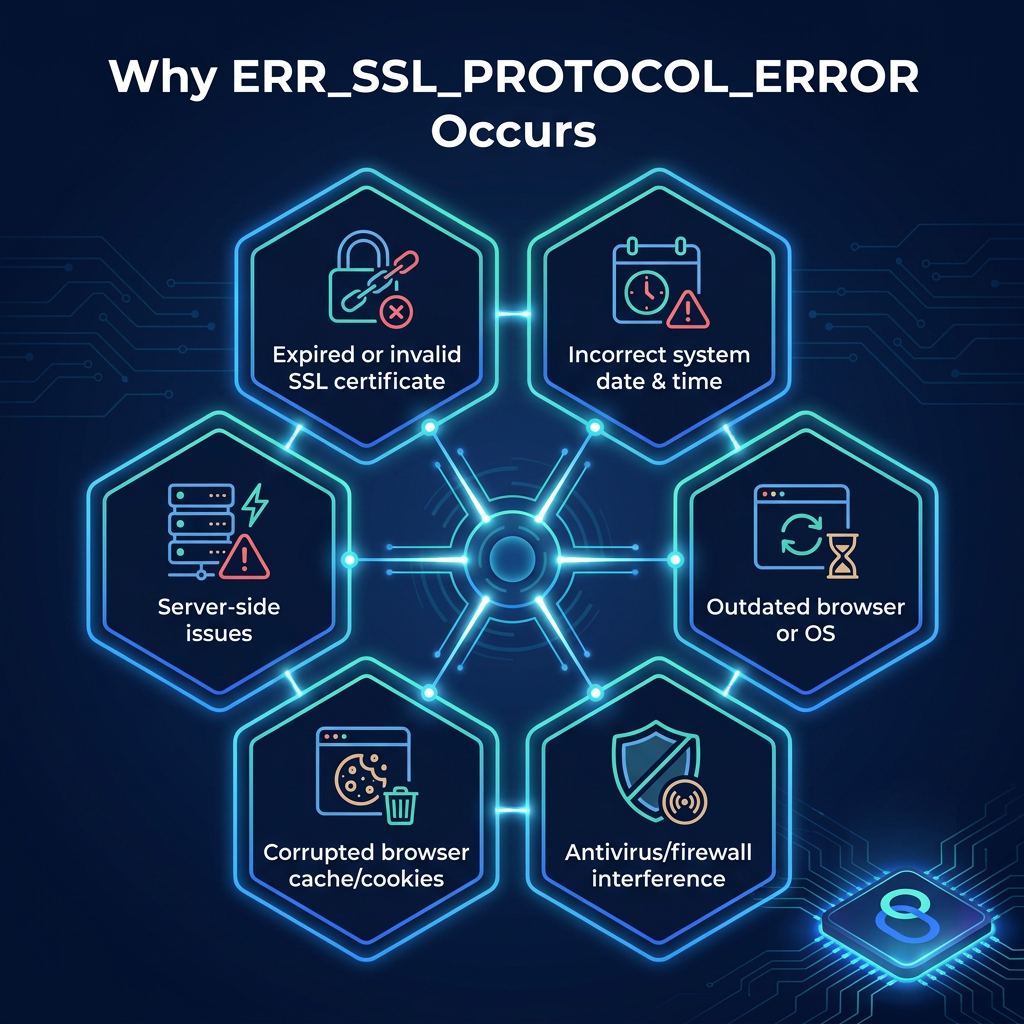
Why ERR_SSL_PROTOCOL_ERROR occurs: Major reasons behind this error
This error doesn’t just pop up for one reason. There’s actually a handful of things that can trigger it, from something as simple as a wrong date on your device to a misconfigured server.
Let’s break down the most common culprits so you know exactly what you’re dealing with.
Expired or invalid SSL certificate
Every SSL certificate comes with an expiration date, and when it lapses, browsers like Chrome instantly block access to the site. This is one of the most common server-side triggers.
If the certificate is expired, self-signed, or issued by an untrusted authority, your browser won’t complete the handshake, and you’ll land right on that error (ERR_SSL_PROTOCOL_ERROR) page.
Incorrect system date & time
This one surprises a lot of people. If your device’s date or time is off (even by a day), your browser might read a perfectly valid SSL certificate as expired or not yet active.
SSL certificates are time-sensitive by design, so a simple clock mismatch can throw the whole verification process out of sync.
Outdated browser or OS
Older browsers and operating systems sometimes lack support for newer security protocols like TLS 1.3. When a website requires an updated protocol that your browser or OS can’t handle, the connection fails.
Keeping your browser and system updated isn’t just about new features; it directly affects whether secure connections work properly.
Antivirus/firewall interference
Some antivirus programs and firewalls perform SSL scanning, essentially intercepting your connection to inspect it for threats. While well-intentioned, this process can sometimes disrupt the SSL handshake and trigger the ‘ERR_SSL_PROTOCOL_ERROR’ error.
If you’ve recently installed new security software or updated it, that’s worth checking first.
Corrupted browser cache/cookies
Your browser stores cached data to speed things up, but over time, that data can become outdated or corrupted. Old SSL state data, cached certificates, or stale cookies can conflict with a site’s current security setup, causing the connection to fail.
Clearing your cache and cookies often resolves this faster than you’d expect.
Server-side issues
Sometimes the problem has nothing to do with you at all. Misconfigurations on the server, like incorrect SSL/TLS settings, missing intermediate certificates, or protocol mismatches, can cause this error for every visitor calling on that site.
If the error appears across multiple browsers and devices, there’s a good chance the issue lives on the server end.
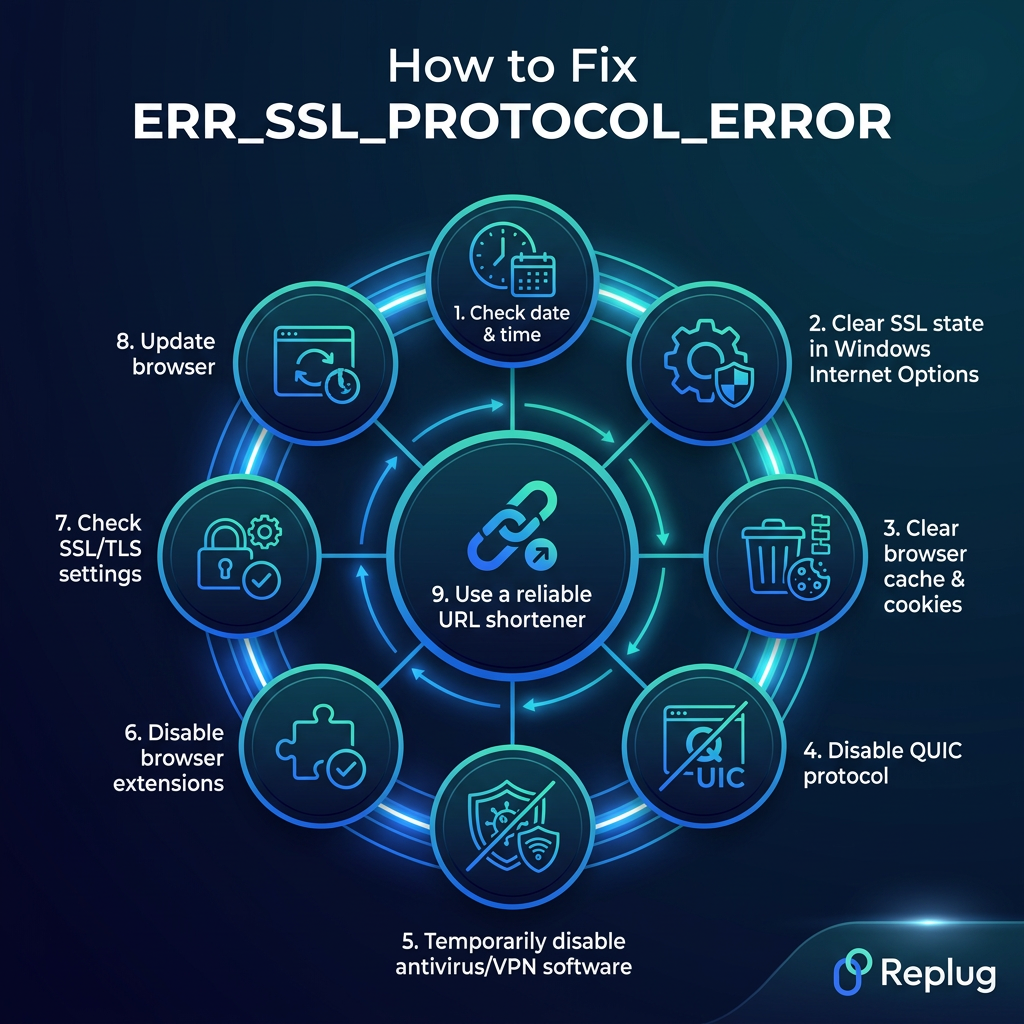
How to fix ‘ERR_SSL_PROTOCOL_ERROR’: Common troubleshooting steps
Finding the right ERR_SSL_PROTOCOL_ERROR fix isn’t always a one-size-fits-all situation. What works for one person might not work for another.
The good news is that most of these solutions are quick, straightforward, and don’t require any technical expertise. Work through these steps one by one, and you’ll likely resolve it faster than you think.
Check date & time
This is always the first thing to check because it’s the easiest to fix and more impactful than most people realize.
Go to your device’s date and time settings and make sure everything is accurate.
On Windows, right-click the clock in the taskbar and select “Adjust date/time.”
On Mac, head to System Settings → General → Date & Time. Enable the “Set time and date automatically” option, so your device always syncs with an internet time server.
Once corrected, restart your browser and try loading the site again.
Clear SSL state in Windows Internet Options
Windows stores SSL certificate data locally, and sometimes that cached data becomes outdated or conflicts with a site’s current certificate.
To clear it, open the “Control Panel” and search for “Internet Options.” Head to the “Content” tab and click the “Clear SSL State” button under the “Certificates” section. You’ll get a confirmation message once it’s done.
This doesn’t affect your browsing history or saved passwords. It simply flushes the old SSL handshake data so your browser can start fresh with the site.
Clear browser cache & cookies
Out-of-date cached data is one of the sneakiest causes of this error because everything on your end looks fine, but old stored data is quietly causing conflicts behind the scenes.
In Chrome, click the three-dot menu (⋮) in the top-right corner → select “Delete browsing data,” → choose a time range, → check “Cookies and other site data” and “Cached images and files,” → then click the “Delete data” button, and relaunch your browser.
In Microsoft Edge, press Ctrl+Shift+Delete. Select “Cookies and other site data” and “Cached images and files,” set the time range to “All time,” and click “Clear now.”
It takes less than a minute and often resolves the issue right away.
Disable QUIC protocol
QUIC is an experimental network protocol built into Chrome that can sometimes interfere with SSL connections.
To disable it, type chrome://flags in your address bar and search for “Experimental QUIC protocol.” Set it to “Disabled” from the dropdown and relaunch Chrome.
This is a lesser-known fix, but it’s surprisingly effective, especially if you’ve already tried the more obvious solutions and are still facing the same error.
Temporarily disable antivirus/VPN software
Antivirus programs and VPNs sometimes intercept SSL traffic as part of their security scanning, and that interception can break the connection. Try temporarily disabling your antivirus or VPN and then reloading the page.
If the error disappears, your security software is likely the culprit. From there, you can look into adjusting its SSL scanning settings rather than keeping it fully disabled. You want security, just without the interference.
Disable browser extensions
Extensions can quietly barge in with how your browser handles connections, especially ad blockers, privacy tools, or proxy-related extensions.
To test this, open Chrome in Incognito mode, since most extensions are disabled there by default. If the site loads fine in Incognito, an extension is almost certainly causing the problem.
Head to chrome://extensions, toggle them off one by one, and reload the page each time to identify the specific offender. If you are using another browser, like Microsoft Edge, here is how to disable extensions: Click the three dots → Extensions → Manage Extensions → Toggle off.
Check SSL/TLS settings
Your browser or operating system might be configured to use older, deprecated SSL/TLS protocol versions that modern websites no longer support.
In Chrome, you can check this via chrome://settings/security under “Advanced.”
On Windows, go to Internet Options → Advanced tab and scroll to the “Security” section.
Make sure TLS 1.2 and TLS 1.3 are enabled, and that older protocols like SSL 3.0 are unchecked. Aligning your settings with current standards often resolves compatibility-related SSL errors.
Update browser
Running an outdated browser is like trying to use an old key on a new lock (it just won’t work). Newer websites are built around modern security protocols, and older browser versions simply can’t keep up.
In Chrome, click the three-dot menu in the top right, go to Help → About Google Chrome, and it’ll automatically check for and install any available updates. Restart/relaunch once it’s done.
In Microsoft Edge, click the three-dot menu in the top-right corner, select Help and feedback → About Microsoft Edge. Edge will automatically check for updates and install them. Click Restart if prompted to complete the update.
It’s a simple step that’s easy to overlook but genuinely makes a difference.
Use a reliable URL shortener
Sometimes the issue isn’t your browser or device; it could be the link itself. Broken, malformed, or insecure URLs can trigger SSL errors before a page even has a chance to load.
If you’re sharing or managing links regularly, using a link optimization platform like Replug is a smart move. You can create short links that are clean, trackable, and redirect through secure connections.
Maximize marketing ROI
by transforming ordinary URLs into branded short links that convert.
Try Replug for free
Replug also offers free domains to get you started, so your links always look professional and load without any security hiccups.
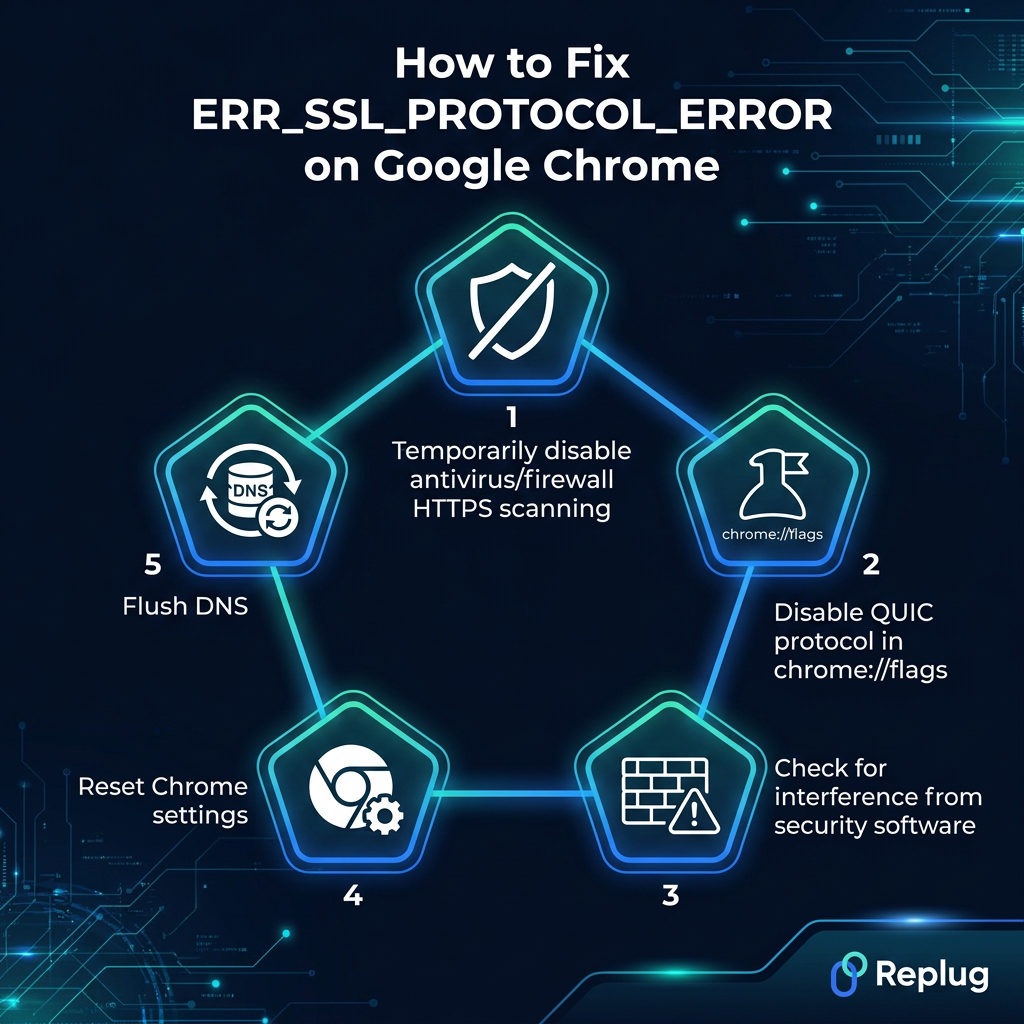
How to fix ERR_SSL_PROTOCOL_ERROR on Google Chrome
While the fixes mentioned in the previous section work across most browsers, ERR_SSL_PROTOCOL_ERROR Chrome cases sometimes need a bit more targeted troubleshooting.
Chrome has its own settings, flags, and configurations that can specifically contribute to this error. So here’s what to look at if you’re running into it on Chrome in particular.
Many antivirus programs have a feature that scans HTTPS traffic to check for threats, which sounds helpful, but it can actually disrupt Chrome’s SSL handshake in the process.
Go into your antivirus settings and look for anything labeled “HTTPS scanning,” “SSL inspection,” or “Web Shield.” Temporarily turn it off and reload the page in Chrome. If it loads fine, you’ve found your culprit.
Most antivirus tools let you whitelist specific sites rather than disabling the feature entirely, which is the smarter long-term fix.
Disable QUIC protocol in chrome://flags
Chrome’s built-in QUIC protocol is designed to speed up connections, but it doesn’t always play nicely with SSL, especially on certain networks or server configurations.
To turn it off, type chrome://flags in Chrome’s address bar and press Enter. Use the search bar to find “Experimental QUIC protocol” and switch it from “Default” to “Disabled.” Click the “Relaunch” button that appears at the bottom.
It’s a small tweak, but it removes one potential layer of interference that Chrome adds on top of standard SSL connections.
Check for interference from security software
Beyond just antivirus, other security tools such as VPNs, firewalls, parental control software, or corporate network filters can all interfere with how Chrome handles SSL connections. Try disabling them one at a time and testing the page after each.
If you’re on a work or school network, a firewall rule set by your IT team might be blocking the connection entirely, and that’s something you’d need to flag with them directly.
Identifying the specific software causing the conflict is the key step here.
Flush DNS
Your device stores a local DNS cache to speed up how it connects to websites. But if that cache holds outdated or corrupted records for a site, it can cause connection issues, including SSL errors. Flushing it forces your device to fetch fresh DNS information.
On Windows, open Command Prompt as “Administrator” and type ipconfig /flushdns, then press the Enter key.
On Mac, open Terminal and run sudo dscacheutil -flushcache; sudo killall -HUP mDNSResponder.
Restart Chrome afterward and try the site again. This fix is quick and often more effective than people expect.
Reset Chrome settings
If you’ve tried everything and Chrome is still throwing the error, a settings reset is worth doing. Over time, Chrome’s configuration can accumulate changes from extensions, experiments, or manual tweaks that quietly break things.
To reset, go to chrome://settings/reset and click “Restore settings to their original defaults.” Confirm the reset by clicking the “Reset settings” button.
This won’t delete your bookmarks, history, or saved passwords, but it will clear your startup page, pinned tabs, and extension settings. Think of it as giving Chrome a clean slate without a full reinstall.
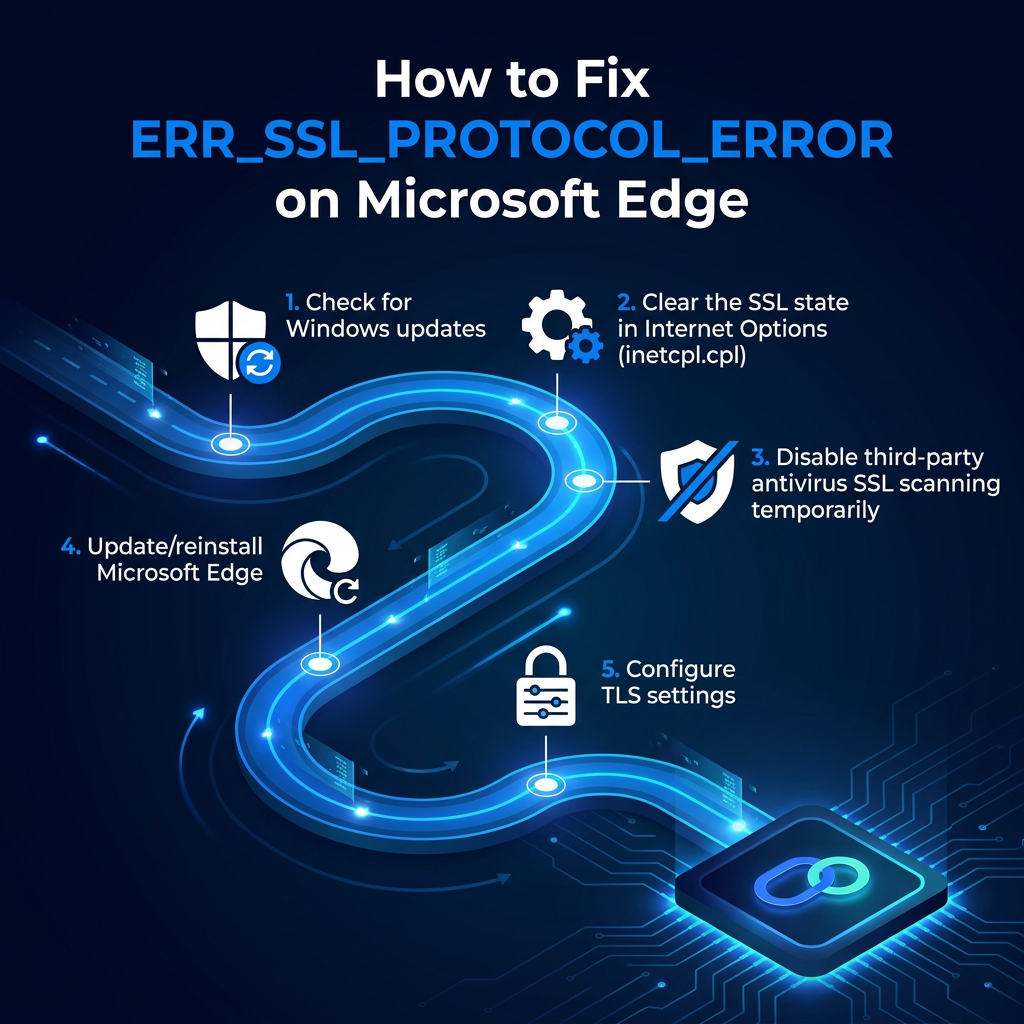
How to fix ERR_SSL_PROTOCOL_ERROR on Microsoft Edge
If you’re hitting ERR_SSL_PROTOCOL_ERROR Edge specifically, it’s worth knowing that Edge has some unique ties to Windows system settings that other browsers don’t share. This means the fixes here are a little different from what you’d do in Chrome.
These steps are tailored to Edge’s architecture and should help you get back on track quickly.
Check for Windows updates
Edge is deeply integrated with Windows, so outdated system files can directly affect how Edge handles SSL connections.
Open Settings → Windows Update and check if any updates are pending by clicking “Check for updates.” This includes both major Windows updates and smaller cumulative patches (both matter).
Microsoft regularly pushes security and protocol-related fixes through these updates, and skipping them can leave Edge unable to properly negotiate connections with modern, secure websites. Install any available updates, restart your device, and test the page again in Edge.
Clear the SSL state in Internet Options (inetcpl.cpl)
Because Edge is built on Windows infrastructure, it shares the SSL cache stored in Internet Options, and clearing it can resolve certificate conflicts that Edge runs into.
Press Windows + R, type inetcpl.cpl, and hit Enter. In the Internet Properties window, go to the Content tab and click “Clear SSL State.” You’ll see a confirmation pop-up once it’s cleared.
This wipes out any stored SSL session data that might be outdated or mismatched with a site’s current certificate, letting Edge establish a fresh connection on your next visit.
Just like with Chrome, third-party antivirus software can intercept Edge’s SSL connections while scanning for threats, and that interception sometimes breaks the handshake entirely.
Go into your antivirus settings and look for SSL inspection, HTTPS filtering, or Web Shield options and turn them off temporarily. Reload the page in Edge and see if the error clears.
If it does, consider adding the affected site to your antivirus whitelist rather than leaving the scanning feature fully disabled. Your security software’s support documentation can guide you through that process.
Update/reinstall Microsoft Edge
An outdated version of Edge can lack support for the security protocols that modern websites require. Click the three-dot menu in Edge, go to Help and feedback → About Microsoft Edge, and let it check for updates automatically.
If updating doesn’t help and the error persists across multiple sites, a full reinstall might be the better move.
Download the latest version directly from Microsoft’s official site, uninstall your current version through Windows Settings → Apps → Installed apps, and do a clean reinstall. It’s a bit more involved, but it rules out any deeper installation issues.
Configure TLS settings
Edge relies on Windows’ TLS (Transport Layer Security) configuration, so if the wrong protocol versions are enabled or disabled, SSL connections can fail.
Press Windows + R, type inetcpl.cpl, and open the “Advanced” tab. Scroll down to the “Security” section and make sure TLS 1.2 and TLS 1.3 are checked.
Older protocols like SSL 2.0 and SSL 3.0 should be unchecked. They’re condemned and can actually cause conflicts with modern sites. Click “Apply” and “OK,” then restart Edge.
This small configuration adjustment can make a noticeable difference, especially on sites that strictly enforce modern TLS standards.
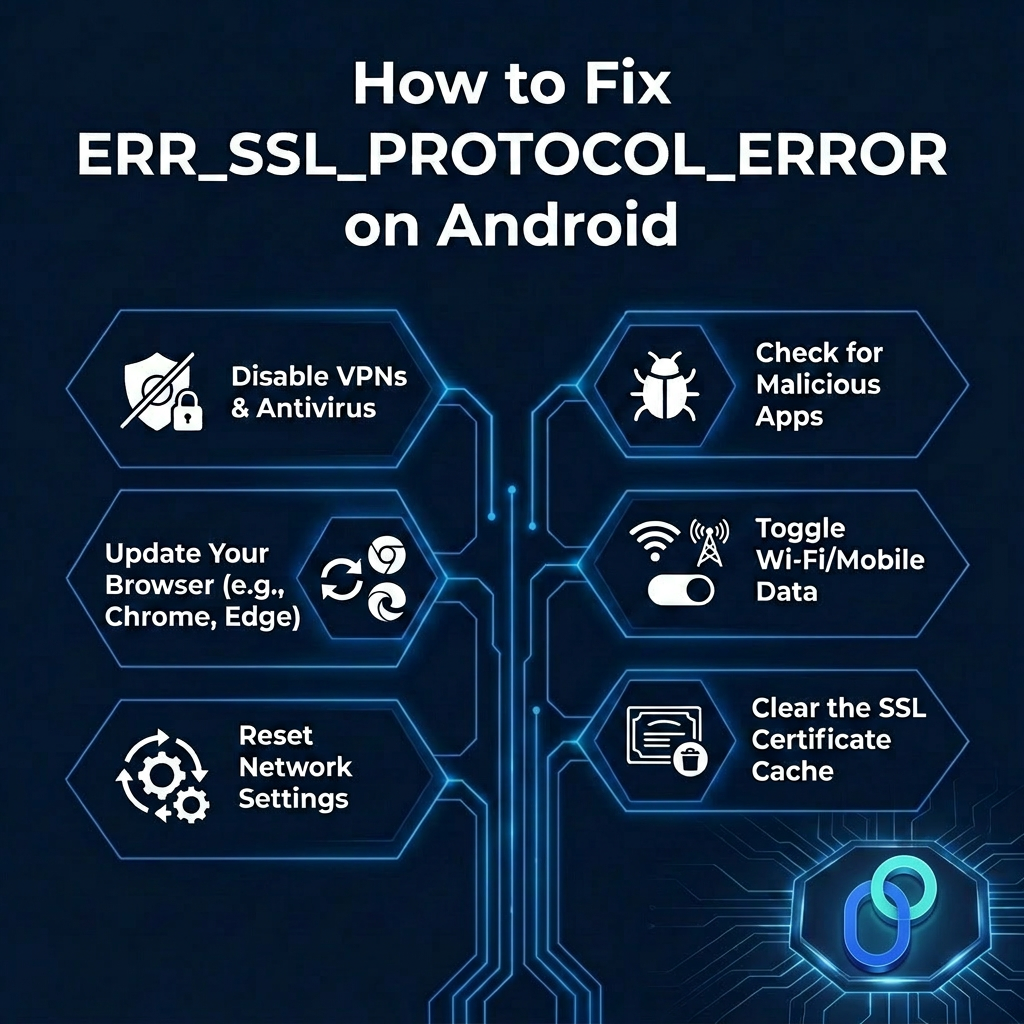
Getting this error on an Android device adds a few extra variables to the mix. Your network connection, installed apps, and device-level settings all come into play in ways they don’t on a desktop.
The good news is that Android gives you several straightforward options to work through, and most of them take just a minute or two to try.
Disable VPNs & antivirus
VPNs and antivirus apps on Android can reroute or inspect your traffic in ways that interfere with SSL connections.
If you have a VPN running, switch it off and try reloading the page. The same goes for any mobile antivirus apps that have web protection or HTTPS scanning features enabled. You can usually find these toggles directly inside the app’s settings.
If the error disappears after disabling one of them, you’ve identified the source. You can then look into configuring that app to allow secure connections without blocking them.
Check for malicious apps
A less obvious but real cause of SSL errors on Android is malicious or poorly built apps that interfere with your device’s network traffic.
Go to Settings → Apps and review any recently installed apps that you don’t fully recognize or trust. Some shady apps install rogue certificates or mess with network configurations in the background.
Run a scan using Google Play Protect. Open the Play Store → tap your profile icon → and select “Play Protect.” Scan and remove anything flagged or suspicious, restart your device, and check if the error persists.
Update your browser (e.g., Chrome, Edge)
An outdated mobile browser is one of the simplest reasons the “ERR SSL PROTOCOL ERROR” error appears on Android.
Older versions may not support the TLS protocols that current websites require, causing the SSL handshake to fail before it even gets started.
Open the Google Play Store → search for your browser, no matter if that’s Chrome, Edge, or another → and tap the “Update” button if one is available. It takes just a few seconds and can instantly resolve compatibility issues.
And, while you’re at it, check if your Android OS itself has any pending updates under Settings → Software Update.
Toggle Wi-Fi/mobile data
Sometimes the issue is as simple as a temporary network glitch that’s disrupting the SSL handshake. In that case, try switching from Wi-Fi to mobile data, or vice versa, and reload the page.
If you’re on Wi-Fi, toggle it off and back on, or forget the network entirely and reconnect. Public or shared Wi-Fi networks are particularly prone to SSL interference due to network-level filters or proxies.
Switching networks entirely is a quick way to rule out whether the problem is tied to your current connection rather than your device or browser settings.
Reset network settings
If toggling your connection doesn’t help, a full network settings reset is the next step. This clears all saved Wi-Fi networks, Bluetooth pairings, and mobile data configurations, essentially giving your device a clean networking slate.
On most Android devices, go to Settings → System → Reset options → Reset network settings (or search “Reset” in Settings). You’ll need to reconnect to your Wi-Fi networks afterward, so keep your passwords handy.
This fix is particularly useful when SSL errors are happening across multiple sites and browsers, as it points to a deeper network configuration issue on the device itself.
Clear the SSL certificate cache
Android stores SSL certificate data to speed up future connections, but that cached data can sometimes become outdated or corrupted. This causes errors even when a site’s certificate is perfectly valid.
To clear it, go to Settings → Apps → your browser → Storage, and clear cached data. After clearing, restart your browser and try the site again.
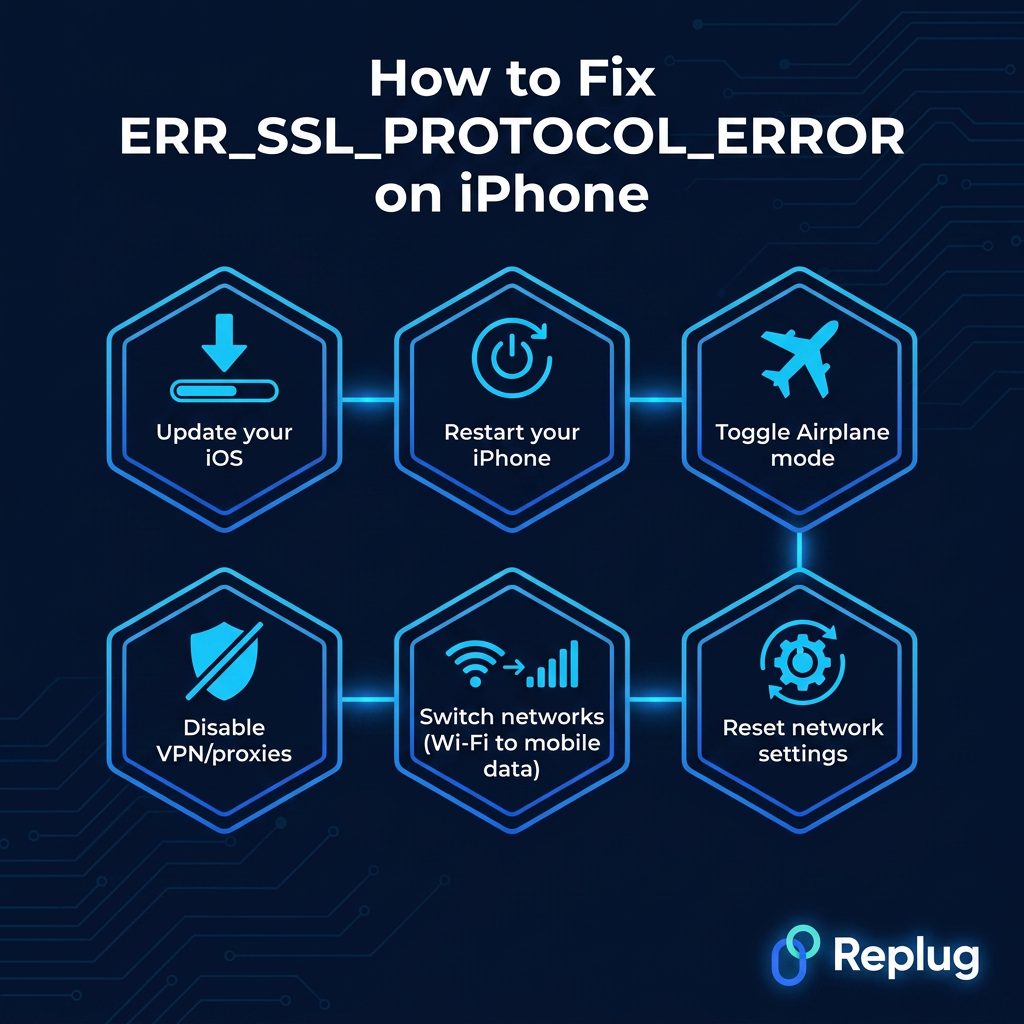
How to fix ERR_SSL_PROTOCOL_ERROR on iPhone
While iPhones are generally well-optimized for secure browsing, they’re not immune to SSL errors.
The fixes on iOS are a bit more streamlined compared to Android since Apple keeps most network and security settings centralized, which actually makes troubleshooting a little easier.
Here’s what to work through if you’re seeing ERR_SSL_PROTOCOL_ERROR on your iPhone.
Update your iOS
Apple regularly pushes iOS updates that include security patches, protocol upgrades, and bug fixes, all of which directly affect how your iPhone handles SSL connections.
If you’re running an outdated version, your device might simply lack support for the security standards a website requires. Go to Settings → General → Software Update and install anything that’s pending.
It’s one of those fixes that people put off but genuinely makes a huge difference, not just for SSL errors, but for your device’s overall security and performance.
Restart your iPhone
It sounds almost too simple, but a restart clears temporary system glitches, refreshes network connections, and resets background processes that might be interfering with SSL handshakes.
If you haven’t restarted your iPhone in a while, there’s a real chance that’s all it takes. Hold the side button and a volume button together, slide to power off, wait about 30 seconds, and turn it back on.
Try loading the site again once it’s fully restarted. This is always worth doing before moving on to more involved fixes.
Toggle Airplane mode
Toggling Airplane mode off and on is essentially a quick reset for all of your iPhone’s wireless connections (cellular, Wi-Fi, and Bluetooth).
It forces your device to re-establish a fresh network connection, which can clear temporary glitches in how SSL handshakes are being negotiated.
Swipe into Control Center and tap the Airplane mode icon to enable it. Now, wait about 10–15seconds, then tap it again to disable it. Once your connection is restored, reload the page.
It’s a 20-second fix that’s surprisingly effective for connection-related SSL errors.
Disable VPN/proxies
VPNs and proxy configurations on iPhone can reroute your traffic through servers that interfere with SSL verification. This is especially true if the VPN server itself has connection issues or uses outdated security protocols.
For VPN, go to Settings → General → VPN & Device Management and toggle off any active VPN.
For proxies, go to Settings → Wi-Fi, tap the ‘i’ icon, select “Configure Proxy,” and set it to “Off.”
Once disabled, reload the page and see if the error clears. If it does, the VPN or proxy configuration was the issue, and you may need to switch providers or adjust settings.
Switch networks (Wi-Fi to mobile data)
The network you’re connected to can be a direct cause of SSL errors, particularly on public Wi-Fi networks that use captive portals, content filters, or proxies that intercept HTTPS traffic.
Try switching from Wi-Fi to your mobile data connection and reloading the page. If it loads fine on mobile data, the problem is tied to that specific Wi-Fi network rather than your device.
You can also try forgetting the Wi-Fi network entirely under Settings → Wi-Fi, then reconnecting fresh. Sometimes, a corrupted network session is all that’s standing between you and a working connection.
Reset network settings
If nothing else has worked for you, resetting your network settings is the most thorough fix available on iPhone short of a full device restore.
It clears all saved Wi-Fi passwords, VPN configurations, APN settings, and network-related preferences, giving your iPhone a completely fresh networking foundation.
Go to Settings → General → Transfer or Reset iPhone → Reset → Reset Network Settings. You’ll need to re-enter your Wi-Fi passwords afterward, so note them down beforehand.
This fix is especially worth trying when SSL errors are appearing across multiple sites and browsers, since that pattern strongly suggests a device-level network configuration issue.
SSL errors can feel intimidating at first glance, but as you’ve seen throughout this guide, they’re almost always fixable with the right approach.
No matter if the culprit was an outdated browser, a misconfigured antivirus, a wrong date setting, or a network glitch, there’s a clear path to resolving it.
Rather than looking for an ERR_SSL_PROTOCOL_ERROR bypass that skips security altogether, working through these proper fixes ensures your connection is genuinely secure, not just superficially unblocked.
Start with the simplest solutions first, work your way down the list, and you’ll likely have things running smoothly in no time. Secure browsing isn’t complicated; it just needs a little attention sometimes.
Frequently asked questions
What is net::ERR_SSL_PROTOCOL_ERROR?
It’s the technical version of the same error. “net” simply refers to the network stack reporting it. When your browser can’t complete a secure SSL/TLS handshake with a website’s server, it logs it as net::ERR_SSL_PROTOCOL_ERROR. The cause and fixes are identical to the standard ERR_SSL_PROTOCOL_ERROR you see displayed on screen.
Why am I seeing ERR_SSL_PROTOCOL_ERROR on Microsoft Edge?
Most commonly, it comes down to outdated Windows settings, incorrect TLS configurations, or third-party antivirus software interfering with Edge’s SSL connections.
Since Edge is tightly integrated with Windows, system-level issues affect it more directly than other browsers. Checking Windows updates, clearing the SSL state via inetcpl.cpl, and reviewing your TLS settings usually resolves it.
Could antivirus software cause ERR_SSL_PROTOCOL_ERROR?
Absolutely! Many antivirus programs include HTTPS or SSL scanning features that intercept your browser’s connection to inspect traffic for threats. While that’s useful in theory, it can disrupt the SSL handshake and trigger this error. Temporarily disabling the HTTPS scanning feature (not the entire antivirus) is the quickest way to test if it’s the cause.
Is ERR_SSL_PROTOCOL_ERROR always server-related?
No, and that’s a common misconception. While server-side misconfigurations like expired certificates or incorrect TLS settings can cause it, the error just as often originates on the user’s end.
An incorrect system clock, an outdated browser, a corrupted cache, or interfering security software are all client-side causes that have nothing to do with the server.
Is it safe to proceed past the warning ‘ERR_SSL_PROTOCOL_ERROR’?
Generally, no! Unlike some browser warnings that offer a “proceed anyway” option, ERR_SSL_PROTOCOL_ERROR typically blocks access entirely for good reason. The secure connection couldn’t be verified.
Bypassing SSL warnings can expose your data to interception. It’s always better to resolve the underlying issue rather than forcing your way through a failed secure connection.
What is the difference between ERR_SSL_PROTOCOL_ERROR and ERR_SSL_VERSION_OR_CIPHER_MISMATCH?
They’re related but distinct!
– ERR_SSL_PROTOCOL_ERROR means the SSL/TLS handshake failed broadly. It could be caused by many things (as already mentioned above). – ERR_SSL_VERSION_OR_CIPHER_MISMATCH is more specific. It means your browser and the server couldn’t agree on a compatible TLS version or encryption cipher.
The second error points more directly to a protocol version incompatibility between the two sides.
Can a firewall or browser extension cause ERR_SSL_PROTOCOL_ERROR?
Yes, both can!
Firewalls that inspect HTTPS traffic can interrupt the SSL handshake, while certain browser extensions (especially ad blockers, privacy tools, or proxy extensions) can interfere with how your browser establishes secure connections.
Testing in Incognito mode (where most extensions are disabled) and temporarily turning off your firewall are quick ways to check.
Is ERR_SSL_PROTOCOL_ERROR dangerous or not?
The error itself isn’t dangerous. It’s actually your browser protecting you by refusing an insecure connection.
What it signals, however, is that something is wrong with the SSL handshake, which could mean the site has a genuine security issue. The risk comes from trying to force access past it rather than fixing the root cause properly.
How to fix ERR_SSL_PROTOCOL_ERROR on Mac?
Start by checking your Mac’s date and time under System Settings → General → Date & Time and enable “Set automatically.”
Then clear your browser cache, disable any VPN or antivirus HTTPS scanning, and make sure your browser is fully updated.
If the issue persists, check Keychain Access for any expired or untrusted certificates that might be conflicting with the connection.
Why is Chrome giving ERR_SSL_PROTOCOL_ERROR when running a local web server on http://localhost:4200?
This usually happens because Chrome expects HTTPS for secure connections, but your local server is running on plain HTTP. Chrome’s security policies flag this as an SSL issue.
The fix is to either configure your local server to use a self-signed SSL certificate or go to chrome://flags and enable “Allow invalid certificates for resources loaded from localhost.”
What is a secure connection?
A secure connection is an encrypted communication channel between your browser and a website’s server, established using SSL/TLS protocols. It ensures that any data you send or receive, like passwords or payment details, can’t be intercepted or tampered with by third parties. You can spot it by the padlock icon and “https” at the start of a website’s URL.
How to fix SSL error in Google Chrome?
Start with the basics: check your system date and time, clear Chrome’s cache and cookies, and make sure Chrome is updated. Then disable any antivirus HTTPS scanning and turn off extensions to rule out interference.
If those don’t work, try clearing the SSL state, disabling the QUIC protocol in chrome://flags, or resetting Chrome settings entirely via chrome://settings/reset.
How do I clear my SSL?
– On Windows, press Windows + R, type inetcpl.cpl, go to the Content tab, and click “Clear SSL State.” – On Chrome, you can clear cached SSL data by going to Settings → Privacy and Security → Clear Browsing Data. – On Mac, you can manage SSL certificates through Keychain Access.
Clearing your SSL state removes outdated handshake data so fresh connections can be established hassle-free.
What is an SSL/TLS handshake, and why does it fail?
The SSL/TLS handshake is the process where your browser and a website’s server verify each other’s identity and agree on encryption settings before any data is exchanged. It typically takes milliseconds.
It fails when there’s a mismatch like incompatible protocol versions, an expired certificate, an incorrect system clock, or interference from security software breaking the negotiation process mid-way.
Welcome to the fascinating realm of the internet, where websites hold a hidden secret: their unique IP addresses.
Curious to uncover this mystery? Fear not, we’ll guide you through a simple step-by-step process.
For those who manage multiple website links and want to streamline link handling, Replug offers a powerful platform to shorten, brand, and track your URLs, on top of standard DNS-based IP lookups.
Besides, by using commands like ping and nslookup, or employing a handy DNS lookup tool, you’ll swiftly discover the IP address of any website.
Get ready to dive into the world of digital discovery and unravel the hidden secrets that make the web tick. Let’s get started on how to find the IP address of a website!
What is an IP address?
An IP address, or Internet Protocol address, is a unique numerical label assigned to each device connected to a computer network. It serves as a digital identifier for devices, allowing them to communicate and exchange data with other devices over the internet.
IP addresses come in two main versions:
IPv4 (Internet Protocol version 4) and IPv6 (Internet Protocol version 6).
IPv4 addresses are comprised of four sets of numbers separated by periods, such as 192.168.0.1.
IPv6 addresses are longer and written in a hexadecimal format, such as 2001:0db8:85a3:0000:0000:8a2e:0370:7334.
IP addresses enable the routing and delivery of information across networks, facilitating seamless connectivity in the digital world.
Because IPv4 addresses are limited in supply, many businesses now use IP rent services to temporarily acquire additional address resources without purchasing permanent IP blocks.
Finding the IP address of a website can be done in a few simple steps using either the ping command, the nslookup command, or a DNS lookup tool. For added convenience and privacy, you can check your IP address using tools like Surfshark, which offers a quick and secure way to see your current IP.
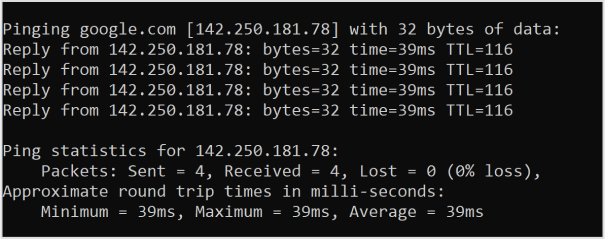
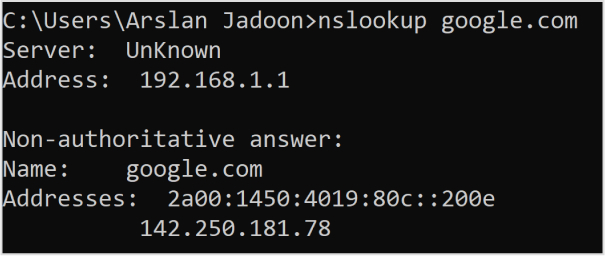
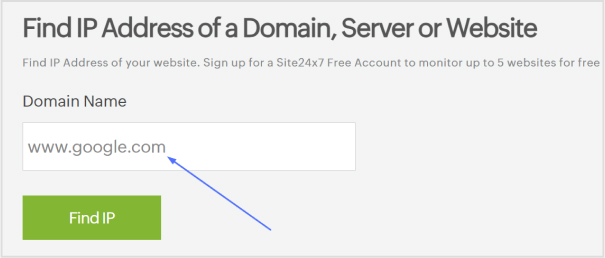
How to find the IP address of a website using the ping command?
Here’s a step-by-step guide to help you find the IP address using the ping command:
Step 1: Open the command prompt on your computer.
Step 2: Type “ping examplewebsite.com” in the command prompt (replace “examplewebsite.com” with the actual website you want to find the IP address for).
Step 3: Press Enter.
Step 4: The results will be displayed, including the IP address of the website.
Below, you can see the pinging results for Google.com
Remember that a website can have both IPv4 and IPv6 addresses, and the results may differ depending on the method used or the website itself. IPv6 addresses are newer and offer more combinations, while IPv4 addresses are more commonly used. Both types of addresses are valid and can be assigned to a website.
That’s it! You have now learned how to find the IP address of a website using different methods.
Remember, if you’re sharing the URL publicly or across social media, you could also use a short link created via Replug to make the address cleaner and more user-friendly, plus track performance if needed.
FAQs
What is an IP address and how does it work?
An IP address is a unique numerical label assigned to devices on a network. It allows devices to communicate and exchange data over the internet by providing them with a distinct identity.
How can I find the IP address of a website?
You can find the IP address of a website by using commands like ping or nslookup in the command prompt or by utilizing a DNS lookup tool online.
What is the difference between IPv4 and IPv6?
IPv4 uses a 32-bit address format and is widely used, while IPv6 uses a 128-bit address format and provides a larger pool of available addresses to accommodate the growing number of internet-connected devices.
Can I change my IP address?
Yes, you can change your IP address by contacting your internet service provider (ISP) or using certain software or tools that allow you to mask or modify your IP address.
Are IP addresses unique to each device?
Yes, IP addresses are unique to each device connected to a network. They serve as a digital identifiers for devices to ensure proper communication.
Can someone track my physical location through my IP address?
While IP addresses can provide a general indication of your location, they cannot pinpoint your exact physical address. However, certain techniques and additional data may potentially help narrow down your location.
What is a static IP address and a dynamic IP address?
A static IP address remains constant and is manually assigned to a device, while a dynamic IP address is automatically assigned by a network’s DHCP server and may change over time.
Want more clicks, more traffic, and maybe even more sales from your YouTube videos? It all starts with one simple thing: a clickable link in your description.
With over 2.7 billion monthly active users on YouTube and more than 1 billion hours of video watched every day, even a small tweak like adding the right link can make a huge difference.
But here’s the catch: many creators still get it wrong or miss out on easy opportunities. In this guide, we’ll show you exactly how to do it the right way in 2026, step by step.
First, let’s quickly understand the basics, starting with what a YouTube video description actually is.
What is a YouTube video description?
A YouTube video description is the text section you see right below a video. It explains what the video is about, gives extra context, and helps both viewers and YouTube understand your content. In simple terms, it’s like a mini guide for your video.
Its main purpose is twofold: to help people quickly decide if your video is worth watching and to help YouTube rank your video in search results. When written properly, it can improve discoverability, boost clicks, and even drive traffic to your links.
Core elements of a YouTube video description
Here are the key elements:
The hook (an engaging, keyword-rich opening line): The first 1–2 lines grab attention and include your main keyword since this part is visible before clicking “show more.”
Detailed description/summary of the content: A clear, simple summary that tells viewers exactly what they’ll learn or get from the video.
Clickable timestamps/chapters for navigation: Time-based links that let viewers jump to specific parts of the video easily.
A clear call to action (CTA): A direct prompt telling viewers what to do next, like subscribe, click a link, or watch another video.
Relevant links & resources: Useful URLs(website, products, references) that add extra value beyond the video.
Social media handles & hashtags: Your social links and hashtags help people connect with you and improve content reach.
Channel bio/disclaimer: A short intro about your channel or any necessary disclaimer (like affiliate links or sponsorships).
How to add a clickable link in YouTube video description (step by step)
Adding a clickable link in your YouTube description is actually very simple. You just need to paste the right type of URL in the right place.
Once done correctly, YouTube automatically turns it into a clickable link that viewers can tap or click, hassle-free.
Let’s break it down step by step for both phone and desktop so you can follow along easily 👇
How to add a clickable link in YouTube description on phone
Here’s how to do it on mobile:
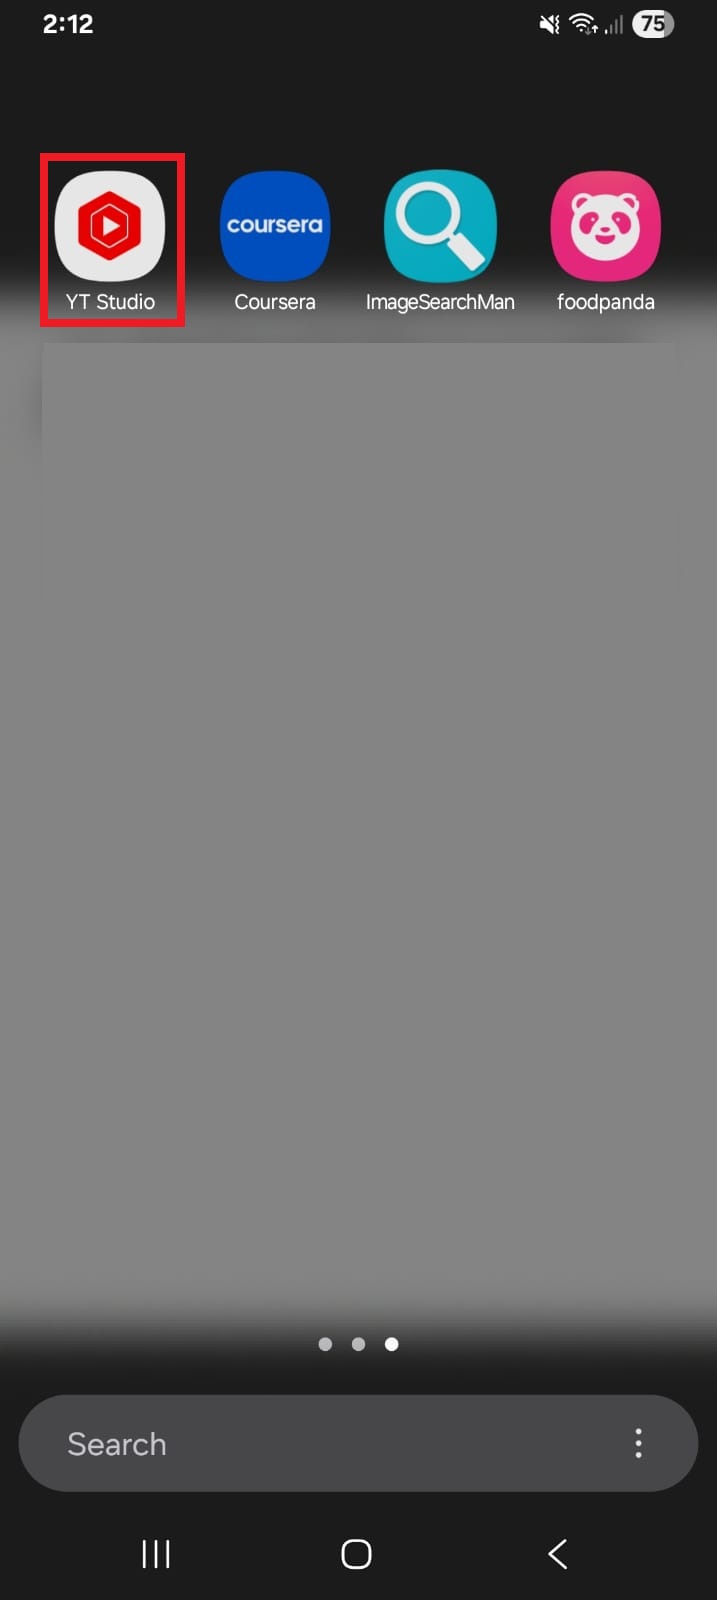
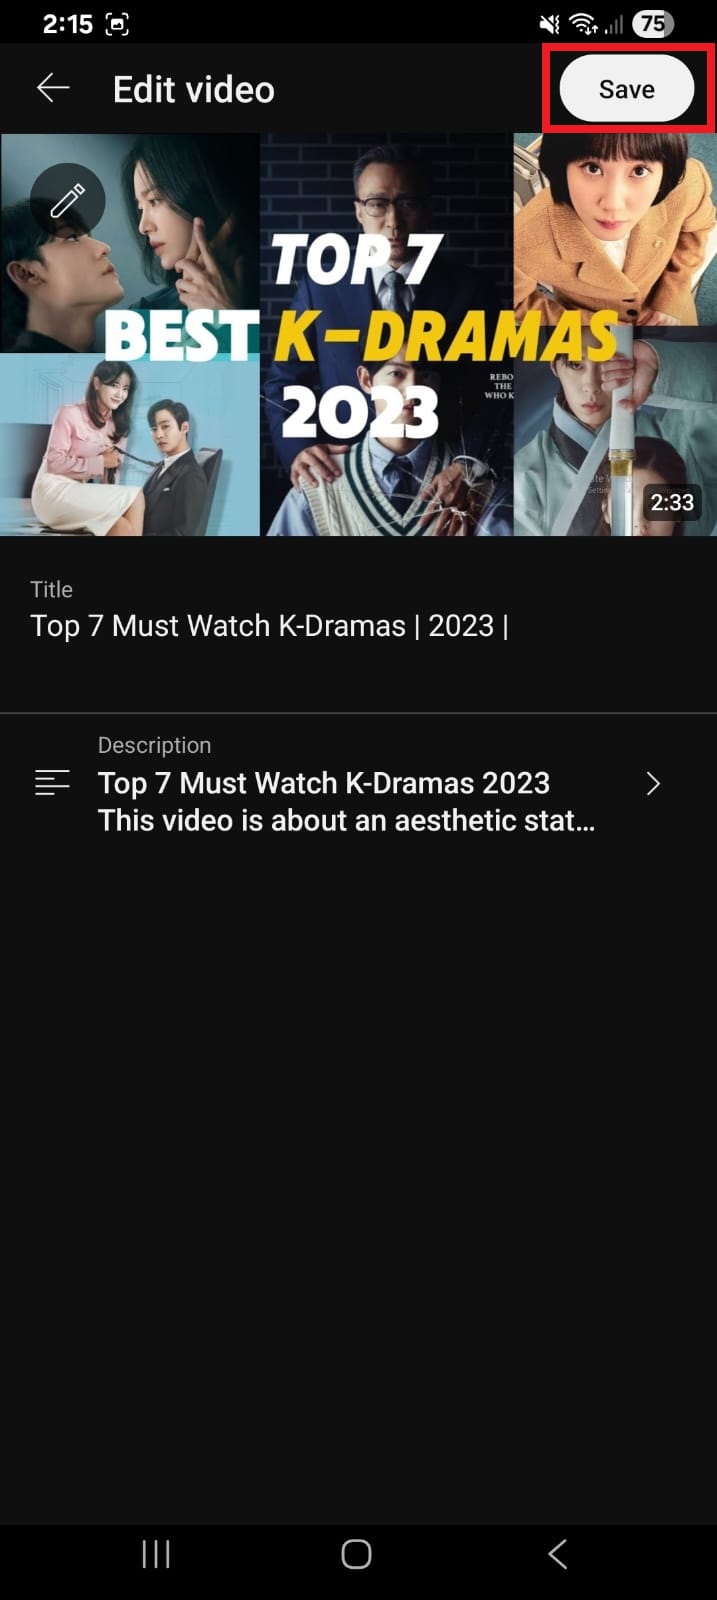
1. Open the YouTube Studio app.
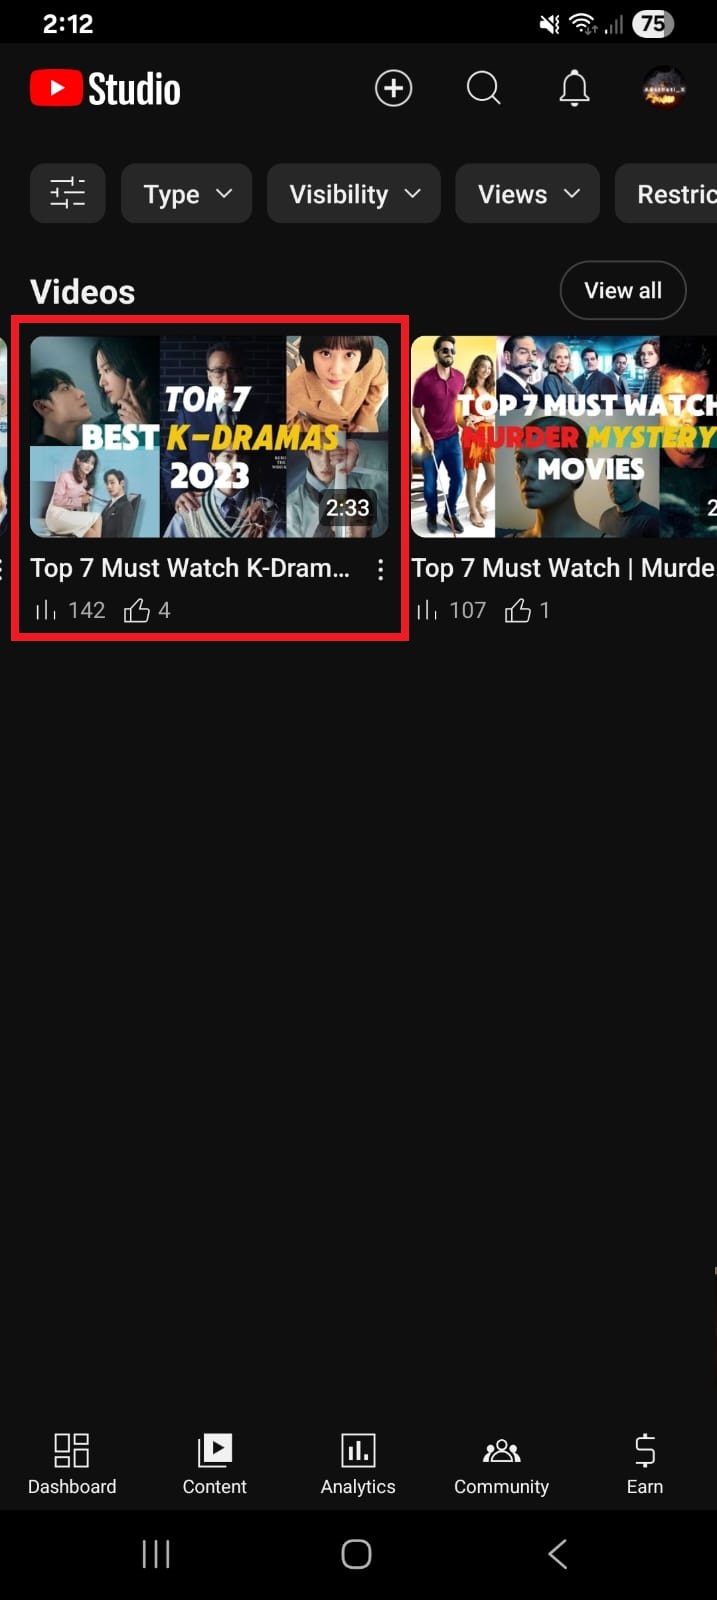
2. Select the video you want to edit.
3. Tap the pencil (edit) icon at the top of the screen.
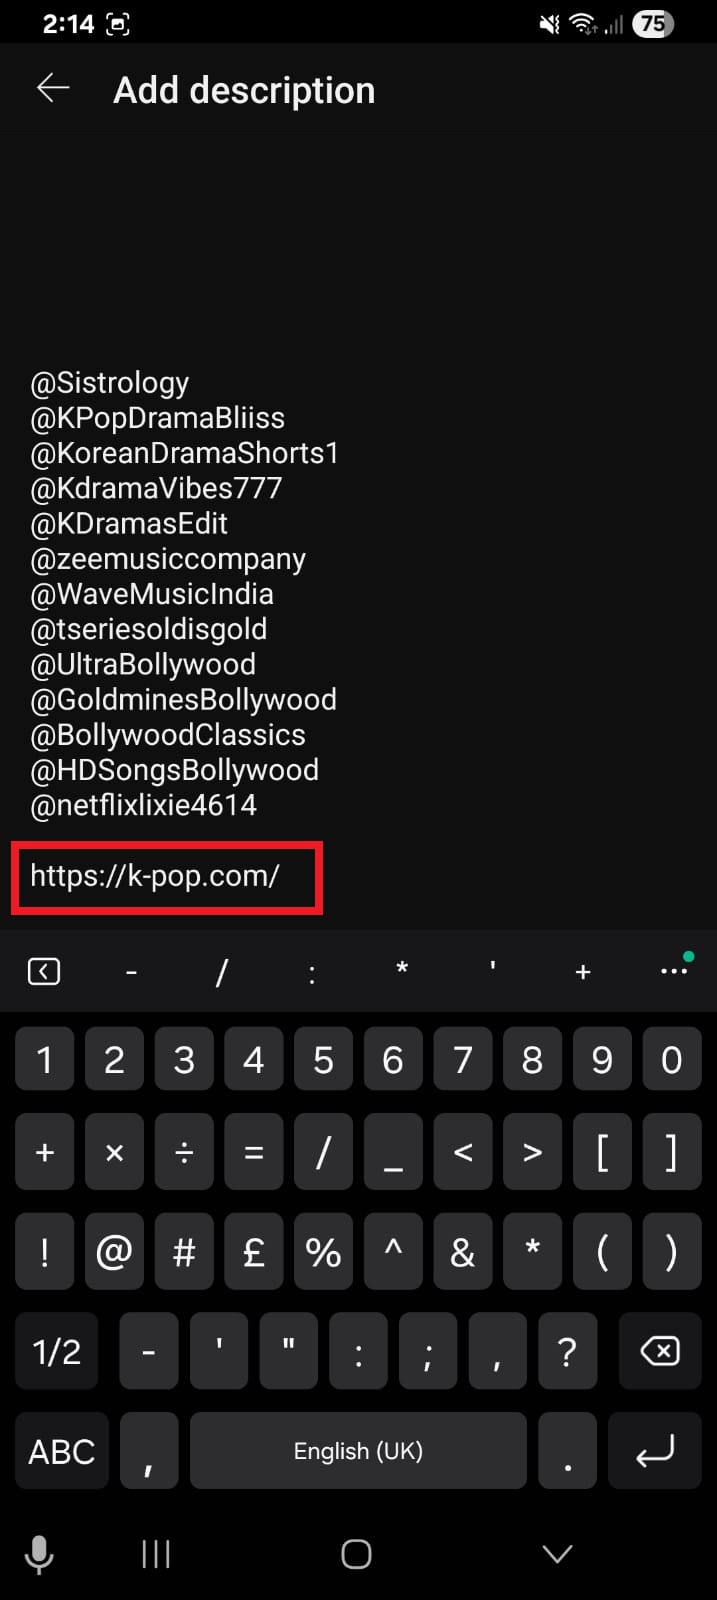
4. Tap on the Description section.
5. In the description box, paste your link (make sure it starts with https://).
6. Tap Save.
That’s it! YouTube will automatically make the link clickable once the video is updated.
How to add a clickable link in YouTube description on desktop
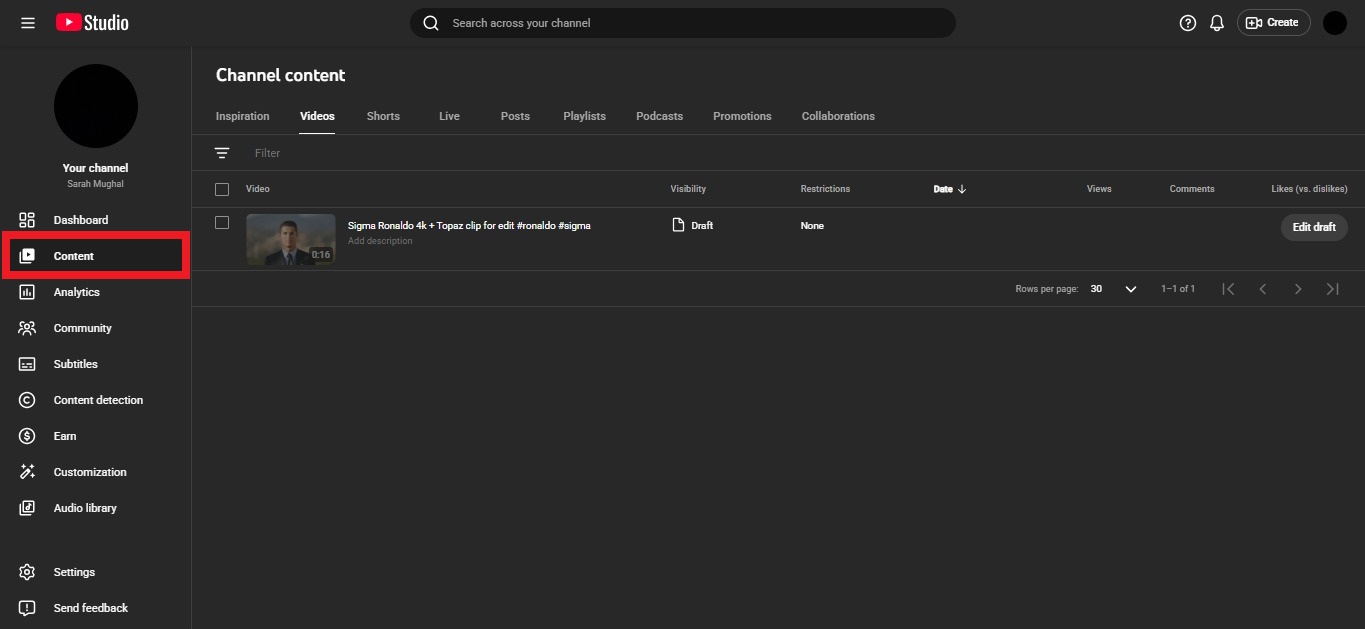
Here’s how to do it on PC:
1. Go to YouTube Studio and log in.
2. Click on Content from the left menu.
3. Find your video and click the edit (pencil) icon.
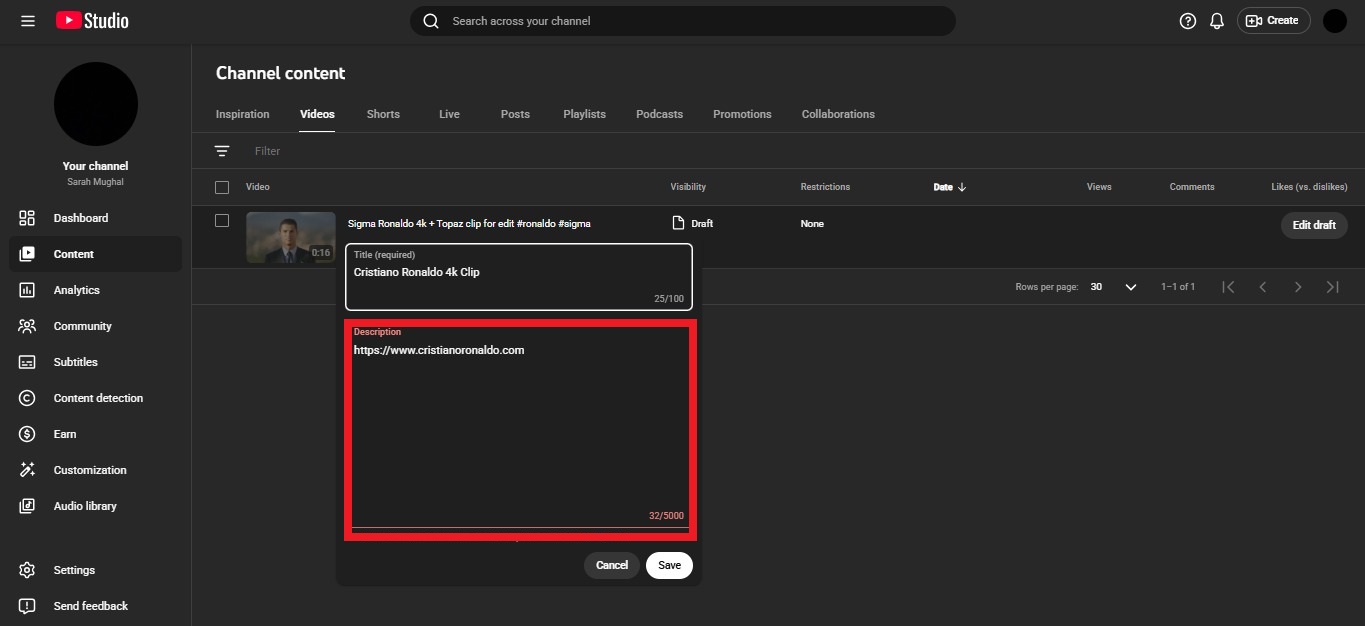
4. Scroll to the Description field, and paste your link with https:// at the start.
5. Click the Save button.
Once saved, your link becomes clickable in the description.
💡 Quick tip: If your link isn’t clickable, it’s usually because it doesn’t include “https://”, so always double-check that part.
How to add a clickable link in YouTube Shorts description
Before you jump in, here’s something important to know 👇
YouTube works a bit differently for Shorts. In most cases, links placed directly in Shorts descriptions are NOT clickable. They show as plain text to reduce spam and scams.
So while you can add a link in the description, it won’t behave like regular video links. Instead, YouTube gives you a few alternative ways to share clickable links (like related videos or other features).
Step-by-step guide:
1. Open YouTube Studio (app or desktop).
2. Go to Content and select your Short.
3. Click the edit (pencil) icon.
4. In the description box, paste your link (make sure it includes https://).
5. Click Save.
Your link will appear in the description, but keep in mind, viewers won’t be able to click it directly.
💡 Better (working) ways to add clickable links in Shorts
Since description links aren’t clickable, here are smarter options you should use:
Add a “Related Video” link: You can link your Short to one of your long videos, which viewers can easily click.
Use channel profile links: Add your website or important links in your channel bio. These are clickable.
Mention links in comments or CTA: Guide viewers to your bio or a full video where clickable links are available.
In short, you can add links in Shorts descriptions, but for optimized results, use YouTube’s built-in linking features instead.
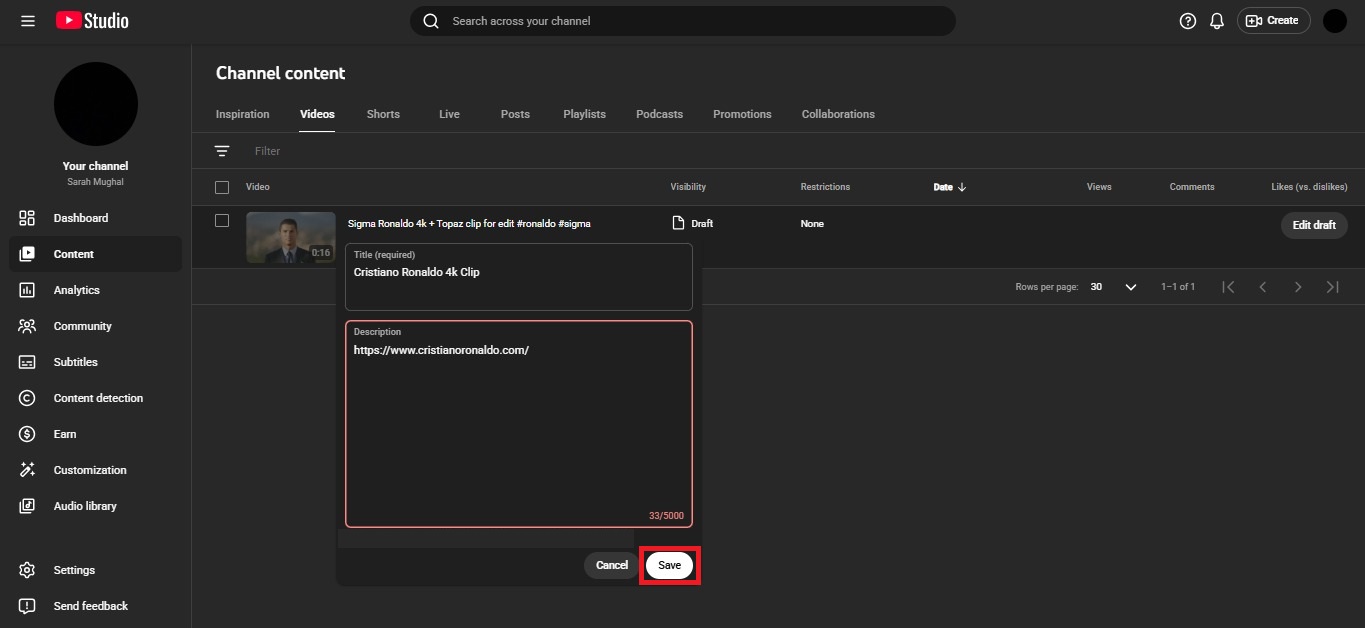
How to add a clickable link in the YouTube channel description
Adding links to your YouTube channel description (the “About” section) is a great way to guide viewers to your website or social profiles. To make links clickable on your channel, you need to use YouTube’s channel profile links (banner links) feature.
Step-by-step guide:
1. Go to YouTube Studio and log in to your account.
2. From the left menu, click on Customization.
3. Open the Basic Info or Profile tab.
4. Scroll down to the Links section.
5. Click + Add Link.
6. Enter your link title (e.g., “My Website” or “Instagram”).
7. Paste your full URL (make sure it starts with https://).
8. Click Publish in the top right-hand corner.
Once saved, these links (up to the first 14) will show up on your channel banner and are fully clickable for viewers.
Why add a clickable link in the YouTube video description
Adding a clickable link isn’t just a small detail; it’s one of the easiest ways to turn viewers into action-takers. Whether you want traffic, sales, or engagement, that single link can make a real difference.
Monetization & marketing: You can promote products, services, or affiliate offers, directly turning views into real income opportunities.
Engagement & traffic: Links help drive viewers to your website or other content, increasing traffic and interaction beyond YouTube.
Improved user experience: You give viewers quick access to helpful resources, making your content more useful and easy to explore.
SEO boost: Descriptions help YouTube understand your content better, improving visibility in search and recommendations.
Lead generation: A well-placed link can capture leads by directing viewers to sign-up pages, offers, or landing pages.
Importance of a good YouTube video description in 2026
At present, a YouTube description is more than just a summary. It’s a key part of how your video gets discovered and how viewers interact with it. A well-written description helps both the algorithm and your audience understand your content better.
Boosts searchability: Using the right keywords helps YouTube understand your video and improves its chances of showing up in search results.
Enhances viewer experience: A clear description, links, and timestamps make it easier for viewers to navigate and get value quickly.
Increases engagement: When viewers know what to expect, they’re more likely to watch longer, click links, and interact.
Builds loyalty & revenue: Good descriptions guide users to subscribe, explore more content, or check out your offers.
Strategic optimization: Descriptions are a core part of YouTube SEO along with titles and tags, helping your content perform better.
Context for AI: With AI-driven search growing, descriptions help systems understand and recommend your content accurately.
Create short clickable links for your YouTube description with Replug!
If you’ve ever pasted a long, messy URL in your YouTube description, you already know that it doesn’t look great. That’s where Replug comes in!
It’s a powerful link shortener that helps you turn long, cluttered links into clean, professional, and clickable ones. Plus, it does a lot more than just shortening links.
Maximize marketing ROI
by transforming ordinary URLs into branded short links that convert.
Try Replug for free
Replug is an all-in-one link optimization platform that lets you brand and track your links, so you can see how they perform and improve your results over time.
Here’s why it’s worth using for YouTube:
Clean & short links: Turn long URLs into simple, easy-to-click links that look better in descriptions.
Branded links: Use your own custom domain to make links look more trustworthy and professional.
Click tracking & analytics: See how many people are clicking your links and where they’re coming from.
Add call-to-actions (CTAs): You can attach small messages or buttons to boost clicks and conversions.
Campaign optimization: Test and improve your links using A/B testing and smart routing features.
In short, Replug doesn’t just shorten your links; it helps you turn every link into a small marketing tool.
Summing up
To wrap things up, adding clickable links to your YouTube description might seem like a small step, but it can seriously level up your results.
From driving traffic and boosting engagement to helping with SEO and lead generation, it all adds up.
And the best part? It only takes a few seconds. Just paste your link with “https://,” and you’re good to go.
If you really want to take things further, tools like Replug can help you create clean, trackable links that actually convert.
👉 Before you go, give Replug’s free YouTube title generator a try as well. It’s a quick, efficient way to make your videos stand out even more!
Frequently asked questions
How do I put a clickable link in a YouTube description?
Just paste your full URL (with https://) into the description box while editing your video, and YouTube will automatically turn it into a clickable link.
Should you put links in a YouTube description in 2026?
Yes, absolutely! Links help drive traffic, promote products, and improve engagement. Still a key strategy for content creators in 2026.
Where is the link in the description on YouTube?
It appears just below the video. On mobile, it’s under “Show more,” and on desktop, it’s visible directly under the title (or after expanding).
Why is my link not clickable in the YouTube description?
The most common reason for this is that the link doesn’t start with https://. Without it, YouTube won’t recognize it as clickable.
How to add social media links in YouTube description?
Simply copy your Instagram, Facebook, or other profile link and paste it into the description with https://, and it will become clickable instantly.
How to put links in YouTube description without verification?
You can still paste links without advanced verification, but some features (like external linking tools) may require channel verification. You must include the full URL starting with https://
Can you hyperlink text in YouTube description?
No, YouTube doesn’t support custom anchor text. You must paste the full URL; no “click here” style hyperlinks.
How to add a hyperlink to the YouTube description?
Same process: paste the full https:// link inside the description box. YouTube automatically converts it into a clickable hyperlink.
How do I add a link to a YouTube description on my iPhone?
Open the YouTube app → tap on your profile icon → go to your desired video → tap Edit → paste your link in the description box → save.
How to add a clickable link in the YouTube video comments section?
Paste your full URL in the comment. In regular videos, it becomes clickable, but avoid spammy posting to stay within YouTube rules.
How to add a clickable Instagram link in the YouTube description?
Copy your Instagram profile link (e.g., https://instagram.com/username) and paste it in the description box. It will be clickable like any other link.
How to add a clickable link to a YouTube video using end screen & card?
Go to YouTube Studio → Content → select video → Cards or End Screen → Add link → Save. These appear during or at the end of the video and are fully clickable.
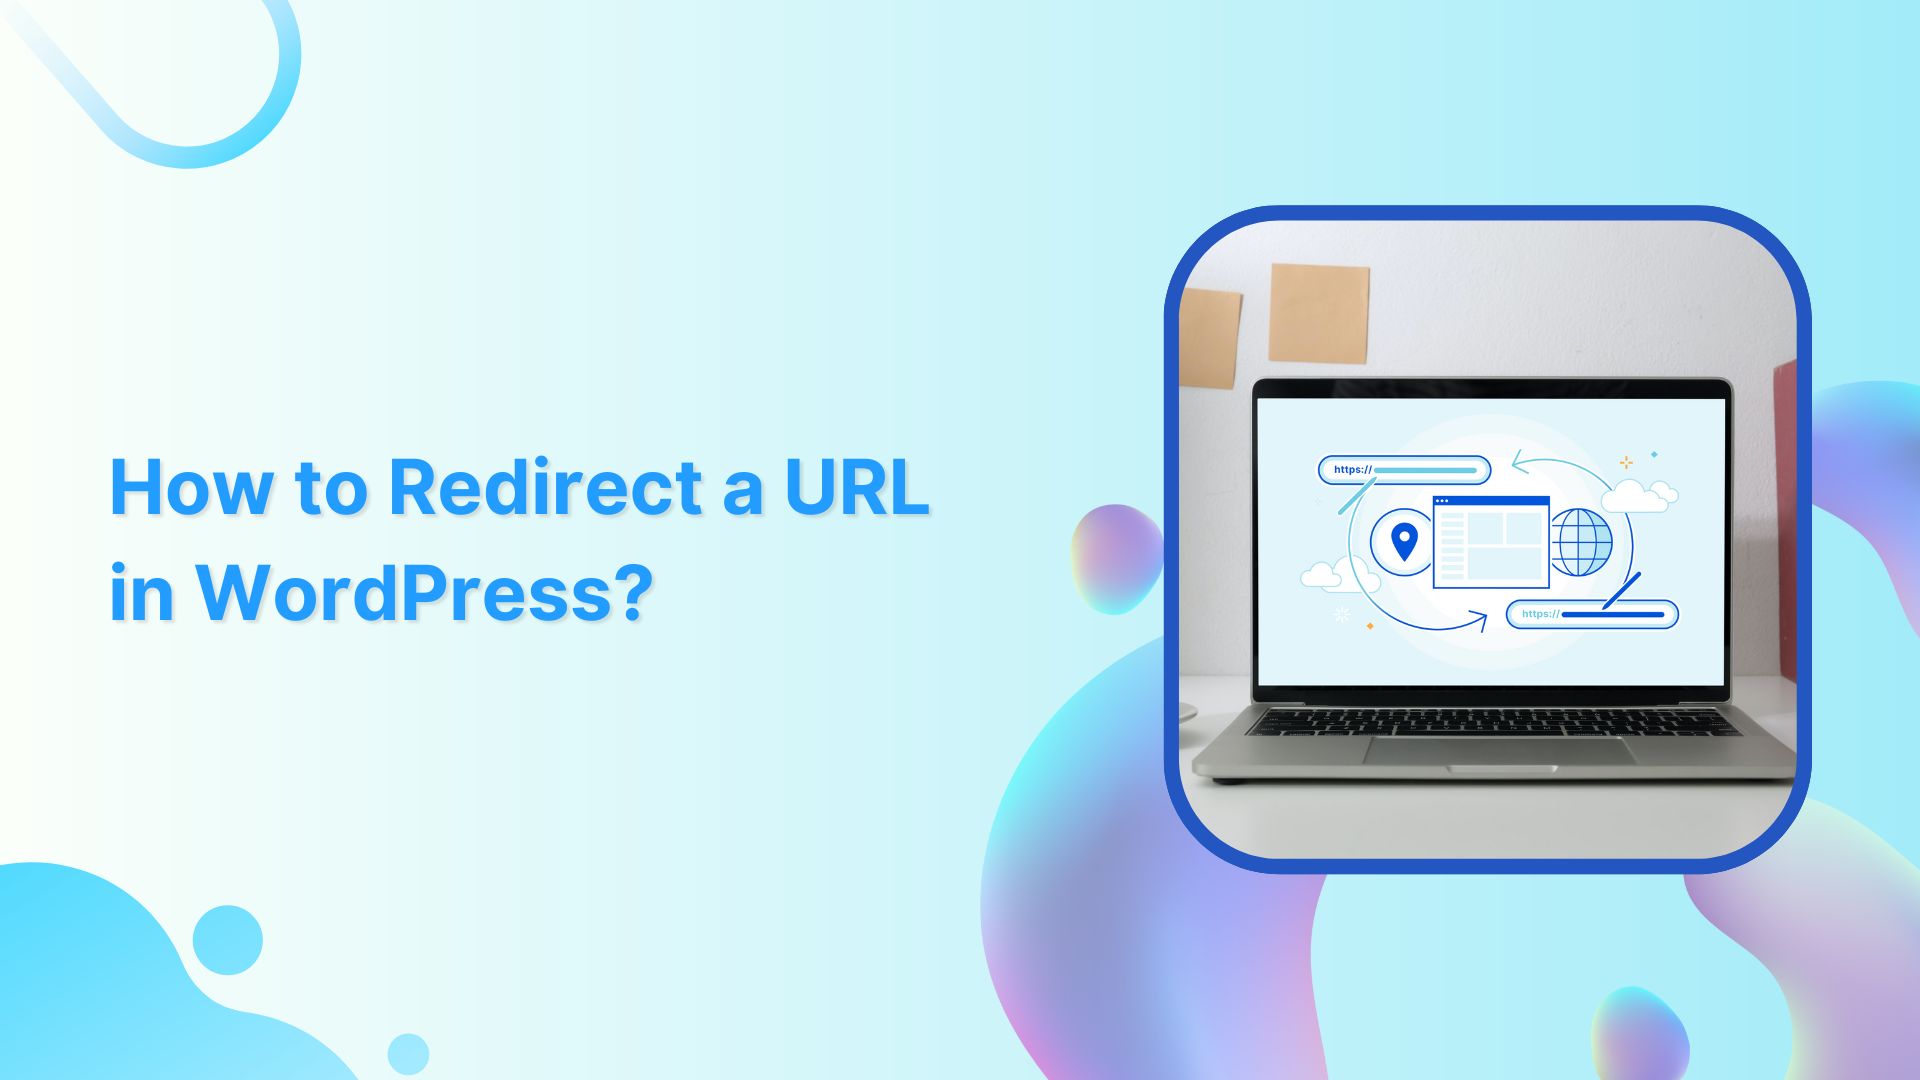
Are you tired of encountering dead ends and frustrating error messages while browsing the web? Well, get ready to bid farewell to those exasperating moments because we have a game-changer for you: URL redirection. It’s like having your very own digital GPS that ensures every click you make leads you straight to your desired online destination.
In this guide, we’re going to unravel the mysteries of URL redirection and make it crystal clear why it’s a must-know concept for anyone navigating the digital realm. No jargon, no complicated technicalities – just straightforward explanations and practical tips that will empower you to redirect URLs like a pro.
Ready? Let’s dive in and discover how to redirect a URL in WordPress!
What is URL Redirection?
URL redirection, also known as URL forwarding, is the process of directing a user from one web address (URL) to another. It is a technique used to ensure that when a user clicks on a specific URL, they are automatically redirected to a different URL, typically to a new location or destination.
URL redirection serves multiple purposes in the digital landscape. It allows website owners to manage changes such as rebranding, domain changes, or restructuring their website’s content without breaking existing links or causing inconvenience to users. It also helps to maintain search engine rankings by preserving the authority and relevance associated with the original URL.
Types of URL redirects
There are two primary types of URL redirection:
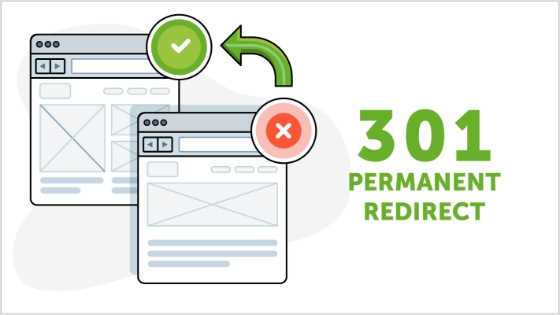
Permanent redirect (HTTP 301)
This type of redirect indicates that the original URL has moved permanently to a new location. It informs search engines and web browsers that the new URL should be considered the main and preferred address for the content. Permanent redirects are commonly used for situations like domain changes or when merging multiple web pages into a single page.
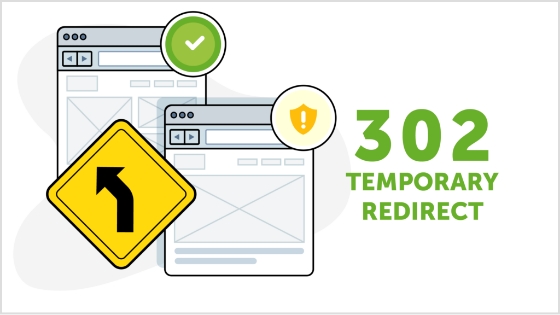
Temporary redirects are used when the original URL is only temporarily unavailable or has moved to a different location for a short period. It instructs web browsers and search engines to visit the new URL temporarily, while still recognizing the original URL. Temporary redirects are often used during website maintenance or when testing new pages before making them permanent.
Other unusual redirects include:
Besides the commonly used permanent redirect (HTTP 301) and temporary redirect (HTTP 302), there are a few other types of redirects that serve specific purposes. These include:
303 see other
This redirect is similar to the temporary redirect (HTTP 302) but has a specific meaning defined in the HTTP protocol. It indicates to the browser that the requested resource can be found at a different location, and the response to the redirected request should be a GET method.
307 temporary redirect
This is another type of temporary redirect, similar to HTTP 302. It indicates to the browser that the requested resource has temporarily moved to a different location. However, unlike HTTP 302, the browser should continue to use the same HTTP method (e.g., POST) for the redirected request.
308 permanent redirect
Similar to the permanent redirect (HTTP 301), the 308 status code indicates that the requested resource has permanently moved to a new location. The key difference is that the browser should use the same HTTP method (e.g., POST) for the redirected request, whereas HTTP 301 may convert a POST request to a GET request.
These additional redirect types (303, 307, and 308) have specific use cases and are less commonly utilized compared to HTTP 301 and HTTP 302 redirects. The choice of which redirect type to use depends on the specific requirements of your website and the desired behavior for the redirected requests.
How to redirect a URL in WordPress?
To redirect a URL in WordPress, you can use either a plugin or modify the .htaccess file. Here are two methods you can follow:
Method 1: Using a WordPress redirection plugin
Step 1: Install and activate a redirection plugin
Go to your WordPress dashboard, navigate to “Plugins” > “Add New,” and search for a redirection plugin such as “Redirection“ or “Yoast SEO“. Install and activate the plugin of your choice.
Step 2: Set up the redirect
Once the plugin is activated, go to the plugin’s settings or options page (usually located under “Tools” or “SEO” in the dashboard menu). Look for a section related to URL redirection or redirects.
Step 3: Add a new redirection rule
In the plugin’s settings, you should find an option to add a new redirection rule. Enter the old URL (source) and the new URL (target) where you want the redirect to point. Choose the appropriate redirect type (301 or 302) as needed.
Step 4: Save the redirection rule
After filling in the necessary details, save the redirection rule. The plugin will handle the redirection, and when someone accesses the old URL, they will be automatically redirected to the new URL you specified.
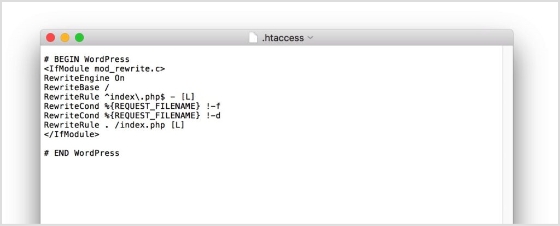
Connect to your website’s hosting account using FTP (File Transfer Protocol) or access the file manager in your WordPress hosting control panel.
Step 2: Backup the .htaccess file
Before making any changes, it’s important to create a backup of the existing .htaccess file in case anything goes wrong. Simply download a copy of the .htaccess file to your local computer.
Step 3: Edit the .htaccess file
Open the .htaccess file using a text editor. Add the following code at the beginning or end of the file, depending on your preference:
Replace “/old-url/” with the actual URL slug or path of the old URL you want to redirect, and “http://www.example.com/new-url” with the desired destination URL.
Step 4: Save and upload the modified .htaccess file
Save the changes to the .htaccess file and upload it back to the root directory of your WordPress installation, overwriting the existing file.
Step 5: Test the redirection
Visit the old URL in your web browser and verify that it correctly redirects to the new URL you specified. If the redirection is working as expected, you have successfully redirected the URL in WordPress.
Remember, modifying the .htaccess file requires caution, as any mistakes in the code can cause issues with your website. Make sure to double-check the changes and keep a backup of the original .htaccess file for safety purposes.
Why you should create a redirect?
There are several scenarios in which you may need to create a redirect. Here are some common situations where redirects are useful:
1. Rebranding or website restructuring
If you undergo a rebranding process or make significant changes to your website’s structure, you may need to redirect old URLs to their new equivalents. This ensures that users who access the old URLs are seamlessly directed to the updated content.
2. Changing domain names
When you change your website’s domain name, it’s essential to set up redirects from the old domain to the new one. This preserves your website’s traffic, and search engine rankings, and ensures that visitors who may have bookmarked or shared your old URLs are still able to access your content.
3. Handling outdated or expired content
When you remove or archive certain pages or posts on your website, you can create redirects to guide users to relevant and up-to-date content. This prevents visitors from encountering dead ends or 404 error pages and helps maintain a positive user experience.
4. Managing affiliate or marketing campaigns
If you’re running specific marketing campaigns or affiliate programs that involve unique URLs, you might need to create redirects to track and direct visitors to the intended landing pages. This allows you to monitor campaign performance and ensure visitors land at the correct destination.
5. Correcting broken or mistyped URLs
If you discover broken or mistyped URLs on your website, creating redirects can fix these issues. By redirecting the incorrect URLs to the correct ones, you can ensure a smooth browsing experience for your users and prevent them from encountering frustrating dead ends.
Remember, redirects are powerful tools that can help you maintain website functionality, improve user experience, and preserve SEO efforts. Whenever you make changes to your website that impact URLs, consider whether a redirect is necessary to ensure a seamless transition and to guide users and search engines to the right content.
In the vast realm of the internet, URL redirection is the key to unlocking seamless navigation and preserving your online presence.
And if you want to simplify your links further, making them more shareable, memorable and trackable, a good short url tool is worth adding to your toolkit.
By mastering the art of redirection, you can ensure a flawless user experience, maintain search engine rankings, and adapt to changes with ease.
Whether you’re rebranding, restructuring, or simply seeking to enhance your website’s performance, redirecting URLs is your secret weapon.
If you’re looking for a full-service solution that combines redirects, analytics and team collaboration, you might consider a dedicated link management platform for your entire domain and marketing workflow.
So, embrace the power of redirection, navigate the digital landscape with confidence, and watch as your online presence soars to new heights. Get ready to redirect your way to success!
FAQs
What is the difference between a permanent redirect (HTTP 301) and a temporary redirect (HTTP 302)?
A permanent redirect (HTTP 301) informs search engines and browsers that the original URL has permanently moved to a new location. A temporary redirect (HTTP 302) indicates a temporary move or change. It’s important to choose the appropriate type depending on the situation.
How can URL redirection impact my website’s search engine rankings?
URL redirection can impact search engine rankings by preserving the authority and relevance associated with the original URL. If implemented correctly, redirects can transfer link equity and prevent loss of traffic and rankings when URLs change or move.
Can I implement URL redirection without a plugin?
Yes, you can implement URL redirection without a plugin by modifying the .htaccess file on your server. This method allows you to set up server-side redirects using rules defined in the .htaccess file.
Are there any SEO best practices to consider when setting up URL redirects?
Yes, when setting up URL redirects, it’s important to ensure that the redirect is a one-to-one mapping from the old URL to the new URL. Additionally, update internal links and notify relevant parties to update their references. Monitor and maintain redirects to address any issues promptly.
How do I test if my URL redirection is working correctly?
To test URL redirection, simply access the old URL and verify that you are automatically redirected to the new URL. Test on different devices and browsers to ensure compatibility and functionality.
What should I do if I encounter redirect loops or broken redirects?
If you encounter redirect loops or broken redirects, review your redirect configurations and ensure they are set up correctly. Check for any circular redirections or incorrect rules. Make necessary corrections and retest the redirects.
Is it possible to redirect multiple URLs at once?
Yes, it is possible to redirect multiple URLs at once. In WordPress, you can use a plugin that supports bulk or wildcard redirects. Alternatively, with server-side redirects, you can set up rules in the .htaccess file to redirect multiple URLs simultaneously.
In WordPress, permalinks play a crucial role in defining the structure of your website’s URLs. Changing the permalink structure can improve your site’s search engine optimization (SEO) and make your links more user-friendly.
If you want a tool that helps you brand, shorten, and track those URLs or links across your marketing efforts, Replug.io is a very strong choice.
This guide will walk you through the process of changing permalinks in WordPress by providing step-by-step instructions.
Let’s dive in!
Here’s how to change Permalink in WordPress
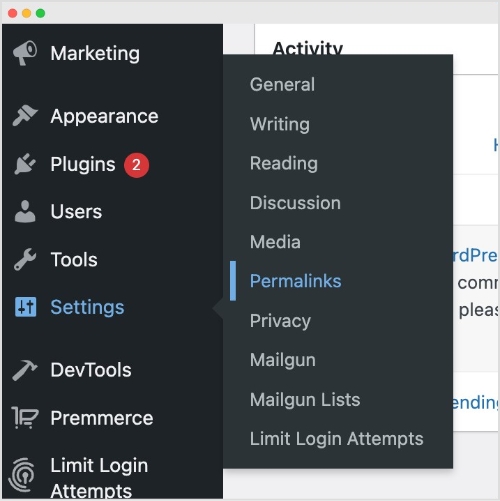
Step 1: Log in to your WordPress admin dashboard
To begin, log in to your WordPress admin dashboard using your credentials. Once logged in, you’ll have access to the necessary settings to modify your permalink structure.
Step 2: Access Permalink settings
From the left-hand menu, locate and click on “Settings,” and then select “Permalinks.” This action will take you to the Permalink Settings page, where you can customize your Permalink structure.
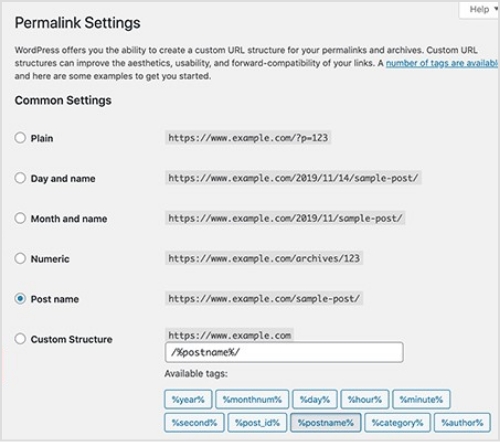
Step 3: Choose a common Permalink structure or create a custom one
On the Permalink Settings page, you’ll find various pre-defined options for permalink structures, including plain, day and name, month and name, numeric, post name, and more. Select the one that best suits your needs. If you prefer a custom permalink structure, proceed to Step 4.
Step 4: Create a custom Permalink structure (optional)
If you want a custom permalink structure, select the “Custom Structure” option on the Permalink Settings page. This will reveal a text field where you can enter your desired permalink structure using tags. Utilize tags like %year%, %monthnum%, %day%, %post_id%, %postname%, %category%, %author%, and %pagename% to craft a unique permalink structure.
Step 5: Save changes
After selecting a common or custom permalink structure, click on the “Save Changes” button located at the bottom of the Permalink Settings page. By doing so, your new permalink settings will be saved, and WordPress will automatically update the URLs accordingly.
Note: Once you’ve updated your permalinks, it’s smart to run your links through a reliable link shortener. This way, you can create clean, branded URLs and also track how often they’re clicked without any hassle!
Frequently asked questions
What is a Permalink?
A permalink, short for “permanent link,” is a URL (Uniform Resource Locator) that points to a specific web page or post on a website. It is called a “permanent” link because it is intended to remain unchanged and accessible over time, even if the content of the page or post is updated or moved.
Will changing my permalink structure affect my website’s SEO?
Yes, changing the permalink structure can impact your SEO. It’s advisable to set up redirects or use a plugin to manage redirects in order to preserve the SEO value of your URLs and prevent broken links.
Can I change the permalink structure for existing posts and pages?
Yes, when you modify the permalink structure, it will apply to all new posts and pages you create. However, for existing content, the URLs will change, which may result in broken links. Implementing redirects can help mitigate this issue.
What if I change my mind after modifying the permalink structure?
WordPress allows you to revert to your previous permalink structure. Simply revisit the Permalink Settings page, choose the desired structure, and save the changes. However, keep in mind that this will once again alter the URLs of your posts and pages.
Are there any performance implications of changing the permalink structure?
Generally, changing the permalink structure itself doesn’t have a significant impact on website performance. However, if you have a large number of posts or pages, updating the URLs may require additional server resources during the redirect process.
Can I localize my permalinks for different languages?
Yes, if you have a multilingual website, you can utilize plugins like WPML or Polylang to set up language-specific permalink structures. These plugins enable you to create separate URLs for different language versions of your content.
Facebook is among the most popular social media platforms that billions of people use worldwide. Its vast collection of videos has become a go-to source for entertainment, information, and education.
However, users may want to download Facebook videos for offline viewing, sharing with friends, or reposting on other platforms.
In this context, downloading Facebook videos can be helpful for those who want to save their favorite videos, access them without an internet connection, or keep a backup copy.
But, it’s essential to remember that downloading videos without the owner’s consent violates copyright laws and Facebook’s terms of service.Therefore, respecting the creator’s rights and using downloaded videos ethically and responsibly is crucial.
If you often work with social media links or share content regularly across platforms, Replug can streamline your workflow, helping you manage and organize URLs alongside your video-sharing activities seamlessly!
How to download Facebook videos on a mobile device?
There are several ways to download Facebook videos on a mobile device. Here’s how:
Step 1: Log in to Facebook from your mobile phone.
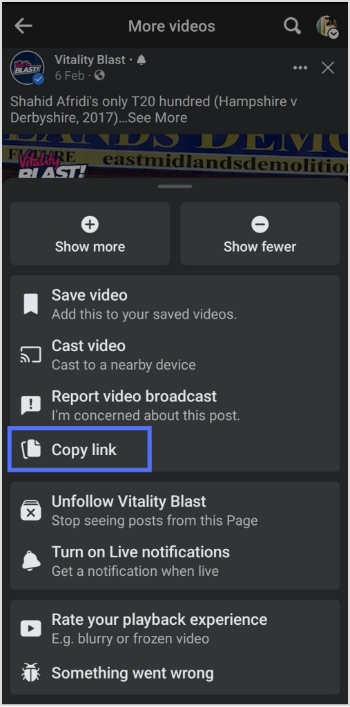
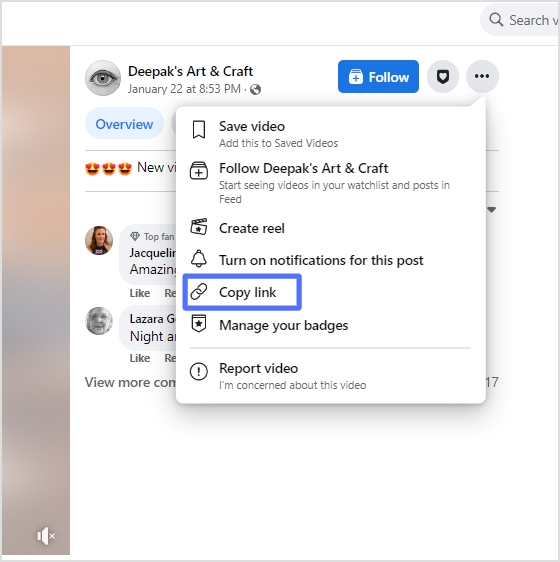
Step 2:Play the video you want to download and tap “3 dots” in the upper right corner of the video.
Step 3: Tap “copy link”.
Note: Before pasting the URL/link into a downloader or sharing it elsewhere, you could optionally use a custom URL shortener. That way the link stays clean, easy to share, and more manageable if you need to store or revisit it later.
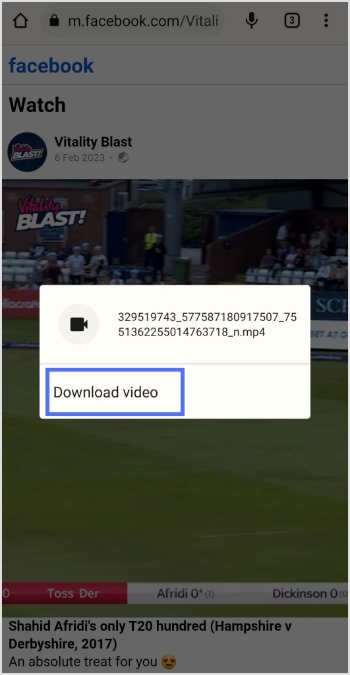
Step 4: Open Chrome on your mobile device. Paste the link in the search bar to open the video in Chrome.
Step 5: Play the video and long-tap on it.
Step 6: Tap “download video,” and your video will be downloaded.
Maximize marketing ROI
by transforming ordinary URLs into branded short links that convert.
Try Replug for free
How to download Facebook videos on a computer device?
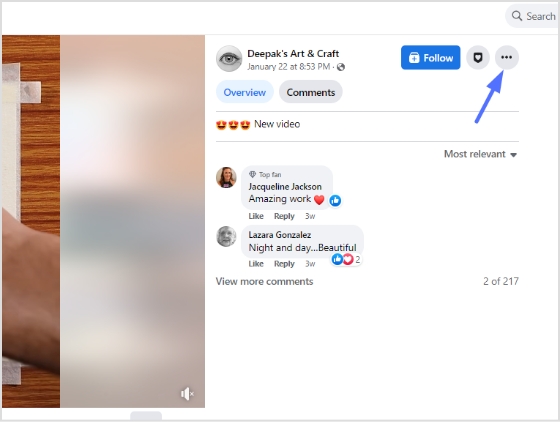
Step 1: Log in to Facebook on a computer using a browser.
Step 2: Open the video you want to download and click “3 dots” on the upper right side of the video.
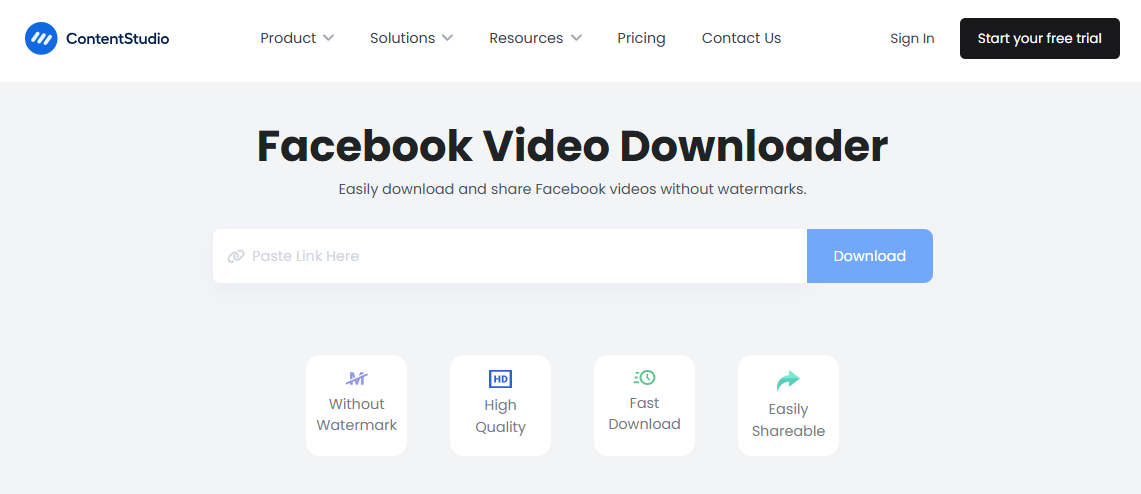
Step 5: Open a facebook Video Downloader online tool from the search results, paste the video link, click the download button, and select the preferred quality. Your video will be downloaded within a few moments.
To download Reels videos from Facebook, you can use the following method:
Open the Facebook app and find the Reels video you want to download.
Tap on the Reels video to open it in full screen.
Tap on the three dots in the bottom right corner of the screen.
Select “Save Video” or “Save Reel” from the options.
The Reels video will be saved to your device’s camera roll or gallery.
If the “Save Video” or “Save Reel” option is not available, it may be because the creator has disabled the option to save their videos. For a case like this, you can download Facebook reels with FvDownloader, an online option for saving Facebook reels for offline use.
However, downloading videos without the owner’s consent violates copyright laws and Facebook’s terms of service. Therefore, using downloaded videos ethically and responsibly is essential, respecting the creator’s rights.
Frequently asked questions
Is it legal to download Facebook videos?
It depends on the copyright laws of your country and Facebook’s terms of service. Downloading videos without the owner’s consent is generally considered a violation of copyright laws, and Facebook’s terms of service prohibit the downloading of videos without permission.
Can I download live videos from Facebook?
Live videos cannot be downloaded directly from Facebook, but some third-party tools can help you record and download live videos from Facebook.
How do I download private Facebook videos?
Private Facebook videos cannot be downloaded unless you can access the video or the owner’s permission. If you have access to the video, you can use the same methods as downloading public videos. You can try contacting the owner to request permission if you don’t have access.
Is there any app to download Facebook videos on iOS devices?
Yes, several apps, such as “Video Downloader for Facebook” or “MyMedia,” can be used to download Facebook videos on iOS devices.
Can I download Facebook videos in high quality?
Yes, some video downloader apps and websites allow you to download videos of high quality. However, remember that higher-quality videos take up more space on your device.
Are you an avid TikTok user and want to share your content with your Instagram followers? Do you wish to showcase your TikTok creations to a broader audience?
If you regularly share content across social platforms and want an easy way to manage, track, and organize all your shared links and posts, Replug offers a unified dashboard to manage everything in one place.
In this guide, we’ll show you how to post TikTok videos on Instagram, so you can double up your social media reach and get more eyes on your entertaining content.
So, get ready to learn the ropes and become a social media sensation!
Here’s how to share TikTok videos on Instagram:
TikTok has become a popular platform for creating and sharing short-form videos. But, if you want to share your TikTok content with your Instagram followers, you might be wondering how to do it. The good news is that it’s relatively easy to post TikTok videos on Instagram, and you can share them in various formats such as feeds, stories, and reels.
Plus, if you need a handy tool to download your TikTok videos for Instagram, consider using a TikTok video downloader to streamline the process.
How to post TikTok to your Instagram feed?
To post a TikTok video on your Instagram feed, follow these steps:
Step 1: Open the TikTok app and find the video you want to share.
Step 2: Tap on the “3 dots” or “share” icon located on the right side of the screen.
Step 3: Tap on the “Instagram” option.
Note: Before sharing or embedding the video link elsewhere, like in bios, descriptions, or other social media, you can use a trusted URL shortener to produce neat, brand-friendly URLs that look clean and are easy to manage.
Step 4: Choose to post the video to your Instagram feed.
Step 5: Edit the video as desired, add filters, captions, or other adjustments, and then tap “Next.”
Step 6: Tap “share” and your video will be shared on your Instagram feed.
How to post a TikTok to Instagram stories?
To post a TikTok video on your Instagram stories, follow these steps:
Step 1: Open the TikTok app and find the video you want to share.
Step 2: Tap on the “Share” or “3-dots” icon located on the right side of the screen.
Step 3: Tap on the “Instagram” option.
Step 4: Choose to post the video to your Instagram story.
Step 5: Edit the video as desired, add filters, captions, or other adjustments, and share.
To post a TikTok video on your Instagram reels, follow these steps:
Step 1: Open the TikTok app and find the video you want to share.
Step 2: Tap on the “Share” icon located on the right side of the screen.
Step 3: Tap on the “Save video” option to save the video to your device.
Step 4: Open the Instagram app and tap on the “Reels” option.
Step 5: Select the video you want to share from your device’s camera roll, add filters or other adjustments, and then tap “Share.”
And there you have it! Now you know how to post TikTok videos on Instagram, whether it’s for your feed, stories, or reels. So, go ahead and share your creative TikTok content with your Instagram followers and watch your social media presence grow!
FAQs
Can I post TikTok videos directly to Instagram?
No, you cannot post TikTok videos directly to Instagram. You need to save the TikTok video to your device first and then upload it to Instagram.
Will my TikTok video lose quality when I upload it to Instagram?
It’s possible that your TikTok video may lose some quality when you upload it to Instagram due to differences in compression and resolution. To minimize quality loss, try to save the TikTok video in the highest possible solution and choose the best Instagram video settings for your device.
Can I automate the process of sharing TikTok videos on Instagram?
While there is no direct way to automatically share TikTok videos to Instagram, you can use third-party apps or tools like Content Studio to automate the process to some extent. However, monitoring the results and making any necessary adjustments is important to ensure your content is shared accurately and effectively.
QR code is the bridge between your online and offline marketing efforts. Nurturing your consumers through the marketing funnel by giving them the correct information at the right time is the key to a successful influencer marketing campaign
Technology is meant to complement traditional print marketing and advertising instead of replacing it. The most successful and engaging marketing campaigns have one thing in common: integrating digital marketing approaches with conventional advertising.
What is QR Code?
QR are 2D barcodes that are scanned through smartphone devices through cameras or their QR code scanning capability.
The strategic use and placement of QR codes with access to the updated and relevant information can be the most significant asset.
Why does QR code marketing matter?
The QR codes were used by a Toyota subsidiary named Denso in 1994. They helped in tracking the vehicle parts and streamline the manufacturing process.
This allowed the fast-decoding process and thus called Quick Response Code.
Back when it was introduced, there was a minimum number of people leveraging this technology. With a tiny number of use-cases, marketers predicted the QR code trend not to last too long.
Fast forward to 2020; the pandemic catapulted the QR code adoption not because of its versatility but for the fact that it was a safe, hygienic and cost-effective solution.
Not just that, it also gave an option to collect data from the traditional marketing campaigns.
Is QR code marketing here to stay?
According to Bank My Cell, there are 6.648 billion smartphone users globally, which means 83.40% of the world population owns a smartphone.
With the growing rate of QR code adoption, they can help increase brand awareness, increase sales and enhance customer engagement with the brand.
Modern way to create QR codes is through URL shorteners. Tools like Replug (i.e., an all-in-one link optimization platform) and other allows users to create custom shortened URLs without needing to know anything about HTML.
If you’re just getting started and want a free tool to manage and shorten your links, check out this free link shortener.
When sharing these shortened links, users just need to scan the link with their smartphone camera. You can easily shorten a link and then create a QR code pointing to it, all in a few clicks. This method is great because no technical skills are required.
How can you use QR codes for your marketing goals?
Increase social media following:
Social media presence for any business is no longer an option. It’s a necessity. You can use QR codes on the products for your marketing material to direct users to your social media pages like Facebook, Instagram.
This is a great way to maximize reach on social media networks. You can also ask them for a review of your product or tag them in the user-generated content with your product.
Get app downloads:
If used strategically, QR code marketing can be one of the fastest ways to increase app downloads and drive users into the mobile app marketing funnel. Burger King used them during 2020 MTV VMAs to let viewers download the Burger King app. These ads encouraged the viewers to scan the codes to download the app and avail various discounts.
Drive more traffic to your website:
You can use the QR code to direct viewers to a page or website with detailed information. The information not covered in the print ad, such as product description, pricing list, dates and time, the procedure to place an order, can be communicated via the code. The luxury brand, Burberry, introduced sustainable labeling where they outlined the product attributes through this.
QR codes can be used on marketing materials from billboards, print ads and business cards to direct users to webpages. This helps marketers to build email lists by asking users to sign up to avail certain offers.
You can improve the user experience by offering them valuable and necessary information in the QR code—for example, an instructional video to set up the product or printable sheet or link to the recipe on food products.
QR codes can be strategically used for lead generation according to the kind of business. For example, a real estate agency had to sell a large office building. They used these to generate and track leads.
You can use QR codes for establishing product transparency through product packaging. This will help you to win your customer’s trust. It will increase the customer’s loyalty and engagement which is why they are more likely will stick to the brand.
With the vCard QR code, you can share your contact details such as email, work address, phone details, location etc., with your customers. The dynamic one gives you the freedom to edit the information many times without reprinting the code.
With the flexibility to embed multiple content formats into QR codes, brands have attracted customers with personalized shopping experiences. JC Penny on Christmas released “Santa tags”. The idea was to allow the giver to record a personalized message played when the recipient scans the code.
Increase post purchase engagement:
Avail the opportunity to engage your customer after the purchase. QR codes for rating and review pages are the one way to go about it. You can also link these to discount coupons for their future purchases, so they continue shopping with you. The Amazon QR codes drive repeat purchases and thus increasing the website traffic.
According to writers block hive, 86% of people said they trust online reviews as much as they believe in word of mouth. You can use a QR code to ask for product reviews and build the customer’s trust by providing them with the information they are looking for.
With the pandemic, restaurants looked for safe and hygienic options for their customers. From menus to payments, restaurants used QR codes to design a contactless experience for their customers.
QR code menus lower the printing price and are also more convenient to update about the availability of items, price, details etc., without reprinting.
One cannot deny the effectiveness of OOH advertising. According to Dash Two’s study, 71% of consumers said digital billboards are more appealing than online ads. Pairing the billboard with a QR code strategically can drive consumers to take action and thus getting you data.
Walmart, during the 2020 holidays, when their sales are supposed to be high, didn’t observe the shoppers due to the covid-19 pandemic, they launched virtual billboards at places where they did not have brick and mortar stores.
These virtual stores allowed people to scan and buy the products on the spot from their online stores.
Visitors scan the code next to a painting, and they get a series of stories about the artwork, its history and the painter themselves.
The intriguing stories about war, deception, insanity, love and romance added to the experience of the museum visitors.
4- Recycling:
PepsiCo used an integrated hydration platform with QR codes in their soda stream style dispenser. For single-use plastic, PepsiCo used an integrated hydration platform. Other companies are embracing this innovation as well. Waste Direct, a leading waste disposal and recycling service in the UK, is leveraging QR codes to simplify waste management for convenient waste collection scheduling and more.
The users can bring their bottles to fill them with still or carbonated options. Thus, replacing the vending machine with dispensers that use QR code stickers. The system was launched in schools and offices, but it was later expanded into public places.
Add a call for action next to your QR code: A QR code is like the door opening into the experience your customer wants to have. But if there is no sign on the door, nobody will enter. A compelling call to action is therefore necessary.
QR code Placement: Make sure your QR code is strategically placed in a well visible place where your target user can notice it and quickly scan it. It should be set against a bright background to increase its readability.
Brand your QR code: Make sure the QR code reflects your brand identity. Branding is an essential part of it as well to generate more scans. Make them more attractive by customising them with brand colours and logos. Source
Mind QR code proportion: While using it on the marketing material or packaging, make sure not to distort the ratio since it can make the scanning difficult.
Minimize the number of QR codes: If there are multiple QR codes on the package or your print ad, it’ll confuse the audience, and thus you’ll miss the opportunity. Ideally, you should go with one goal per QR code, but if you want to give them a holistic view of your product, then you should create a universal link and direct them to the information they are looking for.
Use interactive landing pages: When linking your QR code to the video, file or landing page, make the content accessible on a smartphone and mobile-friendly.
High-quality QR code: Make sure you use a high-quality QR code with well-maintained whitespace so it is easy to read and scan.
Track data: Once your QR code marketing goes live, keep track of data. This data will tell you about your best performing and underperforming campaigns, and you can optimise them accordingly.
Benefits of dynamic QR code:
Editable: You can edit your dynamic QR code’s content at any time, allowing you to print your active QR codes, and you can still change the content at any time.
Data tracking: You can track data of your dynamic QR code addresses, contact numbers, and names; you can follow the number of scans, time of a scan, location of the scan and even people used it to scan it.
Cost-effective: A QR code generator is very cost-effective, and some platforms even offer it for free
Choosing a QR code generator:
Making the right choice of a QR code generator is the prerequisite of leveraging QR code marketing for your business. There are unlimited free QR code generators available, but make sure to choose with:
The accurate data tracking feature
Cost-effective with unlimited scans
High-resolution printable QR codes
Excellent documentation
Excellent customer support service
Frequently Asked Questions:
What are the data points you can get from QR codes?
QR codes are easy to use and are a great tool to analyse users’ click behaviour. They offer multiple data points such as time of the scan, location of the scan, times it has been scanned etc. With the right messaging and strategy, you can ask your users for email addresses, contact numbers and names.
Is there any expiration date for QR codes?
Some QR code generators offer a limited period or a limited number of scans. Once that is over, your QR code expires. However, some QR codes provide a lifetime of free access, and there is no limit on time or number of scans. In this case, you only have to make sure the URL is not broken.
How can we use QR codes in marketing?
QR codes are one of the most widely used tools for marketing by brands and businesses of all sizes. You can use QR code for: – Directing customers to your website – Getting App downloads – Share the business and contact details with potential clients – Share the address and location – Building email lists – Encouraging customers to leave a review – Engaging the customers for post-purchase – Personalized marketing tools the marketing – Sending prompted SMS and emails – Access AR for marketing
How to promote QR codes for your business?
There are various ways in which you can promote QR codes: – Include QR codes on the packaging – Include QR codes on marketing material both online and offline – Include QR codes in email signatures – Include QR codes on your business cards – Stick QR codes on tables, doors and signage where it can grab customer’s attention