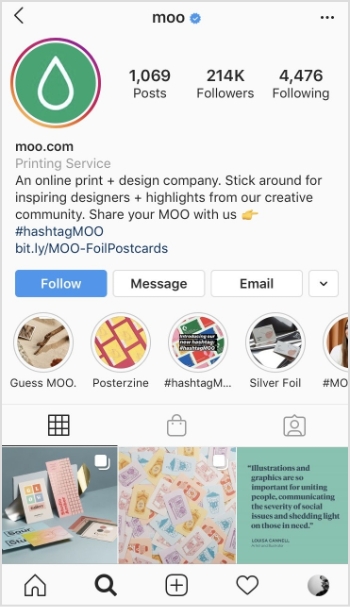
If you’re looking to promote your Instagram profile and boost your online presence, adding your Instagram link to your Facebook bio can be a highly effective strategy. By doing so, you can reach a broader audience and potentially attract more followers, which can help you take your social media game to the next level.
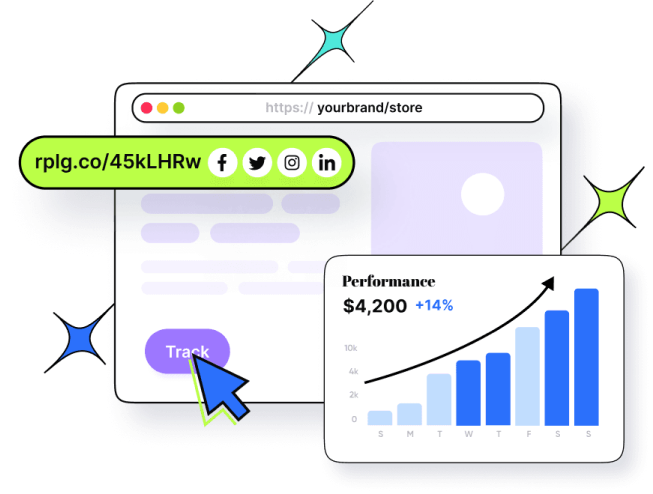
For creators and marketers who care about link performance, Replug.io lets you brand, shorten, and track your shared URLs so every click tells a story.
In this guide, we’ll explore the steps involved in adding an Instagram link to your Facebook bio on both computer and mobile devices, as well as some tips on how to make the most of this “bio links” feature.
How to add Instagram link to Facebook bio on a mobile device?
Here’s a step-by-step guide on how to add your Instagram link to your Facebook bio on a mobile device:
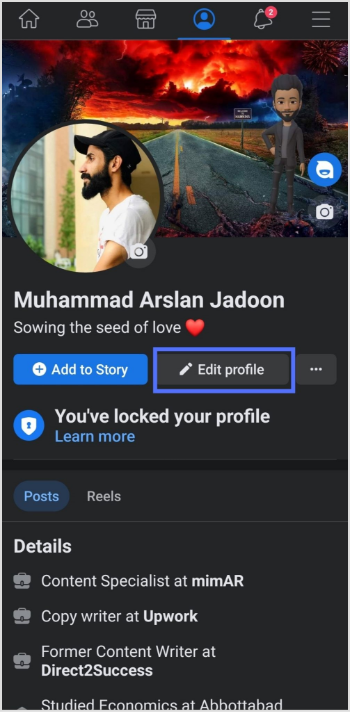
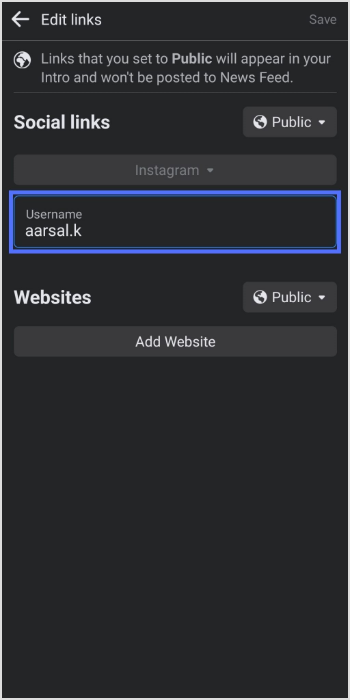
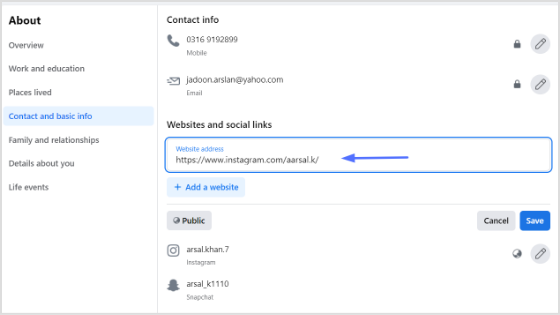
Step 1: Open the Facebook app on your mobile and tap your profile icon.
Step 2: Tap the “edit profile” button.
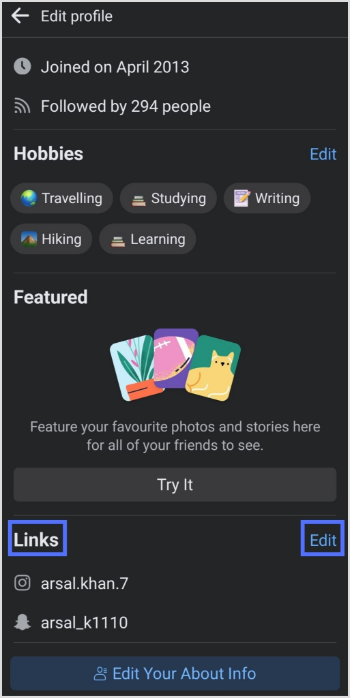
Step 3: In the edit profile section, scroll down to the “links” section and tap “edit”.
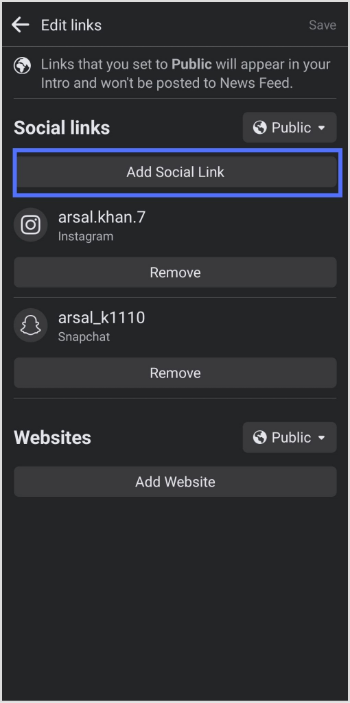
Step 4: Tap the “add social link” button.
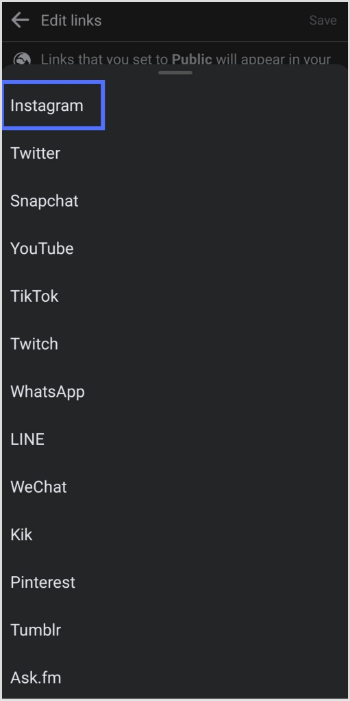
Step 5: Tap the “platform” button and choose Instagram from the list.
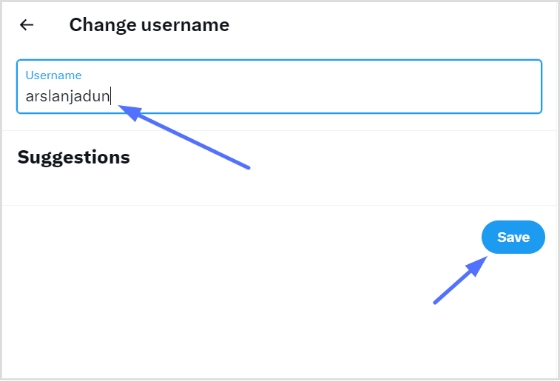
Step 6: Enter your Instagram account “user name” and tap save.
Why can’t I see my Instagram link in my Facebook bio?
If you cannot see your Instagram link in your Facebook bio, make sure you have added it correctly by following the steps above. Also, check that your Instagram account is not set to private, as private accounts cannot be linked to Facebook bios.
Why is my Instagram link not clickable in my Facebook bio?
If your Instagram link is not clickable in your Facebook bio, it may be because you have not entered the link correctly, or your Instagram account may be set to private.
A/B testing, also known as split testing, is a technique used by marketers and web developers to compare two or more variations of a website or marketing campaign to determine which version performs better.
In A/B testing, traffic is split between the different variations, and the results are measured to see which version has a higher conversion rate, click-through rate, or other key performance indicators. By using data to make informed decisions, A/B testing can help improve the effectiveness of websites, email campaigns, ads, and other marketing efforts.
However, to get the most out of your A/B testing efforts, it’s important to have a clear and organized approach. One way to achieve this is by using a URL management tool. By using shortened URLs, you can easily track clicks and engagement rates for each variation, and make data-driven decisions about which version to roll out to your audience.
In this guide, we’ll walk you through the process of A/B testing step by step, while incorporating a URL shortener tool to streamline your testing efforts. Let’s get started!
How to do AB testing using a link management tool?
Replug is a great choice as an A/B testing tool for anyone looking. Along with effective A/B testing, this all-in-one link management platform offers advanced features such as link customization and analytics, retargeting, deep linking and call-to-action overlays, which can help boost your conversions even further.
Plus, with easy integration with popular tools like Google Analytics and social media platforms, Replug can be seamlessly integrated into your existing marketing stack.
Step 1: Sign in to Replug or create an account for free.
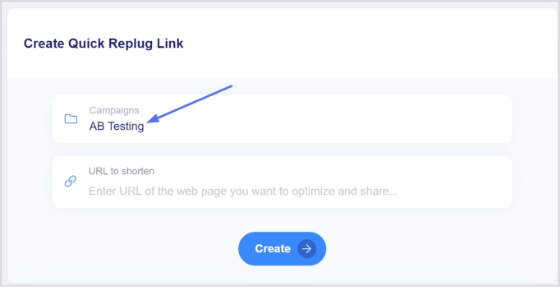
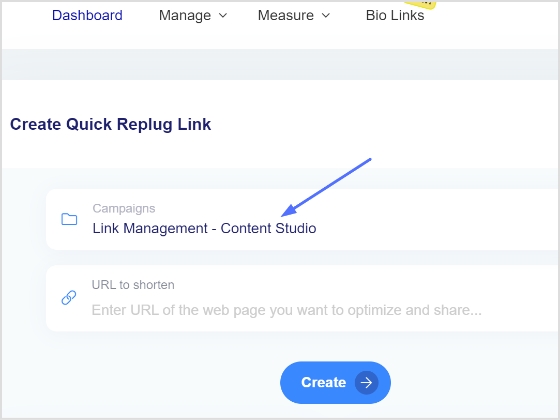
Step 2: On the main dashboard click “select your campaign” under “create quick Replug link” to choose a campaign name.
Note: If you are new to Replug you need to create a campaign name first. To do so, go to “Manage” and click “campaigns” then “new campaign.”
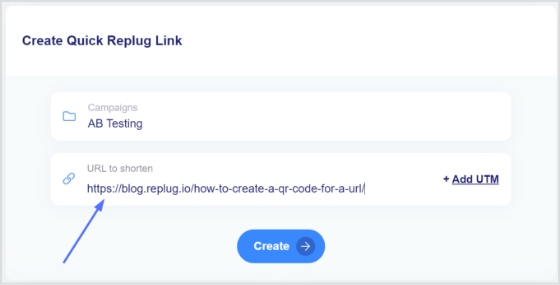
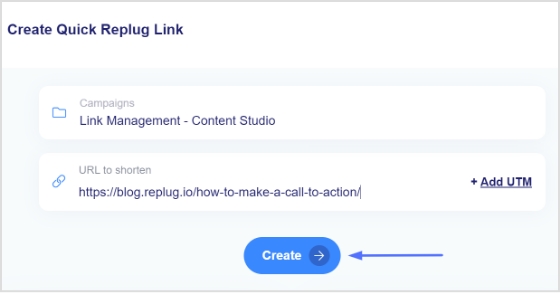
Step 3: Once created or selected a campaign, paste the original link on which you want to perform the AB test in the “URL to shorten” section under the “select your campaign” section.
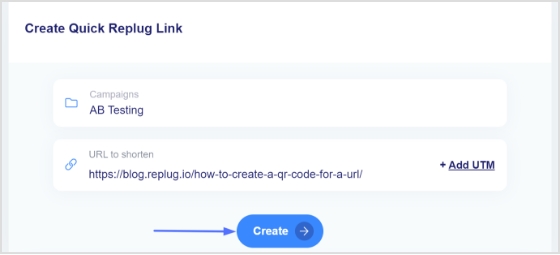
Step 4: Click create to first create a shortened version of your link.
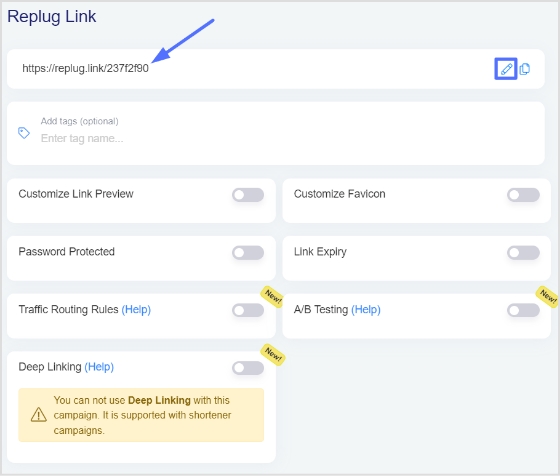
Step 5: Click the edit icon to customize your link.
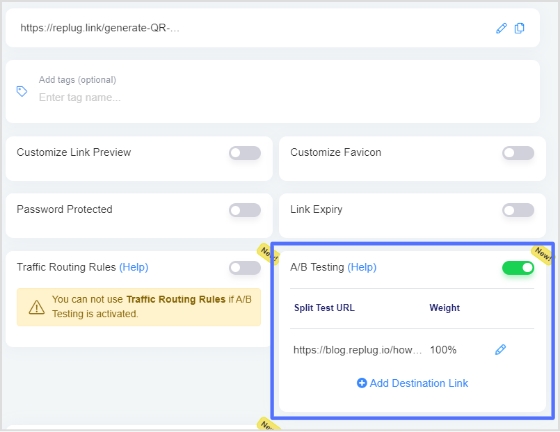
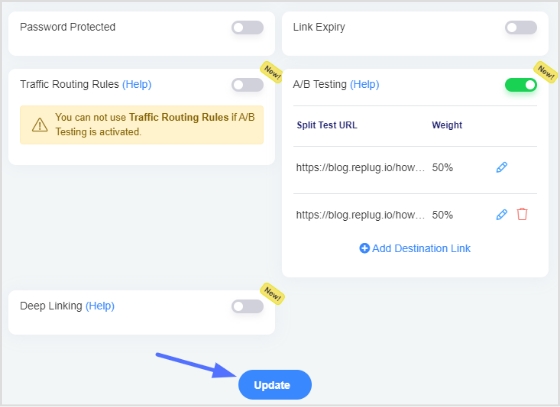
Step 6: To enable A/B Testing, toggle the AB testing slider button before saving your link. Doing so will automatically set your destination URL as the first A/B Testing link with 100% weightage.
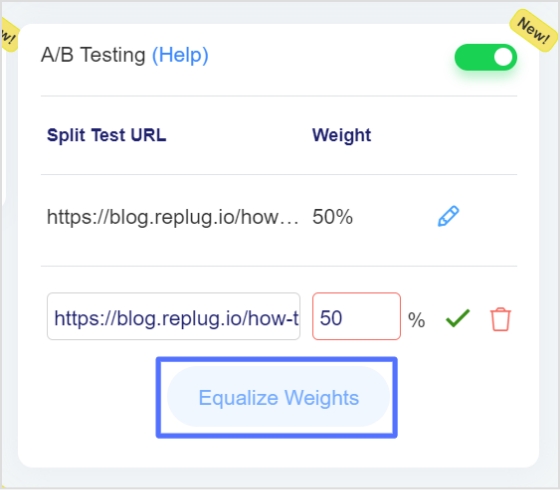
To add more URLs, simply click on the “Add Destination Link” button.
The Weightage does not depend on the previous visits or clicks and also does not strictly constrained.
The final destination URL is selected based on the defined weightage every time the short link is.
Link cannot be saved in A/B Testing if the campaign type is CTA and the mentioned link does not allow Iframe (In order to display a web page inside another website, we make use of the iFrame. The source website must allow showing their website content in an iframe. If the source website doesn’t allow an iframe header, Replug shows a warning while creating CTA Campaigns)
How can A/B testing help me improve my marketing campaigns?
A/B testing allows you to test and optimize different versions of your marketing campaigns to find out what works best for your audience. This can help you improve click-through rates, and conversions, and ultimately drive more revenue or leads.
How is the final destination URL selected in A/B testing?
The final destination URL is selected based on the defined weightage every time the short link is clicked. This ensures that each URL gets a fair chance of being clicked and the A/B testing results are accurate.
Does the weightage in A/B testing depend on previous visits or clicks?
No, the weightage in A/B testing is not dependent on previous visits or clicks. Instead, you can allocate different weightage to each URL, ensuring that the total weightage adds up to 100%.
Can I allocate different weightage to each URL in A/B testing?
Yes, you can allocate different weightage to each URL in A/B testing, ensuring that the total weightage adds up to 100%. This allows you to test multiple versions of your content and find out what works best for your audience.
How do I interpret the results of my A/B testing in Replug?
You can view the results of your A/B testing campaigns in Replug’s dashboard, which shows you the click-through rates and conversions for each URL. This can help you determine which version of your content is more effective and make data-driven decisions.
How often should I run A/B testing on my links and campaigns?
The frequency of A/B testing depends on your goals and the amount of traffic you receive. As a general rule, it’s a good idea to test your campaigns regularly and make adjustments based on the results.
In today’s digital age, social media platforms have become a powerful tool for individuals and businesses to connect with their audience and grow their online presence.
Instagram and Facebook are two of the most popular social media platforms, with millions of users worldwide. While both platforms are distinct and have unique features, linking your Instagram account to Facebook can provide numerous benefits, including cross-promotion, increased visibility, efficiency, and access to insights.
Let’s discuss how to link Instagram to Facebook and why you want to do so.
How to link Instagram to Facebook?
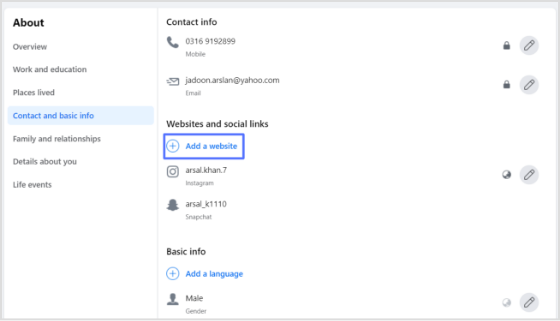
When you link your Instagram account to Facebook, you can take advantage of the integration of the accounts centre. The accounts centre is a feature that allows you to manage your connected accounts in one place, including Instagram and Facebook. Adding your Instagram account to your duplicate accounts centre as your Facebook account allows you to easily share your Instagram content directly with Facebook.
Here’s how to link your Instagram to Facebook via the accounts center:
On a mobile phone:
Step 1: Open the Instagram app on your mobile device.
Step 2: Go to your profile by tapping the profile icon at the bottom right corner of the screen.
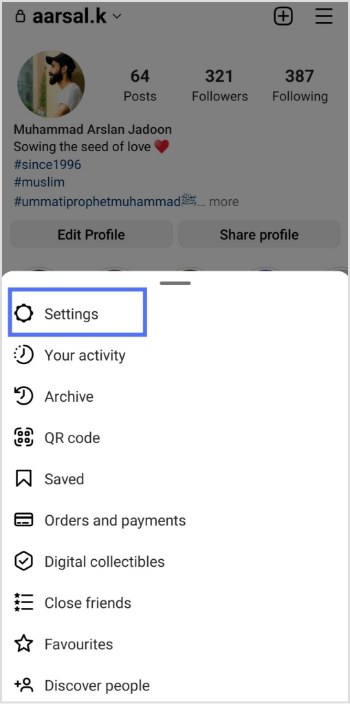
Step 3: Tap the three horizontal lines at the top right corner of the screen to access the options menu.
Step 4: Tap on Settings on your mobile screen.
Maximize marketing ROI
by transforming ordinary URLs into branded short links that convert.
Try Replug for free
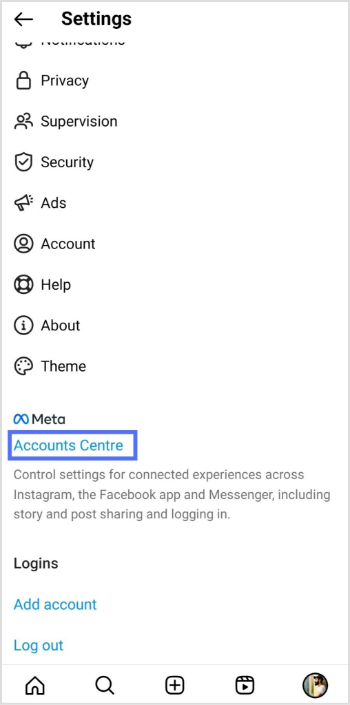
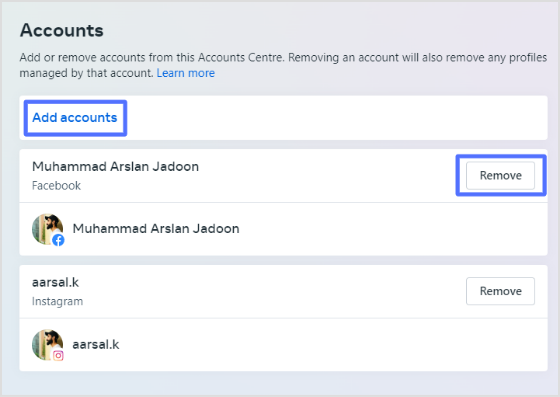
Step 5: Scroll down and tap on the accounts centre.
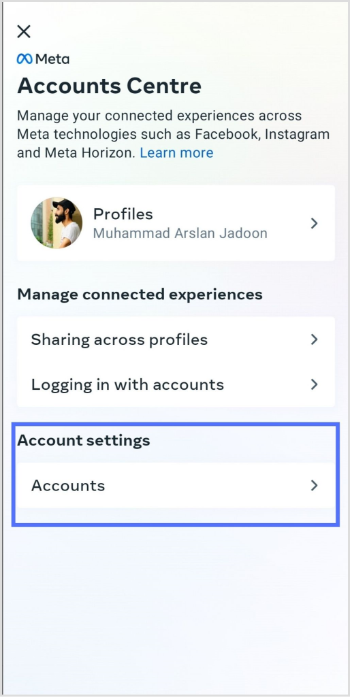
Step 6: Tap on accounts under account settings.
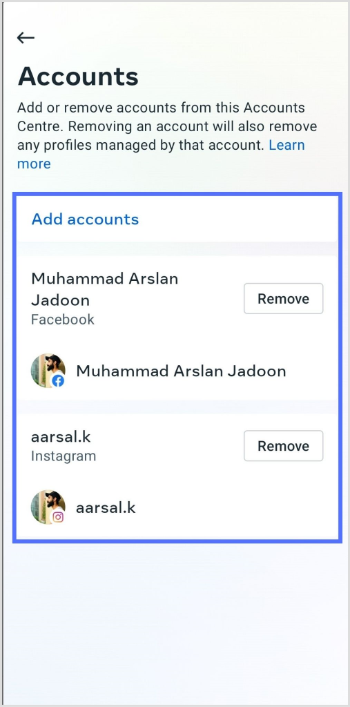
Step 7: Here, you can add or remove an account. Also, you can add multiple Facebook and Instagram accounts. Tap add account and follow the instructions.
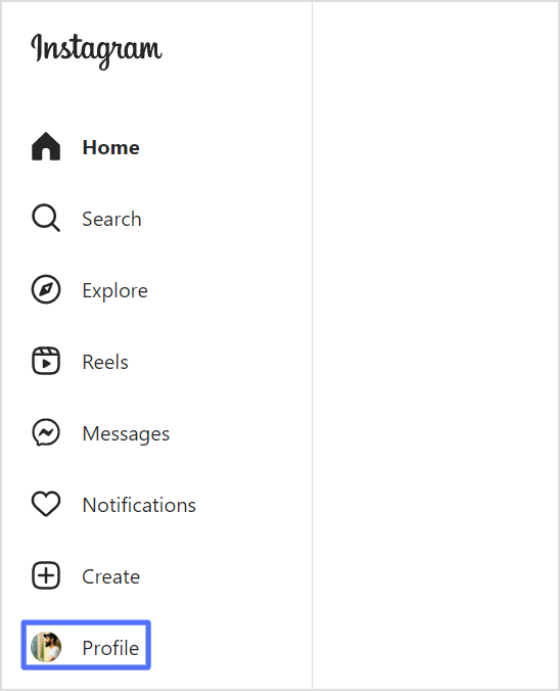
Step 1:Log in to Instagram from your computer device.
Step 2: Go to your profile by clicking the profile at the bottom of the left-side menu.
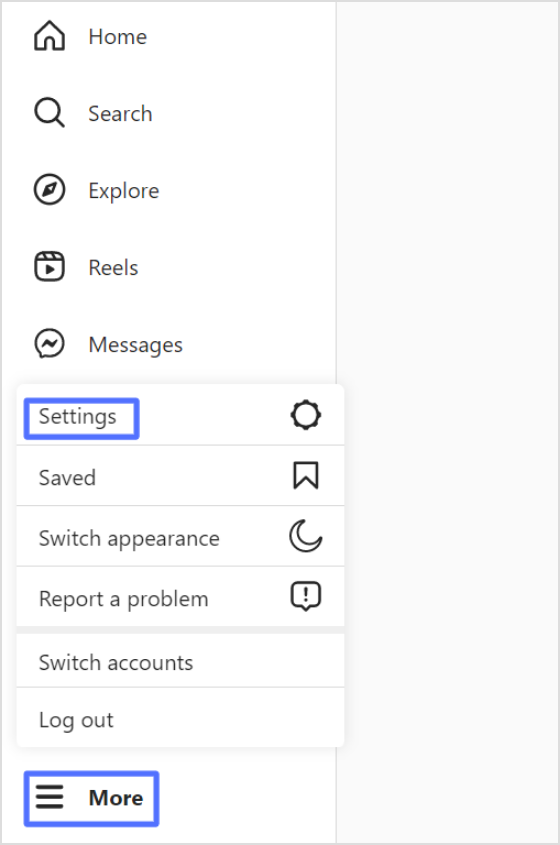
Step 3: Click on more with three horizontal lines at the left bottom side, then click setting.
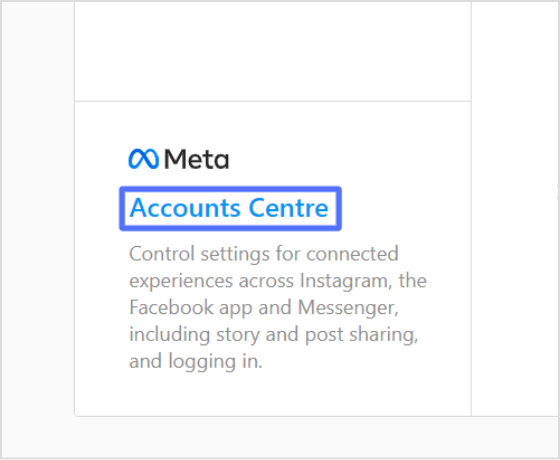
Step 4: Scroll down on your profile section and click accounts centre.
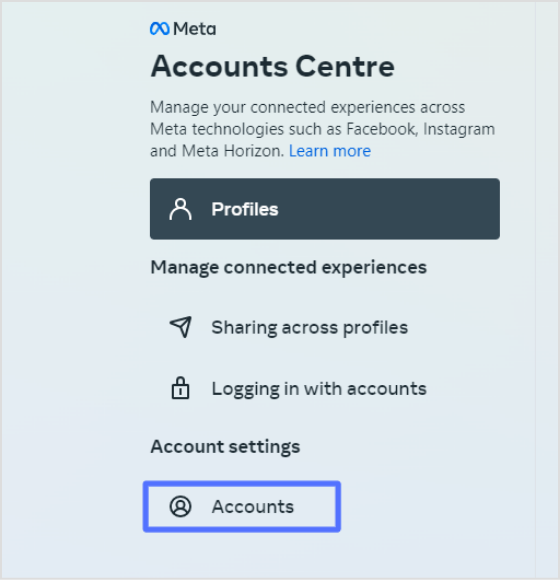
Step 5: Now, click on accounts.
Step 6: You can add or remove an account in the account section. Add an account by clicking on add accounts and following the instructions.
Important note:
Linking your Instagram account to Facebook and using the Accounts Centre is an effective way to streamline your social media marketing efforts and improve your online presence.
By adding your Instagram account to the same Accounts Centre as your Facebook account, you can easily manage your connected accounts in one place and share content, such as stories and posts, directly from Instagram to Facebook. This can save you time and effort while helping you reach a wider audience and gain new followers and engagement on both platforms.
Integrating Instagram and Facebook through the Accounts Centre is a valuable tool for individuals and businesses looking to improve their social media presence and expand their reach.
Also, keep one thing in mind that if you’re managing multiple social profiles and sharing links across platforms, posts, stories, or ads, a dedicated link management platform can help you organize and track all your URLs from one place, hassle-free. And when you share links, whether to your profile, or external content, using a branded short URL makes it a trustworthy option for your audience and quite easier to remember!
Why should I link my Instagram account to my Facebook page?
Linking your Instagram account to your Facebook page allows you to cross-promote your content and reach a wider audience. You can also manage both accounts from a single location, making sharing content and tracking your analytics easier.
Can I link multiple Instagram accounts to a single Facebook page?
Yes, you can link multiple Instagram accounts to a single Facebook page. To do this, repeat the linking process for each Instagram account you want to connect.
Link tracking is essential for businesses looking to improve their marketing efforts and understand their audience’s engagement. By monitoring clicks on specific links within a marketing campaign, businesses can gather valuable data and make informed decisions that lead to increased conversions and a better return on investment.
For example, imagine a business has created a landing page, an email marketing campaign, or a newsletter to promote its product or service. These marketing efforts require links that redirect the audience to the offered product or service. To ensure the success of future marketing communications and interactions, the business needs to know which links are being clicked by the audience.
This information is valuable for businesses as it reveals engagement statistics and helps evaluate the marketing campaign’s success. By tracking clicks on specific links, businesses can gather data on the number of clicks, the location of clicks, and the time of clicks, which can then be used to improve future marketing efforts and increase conversions.
A tracking URL is a hyperlink that tracks clicks on a specific link. It usually contains additional parameters and codes used by tracking software to track the clicks’ source, location, and behavior. The information collected through tracking URLs can be used for various purposes, such as website analytics, marketing campaigns, and conversion tracking.
How do tracking links work?
Tracking links work by redirecting clicks from the original link to a tracking link that contains additional parameters. When a user clicks on the tracking link, the tracking software records the information about the click, such as the source, location, and behavior of the user.
The tracking software then sends the user to the original link while keeping a record of the information gathered through the tracking link. This information can then be analyzed to improve marketing strategies, track conversions, and gather insights into user behavior. The tracking process is typically transparent to the user and occurs in the background without affecting the user experience.
Instagram is one of the most popular social media platforms in the world. It has over 1 billion users and is used by people of all ages. With so many people using it, it can be a great way to build a following and grow your brand. But how do you get followers on Instagram fast?
In this article, we’ll discuss how to get followers on Instagram quickly and easily.
How to Grow Your Instagram Following?
It’s no secret that Instagram is a great platform to build a following and promote your business. But it can also be a difficult platform to crack, especially if you’re just starting.
The good news is that you can use simple strategies to quickly and easily grow your Instagram following. By following these tips, you can get more followers on Instagram and start to see the results you want.
Now that you know the benefits of growing your following on Instagram, let’s look at some tips and strategies to get more followers quickly.
Tip 1: Optimize Your Profile
Optimizing your profile is the first step to getting more followers on Instagram. Your profile is your first impression and needs to be attractive and engaging. Choose a profile picture representing your brand or personality, and use a clear and concise bio explaining who you are and what you do. Make sure your bio includes relevant keywords that people might be searching for.
Posting high-quality content consistently is crucial to gain more followers on Instagram. Create a content strategy and stick to it. Plan out what you want to post, when you want to post it, and how you want to present it. Your content should be visually appealing, informative, and engaging. Use captions to provide context or tell a story that complements the visual content.
Tip 3: Use the Right Hashtags
Hashtags are an excellent way to increase your reach on Instagram. Use relevant and popular hashtags related to your content, niche, or industry. Research the most popular hashtags in your industry and use them in your posts. Don’t overuse hashtags, as they may make your post appear spammy. Use up to 30 hashtags per post for the best results.
Maximize marketing ROI
by transforming ordinary URLs into branded short links that convert.
Try Replug for free
Tip 4: Engage with your followers
Engagement is essential if you want to gain more followers on Instagram. Respond to comments, like and comment on other people’s posts, and participate in Instagram challenges and trends. Show your followers that you care about them and value their opinions. This can help build a loyal following and attract more people to your account.
Collaborating with other accounts can help you gain more followers on Instagram. Find other accounts in your niche or industry and reach out to them. You can collaborate on a post, a giveaway, or an Instagram Live session. This can help you reach a new audience and gain new followers. For brands, using influencer marketing platforms can make collaborations easier by connecting you with the right creators who align with your audience and goals.
Tip 6: Run Instagram Ads
Running Instagram ads is a great way to reach a larger audience and gain more followers. Instagram ads can target specific demographics, interests, and behaviors, making it easier to reach the right audience. You can run ads that promote your account or a specific post, which can help you gain more followers and increase engagement.
Tip 7: Host giveaways
Hosting giveaways is a popular way to gain more followers on Instagram. You can create a giveaway that requires people to follow your account, like your post, and tag their friends. This can help increase engagement and attract new followers. Ensure the giveaway is relevant to your brand or niche and provides value to your followers.
Tip 8: Use Bio Links
Another effective way to grow on Instagram is by using bio links. Instagram allows you to add one clickable link to your bio, which you can use to promote your website, blog, or product. Here’s how you can make the most of your bio link:
Use a link shortener: To make your bio link more memorable and clickable, use a custom link shortener. This will also help you track clicks and analyze the performance of your bio link. Consider Replug, as it is an all-in-one link management platform offering notable features at hand.
Change your link frequently: Changing your bio link frequently can encourage your followers to check your profile regularly. You can use your bio link to promote your latest blog post, a new product, or a current promotion. By changing your bio link often, you can keep your followers engaged and interested in what you offer.
Use a call-to-action: Use a call-to-action in your bio to encourage your followers to click on your link. For example, you can write “Shop now,” “Get your free guide,” or “Join our community” to entice your followers to click on your bio link.
Use a landing page: Using a bio link, use a page relevant to your content or promotion. The landing page should be visually appealing, easy to navigate and provide value to your followers. This can help increase the chances of your followers converting into customers or subscribers.
Final thoughts
It takes time, effort, and consistency to grow on Instagram. You can attract a more influential and engaged audience by optimizing your profile, posting high-quality content, using hashtags, engaging with your followers, collaborating with other accounts, running Instagram ads, and using bio links. Remember to be authentic and genuine and provide value to your followers. You can grow your Instagram following and achieve your goals with the right strategy and mindset.
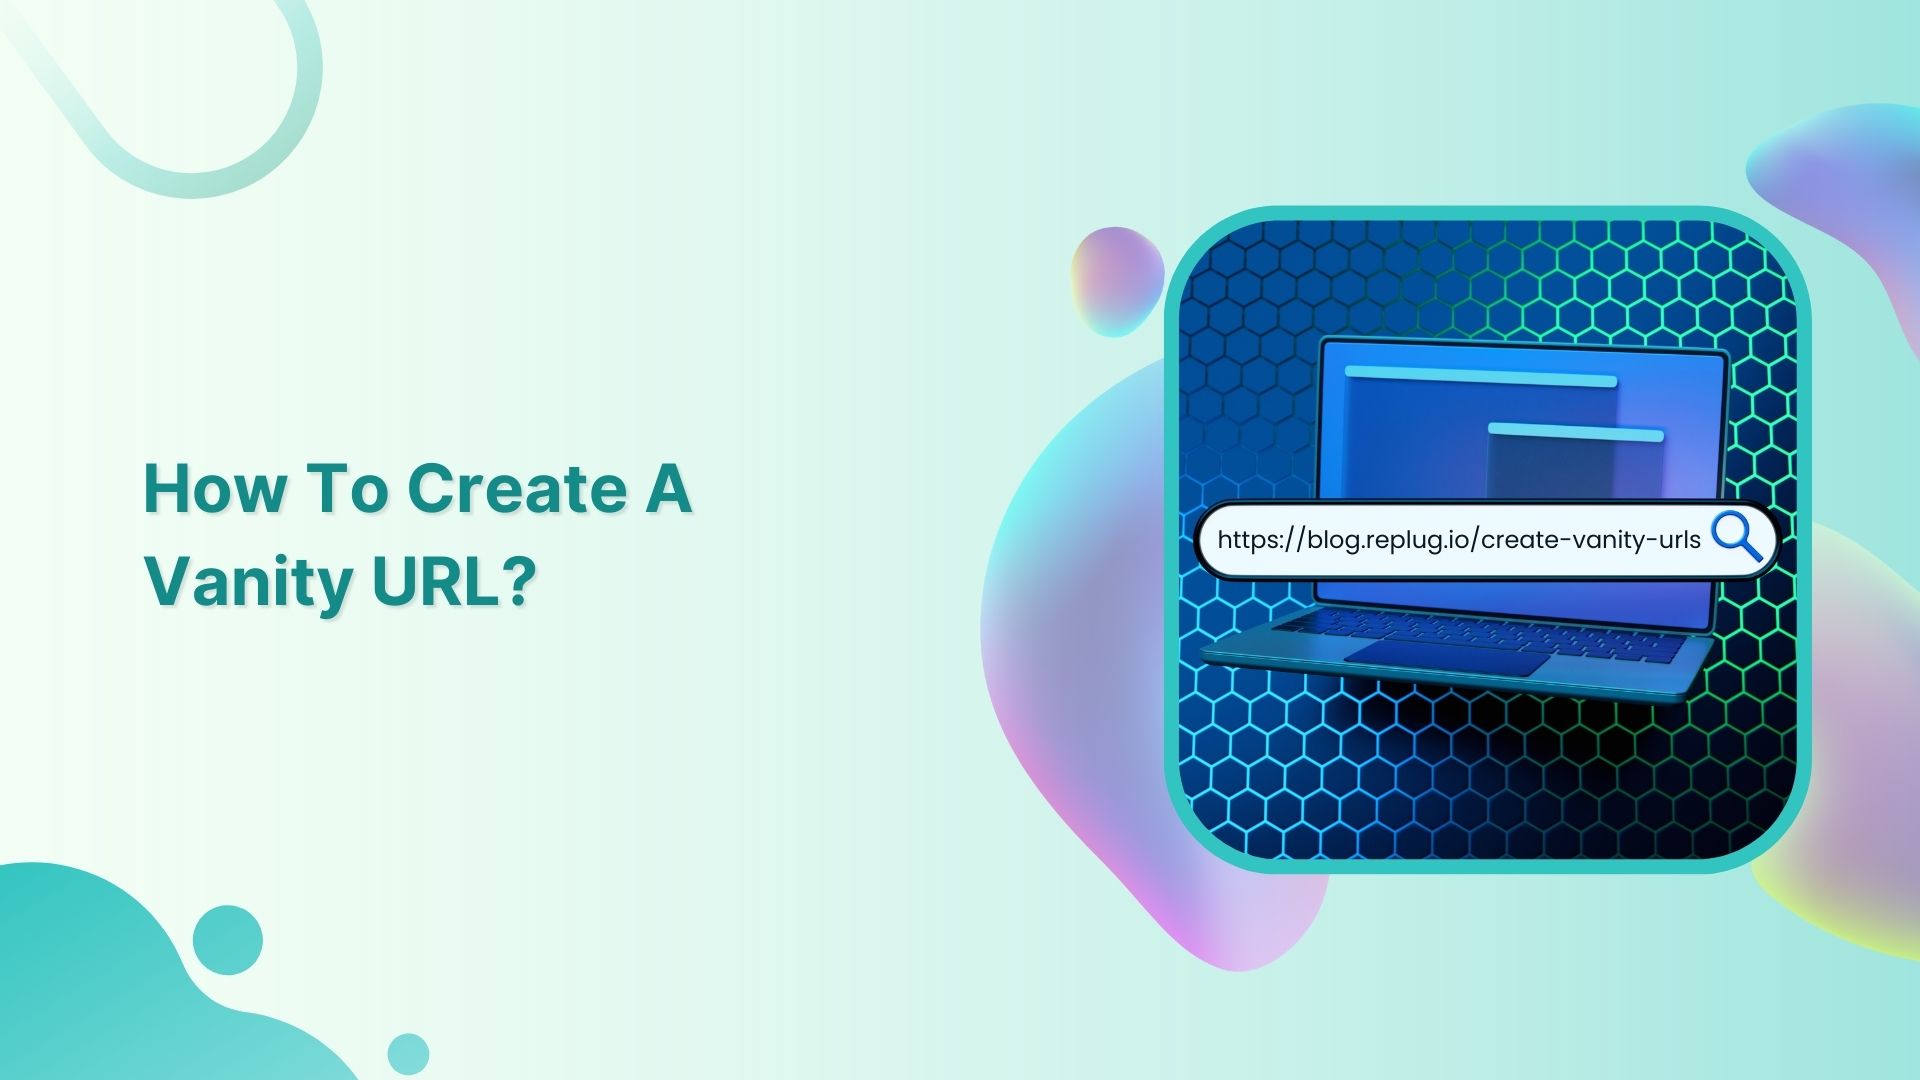
Vanity URLs are a valuable tool for branding, marketing, and tracking efforts and can help to improve the overall user experience.
This quick guide will teach you how to create a vanity URL in just a few simple steps and explain what making a vanity URL entails.
Let’s begin!
Vanity URLs: how do you set them up?
Creating a vanity URL can make it easier to remember a web address and can also build brand consistency. To create a vanity URL, you can either use a link management tool or a content management system (CMS).
A link management tool is a standalone platform that specializes in creating custom short links. You simply enter the long URL you want to shorten, and the URL shortenertool generates a vanity URL within seconds.
A CMS, on the other hand, is a platform used to manage the content of a website. Some CMSs’ have built-in redirect functionality, but others may require a redirect plugin to create a vanity URL. To use a CMS to create a vanity URL, you would set up a redirect from the custom short link to the longer, original URL.
In either case, a vanity URL can be easily shared and is a useful tool for branding and marketing.
Vanity URLs can be tracked and measured, enabling businesses to gain a deeper understanding of their campaigns.
A link management tool can allow for the creation of multiple vanity URLs, making it easier to manage multiple campaigns and track their performance.
Boost your marketing with Replug’s vanity URL builder
By using Replug’s vanity URL builder, businesses can improve the efficiency and effectiveness of their marketing efforts, increase click-through rates, and drive more traffic to their website.
Here’s how you can create a vanity URL using Replug:
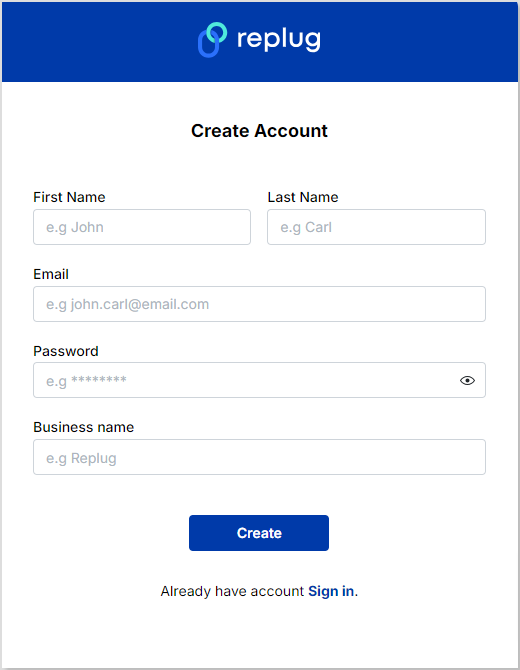
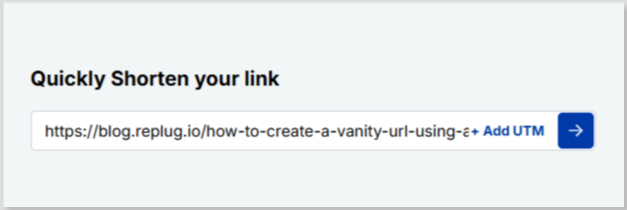
Step 1: Sign in to Replugor create an account for free.
Step 2:Once you’re on the main Replug dashboard, simply enter the long URL in the bar under “Quickly Shorten your link”:
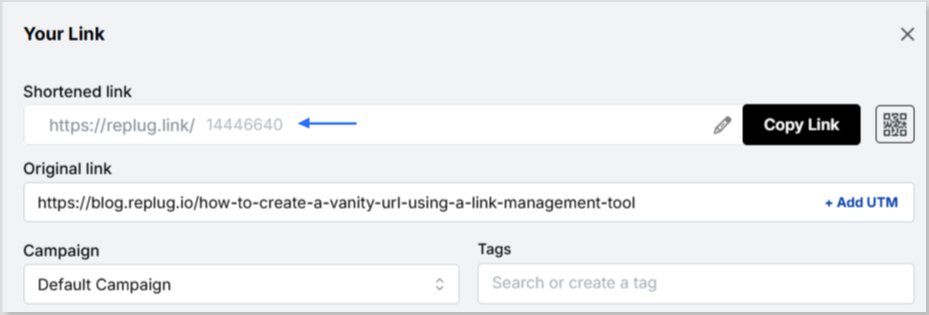
Step 3: Click on the blue arrow button to autogenerate your vanity URL using Replug:
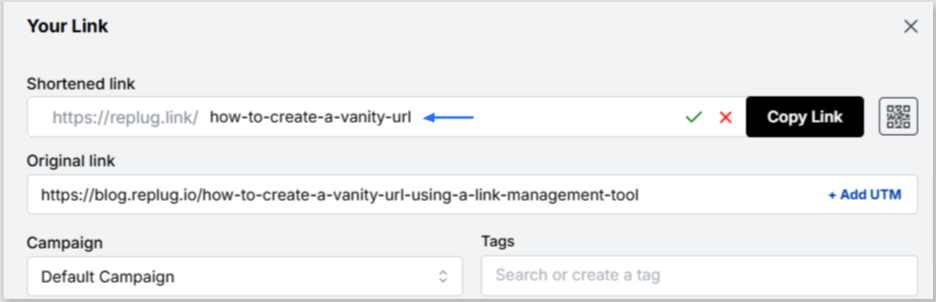
Step 4: Your vanity URL will be generated. You can customize the URL slug using the edit icon to fit your needs:
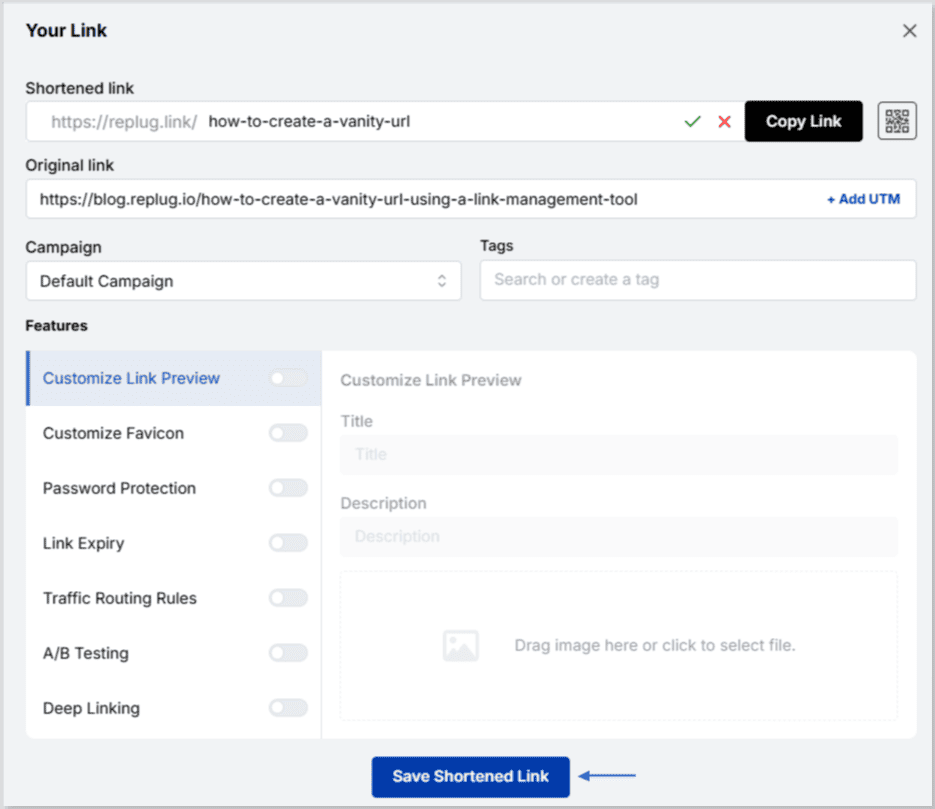
Step 5: Save and share your shortened, memorable link:
To make your vanity URL more clickable using Replug, follow these steps:
Choose a short and memorable vanity URL: The shorter the URL, the easier it will be for your audience to remember and click on it.
Use a relevant keyword: Use keywords relevant to the content behind the link so people know what they’re clicking on.
Use a recognizable brand name: If your brand has a recognizable name, use it in your vanity URL to build trust and make it more recognizable.
Create a custom domain: Replug allows you to create a custom domain for your short links, which can make your links look more professional and increase clicks.
Add a call-to-action (CTA): Adding a CTA to your vanity URL can encourage people to click on it. For example, “Click here to learn more” or “Get your discount now”.
Use UTM parameters: Utilize UTM parameters to track the performance of your links and make data-driven decisions about future link campaigns.
Test and iterate: Test your vanity URL and track its performance to see what’s working and what’s not. Make changes and improvements based on the data you collect.
Boost ROI with branded URLs!
Enhance your marketing campaigns by creating shareable, trackable, and fully multi-purpose
customizable branded URLs.
As a Twitter user, having a URL for your profile is helpful for several reasons.
First, you can share your URL with friends and gain new followers by promoting it on other social media platforms, including email, business cards, company pamphlets, or restaurant menus. The more your URL is shared, the more likely you attract new followers.
Second, you can include your URL in the social media sections on other websites, allowing you to embed links to other profiles. This can help you grow your following as people search for more of your content on different platforms.
Additionally, having a distinct and solid brand identity across all your social media accounts will help you attract and retain followers.
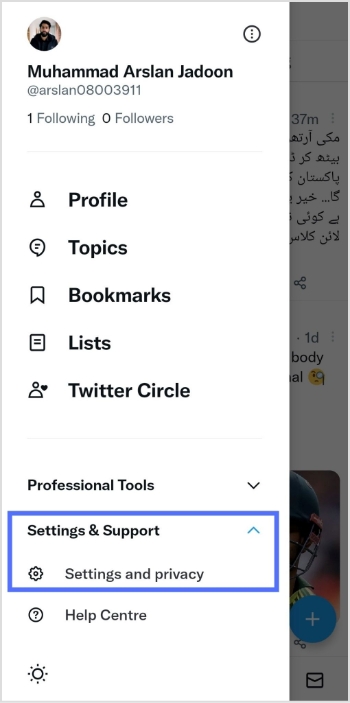
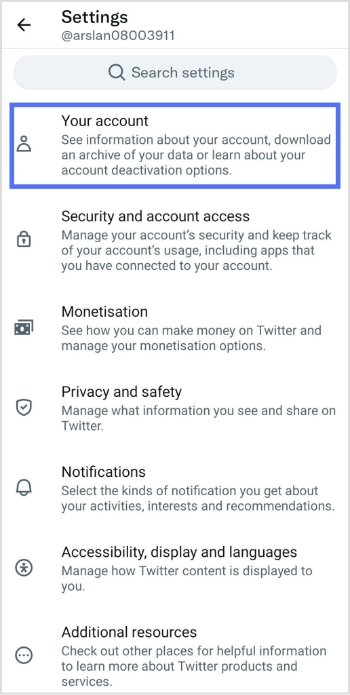
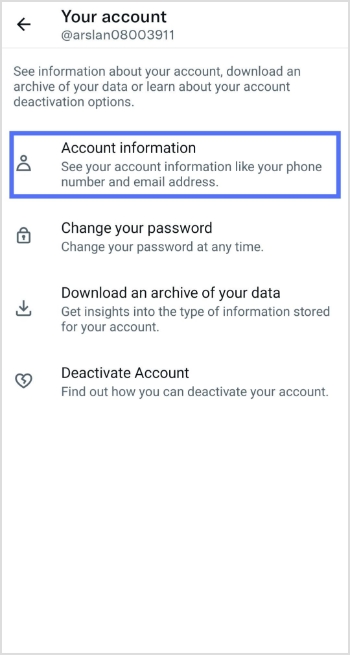
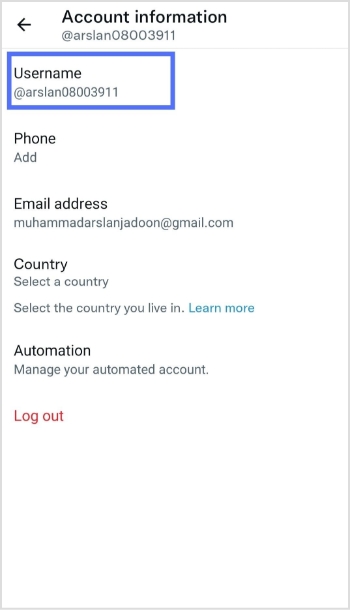
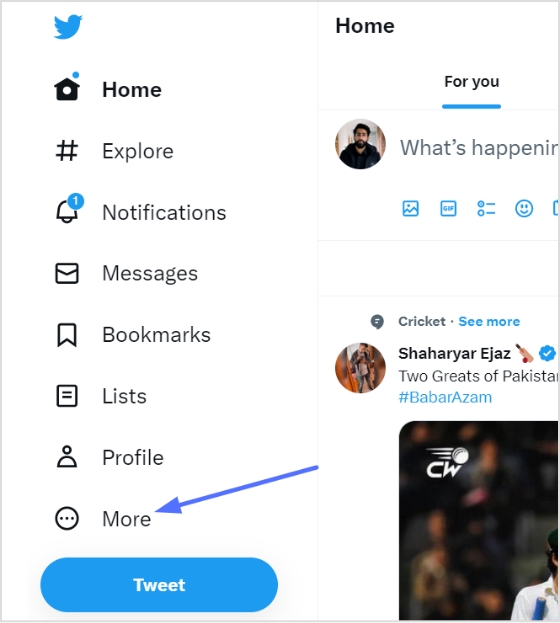
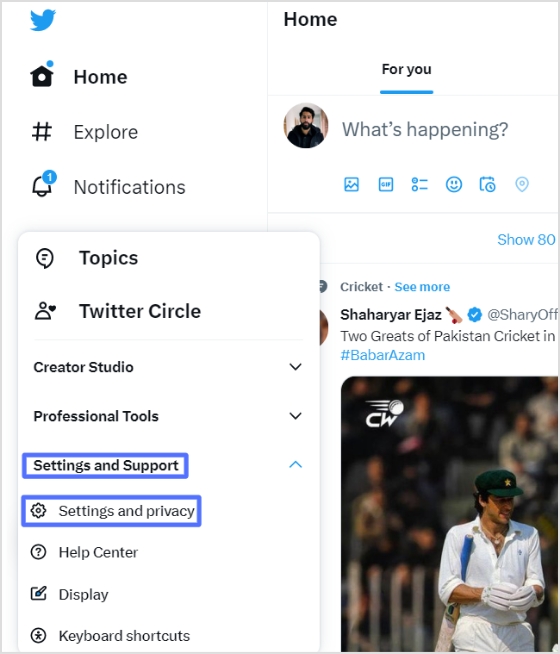
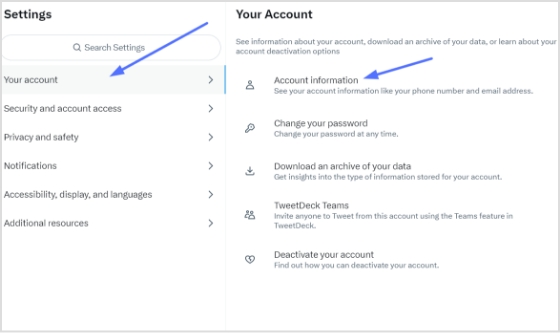
Here’s how to find your Twitter URL:
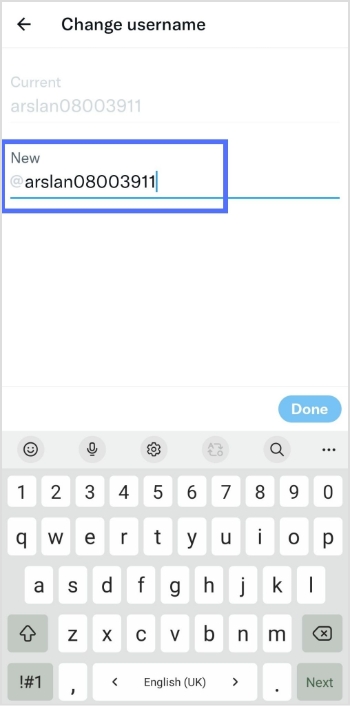
How to find my Twitter URL on a mobile phone?
Follow these steps on your iOS or Android mobile device to find your Twitter URL:
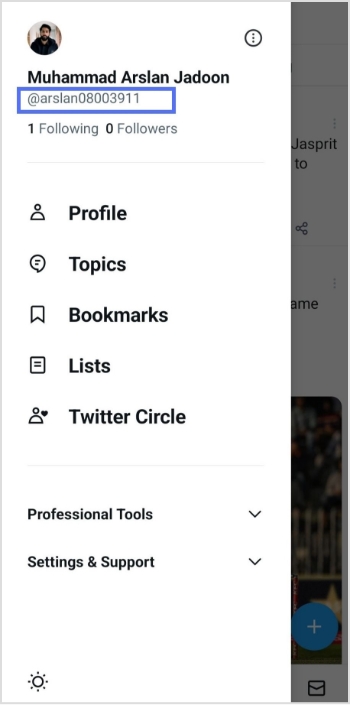
Step 1: Open the Twitter app on your mobile device.
Step 2: Tap the profile icon in the top left corner.
Step 3: You will now see your user name in the sidebar below your name.
Looking for a Better Way to Manage Social Media URLs?
Managing multiple social media accounts is time-consuming, and keeping track of all the links to articles can be challenging. To streamline campaigns, it is recommended to use a tool such as Replug to keep all the links in one place.
It serves as a reliable link management platform that simplifies tracking, organizing, and optimizing your URLs.
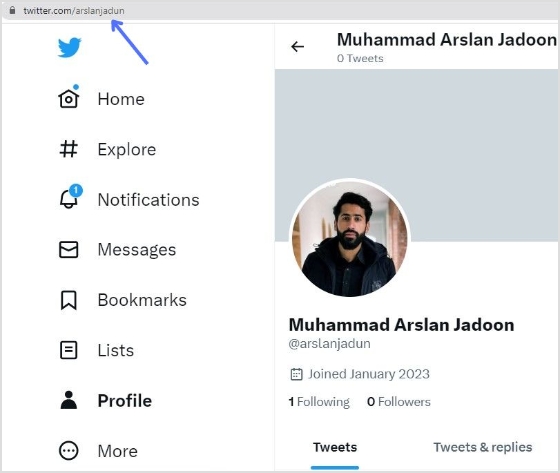
However, deciding what links to include in the Replug can be confusing. For Twitter, the best link to start with is the URL of the entire profile, which can be easily shared and is always in the format of “twitter.com/username.”
The ultimate solution for managing all your social media links
Our link management tool provides you with a dashboard to manage all your shortened links, including the ability to track clicks and see analytics on the usage of each link. This can help you understand how your social media profiles are being used and accessed.
Replug provides several benefits when handling all your social media URLs:
Create a consistent brand across all profiles
A consistent brand across all your social media profiles is important for building a recognizable and professional image. Using the same URL shortener for all your profiles, such as Replug, ensures that your profiles are all linked together under one recognizable brand. This makes it easier for people to find and remember your profiles and creates a consistent image for your brand.
Replug provides analytics and click tracking on your links, so you can see how many people are clicking on your social media profile links, where they are coming from, and which ones are most popular.
Shortened Replug URLs are easier to remember and share than individual social media profiles’ long, complex URLs. You can enhance brand recognition and improve your profile’s accessibility by shortening your social media URLs with Replug.
Provide Cross-platform compatibility
Handling all your social media URLs through Replug provides cross-platform compatibility, making it easier for people to access your profiles from any device or browser. Replug links are designed to work seamlessly across all platforms, including desktops, laptops, smartphones, and tablets, ensuring that your profiles are accessible to everyone, regardless of their device.
YouTube playlists are a feature that allows users to organize and view a series of videos together. Users can create their playlists or add videos to existing playlists created by other users. Videos in a playlist can be rearranged, edited, or removed at anytime.
Deep links directly link to specific content within an app rather than simply linking to the app’s home page.
Using a deep link to share a YouTube playlist allows the recipient to immediately access and view the playlist without having to search for it within the app. Also, deep links can contain information about the content, such as the specific video or playlist, so recipients know what they click on and why it is relevant.
Using deep links to share YouTube playlists can also help increase the app’s engagement and retention. As a result, recipients are more likely to continue using the app after being directed to the specific content they are interested in.
Here’s how to share YouTube playlists on mobile and computer devices:
How to share Youtube playlist with deep links on a mobile device?
Follow the steps below:
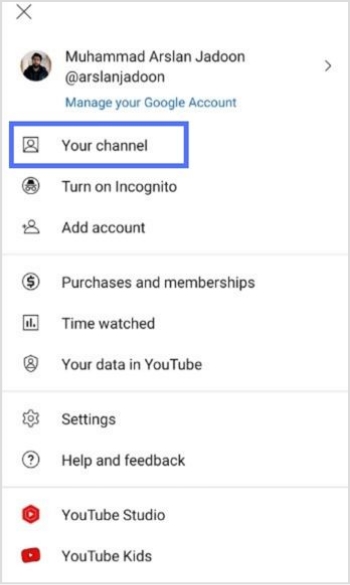
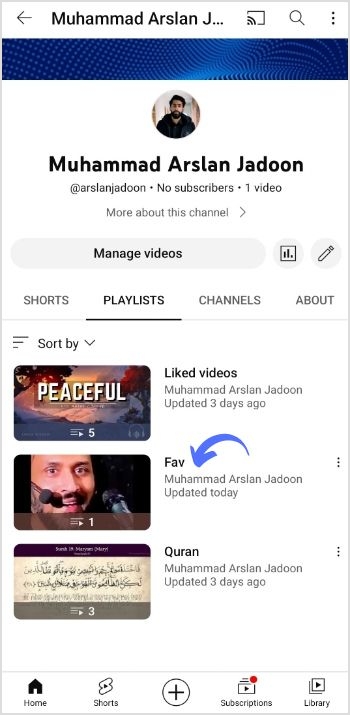
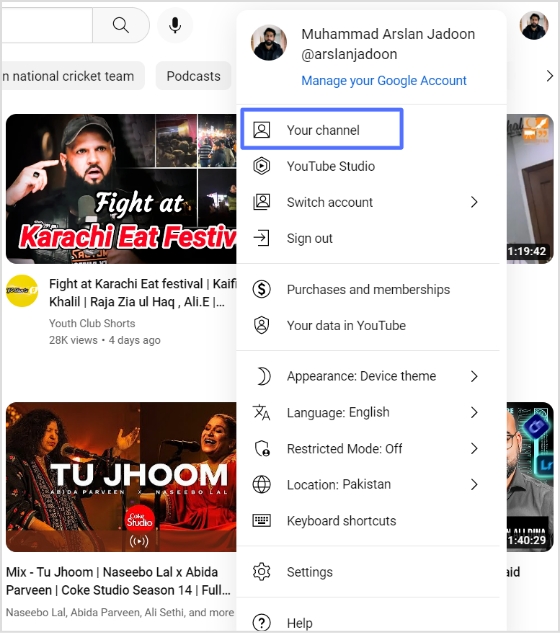
Step 1: Open YouTube on your mobile phone and tap the profile icon in the top right corner.
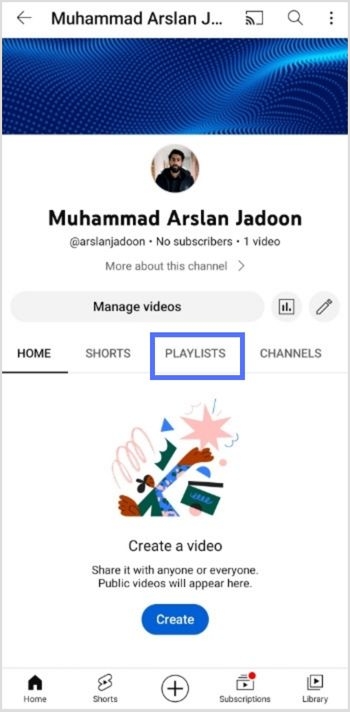
Step 2: Tap “your channel” from the drop-down menu.
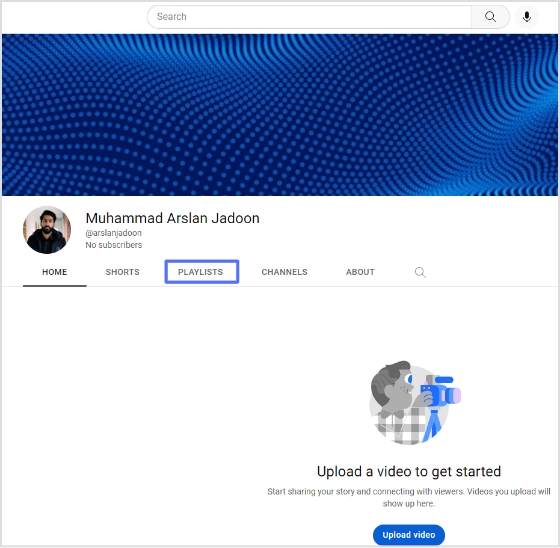
Step 3: Tap “playlist” on your mobile screen.
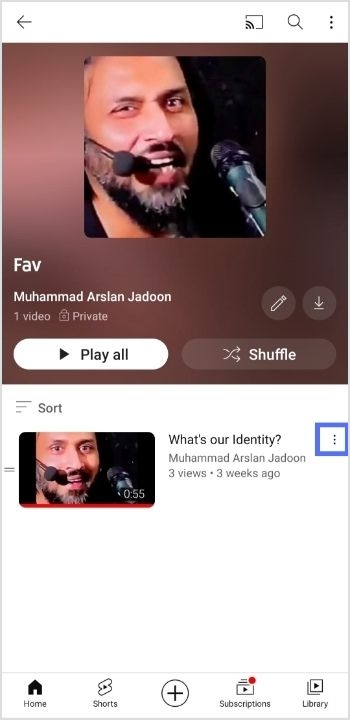
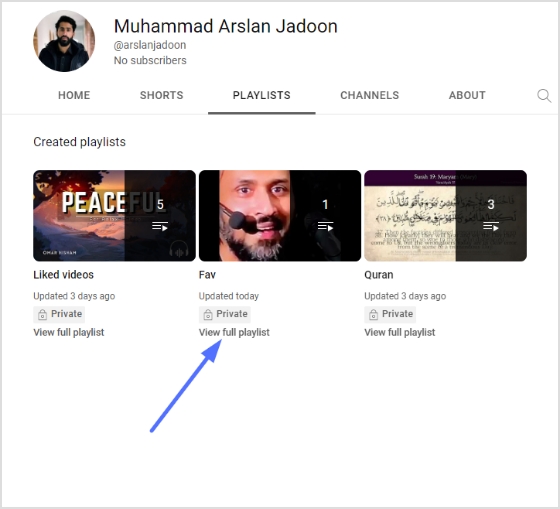
Step 4: Open the playlist you want to share.
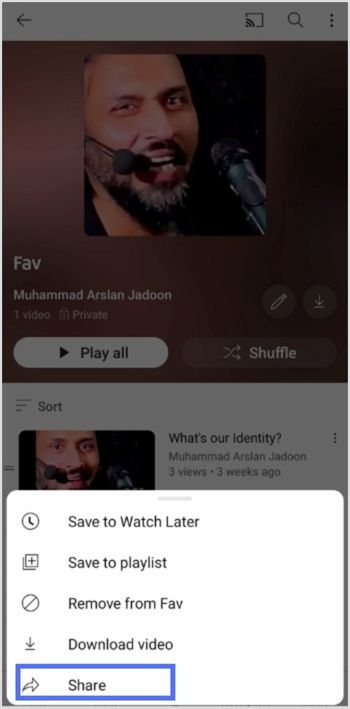
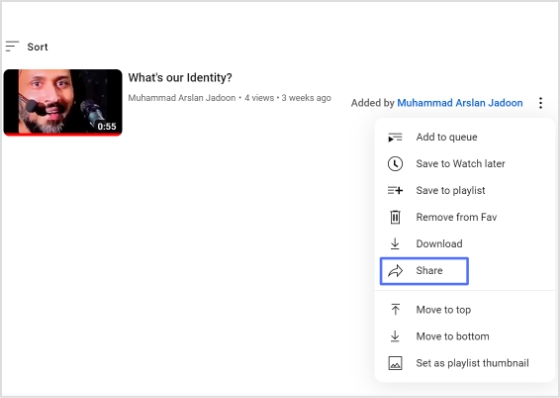
Step 5: Tap three dots alongside the playlist.
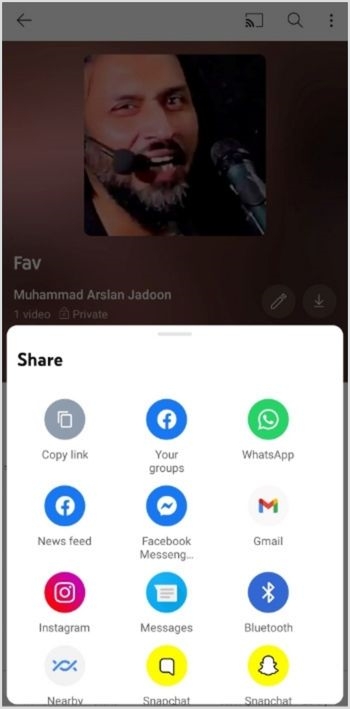
Step 6: Tap share to share the playlist.
Step 7: Tap Copy link to copy the link and create a deep link for your YouTube playlist.
Maximize marketing ROI
by transforming ordinary URLs into branded short links that convert.
Try Replug for free
Create a deep link for YouTube Mobile Playlist:
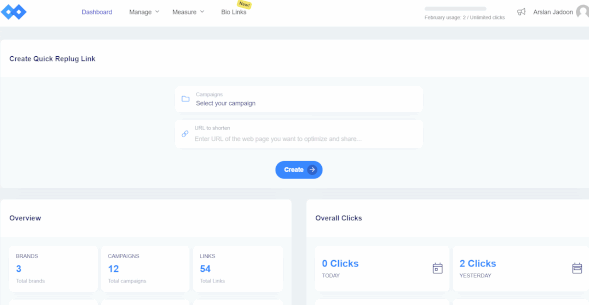
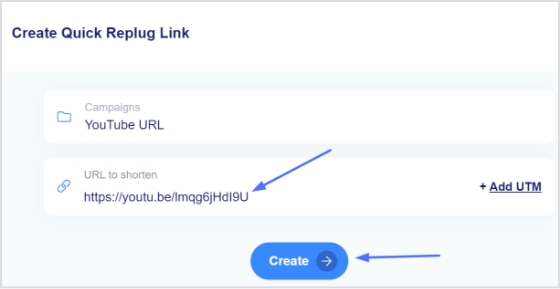
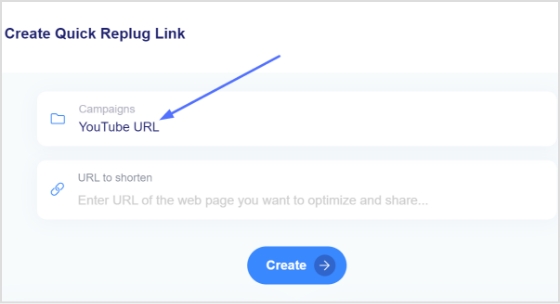
Step 8:Go to Replug and sign in or create an account for free.
Step 9: Select the desired campaign on the main dashboard or create a new campaign.
Step 10: Enter the YouTube playlist link in the “URL to shorten” section under the campaigns section, and click create.
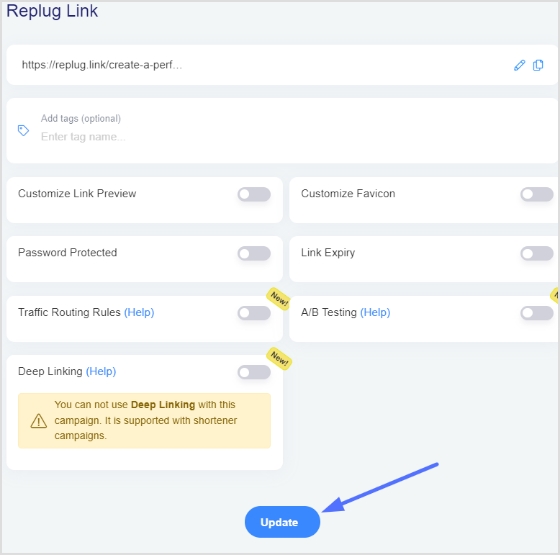
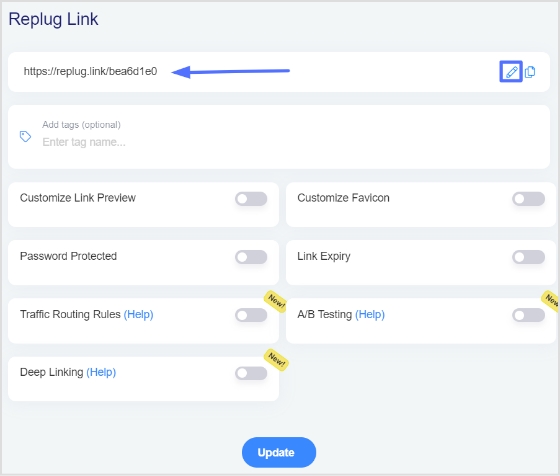
Step 11: You’ve your newly created Replug link. Click the edit icon to customize the link.
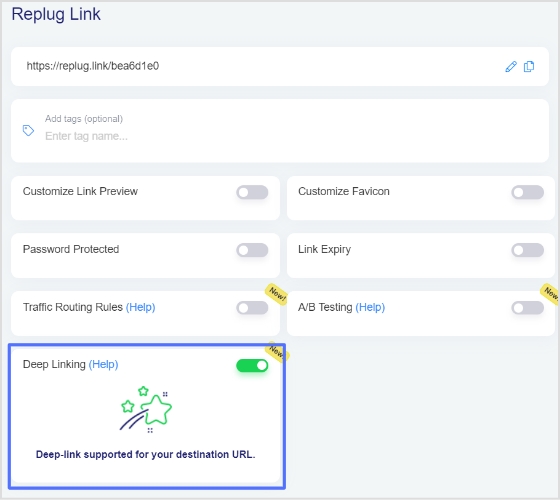
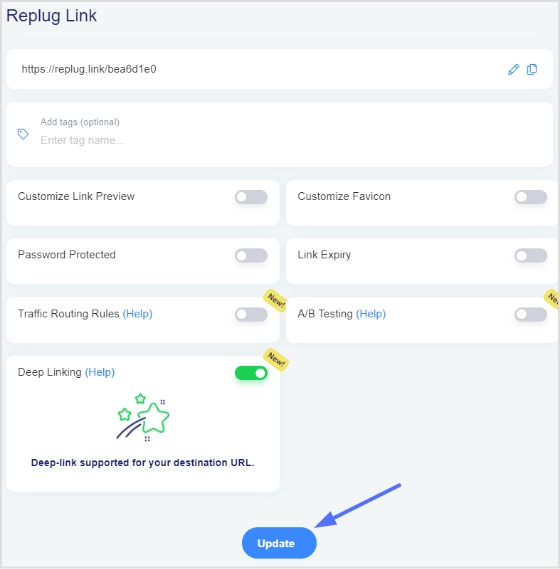
Step 12: Turn on the Deep link button and verify that deep links are allowed for the link.
Step 13: Click the update button to create a deep link for your YouTube playlist.
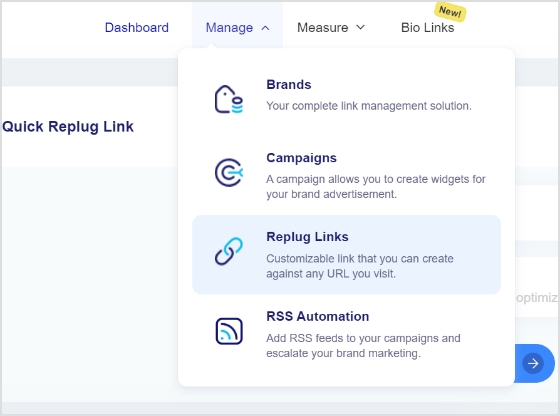
Note: To find the deep link, Go to the manage section on the main dashboard > Click Replug links.
Create a deep link for a YouTube computer playlist:
Step 8:Sign in to Replug or create an account for free.
Step 9: Select the desired campaign on the main dashboard or create a new campaign.
Step 10: Enter the YouTube playlist link in the “URL to shorten” section under the campaigns section, and click create.
Step 11: You’ve your newly created Replug link. Click the edit icon to customize the link.
Step 12: Turn on the Deep link button and verify that deep links are allowed for the link.
Step 13: Click the update button to create a deep link for your YouTube playlist.
Note: To find the deep link, Go to the manage section on the main dashboard > Click Replug links.
Once you have the playlist link, you can create a branded short URL using Replug to make sharing cleaner and more memorable.
FAQs
How to share a YouTube playlist on WhatsApp?
To share a YouTube playlist on WhatsApp:
1. Open the YouTube app on your mobile device and sign in to your account. 2. Find the playlist you want to share and tap on it. 3. Tap the “Share” button, usually represented by an icon of two arrows pointing in opposite directions. 4. Select “Share on WhatsApp”. 5. Select the contact you want to share the playlist with. 6. Your contact will receive a message with a link to the playlist.
Alternatively, you can share the link by copying it and then sharing it on WhatsApp by creating a new message or pasting it into an existing conversation.
Please note that the person you share the link with needs to have the YouTube app installed on their device to view the playlist.
Adding a YouTube link to an Instagram story allows the user to share a video from YouTube on their Instagram story. This allows their followers to view the video directly from the Instagram story without leaving the app and going to YouTube.
It can also help direct more traffic to the YouTube video, increasing its visibility and gaining more views and engagement.
Here’s how to add YouTube links to the Instagram stories:
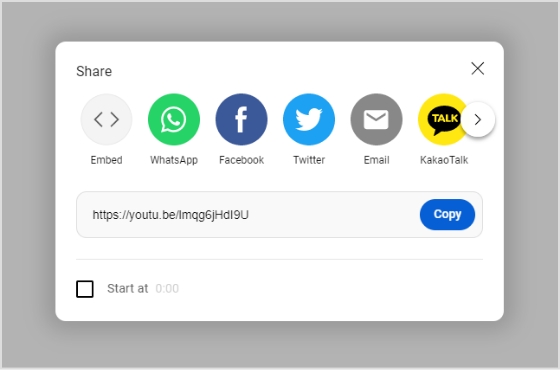
Step 1: Go to the YouTube app and play the video you want to share in Instagram Story.
Step 2: Tap “share” right below the YouTube video.
Step 3: Tap “copy link” to copy the link you want to share in the Instagram story.
Note: Before pasting the URL into your Instagram story’s link sticker, you might want to shorten a link first for a cleaner, more shareable URL that looks better in your story and is easier for followers to click. Replug is the reliable link optimization platform to perform this task in the best possible manner.
Step 4: Now open the Instagram app and tap the “profile icon’’ in the bottom right corner.
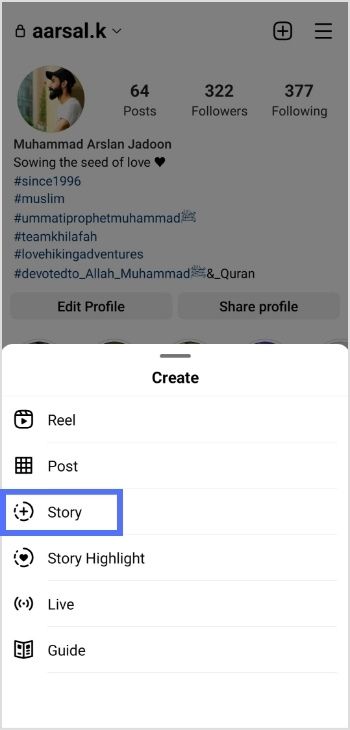
Step 5: Tap the “add (+)’’ sign in the top right corner.
Step 6: Tap “story” to add a new story.
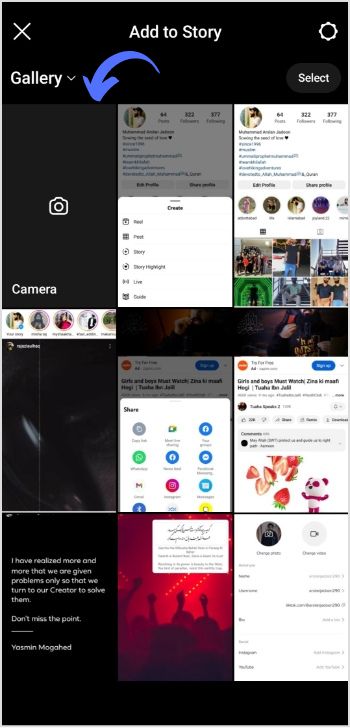
Step 7: Tap the “camera” from different gallery options.
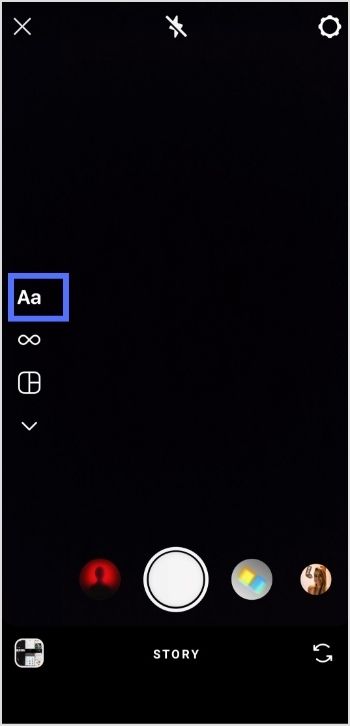
Step 8: Tap “create or Aa” for a new story.
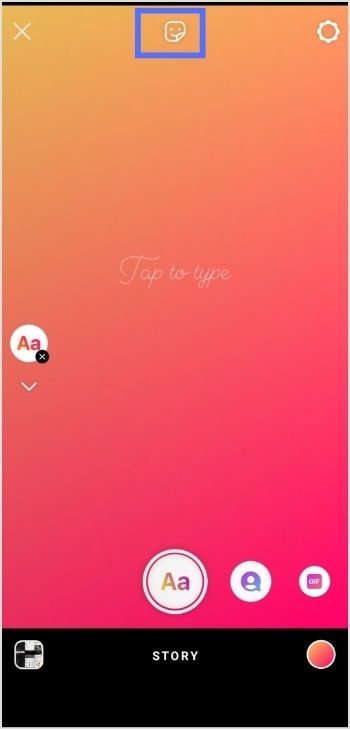
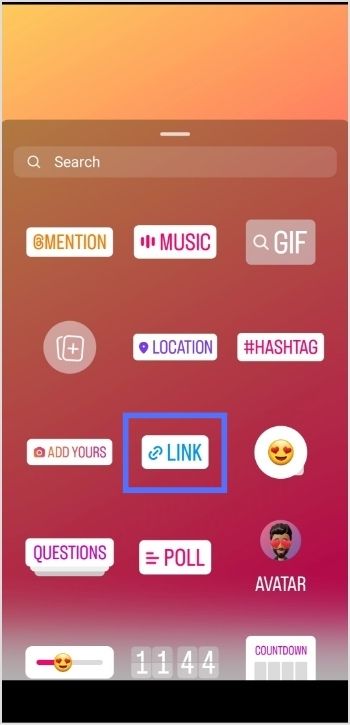
Step 9: Tap the “sticker icon” from the screen’s top.
Step 10: Tap the “link sticker” from the options.
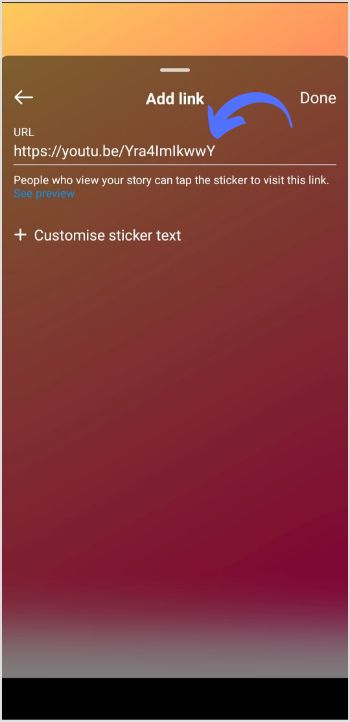
Step 11: Add link screen will open. Paste the YouTube video URL in the URL field and tap done.
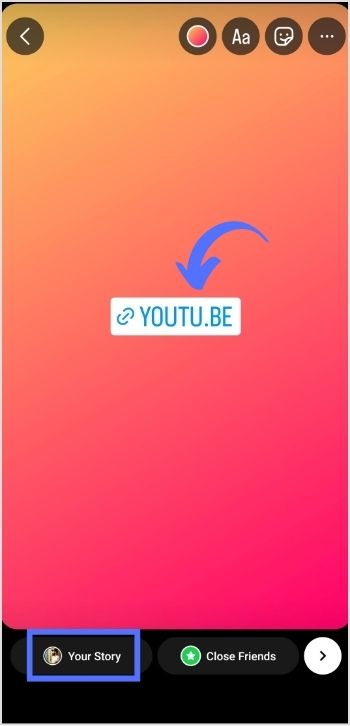
Step 12: Tap “your story,” and your YouTube video link will be posted in your Instagram stories.
Point to note:
Adding YouTube links to Instagram stories can increase the visibility and reach of YouTube content and drive more traffic to a YouTube channel. This can benefit creators looking to grow their audience and expand their brand. Additionally, it allows viewers to access and watch YouTube videos directly from the Instagram app, making the viewing experience more seamless and convenient. Adding YouTube links to Instagram stories can be a valuable strategy for growing a YouTube channel and engaging with viewers on both platforms.
Frequently asked questions
How To Put Youtube Link In Instagram Bio?
To add a YouTube link to your Instagram bio, you need to have a YouTube account. Also, the link to the YouTube video or channel you want to share. Once you have that, follow these steps:
1. Open the Instagram app and go to your profile. 2. Tap the “Edit Profile” button. 3. In the “Website” section, enter the link to the specific YouTube video or channel you want to share. 4. Tap “Done” to save the changes to your profile. 5. Return to your profile and see the YouTube link in the bio section.
Creating a TikTok account can offer a number of benefits depending on your goals and interests. It’s a great way to discover and view the latest and trendiest videos, from funny memes to lip-syncs to dance challenges.
Additionally, TikTok provides a platform for users to showcase their creative talents and share their own videos with a wide audience. It can also be a great way to connect with others who share similar interests and hobbies.
Businesses and brands can also benefit from TikTok by connecting with their target audience. Thus, creating effective marketing campaigns and allowing users to purchase products directly from the app.
It can also be used for personal brand building by consistently creating and sharing engaging content. In addition, you can build a following and establish yourself as an expert in your field.
Overall, having a TikTok account can be a great way to connect with others, and grow your personal or professional brand.
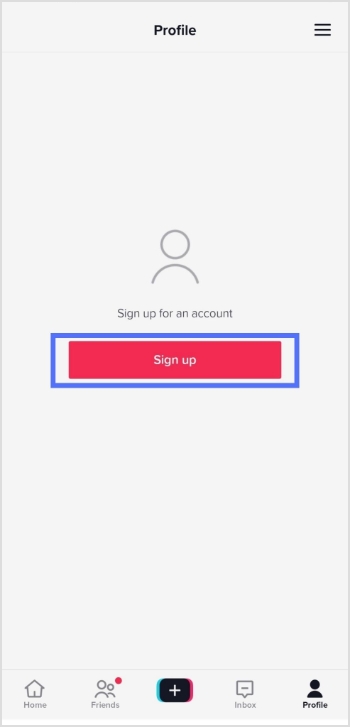
How to create a TikTok account?
Step 1: Download the TikTok app from the App Store (iOS) or Google Play Store (Android).
Step 2: Open the app and tap the profile icon in the bottom right corner.
Step 3: Tap the sign-up button and choose how you like to sign up.
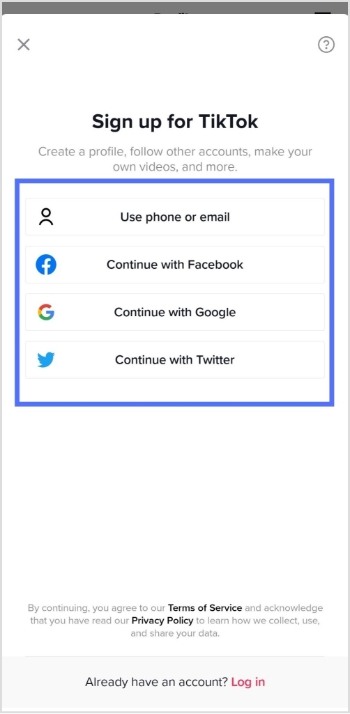
Step 4: Select how you want to create your account, either by using a phone number, or email address, or through a third-party account (such as Facebook or Google).
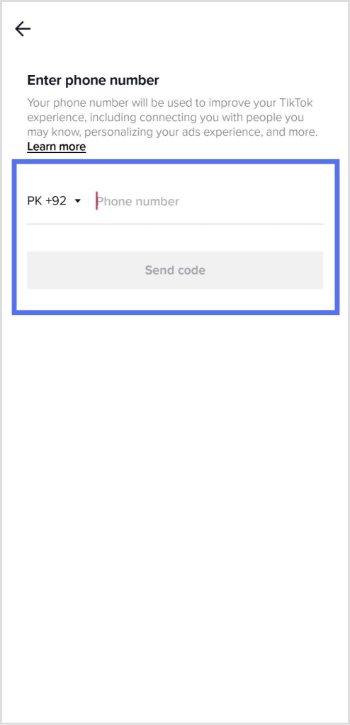
Step 5: Fill in the required information, including your name, birthday, and phone number.
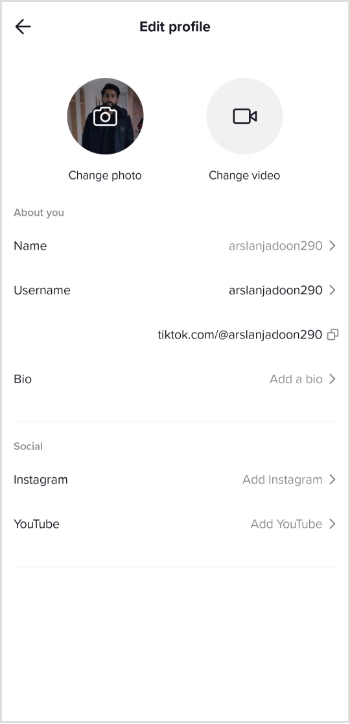
Step 6: Once your account is created, you will be prompted to fill in your profile information.
Step 7: You can also customize your account by selecting your preferred privacy settings, and connecting your other social media accounts.
Once you’ve finished customizing your account, you can start browsing and creating TikTok videos.
Note: You must be at least 13 years old to create a TikTok account.
For those of you who are into managing multiple links, whether for social accounts, content hubs, or marketing campaigns, Replug makes it much easier to organize, track, and optimize every URL from a single dashboard.
FAQs
Is making a TikTok account free?
Yes, making a TikTok account is free. Users can create an account using their email address, or phone number, or by connecting to their Google or Facebook account.
Does TikTok pay you?
TikTok has a monetization program called the TikTok Creator Fund that pays creators based on their engagement and the number of views they receive on the platform. To be eligible for the Creator Fund, a user must have a minimum of 1,000 followers and meet other requirements set by TikTok. Additionally, TikTok also allows creators to monetize their content through brand partnerships and sponsored posts.