In WordPress, permalinks play a crucial role in defining the structure of your website’s URLs. Changing the permalink structure can improve your site’s search engine optimization (SEO) and make your links more user-friendly.
If you want a tool that helps you brand, shorten, and track those URLs or links across your marketing efforts, Replug.io is a very strong choice.
This guide will walk you through the process of changing permalinks in WordPress by providing step-by-step instructions.
Let’s dive in!
Here’s how to change Permalink in WordPress
Step 1: Log in to your WordPress admin dashboard
To begin, log in to your WordPress admin dashboard using your credentials. Once logged in, you’ll have access to the necessary settings to modify your permalink structure.
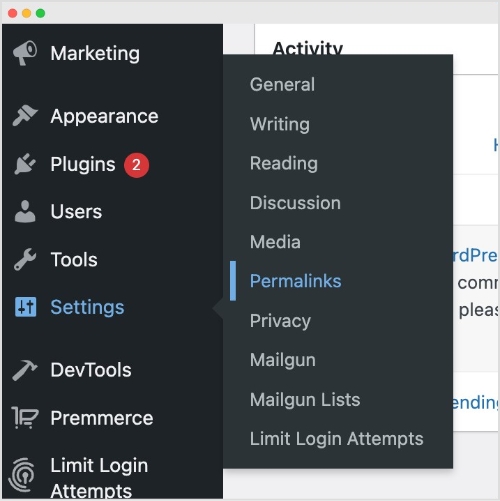
Step 2: Access Permalink settings
From the left-hand menu, locate and click on “Settings,” and then select “Permalinks.” This action will take you to the Permalink Settings page, where you can customize your Permalink structure.
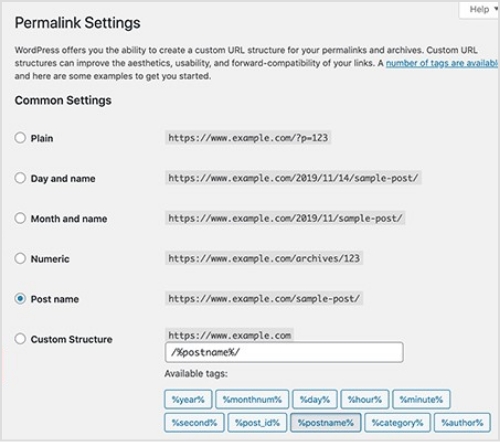
Step 3: Choose a common Permalink structure or create a custom one
On the Permalink Settings page, you’ll find various pre-defined options for permalink structures, including plain, day and name, month and name, numeric, post name, and more. Select the one that best suits your needs. If you prefer a custom permalink structure, proceed to Step 4.
Step 4: Create a custom Permalink structure (optional)
If you want a custom permalink structure, select the “Custom Structure” option on the Permalink Settings page. This will reveal a text field where you can enter your desired permalink structure using tags. Utilize tags like %year%, %monthnum%, %day%, %post_id%, %postname%, %category%, %author%, and %pagename% to craft a unique permalink structure.
Step 5: Save changes
After selecting a common or custom permalink structure, click on the “Save Changes” button located at the bottom of the Permalink Settings page. By doing so, your new permalink settings will be saved, and WordPress will automatically update the URLs accordingly.
Note: Once you’ve updated your permalinks, it’s smart to run your links through a reliable link shortener. This way, you can create clean, branded URLs and also track how often they’re clicked without any hassle!
Frequently asked questions
What is a Permalink?
A permalink, short for “permanent link,” is a URL (Uniform Resource Locator) that points to a specific web page or post on a website. It is called a “permanent” link because it is intended to remain unchanged and accessible over time, even if the content of the page or post is updated or moved.
Will changing my permalink structure affect my website’s SEO?
Yes, changing the permalink structure can impact your SEO. It’s advisable to set up redirects or use a plugin to manage redirects in order to preserve the SEO value of your URLs and prevent broken links.
Can I change the permalink structure for existing posts and pages?
Yes, when you modify the permalink structure, it will apply to all new posts and pages you create. However, for existing content, the URLs will change, which may result in broken links. Implementing redirects can help mitigate this issue.
What if I change my mind after modifying the permalink structure?
WordPress allows you to revert to your previous permalink structure. Simply revisit the Permalink Settings page, choose the desired structure, and save the changes. However, keep in mind that this will once again alter the URLs of your posts and pages.
Are there any performance implications of changing the permalink structure?
Generally, changing the permalink structure itself doesn’t have a significant impact on website performance. However, if you have a large number of posts or pages, updating the URLs may require additional server resources during the redirect process.
Can I localize my permalinks for different languages?
Yes, if you have a multilingual website, you can utilize plugins like WPML or Polylang to set up language-specific permalink structures. These plugins enable you to create separate URLs for different language versions of your content.
In today’s digital age, the internet has become an essential part of our daily lives, allowing us to access information, connect with others, and conduct business anywhere.
However, some websites and online content may be blocked or restricted in certain regions, making accessing the information they need difficult. Being blocked can be frustrating if you’re trying to stream your favorite TV show or access a website for work or research purposes.
Luckily, there are several ways to unblock websites and gain access to restricted content. In this guide, we’ll explore seven effective methods for accessing blocked websites and content, so you can get back to browsing the internet freely and securely.
Why do websites get blocked?
There are various reasons why websites can get blocked. Some of the common reasons include:
Government censorship
In some countries, the government may block certain websites that they consider to be a threat to national security, or that they deem inappropriate.
Workplace or school restrictions
Employers and schools often use web filters to prevent employees or students from accessing websites that are not related to work or studies.
Geo-restrictions
Some websites may be blocked in certain countries due to licensing agreements or legal restrictions.
Website maintenance:
Occasionally, websites may be temporarily blocked for maintenance or updates.
Hacking and cyber threats
Websites that have been hacked or are susceptible to cyber-attacks may be temporarily or permanently blocked to prevent further damage.
The reasons for website blocking can vary widely, and it’s important to understand why a website has been blocked before attempting to access it using any of the methods mentioned above.
Here’s how to unblock websites using seven different ways:
1. Use a VPN
If you’re looking for a reliable and secure way to access restricted websites, a Virtual Private Network (VPN) is a great option. A VPN encrypts your internet traffic and routes it through a secure server in another location, making it look like you’re accessing the internet from that location. This not only lets you unblock websites that are restricted in your region, but it also adds an extra layer of security to your online activities.
VPNs are easy to use, simply download and install a reputable VPN service on your device, select a server location, and connect to the internet.
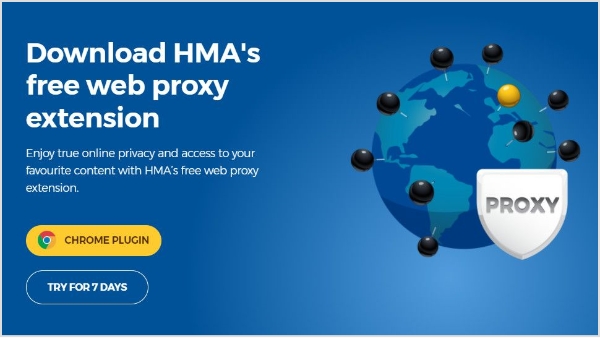
2. Use a Proxy
Another way to unblock restricted websites is by using a proxy server. A proxy acts as a middleman between your device and the internet, allowing you to access websites that may be blocked in your region. Proxies are typically free to use, but they may not always be reliable or secure. For affordable and secure proxy solutions, websites like ProxyCoupons can help you find deals and discounts on trusted proxy providers.
For example, you can use a web-based proxy site such as KProxy to access the blocked website by entering the website URL into the proxy site’s search bar. To use a proxy, you’ll need to find a proxy server and configure your device to use it. You can find free proxy servers online, but it’s important to be cautious when using them, as they may not be trustworthy. Using a free online proxy checker is a helpful way to verify the functionality and security of a proxy server before relying on it for your online activities.
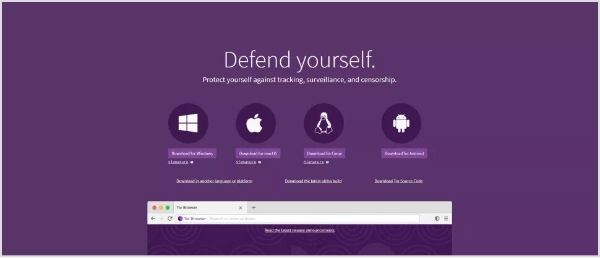
Tor is a free and open-source software that lets you browse the internet anonymously. It works by encrypting your internet traffic and routing it through a network of volunteer-run servers, making it difficult for anyone to track your online activities.
To use Tor, simply download and install the Tor browser on your device, and you’ll be able to access the internet anonymously. However, it’s worth noting that Tor can be slower than other methods of accessing the internet, so it may not be the best option if you need to access websites quickly.
4. Use a URL Shortener
If a website is blocked due to its URL, you can try using a URL shortener to access it. URL shorteners like Replug.io or Rebrandly take a long website address and shorten it to a shorter, more manageable URL. By using a reliable short url shortener, you may be able to bypass website blocks that are based on the website’s URL.
When using a URL shortener, simply visit the website of your chosen service, enter the URL of the blocked website, and click “shorten.” You’ll be provided with a new, shortened URL that you can use to access the website.
5. Access the Website via Its Crawl History
If a website has been recently blocked in your region, you may still be able to access it via its crawl history. Search engines like Google and Bing regularly crawl websites and store cached versions of the website’s pages. By accessing the cached version of the website, you may be able to bypass any website blocks that are currently in place.
To access a website’s crawl history, simply search for the website on a search engine and look for the “cached” option next to the search results. Clicking on the cached version will take you to a version of the website that was saved by the search engine. For example, you can use the Wayback Machine website to access a website’s previous versions and find the version of the website that was not blocked.
6. Change Your Device Settings
In some cases, website blocks may be based on your device settings. For example, if you’re using a public Wi-Fi network, the network’s administrator may have blocked certain websites. To bypass these blocks, you can try changing your device’s DNS settings or using a different Wi-Fi network.
To change your device’s DNS settings, go to your device’s network settings and enter a new DNS server address. Some popular DNS servers include Google DNS, OpenDNS, and Cloudflare DNS.
If a website is blocked due to your account being banned or suspended, you may need to create a new account to access the website. However, this method may not work for all websites, as some may block your IP address from accessing their content even if you create a new account.
To open a new account, you will need to create a new email address, username, and password. Make sure to use a different email address than the one you used for your previous account, as some websites may block your new account if they detect that it is associated with a previously banned or suspended account.
This method is useful if the website has banned your previous account, but it may not be effective if the website has blocked your IP address. Additionally, creating multiple accounts on a website can be against their terms of service, so be sure to read the website’s policies before creating a new account.
For example, social media platforms like Twitter and Facebook may ban accounts for violating their community guidelines. In such cases, creating a new account with a different email address and username can help you regain access to the website. However, some websites like Netflix may not allow users to create multiple accounts, and may even block the new account if they detect that it is associated with a previously banned or suspended account.
While using a proxy can be a quick and easy way to access blocked websites, it’s important to be cautious about the security implications. Some proxies may collect and store your personal information, or be used by hackers to steal your data. Make sure to choose a reputable and secure proxy provider, and use HTTPS websites to ensure that your browsing activity is encrypted.
How do I know if a website is blocked?
If you’re unable to access a website, the first step is to check whether the site is actually down or blocked. You can use online tools such as DownForEveryoneOrJustMe.com to see if the site is unavailable to everyone, or just to you. You can also try accessing the site using a different device or network to rule out any issues with your own connection.
Can I unblock websites on my mobile phone?
Yes, many of the methods for unblocking websites described above can also be used on mobile devices. For example, you can use a VPN app to access blocked sites, or use a browser with built-in proxy support. However, keep in mind that some mobile networks may have more aggressive content filtering in place, so you may need to use more advanced methods to bypass these restrictions.
Is it legal to unblock websites?
The legality of unblocking websites can vary depending on the country and the circumstances. In some countries, it is illegal to use VPNs or proxies to access blocked websites. However, in most cases, unblocking websites for personal use is not considered illegal. It is always recommended to research the local laws and regulations related to internet usage and unblocking websites before attempting to do so.
Why is my internet blocking websites?
There can be various reasons why your internet is blocking websites. One common reason is the use of content filtering software or parental controls, which block access to certain categories of websites. Another reason could be the use of firewalls or antivirus software that blocks websites with malicious content or phishing attempts. In some cases, your internet service provider (ISP) may be blocking certain websites due to legal or regulatory reasons.
How do I stop my browser from blocking a website?
If your browser is blocking a website, you can try the following steps: – Check if the website is included in your browser’s block list and remove it if necessary. – Disable any browser extensions that may be causing the issue. – Clear your browser cache and cookies. – Reset your browser settings to default.
How do I unblock a website on a school Chromebook?
If you are using a school Chromebook, the ability to unblock websites may be restricted by the school’s IT policies. However, you can try the following steps: – Use a VPN or proxy to access the blocked website. – Try accessing the website through a different browser. – Ask the school’s IT department to unblock the website if it is necessary for academic purposes.
Facebook is among the most popular social media platforms that billions of people use worldwide. Its vast collection of videos has become a go-to source for entertainment, information, and education.
However, users may want to download Facebook videos for offline viewing, sharing with friends, or reposting on other platforms.
In this context, downloading Facebook videos can be helpful for those who want to save their favorite videos, access them without an internet connection, or keep a backup copy.
But, it’s essential to remember that downloading videos without the owner’s consent violates copyright laws and Facebook’s terms of service.Therefore, respecting the creator’s rights and using downloaded videos ethically and responsibly is crucial.
If you often work with social media links or share content regularly across platforms, Replug can streamline your workflow, helping you manage and organize URLs alongside your video-sharing activities seamlessly!
How to download Facebook videos on a mobile device?
There are several ways to download Facebook videos on a mobile device. Here’s how:
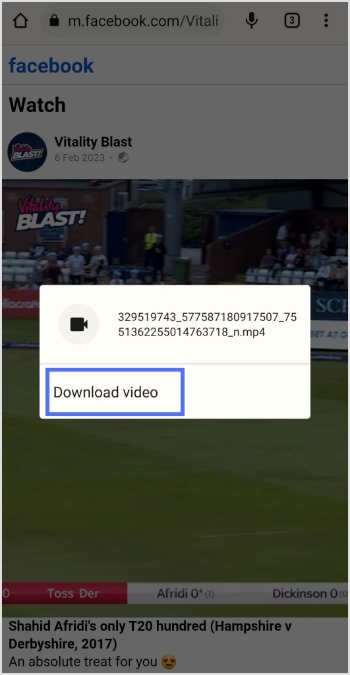
Step 1: Log in to Facebook from your mobile phone.
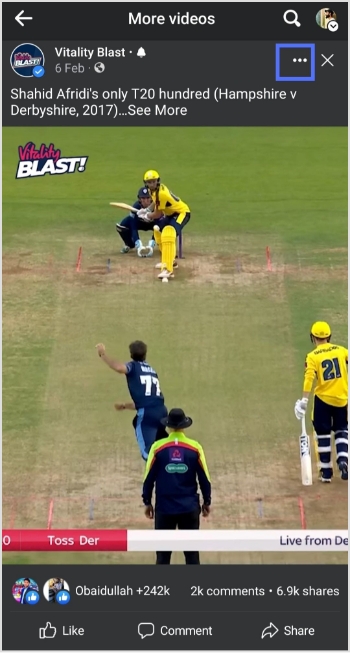
Step 2:Play the video you want to download and tap “3 dots” in the upper right corner of the video.
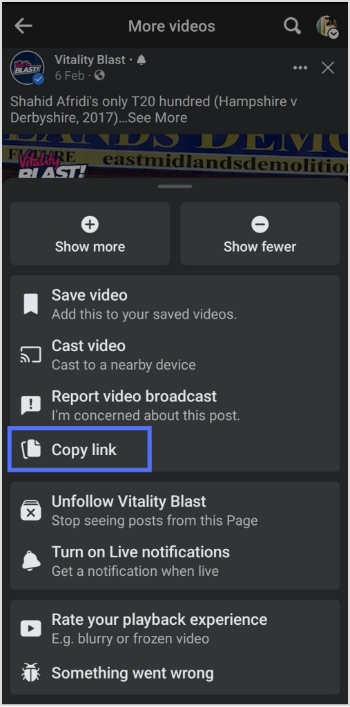
Step 3: Tap “copy link”.
Note: Before pasting the URL/link into a downloader or sharing it elsewhere, you could optionally use a custom URL shortener. That way the link stays clean, easy to share, and more manageable if you need to store or revisit it later.
Step 4: Open Chrome on your mobile device. Paste the link in the search bar to open the video in Chrome.
Step 5: Play the video and long-tap on it.
Step 6: Tap “download video,” and your video will be downloaded.
Maximize marketing ROI
by transforming ordinary URLs into branded short links that convert.
Try Replug for free
How to download Facebook videos on a computer device?
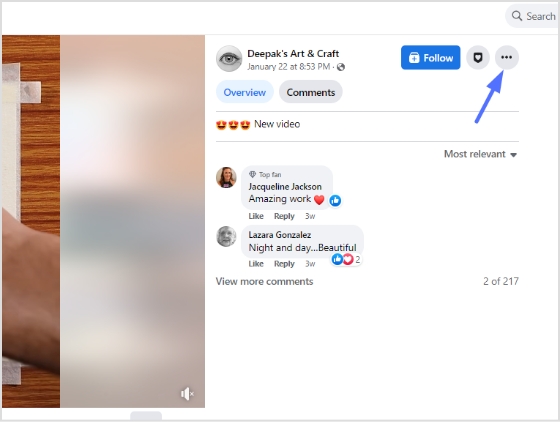
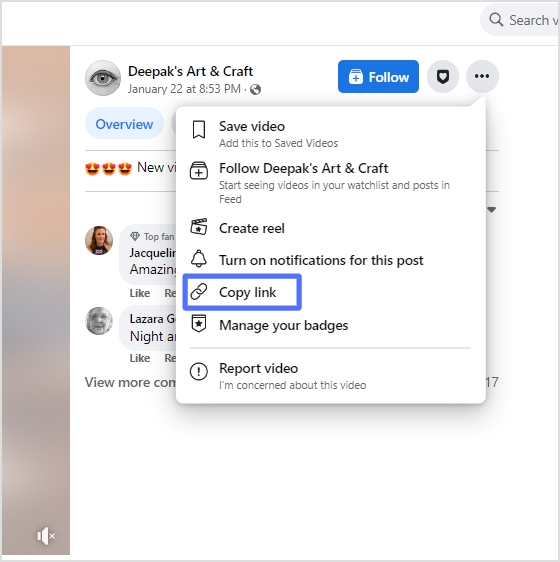
Step 1: Log in to Facebook on a computer using a browser.
Step 2: Open the video you want to download and click “3 dots” on the upper right side of the video.
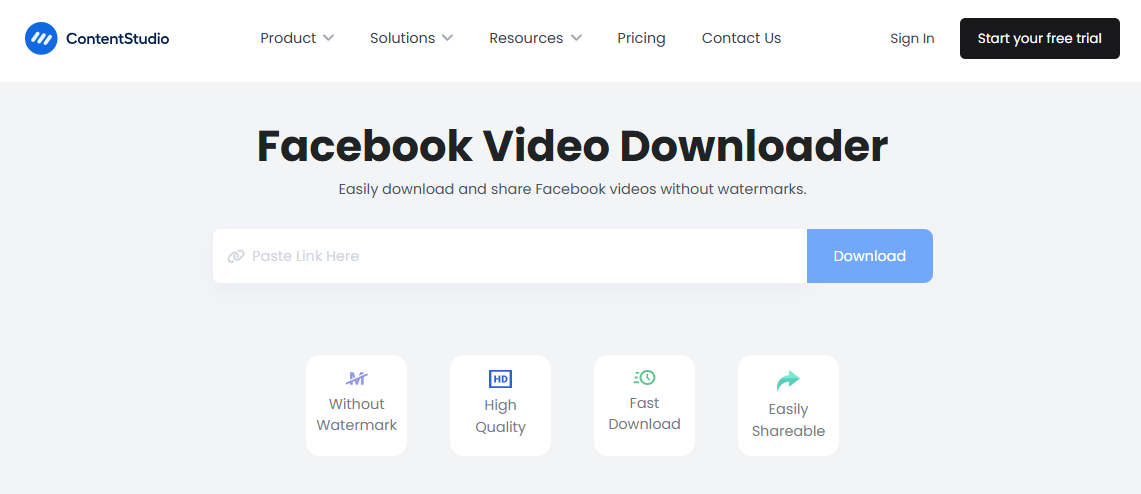
Step 5: Open a facebook Video Downloader online tool from the search results, paste the video link, click the download button, and select the preferred quality. Your video will be downloaded within a few moments.
To download Reels videos from Facebook, you can use the following method:
Open the Facebook app and find the Reels video you want to download.
Tap on the Reels video to open it in full screen.
Tap on the three dots in the bottom right corner of the screen.
Select “Save Video” or “Save Reel” from the options.
The Reels video will be saved to your device’s camera roll or gallery.
If the “Save Video” or “Save Reel” option is not available, it may be because the creator has disabled the option to save their videos. For a case like this, you can download Facebook reels with FvDownloader, an online option for saving Facebook reels for offline use.
However, downloading videos without the owner’s consent violates copyright laws and Facebook’s terms of service. Therefore, using downloaded videos ethically and responsibly is essential, respecting the creator’s rights.
Frequently asked questions
Is it legal to download Facebook videos?
It depends on the copyright laws of your country and Facebook’s terms of service. Downloading videos without the owner’s consent is generally considered a violation of copyright laws, and Facebook’s terms of service prohibit the downloading of videos without permission.
Can I download live videos from Facebook?
Live videos cannot be downloaded directly from Facebook, but some third-party tools can help you record and download live videos from Facebook.
How do I download private Facebook videos?
Private Facebook videos cannot be downloaded unless you can access the video or the owner’s permission. If you have access to the video, you can use the same methods as downloading public videos. You can try contacting the owner to request permission if you don’t have access.
Is there any app to download Facebook videos on iOS devices?
Yes, several apps, such as “Video Downloader for Facebook” or “MyMedia,” can be used to download Facebook videos on iOS devices.
Can I download Facebook videos in high quality?
Yes, some video downloader apps and websites allow you to download videos of high quality. However, remember that higher-quality videos take up more space on your device.
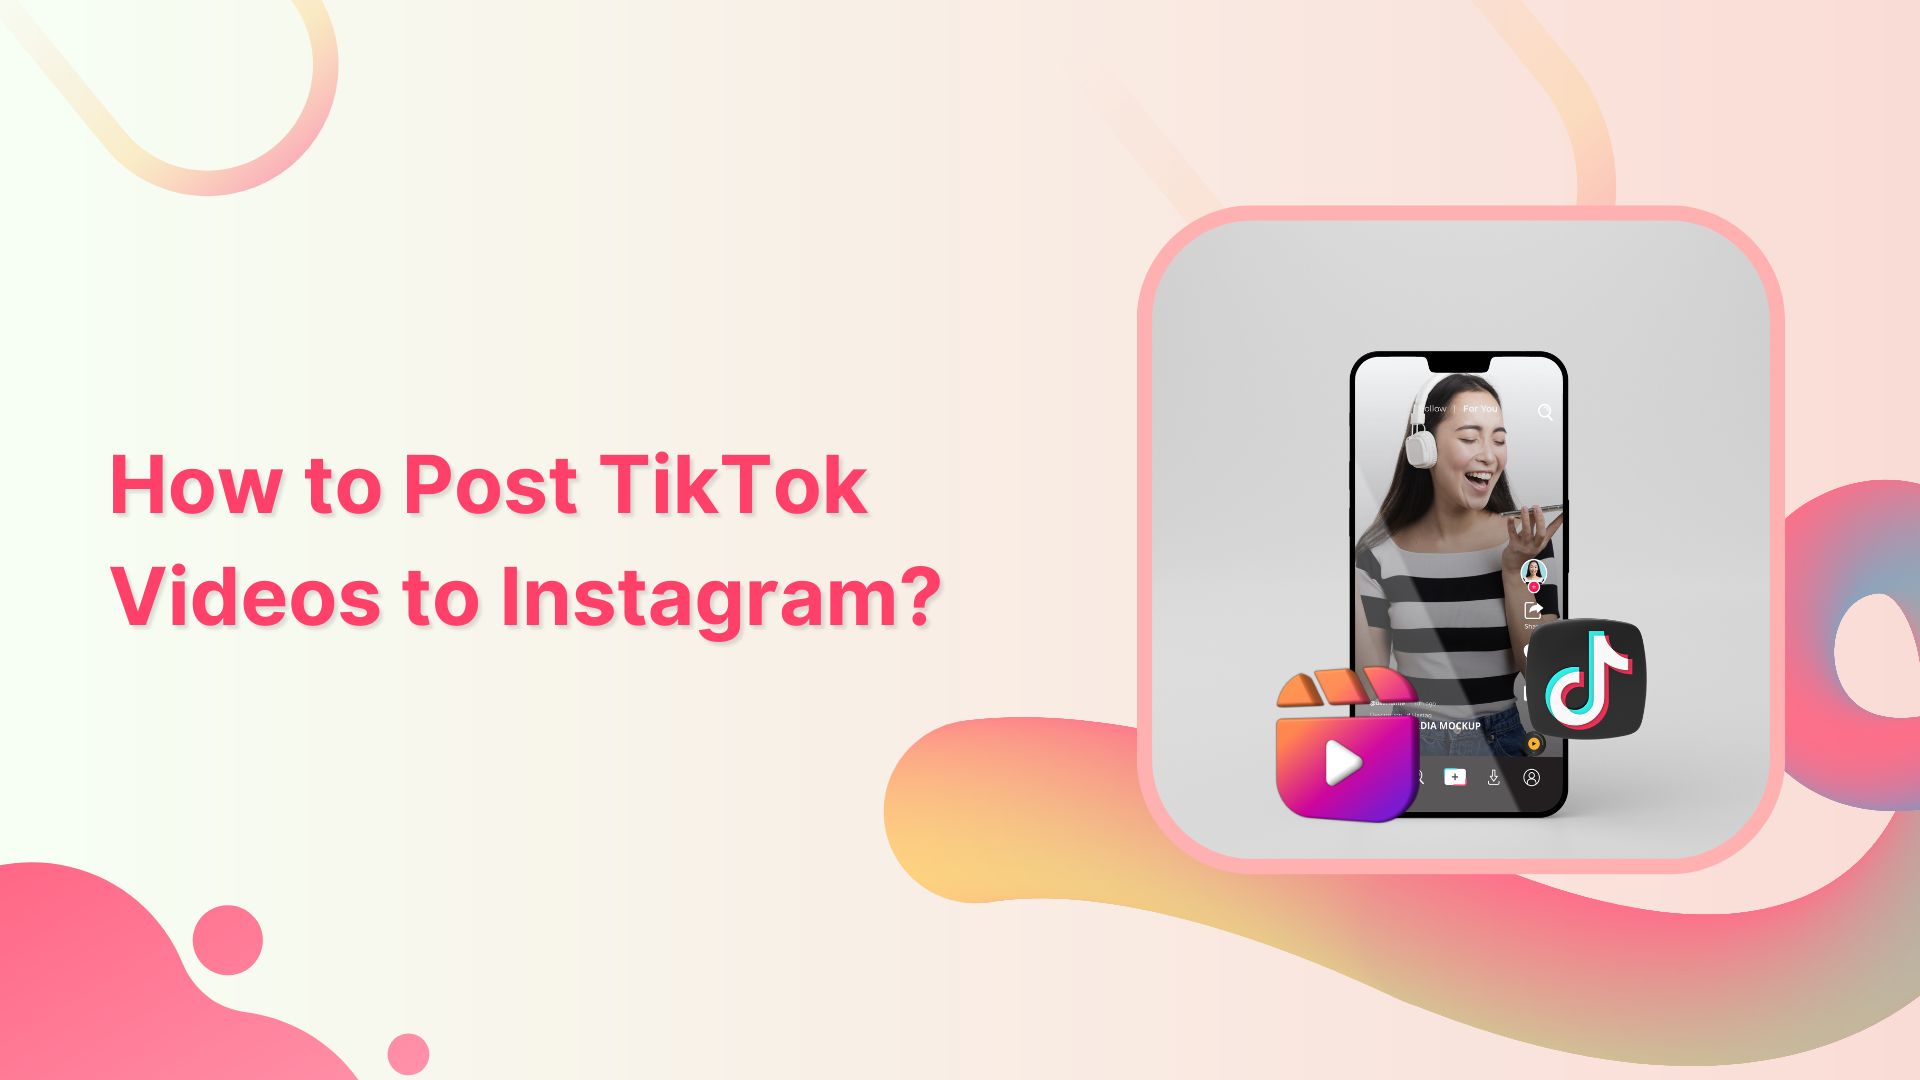
Are you an avid TikTok user and want to share your content with your Instagram followers? Do you wish to showcase your TikTok creations to a broader audience?
If you regularly share content across social platforms and want an easy way to manage, track, and organize all your shared links and posts, Replug offers a unified dashboard to manage everything in one place.
In this guide, we’ll show you how to post TikTok videos on Instagram, so you can double up your social media reach and get more eyes on your entertaining content.
So, get ready to learn the ropes and become a social media sensation!
Here’s how to share TikTok videos on Instagram:
TikTok has become a popular platform for creating and sharing short-form videos. But, if you want to share your TikTok content with your Instagram followers, you might be wondering how to do it. The good news is that it’s relatively easy to post TikTok videos on Instagram, and you can share them in various formats such as feeds, stories, and reels.
Plus, if you need a handy tool to download your TikTok videos for Instagram, consider using a TikTok video downloader to streamline the process.
How to post TikTok to your Instagram feed?
To post a TikTok video on your Instagram feed, follow these steps:
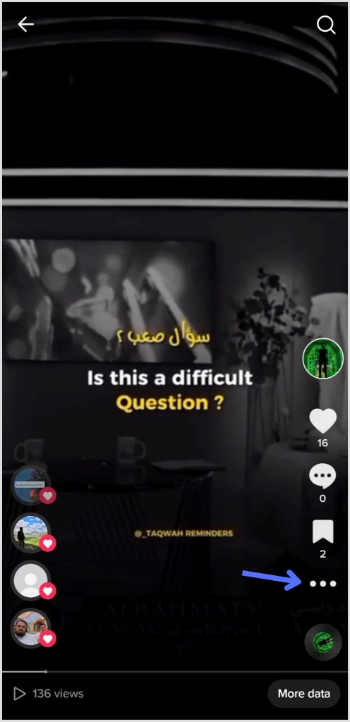
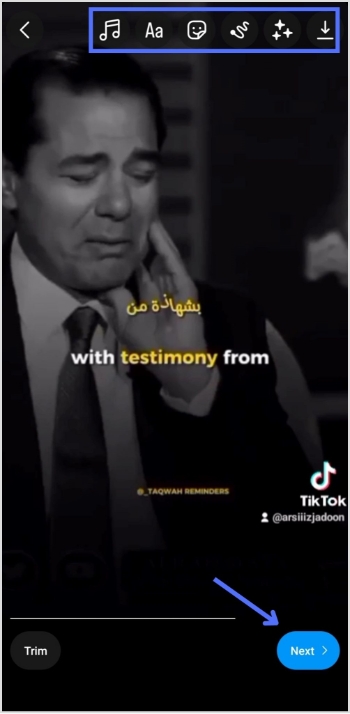
Step 1: Open the TikTok app and find the video you want to share.
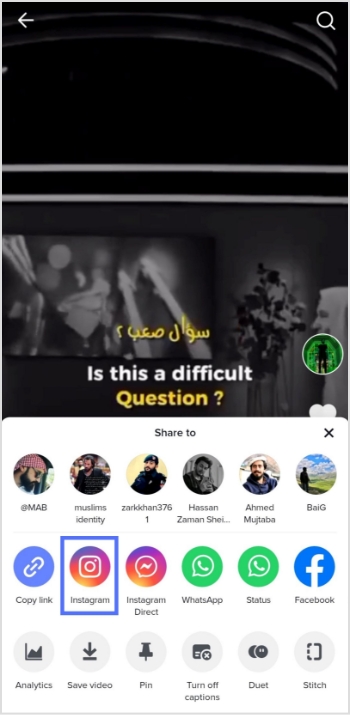
Step 2: Tap on the “3 dots” or “share” icon located on the right side of the screen.
Step 3: Tap on the “Instagram” option.
Note: Before sharing or embedding the video link elsewhere, like in bios, descriptions, or other social media, you can use a trusted URL shortener to produce neat, brand-friendly URLs that look clean and are easy to manage.
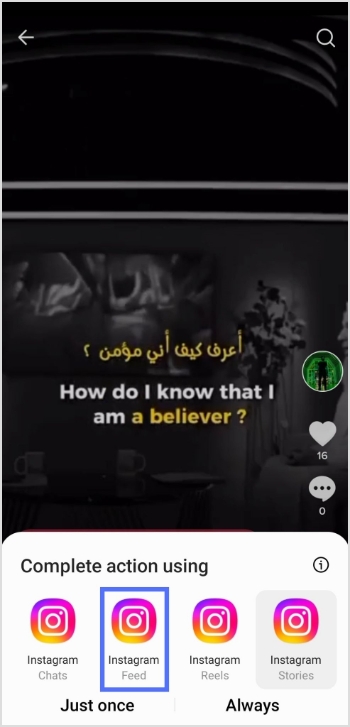
Step 4: Choose to post the video to your Instagram feed.
Step 5: Edit the video as desired, add filters, captions, or other adjustments, and then tap “Next.”
Step 6: Tap “share” and your video will be shared on your Instagram feed.
How to post a TikTok to Instagram stories?
To post a TikTok video on your Instagram stories, follow these steps:
Step 1: Open the TikTok app and find the video you want to share.
Step 2: Tap on the “Share” or “3-dots” icon located on the right side of the screen.
Step 3: Tap on the “Instagram” option.
Step 4: Choose to post the video to your Instagram story.
Step 5: Edit the video as desired, add filters, captions, or other adjustments, and share.
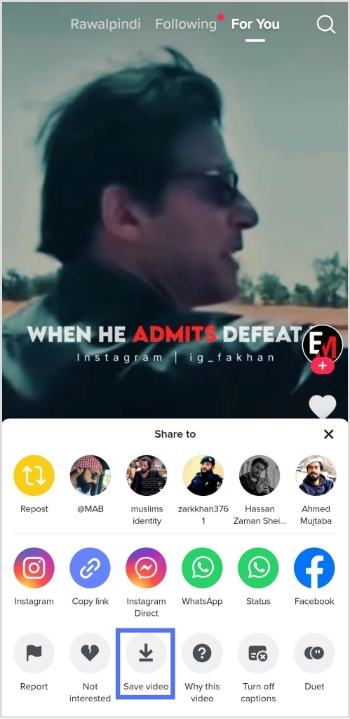
To post a TikTok video on your Instagram reels, follow these steps:
Step 1: Open the TikTok app and find the video you want to share.
Step 2: Tap on the “Share” icon located on the right side of the screen.
Step 3: Tap on the “Save video” option to save the video to your device.
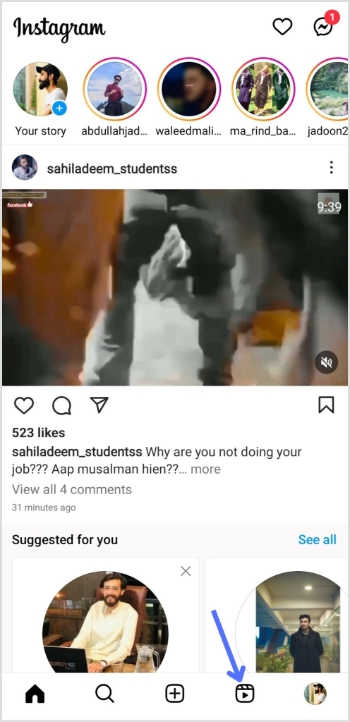
Step 4: Open the Instagram app and tap on the “Reels” option.
Step 5: Select the video you want to share from your device’s camera roll, add filters or other adjustments, and then tap “Share.”
And there you have it! Now you know how to post TikTok videos on Instagram, whether it’s for your feed, stories, or reels. So, go ahead and share your creative TikTok content with your Instagram followers and watch your social media presence grow!
FAQs
Can I post TikTok videos directly to Instagram?
No, you cannot post TikTok videos directly to Instagram. You need to save the TikTok video to your device first and then upload it to Instagram.
Will my TikTok video lose quality when I upload it to Instagram?
It’s possible that your TikTok video may lose some quality when you upload it to Instagram due to differences in compression and resolution. To minimize quality loss, try to save the TikTok video in the highest possible solution and choose the best Instagram video settings for your device.
Can I automate the process of sharing TikTok videos on Instagram?
While there is no direct way to automatically share TikTok videos to Instagram, you can use third-party apps or tools like Content Studio to automate the process to some extent. However, monitoring the results and making any necessary adjustments is important to ensure your content is shared accurately and effectively.
QR code is the bridge between your online and offline marketing efforts. Nurturing your consumers through the marketing funnel by giving them the correct information at the right time is the key to a successful influencer marketing campaign
Technology is meant to complement traditional print marketing and advertising instead of replacing it. The most successful and engaging marketing campaigns have one thing in common: integrating digital marketing approaches with conventional advertising.
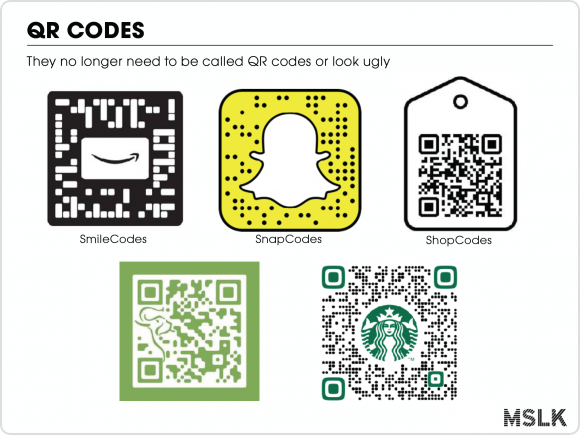
What is QR Code?
QR are 2D barcodes that are scanned through smartphone devices through cameras or their QR code scanning capability.
The strategic use and placement of QR codes with access to the updated and relevant information can be the most significant asset.
Why does QR code marketing matter?
The QR codes were used by a Toyota subsidiary named Denso in 1994. They helped in tracking the vehicle parts and streamline the manufacturing process.
This allowed the fast-decoding process and thus called Quick Response Code.
Back when it was introduced, there was a minimum number of people leveraging this technology. With a tiny number of use-cases, marketers predicted the QR code trend not to last too long.
Fast forward to 2020; the pandemic catapulted the QR code adoption not because of its versatility but for the fact that it was a safe, hygienic and cost-effective solution.
Not just that, it also gave an option to collect data from the traditional marketing campaigns.
Is QR code marketing here to stay?
According to Bank My Cell, there are 6.648 billion smartphone users globally, which means 83.40% of the world population owns a smartphone.
With the growing rate of QR code adoption, they can help increase brand awareness, increase sales and enhance customer engagement with the brand.
Modern way to create QR codes is through URL shorteners. Tools like Replug (i.e., an all-in-one link optimization platform) and other allows users to create custom shortened URLs without needing to know anything about HTML.
If you’re just getting started and want a free tool to manage and shorten your links, check out this free link shortener.
When sharing these shortened links, users just need to scan the link with their smartphone camera. You can easily shorten a link and then create a QR code pointing to it, all in a few clicks. This method is great because no technical skills are required.
How can you use QR codes for your marketing goals?
Increase social media following:
Social media presence for any business is no longer an option. It’s a necessity. You can use QR codes on the products for your marketing material to direct users to your social media pages like Facebook, Instagram.
This is a great way to maximize reach on social media networks. You can also ask them for a review of your product or tag them in the user-generated content with your product.
Get app downloads:
If used strategically, QR code marketing can be one of the fastest ways to increase app downloads and drive users into the mobile app marketing funnel. Burger King used them during 2020 MTV VMAs to let viewers download the Burger King app. These ads encouraged the viewers to scan the codes to download the app and avail various discounts.
Drive more traffic to your website:
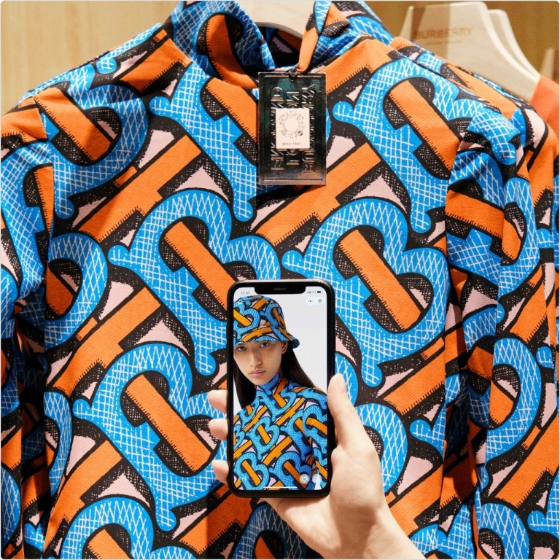
You can use the QR code to direct viewers to a page or website with detailed information. The information not covered in the print ad, such as product description, pricing list, dates and time, the procedure to place an order, can be communicated via the code. The luxury brand, Burberry, introduced sustainable labeling where they outlined the product attributes through this.
QR codes can be used on marketing materials from billboards, print ads and business cards to direct users to webpages. This helps marketers to build email lists by asking users to sign up to avail certain offers.
You can improve the user experience by offering them valuable and necessary information in the QR code—for example, an instructional video to set up the product or printable sheet or link to the recipe on food products.
QR codes can be strategically used for lead generation according to the kind of business. For example, a real estate agency had to sell a large office building. They used these to generate and track leads.
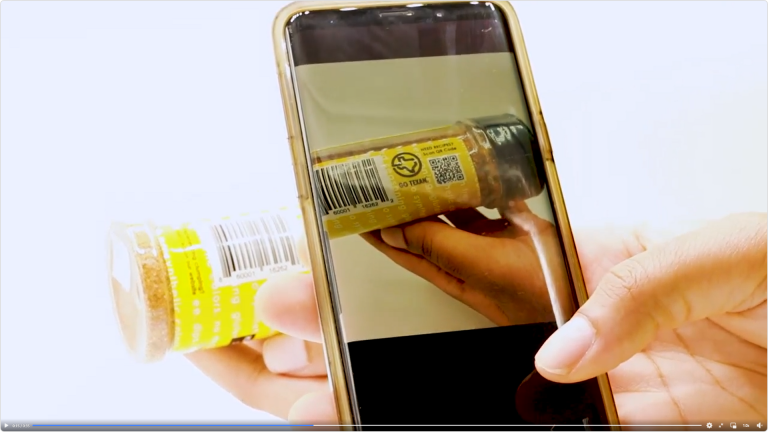
You can use QR codes for establishing product transparency through product packaging. This will help you to win your customer’s trust. It will increase the customer’s loyalty and engagement which is why they are more likely will stick to the brand.
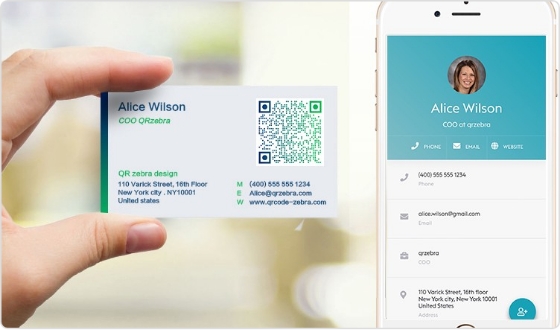
With the vCard QR code, you can share your contact details such as email, work address, phone details, location etc., with your customers. The dynamic one gives you the freedom to edit the information many times without reprinting the code.
With the flexibility to embed multiple content formats into QR codes, brands have attracted customers with personalized shopping experiences. JC Penny on Christmas released “Santa tags”. The idea was to allow the giver to record a personalized message played when the recipient scans the code.
Increase post purchase engagement:
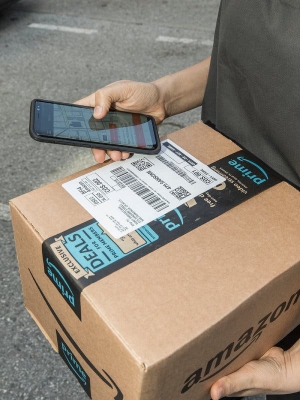
Avail the opportunity to engage your customer after the purchase. QR codes for rating and review pages are the one way to go about it. You can also link these to discount coupons for their future purchases, so they continue shopping with you. The Amazon QR codes drive repeat purchases and thus increasing the website traffic.
According to writers block hive, 86% of people said they trust online reviews as much as they believe in word of mouth. You can use a QR code to ask for product reviews and build the customer’s trust by providing them with the information they are looking for.
With the pandemic, restaurants looked for safe and hygienic options for their customers. From menus to payments, restaurants used QR codes to design a contactless experience for their customers.
QR code menus lower the printing price and are also more convenient to update about the availability of items, price, details etc., without reprinting.
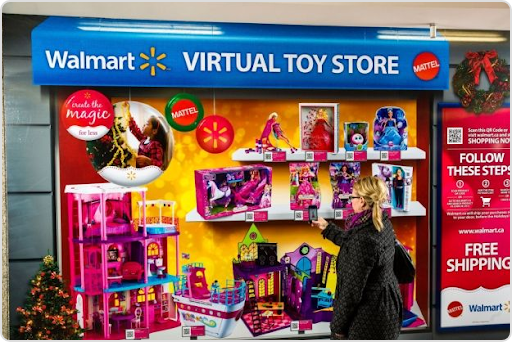
One cannot deny the effectiveness of OOH advertising. According to Dash Two’s study, 71% of consumers said digital billboards are more appealing than online ads. Pairing the billboard with a QR code strategically can drive consumers to take action and thus getting you data.
Walmart, during the 2020 holidays, when their sales are supposed to be high, didn’t observe the shoppers due to the covid-19 pandemic, they launched virtual billboards at places where they did not have brick and mortar stores.
These virtual stores allowed people to scan and buy the products on the spot from their online stores.
Visitors scan the code next to a painting, and they get a series of stories about the artwork, its history and the painter themselves.
The intriguing stories about war, deception, insanity, love and romance added to the experience of the museum visitors.
4- Recycling:
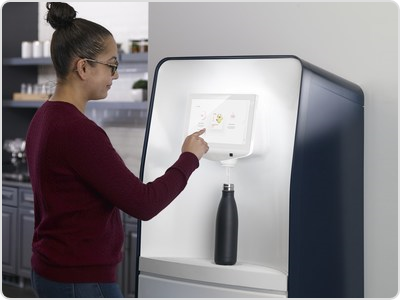
PepsiCo used an integrated hydration platform with QR codes in their soda stream style dispenser. For single-use plastic, PepsiCo used an integrated hydration platform. Other companies are embracing this innovation as well. Waste Direct, a leading waste disposal and recycling service in the UK, is leveraging QR codes to simplify waste management for convenient waste collection scheduling and more.
The users can bring their bottles to fill them with still or carbonated options. Thus, replacing the vending machine with dispensers that use QR code stickers. The system was launched in schools and offices, but it was later expanded into public places.
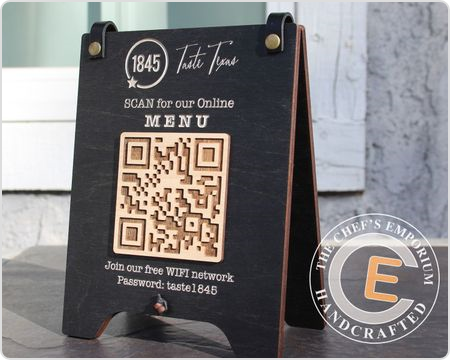
Add a call for action next to your QR code: A QR code is like the door opening into the experience your customer wants to have. But if there is no sign on the door, nobody will enter. A compelling call to action is therefore necessary.
QR code Placement: Make sure your QR code is strategically placed in a well visible place where your target user can notice it and quickly scan it. It should be set against a bright background to increase its readability.
Brand your QR code: Make sure the QR code reflects your brand identity. Branding is an essential part of it as well to generate more scans. Make them more attractive by customising them with brand colours and logos. Source
Mind QR code proportion: While using it on the marketing material or packaging, make sure not to distort the ratio since it can make the scanning difficult.
Minimize the number of QR codes: If there are multiple QR codes on the package or your print ad, it’ll confuse the audience, and thus you’ll miss the opportunity. Ideally, you should go with one goal per QR code, but if you want to give them a holistic view of your product, then you should create a universal link and direct them to the information they are looking for.
Use interactive landing pages: When linking your QR code to the video, file or landing page, make the content accessible on a smartphone and mobile-friendly.
High-quality QR code: Make sure you use a high-quality QR code with well-maintained whitespace so it is easy to read and scan.
Track data: Once your QR code marketing goes live, keep track of data. This data will tell you about your best performing and underperforming campaigns, and you can optimise them accordingly.
Benefits of dynamic QR code:
Editable: You can edit your dynamic QR code’s content at any time, allowing you to print your active QR codes, and you can still change the content at any time.
Data tracking: You can track data of your dynamic QR code addresses, contact numbers, and names; you can follow the number of scans, time of a scan, location of the scan and even people used it to scan it.
Cost-effective: A QR code generator is very cost-effective, and some platforms even offer it for free
Choosing a QR code generator:
Making the right choice of a QR code generator is the prerequisite of leveraging QR code marketing for your business. There are unlimited free QR code generators available, but make sure to choose with:
The accurate data tracking feature
Cost-effective with unlimited scans
High-resolution printable QR codes
Excellent documentation
Excellent customer support service
Frequently Asked Questions:
What are the data points you can get from QR codes?
QR codes are easy to use and are a great tool to analyse users’ click behaviour. They offer multiple data points such as time of the scan, location of the scan, times it has been scanned etc. With the right messaging and strategy, you can ask your users for email addresses, contact numbers and names.
Is there any expiration date for QR codes?
Some QR code generators offer a limited period or a limited number of scans. Once that is over, your QR code expires. However, some QR codes provide a lifetime of free access, and there is no limit on time or number of scans. In this case, you only have to make sure the URL is not broken.
How can we use QR codes in marketing?
QR codes are one of the most widely used tools for marketing by brands and businesses of all sizes. You can use QR code for: – Directing customers to your website – Getting App downloads – Share the business and contact details with potential clients – Share the address and location – Building email lists – Encouraging customers to leave a review – Engaging the customers for post-purchase – Personalized marketing tools the marketing – Sending prompted SMS and emails – Access AR for marketing
How to promote QR codes for your business?
There are various ways in which you can promote QR codes: – Include QR codes on the packaging – Include QR codes on marketing material both online and offline – Include QR codes in email signatures – Include QR codes on your business cards – Stick QR codes on tables, doors and signage where it can grab customer’s attention
Are you an avid gamer or just a casual viewer of gaming streams? Then you’ve likely come across Twitch, the popular live-streaming platform that has taken the gaming world by storm.
Whether you’re watching your favorite gamer or streaming your own gameplay, sharing your Twitch URL link is essential to getting more viewers and building your online presence.
That’s where Replug.io comes in to play. It helps you manage and brand the links you share, so every URL works harder for you.
But with all the different types of links available, from stream links to PDF links to channel URL links, it can be confusing to know which one to share and how to do it.
In this article, we’ll walk you through the process of sharing your Twitch URL link and give you some tips on how to make the most of it.
So, let’s get started and make sure your Twitch channel gets the recognition it deserves!
How to find and share your Twitch channel URL?
Your Twitch Channel URL is the link to your Twitch profile, which viewers can use to find and follow your channel. Here’s how to find and share your Twitch Channel URL:
How to find Twitch channel URL?
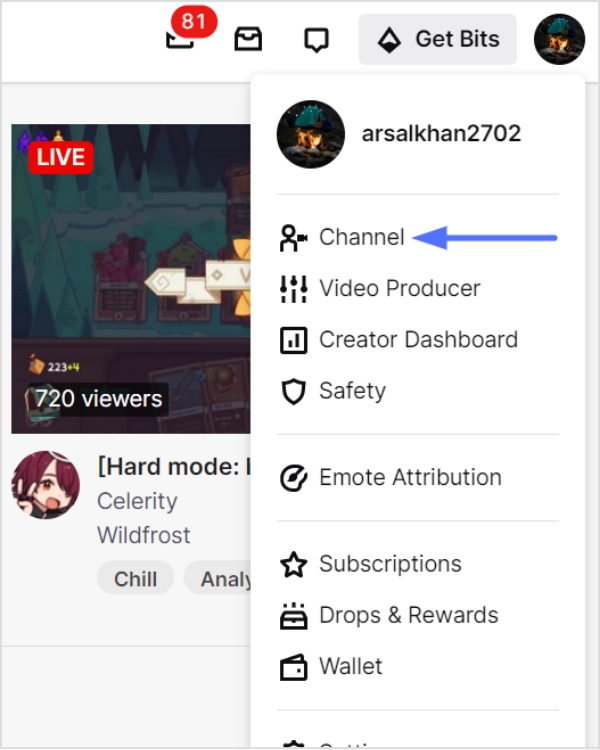
Step 1: Open Twitch on your preferred device and log in to your account.
Step 2: Click on your profile picture in the top right corner of the screen.
Step 3: Select “channel” from the dropdown menu.
Step 4: You can find the profile URL in the URL bar above. This is your Twitch ChannelURL.
How to share Twitch channel URL?
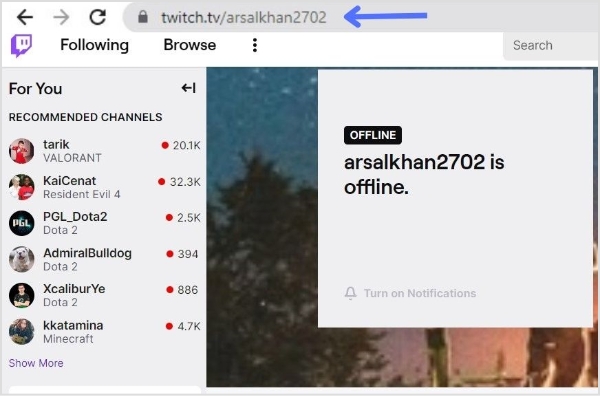
Step 1: Follow the above steps and copy the URL by selecting it and pressing Ctrl+C.
Step 2: Open the platform or social media where you want to share the link (e.g., Twitter, Discord, or Facebook).
Step 3: Create a new post or message and paste the copied URL into the text field.
Noteworthy Tip: Promoting your Twitch Channel URL on social media and other platforms is a great way to attract new viewers and build your audience. Consider joining Twitch communities and groups to connect with other gamers and potential viewers.
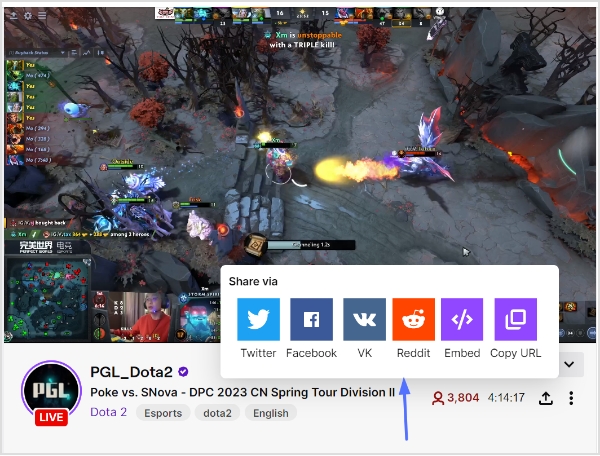
How to share a Twitch Link of a stream you’re watching?
Sharing a Twitch link of a stream you’re watching is a great way to introduce your friends and followers to new content and support your favorite streamers. Here’s how to do it:
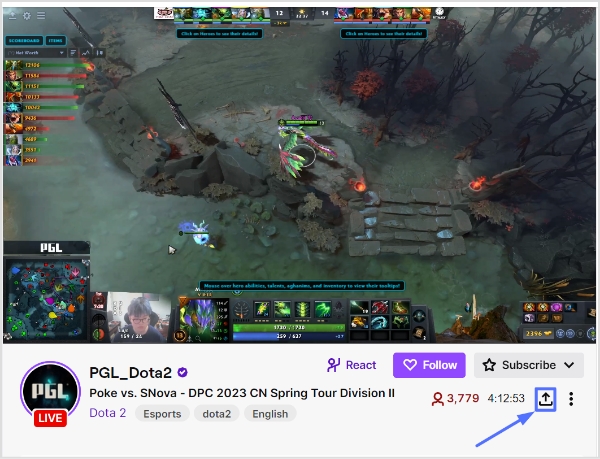
Step 1: Open the Twitch stream you want to share on your preferred device.
Step 2: Click on the “Share” button located below the video player.
Step 3: Choose how you want to share the link. You can copy the link to share it on other platforms or share it directly to social media platforms like Twitter, Facebook, or Reddit. It’s totally up to you!
Note: To make your Twitch link even more shareable and trackable, you can utilize an efficient link shortener to brand it, shorten it, and measure clicks seamlessly.
Step 4: Add a message or comment to your post to provide context for your followers and encourage them to check out the stream.
Step 5: Publish your post and wait for your followers to start watching the stream!
Sharing Twitch links is an essential part of building an audience and connecting with other gamers on the platform. Whether you’re sharing your own stream link, your Twitch Channel URL, or a link to a stream you’re watching, it’s important to provide context and encourage viewers to tune in. By promoting your Twitch content on social media and other platforms, and by supporting other streamers in the community, you can build your audience and create a thriving Twitch channel.
So don’t be afraid to share your links and get involved in the Twitch community – the more you engage with other gamers and viewers, the more successful your channel will be!
FAQs
How to change your Twitch URL link?
Yes, Twitch allows you to change your Twitch URL (also known as your Twitch Channel URL) once every 60 days. Here’s how to do it: – Log in to your Twitch account and click on your profile picture in the top right corner. – Select “Settings” from the dropdown menu. – Scroll down to the “Profile” section and locate the “Profile URL” field. – Click on the “Edit” button next to the field. – Type in your desired username, making sure to follow Twitch’s guidelines for usernames. – Click on the “Check Availability” button to make sure the username is available. – If the username is available, click on the “Update” button to change your Twitch URL.
How do I share my Twitch stream link?
To share your Twitch stream link, navigate to your stream page and copy the URL from the address bar. Then, paste it into a post on your preferred social media platform or messaging app, along with a message encouraging viewers to tune in.
What is the best way to promote my Twitch channel?
The best way to promote your Twitch channel is to engage with your audience on social media and other platforms and to collaborate with other streamers in the community. You can also consider creating content for other platforms like YouTube or Instagram to attract new viewers.
How often should I share my Twitch links?
There’s no set rule for how often you should share your Twitch links, but it’s important to strike a balance between promoting your content and not overwhelming your followers. Aim to share your links a few times a week, and make sure to provide context and encourage viewers to tune in.
Are you an avid Pinterest user looking to share your beautiful boards and pins with friends, family, or potential clients? Or maybe you’re new to the platform and trying to figure out how to navigate its features. Whatever the case may be, one important piece of information you’ll need is your Pinterest URL.
Your Pinterest URL is your unique identifier on the platform and allows others to find and follow your account. But with so many options and features on Pinterest, it can be confusing to locate your URL. Don’t worry though, in this article, we’ll guide you through the steps to find your Pinterest URL and get you on your way to share your amazing content with the world.
Where to Look for Your Pinterest URL?
Your Pinterest URL can be found in a few different places, depending on what you’re looking for. Here’s how to find your profile, pin, and board URL.
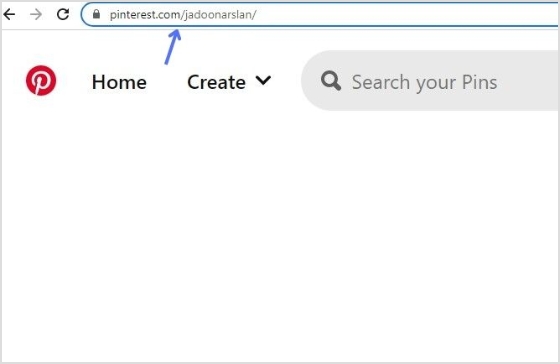
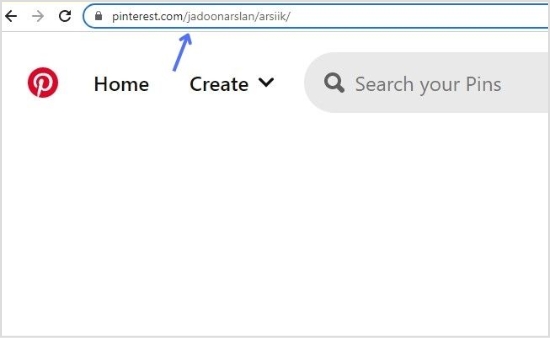
To find your Pinterest profile URL:
Step 1: Log in to your Pinterest account or create a new account.
Step 2: Click your profile icon in the top right corner to open your profile page.
Step 3: Copy the URL from the address bar. That’s your Pinterest profile URL.
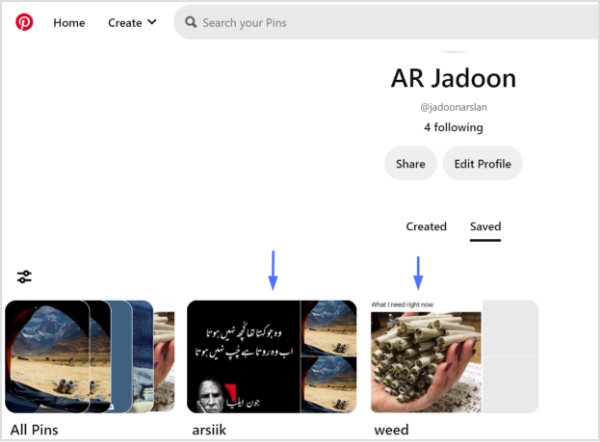
To find your Pinterest board URL:
Step 1: Log in to Pinterest and open your profile page.
Step 2: Select the board you want to share.
Step 3: Copy the URL from the address bar. That’s your Pinterest board URL.
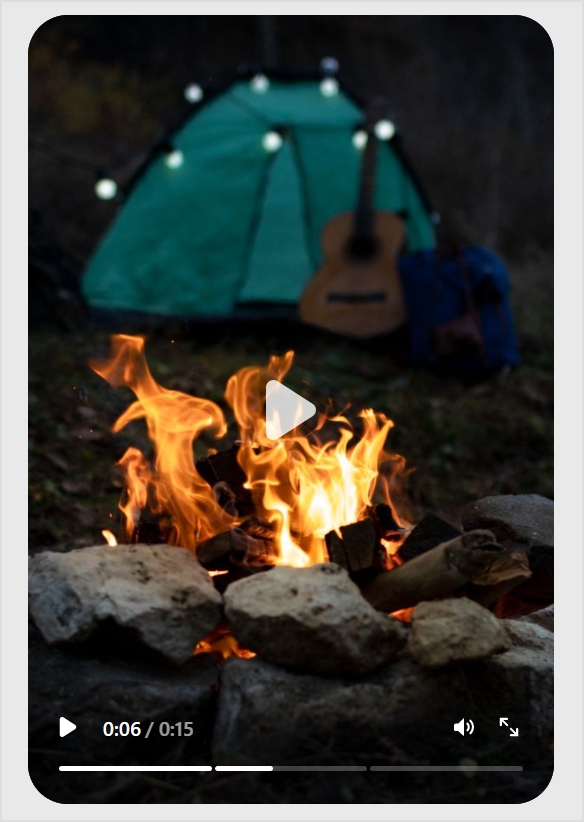
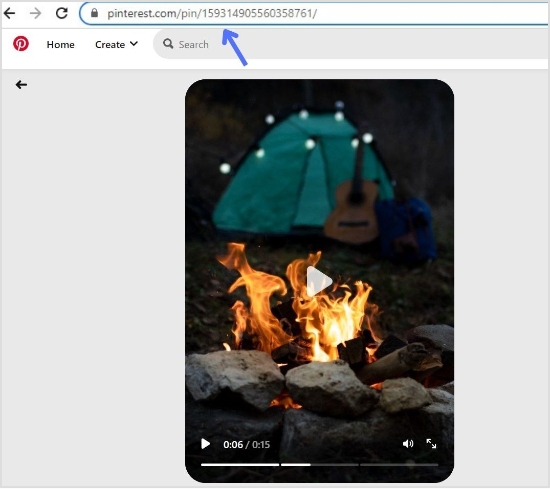
To find your Pinterest pin URL:
Step 1: Log in to your Pinterest account.
Step 2: Select the relevant pin (either from your own board or someone else’s).
Step 3: Copy the URL from the address bar. That’s your Pinterest pin URL.
Your Pinterest URL is a vital part of your presence on the platform, allowing others to find and follow your content. Whether you’re sharing your entire profile, a specific pin, or a board, knowing where to find your URL is essential.
By following the simple steps outlined in this article, you’ll be able to locate your Pinterest URL quickly and easily. Plus, to boost shareability even further, you can shorten link for cleaner, trackable shares. This helps you to grow your reach and connect with others on this visually-driven social media platform.
If you’re using a tool like Replug.io to manage your links and strengthen your sharing strategy, the URL you locate here will feed directly into your broader system.
FAQs
What is a Pinterest board?
A Pinterest board is a collection of related pins organized around a particular theme or topic. Users can create multiple boards on their Pinterest account and save or “pin” content to them, such as images, videos, and links from around the web. These boards can be shared with others and used for inspiration, planning, and bookmarking.
What is a Pinterest pin?
A Pinterest pin is a visual bookmark that users save to their Pinterest boards. Pins can include images, videos, or GIFs, and are typically linked to a website or online resource. Users can save pins they find on the platform or add their own pins to share with others. Pins are organized into boards based on topics or themes and can be discovered through search, recommendations, or by following other users.
How do I change my Pinterest URL?
1. Log in to your Pinterest account and go to your profile. 2. Select “Settings” from the drop-down menu. 3. Scroll down to the “Profile” section and click “Claim” next to the URL option. 4. Enter your desired username and click “Claim“. 5. If the username is available, you’ll be prompted to confirm the change. Click “Yes, let’s do it!” to save your new URL.
Note that you can only change your Pinterest URL once, and the new URL must be available and meet Pinterest’s guidelines for usernames. Once you’ve changed your URL, your old URL will no longer work, so be sure to update any links or references to your profile.
Instagram, like all social media platforms, constantly changes and evolves. In October 2021, one of the biggest updates was the removal of IGTV. Previously, users could find all live videos on Instagram by searching the hashtag #IGTV.
Live videos on Instagram are now integrated into the “Stories” feature. After a live video ends, it is only available to be replayed for 24 hours, after which it is stored in the user’s “Video Archive.” Whether the video is republished or deleted is up to the discretion of the content creator.
When you want to share a live-video replay or archive link, using a link shortener helps make the URL cleaner and more user-friendly, especially if you plan to post it across different platforms or in messages.
Also, if you are someone who manage lots of social-media links and want a unified tool to organize, track and optimize all of them, Replug.io can be a helpful hub to keep your URLs clean and manageable.
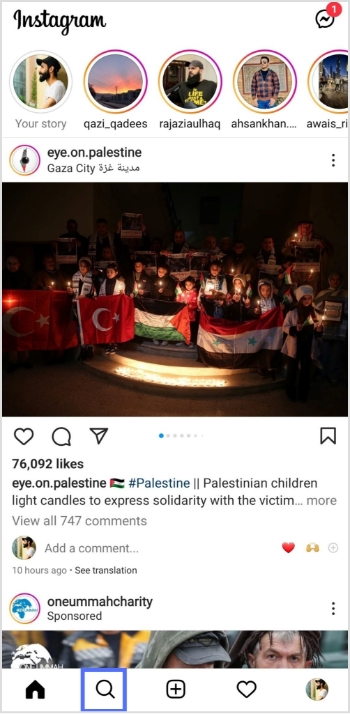
How to find live videos on Instagram?
There are two ways to find live videos on Instagram:
Find Instagram live videos from the accounts you follow
Find random live videos on Instagram
Let’s begin:
Find Instagram live videos from the accounts you follow:
You can easily view the live streams of the accounts you follow without much effort. Follow the steps below to find the live videos from the people you follow:
Step 1: Open the Instagram app on your mobile phone, or log in to Instagram from a browser.
Step 2: Live video will appear in the stories feed with a colorful ring around it and the word Live.
Step 3: Tap on the live video to see the live broadcast from the people you follow.
During the live broadcast, you can interact by:
When watching a live broadcast, remember that the broadcaster and other viewers may see you’ve joined.
Leaving a comment (tap Comment on the app or Add a comment on the website), liking a comment, replying to a comment, reacting to the video with an emoji, or sharing the video. All actions taken during the broadcast, such as liking or commenting, are visible to other viewers.
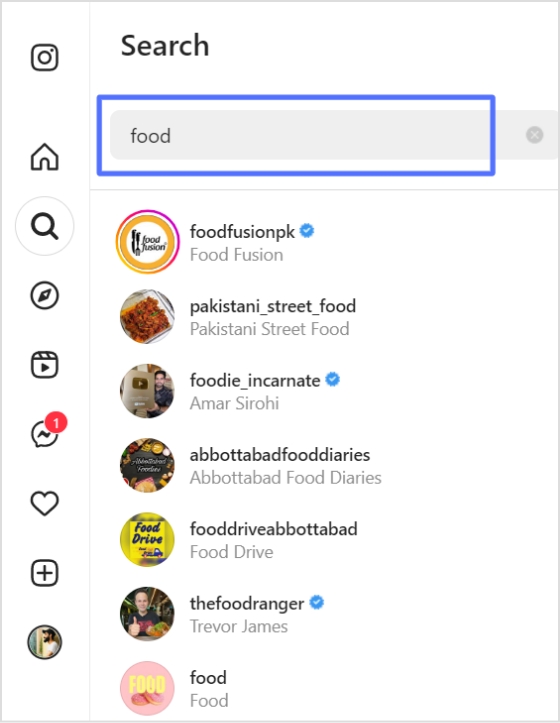
How to find random Instagram live videos?
Discovering random live streams on Instagram can be frustrating if you don’t get any results. However, you can try the following steps for searching for random live streams:
On Instagram mobile app:
Step 1: Open the Instagram app on your mobile phone.
Step 2: Tap the “search icon” at the bottom menu.
Step 3: Enter the intended live video keyword in the search bar and tap the search button on your mobile keypad.
Step 4: Tap the “accounts” tab to open accounts with the live videos.
Step 5: Tap the profile icon with the “live” to open the live stream.
On a web browser:
Step 1: Log in to Instagram from your browser.
Step 2: Click “search” in the left side menu.
Step 3: Enter the intended keyword in the search bar and look for the “live” profile.
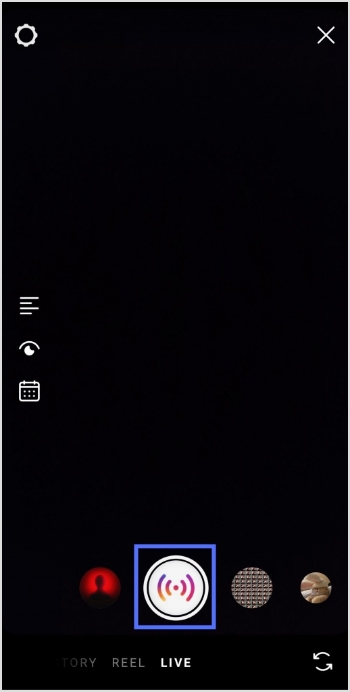
Follow the steps below to start a live broadcast on Instagram:
Step 1: Open the Instagram app and tap the “add icon” in the bottom menu.
Step 2: Swipe left to go to live and tap the live button to start the live video.
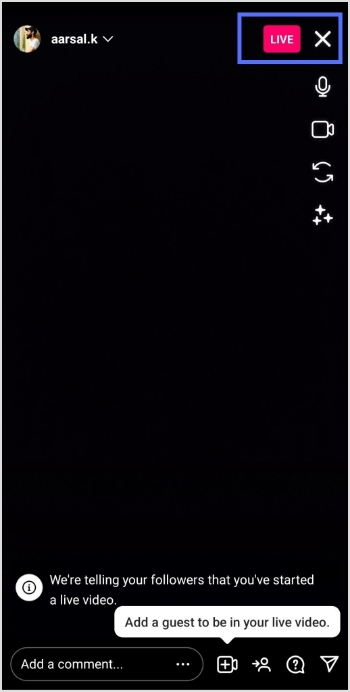
Step 3: The device will check for the internet connection momentarily, then you’ll see the “you are now live” message on the screen.
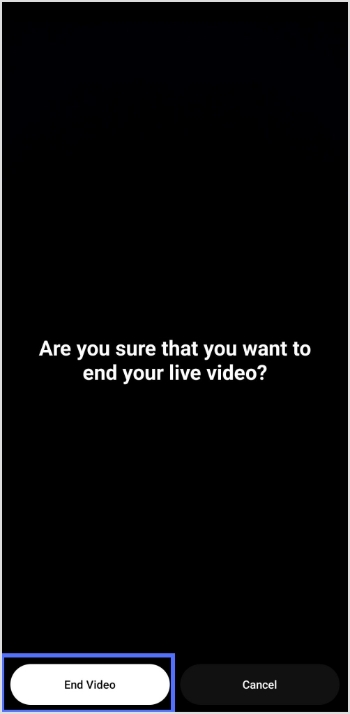
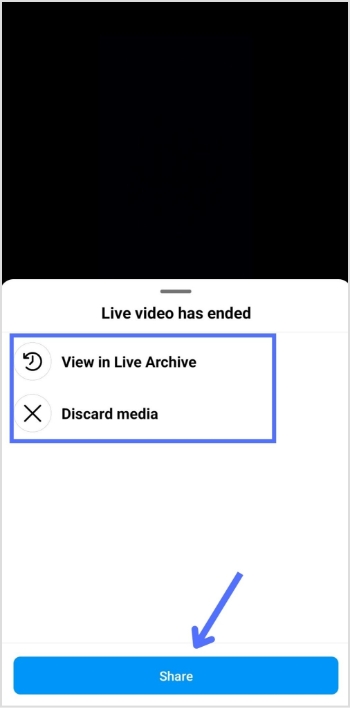
Step 4: Tap the “exit (X)” on the top right corner to end the live stream.
Step 5: Tap the “end video” button and confirm to end the live stream.
Step 6: You will see the following options: View in Live Archive, Discard media or Share. Make your selection according to your preference.
Frequently asked questions
Why can’t I find live videos on Instagram?
There could be several reasons why you are not able to find live videos on Instagram:
– Your account may not have access to live videos. Instagram has certain restrictions and requirements to access live videos. – The person you are trying to view the live video may not be broadcasting. – The person you are trying to view the live video of may have a private account, and you may not be following them. – Your internet connection may be slow or unstable, affecting the live video quality. – There could be a technical issue with the Instagram app or your device.
Try troubleshooting these issues, or contact Instagram support for further assistance.
Do you want to share a video with your followers, but can’t find the right way to do it? Are you tired of sending long, cumbersome links that often get lost in translation? Well, look no further because we’ve got you covered!
Deep linking allows you to share a video directly to a specific point within the app or website, saving time and effort for you and the person receiving the link.
Imagine you’ve just found the perfect video to share with your audience. It’s engaging, informative, and sure to make an impact. But, there’s one problem – the link is long, convoluted, and almost impossible to remember.
Enter Replug’s deep links – the superhero that saves the day!
Replug’s deep links work by taking that long and cumbersome link and turning it into a short and snappy one. But, that’s not all – Replug’s deep links can direct your audience to a specific point within the video or website, ensuring they get to the meat of the content and don’t miss out on anything important.
But wait, there’s more! Replug’s deep links also come with advanced features that give you the power to track and optimize your links. You can add custom CTAs, retargeting pixels, and more, giving you valuable insights into how your links are performing and how you can improve them.
So, what are you waiting for? Say goodbye to long and confusing links and hello to Replug’s deep links – which take your audience on a seamless journey to the content they crave.
Looking to simplify all your URLs even further? Try this precise link shortener to create clean, branded links that perfectly complement your deep linking strategy.
Replug deep links for videos: how do I do it?
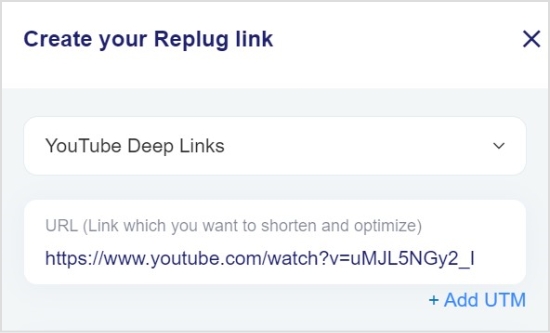
Here’s how to share videos using deep links from Replug.io:
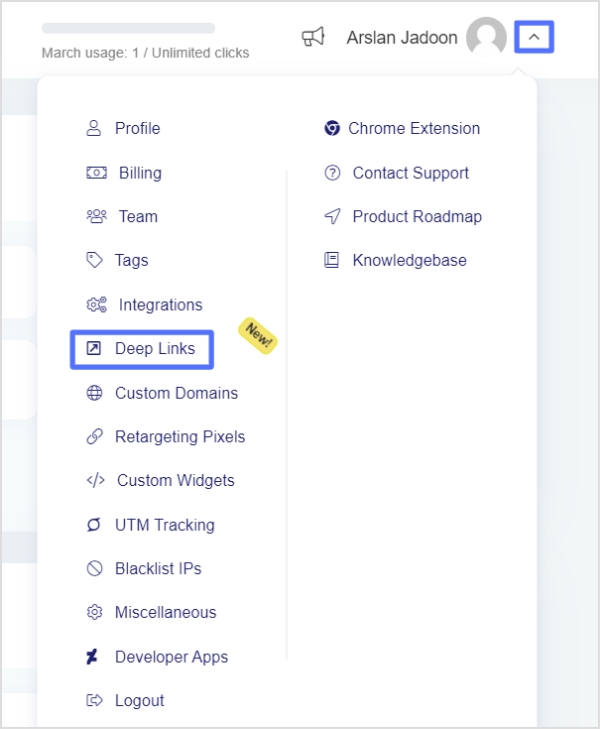
Step 1: Sign in to Replug or create an account for free.
Step 2: On the main dashboard page, click the “drop-down icon” in the top right corner and choose “deep links’’ from the drop-down list.
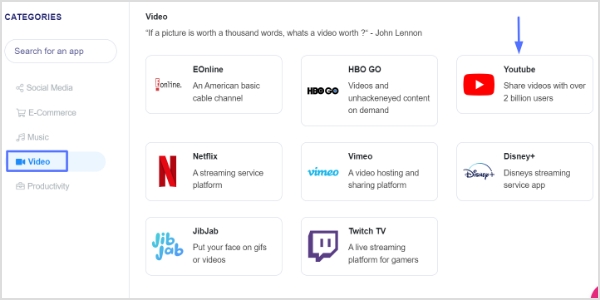
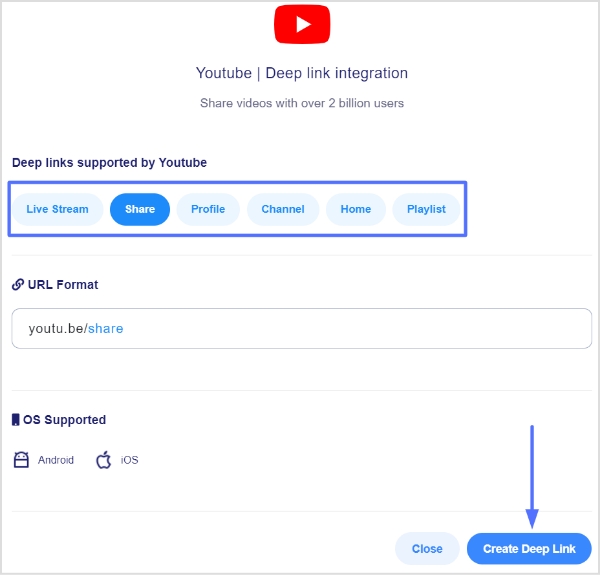
Step 3: On the deep links page, click “video” to create a deep link for a video, then choose the video platform you want to create a deep link for. Let’s choose “YouTube”.
Note: Deep links are allowed on up to 70 applications under Social Media, e-Commerce, Music, Video, and Productivity categories.
Step 4: When a deep link for YouTube is generated, clicking on it will open the desired live stream, video or share, profile, channel, home, or playlist directly in the YouTube application. Select the option you want and click the ‘create deep link’ button (here we’ll select the video or share option as we are creating a deep link for a YouTube video).
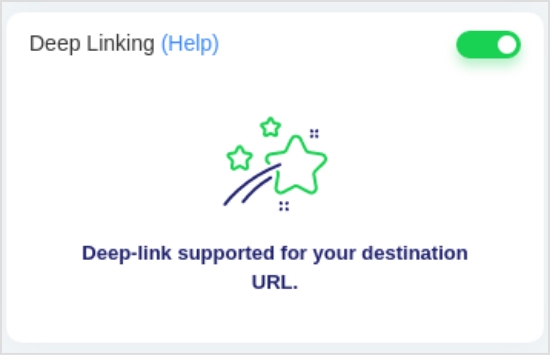
Note: If the destination URL can not be used as a Deep Link, the following indication will appear.
Step 7: Click the “save link’’ button and your link with the deep linking feature will be saved and available for sharing.
FAQs
What are the two types of deep links?
The two types of deep links are:
1. Standard Deep Links: These are deep links that take users directly to a specific page or content within an app. For example, a standard deep link could take a user to a specific product page within an e-commerce app.
2. Deferred Deep Links: These are deep links that not only take users to a specific page within an app but also carry additional information about the user or the context of the link. This information can be used to personalize the user experience within the app. For example, a deferred deep link could take a user to a specific product page within an e-commerce app and also provide information about a promotion that the user is eligible for. Deferred deep links are typically used in marketing campaigns to deliver personalized experiences to users.
How do you create a deep link in HTML?
You can create a deep link in HTML by adding an anchor tag with a specific target location. Here’s an example:
<a href=”https://example.com/page#section”>Click here to go to the section</a>
In this example, “https://example.com/page” is the URL of the webpage, and “#section” is the ID of the section you want to link to. To create a deep link, you simply add a “#section” to the end of the URL in the “href” attribute of the anchor tag.
Instagram does not allow users to download videos directly from the platform, but there are a few ways to download Instagram videos.
Here are some methods:
Method 1:
Download using a video downloader website:
Many websites allow you to download Instagram videos. Here’s how to download Instagram videos using a video downloader website:
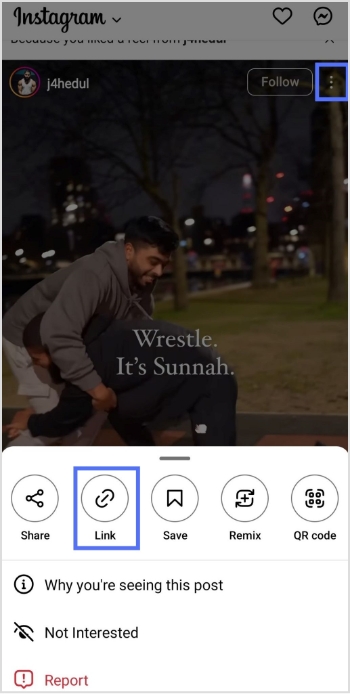
Step 1: Open the Instagram app and find the video you want to download.
Step 2: Click on the three dots in the upper right corner of the video and select “Copy Link.”
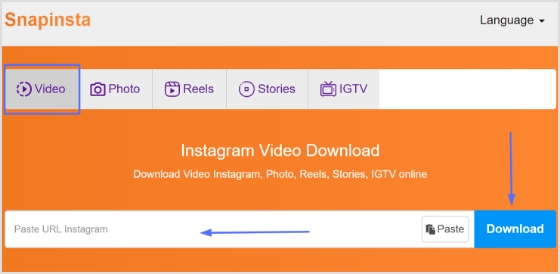
Step 3: Go to a video downloader’s website, like “Snapinsta” and paste the link into the search bar.
Note: Before pasting, you could also use a link converter to shorten or clean up the URL, making it easier to share or save, while keeping things organized and trackable for future reference.
Step 4: Click download, and the video will be downloaded to your device.
Here’s how to download Instagram videos using a third-party app:
Many third-party apps allow you to download Instagram videos. Here are some popular ones:
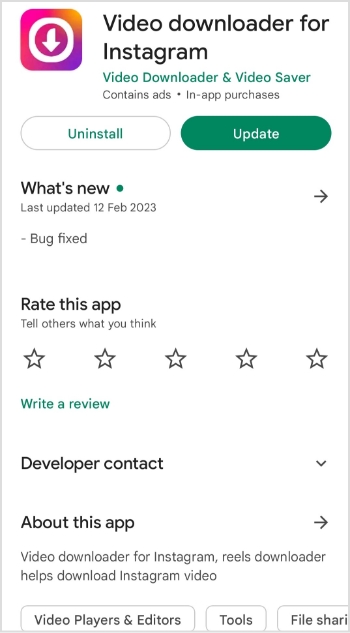
Video Downloader for Instagram: This app is available on iOS and Android. It allows you to download videos from Instagram by copying the video link and pasting it into the app.
InstaSave: This app is available for Android and allows you to download Instagram videos by copying the video link and pasting it into the app.
Method 3:
Use a screen recording tool:
If the above methods don’t work, you can use a screen recording tool to record the video as it plays on your screen. Here’s how:
Step 1: Open the Instagram app and find the video you want to download.
Step 2: Start a screen recording on your device (the method varies by device).
Step 3: Play the Instagram video and let it play in full.
Step 4: Stop the screen recording and save the video to your device.
It’s important to note that some of these methods may violate Instagram’s terms of service, and downloading copyrighted content without permission is illegal. Make sure you have the necessary rights to the content before downloading.
And, if you frequently work with social media links or share downloadable content across platforms, Replug can serve as a handy hub, letting you manage and organize all your links easily before you share or download content.
There are several ways to download Instagram reels, and I’ll outline some of the most common methods:
1. Using a third-party app: Many third-party apps allow you to download Instagram reels. Some popular ones include InSaver, Video Downloader for Instagram, and InstaSave. To use these apps, copy the link to the reel you want to download, paste it into the app, and follow the instructions to download the video. 2. Using an online downloader: Several websites allow you to download Instagram reels. Some popular ones include InstaDownloader, InstaOffline, and DownloadGram. To use these websites, copy the link to the reel you want to download, paste it into the website, and follow the instructions to download the video. 3. Using the built-in download option: Instagram has recently added a built-in download option that allows you to download your reels. To use this feature, open the reel you want to download, tap the three dots in the top right corner, and select “Save Reel.” The reel will be saved to your camera roll.