Category: Help guides

Read Replug’s help guides blog for expert tips, insights, and resources on link management, tracking, branded URLs, QR codes, and audience growth.

  • How to Find and Submit a Sitemap URL to Google?

    How to Find and Submit a Sitemap URL to Google?

    Sitemaps are vital roadmaps for search engines like Google. They ensure that every nook and cranny of your website is explored and indexed accurately. Without a sitemap, search engines might miss important pages or content updates. 

    By providing a clear layout of your website’s structure, you enhance its visibility and accessibility, leading to higher search rankings and better user experiences. 

    Sitemaps are like GPS for search engines, guiding them to navigate and showcase your digital presence effectively.

    This guide will teach you everything you need to know about understanding, creating, and submitting your sitemaps to Google. Let’s get started!

    What is a Sitemap URL?

    A sitemap URL is a web address that points to a sitemap. 

    A sitemap is a list of all the pages on a website. It helps search engines find and index the pages on your website. The sitemap URL is usually in the format of https://www.example.com/sitemap.xml.

    When you create a sitemap for your website, you typically save it as an XML (Extensible Markup Language) file. This XML file contains a list of URLs to different pages and sections of your website, along with additional information like when the page was last updated and its importance relative to other pages. 

    By submitting your Sitemap URL to search engines, you enable them to efficiently crawl and index your website’s content. This helps improve your website’s visibility in search results and ensures that search engines can accurately represent your website to users.

    Important note: We are discussing XML sitemaps throughout this guide.

    XML Sitemap URL example:

    Here’s a simple example of what an XML sitemap might look like:

    Sitemap-url-example

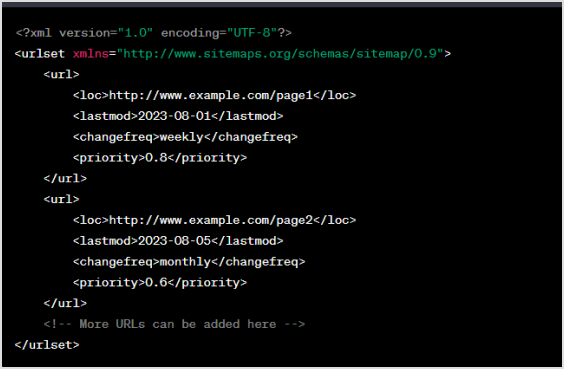
    In this example, each `<url>` element represents a page on the website. The `<loc>` tag contains the URL of the page, `<lastmod>` indicates when the page was last modified, `<changefreq>` specifies how often the page’s content changes (options include “always,” “hourly,” “daily,” “weekly,” “monthly,” “yearly,” and “never”), and `<priority>` indicates the priority of the page relative to other pages (values range from 0.0 to 1.0).

    Keep in mind that this is a basic example. Depending on your website’s structure and content, your XML sitemap might include more elements and attributes. Also, the URLs in the example should be replaced with the actual URLs of your website’s pages.

    Boost ROI with branded URLs - Replug dashboard showing performance metrics and branded URL creation
    Boost your conversion rates with irresistable CTAs with

    for your marketing campaigns.

    Check

    Higher clicks

    Check

    More leads

    Check

    Better ROI

    Generate free CTAs

    How do I find my Sitemap URL?

    To find the Sitemap URL of your website, you can follow these methods:

    1. Check the root domain: 

    Most websites place their sitemap file at the root of their domain. This means you can access it by adding “/sitemap.xml” to your domain name. For example, http://www.yourwebsite.com/sitemap.xml

    1. Robots.txt file: 

    Open your website’s robots.txt file. For example, if you want to view the robots.txt file for yourwebsite.com, enter https://www.example.com/robots.txt into the browser’s address bar. This file often contains a line that indicates the location of the sitemap. Look for a line that looks like Sitemap: http://www.yourwebsite.com/sitemap.xml

    1. Google search console: 

    If you’ve registered your website with Google Search Console, you can find the submitted sitemap URL there. Log in to Google Search Console, select your property, and navigate to the “Sitemaps” section. The sitemap URL should be listed there.

    1. Content management system (CMS): 

    If you’re using a CMS like WordPress, there might be plugins that generate and manage your sitemap. In some cases, these plugins provide you with the sitemap URL directly in the plugin settings or dashboard.

    Also read: The Importance of Choosing the Right URL Slug for SEO Success

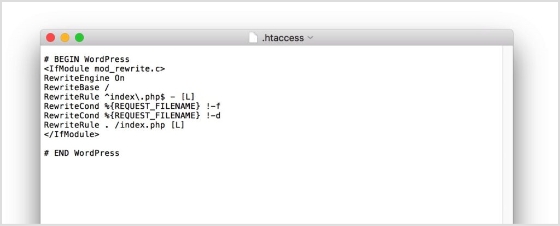
    How to find my Sitemap URL in WordPress?

    In WordPress, finding your sitemap URL can be quite straightforward, especially if you’re using popular SEO plugins like Yoast SEO or All in One SEO Pack. Here’s how to find your sitemap URL on WordPress using these plugins:

    Using Yoast SEO:

    1. Log in to your WordPress dashboard.

    2. Navigate to “SEO” in the left-hand menu and click on “General.”

    3. Click on the “Features” tab.

    4. Look for the “XML Sitemaps” feature and make sure it’s enabled.

    5. Once enabled, you can access your sitemap by clicking on the “XML Sitemaps” link that appears.

    Using all-in-one SEO pack:

    1. Log in to your WordPress dashboard.

    2. Go to “All in One SEO” in the left-hand menu.

    3. Click on “Feature Manager.”

    4. Find “XML Sitemaps” and make sure it’s enabled.

    5. After enabling, a new menu item “XML Sitemap” will appear in the All in One SEO menu. Click on it to access your sitemap.

    If you’re not using these plugins or want to find your sitemap manually, it’s often located at `http://www.yourwebsite.com/sitemap.xml` (replace “yourwebsite.com” with your actual domain name). However, please note that the actual location of the sitemap might vary based on your website’s setup or theme.

    If you’re still having trouble finding your sitemap, consider checking your theme’s documentation or asking your website administrator for assistance.

    Also read: How to Redirect a URL in WordPress – Ultimate Guide

    How to submit a Sitemap URL to Google?

    Submitting a Sitemap URL to Google is an essential step to ensure that your website’s pages are properly indexed and displayed in search results. Here’s a simple guide on how to do it:

    1. Create a Sitemap: 

    First, ensure you have a sitemap for your website. If you haven’t already, you can create a sitemap using various online tools, plugins, or even manually.

    1. Sign in to Google search console: 

    If you don’t have a Google Search Console account, you’ll need to create one. Go to the Google Search Console website (search for “Google Search Console”) and sign in using your Google account.

    1. Add your property: 

    Once logged in, click on the “Add a property” button and enter your website’s URL. Follow the verification process to prove that you’re the owner of the website.

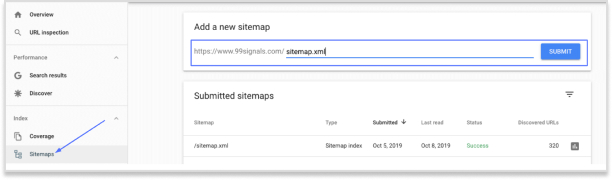
    1. Access the Sitemaps section: 

    After verifying your property, select your website from the Google Search Console dashboard. In the left-hand menu, click on “Sitemaps” under the “Index” section.

    1. Submit your Sitemap URL: 

    On the Sitemaps page, you’ll see an “Add a new sitemap” button. Click it and enter just the part of the URL that comes after your domain name. For example, if your sitemap URL is http://www.yourwebsite.com/sitemap.xml, you would enter only /sitemap.xml. Then, click “Submit.”

    how-to-submit-sitemap-url
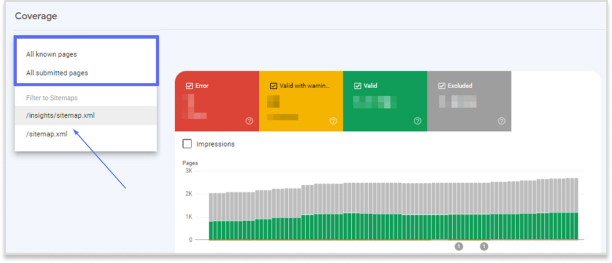
    1. Check status and errors: 

    Google will now process your sitemap submission. You can check the status of your submitted sitemap and any potential errors by refreshing the page or checking back later.

    1. Monitor and update: 

    As your website evolves, it’s a good practice to regularly update your sitemap and resubmit it to Google whenever you add new content or make significant changes.

    Remember, submitting a sitemap helps Google crawl and index your website more effectively, which can improve your website’s visibility in search results. If you encounter any issues during the process, Google Search Console provides helpful information and troubleshooting options.

    Replug Branded Short Links CTA
    Drive more clicks, conversions, and app installations by deep linking
    to your favorite platforms.
    Try deep links for free

    Also read: How to Submit a URL to Google: A Quick and Easy Guide

    Frequently asked questions

    Can I submit multiple sitemaps for different sections of my website?

    Yes, you can submit multiple sitemaps for various sections or content types of your website. This helps Google understand the diverse content your site offers.

    What should I do if my sitemap contains errors or broken links?

    It’s crucial to fix errors and broken links in your sitemap to ensure proper indexing. Regularly review and update your sitemap to maintain its accuracy.

    How often should I update and resubmit my sitemap to Google?

    Update and resubmit your sitemap whenever you add new content, make structural changes, or when Google introduces updates that affect indexing.

    Do other search engines besides Google also support sitemaps?

    Yes, other major search engines like Bing and Yahoo also support sitemaps. Submitting sitemaps to multiple search engines can improve visibility across various platforms.

  • What is “Dark Traffic” & How Should You Deal with It?

    What is “Dark Traffic” & How Should You Deal with It?

    Picture this: you have a website, and you want to know where your visitors are coming from to improve your strategies. But there’s a tricky kind of traffic called “dark traffic.” It’s like visitors arriving in disguise – you can’t tell where they’re really from. This is a problem because you can’t figure out what’s working or not in your marketing.

    Dark traffic happens because sometimes, visitors directly type in your website’s address or use bookmarks. Also, links shared in private messages or some apps can’t be tracked properly. So, even though they’re visiting your site, you don’t know where they’re coming from.

    Solving this puzzle is essential. By understanding dark traffic better, you can make your marketing smarter and improve how you reach people. That’s exactly what Replug.io is built to help you with, shedding light on hidden traffic paths so you can make more data-driven decisions.

    Let’s dive into the world of dark traffic, learn why it’s a challenge, and find ways to uncover the hidden paths your visitors take to reach your website.

    What is dark traffic?

    Dark traffic refers to the website or app traffic that is attributed as “direct” traffic in analytics tools, but its true source or origin is not accurately tracked or identified. In other words, it’s traffic that comes to your website or app without clear referral information.

    Dark traffic can make it difficult to understand the true sources of your traffic and the effectiveness of your marketing efforts. 

    What are the causes of dark traffic?

    There are several reasons why dark traffic may occur, including:

    Direct bookmarks: 

    Users manually typing in your website’s URL or using a bookmarked link.

    Untracked links: 

    Links shared through private messaging apps or email that are not properly tagged with tracking parameters.

    Mobile apps: 

    Traffic from mobile apps might not pass referral information correctly.

    HTTPS to HTTP redirects: 

    If a user clicks a link on an HTTPS site that redirects to an HTTP site, referral information can be lost.

    Social media apps: 

    Links clicked within social media apps might not always be accurately tracked.

    Related: What are Dark Posts on Social Media?

    Replug Branded Short Links CTA
    Drive more clicks, conversions, and app installations by deep linking
    to your favorite platforms.
    Try deep links for free

    How to resolve the dark traffic problem?

    To deal with dark traffic, consider the following steps:

    Implement UTM parameters: 

    Use UTM parameters in your links whenever you share them online. UTM parameters are tags added to the end of URLs that help track the source, medium, campaign, and other relevant information about the link. This can help you better categorize your traffic and attribute it accurately.

    Note: When you need to shorten a link, using a branded link shortener like Replug can help you add UTM tags more cleanly and still get precise attribution, making your analytics much more reliable.

    Use analytics tools: 

    Utilize web analytics tools like Google Analytics or Usermaven to track and analyze your website’s traffic. While these tools may not completely eliminate dark traffic, they can provide insights into trends and patterns that might help you identify sources of direct traffic that should be categorized differently.

    Monitor referral sources: 

    Regularly check your analytics data to identify unexpected spikes in direct traffic. Investigate the source of these spikes to determine if they are the result of dark traffic or if there might be new referral sources that are not being properly tracked.

    Educate team members: 

    Ensure that everyone who shares links on behalf of your organization is aware of the importance of using properly tagged links with UTM parameters.

    Improve tagging: 

    If you’re using social media or other platforms to share links, ensure that these platforms are correctly handling referral information. Some platforms might strip out referral parameters, leading to inaccurate tracking.

    Monitor trends: 

    Keep an eye on traffic patterns and trends. If you notice a consistent pattern of dark traffic from a specific source, it might be worth investigating and finding ways to properly attribute that traffic.

    Regularly review and clean data: 

    Periodically review your analytics data to identify and clean up any discrepancies or misattributions.

    While it’s challenging to completely eliminate dark traffic, taking these steps can help you minimize its impact and gain a clearer understanding of your website’s true traffic sources.

    Dark traffic scenario

    Imagine you’re the owner of a thriving online fashion store, and your website is bustling with activity. You’re excited about the traffic flooding in, but there’s a twist. A significant portion of your website’s visitors fall under the mysterious realm of “dark traffic.”

    You log into your analytics dashboard and notice that a substantial chunk of your traffic is labeled as “direct traffic.” This is the category that includes visitors who type in your website’s URL or use bookmarks to access your site. While this is expected to some extent, you suspect that not all direct traffic is as it seems.

    You’re aware that social media shares and private messages could be contributing to this direct traffic, but without proper tracking, you can’t pinpoint the exact sources. This puts a wrench in your efforts to measure the effectiveness of your marketing campaigns accurately.

    You know that understanding your traffic sources is crucial for making informed decisions. You want to know which campaigns are driving the most visitors and which platforms are performing best. Without proper attribution, your marketing strategies could miss the mark.

    Solution: Unmasking the shadows

    Armed with the knowledge that dark traffic can skew your insights, you decide to take action:

    • UTM parameters: You start incorporating UTM parameters into your links whenever you share content. These magic tags allow you to tell Google exactly where the visitors are coming from. Now, whether it’s a link shared on Twitter, in a WhatsApp message, or through email, you’re covered.
    • Segmentation: You dive into your Google Analytics dashboard and create a segment specifically for direct traffic. This allows you to isolate the dark traffic and understand its impact better.
    • Page analysis: Navigating to the “All Pages” section, you look for anomalies. Certain pages seem to have unusually high direct traffic. You cross-reference these with your marketing campaigns and recent shares.
    • Education: You make sure your team is well-versed in using UTM parameters. You emphasize the importance of tagging links correctly to avoid the shadowy realm of dark traffic.
    • Refinement: Armed with insights from UTM-tagged links, you refine your marketing strategies. You identify which platforms are truly driving traffic and adjust your efforts accordingly.
    • Continual monitoring: You understand that dark traffic isn’t entirely escapable, but you commit to regular monitoring and adjustments to keep it at bay.

    By unveiling the sources of your dark traffic, you’re not only improving your data accuracy but also making more informed decisions about your marketing efforts. The hidden paths are no longer a mystery – you’re shedding light on the shadows and navigating your website’s success with clarity.

    Boost ROI with branded URLs - Replug dashboard showing performance metrics and branded URL creation
    Boost your conversion rates with irresistable CTAs with

    for your marketing campaigns.

    Check

    Higher clicks

    Check

    More leads

    Check

    Better ROI

    Generate free CTAs

    FAQs

    Why is dark traffic a challenge?

    Dark traffic makes it difficult to understand the true sources of your website’s traffic and the effectiveness of your marketing efforts. Without proper attribution, you might misinterpret the impact of your campaigns.

    How does dark traffic happen?

    Dark traffic can occur when users manually type in URLs, use bookmarked links or click on links shared through private messages or certain apps. Referral information can be lost in these cases.

    What are UTM parameters?

    UTM parameters are tags added to the end of URLs to track the source, medium, campaign, and other information about a link. They help in accurately attributing traffic to specific sources.

    How can UTM parameters help with dark traffic?

    UTM parameters provide a way to tag links shared on different platforms, ensuring that even if the traffic appears as direct, you know its true origin.

    What are some common sources of dark traffic?

    Direct bookmarks, links shared in private messages, traffic from certain mobile apps, and links clicked within social media apps can contribute to dark traffic.

    How can I prevent dark traffic?

    To minimize dark traffic, use UTM parameters consistently, educate your team on their importance, and monitor referral sources regularly to identify anomalies.

    Can I completely eliminate dark traffic?

    It’s challenging to eliminate dark traffic entirely since some direct traffic is legitimate. However, you can take steps to reduce its impact and improve tracking accuracy.

    How do I analyze dark traffic in Google Analytics?

    Use segmentation to isolate direct traffic. Analyze specific pages that might have unusually high direct traffic. Look for patterns and trends that can indicate the origin of this traffic.

  • How to Add Spotify Link to TikTok Bio?

    How to Add Spotify Link to TikTok Bio?

    Are you a music lover looking to share your favorite tunes on TikTok? Adding a Spotify link to your bio is a great way to let your followers know what you’re listening to and discover new tracks. However, the process of adding a Spotify link to your TikTok bio may seem confusing at first. 

    Don’t worry, though – in this guide, we’ll show you exactly how to do it in just a few simple steps. Whether you’re a seasoned TikTok user or just starting out, you’ll be able to share your musical taste with the world in no time!

    What is a TikTok link in bio?

    A TikTok link in bio is a clickable hyperlink that can be added to your TikTok profile page. This link appears in the “Bio” section of your profile and can be used to direct your followers to external websites, social media profiles, or any other online destination you want to promote

    By default, TikTok only allows users to add one link to their bio. However, there are third-party tools like Replug that can be used to add multiple links to your bio section. This feature is especially useful for content creators, small business owners, and anyone else looking to promote their online presence to a wider audience.

    How to add Spotify link to TikTok bio?

    Adding a link to your TikTok bio is a great way to share more information with your followers and drive traffic to your website or other social media profiles. Here’s how to add a Spotify link to the TikTok bio:

    Step 1: Open Spotify on your device and log in to your account. 

    Step 2: Tap the “setting icon” in the top right of the screen. 

    setting-icon

    Step 3: Tap “view profile” under your profile name to open your profile. 

    view-profile

    Step 4: Tap 3 “vertical dots” on your profile page. 

    three-dots

    Step 5: Tap “share”. 

    share

    Step 6: Tap “copy link”.

    copy-link

    Add this link to your TikTok bio:

    Step 1: Open TikTok on your mobile device and tap the “profile icon” in the bottom right corner. 

    profile-icon

    Step 2: Tap “edit profile”. 

    edit-profile

    Step 3: Tap “add a bio” to open the bio section. 

    add-a-bio

    Step 4: Paste your Spotify link, tap “save” and you’re done. 

    paste-link

    Also read: How to add your Discord link to TikTok bio (2 easy ways)

    How to add multiple links to your bio?

    Do you have more than one link you want to add to your TikTok bio? 

    Perhaps you want to share your social media profiles or promote your website alongside your Spotify account. Luckily, there’s an easy solution: Replug.

    It offers a top-notch “bio links” feature that allows you to add multiple links to your TikTok bio, helping you to increase your reach and engagement on the platform.

    With this efficient link optimization platform, you can create a single link that directs users to a landing page containing all of your important links. This means that you can easily promote your online presence in one convenient location. 

    Here’s a video showing you how to add multiple links to your TikTok bio using Replug.

    FAQs

    Can I add multiple links to my TikTok bio?

    By default, TikTok only allows you to add one link to your bio. However, third-party tools like Replug can be used to add multiple links to your TikTok bio.

    Is it free to use Replug to add multiple links to my TikTok bio?

    Replug is a free link shortener with limited features inside its free plan. However, it also offers paid plans with more advanced functionality for its subscribed users.

    How do I use Replug to add multiple links to my TikTok bio?

    To use Replug to add multiple links to your TikTok bio, sign up for an account and create a branded landing page with your desired links. Then, copy the Replug landing page URL and paste it into the “Website” field in your TikTok bio.

    Can I track clicks on my TikTok bio links with Replug?

    Yes, Replug offers advanced analytics that allows you to track clicks and engagement on your TikTok bio links and other links across your online presence.

    Trending:

    How to add Amazon link to TikTok bio?

    2 easy ways to add a Pinterest link to your TikTok bio

    How to get your TikTok Profile URL?

  • How to Create a Dynamic QR Code: Step-by-Step Guide

    How to Create a Dynamic QR Code: Step-by-Step Guide

    QR codes are a great way to share information quickly and easily. They can be used to encode various data, including URLs, text, contact information, and more. 

    To create a QR code, you must choose a reliable QR code generator, enter the information you want to encode, choose a design, download the QR code, and share it.

    In this guide, you’ll find out how to create a dynamic QR code quickly and easily. 

    What is a dynamic QR code?

    A dynamic QR code is a QR code that can be updated after it has been created. This is in contrast to a static QR code, which cannot be changed once it has been created. Dynamic QR codes are often used for marketing and advertising purposes, as they allow businesses to track the number of people who have scanned their code and to change the content of the code as needed.

    Dynamic QR codes are created using a special type of software that allows the user to enter the desired information that they want to be included in the code. This information can then be changed at any time by simply updating the code in the software.

    Dynamic QR codes can be scanned by any QR code reader, and they will typically open a web page or redirect the user to a specific location.

    How to create a dynamic QR code?

    Here’s how to create a dynamic QR code. Follow the step-by-step process below:

    Step 1: Choose a QR code generator. There are many free and paid QR code generators available online. In this case, we are using the Beaconstac QR codes.

    Step 2: Log in or create an account for free.

    Step 3: Choose the type of QR code you want to create. There are two main types of QR codes: static and dynamic. Static QR codes cannot be changed after they are created, while dynamic QR codes can be updated with new information.

    how-to-create-a-dynamic-qr-code

    Step 4: Click the “+Create” or “Create QR code” button in the top right corner. 

    how-to-create-a-dynamic-qr-code

    Step 5: Choose the information you want to include in your QR code. This can be a URL, text, contact information, or anything else you want people to be able to access when they scan the code.

    how-to-create-a-dynamic-qr-code

    Step 6: Customize the design of your QR code with colors, logos, and shapes.

    how-to-create-a-dynamic-qr-code

    Step 7: Download your QR code. Once you have created your QR code, you can download it as an image file.

    how-to-create-a-dynamic-qr-code

    Step 8: Share your QR code. You can share your QR code online, print it out, or include it in your marketing materials.

    Boost ROI with branded URLs - Replug dashboard showing performance metrics and branded URL creation
    Boost your conversion rates with irresistable CTAs with

    for your marketing campaigns.

    Check

    Higher clicks

    Check

    More leads

    Check

    Better ROI

    Generate free CTAs

    Looking for a dynamic URL QR code generator?

    Important note: A longer URL makes your QR code more complex and difficult to scan. Use our link shortener tool to shorten long links and download them as QR codes. By doing so, your content will be easier to scan and access.

    How to create a QR code for a URL?

    To create a QR code for a URL follow the step-by-step guide below:

    Step 1: Sign in to Replug or create an account for free.

    Step 2: Click “Select your campaign” on the main dashboard page or create a new campaign in just a few seconds. 

    URL-qr-code-generator

    Step 3: Enter the URL you want to shorten in the “URL to shorten” section under “select your campaign” then click “create”.

    url to shorten

    Step 4: Now you can customize your shortened URL by editing the URL slug to reflect your brand or campaign. 

    customize-your-qr-code-link

    Step 5: Copy the shortened URL and click the “update” button.

    Download your shortened URL as a QR code:

    Step 6: Go to the main dashboard page again and click “manage” then “Replug links”. 

    url-qr-code-generator

    Step 7: You’ll find your newly created short URL here.

    Step 8: Click on the 3 dots under the “Actions” and then click “Download QR code”. Your shortened URL will be downloaded as a QR code. 

    download-url-as-qr-code

    Also read: Uses of QR Codes: Marketing, Sustainability & Convenience

    Note: Replug.io also provides powerful analytics and tracking features to monitor the performance of your short URLs, and QR codes including click-through rates, geographical data, and other valuable insights.

    Static vs Dynamic QR code: What’s the difference?

    Static and dynamic QR codes are two types of QR codes that differ in their functionality. Static QR codes are permanent and cannot be changed after they are created. 

    Dynamic QR codes, on the other hand, can be updated after they are created. This makes dynamic QR codes more versatile than static QR codes, as they can be used for a variety of purposes, such as tracking marketing campaigns or providing access to time-sensitive information.

    Here are some of the key differences between static and dynamic QR codes:

    • Static QR codes are permanent and cannot be changed after they are created. Dynamic QR codes can be updated after they are created.
    • Static QR codes are typically used for simple tasks, such as directing users to a website or providing contact information. Dynamic QR codes can be used for more complex tasks, such as tracking marketing campaigns or providing access to time-sensitive information.
    • Static QR codes are typically less expensive to create than dynamic QR codes.
    • Static QR codes are a good option for simple tasks, such as directing users to a website or providing contact information. 
    • Dynamic QR codes are a good option for more complex tasks, such as tracking marketing campaigns or providing access to time-sensitive information.

    Here are some examples of when you might use a static QR code:

    • To direct users to your website
    • To provide contact information
    • To add a product to a shopping cart

    Tips for creating a successful QR code:

    • Ensure the information you encode in your QR code is relevant to your target audience.
    • Choose a clear and concise design for your QR code.
    • Share your QR code in places where people are likely to see it and scan it.
    • Track the results of your QR code campaign to see how well it is performing.
    Replug Branded Short Links CTA
    A complete link management solution
    for marketing professionals & agencies.
    Try Replug for free

    Frequently asked questions 

    Can I convert a static QR code to a dynamic QR code?

    It is not possible to convert dynamic QR codes to static QR codes, or vice versa, as the two types of codes are fundamentally different.

    How do I create a QR code for a dynamic link?

    Use a QR code generator to create a QR code for a dynamic link. Enter the URL of the dynamic link and the generator will create the QR code.

  • How to Create a Smart URL Link: Step-by-Step Guide

    How to Create a Smart URL Link: Step-by-Step Guide

    Smart URLs, also known as dynamic URLs, are generated automatically based on a set of rules. This contrasts static URLs, which are manually created and do not change. Smart URLs can be used to improve the user experience, track website traffic, and improve search engine optimization.

    Smart URLs can be valuable for businesses of all sizes. 

    They can help businesses to:

    • Improve the user experience by making it easier for users to find the information they are looking for.
    • Track website traffic and see how users are interacting with the website.
    • Improve search engine optimization and make it easier for websites to rank higher in search engine results pages (SERPs).

    Before using smart URLs, consider:

    • Make sure that the rules for generating smart URLs are clear and easy to understand.
    • Use a consistent naming convention for smart URLs.
    • Monitor the performance of smart URLs to make sure that they are meeting your expectations.

    Also read: Unique URLs: What They Are and How to Use Them?

    How to create a smart URL link?

    To create a smart URL link, you can use a custom link shortener online. Replug allows you to create short, easy-to-remember links for long URLs. When you create a smart URL link, you can also add keywords and other information to it. This can help people find your link more easily when they are searching for information online.

    Here’s how to create a smart URL link using Replug

    Step 1: Sign in to Replug or create an account for free.

    Step 2: Click on the “Select your campaign” button on the main dashboard page or create a new campaign in just a few seconds. 

    how-to-create-a-smart-url-link

    Step 3: Enter the URL that you want to shorten in the “URL to shorten” section below “Select your campaign”.

    how-to-create-a-smart-url-link

    Note: Here you can also add UTM parameters to your link. 

    Step 4: Click on the “Create” button.

    Step 5: Replug will generate a short URL for you. You can then customize, copy and share the short URL in this step.

    how-to-create-a-smart-url-link

    Step 6: Here you can also add features to your short URLs which include: 

    • Customize link preview 
    • Customize favicon
    • Password protected
    • Link Expiry
    • Traffic routing rules
    • A/B testing
    • Deep linking

    Here are some tips for creating a smart URL link:

    • Make sure that the link is easy to remember and type.
    • Use keywords in the URL slug so that people can find it easily when they are searching for information online.
    • Keep the link short so that it is easy to share.
    • Track the number of clicks on your link to know how it’s performing.
    Replug Branded Short Links CTA
    Maximize marketing ROI
    by transforming ordinary URLs into
    branded short links that convert.
    Try Replug for free

    Replug link analytics: Track your link’s performance

    Replug empowers you to unleash the true potential of your links by providing a comprehensive suite of analytics. 

    No more flying blind – with Replug’s data-driven insights, you can make informed decisions that amplify your marketing efforts.

    Picture this: a dashboard that paints a vivid picture of your link’s journey across the web. 

    From the number of clicks and unique visitors to geographical data, referral sources, and even the devices your audience prefers – it’s all there at your fingertips.

    Here’s how to create a tracking link with Replug:

    url-tracking- analytics

    FAQs

    What is a smart URL link?

    A smart URL is a short, descriptive URL that is easy to remember and share. It is also more likely to be clicked on than a long, complex URL. Smart URLs are often used for marketing and advertising purposes, as they can help to increase website traffic and brand awareness.

    What is the difference between hyperlinks and smart links?

    Hyperlinks are simply links that point to another web page. They are typically used to provide additional information or to direct users to a related resource. 
    Smart links, on the other hand, are more sophisticated. They can be used to track user behavior, personalize content, and even trigger actions.

    Are smart links safe?

    The safety of smart links depends on the platform or service that generates them. Some smart links are designed to track users and collect data, while others are simply a way to shorten long URLs. It is important to be aware of the risks associated with any smart link before clicking on it.

    You may also like:

    How to Link a QR Code to a Website: A Quick Guide

    Also read: How to shorten a link?

  • How to Submit a URL to Google: A Quick and Easy Guide

    How to Submit a URL to Google: A Quick and Easy Guide

    Are you looking to make your website discoverable by millions of users across the web? Do you want to ensure that your content appears in Google’s search results?

    If so, you’ve come to the right place! Submitting your URL to Google is an essential step in getting your website indexed and increasing its visibility online.

    For marketers who care even more about both visibility and link performance, Replug.io provides an integrated way to shorten, brand, and manage all your shared URLs, so that every link counts.

    In this guide, we will simplify the process and provide you with simple, easy-to-understand instructions on how to submit your URL to Google. 

    Let’s dive in and make your mark in the digital world!

    Why submit URLs to Google?

    Submitting URLs to Google is essential for several reasons:

    1. Enhanced Visibility: Submitting URLs ensures that your web pages are indexed and appear in Google’s search results, increasing visibility among your target audience.
    2. Faster Indexing: By submitting URLs, you expedite the process of indexing, allowing your content to be searchable sooner.
    3. Increased Organic Traffic: Indexed URLs have the potential to appear in search engine results, attracting organic traffic to your website.
    4. Control Over Search Results: URL submission allows you to prioritize your most valuable web pages in search results, giving you more control over your online presence.
    5. Recognition of Updates: Submitting URLs alerts Google to crawl and index your updated content, ensuring users have access to the latest version.
    6. Improved Rankings: Indexed URLs contribute to higher search engine rankings, boosting visibility and organic traffic.

    Also read: How to Bookmark a URL in Google Chrome: Step-by-Step Guide

    How to submit a URL to Google?

    Method 1: Using Google Search Console

    Follow these steps to submit a URL to Google using the Google search console:

    Step 1: Open the Google search console

    Go to Google Search Console (previously known as Google Webmaster Tools) and sign in or create an account if you don’t have one.

    Step 2: Add property

    Click on “Add Property” and enter the URL of your website. Follow the verification process to confirm ownership of the website.

    Step 3: Access the URL inspection tool

    Once your website is verified, navigate to the left sidebar and select “URL Inspection” under the “Index” section.

    how to submit a url to google

    Step 4: Enter the URL

    In the URL Inspection tool, enter the specific URL you want to submit to Google in the search bar.

    Step 5: Request indexing

    Click on “Request Indexing” to notify Google about the URL and request it to be crawled and indexed.

    how to submit a url to google

    Step 6: Verification

    Complete any additional verification steps prompted by Google, if required.

    Step 7: Check status

    You can check the status of the URL submission and indexing progress in the URL Inspection tool.

    Also read: How to Automatically Shorten URLs in an RSS Feed?

    Replug Branded Short Links CTA
    A complete link management solution
    for marketing professionals & agencies.
    Try Replug for free

    Method 2: Submit an XML Sitemap

    Follow these steps to submit an XML Sitemap:

    Step 1: Submit your XML Sitemap

    • On the Sitemaps page, click on the “Add/Test Sitemap” button.
    • In the text field that appears, enter the filename or path of your XML sitemap. It should typically be named “sitemap.xml” and located in the root directory of your website.
    • Click on the “Submit” button to add your XML sitemap to Google Search Console.
    how to submit a url to google

    Step 2: Verify Successful Submission

    • After submitting your XML sitemap, Google Search Console will display the status and details of the submitted sitemap. It may take some time for Google to process the sitemap and index the included URLs.
    • Check the “Coverage” report in Google Search Console to ensure that the submitted URLs are being indexed properly. Monitor any errors or warnings that may require attention.
    how to submit a url to google

    Also read: How to Save a URL to Desktop: Step-by-Step Guide

    Final note

    It’s important to note that Google’s crawling and indexing process may take some time. Submitting a URL doesn’t guarantee immediate inclusion in search results, but it improves the chances of your web page being discovered and indexed by Google.

    Repeat this process whenever you have new content or make significant updates to ensure timely indexing and visibility in search results.

    And when you’re sharing your newly indexed links, you can shorten them through an efficient link shortener to brand them and track clicks easily. This will ultimately result in making your SEO efforts more measurable and powerful.

    FAQs

    What is the purpose of submitting URLs to Google?

    The purpose of submitting URLs to Google is to enhance visibility and ensure that your web pages are indexed and included in search results.

    How long does it take for Google to index submitted URLs?

    The time taken for Google to index submitted URLs can vary, but it typically ranges from a few hours to a few days.

    Can I submit multiple URLs at once to Google?

    Yes, you can submit multiple URLs at once to Google using an XML sitemap or by requesting a crawl through Google Search Console.

    Should I resubmit my URLs to Google if I make updates to my website?

    Yes, it is advisable to resubmit your URLs to Google whenever you make updates to ensure timely indexing of the modified content.

    What should I do if my submitted URLs are not getting indexed by Google?

    If your submitted URLs are not getting indexed by Google, you should review potential issues such as crawl errors or content quality to troubleshoot and address the problem.

    How often should I review and update my XML sitemap?

    Regularly reviewing and updating your XML sitemap is recommended, especially when new content is added or existing content is modified.

    Trending:

    Unique URLs: What they are and how to use them?

    How to shorten link using a URL shortener?

    How to add a link in bio to your Instagram profile?

  • 8 Best Ways to Fix “ERR_SSL_PROTOCOL_ERROR” for Google Chrome?

    8 Best Ways to Fix “ERR_SSL_PROTOCOL_ERROR” for Google Chrome?

    Are you frustrated by the “ERR_SSL_PROTOCOL_ERROR” message that keeps popping up when you try to access websites using Google Chrome? Don’t worry, we’re here to help! 

    For those who oversee multiple links, using a dedicated link optimization platform can streamline the process, making link management and tracking far easier.

    In this guide, we’ll walk you through some simple steps to fix this annoying error and get you back to browsing without any hiccups. No technical jargon or complicated solutions—just easy-to-follow instructions that anyone can understand. 

    So, let’s get started and say goodbye to the “ERR_SSL_PROTOCOL_ERROR” for good!

    What is “ERR_SSL_PROTOCOL_ERROR”?

    ERR_SSL_PROTOCOL_ERROR

    The “ERR_SSL_PROTOCOL_ERROR” is an error message that commonly occurs when there is a problem with the SSL/TLS (Secure Sockets Layer/Transport Layer Security) protocol during a secure connection attempt between a web browser and a website. SSL/TLS protocols are used to encrypt and secure communication over the internet.

    When you encounter the “ERR_SSL_PROTOCOL_ERROR,” it means that the browser was unable to establish a secure connection with the website due to a protocol mismatch or other SSL/TLS-related issue. This error can prevent you from accessing the website and viewing its content securely.

    What are the causes for “ERR_SSL_PROTOCOL_ERROR”?

    The “ERR_SSL_PROTOCOL_ERROR” can be caused by the following:

    • Outdated browser or operating system.
    • Incorrect SSL/TLS settings.
    • Expired or invalid SSL certificate.
    • Firewall or antivirus interference.
    • Server-side SSL/TLS configuration issues.
    • Network connectivity problems.

    These factors can lead to a mismatch in SSL/TLS protocols or other compatibility issues, resulting in the “ERR_SSL_PROTOCOL_ERROR” message.

    Also read: How to Find the IP Address of a Website: Step-by-Step Guide

    How to fix “ERR_SSL_PROTOCOL_ERROR” in Google Chrome?

    To fix the “ERR_SSL_PROTOCOL_ERROR,” you can try the following steps:

    1. Clear Browser Cache: 

    The browser cache stores temporary data, including SSL certificates. Clearing the cache helps eliminate any conflicts or outdated information. To do this, go to your browser’s settings then privacy and security, locate the option to clear browsing data, and select the cache or temporary files option.

    ERR_SSL_PROTOCOL_ERROR

    2. Update Browser: 

    Outdated browser versions may lack support for the latest SSL/TLS protocols. Updating your browser to the latest version ensures that you have the necessary security protocols and fixes. Visit the browser’s official website or use its built-in update feature to install any available updates.

    ERR_SSL_PROTOCOL_ERROR

    3. Check System Time and Date: 

    SSL certificates have an expiration date, and if your system’s date and time settings are incorrect, it can cause SSL certificate verification failures. Make sure your device’s date, time, and time zone settings are accurate. You can usually find these settings in the system preferences or control panel of your operating system.

    ERR_SSL_PROTOCOL_ERROR

    4. Disable Firewall or Antivirus Temporarily: 

    Sometimes, firewall or antivirus software can interfere with the SSL/TLS handshake process. Temporarily disable any such software and then try accessing the website again. If the error no longer appears, it indicates that the software was causing the issue. Adjust the settings of your firewall or antivirus software to allow SSL/TLS connections or consider contacting the software provider for further assistance.

    5. Try a Different Browser: 

    If the error persists after following the previous steps, try using a different web browser to access the website. This can help determine if the issue is specific to the browser you were using. Install and use an alternative browser such as Mozilla Firefox, Microsoft Edge, or Safari to see if the error persists. If the website loads without the error on a different browser, it indicates that there may be browser-specific settings causing the issue.

    6. Disable the QUIC Protocol of Chrome: 

    QUIC (Quick UDP Internet Connections) is a protocol used by Google Chrome to establish faster connections. However, in some cases, it can conflict with SSL/TLS protocols and cause the “ERR_SSL_PROTOCOL_ERROR.” To disable QUIC in Chrome, enter “chrome://flags” in the address bar, search for “Experimental QUIC protocol,” and disable it. Restart Chrome and check if the error persists.

    ERR_SSL_PROTOCOL_ERROR

    7. Adjust Your Internet Security and Privacy Level: 

    Sometimes, overly strict security or privacy settings can interfere with SSL/TLS connections. Adjusting your internet security and privacy level to a more moderate setting can help resolve the “ERR_SSL_PROTOCOL_ERROR.” Check your browser’s settings or security software settings to ensure they are not blocking SSL/TLS connections. Gradually reduce the security or privacy settings until the error is resolved.

    8. Contact Website Support: 

    If the “ERR_SSL_PROTOCOL_ERROR” occurs only when accessing a specific website, it’s worth reaching out to their support team. Provide them with details about the error, including the specific website address (URL) and the browser you are using. The website’s support team can investigate any server-side SSL/TLS configuration issues or certificate problems that may be causing the error and provide guidance on resolving the issue.

    Remember, these steps are general recommendations, and the specific solution may vary depending on the cause of the “ERR_SSL_PROTOCOL_ERROR” in your particular scenario.

    If the error persists, you may need to contact the website’s support team. Besides, if you’re someone managing links for your site or marketing campaigns and want a clean, branded URL, you can easily create short links with Replug, and benefit from reliable redirects too.

    Boost ROI with branded URLs - Replug dashboard showing performance metrics and branded URL creation
    Boost your conversion rates with irresistable CTAs with

    for your marketing campaigns.

    Check

    Higher clicks

    Check

    More leads

    Check

    Better ROI

    Generate free CTAs

    FAQs

    Why am I seeing the “ERR_SSL_PROTOCOL_ERROR” in my browser?

    The “ERR_SSL_PROTOCOL_ERROR” occurs when there is a mismatch or issue with the SSL/TLS protocol.

    Is the “ERR_SSL_PROTOCOL_ERROR” specific to Google Chrome or can it occur in other browsers too?

    The “ERR_SSL_PROTOCOL_ERROR” can occur in other browsers besides Google Chrome.

    Can an expired SSL certificate cause the “ERR_SSL_PROTOCOL_ERROR”?

    Yes, an expired SSL certificate can cause the “ERR_SSL_PROTOCOL_ERROR.”

    Should I be concerned about my online security if I encounter the “ERR_SSL_PROTOCOL_ERROR”?

    The “ERR_SSL_PROTOCOL_ERROR” indicates a problem with the SSL/TLS connection, and it’s important to address it for secure browsing. However, encountering the error alone doesn’t necessarily mean your online security has been compromised.

  • How to Find the IP Address of a Website: Step-by-Step Guide

    How to Find the IP Address of a Website: Step-by-Step Guide

    Welcome to the fascinating realm of the internet, where websites hold a hidden secret: their unique IP addresses.

    Curious to uncover this mystery? Fear not, we’ll guide you through a simple step-by-step process.

    For those who manage multiple website links and want to streamline link handling, Replug offers a powerful platform to shorten, brand, and track your URLs, on top of standard DNS-based IP lookups.

    Besides, by using commands like ping and nslookup, or employing a handy DNS lookup tool, you’ll swiftly discover the IP address of any website. 

    Get ready to dive into the world of digital discovery and unravel the hidden secrets that make the web tick. Let’s get started on how to find the IP address of a website!

    What is an IP address?

    An IP address, or Internet Protocol address, is a unique numerical label assigned to each device connected to a computer network. It serves as a digital identifier for devices, allowing them to communicate and exchange data with other devices over the internet. 

    IP addresses come in two main versions: 

    IPv4 (Internet Protocol version 4) and IPv6 (Internet Protocol version 6). 

    IPv4 addresses are comprised of four sets of numbers separated by periods, such as 192.168.0.1. 

    IPv6 addresses are longer and written in a hexadecimal format, such as 2001:0db8:85a3:0000:0000:8a2e:0370:7334. 

    IP addresses enable the routing and delivery of information across networks, facilitating seamless connectivity in the digital world.

    Also read: How to Unblock Websites: 7 Ways to Access Restricted Content

    How to find the IP Address of any website?

    Finding the IP address of a website can be done in a few simple steps using either the ping command, the nslookup command, or a DNS lookup tool. For added convenience and privacy, you can check your IP address using tools like Surfshark, which offers a quick and secure way to see your current IP.

    How to find the IP address of a website using the ping command?

    Here’s a step-by-step guide to help you find the IP address using the ping command:

    Step 1: Open the command prompt on your computer.

    Step 2: Type “ping examplewebsite.com” in the command prompt (replace “examplewebsite.com” with the actual website you want to find the IP address for).

    Step 3: Press Enter.

    Step 4: The results will be displayed, including the IP address of the website. 

    Below, you can see the pinging results for Google.com

    how-to-find-the-IP-address

    Also read: How to Block a URL in Chrome?

    How to find the IP address of a website using the nslookup command?

    Step 1: Open the command prompt on your computer.

    Step 2: Type “nslookup examplewebsite.com” in the command prompt.

    Step 3: Press Enter.

    Step 4: The results will be shown, and you’ll find the IP address of the website. Below is an example of the nslookup command run on Google.com

    how-to-find-the-IP-address

    Also read: Unique URLs: What They Are and How to Use Them?

    How to find the IP address of a website using the DNS lookup tool?

    Step 1: Go to a DNS lookup tool website (you can search for “DNS lookup tool” in your preferred search engine).

    Step 2: Find the text entry or search box on the website.

    how-to-find-the-IP-address-of-a-website

    Step 3: Type the website URL (e.g., examplewebsite.com) into the text entry.

    Step 4: Click on the “Find IP’’ button.

    Step 5: The results will be displayed, showing the IP address of the website.

    how-to-find-the-IP-address-of-a-website

    Also read: What is URL hijacking: Different forms of typosquatting, consequences, and prevention techniques

    Remember that a website can have both IPv4 and IPv6 addresses, and the results may differ depending on the method used or the website itself. IPv6 addresses are newer and offer more combinations, while IPv4 addresses are more commonly used. Both types of addresses are valid and can be assigned to a website.

    That’s it! You have now learned how to find the IP address of a website using different methods.

    Remember, if you’re sharing the URL publicly or across social media, you could also use a short link created via Replug to make the address cleaner and more user-friendly, plus track performance if needed.

    FAQs

    What is an IP address and how does it work?

    An IP address is a unique numerical label assigned to devices on a network. It allows devices to communicate and exchange data over the internet by providing them with a distinct identity.

    How can I find the IP address of a website?

    You can find the IP address of a website by using commands like ping or nslookup in the command prompt or by utilizing a DNS lookup tool online.

    What is the difference between IPv4 and IPv6?

    IPv4 uses a 32-bit address format and is widely used, while IPv6 uses a 128-bit address format and provides a larger pool of available addresses to accommodate the growing number of internet-connected devices.

    Can I change my IP address?

    Yes, you can change your IP address by contacting your internet service provider (ISP) or using certain software or tools that allow you to mask or modify your IP address.

    Are IP addresses unique to each device?

    Yes, IP addresses are unique to each device connected to a network. They serve as a digital identifiers for devices to ensure proper communication.

    Can someone track my physical location through my IP address?

    While IP addresses can provide a general indication of your location, they cannot pinpoint your exact physical address. However, certain techniques and additional data may potentially help narrow down your location.

    What is a static IP address and a dynamic IP address?

    A static IP address remains constant and is manually assigned to a device, while a dynamic IP address is automatically assigned by a network’s DHCP server and may change over time.

  • How to Insert Links in YouTube Descriptions: Step-by-Step

    How to Insert Links in YouTube Descriptions: Step-by-Step

    Are you eager to level up your YouTube descriptions and engage your viewers like never before? Well, look no further! Inserting links in your YouTube description can be a game-changer, and we’re here to show you how step-by-step. 

    Whether you want to share additional resources, promote your social media channels, or drive traffic to your website, we’ve got you covered. Get ready to unlock the full potential of your video descriptions and captivate your audience effortlessly. 

    Let’s dive in and master the art of inserting links on YouTube, making your content shine brighter than ever! 

    YouTube descriptions: Why are they important?

    YouTube video description plays a crucial role in maximizing the impact of your videos. Not only can it improve your YouTube SEO and video rankings, but it also provides valuable information about your content. Let’s explore why video descriptions are so important.

    Also read: Step-by-Step: How to Get a Custom YouTube URL

    1. Boosting YouTube SEO:

    A well-crafted video description can significantly enhance your YouTube SEO. Including relevant keywords and phrases in your description increase the chances of your video appearing in search results. This means more visibility and potential viewership for your content.

    1. Providing Context:

    YouTube video description allows you to provide additional context and details about your video. You can break down your video into chapters or sections, making navigating and finding specific information easier for viewers. This enhances the overall viewer experience and encourages engagement.

    1. Channel Introduction: 

    YouTube video description is an excellent opportunity to introduce your channel to new viewers. You can give a brief overview of your content, highlight your unique selling points, and encourage viewers to subscribe for more exciting videos.

    1. Driving Traffic:

    Additionally, the description box enables you to include links to external websites, such as your personal website or affiliate offers. This allows you to drive traffic to other platforms or monetize your content through partnerships.

    Also read: How to add YouTube link to instagram bio?

    How to insert links in YouTube descriptions?

    Adding a link to your YouTube description is a breeze, whether you’re using a mobile device or a desktop computer.

    On a desktop device:

    Let’s start with the steps for desktop devices:

    Step 1: Access your YouTube Studio by clicking on your profile picture in the top right corner of the YouTube interface.

    Also read: How to share YouTube videos using deep links?

    Step 2: On the left side of the dashboard, click on “Content.”

    Step 3: Locate the video you want to add a link to and click on the pencil icon to edit its description.

    Step 4: In the description box, type “https://” followed by the URL of the link you want to include.

    Step 5: Save your changes by clicking on the “Save” button.

    Congratulations! You have successfully added a link to your YouTube video description.

    Please note that the above steps are applicable to videos that are already uploaded or published. If you wish to add a link to the description of a video you are currently uploading or planning to upload, simply include “https://” and the URL in the description field during the upload process.

    Also read: How to share youtube playlist using deep links?

    Here’s how to insert links in YouTube Descriptions on a mobile device:

    On a mobile device:

    Adding a link to your YouTube description on mobile devices is just as simple as on a desktop. Follow these steps:

    Step 1: Open the YouTube app on your mobile device and sign in to your account.

    Step 2: Find the video for which you want to add a link in the description.

    Step 3: Tap on the video to open it and then tap on the “More” button (represented by three dots) below the video.

    Step 4: From the options that appear, select “Edit video.”

    Step 5: Scroll down to the description field and locate the spot where you want to add the link.

    Step 6: Type “https://” followed by the URL you want to include in the description.

    Step 7: Once you have entered the link, tap on the “Save” or “Publish” button to save your changes.

    Congratulations! You have successfully added a link to your YouTube video description using a mobile device.

    Remember, the process of adding a link remains the same: simply include “https://” followed by the URL in the description field. Now you can seamlessly include links in your YouTube video descriptions, whether you’re using a desktop computer or a mobile device. Happy linking!

    Also read: How to add YouTube links to Instagram story?

    Replug Branded Short Links CTA
    A complete link management solution
    for marketing professionals & agencies.
    Try Replug for free

    Shorten your YouTube Links for maximum impact:

    Shortening your YouTube links can be the secret ingredient to maximizing your impact. With shorter, more concise links, you’ll capture your audience’s attention, drive more clicks, and achieve higher engagement. 

    Here’s how to shorten YouTube Links using Replug:

    If you’re looking to shorten your YouTube links effectively, Replug is a top-notch link optimization platform that provides a seamless solution. Follow these steps to shorten YouTube links using Replug:

    Step 1: Sign in to your Replug account or create a new account if you haven’t already.

    Step 2: On the main dashboard page, click “Select your campaign’’ to create a new campaign in just a few seconds. 

    select-campaign

    Step 3: Paste your YouTube link or any link your want to shorten in the “URL to shorten” section below “Select your campaign” and click “Create”. 

    url-to-shorten

    Step 4: You’ll have your YouTube link shortened, now, click the edit icon to customize your link. 

    customize url

    Step 5: Copy your link, click the “update button” and you’re done.

    By using Replug’s link shortener, you not only get concise and visually appealing YouTube links, but you also gain access to advanced analytics and tracking capabilities. These insights will enable you to measure the performance of your links, understand audience engagement, and optimize your marketing strategies accordingly.

    Replug Branded Short Links CTA
    Maximize marketing ROI
    by transforming ordinary URLs into
    branded short links that convert.
    Try Replug for free

    Also read: How to Build Your Brand on YouTube – Branding on Youtube the Right Way!

    FAQs

    Why is it important to include links in my YouTube video description?

    Including links in your YouTube video description is important because it allows you to provide additional resources, redirect viewers to relevant websites, promote affiliate offers, and enhance the overall viewer experience. Links can also drive traffic to your website or social media profiles, increasing engagement and conversions.

    Can I include multiple links in my YouTube video description?

    Yes, you can include multiple links in your YouTube video description. However, it’s essential to ensure that the links are relevant and add value to your viewers. Avoid overwhelming the description with too many links, as it may appear cluttered and distract from the main content.

    Are there any restrictions or guidelines for the types of links I can add to my YouTube description?

    YouTube has community guidelines and policies that you must adhere to when adding links. Ensure that the links are not spammy, violate copyright or community standards, or redirect to malicious websites. Familiarize yourself with YouTube’s policies to ensure compliance.

    Can I add clickable links in the description that viewers can directly click on?

    Yes, YouTube automatically converts URLs in the video description to clickable links. As long as you include the full URL (e.g., https://www.example.com), viewers will be able to click on the link and be redirected to the desired webpage.

    You may also like:

    Online Branding: The Roadmap to Stand Out and Succeed Online

    How to shorten link using a URL shortener?

    Unique URLs: What They Are and How to Use Them?

  • How to Redirect a URL in WordPress – Ultimate Guide

    How to Redirect a URL in WordPress – Ultimate Guide

    Are you tired of encountering dead ends and frustrating error messages while browsing the web? Well, get ready to bid farewell to those exasperating moments because we have a game-changer for you: URL redirection. It’s like having your very own digital GPS that ensures every click you make leads you straight to your desired online destination.

    In this guide, we’re going to unravel the mysteries of URL redirection and make it crystal clear why it’s a must-know concept for anyone navigating the digital realm. No jargon, no complicated technicalities – just straightforward explanations and practical tips that will empower you to redirect URLs like a pro.

    Ready? Let’s dive in and discover how to redirect a URL in WordPress!

    What is URL Redirection?

    URL redirection, also known as URL forwarding, is the process of directing a user from one web address (URL) to another. It is a technique used to ensure that when a user clicks on a specific URL, they are automatically redirected to a different URL, typically to a new location or destination.

    URL redirection serves multiple purposes in the digital landscape. It allows website owners to manage changes such as rebranding, domain changes, or restructuring their website’s content without breaking existing links or causing inconvenience to users. It also helps to maintain search engine rankings by preserving the authority and relevance associated with the original URL.

    Types of URL redirects

    Types-of-url-redirects

    There are two primary types of URL redirection:

    Permanent redirect (HTTP 301)

    types-of-url-redirect-301

    This type of redirect indicates that the original URL has moved permanently to a new location. It informs search engines and web browsers that the new URL should be considered the main and preferred address for the content. Permanent redirects are commonly used for situations like domain changes or when merging multiple web pages into a single page.

    Also read: How to Change Permalink in WordPress: Step-by-Step

    Temporary redirect (HTTP 302)

    types-of-url-redirect-302

    Temporary redirects are used when the original URL is only temporarily unavailable or has moved to a different location for a short period. It instructs web browsers and search engines to visit the new URL temporarily, while still recognizing the original URL. Temporary redirects are often used during website maintenance or when testing new pages before making them permanent.

    Other unusual redirects include:

    Besides the commonly used permanent redirect (HTTP 301) and temporary redirect (HTTP 302), there are a few other types of redirects that serve specific purposes. These include:

    303 see other

    This redirect is similar to the temporary redirect (HTTP 302) but has a specific meaning defined in the HTTP protocol. It indicates to the browser that the requested resource can be found at a different location, and the response to the redirected request should be a GET method.

    307 temporary redirect

    This is another type of temporary redirect, similar to HTTP 302. It indicates to the browser that the requested resource has temporarily moved to a different location. However, unlike HTTP 302, the browser should continue to use the same HTTP method (e.g., POST) for the redirected request.

    308 permanent redirect

    Similar to the permanent redirect (HTTP 301), the 308 status code indicates that the requested resource has permanently moved to a new location. The key difference is that the browser should use the same HTTP method (e.g., POST) for the redirected request, whereas HTTP 301 may convert a POST request to a GET request.

    These additional redirect types (303, 307, and 308) have specific use cases and are less commonly utilized compared to HTTP 301 and HTTP 302 redirects. The choice of which redirect type to use depends on the specific requirements of your website and the desired behavior for the redirected requests.

    How to redirect a URL in WordPress?

    To redirect a URL in WordPress, you can use either a plugin or modify the .htaccess file. Here are two methods you can follow:

    Method 1: Using a WordPress redirection plugin

    Step 1: Install and activate a redirection plugin

    redirection-plugin

    Go to your WordPress dashboard, navigate to “Plugins” > “Add New,” and search for a redirection plugin such as Redirection or Yoast SEO“. Install and activate the plugin of your choice.

    Step 2: Set up the redirect

    Once the plugin is activated, go to the plugin’s settings or options page (usually located under “Tools” or “SEO” in the dashboard menu). Look for a section related to URL redirection or redirects.

    Step 3: Add a new redirection rule

    In the plugin’s settings, you should find an option to add a new redirection rule. Enter the old URL (source) and the new URL (target) where you want the redirect to point. Choose the appropriate redirect type (301 or 302) as needed.

    Step 4: Save the redirection rule

    After filling in the necessary details, save the redirection rule. The plugin will handle the redirection, and when someone accesses the old URL, they will be automatically redirected to the new URL you specified.

    Also read: How To Change A URL Of Any Website?

    Method 2: Modifying the .htaccess file

    Step 1:Access your website’s files 

    Connect to your website’s hosting account using FTP (File Transfer Protocol) or access the file manager in your WordPress hosting control panel.

    Step 2: Backup the .htaccess file 

    Before making any changes, it’s important to create a backup of the existing .htaccess file in case anything goes wrong. Simply download a copy of the .htaccess file to your local computer.

    Step 3: Edit the .htaccess file 

    open-htaccess-file

    Open the .htaccess file using a text editor. Add the following code at the beginning or end of the file, depending on your preference:

    redirection-in-cpanel

    Replace “/old-url/” with the actual URL slug or path of the old URL you want to redirect, and “http://www.example.com/new-url” with the desired destination URL.

    Also read: What is URL hijacking: Different forms of typosquatting, consequences, and prevention techniques

    Step 4: Save and upload the modified .htaccess file 

    Save the changes to the .htaccess file and upload it back to the root directory of your WordPress installation, overwriting the existing file.

    Step 5: Test the redirection 

    Visit the old URL in your web browser and verify that it correctly redirects to the new URL you specified. If the redirection is working as expected, you have successfully redirected the URL in WordPress.

    Remember, modifying the .htaccess file requires caution, as any mistakes in the code can cause issues with your website. Make sure to double-check the changes and keep a backup of the original .htaccess file for safety purposes.

    Why you should create a redirect?

    There are several scenarios in which you may need to create a redirect. Here are some common situations where redirects are useful:

    1. Rebranding or website restructuring

    If you undergo a rebranding process or make significant changes to your website’s structure, you may need to redirect old URLs to their new equivalents. This ensures that users who access the old URLs are seamlessly directed to the updated content.

    2. Changing domain names

    When you change your website’s domain name, it’s essential to set up redirects from the old domain to the new one. This preserves your website’s traffic, and search engine rankings, and ensures that visitors who may have bookmarked or shared your old URLs are still able to access your content.

    3. Handling outdated or expired content

    When you remove or archive certain pages or posts on your website, you can create redirects to guide users to relevant and up-to-date content. This prevents visitors from encountering dead ends or 404 error pages and helps maintain a positive user experience.

    4. Managing affiliate or marketing campaigns

    If you’re running specific marketing campaigns or affiliate programs that involve unique URLs, you might need to create redirects to track and direct visitors to the intended landing pages. This allows you to monitor campaign performance and ensure visitors land at the correct destination.

    5. Correcting broken or mistyped URLs

    If you discover broken or mistyped URLs on your website, creating redirects can fix these issues. By redirecting the incorrect URLs to the correct ones, you can ensure a smooth browsing experience for your users and prevent them from encountering frustrating dead ends.

    Remember, redirects are powerful tools that can help you maintain website functionality, improve user experience, and preserve SEO efforts. Whenever you make changes to your website that impact URLs, consider whether a redirect is necessary to ensure a seamless transition and to guide users and search engines to the right content.

    Also read: How to create & track text links?

    Final words

    In the vast realm of the internet, URL redirection is the key to unlocking seamless navigation and preserving your online presence.

    And if you want to simplify your links further, making them more shareable, memorable and trackable, a good short url
    tool is worth adding to your toolkit.

    By mastering the art of redirection, you can ensure a flawless user experience, maintain search engine rankings, and adapt to changes with ease. 

    Whether you’re rebranding, restructuring, or simply seeking to enhance your website’s performance, redirecting URLs is your secret weapon.

    If you’re looking for a full-service solution that combines redirects, analytics and team collaboration, you might consider a dedicated link management platform for your entire domain and marketing workflow.

    So, embrace the power of redirection, navigate the digital landscape with confidence, and watch as your online presence soars to new heights. Get ready to redirect your way to success!

    FAQs

    What is the difference between a permanent redirect (HTTP 301) and a temporary redirect (HTTP 302)?

    A permanent redirect (HTTP 301) informs search engines and browsers that the original URL has permanently moved to a new location. A temporary redirect (HTTP 302) indicates a temporary move or change. It’s important to choose the appropriate type depending on the situation.

    How can URL redirection impact my website’s search engine rankings?

    URL redirection can impact search engine rankings by preserving the authority and relevance associated with the original URL. If implemented correctly, redirects can transfer link equity and prevent loss of traffic and rankings when URLs change or move.

    Can I implement URL redirection without a plugin?

    Yes, you can implement URL redirection without a plugin by modifying the .htaccess file on your server. This method allows you to set up server-side redirects using rules defined in the .htaccess file.

    Are there any SEO best practices to consider when setting up URL redirects?

    Yes, when setting up URL redirects, it’s important to ensure that the redirect is a one-to-one mapping from the old URL to the new URL. Additionally, update internal links and notify relevant parties to update their references. Monitor and maintain redirects to address any issues promptly.

    How do I test if my URL redirection is working correctly?

    To test URL redirection, simply access the old URL and verify that you are automatically redirected to the new URL. Test on different devices and browsers to ensure compatibility and functionality.

    What should I do if I encounter redirect loops or broken redirects?

    If you encounter redirect loops or broken redirects, review your redirect configurations and ensure they are set up correctly. Check for any circular redirections or incorrect rules. Make necessary corrections and retest the redirects.

    Is it possible to redirect multiple URLs at once?

    Yes, it is possible to redirect multiple URLs at once. In WordPress, you can use a plugin that supports bulk or wildcard redirects. Alternatively, with server-side redirects, you can set up rules in the .htaccess file to redirect multiple URLs simultaneously.

    You may also like:

    How to automatically shorten URLs in an RSS Feed

    What Is a Permalink? How Does It Impact SEO Ranking?

    Step-by-Step: How to Get a Custom YouTube URL

    How to Convert video to Link?