Author: Arslan Jadoon

  • How To Deactivate Messenger App?

    How To Deactivate Messenger App?

    It is necessary to deactivate your Facebook account before you can deactivate your Messenger account. Once you have deactivated your Facebook account, the option to deactivate your Messenger account will become available. 

    Deactivating your Messenger account from a computer or laptop is impossible. You can only deactivate a Messenger account from the Messenger application settings on your smart devices, i.e., mobile or tablet.  

    Here’s how to deactivate Messenger app quickly:

    Step 1: Open the messenger app from your mobile phone. 

    Step 2: Tap the profile icon in the top right corner. 

    profile icon

    Step 3: Tap account setting from the account menu. 

    account setting

    Step 4: Tap account ownership and control. 

    account ownership and control

    Step 5: Tap deactivation and deletion. 

    deactivation and deletion

    Step 6: Select Deactivate account, then tap continue to account deactivation

    deactivate account

    Step 7: Enter the password and tap continue, and your Facebook account is deactivated. 

    password and continue

    Important note: This will deactivate your Facebook account since you can’t deactivate Messenger without deactivating Facebook.

    Now your Facebook account is deactivated, you can easily deactivate your Messenger account. 

    Replug Branded Short Links CTA
    Maximize marketing ROI
    by transforming ordinary URLs into
    branded short links that convert.
    Try Replug for free

    Step 8: Again tap the profile icon in the top right corner. 

    profile icon

    Step 9: Scroll to the bottom and select legal and policies. 

    legal and policies

    Step 10: Tap deactivate Messenger. 

    deactivate messenger

    Step 11: Enter your password and tap continue. Your Messenger account will be Deactivated. 

    pass and continue

    To reactivate Messenger, simply log in with your username and password. 

    Deactivating your Facebook account will not automatically deactivate your Messenger account, as the two are separate platforms.

    If you deactivate your Messenger account, your profile will not appear in search results, but your past messages and comments will still be visible to others. If you want your messages to disappear after a certain time, you can turn on the vanish mode by swiping up while in a conversation.

    Read: How to add the Instagram link in the bio?

    Frequently asked questions

    How do I know if my Messenger is deactivated?

    If your Messenger account has been deactivated, you will not be able to access your account or use the Messenger app. When you try to log in to the app, you will see a message indicating that your account has been deactivated.

    If you are unsure whether your Messenger account has been deactivated, you can try logging in to the app to see if you can access your account. If you cannot log in and see a message that your account has been deactivated, your account has been deactivated.

    If you want to reactivate your Messenger account, you will need to follow the steps to reactivate your Facebook account first, as your Messenger account is linked to your Facebook account. Once you have reactivated your Facebook account, you can use the Messenger app again.

    What will my friends see if I deactivate Messenger?

    If you deactivate your Messenger account, your friends will no longer be able to see your online status or send you messages through Messenger. However, your past messages and comments will still be visible to them, but they will not be able to contact you through the app.

    Your profile will also be removed from the Messenger app’s search results, so your friends will not be able to find you within the app. If they try to send you a message, they will receive a notification that you are unavailable.

    If you want to make all your messages and comments disappear from the app, you can switch on the vanish mode by swiping up while conversing. This will cause all of your messages in the conversation to disappear after they have been read. However, this feature is optional and will not affect your account status.

    Trending Now:

    How to Change Facebook URL on Mobile and Desktop?

    How to link Instagram to TikTok?

  • How to check analytics on TikTok?

    How to check analytics on TikTok?

    Are you a TikTok creator or business looking to track the performance of your content on the platform? Understanding your analytics can help you create more effective and engaging content and optimize your TikTok marketing efforts. 

    This guide will show you how to check your TikTok analytics. Also, get the insights you need to succeed on TikTok. So let’s get started!

    How to Check analytics on TikTok Through a mobile phone? 

    Step 1: Open the TikTok app on your mobile phone. 

    Tiktok

    Step 2: Tap on the profile icon in the bottom right corner. 

    profile icon

    Step 3: Tap on three horizontal lines in the top right corner. 

    dropdown

    Step 4: Tap the creator tools menu to see the analytics. 

    creator tools

    Step 5: Tap the analytics menu on your mobile screen. 

    analytics

    Step 6: You will now see the Analytics screen on your mobile device. 

    view analytics

    It’s worth noting that TikTok’s analytics may not be 100% accurate, as the platform uses algorithms to estimate specific metrics. However, the data should still give you a good overall idea of your content’s performance and how it compares to other content on the platform.

    Replug Branded Short Links CTA
    Maximize marketing ROI
    by transforming ordinary URLs into
    branded short links that convert.
    Try Replug for free

    How to Check analytics on TikTok Through a computer device? 

    Step 1: Log in to TikTok on your computer or laptop. 

    Step 2: Click on your profile icon in the top right corner. 

    profile icon

    Step 3: A drop-down menu will open. Click business suite from the drop-down menu. 

    Business suit

    Step 3: Analytics screen will now open. You can check the performance of your content and more. 

    analytics

    Read: How to Make Money on TikTok?

    How to Understand Tiktok Analytics?

    On TikTok, you can access analytics for your account by navigating to the Creator Studio. There are three main categories of analytics: Overview, Content, and Followers.

    Overview: The Overview section provides information about your followers, video views, profile views, likes, and comments. Within this section, the Engagement tab lets you see metrics such as likes, comments, and shares for your videos within the chosen time frame.

    Content: The Content tab offers more in-depth data and analytics for each video you post, including total views, total likes, comments, shares, average watch time, percentage of people watching the entire video, traffic source type (such as your profile or the For You feed), and audience territories. All content metrics are only available for the last seven days.

    Followers: The Followers tab shows you insights about the community you’ve built on TikTok, including information about the locations of your followers and their activity times. You can also see your profile views and track changes in follower growth. If you have LIVE access, you can view analytics for your live streams in the LIV tab. This includes metrics like total views, new followers, total time, and diamonds earned.

    Note: Read more about TikTok Analytics! 

    Trending Topics:

    What is the Best Time to Post on TikTok

    How to link Instagram to TikTok?

    How to Make Money on TikTok?

  • How to create a call to action using a URL shortener?

    How to create a call to action using a URL shortener?

    Creating a call to action using a URL shortener can effectively drive conversions and encourage users to take a specific action. Using a reliable URL shortener like Replug to create a call to action has a few key benefits.

    First, it can shorten link that are long and complex, making them easier to share and more visually to appeal. Sharing a link in a social media post or on a platform with limited space for long URLs can be beneficial. 

    Second, URL shorteners can help to track clicks on a link, which can help understand the effectiveness of your call to action. 

    Finally, URL shorteners can make creating custom and branded links easier, which can help build brand awareness and make your link more memorable.

    How to create a call to action using Replug?

    Use these simple steps to create a call to action that inspires users to take action that will benefit your business or organization.

    Step 1: Sign in to Replug or create an account if you’re new.

    signin or create account

    Step 2: Go to the manage section on the main dashboard page and select campaign. 

    click campaign

    Step 3: Click on the “create new campaign” button in the campaign section.

    new campaign

    Step 4: To create a new campaign, you must select a brand first. You may choose an existing brand or create a new one if not already been created.

    select brand

    Step 5: Click the next button once you’ve selected or created a brand. 

    brand and next

    Step 6: You will now see a page for choosing a campaign type. Choose a name for your call-to-action campaign here. 

    campaign name

    Step 7: Select the call to action option from the campaign type page and click the next button.

    select call to action button

    Step 8: Next, select your CTA type; here, we’ve selected a button CTA.

    button cta

    Step 9: After selecting the CTA type, you need to select the theme for your CTA. Your CTA’s appearance depends on your CTA’s purpose. As for this case, we have chosen a popup CTA theme to appear after clicking the shortened link.

    Note: Read more about the use cases for different theme types to understand which CTA theme is perfect for you.

    select cta theme

    Step 10: Enter your URL, upload an image for the CTA, and click Next.

    Note: Recommended size: Width = 920, Height = 1080

    image and url

    Step 11: You can view your CTA side-by-side.

    preview image and click next

    Step 12: You are now in the CTA message section. Write your headline, message, and CTA button text

    CTA message

    Step 13: Enter your CTA button’s URL or phone number in the last block, and click Next. 

    button url or number

    Step 14: You’re now in the CTA customization section, where you can add colors. (Background colors, text colors, CTA button background colors, CTA button text colors). Choose your colors and click next. 

    cta colors

    Step 15: In the final step, you will select the seconds, after which the CTA will be displayed to the user. Alternatively, you can select the “On exit-intent” option, which will display the CTA when the user wants to exit the page.

    appearance time

    Step 16: Save the campaign; now, you can share it across other platforms. Ensure that your newly created campaign appears in the campaigns section

    save compaign

    Did You Know?

    Replug is a top-notch link optimization platform that can also help to track the effectiveness of the CTA. It offers analytics tools that allow you to track how many clicks the CTA receives. This can help you determine which CTAs are most effective and optimize your marketing efforts accordingly.

    FAQs

    What are the 3 features of a strong call to action?

    Any CTA should have these three key features:

    1. Clarity: A strong call to action should be clear and straightforward so that the reader knows exactly what they are being asked to do. This means using actionable language, such as “click here” or “sign up now,” and avoiding vague or confusing phrases.

    2. Urgency: A sense of urgency can be a powerful motivator, and a strong call to action should convey a sense that the reader needs to take action immediately. This can be achieved through time-sensitive language, such as “limited time offer,” “act now,” or by highlighting the benefits of taking action immediately.

    3. Relevance: A strong call to action should be relevant to the reader and the context in which it appears. This means that it should be tailored to the specific needs and interests of the audience and should align with the overall goals and message of the campaign or piece of content. By focusing on the reader and their needs, a strong call to action can increase the chances of conversion.

    What elements are in CTA?

    There are a few key elements that are typically included in a CTA:

    Action verb: The CTA should include an action verb that tells the reader what to do. Some common action verbs used in CTAs include “click,” “sign up,” “download,” and “register.”

    Button or link: The CTA should include a button or link that the reader can click to take the desired action. The button or link should be prominently placed and easy to find.

    Benefit: The CTA should include a benefit or reason for the reader to take the desired action. This could be a discount, exclusive content, or a chance to win a prize.

    Sense of urgency: The CTA should convey a sense of urgency or time sensitivity to encourage the reader to take action immediately. This can be achieved through time-sensitive language or by immediately highlighting the benefits of taking action.

    Popular Topics:

    Call To Action For Social Media: 15 Best Examples

    Remarket your brand with a click of a button – Replug Chrome Extension


  • How to change YouTube URL name using a URL shortener tool?

    How to change YouTube URL name using a URL shortener tool?

    You can shorten any Youtube URL name using a URL shortener. URL shorteners are useful tools for creating shorter, more manageable versions of long URLs.

    No one likes to click a URL link with random characters. But when you make your URL look more professional and authentic. Then, you will get more clicks, and it will be easier for users to recognize what the link is about.

    Create customized URLs that are visually appealing and help brand your content. Therefore, creating short custom URLs can make URLs easier to share, manage, and improve the branding of your content. This can be useful if you are promoting your YouTube channel.

    Here’s how to change the Youtube URL name using Replug:

    Step 1: Create a Replug account or sign in.

    signin or create account

    Step 2: Find the desired campaign on the main dashboard, or create a new one. 

    Note: If you need help creating a new campaign, check out this guide: “Create a campaign in seconds.”

    Select compaign


    Step 3: Paste the URL in the “URL to shorten” section below “Select your campaign.”

    paste url

    Step 4: Click the create button to see your new URL. 

    click create

    Step 5:  Look at the newly shortened version of your Youtube URL. 

    new url

    Step 6: Customize the URL by clicking the edit icon opposite the URL.

    click edit icon

    Step 7: Type your desired URL slug and click update at the bottom, and your new Replug URL is ready to share.

    type new url and update

    Create deep links to increase Youtube views using a URL shortener

    Deep links are shortened links that directly open a specific location within a mobile app. This, in return, improves the user journey experience and increases the chance of conversions. 

    YouTubers can create deep links using a URL shortener tool. This tool can help shorten a link in no time at all. It also assists influencers, brands, and others to get more views and clicks on their videos by delivering an unbreakable experience.

    For example, sharing a deep link will allow users to directly watch the video you intended without the hassle of signing up, logging in, or even searching the video on Youtube.

    Deep linking is not only limited to Youtube. These links are helpful when sharing links to specific social media content or a specific product on your online store and other platforms.

    To create a deep link using the amazing link optimization platform named Replug, you’ll need to follow these steps:

    Step 1: Sign in to Replug and click the drop-down icon in the top right corner. 

    click dropdown icon

    Step 2: Choose deep links from the drop-down menu. 

    click deep link

    Step 3: Deep link categories page will open. Choose a category since, in this case, a deep link is needed for the YouTube video. So, here we choose video.

    click video

    Step 4: Select Youtube from the video category page since we will create a deep link for a Youtube video. 

    click youtube

    Step 5: The next step is to select the playlist, since this video belongs to our YouTube playlist, and click create deep link. 

    click playlist and create deep link

    Step 6: A new page will open where you need to select the campaign.

    select compaign

    Step 7:  Paste the URL in the “URL” section below “Select your campaign.”

    paste url

    Step 8: Click the save link button to create the link.

    save link

    Step 9: Now click the edit button to customize your new link. 

    edit url

    Step 10: Type your new URL slug and click save. 

    save click

    You can download your custom deep link as a QR code and share it on any social media platform you like.

    Popular Topics:

    Top 5 Paid URL Shorteners Worth Paying For!

    How to Disguise a Link Using a URL Shortener?

    The Ultimate Guide to Online Branding and Building Authority

    How to Change Facebook URL on Mobile and Desktop?

  • How to link Instagram to TikTok?

    How to link Instagram to TikTok?

    Quick steps to link Instagram to TikTok:

    Go To Edit Profile Section > Scroll down to Social > Add Instagram Link

    Linking Instagram to TikTok allows users to share their content across both platforms, increasing their reach. It also helps to build an audience and create a unified brand presence across both platforms. Additionally, it helpfHow to get to the link in the bio on Instagram?s to generate more engagement, as users can interact with the same content on both platforms.

    Link Instagram to TikTok:

    Step 1: Open TikTok from your mobile device to link Instagram.

    tiktok icon

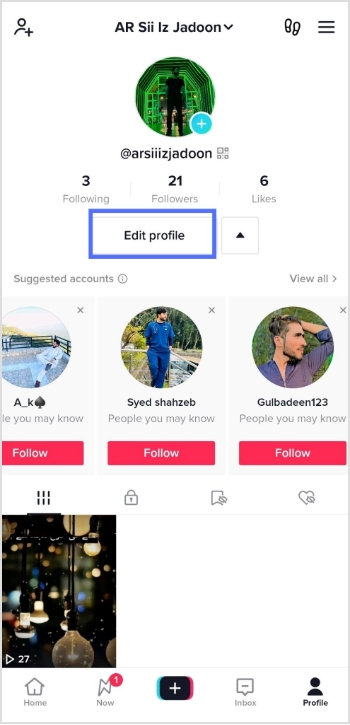
    Step 2: Tap on the profile icon in the bottom right corner to open your profile.

    profile icon

    Step 3: Tap the edit profile button on the main profile screen.

    edit profile


    Replug Branded Short Links CTA
    Maximize marketing ROI
    by transforming ordinary URLs into
    branded short links that convert.
    Try Replug for free

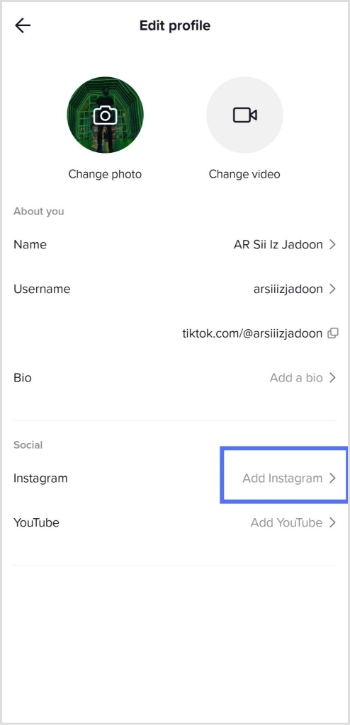
    Step 4: Tap the Add Instagram button in the edit profile section.

    add instagram

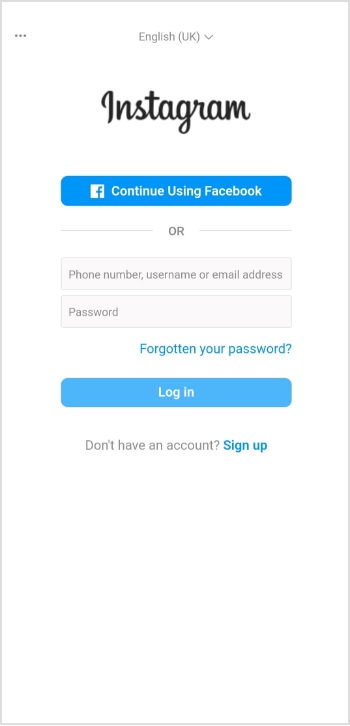
    Step 5: Next, enter your login credentials.

    login

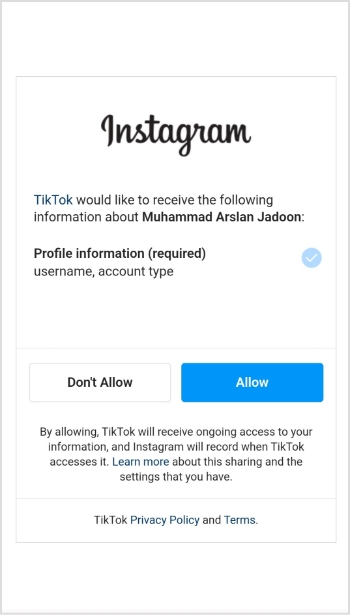
    Step 6: Tap the Allow button when asked whether TikTok needs access to your Instagram information.

    tap allow

    Now your Instagram account is linked to your TikTok account. 

    Frequently asked questions

    Is there a fix for the TikTok Instagram button not working?

    There is no fix for the TikTok Instagram button not working. Ensure you have the most recent versions of the TikTok and Instagram apps. Some people succeeded when they deleted the app and cleared the cache from their phones. Then when they reinstall the app, the problem is usually fixed. 

    Related Reads:

    How to add bio links on Instagram?

    A Complete Guide To Use QR Code Marketing

    How to Disguise a Link Using a URL Shortener?

  • How to get to the link in the bio on Instagram?

    How to get to the link in the bio on Instagram?

    A link in your Instagram bio is a great way to drive traffic to your website and increase engagement with your content. In addition, it allows you to direct potential followers to a landing page, portfolio, or blog post you want to promote. 

    You can also link to an email sign-up page, product page, or shop. This feature is handy for businesses, brands, and influencers who want to increase their reach and promote their content.

    Follow this step-by-step guide to quickly find any profile’s link in the bio on mobile and desktop.

    How to get to the link in the bio on Instagram on a mobile device?
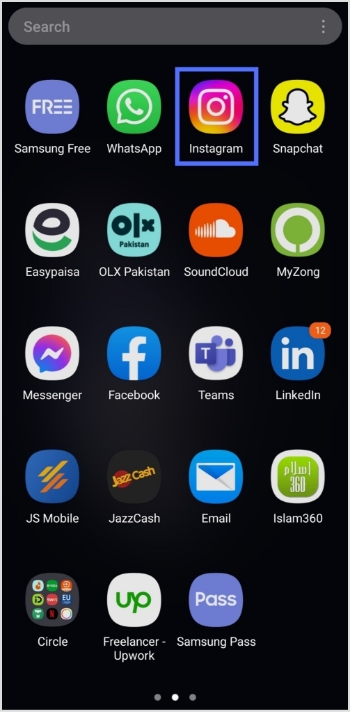
    Step 1: Open the Instagram app on your mobile device.

    Open Instagram

    Step 2: Tap on the user’s profile name (username) on whose caption you noticed the Link in Bio.
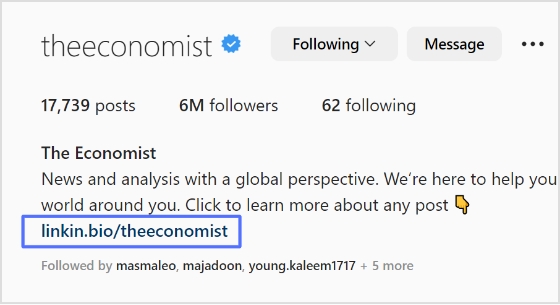
    click profile

    Step 3: You will be taken to the user’s profile screen. Here you will see a website link that’s your “Link in Bio.” Just tap on the link to open it.

    How to get to the link in the bio on Instagram on a computer device?

    Here are two simple steps to find the Instagram link in the bio on a computer.

    Step 1: Click on the profile that says Link in bio in a post.

    user profile name

    Step 2: The website link will show up under their bio on their profile screen. Click on it to open the link.

    link in bio

    How To Add A Instagram Link In Bio?

    Adding an Instagram link in your bio helps direct your followers and potential customers to your Instagram page.

    As a result, makes it easier for them to find your profile and learn more about your brand. It also encourages followers to engage with your content, which can help drive sales and increase brand awareness.

    Here’s how to add an Instagram link in the bio:

    Step 1: Open Instagram on your mobile and tap your profile icon in the bottom right corner.

    tap profile icon

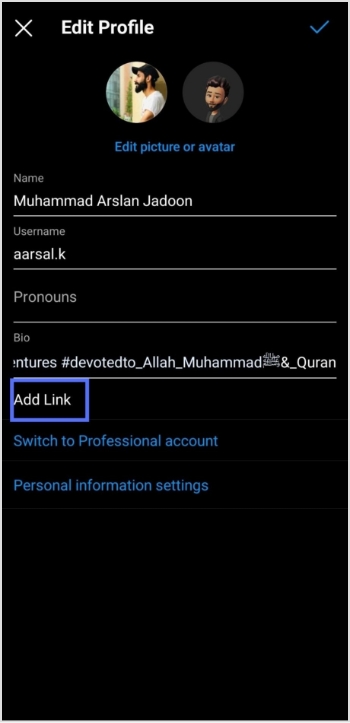
    Step 2: Tap on the edit profile button on your profile page. 

    edit profile

    Step 3: Now, you will see the add link section on your mobile screen. Tap on it. 

    add link

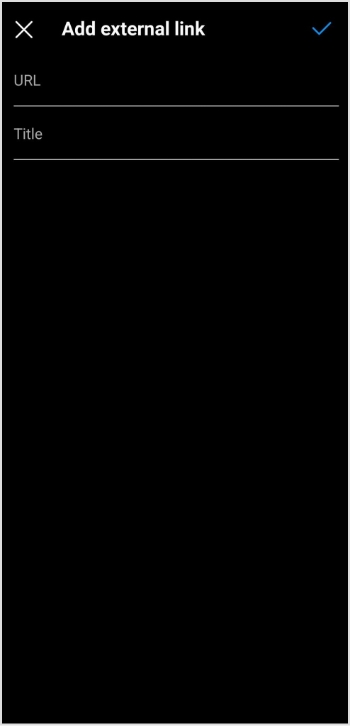
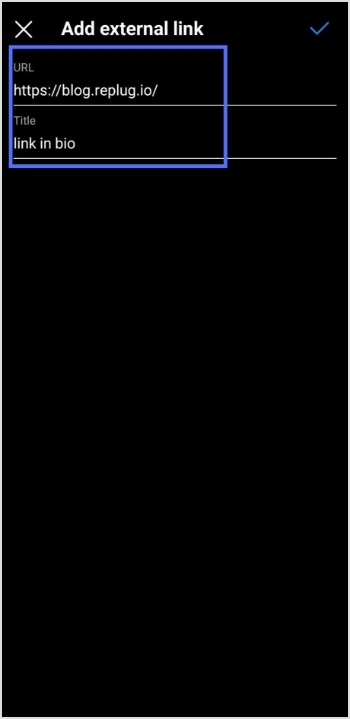
    Step 4: Tap the add external link section to add your website address. 

    url&title

    Step 5: Copy and paste the URL in the URL section and add a title in the title section. 

    add external link

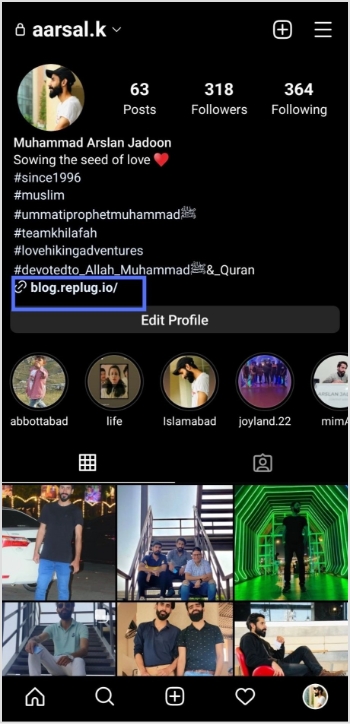
    Step 6: Your link in the bio will now appear in your profile.

    url in bio (2)

    Your Instagram profile now has a link in the bio. 

    Instagram bio page with multiple bio links – Is it possible?

    Adding multiple bio links to your Instagram bio is a great way to drive more traffic to your website and other online resources. By adding links to your Instagram bio, you can easily direct your followers to your website, blog, YouTube channel, and other platforms where they can learn more about you and your business.

    Additionally, including multiple bio links allows you to showcase your work, products, or services in an efficient and organized way. You can use a free link shortener to create a single, short URL that links to multiple websites.

    Follow these steps to add multiple bio links to your Instagram profile. 
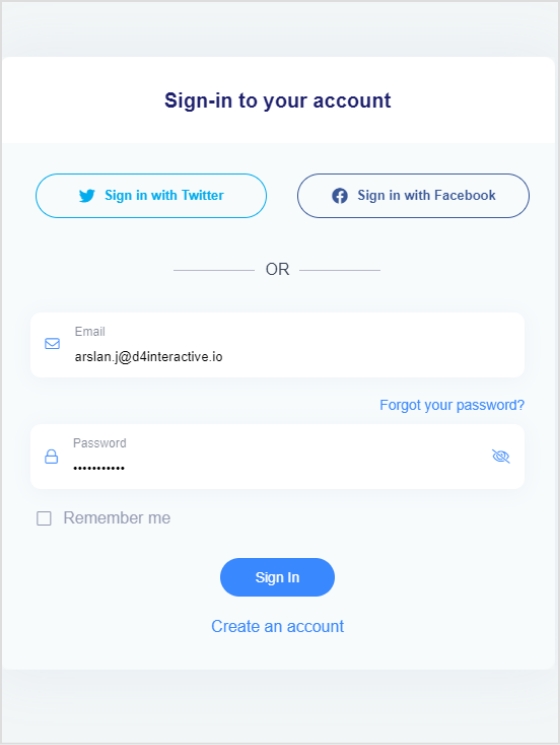
    Step 1: Sign in to your Replug account or create a new one if you don’t have one.

    signin or create account

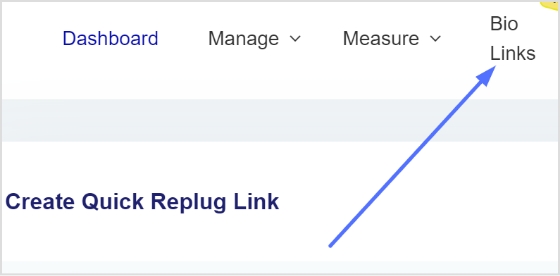
    Step 2: You’ll be taken to the main dashboard page. Click on the bio links section from the main dashboard page.  

    bio link

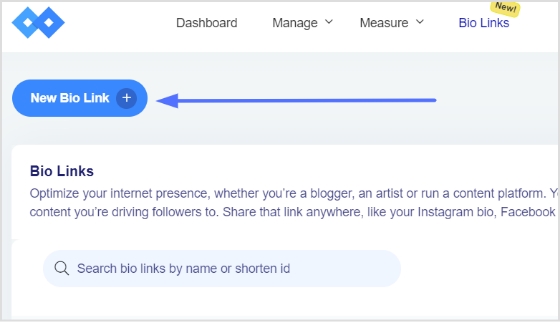
    Step 3: Click the new bio link button to create your bio link. 

    add bio link

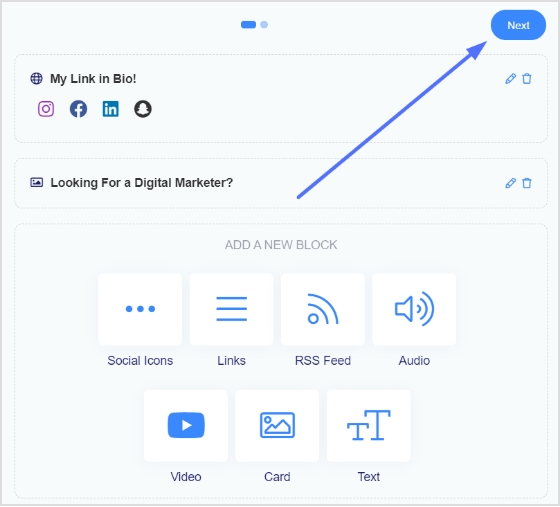
    Step 4: Add Social Icons, Links, RSS Feed, Audio, Video, Card, and Text as part of your bio links. Our bio link page, for example, has social icons and a card.

    Note: The above image shows you the options (blocks) you can choose for your Instagram bio or landing page.

    social icons and next

    Step 5: Choose social icons and click next. You can choose up to 5 social icons (profiles).

    social icons

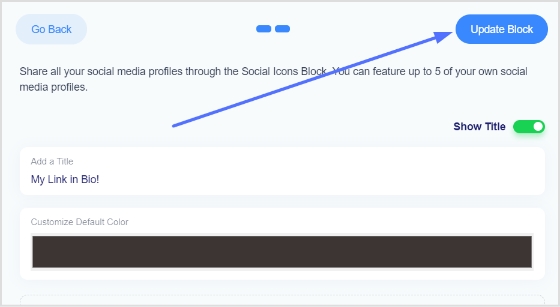
    Step 6: Now, add a title to your social links, customize the icon’s color and enter the links or usernames for your social media accounts, as shown in the picture below.

    Note: When someone clicks on any of your social icons, they will go to the relevant social media profile. 

    social icons links, color, title

    Step 7: Now, click the update block button to add other blocks, like card, text, video, etc. 

    update block

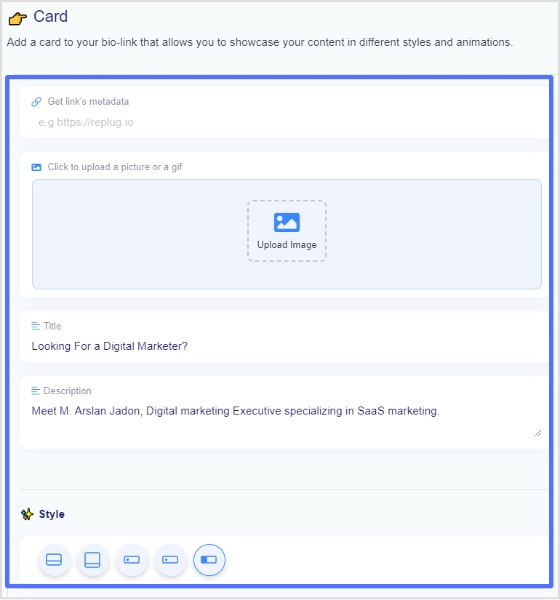
    Step 8: Now, choose another block, for example, a card.

    click card

    Step 9: In the card section, add your destination URL add the card image, title, and description. Also, choose the style of the card and click the save block button.

    card select

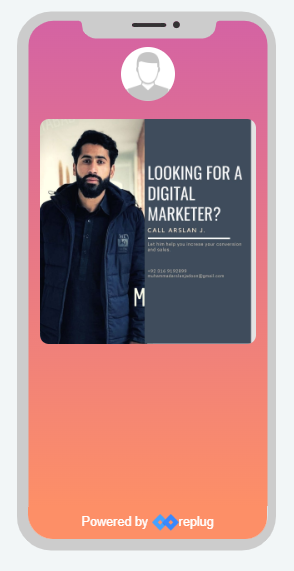
    If you want to see how any section or block looks, you can preview it side by side. Here is an example of how the card looks. 

    preview card

    Step 8: Once you have added all the necessary blocks, click the next button.

    click next

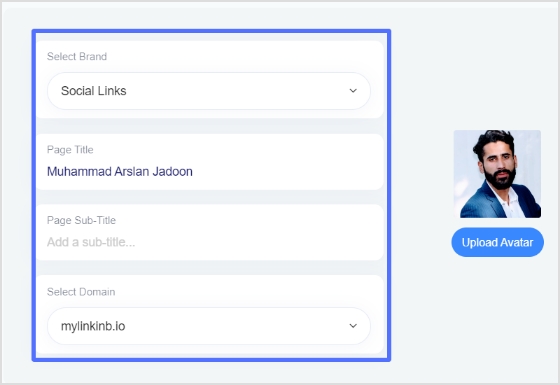
    Step 9: You are now on the final page. Upload your avatar, select a brand, add a title and sub-title, and choose a domain. 

    Note: Replug is an all-in-one link optimization platform that allows you to create a brand with a custom domain in seconds.  

    final page

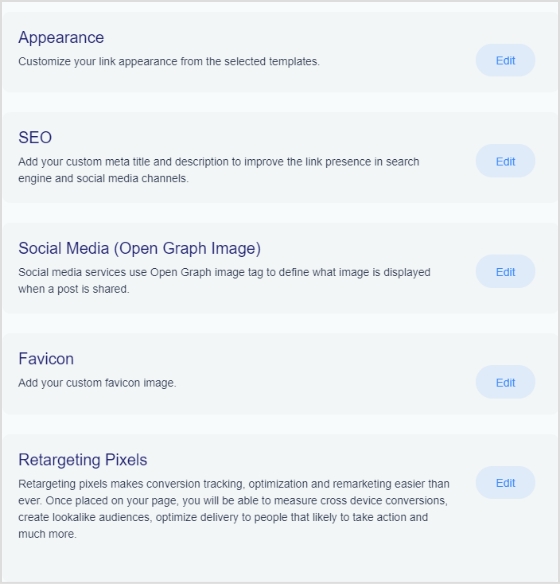
    Step 10: As you scroll down, you’ll find other cool features, such as custom appearances, SEO, social media open graph images, favicons, and retargeting pixels. Make your bio link more appealing by adding these features.

    rich features

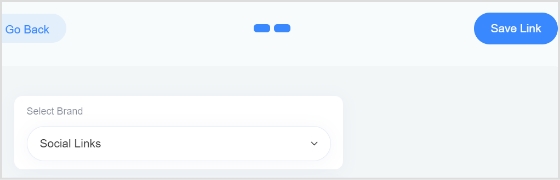
    Step 11: Once you’re done, click the save link button, and your bio link is ready to share on any social platform.

    save link

    Frequently asked questions

    Can you have more than one link in your bio? 

    Yes, you can have more than one link in your bio. However, it is important to remember that a bio should be concise, so it is advisable to limit the number of links to two or three.

    Can I create a link with multiple links? 

    Yes, you can create a link with multiple links using Replug. Simply create a Replug account and follow the instructions to create a link with multiple links, often called Bio links. 

    Trending Topics:

    How to get followers on Instagram fast?

    How To Put A Link In TikTok Bio?

    How to Change Facebook URLs on Mobile and Desktop?

  • How to change Shopify URL for sharing on social media?

    How to change Shopify URL for sharing on social media?

    Link shortener services can create a more memorable and professional-looking URL for your store. A link shortener tool can help shorten the URL of your store’s home page and also help shorten the URLs of individual product pages, making them easier to remember and share.

    A link shortener can help create custom URLs with your domain, making them easier to remember and share. They also provide analytics to track your links’ performance and make your store more secure by hiding the link’s true destination.

    Here’s how to change the shopify URL, shorten it, share it with the audience, and track its performance using Replug’s link converter.

    How to change Shopify URL using a URL shortener

    Step 1: Sign in to Replug or create a new account, if you don’t have one.

    signin or create account

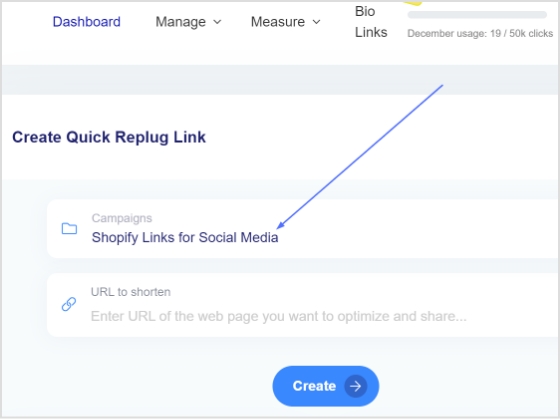
    Step 2: Choose a campaign from your dashboard, or create a new one.

    select campaign

    Note: For help creating a new campaign, visit this guide: Create a campaign in seconds.” 

    [branded_short_links]

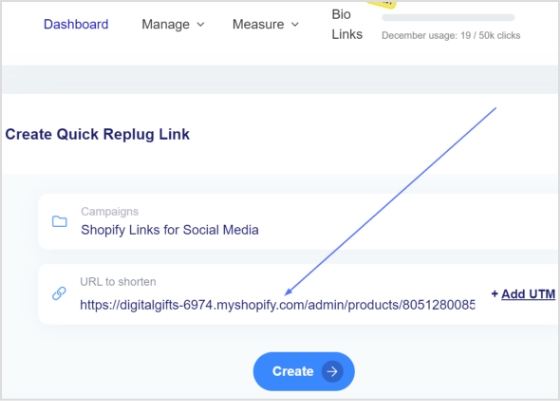
    Step 3: Enter your Shopify URL as the destination URL in the “URL to shorten” section below “Select your campaign.”

    paste link

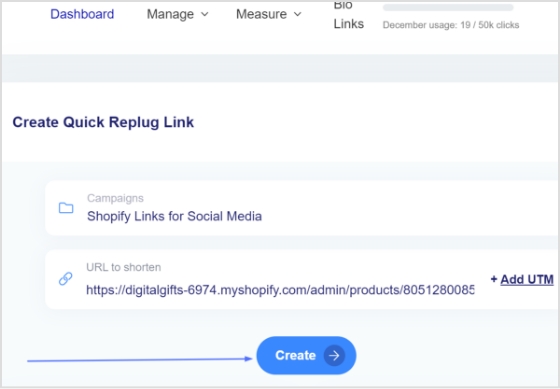
    Step 4: Simply click the create button to create a shortened URL for your Shopify store.

    click create

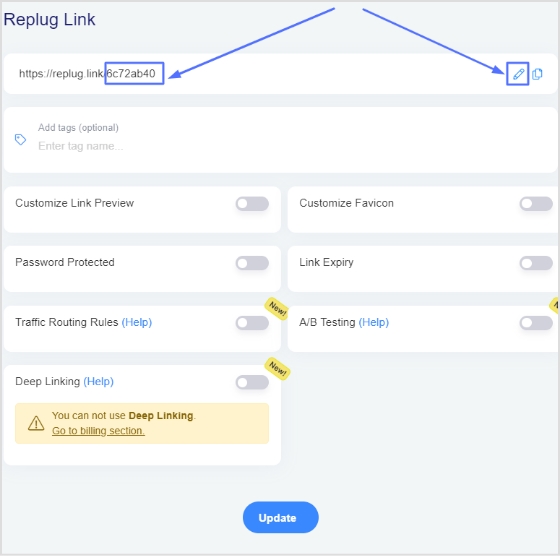
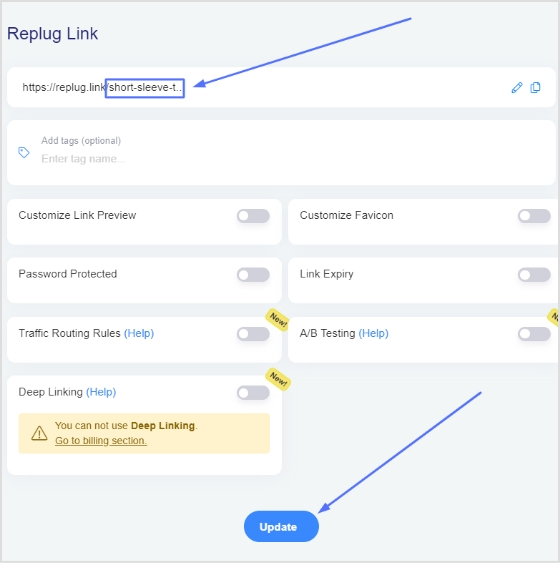
    Step 5: Now you have your new URL, which will look like the one below in the picture. You can customize this URL by clicking on the edit icon.

    shortened url

    Step 6: Enter the new URL you want to use, and your custom Shopify Store URL is ready for sharing on social media. Click on the update button to save the new URL. 

    cutom url

    FAQs

    Can I change my Shopify store name?

    Yes, you can. You must be the store owner to change your Shopify store name. Log in to your Shopify store, go to the Settings page, and click Store Details. You can enter a new store name into the ”Store name” field.

    How do I find a Shopify URL?

    Log in to your Shopify store admin. The URL will be in the browser address bar.  Go to Online Store > Domains in the leading left menu. This will give you an overview of your store domains.